
5. Animating with Modern Rigging
Lesson overview
In this lesson, you’ll learn how to do the following:
Use the Asset Warp tool on a bitmap or a vector shape for modern rigging.
Create and edit rigs with the Asset Warp tool.
Animate rigs with classic tweening.
Freeze or rotate joints for precise and easier rig positioning.
Understand and apply different bone types in your rig, such as hard, soft, and Flexi bones.
Distort the contours of a graphic with the envelope deformer.
Organize and manage your warped assets in the Library panel.
Apply single joints to your rig.

This lesson will take about 90 minutes to complete.
To get the lesson files used in this chapter, download them from the web page for this book at www.adobepress.com/AnimateCIB2023. For more information, see “Accessing the lesson files and Web Edition” in the Getting Started section at the beginning of this book.

Use the Asset Warp tool to create rigs inside your graphics for modern rigging, Animate’s newest approach to animation. Rigs allow you to stretch, rotate, deform, and move vector shapes and bitmap images fluidly with classic tweening.
Getting started
![]() Note
Note
If you have not already downloaded the project files for this lesson to your computer from your Account page, make sure to do so now. See Getting Started at the beginning of the book.
Start by viewing the finished projects to see the three short animations that you’ll create in this lesson.
In a browser, open the 05End.gif file from the 05/05End folder to play the finished animation.
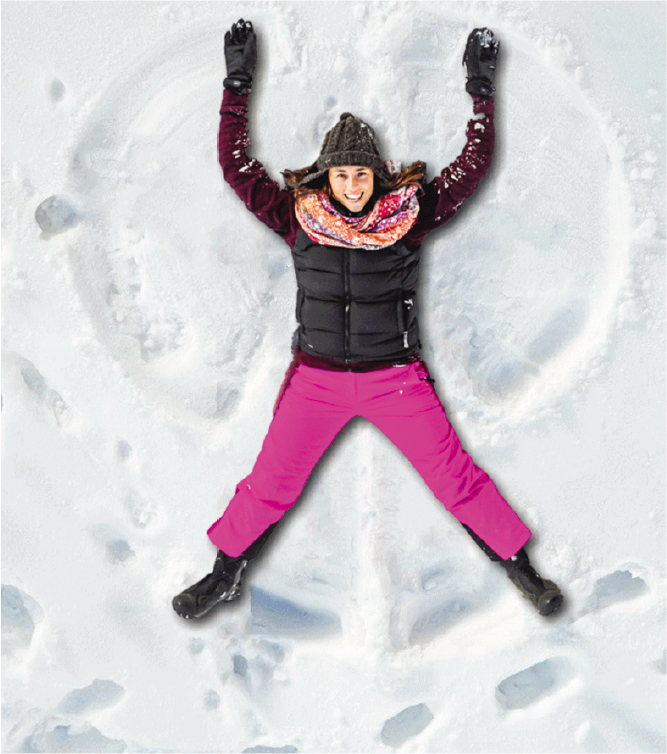
The project is an animation of a woman lying flat on her back and moving her hands and legs to make a snow angel.
Close the 05End.gif file.
Open the 05End_weightlifter.gif file from the 05/05End folder to play the finished animation.

The project is an animation of a cartoon weightlifter holding weights over his head. He does small squats to exercise.
Close the 05End_weightlifter.gif file.
Open the 05End_snakecharmer.gif file from the 05/05End folder to play the finished animation.

The project is an animation of a snake charmer playing musical notes that undulate from his flute. As he does so, a cobra dances to his tune.
Close the 05End_snakecharmer.gif file.
As you complete these projects, you’ll learn how to animate bitmaps and vector shapes with the Asset Warp tool in an approach called modern rigging.
What is modern rigging?
Modern rigging is an animation technique in which you create a structure inside a graphic to animate with classic tweening. The structure can have multiple joints and branches, much like a skeleton in a body. The bones of the rig can be straight or they can be curved, and they can stretch or shrink. Manipulating this structure—which is referred to as a rig in Animate—moves and deforms a mesh that is superimposed on the graphic. Moving the mesh makes the graphic move and deform accordingly.
The outlines of the mesh, known as the envelope, can also be modified, which lets you alter the contours of your graphic.
Modern rigging is a powerful yet intuitive way of working. Once you’ve established the internal rig for your graphics, adding animation is very much like controlling a puppet.
Characters are natural targets for modern rigging since they have limbs that can be controlled with the bones of a rig. But any graphic—even those that don’t have limbs—can be animated with modern rigging.
Using the Asset Warp tool
You use the Asset Warp tool to create, edit, and move your rig. A rig is similar to an armature that you’ll learn to create with the Bone tool in a future lesson. A rig can be created inside a bitmap or inside a vector shape. Animate converts the graphic associated with a rig to a special Library item known as a warped asset.
The rig can be a series of connected bones, branching bones, or even single points.
You’ll start by animating the woman lying in the snow and creating a snow angel.
Creating your first rig
You’ll establish your first rig inside a bitmap image.
Open the 05Start.fla file and then save it as 05_workingcopy.fla.
The file contains two bitmap images saved in the Library. The snow_background asset is an image of the snow. The woman asset is an image that has its background removed in Photoshop.

Drag the snow_background bitmap from the Library panel onto the Stage. Align the bitmap so that X=0 and Y=0 and the bitmap completely covers the Stage.
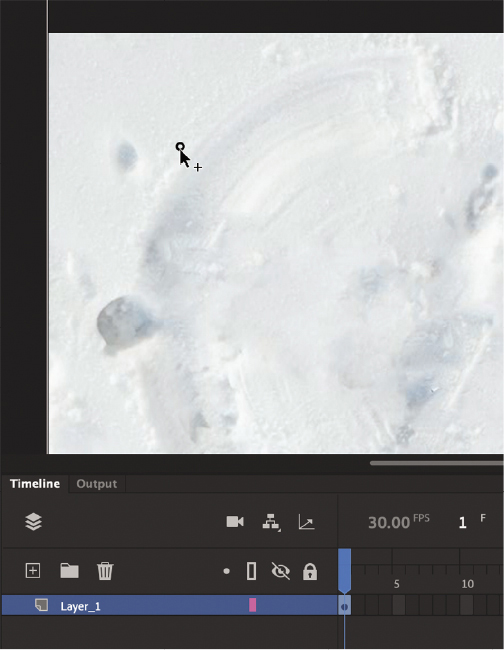
Rename the layer background.
Insert a new layer above the background layer and name it woman.
Drag the woman bitmap from the Library panel onto the Stage. Position her in the center of the depression in the snow at about X=97 and Y=133.

Select the Asset Warp tool
 .
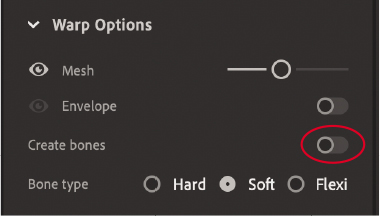
.In the Properties panel, under the Tool tab, make sure the Envelope option is turned off, the Create Bones option is turned on, and the Bone Type is set to Hard.
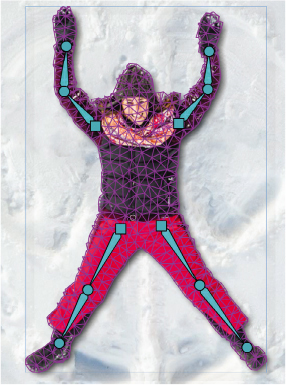
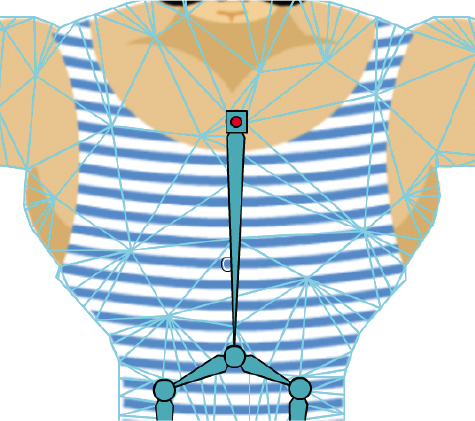
Click the woman’s left shoulder.
Animate creates a mesh over the bitmap and creates a single joint. Your rig is established.

If you use the Selection tool to select the woman, you’ll notice that the mesh goes away, and the object on the Stage is no longer a bitmap and is now called a Warped Bitmap in the Properties panel.
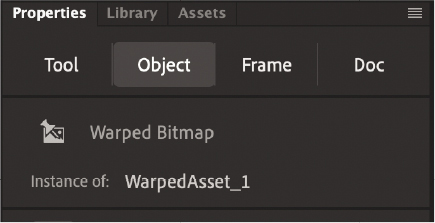
The Warped Bitmap is stored in the Library as WarpedAsset_1. You’ll learn to rename and organize warped assets later in this lesson.
Select the Asset Warp tool again and click your first joint to select it. Move your cursor over the woman’s elbow.
Animate shows a preview of where a bone will be created, based on the position of the cursor.
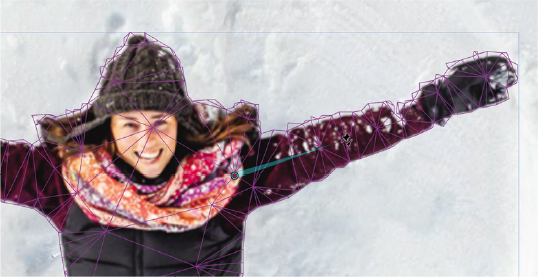
Click the woman’s elbow. Animate creates another joint at her elbow, and a bone appears, connecting the first point at her shoulder and the second point at her elbow. Hard bones are shown as elongated triangles, with the fatter base at their origin and the narrower tip at the farthest joint. The first joint becomes a square, indicating that it is the root joint.
Finally, click the woman’s left wrist.
Animate creates a third joint with another bone connecting to it. You’ve just completed the first rig for your bitmap.

Creating additional bones
Your first set of bones and joints will control the woman’s left arm. Now you’ll create additional bones for your rig for her other limbs.
With the Asset Warp tool selected, click an area outside the mesh.
The last joint of your rig becomes deselected.
Click the woman’s right shoulder.
A new joint is created.

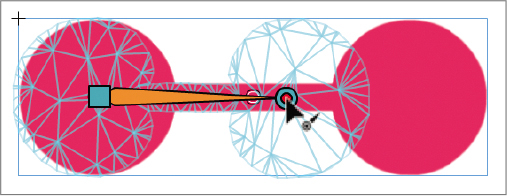
In step 1, you needed to click an area outside the mesh to ensure that Animate creates a new joint in step 2 unconnected from a previously selected one. If you were to click the woman’s right shoulder when the joint of her left wrist was still selected, you would create a connecting bone as in the following screenshot (which is something that you do not want!).

As you did with her left arm, continue creating bones down her right arm by clicking her elbow and her wrist.

Click an area outside the mesh and build bones inside each of the woman’s legs, with joints at the hips, knees, and ankles.

Your rig is complete! Notice that your bitmap can have multiple bones that are not connected to one another.
Moving your rig
Now for the fun part. With the Asset Warp tool, you get to move the individual joints around to position your graphic for animation.
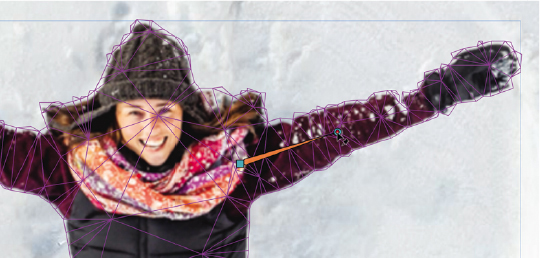
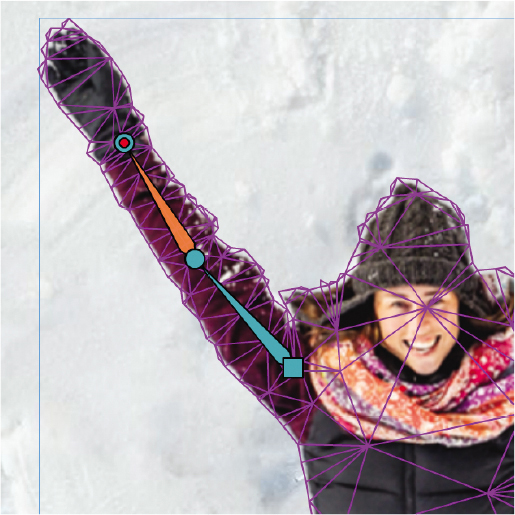
Drag the woman’s left upper arm upward by dragging on the bone between the shoulder and elbow joints.
Her arm rotates upward. The bone is highlighted in orange and the joint at the elbow is highlighted in red.
Drag the woman’s left lower arm (her forearm) upward.
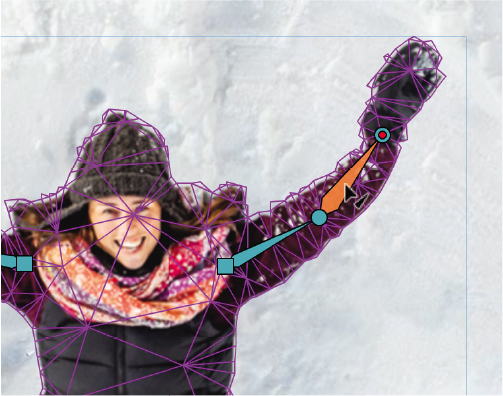
Her forearm rotates upward. The bone is highlighted in orange, and the joint at the wrist is highlighted in red.
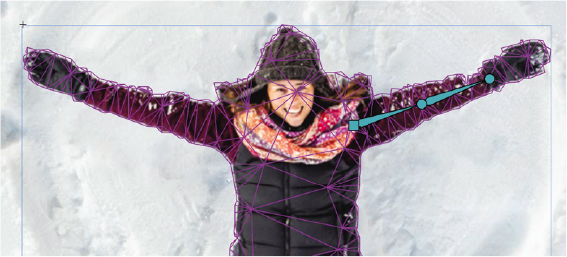
Now try dragging the joint at the woman’s left wrist.
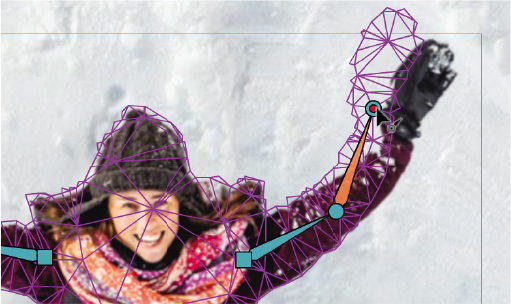
When you move a joint, you can reposition the attached bone by stretching or shortening the bone as well as rotating it. Dragging a bone, as you did in steps 1 and 2, allows only for rotation.
Drag the joint at the woman’s left elbow so that she is fully raising her arm above her head.
 Tip
TipAs you’ll notice, moving the bones of your rig too much will likely result in unnatural distortions as the bitmap gets stretched too far from its original position. When you use the Asset Warp tool on bitmaps, it’s most effective when used with less dramatic or extreme motions.

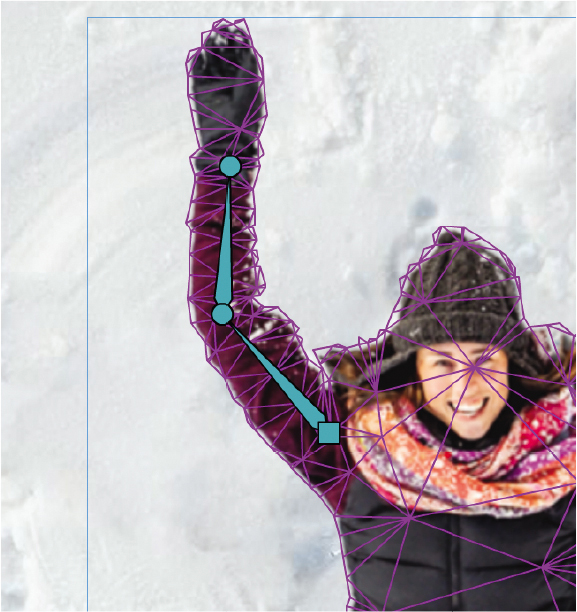
Note that when you move a joint, any attached joint and bone farther down the chain also move. So when you move the upper arm bone and elbow joint, the forearm bone and wrist joint follow. Another way to describe this relationship is to call the first joint the parent and the connecting one the child. Moving the parent also moves the child.
Using rotation angles
Sometimes you’ll want precise control over the angle of a joint. You can enter numerical values for the rotation angle in the Properties panel.
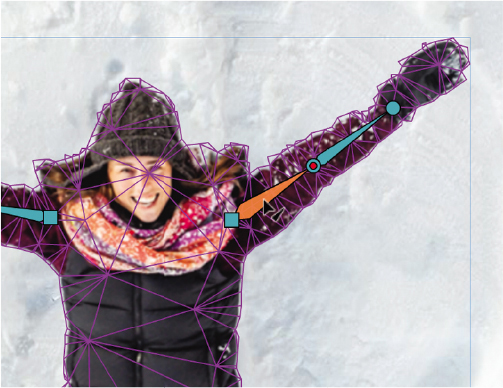
Select either the bone in the woman’s right upper arm or the joint at the woman’s right elbow.

In the Properties panel, under Warp Options, enter the value –132 as the new rotation angle.

Her right arm moves upward at the new angle.

Select the bone in her right forearm or the joint at her wrist.
In the Properties panel, under Warp Options, enter the value –87 as the new rotation angle.
Her right forearm moves upward at the new angle.
Feel free to adjust either of her arms to establish the first position in the animation of the snow angel.
Mesh options
When you’re working with your rig, you may want to see your bitmap more clearly, without the superimposed mesh. You can hide the mesh by deselecting the Mesh option (the eye icon) in the Warp Options section of the Properties panel.
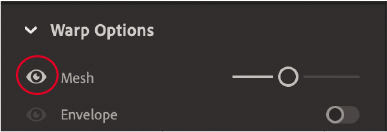
Hiding the mesh allows you to see only the joints and bones of your rig.

The slider to the right of the Mesh option allows you to change the resolution of the mesh over the bitmap. Move the slider to the right to increase the mesh density, or move the slider to the left to decrease the mesh density.
High mesh density

Low mesh density
The mesh density determines how coarse or refined the warping of the bitmap over your rig is. For most purposes, you can leave the slider at its default middle position.
Editing your rig
If you make a mistake in placing your joints, you can easily move them into a better position, or remove them entirely to start over.
Repositioning joints and bones
Use the Edit Rig mode to move joints within a rig without affecting the mesh.
With the Selection tool or the Asset Warp tool, right-click your rig and choose Edit Rig.

Animate puts you into a rig editing mode. The rig appears in a different color, indicating that you can reposition it without affecting the underlying mesh or graphic.

Drag the elbow joint to a new position within your mesh.

The joint and connecting bones move to a new position but do not modify the bitmap.
Make sure you drag the joint back to its original (correct) position before moving on.
Exit rig editing mode by clicking the left-facing arrow at the top of the Stage.

You return to Scene 1.
Removing joints and bones
Use the Delete/Backspace key to remove joints and connecting bones.
Select the last joint (in the wrist).

Press the Delete/Backspace key.
The selected joint and its connecting bone are removed from the rig.

Press Cmd/Ctrl+Z to undo your edit to the rig.
Select just the bone in the forearm.
Press the Delete/Backspace key.
The selected bone is removed from the rig, but the joint in the wrist remains.

Pressing the Delete/Backspace key on a selected pin deletes the pin as well as the bone associated with it. Pressing it on just a selected bone deletes the bone, leaving the pin as it is.
Reconnecting joints and bones
Use the Option/Alt key to reconnect joints with bones.
Select the woman’s right elbow joint with the Asset Warp tool.
Hold down the Option/Alt key and click the joint in her right wrist.
Animate creates a bone between the two joints.
Animating your rig
Animating your rig involves positioning it in different keyframes and using classic tweening to interpolate the changes between keyframes.
Creating your keyframes
Each keyframe shows your rig in different positions.
On the timeline, select frame 40 in both layers and add frames (F5) to extend the amount of time that you see the woman and the background snow.

Insert a keyframe (F6) in the woman layer at frame 16 and at frame 40.

Select the keyframe at frame 16.
Move the joints of your rig to position the woman’s arms downward so that the arc of her arms traces the depression in the snow.

You won’t be able to move her arms all the way down to her sides without making major distortions to her shoulder, neck, and face since they are connected, so keep the motion modest.
Move the joints in her legs so that they are close together.

Applying a classic tween
A classic tween between the first and second keyframes and between the second and third keyframes will interpolate the rig positions.
Select any frame between the first and second keyframes.
Right-click and choose Create Classic Tween.
A classic tween is created from the first keyframe to the second keyframe.
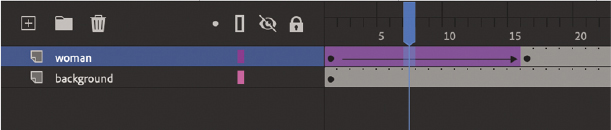
Select any frame between the second and last keyframes.
Right-click and choose Create Classic Tween.
A classic tween is created from the second keyframe to the last keyframe.
TipAs with any classic tweens, you can also make changes to the scale, rotation, position, or color effect of your warped object and Animate will interpolate those changes between keyframes. If you want to move your entire rig, for example, use the Selection tool to move the warped object to a new location on the Stage. To change the scale or rotation, use the Free Transform tool.
 Tip
TipYou can modify your rig even after a tween has been added so long as the Propagate option is enabled for the Asset Warp tool. If, for example, you add or remove a joint from your rig in one keyframe, that change will be reflected, or propagated, in all the keyframes for the integrity of the tween to be maintained.
Animate creates a smooth motion between keyframes to move your rig and the bitmap image.
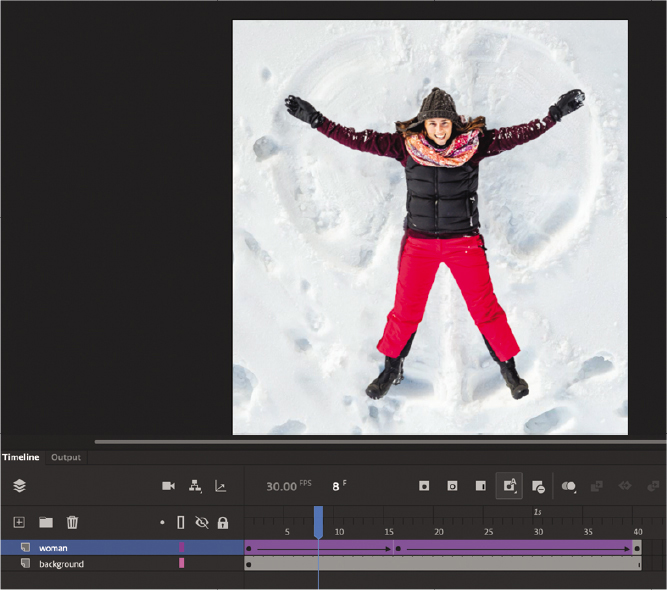
Choose the Loop Playback option and extend the brackets to include all frames, from 1 to 40. Play the animation to see the looping snow angel being created by the woman’s arm and leg motions.
Adding a drop shadow effect
To make the animation look more integrated into the snowy background, you’ll add a drop shadow filter.
Select the first keyframe at frame 1 of the woman layer.
In the Properties panel, in the Filters section, click the Add Filter button and choose Drop Shadow.

A Drop Shadow filter is added to the objects in the woman layer.
Change the settings for the Drop Shadow filter. For Blur X and Blur Y, enter 20. For Distance, enter 10. For Strength, enter 75%.

The settings create a softer shadow under the woman for a greater sense of depth and make her appear to be on top of the snow.

On the timeline, the keyframe appears white, indicating that a filter has been applied.

In the Filters section of the Properties panel, click the options in the upper-right corner and choose Copy All Filters.

The Drop Shadow filter and all its settings are copied.
Select the second keyframe at frame 16.
In the Filters section of the Properties panel, click the options in the upper-right corner and choose Paste Filters.

The Drop Shadow filter, including all its settings from the first keyframe, is pasted into the second keyframe.
Select the third keyframe at frame 40 and paste the filter into the third keyframe.
All three keyframes contain the same Drop Shadow filter.

Organizing warped assets
Currently you have only one warped asset in your Library panel. However, as your animation project grows in complexity, you’ll need ways to keep track of your graphics.
Renaming and grouping warped assets
In the Library panel, you can manage your warped assets by renaming them and by organizing them in folders, just as you can with symbols and imported assets.
In the Library panel, double-click the warped asset named WarpedAsset_1, or right-click and choose Rename.
Enter snow_angel as the new name. Press Return (macOS) or Enter (Windows) to accept the modification.
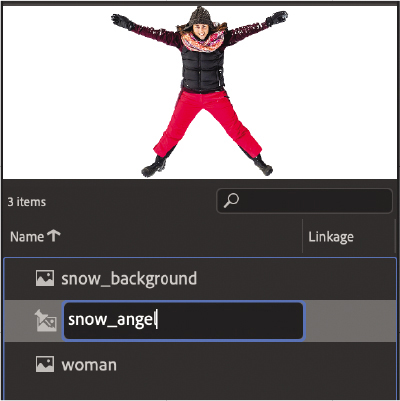
Click the New Folder symbol at the bottom of the Library panel.
A new folder is created in the Library panel.
Enter warped_assets as the name of the new folder. Press Return/Enter to accept the modification.

Drag the snow_angel warped object into the new folder.
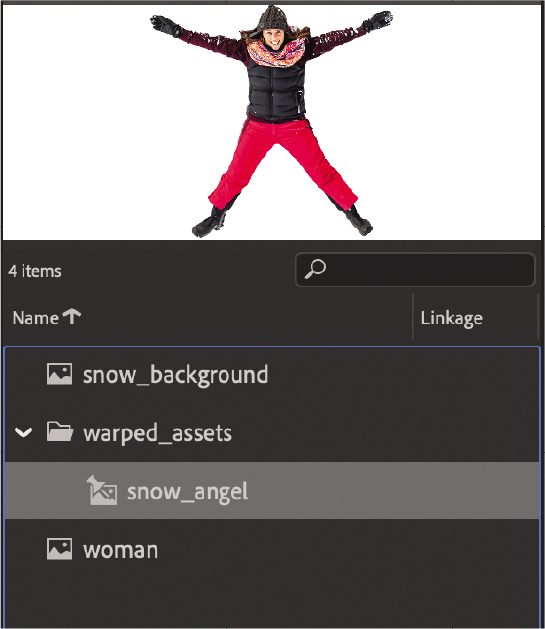
Keeping your Library panel organized will keep your workflow efficient and save you future headaches.
Editing warped assets
Warped assets can be edited through the Library. However, limit those edits to minor changes, as more substantial changes can produce unpredictable results in how the current rig is associated with the graphic.
Editing the snow_angel warped object
Imagine the creative director wants you to change the color of the woman’s pants even though all the animation work has been completed. Fortunately, you can make minor changes to a warped object without having to redo the rigging or tweening process.
In the Library panel, double-click the snow_angel warped object, or right-click and choose Edit.

Animate warns you to limit your modifications to minor changes that don’t alter the image’s dimensions or position.

Click OK.
You enter asset warp editing mode. The graphic appears on the Stage, but the rig is absent.

This mode is different from rig editing mode, which you learned about previously. In this editing mode (accessed through the Library), you make modifications to the graphic. In rig editing mode (accessed by right-clicking the rig itself on the Stage), you make modifications to the rig without altering the graphic.
Right-click the graphic on the Stage and choose Edit With Adobe Photoshop 2023, or choose Edit With and choose Photoshop in the dialog box that appears.

Photoshop opens, and opens the bitmap file of the woman in snow pants.

Make simple changes to the photo color (Image > Adjustments > Hue/Saturation or Color Balance). Depending on your skill with Photoshop, you can first make a selection to just target the woman’s snow pants.

Save the changes to the image in Photoshop (Cmd/Ctrl+S).
Return to Animate. In Animate, click the left-pointing arrow above the Stage to exit editing mode and return to Scene 1.
The warped asset in Animate reflects all the changes you made to it in Photoshop.

The creative director should be happy with your revision. (You don’t need to let them know how easy it was to make in Animate!)
Rigs with branching joints
Now you’ll create something a little more complicated. The snow angel animation you just completed contained bones in each of the woman’s limbs that were connected in a straight line, but in the next animation, you’ll create a rig that branches. You’ll also explore some of the other warp options.
Creating a branching rig
![]() Note
Note
When you create a rig on a vector shape, Animate converts it to a bitmap by default to maintain high-quality warping and tweening. However, you can change this setting in Animate > Preferences if you want to maintain the vector shape.
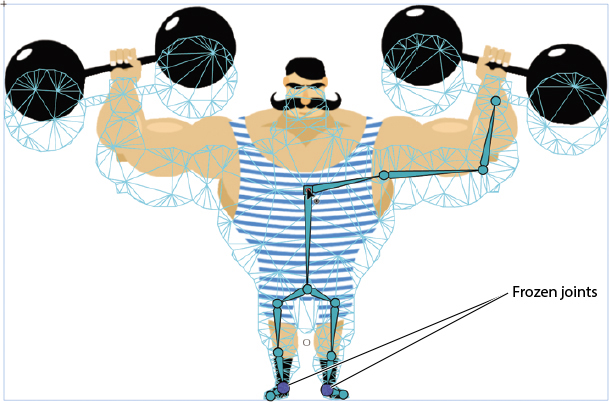
A branching rig is one in which a single joint can connect to multiple joints and bones, much like a human pelvis branches into two legs. Moving the pelvis (the parent) moves the joints and bones in the legs (the children). In this task, you’ll create a branching rig in a vector shape of a weightlifter.
Save your 05_workingcopy.fla file and close it. You will not need it for the remainder of this lesson.
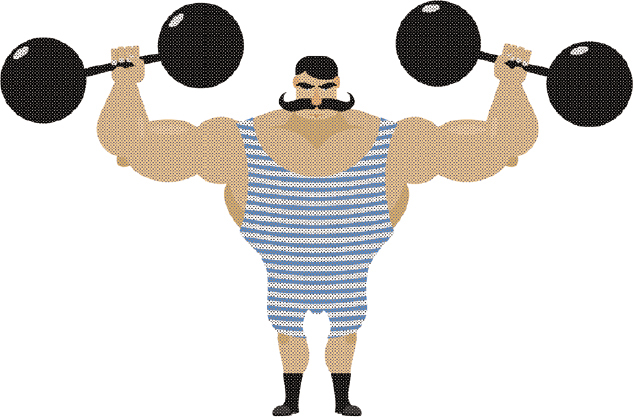
Open the 05Start_weightlifter.fla file in the 05Start folder and save it as 05_workingcopy_weightlifter.
The file contains a drawing of a weightlifter, composed of different colored fills. The shapes are in frame 1 of a single layer called weightlifter.

Select the Asset Warp tool and click the weightlifter graphic on the Stage.
The whole shape becomes selected.
Click the top of the weightlifter’s chest.
A mesh is applied to the selected shape, and a single joint is created.
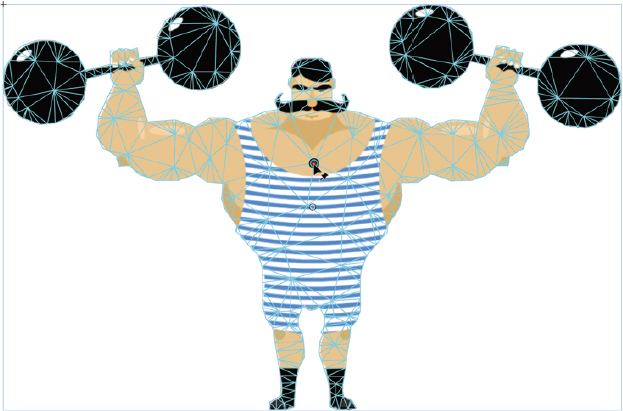
Click the weightlifter’s abdomen, just below his belt, to create a second joint with a bone connecting the two joints.

Continue building the bones down the weightlifter’s right leg with joints in his knee, ankle, and foot.

Click the joint in the abdomen to select it.
 Note
NoteA joint can have multiple children but not multiple parents.

New bones will be created from the currently selected joint.
Click the weightlifter’s left hip, knee, ankle, and foot.
Animate creates bones that branch from the hip.

Click your first joint at the top of his chest. This parent joint is square and is also known as the root joint.
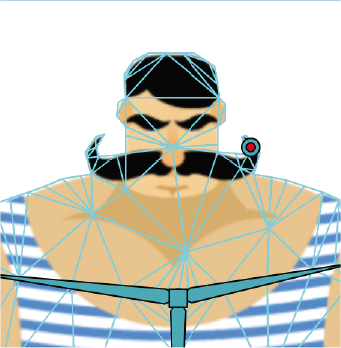
Click the weightlifter’s outstretched left arm to create joints and connecting bones. Create joints at the shoulder, elbow, and fist.

Your finished rig should look similar to the following screenshot. Don’t worry about adding joints to his other arm. You’ll do that later.

Warp options
You’ll animate the weightlifter doing squats to help bulk up his skinny legs. Animating that motion would mean moving his body up and down, flexing his legs, and keeping his feet planted firmly in place. In order to make the animation easier and to keep certain joints (such as his ankles and feet) frozen in position, you can turn to the different warp options in the Properties panel.
Freezing joints
To prevent a joint from moving from its position on the Stage, use the Freeze Joint option in the Warp Options section of the Properties panel.
If you drag the rig in the weightlifter from the root joint (the square joint in his chest), the entire rig, and therefore the entire mesh, moves.

Move the rig back to its original position.
Select the joint in one of his ankles.

In the Warp Options section of the Properties panel, select Freeze Joint.

The selected joint becomes a large blue circle to indicate it is a frozen joint.
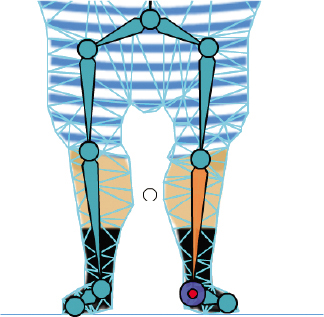
Select the other ankle joint and choose Freeze Joint in the Properties panel.
Both joints are frozen and are fixed to the Stage.

Now when you drag the root joint of the rig, the entire mesh moves except the two ankle joints, keeping the weightlifter’s feet in place.
NoteYou cannot select multiple joints to change their warp option preferences. Only single selections are possible.
Using soft bones for flexible connections
In the previous task, you froze the weightlifter’s ankle joints so that as his body moved downward, his legs became compressed. That effect happens when you use hard bones, the default bone type in the Asset Warp tool. Hard bones allow you to elongate and compress the mesh. An alternative option, soft bones, keeps the mesh from being compressed. See the sidebar “Hard, soft, and Flexi bones” for additional details.
In this task, you’ll modify the bones in the weightlifter’s legs from hard to soft bones.
Select the weightlifter’s right ankle joint.

In the Warp Options section of the Properties panel, change the Bone Type from Hard to Soft.

The connecting bone becomes a soft bone, indicated by its shape. Soft bones are thin and rectangular, while hard bones are shown as triangular.
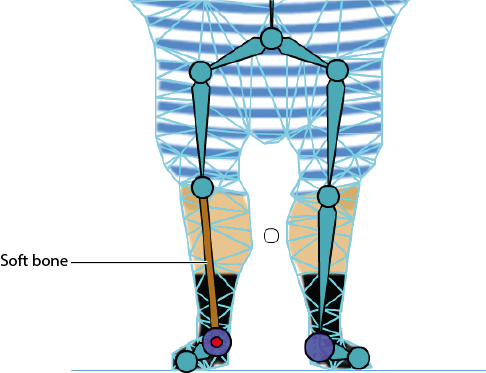
Select the other ankle joint and change the Bone Type from Hard to Soft.

Move the parent joint of the mesh downward.

Because the ankle joints are frozen, the mesh has nowhere to go as you move the rig downward. Rather than being compressed, the mesh bends in a flexible manner. It’s not entirely natural, but in the next series of tasks to animate the weightlifter, you’ll move the rig in a more natural position by dragging the other joints.
Move the rig back to its original position before moving on to the next task.
Hard, soft, and Flexi bones
Which one do you pick? Rigs can be made of hard, soft, or Flexi bones, and you can mix and match them within the same warped asset, depending on the needs of your rig. You can also change them at any time.
What’s the difference between these bones? Hard bones appear as triangles that are thicker at their parent joint and thinner at their child joint. Soft bones appear as straight rods of uniform thickness, and Flexi bones can appear as curved rods.

Different bone types change the mesh of the warped asset differently. In a hard bone, if you were to move two joints closer together, the mesh would squash and shorten.
Hard bone.
On the other hand, soft bones will attempt to preserve the volume of the mesh as you move the joints of the rig. If you were to move the two joints closer together, the mesh would compensate and bulge outward. Soft bones have the potential to distort the mesh more naturally, but their behavior can also be more unpredictable.
Soft bone.
Flexi bones are the latest addition to Animate. Flexi bones allow you to create curved bones with Bezier handles. Instead of clicking to position each joint in a rig, you drag to pull out handles to create your curves. You can not only move and rotate joints, but also change the curvature of each bone for more precise control.

Flexi bone.
Animating your weightlifter
With the modifications to your rig for soft bones and frozen joints, you’re now ready to animate your character.
Create new keyframes at frame 15 and frame 30 on your timeline.

The first and last keyframes (frames 1 and 30) will remain identical, with the weightlifter in his full upright position. You will modify the rig in the middle keyframe, at frame 15.
Move your playhead on the timeline to frame 15.
With the Asset Warp tool, move the root joint downward.

Move the knee joints outward so that the weightlifter’s legs bend naturally.

On the timeline, insert a classic tween in between frames 1 and 15 and in between frames 15 and 30.

Select the Loop option for playback on the timeline, and move the first and last brackets to encompass all your frames. Play the animation to see your weightlifter in action!

Isolating joints
Fine-tuning your animation means positioning your rig exactly how you want it. Double-clicking a joint isolates the positioning of only that selected joint without affecting its child bones.
Turn off the Loop Playback option.
Move your playhead on the timeline to frame 15.
With the Asset Warp tool, select the joint in the weightlifter’s left hip.
Move the joint slightly outward.

The joint moves and all its child bones follow.
Double-click the joint.
The child bone of the selected joint becomes pale yellow, indicating that the selected joint is now isolated. You can move the joint without affecting any of its child bones.

Move the left hip joint.
NoteAs you move your rig around in the middle keyframe, you may notice the frames on your timeline occasionally flashing. This is an indication that Animate is recalculating the tweening to interpolate the changes between keyframes.

Moving the isolated joint repositions that joint alone.
Propagating rig edits
You’ll notice that you created only one branch of bones in the weightlifter’s left arm. You can add more bones to your rig, even after you’ve applied a tween to multiple keyframes, as Animate propagates changes to your rig to preserve the integrity of the tween.
Adding more bones
You’ll add bones to the weightlifter’s right arm and see how those changes propagate to all the keyframes.
Select the first keyframe on your timeline.
Choose the Asset Warp tool, and in the Tool tab of the Properties panel, make sure the Propagate Changes option is turned on.
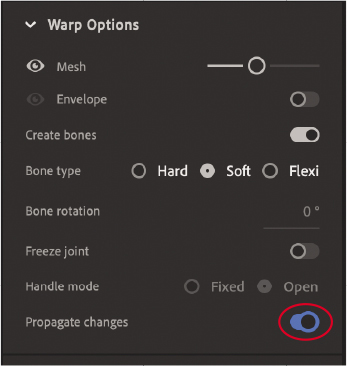
The Propagate Changes option is turned on by default.
Select the root joint and create additional joints in the weightlifter’s shoulder, elbow, and fist, just as you did with his other arm.

Move your playhead on the timeline to the middle keyframe, at frame 15.
The additions you made to your rig in the first keyframe propagate to the other keyframes to keep the tweens intact.

Feel free to move the weightlifter’s arms around in the middle keyframe so that his elbows dip down a little as he squats. The additional motion can help provide a sense of weight and realism.
NoteAnimate propagates both deletions and additions of bones and joints across keyframes.

Single joints
Your rig can also contain single joints that are not connected by bones. With these independent joints, you can deform the mesh in more organic ways without being tied to a hierarchical structure.
Adding single joints
You’ll add an unconnected joint in the mustache of your weightlifter. As he does his squat, his mustache unfurls.
Select the middle keyframe, at frame 15.
Choose the Asset Warp tool. Click off the rig to deselect any selection, and then click the tip of one side of his mustache.
A single joint is created at the tip of his mustache, and the change is propagated across the other keyframes.
Click off the mesh to deselect the joint and then click the tip of the other side of his mustache.

Another joint is created at the tip of the other side of his mustache. The rigs in your other keyframes also get the additional joint.
If you are creating multiple joints without connecting bones and you do not want to keep deselecting joints, you can change the options in the Tool tab of the Properties panel. Turn off the Create Bones option to create joints only.
Move the joints away from the weightlifter’s face to straighten out his mustache.

Animate animates the changes so that his mustache unfurls as he squats with his weights.

Add an ease-out to your first tween and an ease-in to your second tween to give your motion a little more realism. Feel free to experiment to make the motion your own!
Choose Quick Share And Publish > Publish > Animated GIF to export an animated GIF to share on social media.
Fixed and Open Handle modes
When you create single joints in a rig, you can choose whether those joints are Fixed or Open for the Handle mode in the Warp Options section of the Properties panel. This determines how they behave and how they affect the mesh.

For Open Handle mode, which is the default option, you can move the joints to different positions to warp the mesh. In this example, there are three joints in a long rectangle. Moving the middle Open joint upward deforms the rectangle so that it bends.

For the Fixed Handle mode option, you can move the joint position as well as rotate the mesh around the joint. Move your cursor close to the dotted circle around the joint and drag to rotate the mesh.
Using Flexi bones
Flexi bones, the third option in the Asset Warp tool’s Bone Type option, let you deform your bones with Bezier curves for more fluid, organic shapes and motions.
Adding Flexi bones
Close the 05_workingcopy_weightlifter file and open the 05_Start_snakecharmer.fla file to explore the animation potential of Flexi bones. Save the file as 05_workingcopy_snakecharmer.
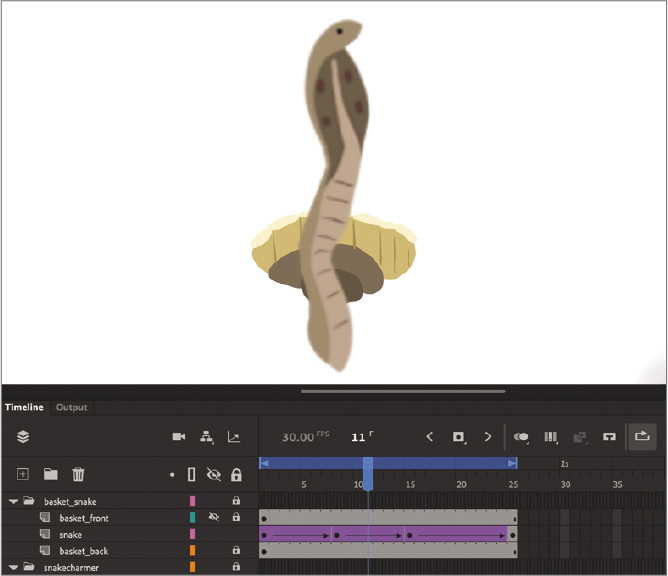
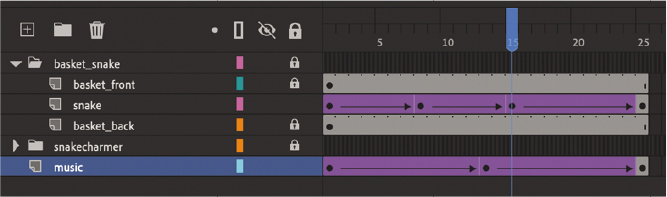
Examine the project timeline.
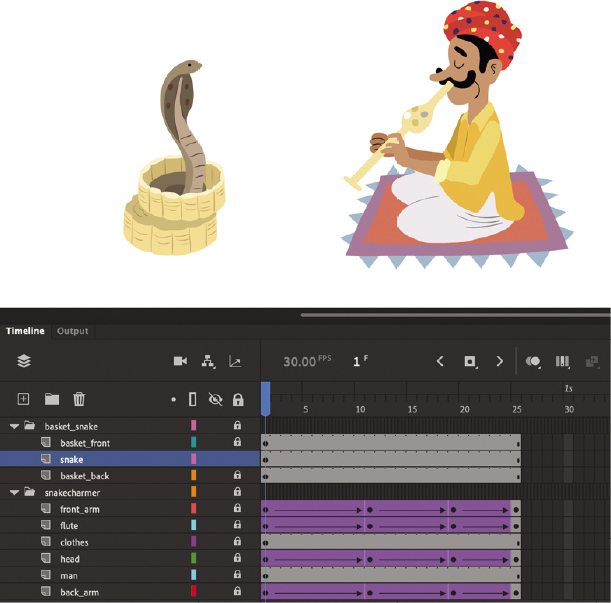
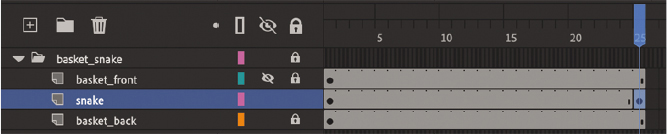
The timeline contains multiple layers organized in two folders: a basket_snake folder and a snakecharmer folder. Inside the snakecharmer folder are six layers that have a completed animation of the snakecharmer moving his flute up and down with his head and arms.
The snake layer contains a vector shape of a snake body. You will use the Asset Warp tool with Flexi bones to animate the snake.
Make sure all the layers are locked except for the snake layer. Hide the basket_front layer so that you can see the snake’s entire body.

Select the Asset Warp tool.
In the Tool tab of the Properties panel, make sure Envelope is disabled, Create Bones is enabled, and Bone Type is set to Flexi.

Click the snake’s body near its base to select it, and then click it again.
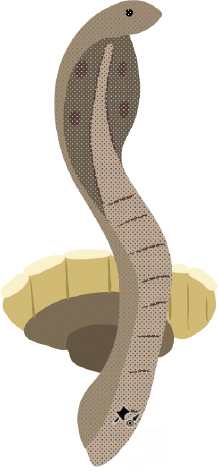
Animate converts the vector shape into a warp asset. A mesh appears over the graphic and your first joint is created. If you want Animate to maintain the vector shapes instead of converting the snake into a bitmap, change the preferences in Animate > Preferences.
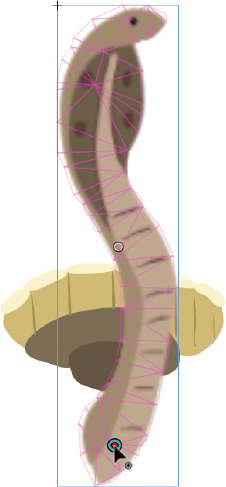
Move your pointer up the snake’s body and drag to create the next joint.
As you drag your pointer, handles appear from the joint and the bone curves in the same direction as the Bezier handles.

Release your pointer and create the next joint farther up the snake’s body in the same manner, creating curved Flexi bones that follow the curves of the snake.
Create the last joint in the snake’s head.

Animating the snake
The snake will dance to the snakecharmer’s music. You’ll animate its slinky movements by changing the curvature of the Flexi bones in the rig.
On the timeline, create a keyframe (F6) at frame 25.
The first keyframe and the last keyframe will be identical so that the animation can loop seamlessly.
Create another keyframe (F6) at frame 8.

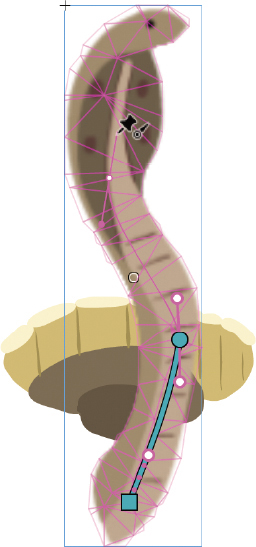
With the Asset Warp tool, double-click the first joint from the root joint.
NoteRecall that double-clicking a joint allows you to isolate the joint from the rest of the rig to manipulate it.

Move the joint to the left to shift that portion of the snake’s body.

Double-click the next joint and move it slightly to the right to shift that portion of the snake’s body.

Drag the handles of the joint to smooth out the curvature of the snake. Hold the Option/Alt+Shift key to move both sides of the handles together.

Create another keyframe (F6) at frame 15.

As you did in the previous keyframe, use the Asset Warp tool to move the joints of the snake and modify the curvature of the Flexi bones with the joint handles. You can follow the positioning and curves in the following image, or you can try your own snake moves.

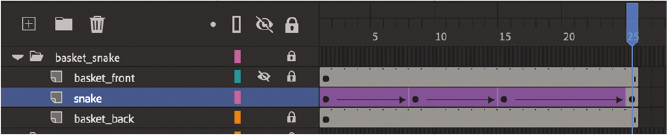
Select all the frames between the first keyframe and the last keyframe in the snake layer and choose Create Classic Tween.
Animate applies a tween between your four keyframes in the snake layer and smoothly interpolates the sinewy movements between keyframes.
Select the Loop option on the timeline, move the brackets to cover all your frames, and press Return/Enter to preview your animation.
Watch your snake do its slinky dance to the tune of the snakecharmer’s flute! If you’re not satisfied with the motion, you can always return to any of the keyframes to modify the positioning of the joints or curvature of the Flexi bones in the rig.
TipYou can hold down the Option/Alt key and drag the Flexi bone itself to change its curvature instead of using the Bezier handles at the joints.
Making envelope deformations
Now you’ll add the musical notation flowing from the snakecharmer’s flute. The musical notation will ripple to represent the smooth melodies. The Asset Warp tool’s envelope deformer option provides controls around the boundaries of your graphic to create those changes.
Adding the musical notation
The musical notation is a bitmap, which you will place in a separate layer.
Unhide the basket_front layer.
Insert a new layer and rename it music.
Drag the music layer to the bottom of the layer stack.
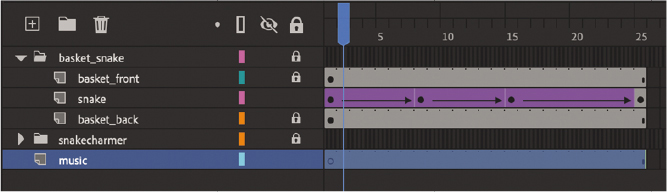
In the Library, find the music bitmap and drag it to the Stage in the music layer.

Use the Free Transform tool to scale the bitmap smaller (about 80%) and move it so that the right edge of the bitmap is hidden under the snakecharmer’s body.

Applying the envelope deformer
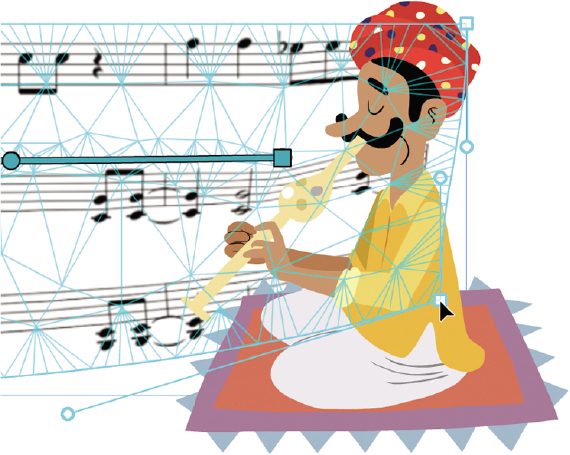
The envelope deformer is an option in the Asset Warp tool that adds control points around the boundaries of your warp asset.
Select the Asset Warp tool.
In the Tool tab of the Properties panel, enable the envelope deformer option. Leave Create Bones on and choose Flexi as the Bone Type.

Click the musical notation bitmap.
The bitmap becomes a warp asset and a mesh is superimposed on it.

Notice that there are additional control points on the four corner points. Because you chose the envelope deformer option, the additional control points allow you to deform the contours of the graphic.
If the graphic were not rectangular, Animate would add enough control points to define the contours of your warped asset.
NoteYou cannot add additional control points to the envelope deformer.
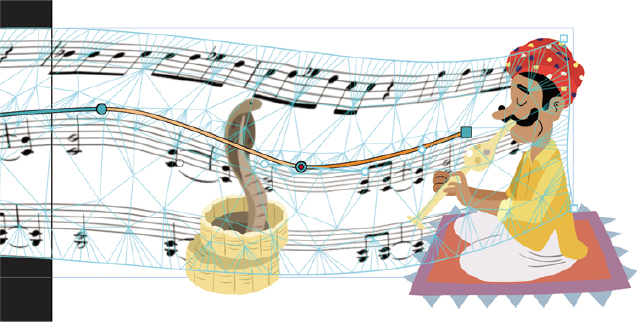
Adding the rig with Flexi bones
![]() Note
Note
A warped asset can have an envelope deformer without a rig inside it.
A warped asset can just have an envelope deformer without a rig inside it, or it can have both an envelope deformer and a rig. In this example, you’ll add a rig with Flexi bones so that you can create slight curves in the musical notation.
With the Bone Type set to Flexi, create a bone from the right side of the music to a point just in front of the snake’s head. Remember to drag when you create the second joint, but keep the handles horizontal so that the bone is straight.

Continue making bones across the music so that you have three joints and one root joint.

Animating the music
You can deform the contours of the graphic and reposition the joints or bones of the rig at the same time.
Select the Asset Warp tool.
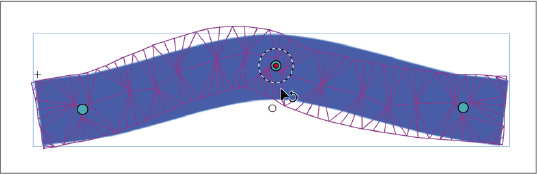
Click the bottom-right corner control point on the envelope deformer.
Pull down on the handle that is connected to the corner control point.

The bottom edge of the warped asset bends and deforms the graphic.
Move the corner control point upward.
Move your pointer to the edge of the mesh until a curved line appears near your cursor, indicating you can modify a curve. Pull up on the top edge to deform it.

The top edge deforms. You can either use the handles or push and pull directly with the Asset Warp tool.
Reposition the joints and move the handles to create a smooth, wave-like curve for the rig.
Insert a new keyframe (F6) in the last frame of the music layer.

The last keyframe will remain identical to the first to ensure a smooth loop for the animation.
Insert a new keyframe (F6) at frame 13 of the music layer.

Modify the curve in your rig and/or deform the contours of the warp asset in the keyframe at frame 13. You don’t have to move the control points or handles too far—subtle movements can go a long way, and will also create fewer issues for Animate to tween.

Select all the frames between the first keyframe and the last keyframe in the music layer and choose Create Classic Tween.
Animate applies a tween between your keyframes in the music layer and creates the undulating musical notation animation.
Select the Loop option on the timeline, move the brackets to cover all your frames, and press Return/Enter to preview your animation.

Your animation is complete! The Flexi bones in your rig, combined with the envelope deformations, make possible the fluid, organic motions of the snake and music.
Think of the countless creative ways you can use modern rigging and envelope deformation in your animations!
Review questions
1 The Asset Warp tool can be used to create a rig on what kinds of graphics?
2 How do you assign a specific numerical value for the rotation of a rig joint?
3 What’s the difference between a hard bone and a soft bone?
4 Why would you use a Flexi bone?
5 What animation technique should be applied to animate a rig created by the Asset Warp tool?
6 How do you edit the positions of the joints in a rig?
7 What does the Freeze Joint option do to a rig?
8 What are two ways you can deform the envelope of a warped asset?
Review answers
1 The Asset Warp tool can be used to create a rig on either a vector shape or a bitmap. When the Asset Warp tool is used on a vector shape, the shape is converted to a bitmap unless you change the drawing preferences in Animate > Preferences.
2 Select the joint and, in the Warp Options section of the Properties panel, enter a value for the angle of rotation.
3 A hard bone is one that allows you to stretch and squash the mesh, which distorts the associated graphic. A soft bone, in contrast, is an option that attempts to preserve the volume or length of the mesh, which simulates a more flexible connection between joints.
4 The Flexi bone option allows you to create a rig with nonlinear bones and distort the warped asset mesh with Bezier curves.
5 A rig created by the Asset Warp tool can be animated only with classic tweening.
6 To edit a rig, right-click the rig or warped asset on the Stage and choose Edit Rig.
7 The Freeze Joint option fixes the joint to the Stage to prevent it from moving.
8 The first way you can deform the envelope of a warped asset is by moving the control points or dragging the handles of the control points that are around the edges of the warped asset’s mesh. The second way is by using the Asset Warp tool to intuitively drag on the edges of the mesh to modify their curves.