Chapter Eight. Designing for Creative Flexibility
Change is good. Or at least that’s what they say. But I don’t think they were talking about changes from clients at the eleventh hour. In those situations, change isn’t so good; it’s actually kind of troubling. But if you’ve done your homework and set up your Creative Suite documents properly to account for these sorts of last-minute changes, you may well greet them with the utmost conviction and take them on instead of dreading them.
Another kind of change is when you decide to head off in a different design direction. You shouldn’t feel stifled by your software when creative inspiration strikes. Being able to explore many creative directions in your designs should only be limited by your time and inspiration, not your software.
This chapter focuses on the features and tools found throughout the Creative Suite that help manage last-minute changes and allow you the freedom to easily go off in a completely new design direction without losing where you began.
#71 Using Adjustment Layers in Photoshop
Adjustment layers in Photoshop allow you to make color and tonal adjustments to an image without permanently changing the underlying pixels. This nondestructive method of editing means you can try different modifications to an image at any time by editing the adjustment layer. For example, instead of applying the Levels command to your file and hoping it prints out acceptably once it’s saved and placed in InDesign, you can add a Levels adjustment layer that provides the flexibility to go back later and change the Levels settings if necessary. Adjustment layers also reduce the loss of image data since you’re not applying multiple adjustments directly to the image over time.
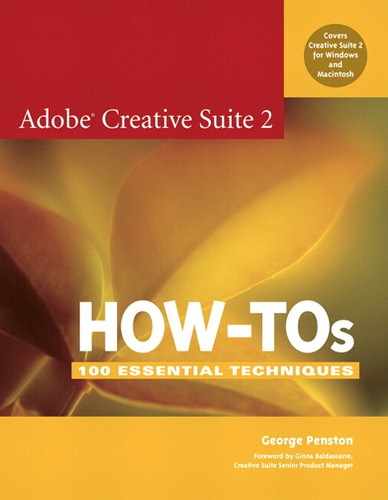
Creating adjustment layers is easy, and they increase your file size no more than any other layer. So it’s hard to come up with a good reason for not taking advantage of them. To quickly create an adjustment layer, click the New Fill or Adjustment Layer button ![]() at the bottom of the Layers palette and then select any of the 12 adjustment commands available in the pop-up menu (Figure 71a). All the standard favorites are available: Levels, Curves, Hue/Saturation, and so on. The appropriate adjustment dialog will then pop open for you to apply your edits. These dialogs are the same as the ones you’re used to seeing that directly apply to the image. Make your adjustments as you normally would and click OK.
at the bottom of the Layers palette and then select any of the 12 adjustment commands available in the pop-up menu (Figure 71a). All the standard favorites are available: Levels, Curves, Hue/Saturation, and so on. The appropriate adjustment dialog will then pop open for you to apply your edits. These dialogs are the same as the ones you’re used to seeing that directly apply to the image. Make your adjustments as you normally would and click OK.
Figure 71a. The adjustment layer pop-up menu located in the Layers palette gives you quick access to creating an adjustment layer.
The adjustments are applied and then represented as a layer in the Layers palette (Figure 71b). Since it’s a layer, you can do almost everything you can do to image layers: toggle visibility, reorder the layer in the stacking order, apply a mask, and so on.
Figure 71b. Once an adjustment layer is applied, it appears in the Layers palette. Each adjustment command is represented by a different thumbnail icon.

Here’s where it gets interesting. To edit an adjustment layer, simply double-click the adjustment layer’s thumbnail in the Layers palette. The adjustment’s dialog opens again, allowing you to tweak any settings and reapply them. You can edit an adjustment layer at any time, even after you’ve saved and reopened the document.
You can apply and edit adjustment layers only in Photoshop, although you can view them in ImageReady if the document’s color mode happens to be in RGB.
#72 Working with Layer Styles in Photoshop
Layer styles let you add to a layer an array of live effects that automatically update whenever the layer’s content changes. For example, you can apply a drop shadow to a type layer, and the drop shadow will automatically update as you change the text of the layer. Similar to adjustment layers, layer styles are nondestructive, so you can return to them at any time to edit existing effects or add new effects to the style without degrading the quality of the image.
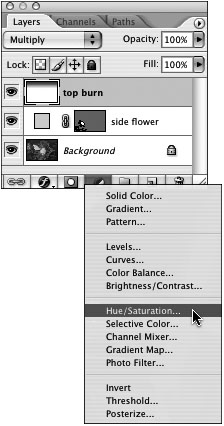
To apply a layer style to a selected layer, click the Layer Styles button ![]() at the bottom of the Layers palette and choose an effect from the pop-up menu. The Layer Style dialog (Figure 72a) opens and offers options for the effect you selected. Be sure to select the Preview option so you can see the effect in action on the layer. It’s also a good idea to set your view at actual pixels (100%) so the effects appear as they actually will in print once applied. Make any other adjustments to the default settings and click OK. You can apply other effects while in this dialog by selecting any of the effect names in the list that appears on the left.
at the bottom of the Layers palette and choose an effect from the pop-up menu. The Layer Style dialog (Figure 72a) opens and offers options for the effect you selected. Be sure to select the Preview option so you can see the effect in action on the layer. It’s also a good idea to set your view at actual pixels (100%) so the effects appear as they actually will in print once applied. Make any other adjustments to the default settings and click OK. You can apply other effects while in this dialog by selecting any of the effect names in the list that appears on the left.
Figure 72a. The Layer Style dialog provides all the layer effects and settings in one easy to manage interface.
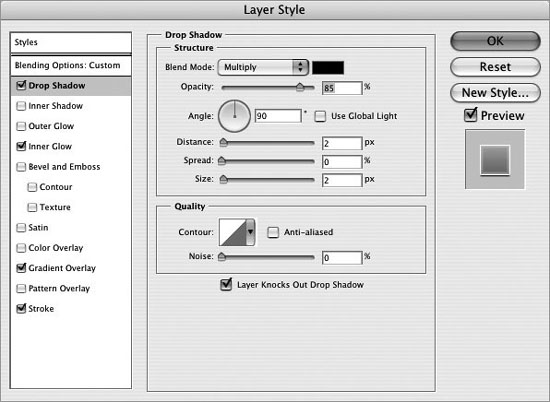
Once you’ve applied your layer styles to a selected layer, they appear indented below the layer in the Layers palette (Figure 72b). Notice that a small “f” icon ![]() appears to the right of the layer name. This indicates that layer effects are applied in case you collapse the layer effects list by clicking the triangle beside the icon. You can easily edit an effect by double-clicking it. And just like layers, you can toggle the visibility of a layer effect by clicking the eye icon next to the effect. Click the eye icon next to the top-level Effects row to toggle all the effects of a layer on and off. To copy an effect to another layer, simply drag it to that layer. To move an effect, hold down Option/Alt while dragging. You can also store and apply layer styles via the Styles palette much like you manage color swatches from the Swatches palette.
appears to the right of the layer name. This indicates that layer effects are applied in case you collapse the layer effects list by clicking the triangle beside the icon. You can easily edit an effect by double-clicking it. And just like layers, you can toggle the visibility of a layer effect by clicking the eye icon next to the effect. Click the eye icon next to the top-level Effects row to toggle all the effects of a layer on and off. To copy an effect to another layer, simply drag it to that layer. To move an effect, hold down Option/Alt while dragging. You can also store and apply layer styles via the Styles palette much like you manage color swatches from the Swatches palette.
Figure 72b. A layer style’s effects are indicated directly below the layer. Click a layer effect eye icon or the Effects eye icon to toggle its visibility on and off.
#73 Creating Layer Comps in Photoshop
If you’ve fallen into the habit of creating multiple design compositions or comps in a single Photoshop file and then turning its layers on and off to review the different design directions, layer comps are definitely going to make your day. Layer comps save the current state of all the layers in the Layers palette, capturing the visibility, position, and appearance of the layers. A layer’s appearance is based on the layer styles applied (see #72) and its blending mode.
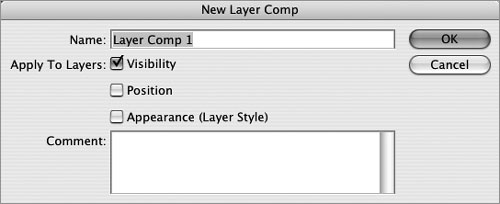
To create a layer comp, make sure the layers are visible and positioned along with their appearance set to how you want the layer comp to be captured. Open the Layer Comps palette (Window > Layer Comps), which by default resides in the palette well. In the Layer Comps palette, click the New Layer Comp button. In the resulting dialog (Figure 73a), supply a name for your layer comp and decide which layer settings should be captured and applied to the layer comp. You can optionally add a comment to the layer comp that then appears below the layer comp name once it’s created. Click the OK button to finish creating your layer comp.
Figure 73a. When you create a layer comp, you have the option of capturing the visibility, position, and appearance of the layers in your document.
Now one layer comp isn’t really that useful, since there’s nothing to switch back and forth between, so continue to create other layer comps by turning on and off layers and their styles, and repositioning them. Then click the New Layer Comp button again and follow the previous detailed steps.
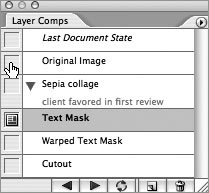
Once you have a couple of layer comps created, you can start viewing them via the Layer Comps palette (Figure 73b). Click the empty box to the left of a layer comp name to view it. The Apply Layer Comp icon ![]() will then appear in the box. You can click the Previous and Next Selected Layer Comp buttons
will then appear in the box. You can click the Previous and Next Selected Layer Comp buttons ![]() at the bottom of the Layer Comps palette to cycle through all the layer comps. If you first select certain layer comps by Command-clicking (Mac) or Control-clicking (Windows) them, the buttons will cycle through only your selected set.
at the bottom of the Layer Comps palette to cycle through all the layer comps. If you first select certain layer comps by Command-clicking (Mac) or Control-clicking (Windows) them, the buttons will cycle through only your selected set.
Figure 73b. Use the Layer Comps palette to quickly and easily flip through different comps by either clicking the empty gray box next to a layer comp name or using the left and right arrows at the bottom of the palette.
If you want to update a layer comp, select the layer comp in the Layer Comps palette and make your changes to the layer’s settings. Then click the Update Layer Comp button ![]() at the bottom of the palette.
at the bottom of the palette.
You can also create layer comps in ImageReady. Illustrator and InDesign now allow you to select a layer comp when placing a Photoshop file that contains them (see #63 and #64).
#74 Working with Graphic Styles in Illustrator
You can rely on graphic styles to quickly and consistently apply a set of appearance attributes to your artwork in Illustrator. It’s a one-click operation that changes the fill, stroke, transparency, and effects of objects. If you or your client decide to change one of these attributes later on, just update the graphic style and all the elements with the style applied update along with it.
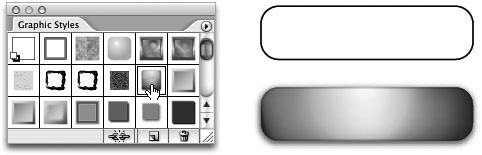
To apply a graphic style to a selected object or group, open the Graphic Styles palette (Window > Graphic Styles) and click the style you want to apply (Figure 74). Graphic styles can also be applied via the Control palette or simply by dragging the style from the palette and releasing it on top of an object.
Figure 74. Graphic styles in Illustrator make it possible to take an ordinary shape and turn it into a compelling element with one click.
To create a graphic style from your own design, build up your object with any combination of appearance attributes. Use the Appearance palette to add multiple fills and strokes, and manage any effects you apply (see #37). To add the object’s appearance attributes as a style just drag it directly into the Graphic Styles palette. Now you can apply the style to any other objects in your document. Use the Save Graphic Style Library option in the Graphic Styles palette menu to save your styles as a library file so you can load them into other Illustrator documents. Graphic styles are saved with the document they were created in.
You can update a graphic style by replacing the attributes used in the style. The simplest way to do this is to create an object you’d like to use to replace the style and then hold down Option/Alt while dragging the object on top of the graphic style in the Graphic Styles palette. This redefines the style with your new appearance attributes, and any occurrences of the original style will automatically update.
#75 Using Paragraph Styles in Illustrator and InDesign
Paragraph styles in Illustrator and InDesign make it possible to apply a consistent set of character and paragraph formatting attributes to a paragraph or several paragraphs at once. Then when you change any of the formatting attributes in the paragraph style, all the paragraphs in your document with the applied style automatically update. Paragraph styles are essential for laying out documents consistently while incorporating the flexibility for changes later on.
We all know that we’re not supposed to add two spaces after punctuation when using these new-fangled computers, right? Well, you can also do away with adding double returns for imposing space between paragraphs. Instead, use a single return to end a paragraph and then use the Space After formatting option ![]() in the Control palette to set a specific amount of space between your paragraphs. Define this in your paragraph style in the Indents and Spacing area, and you gain ultimate control of the space between your paragraphs throughout your entire document.
in the Control palette to set a specific amount of space between your paragraphs. Define this in your paragraph style in the Indents and Spacing area, and you gain ultimate control of the space between your paragraphs throughout your entire document.
Although you can create a paragraph style completely from scratch, it’s much more straightforward to first apply all the formatting you want to include in your style to a paragraph of text. Once you have the formatting applied to the paragraph, click the New Paragraph Style button in the Paragraph Styles palette while holding down the Option/Alt key. (To access the Paragraph Styles palette, choose Window > Type in Illustrator or Window > Type & Tables in InDesign.) You will then be able to rename your paragraph style and make any adjustments to the formatting attributes within the Paragraph Style Options dialog that opens (Figure 75a). Enable the Preview option so you can immediately see what effect any changes you make to the style will have without exiting the dialog. Once you’re satisfied with your paragraph style, click OK. With your paragraph style created, you can start applying it to paragraphs within your document.
Figure 75a. The Paragraph Style Options dialog is your control center for defining all the formatting attributes (both character and paragraph) that will comprise your paragraph style. Notice that the Style Settings provides a helpful summary of the formatting applied in your style.

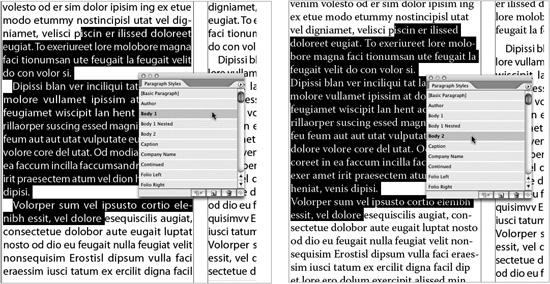
You can apply a paragraph style via the Paragraph Styles palette in Illustrator or InDesign. InDesign also offers a Paragraph Style drop-down menu in the Control palette when you have it switched to the Paragraph Formatting Controls ![]() . You can also take advantage of the new Quick Apply feature (see #49) in InDesign. To activate Quick Apply, press Command+Return (Mac) or Control+Enter (Windows) and then start typing part of the style’s name. When the name is highlighted, click Return or Enter again to apply the selected style. Since a paragraph style applies to an entire paragraph, you don’t have to worry about selecting the whole paragraph before applying the style. Just have your text insertion point within the paragraph or select a portion of the paragraph you want to apply the style to. You can select any part of multiple paragraphs to quickly apply a paragraph style to all of them at once (Figure 75b).
. You can also take advantage of the new Quick Apply feature (see #49) in InDesign. To activate Quick Apply, press Command+Return (Mac) or Control+Enter (Windows) and then start typing part of the style’s name. When the name is highlighted, click Return or Enter again to apply the selected style. Since a paragraph style applies to an entire paragraph, you don’t have to worry about selecting the whole paragraph before applying the style. Just have your text insertion point within the paragraph or select a portion of the paragraph you want to apply the style to. You can select any part of multiple paragraphs to quickly apply a paragraph style to all of them at once (Figure 75b).
Figure 75b. You don’t need to select an entire paragraph to apply a paragraph style to it. You can even select just portions of multiple paragraphs to quickly apply a style to them at once.
#76 Using Character Styles in Illustrator and InDesign
If you want to consistently format certain characters, words, or sentences but not necessarily paragraphs, look no further than character styles. Character styles are available in Illustrator and InDesign, allowing you to establish a collection of formatting attributes that you can quickly apply to a selection of text (Figure 76a). And since it’s a style, you can perform last minute formatting changes at, well, the last minute instead of frantically scouring through your document for the particular formatted bits of text to update.
Figure 76a. Illustrator and InDesign include character styles and their requisite palettes. Both applications’ options and interfaces for creating character styles are virtually identical.
You can create character styles completely from the ground up by selecting the formatting options you want from the Character Styles Options dialog. With no text selected, click the New Character Style button in the Character Styles palette while holding down Option/Alt to start a new style from scratch. (To access the Character Styles palette, choose Window > Type in Illustrator or Window > Type & Tables in InDesign.) You can also base a character style on formatting you’ve already applied to existing text. Using the Text tool, select the portion of text that includes the formatting you want to base your character style on. Then click the New Character Style button. Once you’ve created your character style, you can begin applying it to other selections of text throughout your document.
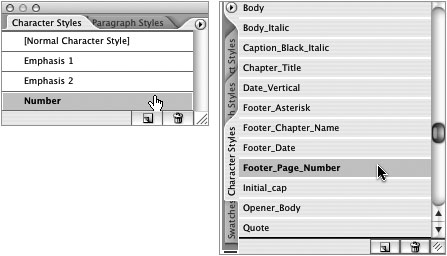
To apply a character style to a selection of text, click the style name in the Character Styles palette in Illustrator or InDesign. In InDesign, you can also select the style from the Character Styles drop-down menu in the Control palette (Figure 76b) when you have the Character Formatting Options mode selected ![]() or call up the Quick Apply panel and start typing part of the character style’s name.
or call up the Quick Apply panel and start typing part of the character style’s name.
Figure 76b. InDesign’s Control palette provides quick access to your character styles. This is convenient if you happen to be working in the Control palette anyway.
![]()
#77 Defining Character Styles with Paragraph Styles in Mind
Character styles can contain as much or as little formatting as you want to assign to them. This is important to consider when defining your character styles, especially if you want them to play well with other paragraph styles you’ve created.
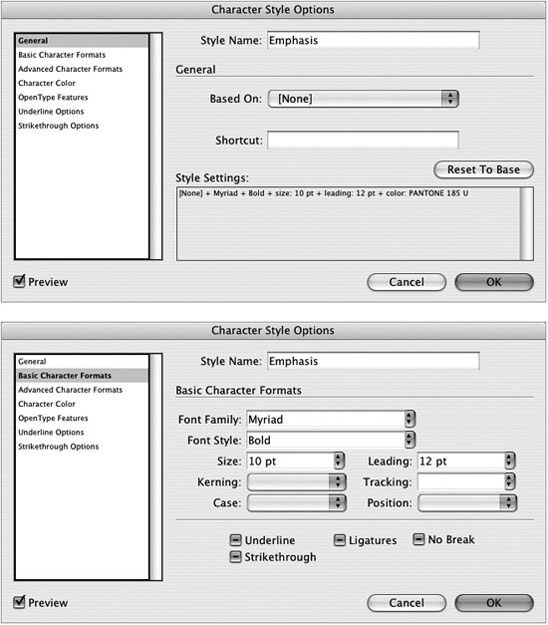
For example, you could create a character style to use for emphasis based on existing text. The character style might specify the font family, font style, size, leading, and color formatting attributes (e.g., Myriad, bold, 10 point over 12, and red) (Figure 77a). Although it is perfectly fine to specify this level of formatting in a character style, you may find that it causes some formatting headaches when applying the character style within text that also has a paragraph style applied.
Figure 77a. You can define as many character formatting attributes as you want in your character style, but it may complicate matters later on when paragraph styles are also applied.
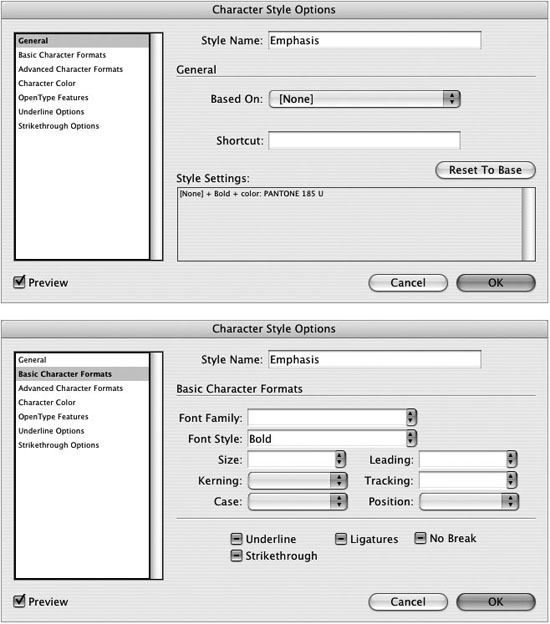
But let’s say you know the character style will coexist with paragraph styles that already determine the font family, size, and leading. So all you really need to specify in the character style is the font style and color (bold and red) (Figure 77b). If you then decide to change the paragraph style’s font family (say from Myriad to Warnock Pro), your character style perfectly adapts to apply just the additional formatting attributes required to emphasize the text (bold and red). Using character styles in this manner, to only override formatting attributes that have already been specified in the paragraph styles, really taps into the powerful flexibility character styles can offer.
Figure 77b. Defining just the formatting attributes necessary to override what’s already been defined in paragraph styles is far more flexible to changes in both.
#78 Working with Components in GoLive
Components in GoLive are blocks of your Web pages that you can reference within multiple pages throughout your site and then have them automatically update whenever a component is changed. Components behave similarly to Smart Objects in GoLive (see #70) but instead of helping with graphic-based source files, they help you manage chunks of HTML code that are susceptible to changes and may appear on several pages in your site. This makes components ideal for headers, footers, mastheads, and other common navigation elements that would be tedious to update on every single page of your site.
Follow these steps to create a component source file and then use it in other pages:
1. With your GoLive site open, create a new component page by opening the Library palette (Window > Site > Library), choosing the Documents tab, and double-clicking Component Page (Figure 78a).
Figure 78a. Although you can use any HTML page as a component, using the Library palette’s preset component page in the Documents tab is an uncomplicated way of creating your component.

2. Remove the placeholder text on the new component page and add any content you like. For example, you could add all the links that appear in the footer of your site. You needn’t worry about linking your external stylesheet (CSS) to the component page since the component will ultimately exist in the actual pages the CSS is applied to. GoLive will also contend with reconciling links to other pages in the site once the component is added to them.
3. Save the component page (File > Save As) to the Components folder of your site. GoLive targets this location (web-dataComponents) when the Save As dialog opens because you started with a preset component page.
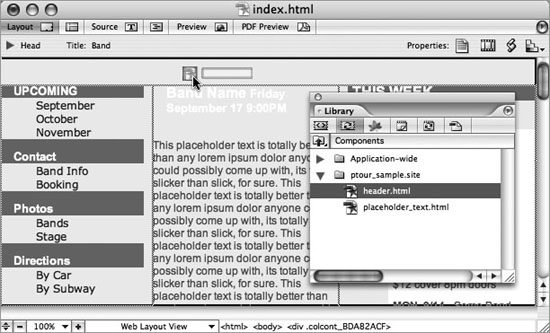
4. Once the component is saved, you can start using it in other pages in your site. To add your component to a page, drag it from the Components tab of the Library palette onto the page (Figure 78b). Components are also available in the Extras tab of the site window.
Figure 78b. To add a component to a page, drag it from the Components tab of the Library palette onto the page.
5. Add the components to one or more pages within your site. To update a component, just double-click it in any page where it’s been added. Make any changes to the component, and once you save them, all the pages where the component has been added will automatically update.
GoLive CS2 lets you crop text in components you’ve added to your pages. You can use one component to create several instances, all cropped differently. With a component selected in the Layout Editor, open the Inspector palette and click the Crop Text button ![]() . Then select the text you want to keep in the component or jump to the Main toolbar to specify a certain amount using the Crop Text By menu. When you’re ready to apply the crop, click the Accept Crop button in the Main toolbar
. Then select the text you want to keep in the component or jump to the Main toolbar to specify a certain amount using the Crop Text By menu. When you’re ready to apply the crop, click the Accept Crop button in the Main toolbar ![]() .
.
#79 Changing Photoshop Layers in a GoLive Smart Object
Smart Objects in GoLive offer you incredible flexibility in what you can do with native CS2 files dragged onto a GoLive page (see #70). Yet believe it or not, there’s more. It’s possible to change the text or visibility of layers in a Photoshop Smart Object right in GoLive.
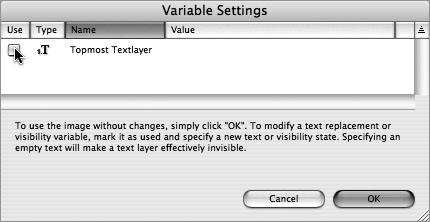
If you create a Smart Object from a Photoshop file that has a type layer as its topmost layer, you’ll be able to change the text in that type layer when you drag the file into GoLive. GoLive will prompt you with a Variable Settings dialog where you can click the Use check box and enter different text for the type layer (Figure 79a).
Figure 79a. If your Photoshop file has a type layer as its topmost layer, GoLive will prompt you with this dialog when you drag the file onto a Web page.
If you’d like to gain this level of flexibility for lower-level type layers or the visibility of layers, you’ll first have to define them as variables in Photoshop. But don’t let the techie term put you off; variables are surprisingly easy to set up.
Here’s how to set up variables in Photoshop for use in GoLive:
1. With your source file open in Photoshop, choose Image > Variables > Define.
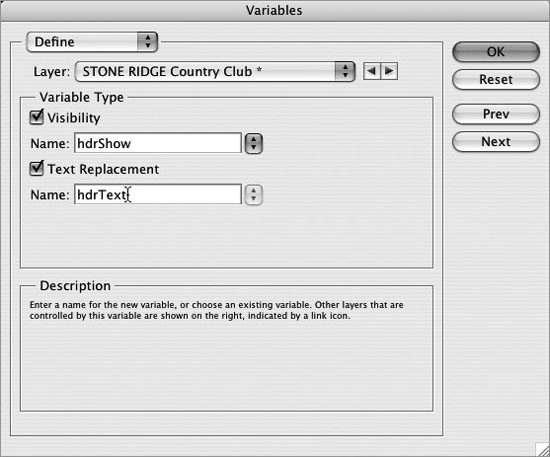
2. In the Variables dialog (Figure 79b), choose the layer you’d like to define as a variable for from the Layer menu. Type layers offer visibility and text replacement options, whereas image layers offer visibility and pixel replacement options—although the pixel replacement option isn’t pertinent to this technique.
Figure 79b. Use the Variables dialog to define which layers and their properties should become variables.
3. Select the options you’d like to enable and supply meaningful names for the variables. Make sure your variable names start with a letter and don’t contain any spaces. You can use underscores ![]() or change case to help separate words in your variable names.
or change case to help separate words in your variable names.
4. Repeat this process for however many layers you’d like to be able to change in GoLive. When you’re done, save the Photoshop file to your GoLive project site folder in the webdataSmartObjects folder.
With your variables set in Photoshop, you can then see them in action:
1. In GoLive, drag your Photoshop file from the Smart Objects folder in the Extras tab of your site window onto a GoLive page. The Variable Settings dialog appears with all your defined variables (Figure 79c).
Figure 79c. You can change the values of any variables you defined in your Photoshop file when you drag it into a GoLive document.
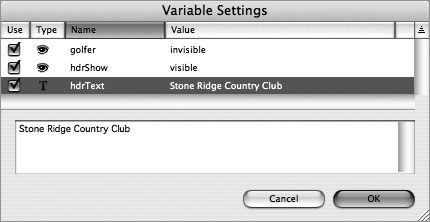
2. Check the Use check box related to any variables you’d like to adjust. Text replacement variables offer a text box for you to enter new text for that layer. Visibility variables provide you with a menu to toggle the visibility of that layer. When you’re done adjusting the settings, click OK.
3. Decide on your optimization settings in the Save for Web window and choose a location for the optimized file. Your Photoshop Smart Object shows up on your page with the new text or visibility settings you’ve entered.
#80 Using CSS in GoLive
Much like character, paragraph, and object styles in InDesign make it effortless to change formatting of elements across an entire document, cascading stylesheets (CSS) allow you to make sweeping changes to text formatting and other properties across an entire site. But as with element styles in InDesign, it takes a little bit of foresight and discipline to realize the flexibility and nimbleness that using CSS affords.
For the ultimately flexibility within your site, every significant element should have some way to specify it in a style. This doesn’t necessarily mean you need to create a slew of classes for each type of element found in your site. It just means you should have a way to style the element via the different kinds of selectors. Heavily peppering your site with inline styles not only makes it difficult to maintain a level of consistency but also makes it next to impossible to change these styles.
Here are a few pointers when using CSS to allow for the most flexibility for changes down the line and minimize the amount of additional code:
• Create markup styles (HTML selectors) before resorting to classes and IDs. Build your Web pages using semantically correct HTML tags (<p> tags for paragraphs, etc.) and style them however you want (see #55). Then use class (.) and ID (#) selectors for special formatting needed within the markup styles.
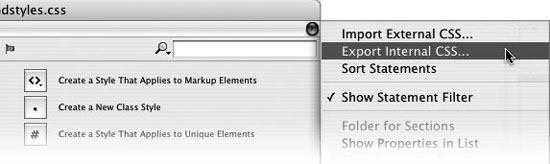
• Move your internal styles to an external stylesheet when appropriate. This prevents you from leaving inconsistent formatting in pages that you can’t affect globally. You can export an internal stylesheet to an external stylesheet using the CSS Editor pop-up menu (Figure 80).
Figure 80. You can effortlessly export an internal stylesheet to an external one by using the Export Internal CSS command in the CSS Editor pop-up menu.
• Take advantage of external stylesheets. Not only do external stylesheets provide a means to centralize and manage all your styles in one location for quick editing, but they’re beneficial to visitors of your sites as well. Browsers typically cache an external stylesheet, so they don’t have to load the styles again when other pages are visited within your site.
• Use CSS layouts and layers. GoLive’s CSS layout objects and CSS-based layers make it easy to design visually with CSS (see #53). CSS usually results in leaner code than older table-based techniques and offers you greater flexibility and options in terms of formatting and positioning.