Chapter One. Getting Started
Adobe Creative Suite 2 Premium (CS2) not only offers entirely new versions of Photoshop, Illustrator, InDesign, GoLive, and Acrobat Professional, but also introduces Adobe Bridge—a new application specifically designed to help you preview and work with all your CS2 documents. Adobe has also strived to make the integrated versioning and workflow system, Version Cue, more flexible and easier to use. In addition, the suite eliminates a lot of the headaches associated with working with stock photography with the introduction of Adobe Stock Photos.
Getting acquainted with the multitude of new features and tools found in CS2 is enough to make anyone’s head spin. With limited time in a day, uncovering new capabilities in your applications is often at the bottom of your priority list. That’s where this book comes in. It’s intended to help those new to the product suite quickly get up to speed but also includes useful tips and tricks that longtime Adobe software users will appreciate.
This first chapter helps you get your bearings with the new version of the suite. It highlights the fundamental interface elements common in many of the suite’s applications and explains the options available to customize them. The brand-new tools, Adobe Bridge and Adobe Stock Photos, are detailed here as well. So let’s get started.
#1 Starting with the Welcome Screens
When you first launch any of the main applications in CS2, a Welcome screen appears. These Welcome screens are great launch pads to learn what’s new in a particular application or to run through some tutorials. Most Welcome screens also offer quick and easy access for creating new documents or opening existing ones (Figure 1).
Figure 1. The Welcome screen that opens when you first launch a CS2 application includes links to tutorials, cool extras, and buttons for common tasks.
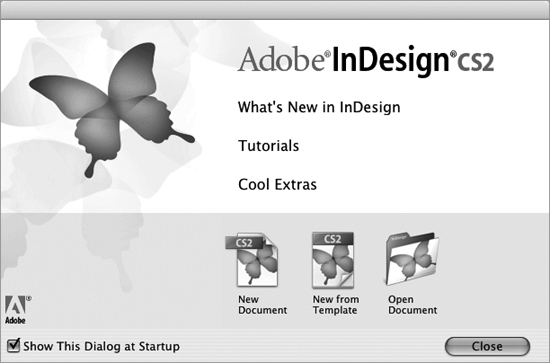
Although the Welcome screens in Photoshop, Illustrator, InDesign, and GoLive are similar, they do vary slightly in content. Strictly speaking, Acrobat doesn’t include a Welcome screen, but it does load a How To window with several links to Acrobat’s own help, which explains frequently performed tasks. It’s worthwhile exploring each application’s Welcome screen to discover what resources and shortcuts to common tasks are available.
As you become more familiar with CS2, the Welcome screens may wear out their welcome. To prevent them from popping up, simply uncheck the Show this dialog at startup check box in the lower-left corner. But don’t be too quick to dismiss them. You may be missing out on a good deal of learning resources and shortcuts to common tasks.
#2 Customizing Keyboard Shortcuts
If you find yourself selecting a menu item in a CS2 application several times a day, consider memorizing that menu item’s keyboard shortcut. If the menu item doesn’t have a shortcut equivalent, you can add your own.
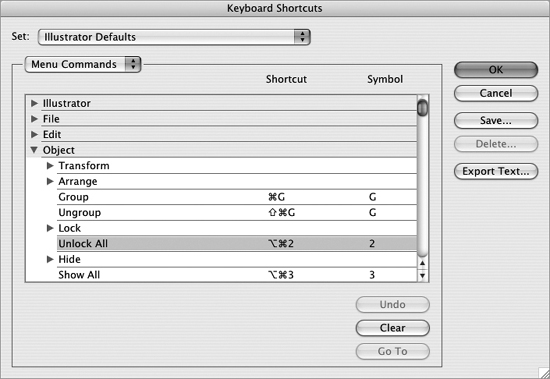
All of the core CS2 applications—Photoshop, Illustrator, InDesign, and GoLive—include a dialog box for customizing its set of keyboard shortcuts (Figure 2). You can access an application’s keyboard shortcuts dialog by selecting Edit > Keyboard Shortcuts.
Figure 2. The Keyboard Shortcuts Editor in Illustrator is typical of the type of interface you can expect in a CS2 application to redefine menu and tool shortcut keys.
All the applications include a means for managing your collection of shortcuts, known as shortcut sets, which allow you to create sets for different work modes or keyboards (desktop vs. portables). But before you begin editing an application’s shortcuts, it’s a good idea to duplicate the default set and work from a copy of it. This way, you’ll always have the default keyboard shortcut set to return to.
Each application offers a different shortcut editor to customize its shortcuts. Here’s a brief overview of each application’s level of customization:
• Photoshop: Application menus, palette menus, and tools can be customized via the Shortcuts For menu. The editor is made up of an organized list of menus or tools and their corresponding shortcut, if one is defined.
• Illustrator: Menu commands or tools can be customized. Choose the type of shortcut you want from the menu below the Shortcut Set menu.
• InDesign: Just about everything in InDesign can be customized. In fact, it offers a very different editor than the other applications. The shortcut types are actually broken out by product area and include a context menu for when you’re in a text frame, dialog, and so on.
• GoLive: Only menu commands can be customized in GoLive. The editor functions like a pared-down version of the editors found in Photoshop and Illustrator.
#3 Customizing Menus in Photoshop
Photoshop is the definitive “killer app” and with every new version the venerable application amasses a whole new set of features and tools. It’s also one of those rare applications that is used in many different ways. All these new features translate into more menus—menus that some users may find valuable but others may never care to see. That’s where the ability to customize the appearance of any menu in Photoshop comes in handy. Through a relatively simple editor (Figure 3a) you choose which menu items to hide or highlight in color.
Figure 3a. With the Menu Editor, Adobe provides you with total power to customize Photoshop. Now you can decide which menus are visible and even highlight your favorites.
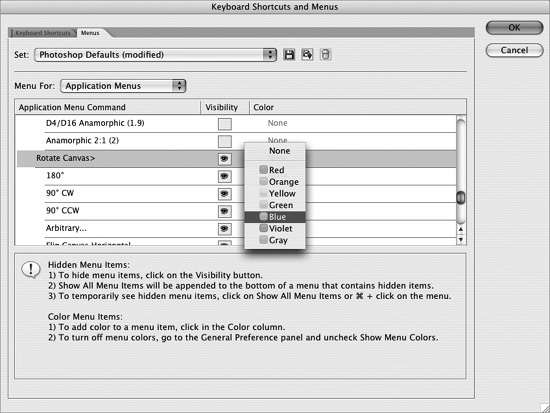
To create a custom menu set, choose Edit > Menus. Choose whether you want to customize the application or palette menus from the Menu For menu. Browse through the list of menus to an item you want to change. To change the visibility of a menu, click the Visibility button ![]() to hide a menu, or click the empty Visibility button to show it. To highlight a menu with color, click the None label in the Color column and choose a color. Click either the Save Set button
to hide a menu, or click the empty Visibility button to show it. To highlight a menu with color, click the None label in the Color column and choose a color. Click either the Save Set button ![]() or the Save Set As button
or the Save Set As button ![]() to save your settings.
to save your settings.
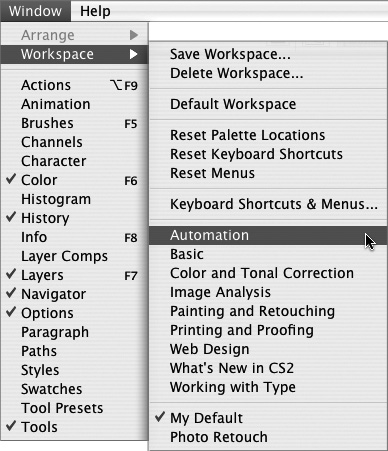
Even if you’re not quite ready to start customizing your menus, you can still reap the benefits of this great new feature. Adobe includes a handful of starter menu sets that make it easy to see this feature in action. To switch to any of these menu sets, choose Window > Workspace, then select one of the menu sets that appear below Keyboard Shortcuts & Menus (Figure 3b). When you’re through exploring, you can switch back to the default workspace by choosing Window > Workspace > Default Workspace or choose one of your custom workspaces (see #6).
Figure 3b. Tucked under the Keyboard Shortcuts & Menus menu are several ready-made menu sets for you to try. They are a perfect way to see Photoshop’s menu customization feature in action.
#4 Managing Palettes
No matter how large computer displays get, your workspace still seems to get overrun by all your palettes. Fortunately, several palette management features are found throughout CS2 to keep palettes at bay and your documents in plain view.
To group palettes together, drag one palette’s tab into another palette. Grouped palettes can be moved around as a set by dragging the title bar. Palettes can also be docked so they move together but are visible at the same time (Figure 4a). Drag a palette to the bottom of another palette to dock it. Individual, grouped, and docked palettes can all be collapsed to just their title bars by clicking the zoom box (Mac) or the minimize/maximize box (Windows).
Figure 4a. Dock a palette with another by dragging its tab to the bottom of the other palette.
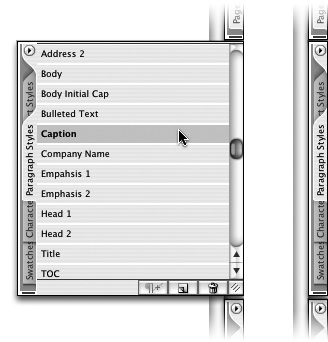
Another great way to manage palettes is to stash them. Stashing palettes collapses them into side tabs where they remain until you click them to slide open (Figure 4b). Palette stashing is only available in InDesign and GoLive, although Photoshop includes a palette well that behaves similar to stashing. To stash a palette, drag its tab to the left or right side of the screen. To stash a palette group in InDesign, hold down the Option (Mac) or Alt (Windows) key while dragging to the side of the screen. To resize a side tab, drag its bottom edge; to reposition a side tab up or down on the side of the screen, drag the dark gray background behind any tab.
Figure 4b. Palettes stashed to the side of the screen help minimize screen clutter. Clicking the side tab causes the palette to slide out when needed.
#5 Customizing Toolbars
Although you may be accustomed to the default setup of the Tools palette that’s common in CS2 applications, InDesign and GoLive do offer options to change them a bit to complement your work style. This makes it possible to adjust the layout and orientation of some of the tools.
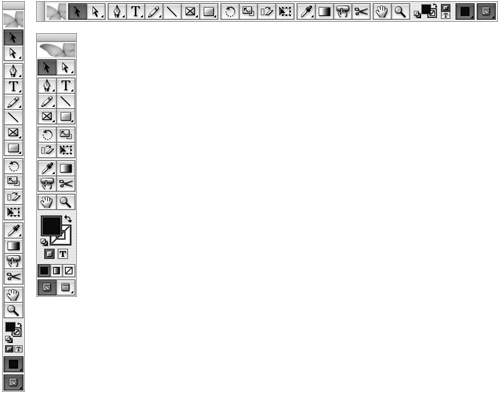
You may value the Tools options available in InDesign whether you’re a recent QuarkXPress switcher or just trying to eke out every last piece of screen real estate. Within InDesign access the Preferences dialog. On the General pane, General Options contains the Floating Tools Palette menu (Figure 5a). Here you can adjust the Tools palette to be a single vertical column, a standard double column, or a single horizontal row (Figure 5b).
Figure 5a. The Floating Tools Palette option in InDesign’s General Preferences allows you to lay out its Tools in three different formats. You can even emulate the single column toolbar available in QuarkXPress.
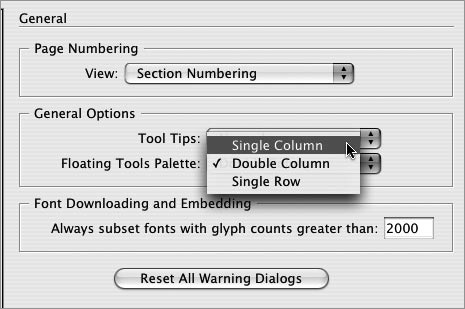
Figure 5b. In InDesign, you can adjust the format of your Tools palette. Choose from Single Column, Double Column, or Single Row.
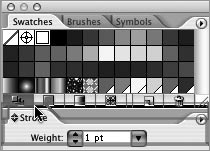
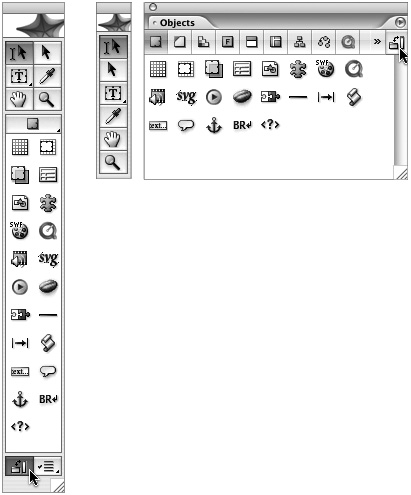
Longtime GoLive users might miss the stand-alone Objects palette now that objects are combined with the Tools palette. You can bring GoLive back to its roots by clicking the Separate tools and objects button located at the bottom of the Tools palette (Figure 5c). Click the Join object and tools button found at the end of the separated Objects palette to combine them again.
Figure 5c. If you want your objects in a standard palette and not part of the Tools palette, click the lower-left icon in the Tools palette to separate the objects from the tools. Once separated, click the icon where it appears in the Objects palette to rejoin the two.
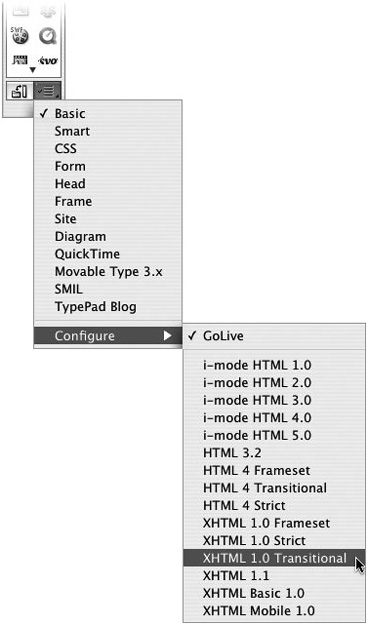
If you want GoLive to only make available the objects allowed in your working markup language, click the Palette Options button, also at the bottom of the Tools palette (Figure 5d). Choose Configure and then the markup language you’re working with (e.g., XHTML 1.0 Transitional).
Figure 5d. You can have GoLive filter out objects from the Tools palette that aren’t valid with your working markup language. Click the Palette Options icon that appears in the lower-right corner of the Tools palette and choose Configure > your markup language of choice from the menu to hide the inappropriate objects.
#6 Managing Workspaces
It’s not unusual these days to work on multiple computers or work on a computer that’s shared with others. This is why a straightforward feature like workspaces, which is common throughout the core CS2 applications, is so useful. You can move your palettes to the locations you prefer and then save that setup as a custom workspace. You can even save multiple workspaces and quickly switch between them to suit your needs.
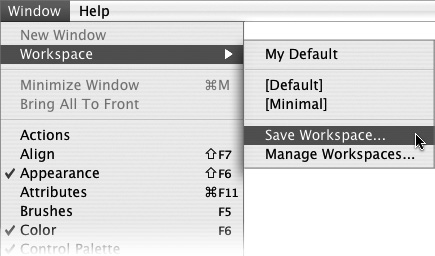
To create a custom workspace, move and group your palettes to the desired locations, then choose Window > Workspace > Save Workspace (Figure 6a). Enter a descriptive name, such as “Photo Retouching” or “Laptop workspace.” Now if your palettes inadvertently get moved around, you can quickly get them back to where you like by choosing Window > Workspace and selecting the name of your workspace from the list. All your palettes attentively snap back to where they should be.
Figure 6a. Arrange your palettes to your liking and then choose Save Workspace from the Workspace submenu.
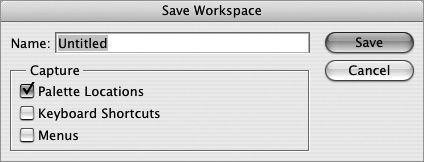
Photoshop also allows you to customize keyboard shortcuts and menu items (see #2 and #3), and link them to your custom workspace. In Photoshop’s Save Workspace dialog box, select the options you want to capture—palette locations, keyboard shortcuts, and menus—along with the workspace (Figure 6b).
Figure 6b. Other CS2 applications allow you to link your palette locations to a workspace. Photoshop takes this a step further by letting you link keyboard shortcuts and menus to a workspace.
If you want to delete a workspace in Photoshop or InDesign, choose Window > Workspace > Delete Workspace. To rename or delete a workspace in Illustrator or GoLive, choose Window > Workspace > Manage Workspaces, click an existing workspace, and then rename or delete it.
#7 Introducing Adobe Bridge
Adobe Bridge is the successor to the File Browser that appeared in previous versions of Photoshop. The File Browser was a virtual light table that made it easy to view and manage your files from within Photoshop. But unlike the File Browser, Bridge is a stand-alone application available on its own as well as from Photoshop, Illustrator, InDesign, and GoLive. Bridge offers much more than just file browsing. It can essentially become the control center for all your projects and a window into all your CS2 content.
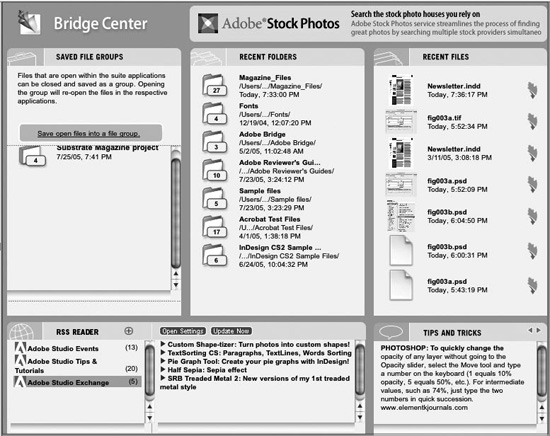
Bridge is also meant to be your personal portal into the various support applications and services now offered in the suite. Located as the first option in the Favorites tab, the Bridge Center is a dashboard of sorts where you can view and open recent folders and files, save open files as a group, and read news and tips and tricks related to CS2 (Figure 7a).
Figure 7a. The Bridge Center in Adobe Bridge functions as a dashboard, showing your recent files and providing a place to read CS2-related news and learn new tips and tricks.
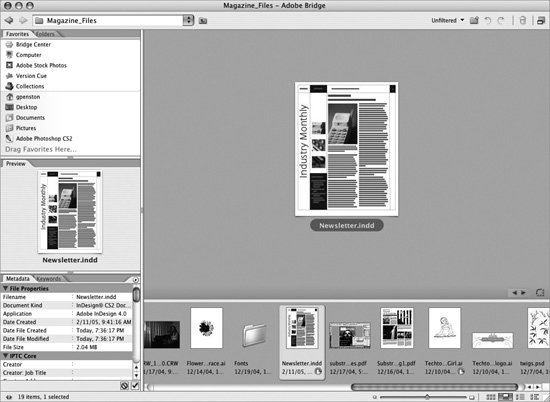
Of course Bridge excels at file browsing as well (Figure 7b). It can preview all native CS2 files in a myriad of ways (see #12) and lets you drag thumbnails from a Bridge window directly into a layout. Fundamental image management tasks that were once reserved for Photoshop or ImageReady can now be off-loaded to Bridge. You can run batch commands, edit metadata, rotate images, and process images. It can even take over for your operating system’s file manager, making it easy to create folders, rename, move, and delete files (see #13). Once you begin working with Bridge, you’ll wonder if there’s anything it can’t do.
Figure 7b. Bridge’s file browsing and management features go far beyond the capabilities of the old File Browser. For example, you can now view thumbnails of all CS2-native document formats and work directly with Camera Raw formatted files.
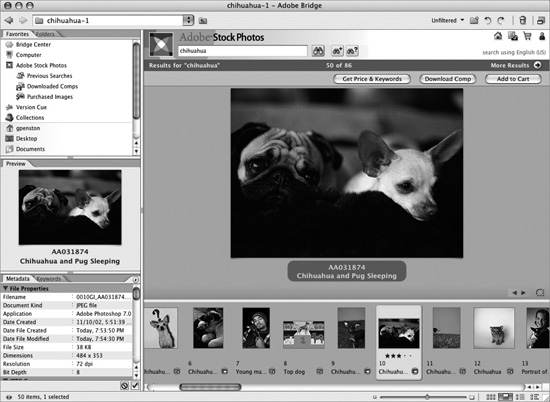
#8 Introducing Adobe Stock Photos
Searching for and managing stock photography has always been a bit of a challenge. You usually have to search across multiple vendors using separate log ins, select the best images, and then download comps for use in your designs. Once your designs are approved, you then have to recount which images came from which vendors, buy the rights for use, and download the high-resolution images to use in your final designs. Adobe saw room for improvement in this process and now offers the Adobe Stock Photos service.
Adobe Stock Photos is available on the Favorites tab in Adobe Bridge (Figure 8). With Adobe Stock Photos you can search, view, try, and then buy royalty-free images from various stock photography vendors all in one manageable window and from one account. What makes Adobe Stock Photos even more appealing is that it offers tight integration with all the core CS2 applications. You can download low-resolution comps and easily place them in your designs via Bridge. These comps have metadata associated with them, which is read by Photoshop, Illustrator, InDesign, and GoLive, so they recognize that you’re working with stock images even if you rename the files. When your design is finalized, return to Adobe Stock Photos in Bridge to buy and download the high-resolution images used in your design.
Figure 8. Adobe Stock Photos is a welcome feature for those using stock photography in their designs. Its seamless integration within the suite makes the use of stock photography easier than ever before.
#9 Introducing the Help Center
When you have such an integrated suite of applications, you expect a help system that’s just as integrated. Well, that’s just what Adobe has created. Whereas the original version of Creative Suite had separate help system files for each application that launched in your browser, Creative Suite 2 does away with all this and supplies a single, stand-alone application called Adobe Help Center, which provides help and tutorials for practically every application in CS2.
To launch Help Center from most applications, choose Help > application name Help. The one exception is Acrobat, which includes its own help. Once Adobe Help Center is loaded, you can browse the help contents of the currently selected application, search the help by entering terms, or look through the index (Figure 9).
Figure 9. The new Help Center is a one-stop shop for all your CS2 information needs. You can search the entire help system or choose a different application from the Help For menu to jump to its specific help contents.
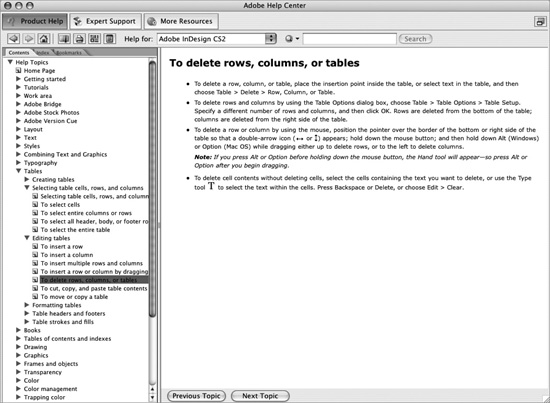
Use the Help For menu to switch to a different application or to search the entire Creative Suite. Supporting applications and services such as Bridge, Stock Photos, and Version Cue are covered in the Creative Suite 2 Help area. There’s even help for the Help Center.
#10 Updating Adobe CS2 Automatically
Just as a perfectly tuned car needs scheduled maintenance, Adobe CS2 needs its fair share of periodic updates. Adobe CS2 has a built-in application that automatically checks and updates all the components that make up the suite, much like your operating system software does.
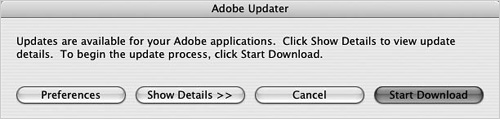
To launch Adobe Updater, choose Help > Updates from any CS2 application except Acrobat. The Updater then checks to see if your Adobe applications need updating. If no updating is needed, a dialog informs you of this. If updating is needed, a dialog box asks if you would like to download the updates (Figure 10a). Click the Start Download button to begin the update process. You may be asked to quit some or all of your Adobe applications, so you might want to postpone the update process until you have time to spare. You can click Show Details to see which updates are available and which updates have already been installed.
Figure 10a. If updates are available for any of your CS2 applications, this dialog will ask if you want to start downloading them.
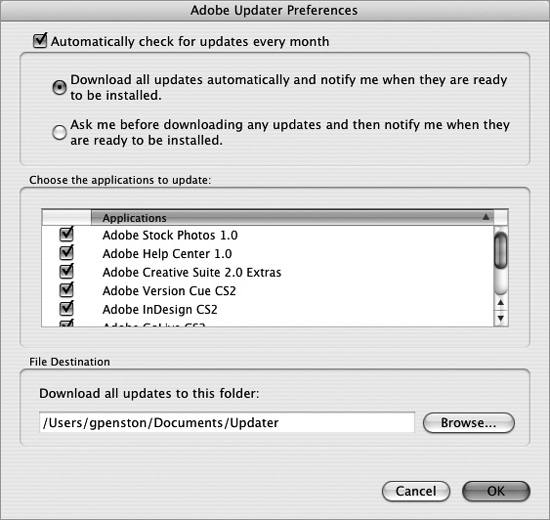
You can also configure Adobe Updater to automatically check for updates every month. Launch Adobe Updater, click the Preferences button, and select the topmost check box. You can choose between two options to specify what to do if it finds updates: download all updates automatically and notify you or ask you before downloading any updates (Figure 10b). You can then decide which applications to update and specify folders in which to download the updates. Now you’ll never have to worry about missing an important update.
Figure 10b. Much like your operating system’s automatic software updates, Adobe Updater checks for updates every month for you. (If only your car would be as considerate.)