Chapter Two. Working Within the Creative Suite
The Creative Suite’s value should really be considered the sum of its parts. Sure, there are the cornerstone applications—Photoshop, Illustrator, InDesign, GoLive, and Acrobat—but look beyond these applications and you’ll find the elements that really make CS2 a truly integrated suite: its supporting applications, services, and common user experience.
With the introduction of Bridge, Adobe offers a supporting application designed for browsing and working with visually oriented files. If a picture is worth a thousand words, then Bridge can be your translator. Learning how to work with this new application and discovering what it’s capable of is key to working within the suite. Bridge is also the access point into Version Cue CS2, a much-needed, creative-minded, version control system you can quickly set up and start taking advantage of right away.
These supporting tools really go a long way in keeping the suite’s components working well together. Although the binding that holds the suite together is its strong support of native file formats and shared user interface elements, learning how all these shared components benefit you when working within the suite is essential.
#11 Accessing Bridge
Adobe designed Bridge to be the nucleus to all of the shared settings, services, and documents you work with within the suite. Although Bridge has a supporting role in the suite, you’ll soon consider it indispensable as you start working with it.
So how do you open Bridge? Several options are available to you:
• Launch the application: Since Bridge is a stand-alone application, you can launch it just as you would any other application. Add it to the Dock (Mac) or Start menu (Windows) to make it more convenient to access.
• Click the Bridge button: The Bridge button ![]() is located at the right end of the Options palette in Photoshop, the Control palette in Illustrator and InDesign, and the Main toolbar in GoLive. Make sure you can see the Adobe Services toolbar in GoLive by choosing Window > Toolbars > Adobe Services Toolbar, which by default is docked to the main toolbar.
is located at the right end of the Options palette in Photoshop, the Control palette in Illustrator and InDesign, and the Main toolbar in GoLive. Make sure you can see the Adobe Services toolbar in GoLive by choosing Window > Toolbars > Adobe Services Toolbar, which by default is docked to the main toolbar.
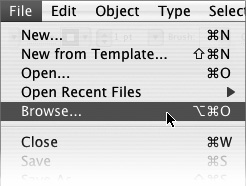
• Use the Browse command: Photoshop, Illustrator, InDesign, and GoLive also include the menu command File > Browse to launch Bridge (Figure 11). The default keyboard shortcut for Browse is Command+Option+O (Mac) or Control+Alt+O (Windows). To remember this shortcut, just think of the common keyboard shortcut for opening files and add Option/Alt to the mix.
Figure 11. Adobe has added the Browse command to almost all File menus in CS2, making Bridge as accessible as opening files.
#12 Browsing Files in Bridge
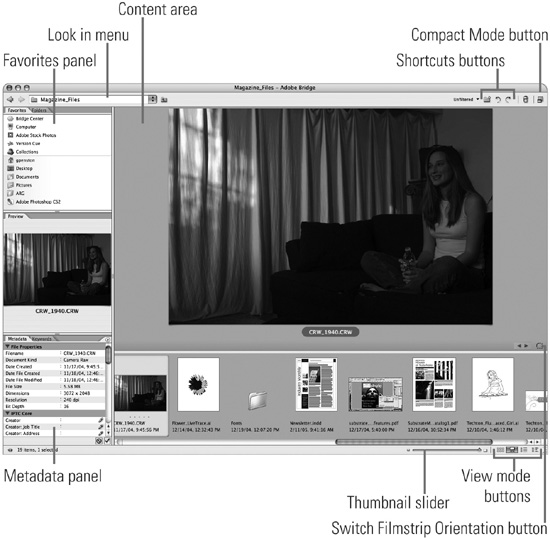
Bridge includes several different views in which to browse your files. You can choose between these views by selecting them from the application’s View menu or by clicking their button in the lower-right corner of a Bridge window. Next to the set of View buttons is a thumbnail slider to adjust the size of the thumbnails displayed (Figure 12a).
Figure 12a. The Bridge window contains several buttons and panels for switching view modes, getting at favorite folders, and editing file details.
Let’s take a look at the various ways you can browse files in Bridge.
• ![]() Thumbnails: View files in a thumbnail grid.
Thumbnails: View files in a thumbnail grid.
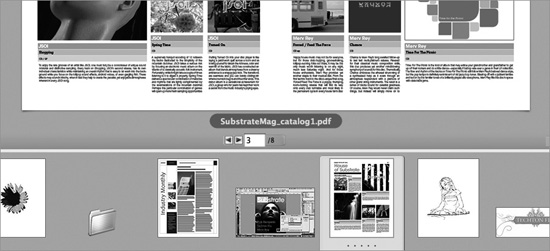
• ![]() Filmstrip: View an extra-large thumbnail of the selected file while the other files display as a scrollable list. Click the Switch Filmstrip Orientation button
Filmstrip: View an extra-large thumbnail of the selected file while the other files display as a scrollable list. Click the Switch Filmstrip Orientation button ![]() to toggle between a horizontal or vertical thumbnail list. An added benefit is that you’re able to flip through the pages of a PDF using this view (Figure 12b).
to toggle between a horizontal or vertical thumbnail list. An added benefit is that you’re able to flip through the pages of a PDF using this view (Figure 12b).
Figure 12b. You can page through Acrobat while in Filmstrip view.
You can hide the filename and other details displayed below the thumbnails in Thumbnails and Filmstrip views by choosing View > Show Thumbnail Only.
• ![]() Details: View a scrollable list of thumbnails with useful information, such as color mode, file format, and size displayed beside them.
Details: View a scrollable list of thumbnails with useful information, such as color mode, file format, and size displayed beside them.
• ![]() Versions and Alternates: Similar to the Details view, this view also includes a column displaying any Version Cue versions or alternates of the file if any exist.
Versions and Alternates: Similar to the Details view, this view also includes a column displaying any Version Cue versions or alternates of the file if any exist.
• Slide Show: Available only from the View menu, Slide Show lets you view extra-large thumbnails using the full screen. Onscreen help appears when you enter this view. You can also switch to Slide Show view by pressing Command+L (Mac) or Control+L (Windows).
#13 Managing Files in Bridge
As you start using Bridge more and more, you may find yourself using your file manager less and less. Sure, Bridge delivers a myriad of ways to browse your files (see #12), but look at some of the ways it can help you manage those files as well.
• File and folder management: Create new folders, move, copy and paste, duplicate, rename, and delete folders and files all without ever leaving Bridge. You perform these actions just as you would in your operating system’s file manger.
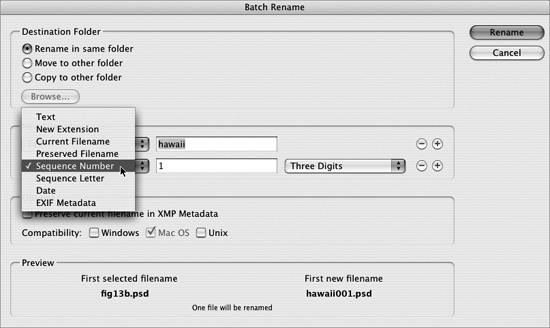
• Batch Rename: Your digital camera saves your photos with obscure filenames. Bridge can batch rename them all faster than you can say IMG_2812.JPG. Just choose Tools > Batch Rename (Figure 13a).
Figure 13a. Bridge has its own Batch Rename tool so that you can change the filenames your camera assigns to more human-friendly names.
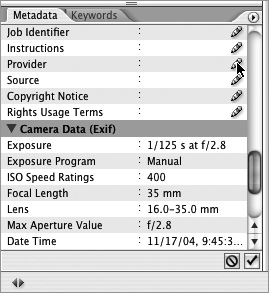
• View and edit metadata: Metadata is all the data about the data, such as creation date, file format, author, and so on. Bridge has a Metadata panel (Figure 13b) where you can view all this information for a selected file and edit certain properties. A small pencil icon indicates which properties are editable. If you don’t see this panel (or any others) on the left side of the Bridge window, click the Show/Hide panels button ![]() at the bottom-left corner of the window.
at the bottom-left corner of the window.
Figure 13b. You probably won’t frequent the Metadata panel unless you’re a dedicated digital photographer, but it’s good to know it’s there chock full of data about your files.
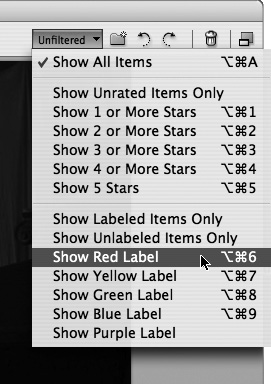
• Rating, labeling, and filtering: Bridge makes it easy to rate and color label files. When thumbnails are selected, a rating control appears below them. Click one of the five dots to assign a rating (Figure 13c). Once files are rated or labeled, you can filter them using these attributes. To do so, use the Filter menu next to the New Folder button in the top-right of the Bridge window (Figure 13d).
Figure 13c. Selecting a thumbnail displays the 5-star rating control. This is also where a color label will appear if you’ve applied one.
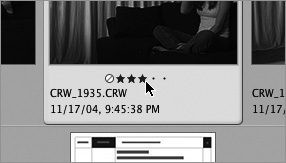
Figure 13d. The Filter menu makes it easy to show the highest rated files or those labeled with a certain color.
• Add to Favorites: If you find yourself navigating often to the same project folders in Bridge, set them up as favorites so they’re just a click away. Simply drag any folder, file, or application to the Favorites panel to add it. You can also Control+click (Mac) or right-click (Windows) on them and choose Add to Favorites from the menu.
• Searching and collections: You can search for files and folders within Bridge and then save the search criteria as a collection. To start a search, choose File > Find and enter your criteria. Once you run a search, you can save it as a collection so you can run it again another time. Click the Save As Collection button in the top right of the main content area. Saved collections appear in the Collections folder in the Favorites panel.
#14 Synchronizing Color Management Settings
One of the helpful management features in Bridge is its ability to synchronize your color management settings across the suite. Now you can rest easy knowing that your color settings are consistent in all your work.
This feature doesn’t guarantee perfect color management—that subject could fill an entire book. It only guarantees that the color settings will be consistently selected in each CS2 application without you having to manually verify them.
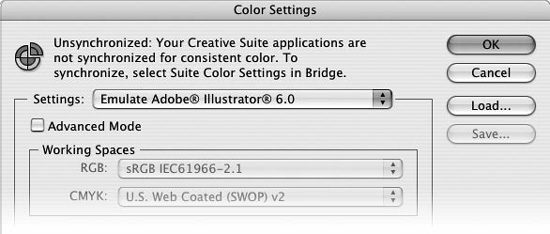
Bridge can automatically synchronize the color settings selected in each application. If the color settings are not synchronized or somehow get out of sync, a warning message appears in any of the applications’ Color Settings dialogs. Choose Edit > Color Settings in any of the applications to see whether or not there is an Unsynchronized warning at the top of the dialog (Figure 14a). If a warning appears, do the following to remedy the situation:
Figure 14a. If you see this warning in a Color Settings dialog, go to Bridge to fix the problem.
1. Go to Bridge and choose Edit > Creative Suite Color Settings (Figure 14b).
Figure 14b. Bridge ensures that your color settings are synchronized across the CS2 applications so you don’t have to.

2. Select a color setting from the list that best matches your working space. Read through each setting’s description to get a better sense of which color setting best suits the media in which you mostly work. Those working with video should select Monitor Color, whereas Web designers would most likely select North America/Web Internet. Print designers should select either North America General Purpose 2 or North America Prepress 2.
If you don’t see the color setting you’re used to working with, select Show Expanded List of Color Setting Files.
3. Once you’ve selected a color setting you think best describes your type of work, click Apply. Bridge then synchronizes all the Creative Suite applications with this setting.
#15 Setting Up Version Cue
If you asked a group of designers how they normally manage versions of their project documents, you’d probably get a different answer from each. Many probably use different folders or append cryptic number sequences to the ends of their filenames. Version Cue eliminates this file naming madness and makes it possible for a team to work collaboratively on a project without losing their minds.
Checking that Version Cue Is Running
When you install CS2, Version Cue is on and available within all the suite’s components except Acrobat. This differs from the earlier version of CS, where you had to explicitly turn on Version Cue and enable it within all the applications. You can visually check that Version Cue is indeed running by looking for the Version Cue icon ![]() in the menu bar (Mac) or system tray (Windows). If the icon appears with a red circled X
in the menu bar (Mac) or system tray (Windows). If the icon appears with a red circled X ![]() , Version Cue is not running.
, Version Cue is not running.
Version Cue is an integrated version control system available in CS2. But if you look for the Version Cue application, you won’t find it, because Version Cue is a service that runs systemwide and works with all CS2 applications.
Version Cue does change the way you work, so it’s best to try using it at the beginning of a small project instead of in the middle of a large project with deadlines looming.
Version Cue is set up for individual use by default. So if you’re not planning on using the service with others, you may only need to adjust the Optimize for menu (noted in the following setup). If you want to use Version Cue with a team, you’ll need to adjust the workspace settings to allow for project sharing. You’ll need to let Version Cue know the size of the team and the type of project you typically work on so Version Cue can adjust its resources accordingly. All of these settings are easily tweaked in the Settings tab of the Version Cue CS2 Preferences:
1. To access Version Cue’s settings, select the Version Cue icon and choose Version Cue CS2 Preferences (Figure 15a).
Figure 15a. The Version Cue icon provides a shortcut to the Version Cue CS2 System Preference (Mac) or Control Panel (Windows) along with the ability to turn it off and on from this menu.

If you don’t see the Version Cue icon, go to System Preferences (Mac) or Control Panel (Windows) and choose Version Cue CS2.
2. To share your Version Cue, from the Settings tab in the Preferences dialog (Figure 15b), click the Workspace Access menu and choose This Workspace is Available to Others.
Figure 15b. Adjust the controls located in the Version Cue Settings tab so it best suits your working environment.
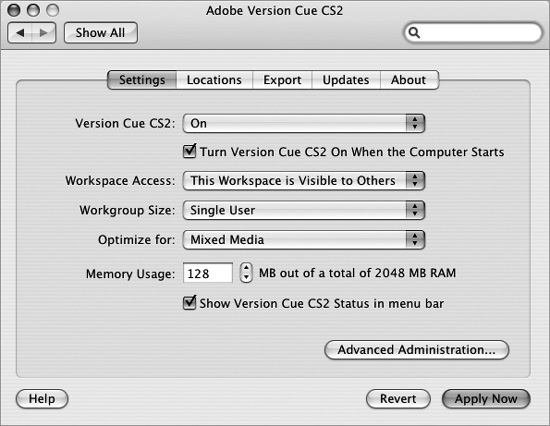
3. Choose a level from the Workgroup Size menu that best describes your environment on a typical day.
4. From the Optimize for menu, choose an option that best describes the kind of projects you usually work on. If you use InDesign just as much as you use GoLive, leave the setting at Mixed Media. Otherwise, choose Print Media or Web Media.
5. In the Memory Usage field, decide how much memory you want to allocate to Version Cue. If you’re running it in a large workgroup or dealing with a lot of files, increase this setting to 256 MB or more.
6. After adjusting the settings, click Apply Now and then choose Restart Now in the dialog that appears. Your Version Cue workspace should now be available to others and ready to use (see #16).
#16 Creating and Working with Version Cue Projects
Once you have Version Cue up and running (see #15), you’re almost ready to start working with the service. You’ll first need to create a Version Cue project folder in Bridge:
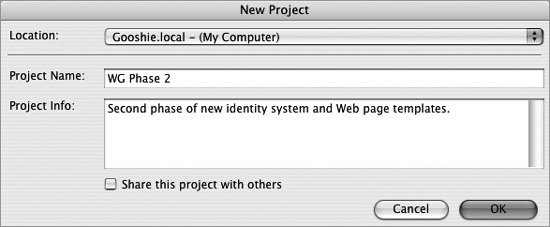
1. Open Bridge (see #11) and choose Tools > Version Cue > New Project.
2. Name your project and optionally add any extra information you’d like to note (Figure 16a). If you want to share the project, select the Share this project with others option. Click OK to save your Version Cue project. Now Version Cue is ready to start managing files within the project.
Figure 16a. This basic dialog pops up when you create a new Version Cue project. Just enter a name and any extra information, and you’re on your way to working with Version Cue.
After creating a Version Cue project folder, you can start using CS2 applications to do any of the following tasks:
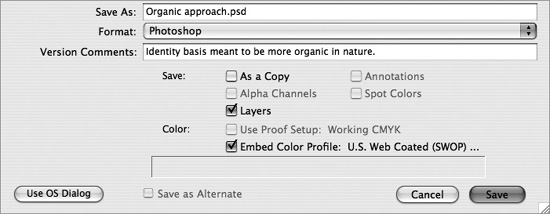
• Add a file: To add a file to your Version Cue project, choose File > Save As from Photoshop, Illustrator, or InDesign. Click the Use Adobe Dialog button (Figure 16b) if you’re using the OS dialog box, and then click Version Cue from the Favorites panel (Figure 16c). Open your project folder and name your file. Remember, you can now keep your filenames simple since Version Cue will keep track of the versions for you. Add a note in the Version Comments field for your first version and click Save.
Figure 16b. The Use Adobe Dialog button switches from your operating system’s standard dialog to Adobe’s version.

Figure 16c. Using the Adobe dialog offers more information about your CS2 documents, including their current Version Cue status.
• Open and place files: To open or place files from your Version Cue project, open Bridge and click Version Cue from either the Favorites or Folders panel. Open your project and then open the file you want to work on. Alternatively, you can use the File > Open command using the Adobe dialog.
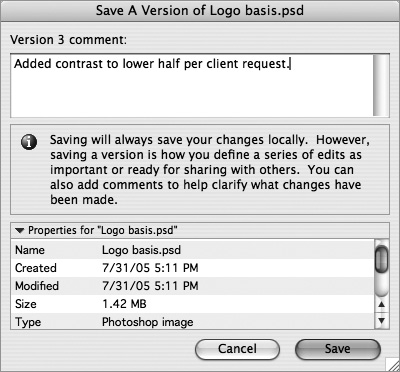
• Save a file: To save a version of a file in Photoshop, Illustrator, and InDesign, choose File > Save A Version. In Bridge, choose Tools > Version Cue > Save A Version. Enter your version comments and click Save (Figure 16d).
Figure 16d. Being able to add a quick note when creating a new version is helpful, especially when you have to go back a month later and figure out why you changed something and if it was the client or you who decided to make the change.
• View and manage files: To view and manage your saved versions, select a file in your project in Bridge and choose File > Versions. The Versions dialog (Figure 16e) opens. Here you can view a list of versions of that file and version comments. You can also view, promote, or delete previous versions from this dialog. In addition, you can view and manage versions of a file while it’s open in any CS2 application by choosing Versions from the status menu that appears at the bottom of the file window (Figure 16f).
Figure 16e. The Versions dialog is where all your versioning diligence pays off. Here you can view your past versions along with a small thumbnail and notes. You can easily promote an older version as the current version as well as view or delete past versions.
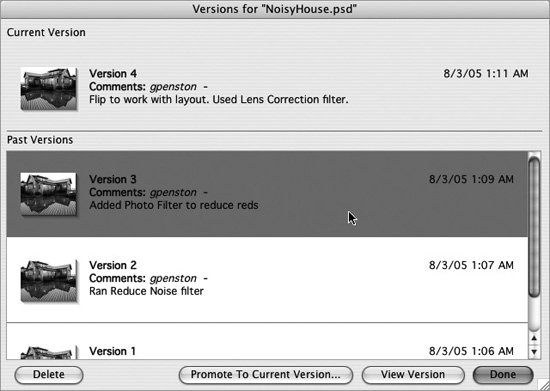
Figure 16f. You can also access the Versions dialog from the status menu of an open file window.

This tip just touches on the basics of how you can use Version Cue, but it should be enough to determine whether it will work for you or not. If you find Version Cue helpful in your process, be sure to check out Chapter 10, “Working with Versions and Reviews” to learn more about the additional features available in Version Cue and Acrobat.
#17 Appreciating the Control Bars
Regardless of whether you’re new to the Creative Suite or just new to this version, you’ll come to appreciate the control bars that are now common across the suite. These helpful floating bars serve up a set of controls that are contextually based on the tools and objects you have selected. Control bars prevent you from cluttering your working space with additional palettes just to change a font or precisely adjust the size of an object.
Let’s take a look at how each application presents its version of a control bar:
• Photoshop calls its bar the options palette (Figure 17a). Photoshop also includes a palette well to the side of its control palette for docking palettes you don’t necessarily need front and center but want to keep handy.
Figure 17a. Photoshop’s options palette.
![]()
• Illustrator now has its own control palette (Figure 17b), which offers a unique functionality. Click any control label that appears as a hyperlink and a full version of the palette pops up under the label (Figure 17c). Once you click out of the palette, the full palette disappears.
Figure 17b. Illustrator’s control palette. The most recent addition to the suite.
![]()
Figure 17c. Labels that appear in blue and underlined in Illustrator’s control palette can be clicked to pop up a related palette.
• InDesign was one of the first CS applications to include a control palette (Figure 17d), taking its cue from earlier page layout applications such as QuarkXPress and PageMaker. Although you could probably get pretty far in other applications without using the control bar, I can’t imagine attempting this in InDesign.
Figure 17d. InDesign’s control palette is probably the most robust control palette of the suite.
![]()
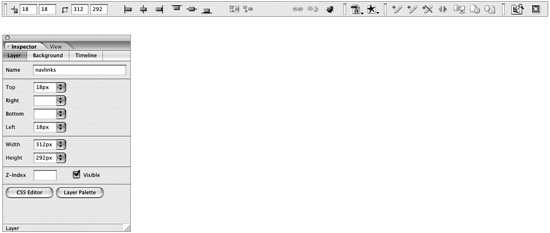
• GoLive distributes the work of a control palette to its two most used palettes: the Main toolbar and the Inspector palette (Figure 17e), which is a standard palette that can be stashed (see #4). Be sure to keep both palettes visible so you always have the appropriate options available to you based on what you’ve selected.
Figure 17e. GoLive’s Main toolbar and Inspector palette work together to act like a control bar does in the other applications.
#18 Relying on a Common User Interface
One of the advantages of using a suite of applications from the same software developer is that you can rely on a common user interface throughout the product offerings. As the applications in the Creative Suite have matured and become increasingly used in conjunction, Adobe has strived to create a common user experience between them. Menu commands, palettes, keyboard shortcuts, tools, and how you interact with all of these elements have been made more universal wherever possible.
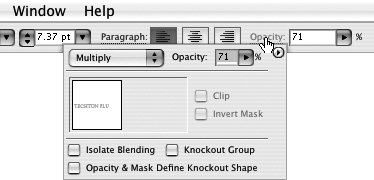
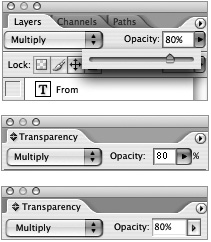
For example, the way you work with opacity settings (Figure 18) in Photoshop, Illustrator, and InDesign are in effect the same. The standard Move/Selection tool ![]() found throughout the suite uses the same keyboard shortcut (V). And you may have noticed that many of my tips point you to the same menu locations regardless of the application. For example, Keyboard Shortcuts can be found on the Edit menu in every application.
found throughout the suite uses the same keyboard shortcut (V). And you may have noticed that many of my tips point you to the same menu locations regardless of the application. For example, Keyboard Shortcuts can be found on the Edit menu in every application.
Figure 18. These palettes are used in Photoshop, Illustrator, and InDesign to adjust the opacity setting of an object. They’re virtually identical.
#19 Working with Native File Formats
Back in the early days of Adobe applications, you usually ended up maintaining two separate files when working with different applications: the file in its native format (e.g., .psd or .ai) and the exported file (e.g., .eps) for placing in another application. This resulted in file management headaches that ate up your time and hard drive space. Well, those days are over.
Native file format support across the Creative Suite is something Adobe has been building upon for some time. Now in CS2, you can work directly with each application’s file format and take advantage of new integration features by doing so. This is what makes the suite truly shine.
Here are some examples of how applications support the placement of another application’s native file format:
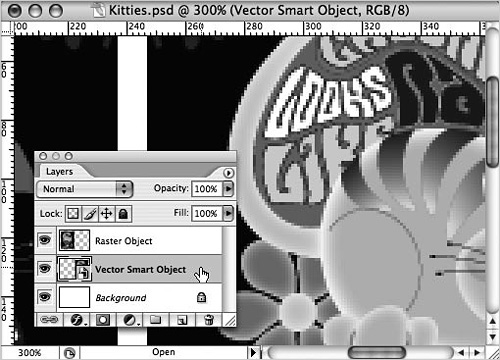
• Photoshop: Place Illustrator and Acrobat files as dynamically linked Smart Objects (Figure 19a).
Figure 19a. Photoshop not only accepts Illustrator and Acrobat files for placement, but it can now dynamically link them so that it’s smart about any updates that are made.
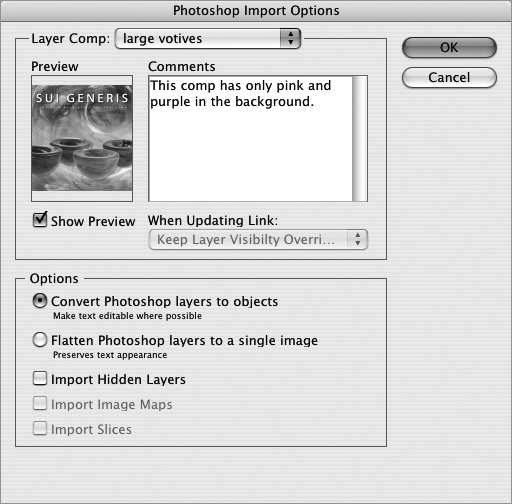
• Illustrator: Place or import Photoshop and Acrobat files. Choose a Layer Comp to use when opening Photoshop files (Figure 19b).
Figure 19b. Illustrator has been able to place and import Photoshop and Acrobat files for some time. CS2 now allows you to choose which layer comp to import.
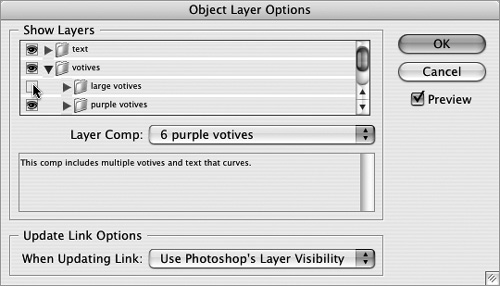
• InDesign: Place Photoshop, Illustrator, and Acrobat files. The transparency in a layered Photoshop file is retained (say goodbye to clipping paths). Toggle the visibility of layers in Photoshop and Acrobat files, and switch between different layer comps in a placed Photoshop file (Figure 19c).
Figure 19c. Much like Illustrator’s support of Photoshop Layer Comps, InDesign lets you select which comp to use and what layers to turn on without going into Photoshop. That’s integration.
• GoLive: Place Photoshop, Illustrator, and Acrobat files to create dynamically linked Smart Objects. GoLive creates Web-friendly formats from the native file formats and constantly keeps them in sync.
• Acrobat: Although Acrobat doesn’t support placement of native file formats, all other CS2 applications are capable of saving files as PDFs. There’s no need to print to a PDF or distill files anymore if you’re working within the suite.
#20 Sharing PDF Presets
Every main CS2 application is able to save as a PDF file (see #19). So many options are available when creating a PDF that it usually makes sense to use one of the presets available to you and then slightly tweak it if necessary. Using a preset is all well and good, but if you find yourself having to create a PDF in another Creative Suite application, you have to remember which PDF preset you selected and what tweaks you made to it.
The good news is that Adobe has made the Adobe PDF presets dialog virtually identical in every application to make it easy for you to create, edit, and mange your presets. And if that isn’t enough, all applications now share the same preset folder location. So if you create a PDF preset in one application, it will magically appear in another.
To define a new PDF preset that’s shared among the applications, do the following:
1. Open the Adobe PDF Presets dialog in a CS2 application: In Photoshop, Illustrator, and GoLive, choose Edit > Adobe PDF Presets. In InDesign, choose File > Adobe PDF Presets > Define.
2. Select a preset that you want to base a new preset on and then click New.
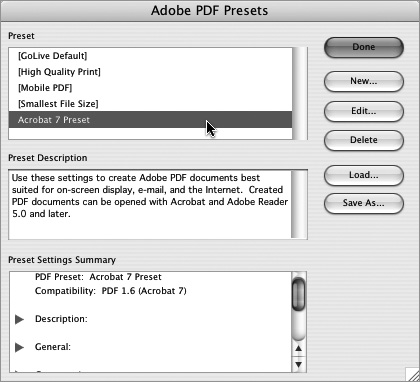
3. Adjust the compatibility level and any other settings (Figure 20a).
Figure 20a. Acrobat PDFs have so many options that it’s best to base your preset on an existing one.
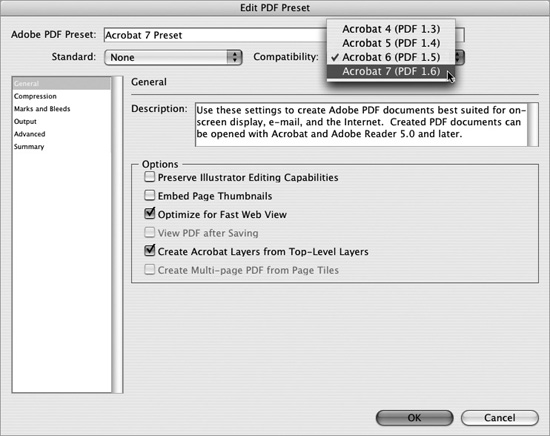
4. Enter a name for the preset in the Preset field and click OK. Then click Done in the main preset dialog.
5. Switch to another CS2 application and bring up its PDF Presets dialog. Notice your newly defined preset is immediately available here as well (Figure 20b).
Figure 20b. Once you save your PDF preset in one application, you’ll be pleasantly surprised to find it ready to use in others.