4. Creating Interactive Flash Content
In this lesson, you’ll learn the following:
• Creating a Flash Catalyst document
• Editing pages and states
• Creating interactivity
• Animating transitions
• Roundtrip editing with Adobe Illustrator
• Adding video
• Publishing to SWF format
![]() This lesson will take about two hours to complete.
This lesson will take about two hours to complete.
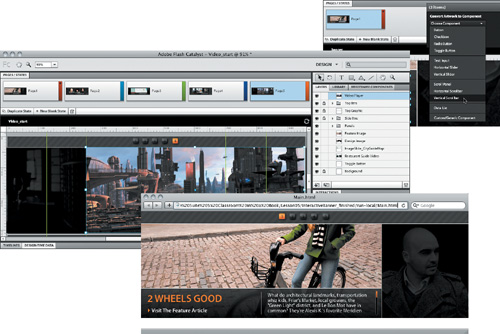
Start with compelling graphics designed using Adobe Illustrator. Add interactivity, navigation buttons, and video, and animate the graphics. Export the project as a fully functional Adobe AIR rich-media application, ready to be deployed online.
About Adobe Flash Catalyst
New from Adobe, Flash Catalyst helps designers easily build rich, interactive content. It combines an intuitive user interface with a toolset that will feel familiar—similar to Photoshop, Illustrator, and Fireworks—with the expressiveness, consistency, and reach of Adobe Flash technology. The result: a feature-rich interaction design tool you can successfully use to publish SWF files without writing code.
As you’d expect from a professional Adobe design tool, you always have complete control over the appearance of your artwork, and you can publish your interactive content as a SWF file that displays with Adobe Flash Player 10 for wide browser compatibility on the web.
If you want a developer to enhance an interactive project you’ve built with Flash Catalyst, you don’t have to do anything. Flash Catalyst output is developer-friendly, writing code for you in the background while you focus on designing expressive, interactive content. Using the open-source Adobe Flex framework as its underlying structure, Flash Catalyst helps ensure that when you have to hand more complex projects off to a developer, everything is already in place, ready to go.
A typical workflow
To create an interactive document in Flash Catalyst, you typically perform the following steps:
- Plan how the user should interact with your document, and also plan transitions between states or pages.
- Design the document in Adobe Illustrator or Adobe Photoshop, using layers to structure the content in a way that supports the buttons, states, and other interactivity you’ll apply in Flash Catalyst.
- Import the design and any multimedia assets into your Flash Catalyst document.
- Add interactivity and transitions.
- Test and publish your document.
Viewing the sample document
You will start by opening a Flash document provided in the Lesson04 folder. It’s an interactive banner intended to work within a larger website design.
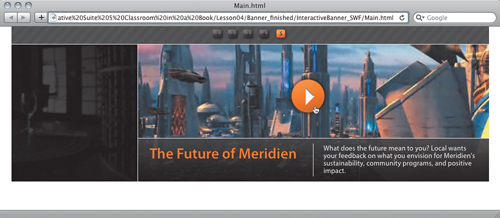
- In Windows Explorer/the Finder, navigate to your Lesson04 folder. In the Banner_finished folder, open the InteractiveBanner_SWF folder. Double-click the file Main.html.

- In your web browser, explore the Flash document. Move the mouse over the five buttons at the top of the banner, and notice how the buttons highlight and make a sound as the cursor passes over them. At the bottom-left corner is an article link (it doesn’t actually go to the web in this demonstration), and at the middle of the bottom is a scrollable text field.
- Move the cursor to the right edge to highlight the navigation arrow, and click it to see the second panel. Then click button 4 at the top of the banner to go to the fourth panel.
- The fourth panel contains a movie. Click the Play button in the middle of the movie to watch it. Feel free to explore the other panels.
- You can keep this document open as reference as you go through this lesson. If you don’t want to leave it open right now, close the web browser window or tab, or exit the web browser.
Next you’ll open the Flash Catalyst document that was used to create the interactive Flash document.
- Start Adobe Flash Catalyst.
- Click the Open button in the Welcome screen, or choose File > Open Project.
- In the Open Project dialog box, navigate to your Lesson04 folder. In the Banner_finished folder, open the InteractiveBanner_FC folder. Double-click the file InteractiveBanner_finished.fxp.
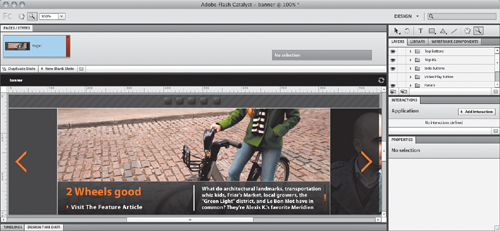
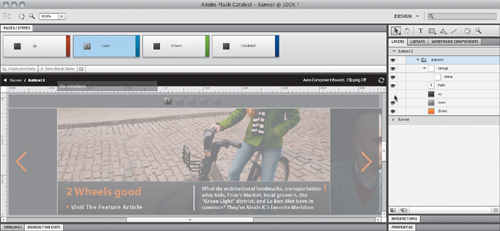
Across the top of the window you can see the five pages of the banner. The top of the workspace contains view controls, and many of the tools you’ll use are available along the right side of the workspace, starting with the tools at the top and then a column of panels. The Timelines and Design-Time Data panels are minimized at the bottom of the workspace.

Creating a Flash Catalyst document
You’ll create a new Flash Catalyst document. This will be the foundation for the design and interactivity that you’ll add later.
- In the Flash Catalyst welcome screen, click Adobe Flash Catalyst Project. If you don’t see the welcome screen, choose Welcome.
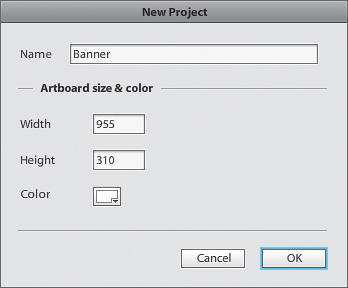
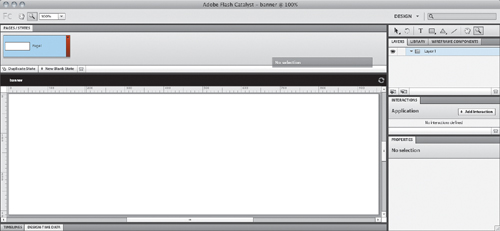
- Name the project Banner. For the width enter 955, for the height enter 310, and then click OK. The new blank document appears, and the document that was previously open is closed.
- To see the entire content of the artboard in the document window, choose View > Fit Artboard In Window.
- At the top of the workspace, in the application bar to the left of the search field, click the Design menu and choose Code.
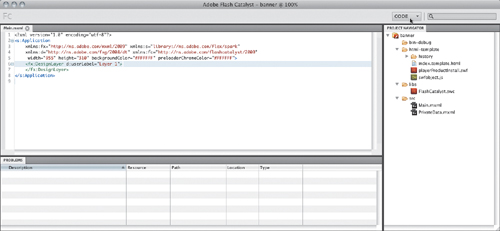
Design and Code are the two document workspaces in Flash Catalyst. As you work, Flash Catalyst creates code in the background so that a web developer can build upon your work using Flash Builder. You can see that Flash Catalyst has already generated code for the new blank document. You can’t edit the code in Flash Catalyst; you’ll be working in Design workspace during this lesson.
- Switch from Code workspace back to Design workspace.
- Choose File > Save As, and save the document under the name Banner in your Lesson04 folder.
Importing a design from Adobe Illustrator
You can import Adobe Illustrator or Adobe Photoshop graphics directly onto the artboard, preserving all layers and the image composition. In this exercise you’ll import the design for the banner created in Adobe Illustrator.
- Choose File > Import > Adobe Illustrator File (.ai).
- Navigate to your Lesson04 folder. Select the file InteractiveBanner_art.ai, and click Open. When the Illustrator Import Options dialog box appears, click OK to accept the default settings. Flash Catalyst converts the Illustrator document for use in Flash Catalyst. If the Import Issues dialog box appears, click OK.
- The Illustrator artwork you just imported may be selected; if it is, choose Edit > Deselect All. You may also want to choose View > Fit Artboard In Window.
Now you’ll add interactivity and navigation to the Illustrator graphics you imported.
Creating a scroll bar
Now you’ll turn a graphic of a scroll bar into an actual, working scroll bar. This is easy because Flash Catalyst already knows about the most common interactive controls. All you have to do is assign specific graphics to become those controls.
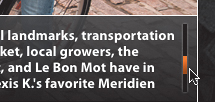
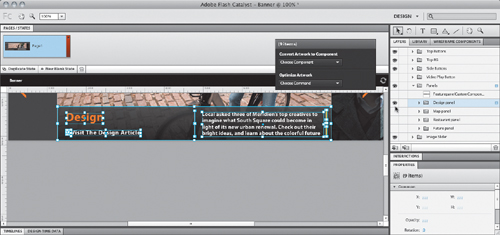
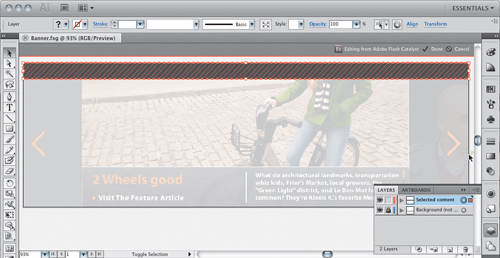
- Choose View > Magnification > 200% and adjust the view so that you can see the scroll bar graphic to the right of the paragraph in the center of the banner.
- With the Selection tool, Shift-click to select both the scroll bar thumb and its track.
As soon as you select objects, a floating Heads Up Display (HUD) appears, presenting context-sensitive options for the selected object. You’ll use the HUD to quickly create a working scroll bar from the selected graphics. If the HUD is in the way, you can drag it to another position.
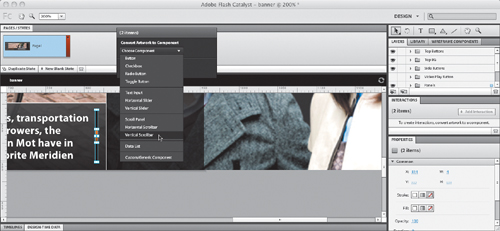
- With the two objects selected, choose Vertical Scrollbar from the Convert Artwork to Component menu. The HUD changes to lead you through the next step, indicating which graphics correspond to the parts of a working scroll bar.
- In the HUD, click Edit Parts.
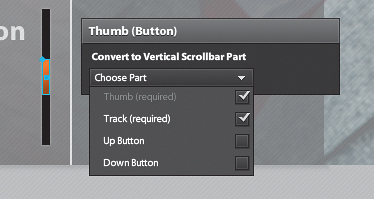
- Select the larger object that will become the scroll bar track, and in the HUD select “Track (required)” from the Convert to Vertical Scrollbar Part menu.
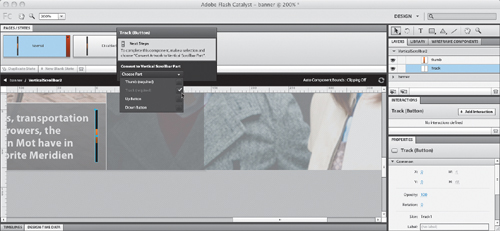
- Select the smaller object that will become the scroll bar thumb control, and in the HUD select “Thumb (required)” from the Convert to Vertical Scrollbar Part menu.
You’ll see the word “Required” in the menu when Flash Catalyst knows that a control can’t function without that part. You’re done setting up the scroll bar, because you’ve already assigned objects to both required parts—the scroll bar track and the thumb control.
- Choose File > Run Project. Flash Catalyst builds a temporary version of the project and opens it in your default web browser.
- In your web browser, test that the scroll bar is working properly.
Creating a scrolling text panel
Now that your scroll bar works, you can bind it to a text panel to make the text scrollable when it’s too big for the panel. You’ll do this the same way you just created a scroll bar out of two objects—by converting the scroll bar and a text panel into a component. This associates the scroll bar with the text panel so that Flash Catalyst knows which panel is controlled by that particular scroll bar.
- Switch back to Flash Catalyst. Just above the artboard is a crumb trail that works like a folder path, telling you what you’re editing in the document. Right now it reads Banner/VerticalScrollbar1. It isn’t just an indicator; it also lets you control which level of the document you’re editing. Click the word Banner to exit scroll bar editing mode.
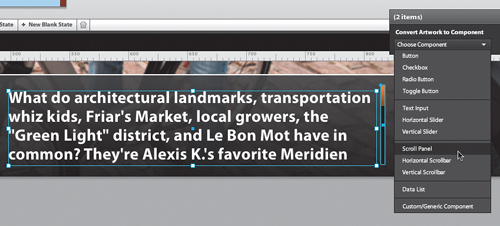
- Select the scroll bar and the text panel next to it.
- With the two objects selected, choose Scroll Panel from the Convert Artwork to Component menu. The HUD changes to lead you through editing the parts of the scroll panel.
- In the HUD, click Edit Parts. Because the scroll bar already exists in the selection, the only required part to assign is the scrolling content, so select the text panel and then choose Scrolling Content (required) from the Choose Part menu.
- Choose File > Run Project, and test the scrolling panel in your web browser.
Now you’ll group the objects in the lower part of the banner to make it easier to work with as a unit later, when you apply transitions. There are many objects involved, but because they’re already arranged within the same layer, you can select all of them at once using the Layers panel.
- In Flash Catalyst, click Banner in the crumb trail. In the Layers panel, click the triangle next to the Panels layer to expand it; expand the Feature panel sublayer and click the Feature panel sublayer to select it and all of the objects inside it.

- With the objects still selected, choose Custom/Generic Component from the Convert Artwork to Component menu.
When you combine objects into a component, Flash Catalyst can optimize that component more easily than if it was still multiple objects. Now you’re ready to provide visual feedback and context that will reinforce the interactivity you’ll add.
Editing pages and states
With the Pages/States panel in Flash Catalyst, you can define how your design responds to viewer interactions. With Pages, different parts of your design can respond to viewer interaction, such as a button changing another part of your design. With States, you can control how individual components respond, such as the button itself.
Note
As you work with objects in this lesson, you may see the same object referred to in more than one way. For example, you might see references to button 1 and Button1. When you see a reference such as button 1, look for a button on the artboard labeled 1. When you see a capitalized name with no space (such as Button1), that’s an object name that you’ll find in a panel such as Layers or Library.
Now you’ll create the buttons that allow the user to go from one page to the next.
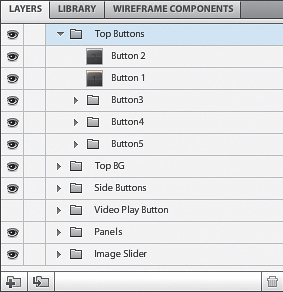
- In the Layers panel, expand the Top Buttons layer. If necessary, zoom out so that you can see the five buttons at the top of the banner.
- Click the Button1 sublayer to select all the objects that make up Button1.
- In the HUD, choose Button from the Convert Artwork to Component menu.
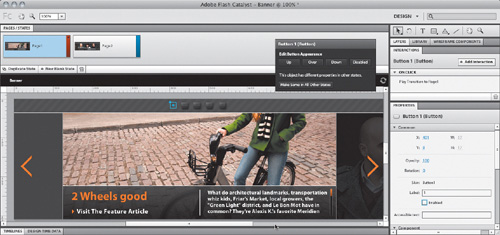
- Double-click button 1 on the artboard. Notice in the crumb trail that you are currently editing only the button, and the Pages/States panel now displays the different states of that button.
- In the Pages/States panel, click the Over state.
- In the Layers panel, expand the Button1 layer and turn off the Up layer.
- Click the Down state, and in the Layers panel turn off the Up and Over layers.
- Click the Disabled state, and in the Layers panel turn off the Up and Over layers.
The orange Down layer will now be visible as long as the mouse button is down over a button, and also when you’re already on the target page for a button.
You have now created all the different states for that button when the user mouses over and clicks on the button.
- In the Pages/States panel, click each of the states to preview how the button looks during viewer interactions.
Setting up a label
When your design uses multiple copies of an object, you can represent them with multiple instances of a single component. To differentiate them during interactions, you can convert the object’s text into a label that you change for each instance of the component. Using instances and labels instead of making whole copies of objects makes the project more efficient and easier to store and optimize. In this project, the buttons are identical except for the number, so you’ll turn the numbers into labels.
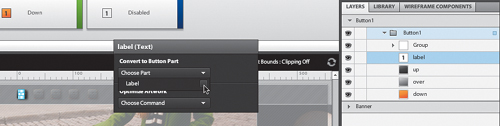
- With the Button1 sublayer selected in the Layers panel, click the Up state in the Pages/States panel; then in the Layers panel, expand the Button sublayer and click the layer named label that contains a 1.
- In the HUD, choose Label from the Convert to Button Part menu.
Note that although the layer is already named Label, that was just a name assigned in Illustrator to remind you to convert the text into a label in Flash Catalyst.
- In the crumb trail, click Banner to exit button editing mode.
- Click the Library tab to open the Library panel, expand the Components section if necessary, and then select Button1 in the Components section. Drag Button1 from the Library panel over button 2 on the artboard. Don’t be concerned that Button1 doesn’t match the square shape of button 2 on the artboard; align the top-left corner with the top-left corner of the existing square button.
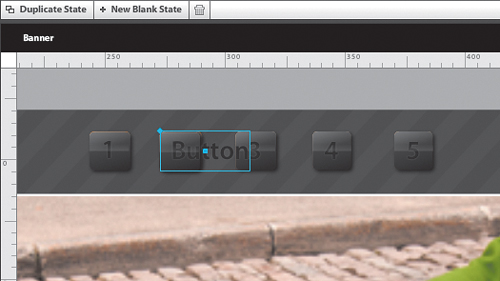
When you created a working Button1 component earlier, it was added to the Library panel. In this step you’re adding another instance of the same button so that you don’t have to create it again. Now you’ll customize the label of the new button 2.
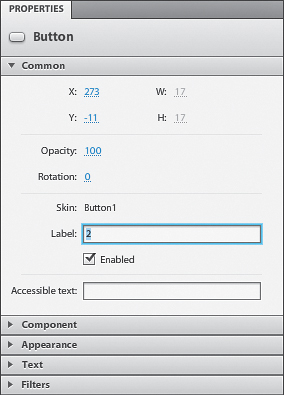
- With the button selected (not the text), in the Properties panel expand the Common properties if necessary, and for Label enter 2. The text is now short enough to fit inside the button because you edited it down to the number 2.
- On the artboard, select the first button in the row of buttons you’re working with. This also selects it (Button 2) in the Layers panel. Double-click the name of the selected button and change its name to Button 1. You’re replacing the button graphics imported from Illustrator with interactive button components you’ve just built in Flash Catalyst. In the same way, edit the second button so its layer name is Button 2.
- In the Layers panel, delete the Button2 sublayer (the one that looks like a folder, not the new button component you just added and renamed). You don’t need it anymore, because you just replaced it with a working button.
In an actual project, you’d continue this process to replace the other three top buttons. For this lesson, you’ll move on to creating a transition between pages 1 and 2 of the interactive banner.
Setting up pages and states for a transition
You can set up a transition that you can customize extensively by animating multiple objects. In this section you’ll set up how the project experience changes during different states of interaction, and then in the next section you’ll set up the events that animate them.
You may want to review the final project in your web browser to understand where each component of the project will move during this page transition.
- In the Pages/States panel, click Page1.
- In the Layers panel, turn off the FeaturepanelCustomComponent layer, and turn on the Design Panel layer. This sets the visibility of these layers when the viewer is on page 1.
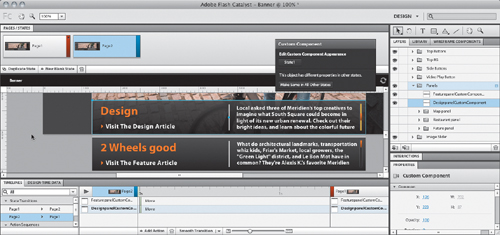
- Select the Design Panel sublayer in the Layers panel. With all the objects in that sublayer selected, create a custom component in the same way you did for the Feature panel in step 7 of Creating a Scrolling Text Panel, earlier in this lesson.
You may want to zoom out a level or two before the next step, so that there’s a little space below the artboard.
- With the DesignpanelCustomComponent layer selected, Shift-drag the component downward until it is off the artboard to set the initial position of the layer before a page transition starts.
- Turn on the FeaturepanelCustomComponent layer and make sure the DesignpanelCustomComponent layer is still visible off the artboard.
- In the Pages/States panel, click the Duplicate State button to create a new page called Page2. If the Timelines and Design-Time Data panels open at the bottom of the workspace and take up too much space on your screen, double-click the Timelines panel tab to minimize the panel group.

- In the Layers panel, select the FeaturepanelCustomComponent layer, and Shift-drag the custom component downward until it is off the artboard; then hide it in the Layers panel.
- Select the DesignpanelCustomComponent layer and Shift-drag it onto the artboard until it is positioned properly. In the Layers panel, make FeaturepanelCustomComponent visible again.
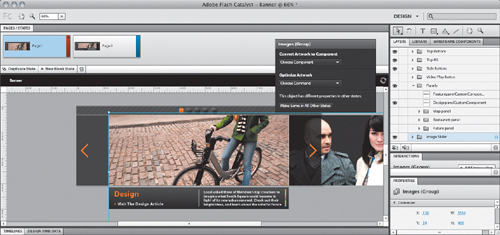
- Still on Page2, select the Image Slider sublayer and use the HUD to turn it into a custom component.
- With the ImageSliderCustomComponent layer selected, Shift-drag the component to the left until it is positioned properly between the two gray dark rectangles at the left and right sides of the page. This moves the image on Page2 into place to complete this page transition.

Setting up button navigation
After you’ve defined the different pages and states of interaction, you set up the buttons that will move the viewer between the pages and states.
- In the Pages/States panel, click Page1, and then on the artboard select button 1.
- In the Interactions panel, click Add Interaction.
- Choose On Click from the first menu.
- Choose Play Transition to State from the second menu.
- Choose Page1 from the Choose State menu, and click OK.

- Still on the Page1 state, select button 2 and repeat steps 2–5, except in step 5 choose page 2 as the target state.
- In the Pages/States panel, click Page1, and then on the artboard select button 1.
- In the Common section of the Properties panel, make sure the Enabled check box is not selected, because you don’t want Button1 to do anything on Page1.
- Click button 2, and in the Properties tab, make sure the Enabled check box is selected.
- In the Pages/States panel, select Page2.
- Click button 1, and in the Properties panel, make sure the Enabled check box is selected.
- Click button 2, and in the Properties panel, make sure the Enabled check box is not selected.
- Choose File > Run Project, and test your work by clicking the 1 and 2 buttons. Notice the transition you created between pages 1 and 2 and also how each button changes in appearance when you move the cursor over each of them.
Creating transitions
With the pages, states, and buttons all in place, you can now use the Timelines panel to control what happens over time during the transitions among pages and states.
- Open the Timelines panel at the bottom-left corner of the workspace.
Notice that two state transitions already exist in the Timelines panel: Page1 to Page2 and Page2 to Page1. Also, note that all the layers that have been dragged onto and off the artboard have a layer in the Timelines panel that indicates the elements moved.
- In the State Transitions section of the Timelines panel, make sure Page1 > Page2 is selected, and select the DesignpanelCustomComponent layer.
- Position the cursor over the vertical bar that says Move and you will see a small handle appear.
- Click the handle and drag the bar until it is at the 0.25 second mark, and then repeat for the FeaturepanelCustomComponent layer.

You want the Design panel (DesignpanelCustomComponent) to move onto the artboard after the 2 Wheels Good panel has moved off the artboard.
- Click and drag the green bar for FeaturepanelCustomComponent movement so that it starts at the 0.25 second mark and ends at the 0.5 second mark.
- For the ImageSliderCustomComponent layer, make the movement last for 0.5 seconds.

You can test the transitions within Adobe Flash Catalyst without running the project.
- In the Timelines panel, click the Play button above the layer names.
Now, in much the same way, you’ll create the transition that plays when the viewer navigates from Page2 back to Page1.
- In the State Transitions section of the Timelines panel, make sure Page2 > Page1 is selected, and select the FeaturepanelCustomComponent layer.
- With the FeaturepanelCustomComponent layer selected, click the handle and drag the bar until it is at the 0.25 second mark. Repeat for the DesignpanelCustomComponent layer.
- You want the DesignpanelCustomComponent layer to move before the FeaturepanelCustomComponent, so drag the green bar representing the FeaturepanelCustomComponent animation so that it starts at the 0.25 second mark and ends at the 0.5 second mark.
- For the ImageSliderCustomComponent layer, make the movement last for 0.5 seconds.
- Click the Play button in the Timelines panel to test your animation.
- Choose File > Run Project, and test the animation in your web browser.
Roundtrip editing with Adobe Illustrator
What happens if you need to make changes to the design after you’ve already applied interactivity in Flash Catalyst? Fortunately, you won’t have to backtrack and lose work. Flash Catalyst integrates tightly with Adobe Illustrator so that after you import an Illustrator document into Flash Catalyst, you can open selected objects from the Flash Catalyst document in Adobe Illustrator, make changes, and return to Flash Catalyst without losing your interactivity.
- In the Pages/States panel, click Page1.
- In the Layers panel, click the Top BG sublayer to select the group at the top of the banner that includes the buttons.

- With the group selected, choose Modify > Edit in Adobe Illustrator CS5 to open the banner objects in Illustrator. If the Enter Adobe ID dialog box appears, click Skip.
In Illustrator, the gray bar at the top of the document window tells you that you’re editing graphics from Adobe Flash Catalyst.
- Click the Layers panel icon to open the Layers panel, and click the target circle to the right of the Selected Content layer name to make sure the objects from Flash Catalyst are selected.
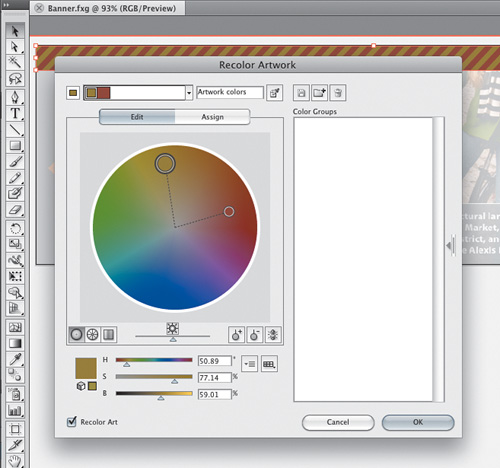
- In the Control panel, click the Recolor Artwork button, and then in the Recolor Artwork, click the Edit tab.

- Brighten the color by dragging the Brightness Adjuster slider to the right. The Brightness Adjuster is the first slider below the color wheel.
- In the color wheel, drag the center circle anywhere on the color wheel.
- Click the center of the color wheel and drag the second circle anywhere on the color wheel.
- Click OK. If you don’t want to make any more changes, click Done in the Editing from Adobe Flash Catalyst bar. When the FXG Options dialog box appears, click OK. The graphics in Flash Catalyst are updated.
Adding video
Video is an integral part of online media, and it’s easy to add video or other multimedia to a Flash Catalyst project. You can easily control how the video plays and whether playback controls are visible.
- In Windows Explorer/the Finder, navigate to your Lesson04 folder. Inside the Banner_finished folder, open the InteractiveBanner_SWF folder. Double-click the file Main.html.
- Click button 5, and then click the circular orange Play button. Watch how the video plays back.
For this part of the lesson, you’ll use another version of the Flash Catalyst project in which all five panels are complete except for a video.
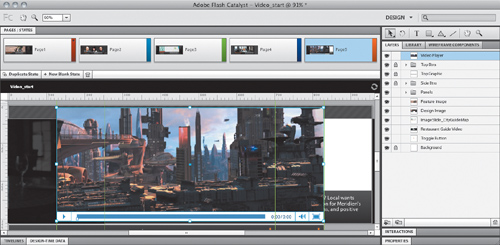
- Switch to the desktop, and in your Lesson04 folder, double-click the file Video_start.fxp. (If you’re asked to save changes for Banner.fxp, click Save.) Choose File > Save As, name the file Video.fxp, and click Save.
You’ll now add the video to this Flash Catalyst project.
- In the Pages/States panel, click Page5, and then choose View > Fit Artboard In Window so that you can see the entire artboard.
- In the Layers panel, select the Feature Image layer. This is to make sure the video imports at the top level of the Layers panel, not inside a layer.
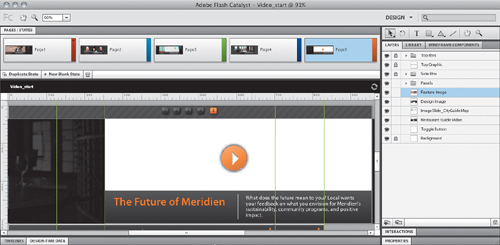
- Choose File > Import > Video/Sound File. In your Lesson04 folder, select the cityscape.flv file and click Open. Notice that video controls are automatically displayed at the bottom of the video file.
- With the video selected, in the Properties panel select None from the Video Controls menu because you won’t use the built-in controls for playback.

- Drag the Video Player layer until its top edge meets the top edge of the white area reserved for it in the design.

- In the Layers panel, drag the Video Player layer downward until it’s just below the Toggle Button layer.
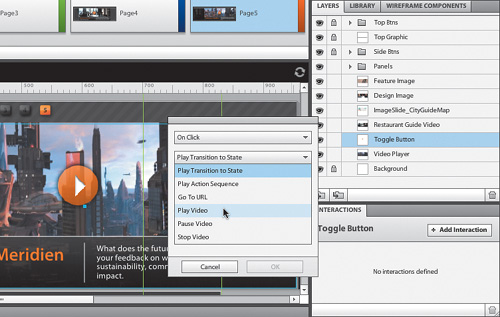
- In the Layers panel, select the Toggle Button layer. You’ll set up this button so that it plays the movie.
- In the Interactions panel, click Add Interaction. In the floating panel that appears, choose Play Video from the second menu, choose Video Player - cityscape1.flv from the Choose Video menu, and then click OK.
- Choose File > Run Project to check your work.
Publishing to SWF for the web
Although Flash Catalyst can create code to be enhanced later by a web developer, for some projects you may find that you can reach all of your interaction design goals with Flash Catalyst alone. In these cases you can export directly to the SWF format for deployment on a web page.
You’ll open the completed version of the project and export that to SWF.
- Save your changes and close your Video.fxp project.
- Choose File > Open Project, navigate to your Lesson04 folder, and inside that folder navigate to Banner_finished/InteractiveBanner_FC; select the file InteractiveBanner_finished.fxp and click OK.
- In the menu bar, select File > Publish to SWF/AIR.
- Navigate to your Lesson04 folder.
- Leave the default settings as they are, and click Publish.
- On the desktop, navigate to your Lesson04 folder. In that folder navigate to the InteractiveBanner_finished/run-local folder, and then double-click the Main.html file. Test the project.
You’ve successfully converted static Adobe Illustrator designs into dynamic, interactive online pieces using Flash Catalyst. You also used Adobe Illustrator to touch up the graphics using roundtrip editing. To use the finished project on your website, you would upload the entire Lesson04/InteractiveBanner_finished/ InteractiveBanner_SWF folder, and then embed the Main.swf file on one of your web pages.
Review questions
1 Describe the typical workflow for creating a Flash Catalyst document.
2 Which applications can you use to create the graphics for a Flash Catalyst document, and why must you create them outside of Flash Catalyst?
3 What is the advantage of converting objects into a component?
4 In which panel do you define the duration of an animation?
5 Explain roundtrip editing between Flash Catalyst and Adobe Illustrator, and why it’s advantageous.
Review answers
1 To create an interactive document in Flash, you typically perform the following steps:
• Plan the animations and how the user should interact with your document.
• Design the document in Adobe Illustrator or Adobe Photoshop.
• Import the designed document and any other assets into your Flash Catalyst document.
• Add interactivity and transitions.
• Test and publish your document.
2 You create graphics for Flash Catalyst in Adobe Illustrator or Adobe Photoshop, so that you can use the powerful design tools in those programs to focus on graphic design. In Flash Catalyst, you focus on interaction design.
3 Combining objects into a component makes them easier to work with because they become a single unit, which makes it possible for Flash Catalyst to optimize the project further for online delivery.
4 You define the duration of an animation in the Timelines panel.
5 In roundtrip editing, you start by selecting objects in Flash Catalyst and opening them directly into Adobe Illustrator for editing. The advantages of the roundtrip workflow are that you don’t have to take extra steps to export and import files between programs; and when you’re done editing, the edited objects are returned to the Flash Catalyst document in place and ready to go without having to manually update or reimport files.