7. Designing for Mobile Devices
In this lesson, you’ll learn the following:
• Selecting a mobile device in Device Central
• Organizing mobile profiles
• Importing an image from Adobe Photoshop
• Optimizing content for mobile devices
• Previewing and testing artwork in Device Central
• Adjusting an image for mobile devices
• Creating snapshots
• Automating the testing process
• Publishing your work on Device Central
• Testing a mobile website
![]() You’ll probably need between one and two hours to complete this lesson.
You’ll probably need between one and two hours to complete this lesson.
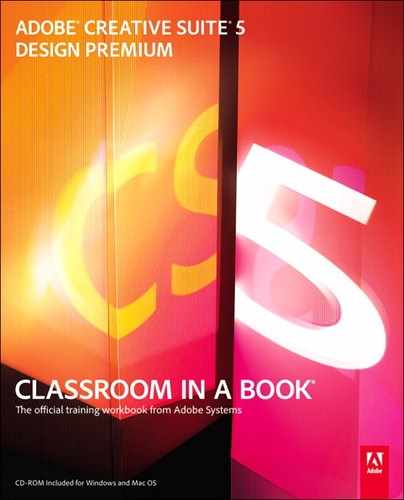
Streamline your mobile design workflow with tight integration between Device Central and other Creative Suite 5 Design Premium components. Device Central incorporates an extensive library of mobile device profiles, enabling you to quickly test the appearance and behavior of your mobile content in a simulated environment—right on your desktop!
Planning for a mobile device workflow
Now that you’ve created print and interactive PDF versions of a document, built a website, and added animation, you might want to use your design assets for a rapidly emerging type of output: content for mobile devices.
Mobile devices, such as cell phones, smart phones, PDAs (personal digital assistants), or gaming systems are like pocket-sized computers. Popular and widespread, these devices are small enough to be truly portable, yet powerful enough to readily access large amounts of information.
Note
Before you start working on this lesson, make sure that you’ve installed the Creative Suite 5 Design Premium software on your computer, and that you have correctly copied the Lessons folder from the CD in the back of this book onto your computer’s hard disk (see “Copying the Classroom in a Book files” on page 2).
People can now view a wide variety of mobile web content on these devices, many of them paying additional fees for web browsing on their mobile telephones and handheld computers. Developing successful content for delivery to these mobile devices requires that website designers work within special constraints. Text, images, and navigation all need to be optimized for small screens, and file sizes minimized to reduce download times. Adobe Device Central can facilitate the process of evaluating mobile design solutions for a wide variety of mobile devices, with emulation technology designed to simulate network performance of content on mobile devices in a realistic way.

To simulate real-life performance of your Flash Lite content, the Emulation workspace in Device Central helps you optimize your designs for the limitations of hardware and bandwidth. Device Central emulation gives you an idea of estimated download times and highlighting possible playback delays due to intensive interaction with a network server—enabling you to deliver a more satisfying end-user experience. You’ll try emulation later in this lesson.
Typically, the process of evaluating your mobile content with Device Central follows a very simple workflow:
- Locate a device profile in Device Central.
- Preview and test your work in Device Central.
- Make design adjustments in the original applications, such as Photoshop.
- Publish your mobile content.
Using Device Central
In Device Central, you can preview and test your work as if you had hundreds of portable devices at hand. In the Emulate workspace, you can quickly view and assess a representation of the mobile content as it will appear on the selected device or devices. This method of testing is similar to the way you would preview website design in different target web browsers. The tight integration with other CS5 components streamlines the process: You can move smoothly between Device Central and Creative Suite components such as Fireworks, Photoshop, Illustrator, or Flash to adjust your designs before the final step of publishing the content to a handset.
Browsing the Device Library panel
In Device Central you can choose between profiles for hundreds of different brands and models of mobile devices, each containing the specifications and limitations for an individual handset.
- Start Adobe Device Central CS5.
- Under Device Profiles in the Welcome screen, click Browse Devices.

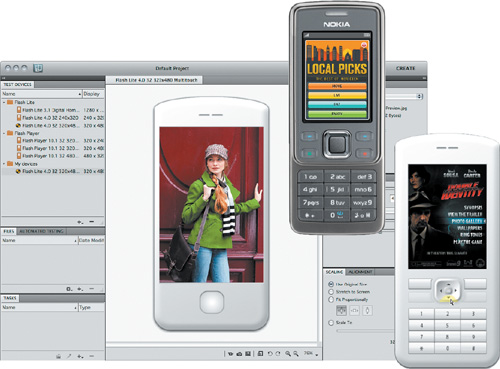
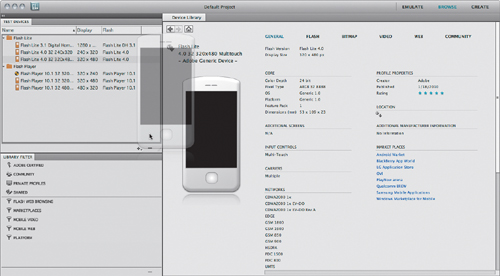
The Device Central main window opens. Notice the three panels: Test Devices, Device Library, and Library Filter. The Device Library panel lists all the currently available device profiles. If you’re connected to the Internet, the first time you browse devices in Device Central it downloads the latest device profiles from the online device library maintained and updated by Adobe.
- Before you begin working with Device Central, let’s look briefly at some of the preference settings for Device Central. Choose Edit > Preferences (Windows) or Device Central > Preferences (Mac OS X).
By default, the Preferences dialog box opens to the General pane. The number you see in the Default Phone ID text box is the International Mobile Equipment Identity (IMEI) number of the device currently being emulated by Device Central. The IMEI is a 15-digit number that uniquely identifies a device on the mobile phone network—containing information about the origin, model, and serial number of the device. Leave the default number unchanged for now; you’ll choose a device later.

In the Application Language menu, you can change the language used in the Device Central user interface. You must restart Device Central for this change to take effect.
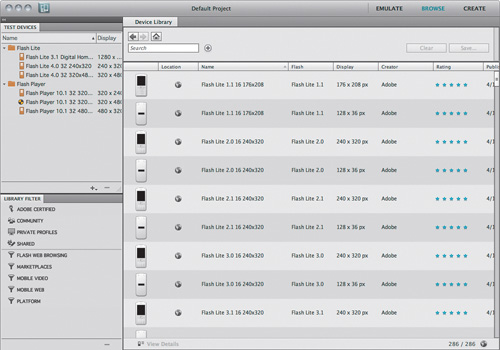
- Click Font Mapping. Here you can specify the fonts that will be used on your computer to emulate the actual fonts on the device.
Note
Adobe Flash Lite automatically tries to match the selected generic font to a font available on the device at run-time. If you know which fonts are available on a device, you can select those or similar fonts from the Assigned Fonts menus. On an actual mobile device, the device’s native system fonts will be used to render the SWF text.
- Click Cancel to close the Preference dialog box without making any changes.
Scanning through the device specifications
- In the Test Devices panel, if necessary, click the triangle beside Flash Lite to expand the list of profiles. Select the Flash Lite folder to display the different models with their specifications on the right side of the main window.
- Click in the empty area at the bottom of the Test Devices panel to deselect the Flash Lite folder.
Tip
Double-clicking a device in the Device Library panel is a shortcut for clicking View Details at the bottom of the Device Library panel.
You can sort the list by carrier, content type, display size, Flash version, manufacturer, or region. At one glance you are able to see the capabilities, constraints, and features of individual mobile devices. This is a very efficient way to research all the valuable pieces of information that can hugely increase your productivity in design development.
In the Device Library panel, when you see a globe icon (
 ) in the Location column it means the device profile is stored online. Once you’ve located the devices you want to test, you can drag them to the Test Devices panel. When you do this, the Location column icon for that device changes (
 ) to let you know that the device profile has been copied to your hard disk.
 - Select any device in the Flash Lite folder. To take a quick look at the key specifications of a selected device, you might need to make a panel or the window wider so that you see more details. As with other Creative Suite components, you can resize a panel by positioning the pointer at a panel edge until it changes to a double arrow that you can drag.

- Click in the empty area at the bottom of the Test Devices panel to deselect any devices. In the Device Library panel, click the plus sign next to the Search field. Click the Choose menu and choose Flash Version, choose Larger Than from the second menu, and choose Flash Lite 3.1 from the third menu.
- Click the add button (
 ) to the right of the search criterion to add another. This time specify a color depth larger than 16 (bits per channel). Add one last criterion for a Display Size of Exactly 320.

- Double-click the first device on the list: Flash Lite 4.0 32 320×480 Multitouch. The Device Library panel displays detailed information for the selected device. Additional information is available in the Flash, Bitmap, Video, Web, and Community tabs.

Tip
To view multiple devices simultaneously, Shift-click the device names for a consecutive selection, or Control-click / Command-click for a noncontiguous selection.
You can drag a device to the Test Devices panel for easier access during a project. Doing this also saves a copy of the device profile from the online Device Library to your hard disk, so that you don’t have to be online to use the profile.
- Drag the device image to the empty area at the bottom of the Test Devices panel; it’s added to the list.
- With the newly added device selected, click the plus sign at the bottom of the Test Devices panel and choose Wrap into New Group. This puts the device into a new device group, which you may find convenient for organizing your devices. Click the group name, enter My Devices, and press Enter.

Setting up to create mobile content
You can use Device Central to select a target profile before you even begin creating your mobile content in Creative Suite components such as Fireworks, Photoshop, Illustrator, or Flash so that you can start with a document that is already configured correctly. Take further advantage of the close integration of CS5 applications by previewing your design in Device Central and then quickly returning to the original editing program to fine-tune it.
- In the Test Devices panel, select the profile you saved in the Test Devices panel, and click Create at the right side of the Application bar at the top of the window.
- Click the large application icon and choose Fireworks. Notice the document size, 320 × 480 px, which will be used as the canvas size for your mobile design project in Fireworks.

- Click the Create button at the bottom of the window. Device Central opens Fireworks and creates a new document using the specifications from the device profile.

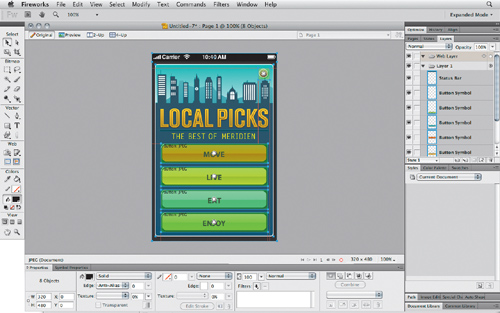
- Choose File > Open, navigate to your Lesson07 folder, select the file localpicks_320x480.png, and then click Open. The image opens in Fireworks.
Tip
You can also drag an image from Adobe Bridge or the desktop and drop it into the Fireworks document window.
This is an image that was previously built in Fireworks for the same display size as the device you selected. However, it hasn’t been tested on the device yet. You can use Device Central to preview the Fireworks document using the device profile you selected earlier.
Previewing and optimizing your mobile content
In most situations you’ll need to make a compromise between image quality and file size to fit the specifications of mobile devices. Before making any adjustments in Fireworks, let’s first preview the image for the selected profile in Device Central.
Tip
If you can see the Optimize tab but it’s collapsed, double-click the tab to expand the entire panel.
- Choose Window > Optimize to open the Optimize panel.
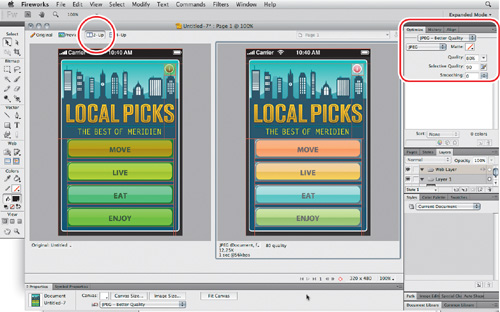
- In the Optimize panel, choose JPEG – Better Quality from the menu at the top of the panel, and then click the 2-Up button near the top-left corner of the window to compare the original with the web-optimized version.
- Choose File > Preview in Device Central.
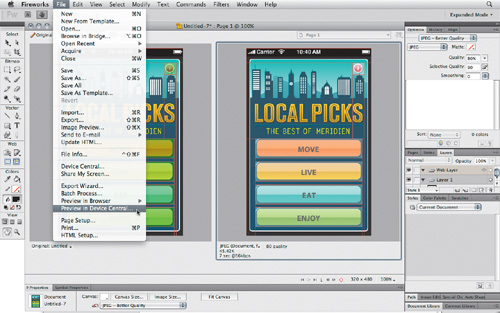
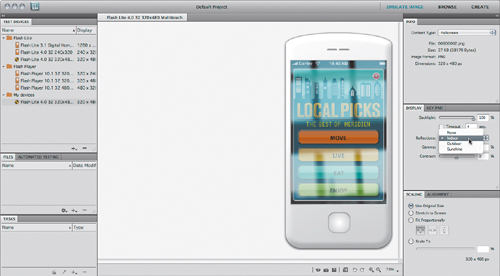
Fireworks sends the image to Device Central and previews it using the device profile you started from. Notice that at the top-right corner of the window, Emulate Image is selected. You can always move among the Browse workspace for viewing and choosing device profiles, the Create workspace for starting a new document from the selected device profile, and the Emulate workspace for previewing your work on the selected device.

Emulate Image is designed to simulate the performance of various media types—such as Flash, bitmap, and video—on mobile devices in a realistic way. In the Content Type menu in the panel group on the right you can specify your mobile content as either a full-screen image, screen saver, or wallpaper. In the Display panel you can test how your image performs in different environments.
- In the Display panel, choose Indoor from the Reflections menu. In Emulate Image you’ll see how your image might look on your mobile device by a window or under overhead lights.
Note
If you are emulating performance for Flash content, make sure that the device you’ve specified supports the same Flash Lite version and content type. If your Flash SWF file requires Flash Lite version 2 and the emulated device supports only Flash Lite 1.1, the file will not appear in the Emulator view. You can sort devices by supported Flash Lite version to make sure that your mobile content is compatible.
- Choose Outdoor and then Sunshine from the Reflections menu, and review the resultant effects on the image in the Emulate Image workspace. When you’re done reviewing the simulation, select None from the Reflections menu.
Of course, an emulator cannot fully substitute for testing on real devices, but it can help you anticipate issues so that you can address them before you test on actual devices. You’ll try more comprehensive testing methods later in this lesson.
- Choose File > Return to Fireworks to quickly and easily switch back to Fireworks when you need to make changes based on the Device Central preview.
- For this lesson, you’re done working with this document, so choose File > Save As, navigate to your Lesson07 folder, name the file mobile.png, and click Save.
- Choose File > Save As, locate your Lesson07 folder, name the Fireworks document Local Picks, click Save, and then exit Fireworks.
Viewing and refining Photoshop artwork
When you created a Fireworks document from Device Central, you may have noticed that you were able to choose from a number of Creative Suite 5 components. Some images are edited more effectively in Photoshop, so in this part of the lesson you’ll do that. It’s easy to jump quickly between Device Central and Photoshop to preview and refine your work.
- Start Photoshop, choose File > Open, navigate to your Lesson07 folder, and double-click the document green_jacket.psd.
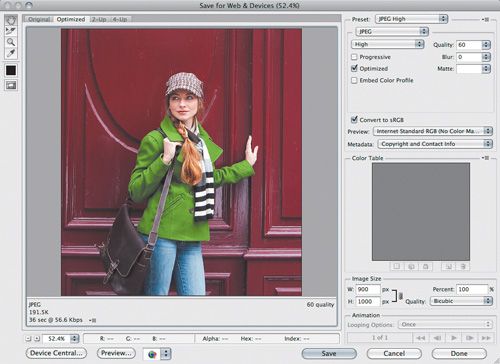
- Choose File > Save for Web & Devices.
- Choose the JPEG High preset from the menu at the top-right corner of the Save for Web & Devices dialog box.

- Click the Device Central button at the bottom-left corner of the dialog box. Device Central displays the image in the last device you selected. It’s obvious that the image is too large; now you’ll resize it properly in Photoshop.
- Choose File > Return to Photoshop. You’ll find yourself back in the Save for Web & Devices dialog box in Photoshop. Here, you can see why the image didn’t fit: In the Image Size section, the image size is reported as 900 pixels wide by 1000 pixels tall—much larger than the 320 × 480 pixel size of the mobile device you’re testing. Now you’ll crop the image to the proper size.
- Click Done to exit the Save for Web & Devices dialog box.
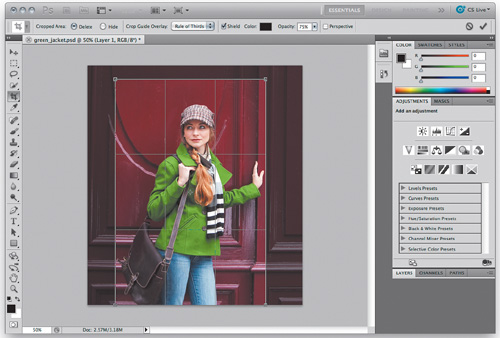
- Select the Crop tool. In the Options bar for the Crop tool, enter 320px for Width and 480px for Height. Leave Resolution blank.

- Drag a crop rectangle that composes the image appropriately for the mobile device, and press Enter. Choose View > Actual Pixels to display the image at the size you entered in the Crop tool options earlier.
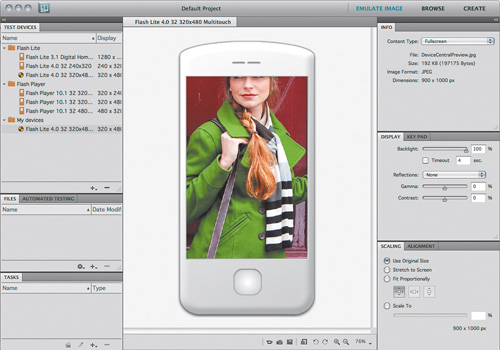
- Choose File > Save for Web & Devices, and click the Device Central button to switch to Device Central and preview the image again in the Emulate Image workspace. This time the image size looks good on the device.

If you like, you can double-click other devices in the Test Devices panel to visualize the image on those devices. Of course, the size of this particular image will look correct only on devices with 320 × 480 pixel displays.
- Choose File > Return to Photoshop. In the Save for Web & Devices dialog box, click Save.

- In the Save Optimized As dialog box, navigate to your Lesson07 folder, select Images Only from the Save As Type/Format menu, name the file green_jacket.jpg, and then click Save.
Taking snapshots
It doesn’t take much effort to change devices and to test your mobile content under different light conditions in the Emulator, but you might want others to see the results as well. Device Central CS5 enables you to take snapshots of your work at any point in the testing process and quickly share those snapshots with colleagues or clients.
- Switch back to Device Central. With the image still emulated on the device, click the Take Snapshot button (
 ) in the row of controls at the bottom of the Emulate Image workspace.

- In the Display panel, choose Indoor from the Reflections menu, and then click the Take Snapshot button again.

- Take a snapshot with each of the Outdoor and Sunshine Reflections options.
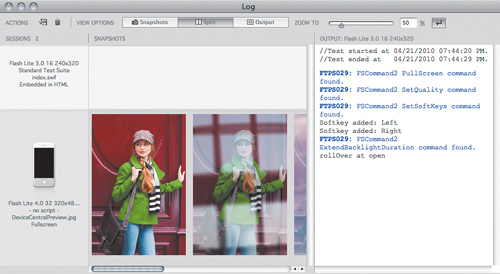
- Click the Show Snapshots button (
 ) in the row of controls at the bottom of the Emulate Image workspace. The Log window opens and displays the snapshots (make sure the Snapshots button is selected at the top of the Log window). If needed, drag the Zoom slider to the left to fit the images on your monitor.

- In the Log window, click the Export Snapshot Log As button (
 ) near the top-left corner of the Log window.
 - In the Export Snapshot Log dialog box, navigate to your Lesson07 folder, type Device Snapshots in the File Name/Save As text box, and then click Save.
- Switch to Windows Explorer/the Finder and open your Lesson07 folder. Inside that folder, open the Device Snapshots folder that you just created on your hard disk. Double-click the index.html file to open it in your default web browser. When you’re done reviewing the browser-based snapshot log, close the web browser window.
- Return to Device Central, and close the Log window.
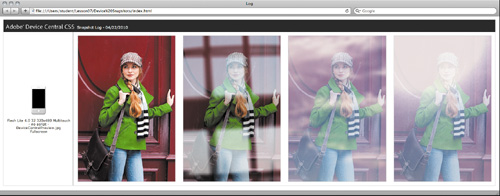
The ability to create snapshots and post them as web pages makes it easy to share your mobile device simulations with colleagues.
Publishing mobile content
When you’ve completed your reviews and finalized the mobile content, you can see your content on an actual handset display. Device Central offers different export options, all guided by a wizard for quick results, and avoids the need to use thirdparty tools.
To publish the image you just created, you can send it to a mobile device via Bluetooth or USB cable, upload it to a server via FTP, or copy it to your hard disk.
Provided you have a computer and mobile phone that are both Bluetooth-enabled, you can follow the instructions in the following exercise to export the image to your phone. Otherwise, reading through those steps will hopefully give you a good idea of the process.
- In Device Central, choose File > New Project.
- Navigate to your Lesson07 folder, name the project Touchscreen.adcp, and click Save.
- Choose File > Open File. Navigate to your Lesson07 folder, select the file green_ jacket.jpg you created earlier, and then click Open.
- In Device Central, click Browse at the top of the window. In the Device Library panel, select a profile that matches your Bluetooth phone’s characteristics, and then drag it onto the Test Devices panel.
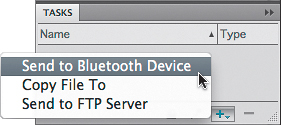
- In the Tasks panel, click the New Task button (
 ) and choose Send To Bluetooth Device from the menu.
- Switch on your Bluetooth-enabled mobile phone and make it discoverable. If necessary, refer to the instructions that came with your phone.
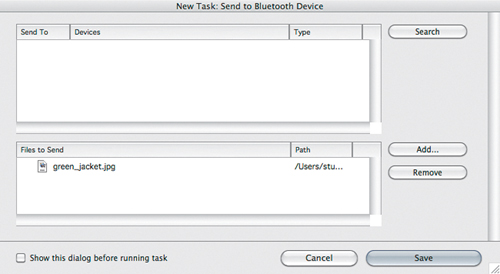
- In the New Task: Send to Bluetooth Device dialog box, click Search, which will prompt Device Central to look for your mobile device.
- Once your phone has been found, click Add, select the file green_jacket.jpg, and click OK. Then click Save to close the New Task: Send to Bluetooth Device dialog box.
- In the Tasks panel, click the Run Task button.

- Under Send To in the Run Task: New Task dialog box, make sure that the check box next to your device is enabled and that the file green_jacket.jpg is listed under Files To Send, and then click the Save & Run button.


Device Central processes the file and sends it to your mobile phone, where you’ll receive a notification of the transfer. Once the image is received by your phone, refer to the instructions that came with your phone to simply view the image or to install it as your new wallpaper or background image.
Previewing a mobile Flash Lite website
In addition to testing static images such as the wallpaper image from the previous exercise, you can evaluate other mobile content as well. For the next exercise you’ll work again with imagery from the movie Double Identity: a website—especially designed for mobile devices—with background information about the movie.
- In the Test Devices panel, double-click the profile Flash Lite 4.0 32 240×320.
- In Device Central, choose File > Open Project.
- Navigate to your Lesson07 folder. Open the folder Movie Promo and within that folder open the file MobileFilmSite.adcp, then click the Emulate workspace at the top-right corner of the window. The content of the project will be displayed in the Files panel.
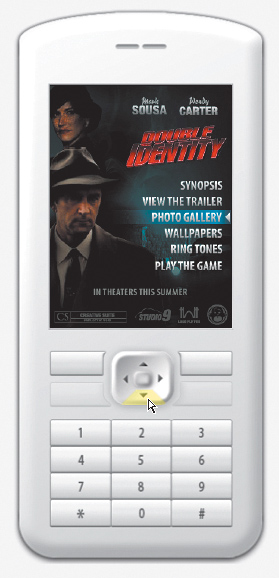
- In the Files panel of the Project window, double-click the file index.swf. Device Central displays the intro animation of the Double Identity home page.
- To move up and down the menu on the home page, click the navigation keys displayed below the virtual phone’s screen. Alternatively, you can use the arrow keys on your keyboard or the navigation controls displayed in the Key Pad panel.
- Now see how the movie trailer plays back on the phone. Select the View the Trailer menu item, and then click the virtual device’s Select button or press Enter on your keyboard. The trailer plays on the screen of the device in the Emulate Flash workspace. To control playback of the video, click a button on the phone below the respective option displayed near the lower edge of the phone screen.
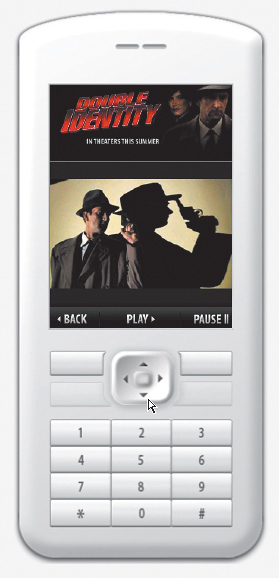
- Select Back to return to the home page.
As you did previously in this lesson, you could test how the movie might look under different lighting conditions by choosing a setting from the Reflections menu in the Display panel.
- Once you’ve explored this mobile website, you can quit Device Central.

Congratulations, you’ve finished this lesson about designing for mobile devices! You’ve learned a lot about Device Central’s vast library of online profiles, as well as how to test different content from wallpapers to websites.
Review questions
1 What’s the difference between the Test Devices panel and Device Library in Device Central?
2 How would you create new mobile content from within Device Central?
3 What is the Emulate workspace?
4 How can you quickly share your test results with others?
Review answers
1 The Test Devices panel offers Device Library that you’ve specifically added to your local computer. These profiles are available to you whether you have an Internet connection or not. The Device Library provides access to the Adobe online library of device profiles. These profiles are dynamically updated to ensure that each time you start Device Central, you will have access to the latest, most accurate information. Double-clicking any device profile in the online library will add that profile to your Test Devices panel.
2 With a device profile selected in Device Central, click Create at the top of the window, click the large application icon, and choose from the Creative Suite components listed in the menu that appears. Depending on your target profile, Device Central determines the document size to propose for the file you want to create and displays a picture and a matching size preset of the selected device(s) in the Create workspace. Click the Create button at the bottom of the window, and Device Central CS5 opens a new blank document in the CS5 component you chose.
3 The Emulate workspace in Device Central is designed to simulate network performance of content on mobile devices in a realistic way. A number of collapsible panels for testing and performance tuning appear in the Emulate workspace. Each panel has options for different media types, such as Flash, bitmap, and video, and offers options that apply to each type of content.
4 In Device Central CS5 you can take snapshots of your content at any time throughout your testing routine. Those snapshots will be collected together with the relevant device in the Snapshots tab in the Log window. You can easily share those results by exporting them from Device Central as HTML pages. You can send the HTML pages to your clients or colleagues, who can view them conveniently in a web browser.