8. Submitting Work for a PDF Review
In this lesson you’ll be introduced to the different types of PDF review and learn the techniques you’ll need to take advantage of the exciting collaborative features in Acrobat and CS5:
• Attaching a PDF for e-mail-based review
• Adding and replying to comments
• Customizing the appearance of your notes
• Marking up a document
• Collaborating in online meetings
• Initiating a server-based shared review
• Tracking and managing PDF reviews
• Protecting your work
![]() You’ll probably need between one and two hours to complete this lesson.
You’ll probably need between one and two hours to complete this lesson.
Whether you want to get input on a spreadsheet or to collaborate on a design project, or you just need a project approved, Acrobat facilitates a range of review workflows. You can set up a review to suit your needs and have Acrobat keep track of comments, send notifications, and more. You can also collaborate live in online meetings—all in secure settings.
Introducing the different types of review
When it’s time to present and share your work, Acrobat delivers many features to facilitate the review process. As you experienced in Lesson 1, you can also demonstrate and review your work live, directly from other CS5 applications such as Adobe Illustrator via the Share My Screen feature. You have a choice between different types of review—and for each of them there’s a wizard to guide you step by step through the process.
Note
Before you start working on this lesson, make sure that you’ve installed the Creative Suite 5 Design Premium software on your computer, and that you have correctly copied the Lessons folder from the disc in the back of this book onto your computer’s hard disk (see “Copying the Classroom in a Book files” on page 2).
The e-mail-based review
An e-mail-based review is an excellent option when reviewers do not have access to a remote server or when it’s unnecessary to interact with each other directly or in real time. Reviewers in an e-mail-based review have the opportunity to interact by replying to each other’s comments once the initiator of the review has merged them. Later in this lesson you’ll add and reply to comments in an e-mail-based review.
Note
Only users of Adobe Acrobat Pro can initiate a document review and invite users of Adobe Reader to participate.
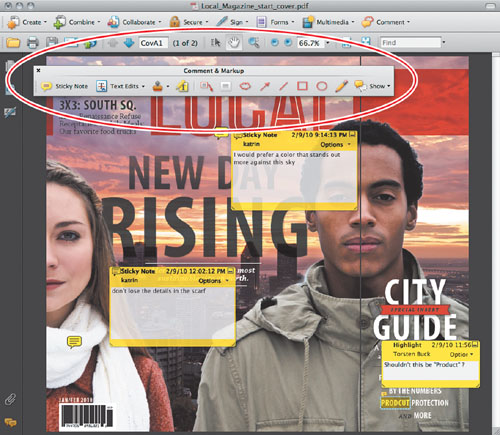
To start this review, the initiator sends an e-mail invitation to review the PDF file by choosing Comments > Attach for Email Review. The e-mailed PDF file includes comment and markup tools for the addressees to state their opinions. The Review Tracker enables the initiator to automatically merge those reviewers’ comments into the master copy when monitoring them. You’ll be guided through this process later on in this lesson.
The shared review
The highly collaborative nature of the shared review makes it the perfect solution for a group of people with common access to a centralized server. A shared review allows reviewers to read and reply to the comments of other participants rather than only being able to do so through the initiator.
When you initiate a shared review, you post a PDF file by choosing Comments > Send for Shared Review. The review can be hosted online in two ways: On Acrobat.com, or by specifying your own server location (a network folder, a Windows server running Microsoft SharePoint Services, or a web server folder). The reviewers receive an e-mail message with a link to the review location online. When they click the link, they can review the document in their web browser (if the PDF plug-in is installed) or they can download the PDF file and review the document within Acrobat. Reviewers can see the comments that other reviewers have made.
The Review Tracker in Acrobat facilitates the entire review process: Not only will the comments be merged and collected, but you can also invite additional reviewers as well as send e-mail reminders to participants.
The online, real-time review
There’s no better way to show and tell than sharing your work online and live via your desktop. Adobe ConnectNow, a personal web-conference tool, enables you to conduct real-time meetings on your desktop. From Acrobat 9 Pro, you can create your own user account on Acrobat.com. You can upload and share most document types—or your entire desktop—in online meetings. This option becomes especially interesting when you want to share files in formats other than PDF or when you want to demonstrate an action within an application. A real-time online review can save so much time in collaborative discussions—not to mention the reduced travel costs!
Participants join the meeting by logging in to a web-based meeting space from their own computers, so obviously they require an Internet connection. In a ConnectNow online meeting, you can share just a document or your entire desktop, use live chat, share online whiteboards, and take advantage of many other collaborative features.
Note
As an initiator of an e-mail-based review you cannot send an e-mail to yourself—unless you have two separate e-mail addresses.
Collaborating in an e-mail-based review
For the purposes of this lesson, where you’ll be exchanging comments regarding the magazine cover you designed in Lesson 2, the process of conducting the review will be simplified. You may not have access to a shared server or a partner to participate in the review, but you can still get to know the relevant features in Acrobat and the interface and tools you’ll use to collaborate in a review.

Following are the steps of this hypothetical review:
- You initiate the review by using Acrobat to open a PDF file from your Lessons folder, and using an e-mail-based review to send the PDF file to your selected reviewers as an e-mail attachment.
- You can review this PDF attachment, adding your remarks using the comment and markup tools in Acrobat or the free Adobe Reader.
- Use the Review Tracker to monitor the comments that each reviewer has added to the PDF file.
Viewing comments
Your task is to review a magazine cover—evidently not sent as an e-mail attachment but as a PDF file in your Lessons folder—and add your comments using the comment tools in Acrobat. First, you’ll want to view and assess the comments of other reviewers.
- If you haven’t already done so, launch Adobe Bridge.
- In Bridge, navigate to your Lesson08 folder and double-click the file Local_Magazine_start_cover.pdf to open it in Acrobat 9 Pro.
- If the Comment & Markup Toolbar is not already open, click the Comment button (
 ) in the menu bar and choose Show Comment & Markup Toolbar.
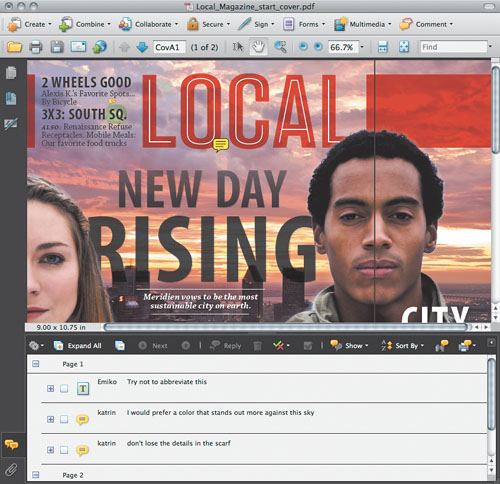
When reviewing a document, there are different ways to mark up and comment. In our example comments are made as sticky notes. Any comments added to a file being reviewed are recorded in the Comments List, which is located on the bottom of the document pane.
Attaching a file for an e-mail-based review
- In Acrobat, open the PDF file you want to send for review.
- Choose Comments > Attach for Email Review. If this is the first time you’ve used this feature, the Identity Setup dialog box appears. You’ll need to enter your information before proceeding.
- The Attach for Email Review command opens a wizard to guide you through the process of attaching a PDF file and specifying a master copy. All comments from the reviewers will be merged into this file.
- Enter the e-mail addresses of the reviewers. To enter addresses faster, click Address Book to select addresses from the address book of the default e-mail application on your system.
- Click Next. You can preview and edit the Subject and the Message of the e-mail that will be sent to the recipients.
- Click Send Invitation. A copy of the PDF is sent to the reviewers as an attachment. It may be opened in your e-mail program and you may need to send it manually from there.

- To see the list of comments, click the Comments button (
 ) at the bottom of the navigation pane.
Note
In Reader, comment tools are available only for PDF files that have commenting enabled. PDF files in a review workflow typically include commenting rights.
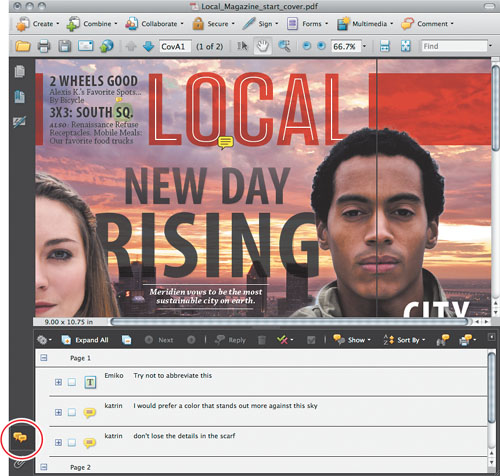
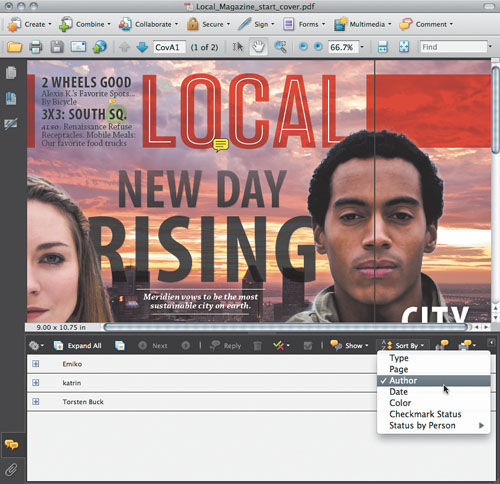
By default, comments are sorted according to the page on which they appear. However, you can change that order to sort the comments by author, type, date, color, or checked status.
- Change the sorting order by clicking the Sort By button in the Comments List toolbar and choosing Author. An Acrobat dialog box appears with some tips. Click OK.
Tip
To view only the comments of a particular reviewer, click the Show button on the Comments List toolbar, choose Show by Reviewer, and then select the name of the reviewer. All comments from other reviewers will be hidden. To display all of the comments again, choose Show by Reviewer > All Reviewers.
- Click the plus sign next to an author’s name to expand that reviewer’s comments.
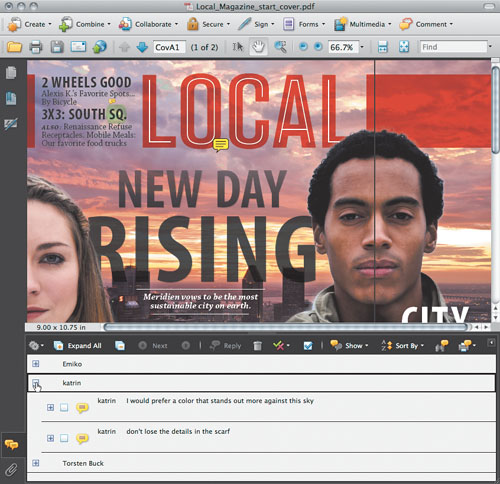
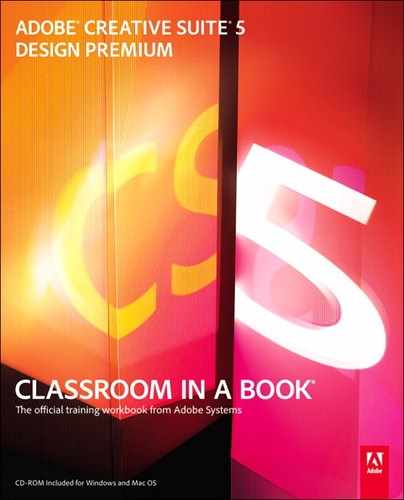
- Click the yellow sticky note under the name Katrin. Acrobat will highlight the corresponding sticky note on the document with a halo.

- Move the pointer over the highlighted yellow sticky note on the magazine cover. The text of the comment becomes visible.

- Double-click the yellow sticky note icon to open the associated pop-up window, and then drag to position the pop-up window anywhere you want on the magazine cover.
Uploading a file for a live collaborative review
- In Acrobat, open the PDF file you want to send for review.
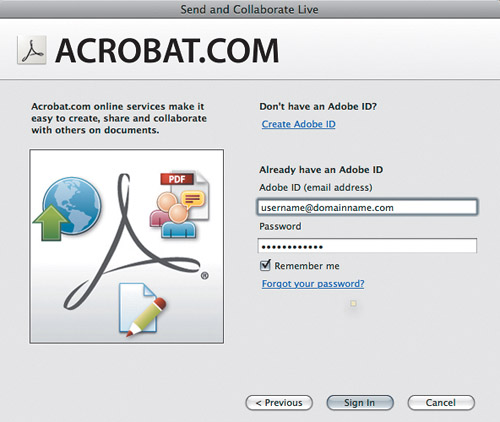
- Choose File > Collaborate > Send & Collaborate Live.
- Sign in to Acrobat.com with your Adobe ID (or click Create Adobe ID to make one), then click Next.
- Preview and edit the recipients, Subject, and Message of the e-mail that will be sent to reviewers. Clicking the To and CC buttons lets you select addresses from the address book of the default e-mail application on your system.
- Select the Store File on Acrobat.com and Send a Link to the Recipients checkbox to host your PDF file on Acrobat.com. This is useful when the PDF file is large because the e-mail doesn’t need to include an attachment; instead the receipient gets a small email and a download link. If you prefer to send an attachment, leave the Store File on Acrobat.com and Send a Link to the Recipients checkbox deselected.
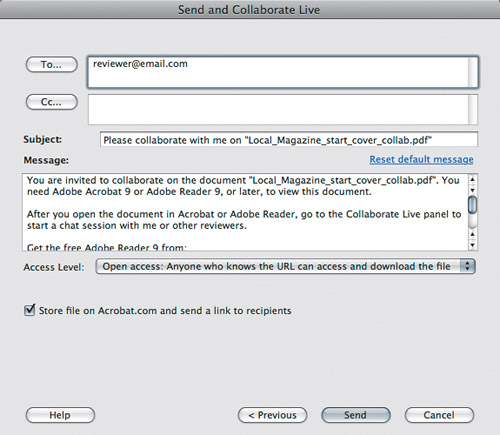
- Click Send. When the PDF file is opened by you or any recipient, it displays the Collaborate Live panel which provides the opportunity to go online and start a live collaborative review immediately.

All comments can be moved around the page except text markups. You’ll appreciate this when you receive documents for review that are cluttered with comments.
You can hide or show comments by filtering them based on the reviewer. When you summarize or print comments, you can specify whether hidden comments appear. Hiding a comment that has been replied to will hide the entire thread associated with that comment—that is, all the replies and discussion on the comment.
Note
In an e-mail-based review, hidden comments aren’t included when you send your comments to the initiator.
Replying to a comment
Now that you’ve seen the other comments and are part of the review, you’d probably like to put in your two cents worth, as well. Acrobat gives you a wide choice of comment and markup tools for giving feedback and communicating your ideas.
![]()
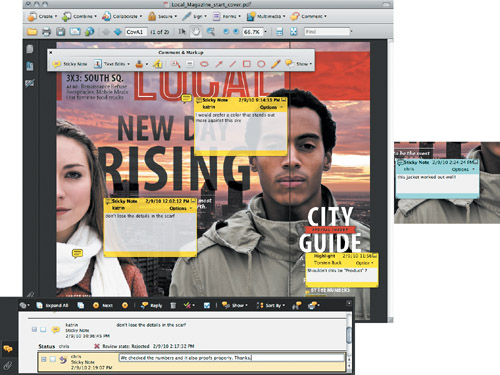
Not only can you type text comments into the familiar sticky notes, you can also add arrows and shapes, and draw freehand directly onto the file to illustrate your point or highlight parts of the text and add callouts. You can modify the appearance of your comments by changing the color of the sticky notes or the type style, which you’ll be doing as part of the next exercise. An array of stamps helps you to efficiently comment and mark standard business documents, and you can also create and customize your own stamps. Provided you have the appropriate hardware and software installed, Acrobat even lets you add audio comments.
Next, you’ll reply to one of those yellow sticky notes from this e-mail-based review.
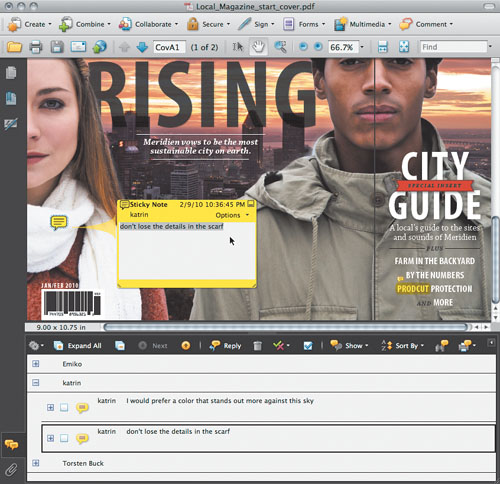
- With the Comments List still open in the navigation pane, select the comment from Katrin that says, “don’t lose the details in the scarf.”
- Click the Set Status button on the Comments List toolbar and choose Review > Rejected.

The rejected status is indicated by a red cross below the comment in the list.
- With Katrin’s comment still selected, click the Reply button (
 ) in the Comments List toolbar.
 - A reply box opens where you can explain why you rejected the design. We wrote: We checked the numbers and it also proofs properly. Thanks.

- Alternatively, you could also open a reply window by choosing Reply from the comment’s Options menu.
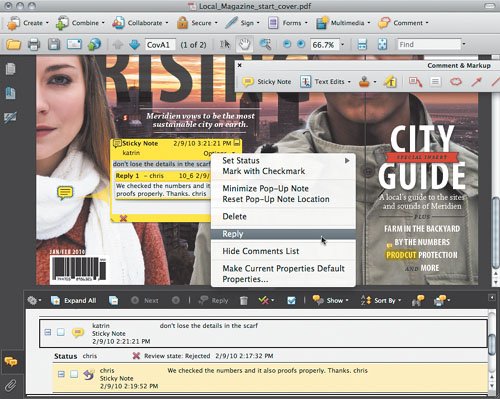
- Close the sticky note by clicking the Close button on the upper-right side of the sticky note.
Customizing the appearance of your notes
Finally, you’ll add your own comment—this time via the Comments menu—and then change the color of the sticky note to make your statement more prominent.
- In the Comment & Markup Toolbar, select the Sticky Note tool. Click to add a new sticky note on the man’s shoulder.
- If the yellow sticky note isn’t open, double-click to open it, and then type your comment. We wrote: This jacket worked out well!
- Click the comment’s Options menu and choose Properties.
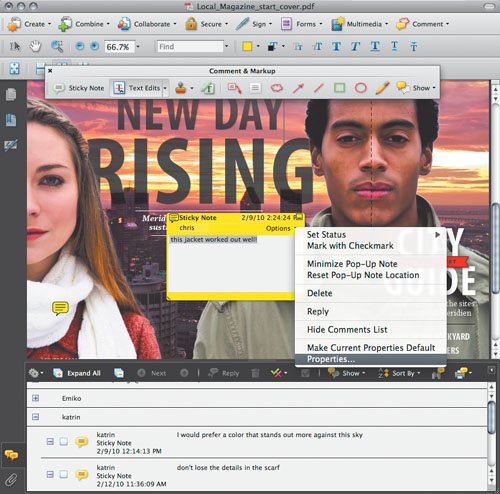
- In the Sticky Note Properties dialog box, click the Color swatch to open the color picker, choose a bright blue, and then click OK.

- Now your note stands out among the others.

Marking up a document
As you may have noticed, the Comment & Markup Toolbar includes specialized tools for editing a document. You can use the Text Edits tool to insert or replace text, underline text, or cross it out to mark it for deletion. Your text edit comments do not alter the actual PDF file; they merely indicate where text should be inserted and which text should be deleted or replaced in the source file from which the PDF was created.
- In the Comment & Markup Toolbar (note how it docks to the upper panel) select the Text Edits tool. If this is the first time you’ve used this tool, the Indicating Text Edits dialog box appears with tips for some standard text edits; once you’ve read them, you can click the Don’t Show Again box, and then click OK.

- With the Text Edits tool still active, select the word DAY in the NEW DAY RISING headline. Click the triangle beside the Text Edits tool to open a menu of tool options and choose the Replace Selected Text tool.
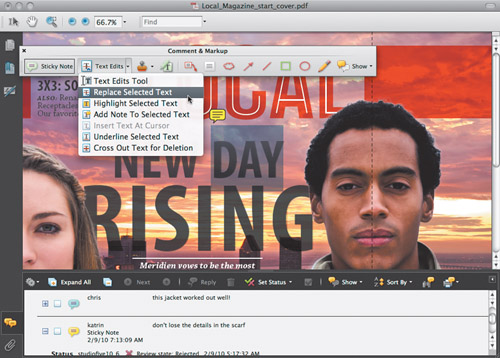
- With the letters still selected, type your replacement text (we wrote: DAWN). As you start typing, the pop-up note window should open if needed.
- For the purpose of this exercise there is no need to save any changes to your review work—just close the Local_Magazine_start_cover.pdf file.
Tools like the Highlight Text tool and the Underline Text tool can be used to add comments either on their own or in conjunction with notes. Acrobat provides you with a variety of options for text edits: You can highlight parts of the text and add a note, or cross out selected text by clicking the triangle beside the Text Edits tool to open a menu of tool options. Select the Replace Selected Text tool, and then enter your corrections in the associated pop-up note. You can also use the Cross-Out Text tool to quickly indicate text to be deleted, or even faster, simply click the Text Edits button, select the text, and press the Delete key.
Tip
For major editing work, the specialized markup tools are faster, clearer, and easier to use than simply adding a sticky note and describing an edit.
Managing reviews
In a managed review, a wizard will help you set up your review and invite the participants. The Tracker, as its name implies, helps you to keep track of the review. The Tracker lets you manage document reviews and enables you to distribute forms as well as administer RSS feeds (online subscriptions to updated content). No longer do you have to import comments, enable commenting for Reader users, or manually track reviewers’ responses.
Note
RSS (Really Simple Syndication) is used to publish frequently updated content (e.g., news headlines, blog entries, or podcasts). The RSS format is compatible with XML and RDF formats.
Even if you did not initiate a shared review but are merely a participant, published comments on your local hard drive are synchronized with the comments on the server. You are notified whenever new comments are published—even when the PDF file is closed, as synchronization continues.
Working with the Tracker
Because you might not be connected to the Internet or have e-mail access on your computer, let’s just imagine for the purposes of this exercise that you did initiate the cover review—though your Tracker dialog box will look different from the illustration. Some of the settings for the Tracker can be specified in the Acrobat Preferences dialog box. To initiate a review yourself, look at Initiating a Shared Review later in this chapter to get started with the Tracker wizard.
- In Acrobat, choose Comments > Track Reviews to open the Tracker dialog box. To open the Tracker in Reader, choose View > Tracker. In the left panel, we were able to select the Local_Magazine_start_cover.pdf under Reviews Sent, because we initiated that review.

Since you are already an active reviewer, the left panel of the Tracker dialog box displays more details about the reviews, forms, server status messages, and RSS feeds—should you want to participate in those. The Latest Updates panel gives you a summary of all the latest changes to reviews in which you are a participant. You can turn Tracker notifications on or off in Acrobat and, for Windows only, in the system tray.
The right panel shows the review details for the item selected in the left panel—in our case the magazine cover review. Because published comments on your local hard drive are synchronized with the comments on the server, you’ll be notified automatically when new comments are available.
To look at the comments from the Tracker, click View Comments to go straight to the sticky notes on the document in Acrobat’s main window. At any time during a review the initiator can invite more reviewers by clicking Add Reviewers and entering their e-mail addresses.
- Ctrl-click / right-click the file Local_Magazine_start_cover.pdf in the left panel of the Tracker, and choose E-mail All Reviewers. This is a quick way to contact all the other reviewers.
- You can close the e-mail window when it appears, because there is no need to write a message.
- As the initiator you can discontinue a shared review by Ctrl-clicking / right-clicking the PDF file and choosing End Review.

Once a review has ended, participants cannot publish comments to the server. You can restart the review by extending the deadline.
Collaborating in online meetings
There may be times when you want to hold an online meeting that involves more than one document or application. In these cases you can’t use the shared review described earlier in the chapter because that’s based on a single document. Instead you can use Adobe ConnectNow, a personal web-conference tool that you can use to conduct real-time meetings—sharing a document or your entire desktop, and using live chat, online whiteboards, and other collaborative features. As an attendee you join the meeting by signing in to an online meeting space using a web browser on your computer.
The great thing about this kind of online meeting is that everybody has the same view—which is set up by the person conducting the meeting. As the initiator, you have complete control of what your clients or colleagues are seeing while you walk them through the project.
Tip
Although Acrobat is the example used in this chapter, ConnectNow shared meetings aren’t limited to Acrobat. You can use ConnectNow to share any file or application on your computer.
An online meeting can be highly productive when it comes to sharing ideas, discussing detailed issues, and collaborating on a project. As a matter of fact, ConnectNow helped a lot in the writing of this book because the various Adobe product teams were able to demonstrate some of the new features of the Creative Suite live to colleagues who were geographically dispersed. Version control, platform compatibility, and even having the same programs installed are no longer an issue. You can enable video conferencing, send instant messages, and even permit another participant to take control of the desktop. Interaction takes place in real time, which makes the meeting more personal and more fun.
Working with Share My Screen
On the following pages, you’ll be guided through the process of setting up an online meeting to discuss the magazine cover. To share this document from your desktop, you’ll use the Share My Screen feature from within Acrobat.
Note
CS Live online services are complimentary for a limited time. See the sidebar “Accelerate your workflow with Adobe CS Live” on page 25 for details and limitations related to all Adobe online services.
You’ll be guided through the process of setting up your online meeting. However, you do need an active Internet connection to work with Share My Screen. If you’re not connected to the Internet, you can still follow some of the steps in this exercise and simply skim others.
- Switch back to Adobe Bridge, select your Lessons folder in the Favorites panel, and then navigate to the Lesson08 folder. Double-click the file Local_Magazine_ start_cover.pdf, which should open in Acrobat.
- In Acrobat, choose File > Collaborate > Share My Screen. Enter the e-mail address and password that you use as your Adobe ID, and click Sign In.
If you don’t already have an Adobe ID, click Create Adobe ID and when you’re done with that, return to Step 2.
Tip
In CS5 components other than Acrobat that support Share My Screen, holding down the CS Live button at the right end of the Application Bar is another place to choose Share My Screen, and also a way to use other CS Live online services*.
It will take a moment for the server to sign you in; then the Welcome to Connect Now Meeting Room dialog appears offering you two choices:
• Customize Your Meeting URL. The end of the URL is your name by default, but you can change it to something that better describes the nature of the meeting, or to a word or phrase that’s shorter or easier to remember.
• Send E-Mail Invitation Now. This option opens the default e-mail client on your system with a message that contains the URL for your meeting. You’ll have an opportunity to edit the message before you send it.
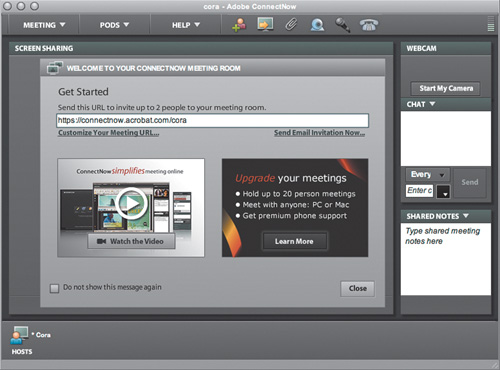
- If there’s someone who can join you for this exercise and they have Acrobat 9 or Acrobat Reader 9 installed, you can click Send E-Mail Invitation Now, and they can be your attendee. Or you can make a note of the URL and click Close.
If you have access to another networked computer, you can enter the URL into a web browser on that computer to see how Share My Screen looks from the point of view of an attendee. Attendees don’t need an Adobe ID; they can sign in as a guest and the meeting host can decide whether to let them in.
- Click Share My Computer Screen to start the meeting. You may be asked to approve the installation of the Adobe Connect. Now add-in for your web browser; click Yes.
You’ll be asked what you want to share—your entire computer desktop, individual windows, or a specific application. When you’ve got windows open with information you don’t want the meeting participants to see, it’s a good idea to restrict what you display to others, limiting screen sharing to one application or even just one window.
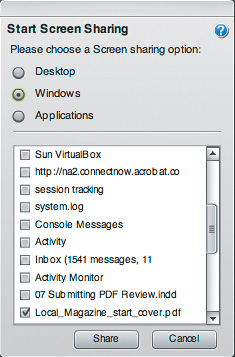
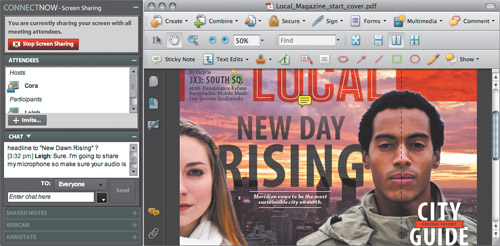
- Click Windows, then in the list select Local_Magazine_start_cover.pdf.
While the meeting is in progress, the ConnectNow screen sharing panel is displayed, giving you access to key meeting features and enabling you to share notes, send chat messages to one person or the whole group, use an online whiteboard to sketch ideas, activate a webcam, and even turn over the control of your desktop to another attendee, which can be very productive for collaborative work sessions and technical support. You can position the ConnectNow screen sharing panel wherever you want on your desktop.
- The open Acrobat file on your desktop is now shared with the other participants. Notice the ConnectNow screen sharing panel where you can type chat messages to other attendees, and also control various meeting tools such as your webcam.
- When an attendee wants to join the meeting, an alert will appear. Click Accept to admit that attendee to the meeting room. The attendee receives a note to let them know that the host has been notified of the attendee’s presence.
The Chat window is useful for side discussions during the meeting, as a way to ask questions, and to provide any instructions for the attendees.
- In the Chat window, type a message (such as “Welcome to the meeting”) then click Send. If you have an attendee set up, you can have them enter a reply.
Imagine how helpful it could be if the tech person could sort out problems directly on your computer, even though the tech is only present online. That’s possible with Share My Screen, because you can hand over control of your computer to another participant in the meeting.
- In the ConnectNow screen sharing panel, click the triangle to the right of the attendee’s name and choose Give This User Control Of My Computer.
Being able to work in the application that was used to create the artwork has the advantage that you or any trusted reviewer can quickly react to a suggestion. For example, it would take you only a couple of seconds to demonstrate how the cover would look with a different headline.

- To leave the online conference, click Exit Adobe ConnectNow.
Bravo! You finished the online review and with it the last lesson in this book. You’ve covered a lot of ground: from creating basic assets to publishing a magazine in both printed and interactive form—from prototyping and building a website and designing for mobile devices to experimenting with different review workflows. There is so much more you can do with Adobe Creative Suite 5 Design Premium—this is just the beginning!
Review questions
1 What are the advantages of the shared review using a centralized server?
2 Describe three of Acrobat’s comment or markup tools, and explain where to find them.
3 Describe three ways to review a PDF file online.
Review answers
1 Using a centralized server allows all participants to collaborate directly with each other rather than only through the initiator. Not only can they read and reply to each others’ comments, but they also receive notifications when new comments are published.
2 The comment and markup tools in Acrobat can be accessed by choosing View > Toolbars > Comment & Markup. These tools enable you to make edits, attach notes, and even draw diagrams to communicate your ideas or provide feedback for a PDF file being reviewed. Using the Sticky Note tool you can add your comments in the form of a yellow note icon that appears on the page with a pop-up note for your text comment. With the Text Edits tool you can make a variety of edits, such as replacing text, highlighting, underlining, or adding a note to selected text. You can insert text, or cross it out for deletion. The Stamp tool enables you to apply a stamp to a PDF in much the same way you apply a rubber stamp to a paper document. You can apply predefined stamps or stamps that you create yourself.
3 An e-mail based review lets you manage a review without a central server. A shared review lets you host a review on a central server so that reviewers can view and respond to each others’ comments; with an e-mail review you’re the only person who sees all of the comments. A live, collaborative review lets you and your reviewers view a document simultaneously online with the option of a chat session, while a ConnectNow meeting adds the ability to share not just one document but anything on your computer.