13. Printing and Exporting
Lesson overview
In this lesson, you’ll learn how to do the following:
Check a document for potential printing issues and fix them.
Manage the colors used in a document.
Confirm that an InDesign file and all of its elements are ready for printing.
Preview a document onscreen before printing.
Create different Adobe PDFs for proofing and for press.
Create an Adobe PDF preset for press-ready PDFs.
Print a proof of a document.
Create a print preset to streamline the printing process.
Assemble all necessary files for printing or delivery to a service provider or commercial printer.
Export graphics for the web and other digital destinations.

This lesson will take about 50 minutes to complete. To get the lesson files used in this chapter, download them from the web page for this book at adobepress.com/InDesignCIB2023. For more information, see “Accessing the lesson files and Web Edition” in the Getting Started section at the beginning of this book.

Adobe InDesign provides advanced print-preparation and printing controls to help you manage the printing process, regardless of the output device. You can easily output your work to a laser or inkjet printer, an onscreen proof PDF, or a press-ready PDF.
Getting started
In this lesson, you’ll do some print-preparation work on a magazine cover and spread. The document will be printed on a color inkjet or laser printer for proofing and also on a high-resolution imaging device, such as a platesetter used in commercial offset printing. Prior to printing, you will export the document to a PDF file that can be used in a review process.
To ensure that the preferences and default settings of your InDesign program match those used in this lesson, move the InDesign Defaults file to a different folder following the procedure in “Saving and restoring the InDesign Defaults file” on pages 3–4.
 Note
NoteIf you have not already downloaded the project files for this lesson to your computer from your Account page, make sure to do so now. See “Getting Started” at the beginning of the book.
Start InDesign. Choose File > Open and open the 13_Start.indd file in the Lesson13 folder, located inside the Lessons folder within the InDesignCIB folder on your hard drive.
An alert message informs you that the document contains one modified link. Click Don’t Update Links. You will correct this problem later in this lesson.
When you print an InDesign document or export a PDF file for printing, InDesign must access the original artwork that was placed in the layout. If imported artwork has been moved, graphic filenames have changed, or the original files are no longer available, InDesign alerts you that the original artwork cannot be located or has been modified. This alert appears when a document is opened, printed, exported, or checked for printing using the Preflight panel. InDesign shows the status of all files necessary for printing in the Links panel.
To ensure that the panels and menu commands match those used in this lesson, choose Window > Workspace > [Printing And Proofing], and then choose Window > Workspace > Reset Printing And Proofing.
Choose File > Save As, rename the file 13_Press.indd, and save it in the Lesson13 folder.
NoteTo better view the interface onscreen or in print, the screen captures in this book reflect the Medium Light interface rather than the default setting of Medium Dark. In addition, some screen captures illustrate User Interface Scaling for a closer look at interface elements. You can modify interface settings in Preferences.
To see what the finished project looks like, open the 13_End.indd file in the Lesson13 folder. For this lesson, the difference between the Start and End files is not visible in a preview; instead, you’ll need to examine the Links and Color Swatches panels to see the differences.
When you are ready to start working, either close the 13_End.indd file or leave it open for your reference. Then return to your lesson document by choosing 13_Press.indd from the Window menu or by clicking the 13_Press.indd tab in the upper-left corner of the document window.
Preflighting files
InDesign provides controls for performing a quality check on a document prior to printing, handing off the document to a print service provider, or publishing to a digital format. “Preflight” is the standard industry term for this process. In “Preflighting as you work,” in Lesson 2, “Getting to Know InDesign,” you learned how you can take advantage of the live preflight capabilities in InDesign. This lets you monitor a document as you create it to prevent potential problems.
You can use the Preflight panel to confirm that all graphics and fonts used in the file are available for printing and exporting and that there are no instances of overset text. Now you’ll use the Preflight panel to identify a modified graphic and overset text in the sample layout.
Choose Window > Output > Preflight, or click the Preflight icon (
 ) in the panel dock.
 Tip
TipYou can also access the Preflight panel by double-clicking ”2 errors” at the bottom of the document window or by choosing Preflight Panel from the menu to the right of “2 errors.”
In the Preflight panel, make sure that On is selected and confirm that [Basic] (Working) is selected in the Profile menu. Notice that two types of errors are listed: LINKS and TEXT. The number following in parentheses indicates one link-related error and one text-related error.
Click the triangle to the left of LINKS and then to the left of TEXT to reveal more information about the errors. Click the triangle to the left of Modified Link to display the name of the modified graphic file. Double-click the Lily.jpg link name; this centers the graphic in the document window and selects the graphics frame. (In this case it goes to page 8 because that’s where this graphic is placed.) The Info area at the bottom of the panel displays details about the selected problem and how to fix it. If you look carefully at the frame that contains the magazine title, you’ll notice a yellow triangle in the upper-left corner (the modified link alert (
 ) badge), which indicates that the graphic file has been modified after it was placed into the layout.
You can click the Link badge or double-click the modified link icon in the Links panel to update this graphic. Click one of those now.
NoteModified or missing graphics are displayed in low resolution regardless of the current Display Performance setting.
Notice that after you update the link to the Lily.jpg graphic, the color has changed. A typical scenario in production is that color correction was done to this photo after the design was approved to go to press. Also notice that the modified link alert in the upper-left corner has changed to a link symbol, meaning that the graphic is linked to the InDesign file and is not missing or modified.

Modified graphic before updating.

After updating.
To display the document at high resolution, choose View > Display Performance > High Quality Display. It’s a best practice to view a document at High Quality Display when checking it for production quality.
TipThe Display Performance area of the Preferences dialog lets you change default settings for the display of raster images, vector graphics, and objects to which transparency is applied, independently of each other. Choose Edit > Preferences > Display Performance (Windows) or InDesign > Preferences > Display Performance (macOS) to open the Preferences dialog.
Open the Preflight panel again by clicking the icon in the panel dock (
). Notice that there is now a single TEXT error. In the same way you clicked the missing or modified graphic to locate it, click the triangle to the left of Overset Text (1). Then click the page number to the right of the listed text frame. This navigates to the text frame and selects it, centering it in the document window.The red square with a plus sign inside indicates that there is more text that does not fit into the frame. There should be no overset text in a file that is ready to be reviewed, published, or printed.

Using the Selection tool (
 ), pull down the center handle on the text frame enough to display the last line of the paragraph. Now the Preflight panel status shows No Errors (
 ) at the bottom. Every document should have No Errors in the preflight status when you are finished preflighting.
Choose File > Save to save the changes you’ve made to the document, and close the Preflight and Links panels.
NoteIf any links remain modified at this point, open the Links panel menu and choose Update All Links.
Two other important aspects of preflighting for printing on press are the color space and resolution of the images. Some workflows use the CMYK color space for press, and others use RGB and convert to CMYK at different points in production. Images for press need to be high resolution, where the effective resolution is at least 300 ppi. Since such files can be very large, the image files in this lesson are small so that the lesson can be easily downloaded. See “Viewing information about linked files” in Lesson 11, “Importing and Modifying Graphics,” for how to customize the Links panel to show the information important to your workflow, which will help you add color space and resolution to your preflighting process. You can also create custom preflight profiles suited to your workflow and to different output destinations (see the sidebar on the next page).
Creating a preflight profile
When the live preflight feature is enabled (that is, when On is selected in the Preflight panel), the default working profile, called [Basic], is used to preflight your InDesign documents. This profile checks for basic output conditions, such as missing or modified graphic files, unresolved caption variables, inaccessible URL links, overset text, and missing fonts.
You can also create your own custom preflight profiles or load profiles from your print service provider or another source. When you create a custom preflight profile, you specify the conditions you want to detect. Here’s how to create a profile that alerts you when non-CMYK colors are used in a layout:
If the Preflight panel is not open, choose Window > Output > Preflight, and then choose Define Profiles from the Preflight panel menu.
Click the New Preflight Profile button (
 ) on the lower-left side of the Preflight Profiles dialog to create a new preflight profile. In the Profile Name box, enter CMYK colors only.
Click the triangle to the left of Color to display color-related options, and select Color Spaces And Modes Not Allowed.
Click the triangle to the left of Color Spaces And Modes Not Allowed, and then select all of the available options except CMYK and Gray (RGB, Lab, Spot Color, and HSB). Gray works with CMYK because it prints on the black plate only. Deselect Cyan, Magenta Or Yellow Plates Not Allowed. (This would be used for a preflight profile for documents printing with spot colors only.)

Leave existing preflight criteria for Links, Images And Objects, Text, and Document as is. Click Save, and then click OK.
Choose CMYK Colors Only from the Profile menu in the Preflight panel. Notice the additional errors listed in the Error area of the panel.
Click the triangle next to Color to expand the display, and then click the triangle next to Color Spaces And Modes Not Allowed to see a list of objects that do not use the CMYK color model. Click various objects to view information about the problem and how to fix it. (Make sure the Info area of the Preflight panel is visible. If not, click the triangle to the left of Info to display it.)
When you’re done viewing information, choose [Basic] (Working) from the Profile menu to return to the default profile used for this lesson.
Previewing separations
If your documents need to be prepared for commercial printing, you can use the Separations Preview panel to check whether the colors are set up properly for the particular printing process that will be used for this document. For example, will the document be printed with process CMYK inks, with spot-color inks, or with a combination of those? The answer determines what you need to check for and fix.
Navigate to page 1, and choose Window > Output > Separations Preview. Or click the Separations Preview icon (
 ) in the panel dock to open the panel.
Choose Separations from the View menu in the Separations Preview panel. Adjust your view so that you can see the page, and adjust the panel’s height so that all the listed colors are visible. If necessary, choose View > Fit Page In Window.
Click the eye icon (
 ) next to CMYK to hide all page elements that use CMYK colors. The elements that are still visible are elements that use something other than CMYK color. In this case, spot colors are applied. Tip
If you choose Ink Limit from the View menu in the Separations Preview panel, InDesign displays in red any areas that exceed the specified maximum ink percentage. (The default Ink Limit value is 300%.)

Click the eye icon next to Bright Green. The text at the bottom disappears, which means it’s using this spot color. This should be the process color version of the design’s theme color. You’ll correct this later in the lesson.
TipBecause the printing process works by laying each ink down exactly on top of each other, you want to avoid using multiple inks on very small objects such as body text. This is because if there is the slightest variance in the inks being positioned exactly on top of each other (mis-registration), the text will look blurry. When small objects like text use only one ink, this problem is avoided.
Click the eye icon next to CMYK to show all colors again, and navigate to page 2. Click the eye icon next to Black to turn it off. The headline disappears, but some of the body text is still visible. The intention is for the body text to be black only, but because it’s still visible when the black plate is off, it will print on several plates.

To investigate why this is and fix it, slide the page to the left so that you can see part of the body text from page 3. The text on both pages is supposed to be the same, but something is wrong. Neither story should be visible when the Black plate is turned off. Turn Black back on, open the Paragraph Styles panel (Window > Styles > Paragraph Styles), and click in the body text on page 3 using the Type tool (
 ). The style Body Copy No Indent is highlighted. Now click in the body copy on page 2. The [Basic Paragraph] paragraph style is highlighted. Somewhere in the creative process, this text was formatted without using the paragraph style.
Select some text at the end of the first paragraph and drag through the beginning of the third paragraph. Click the Body Copy No Indent paragraph style to apply it to all paragraphs.

Press the Esc key to exit the Type tool. Turn off Black again in the Separations Preview panel. Now all of the text that you expect to be black disappears. This is because the character color is part of the paragraph style, and that color is 100% Black. You can see how using paragraph styles can prevent many errors, including accidentally styling text in the wrong color.
Choose Off from the View menu in the Separations Preview panel to enable viewing of all colors, and then close the panel. Then close the Paragraph Styles panel, choose Edit > Deselect All, and choose File > Save.
Coated vs. uncoated ink names
The widely used PANTONE ink libraries include both Coated (C) and Uncoated (U) versions. The ink names include (C) or (U) to indicate the difference.
![]() Tip
Tip
Sometimes special effects are achieved in printing with spot color inks by printing the same ink twice. This is called a “second hit” and must be set up in the file like an additional color.
This difference in appearance onscreen is to approximate the way the ink will look printed on these different types of paper. In the vast majority of projects printed with spot color inks, there is only one plate for each ink. Therefore, if you have a file using these colors, you’ll need to make sure only one instance of the same color is in the document so that only one printing plate for that color will be produced.
Coated vs. uncoated paper

The photo to the right shows how different the same CMYK ink mix looks when printed on coated paper (left) and on uncoated paper (right). The same difference happens with any kind of ink, including PANTONE inks.
This difference in appearance is caused by the physical characteristics of the paper. Uncoated paper absorbs more ink than coated paper, so it looks more matte and less glossy when the ink dries. The same color can look darker on uncoated paper and brighter on coated paper.
Managing colors
One of the best practices when making sure a file is ready for commercial printing is to ensure that the colors used—and only those colors—appear in the Swatches panel. This is one of the first checks a service provider will do when they receive your files.
Choose Window > Color > Swatches to open the Swatches panel. Pull the panel down so that it’s long enough to see all of the colors. Notice that there is another blue color just below Blue-Bright that looks nearly identical. This commonly happens in the creative process, but the intention is to use the same color for this blue throughout, so this must be fixed in production. Drag the Swatches panel to the dock for easy access later. You can close the Color and Gradients panels. Then click the icon (
 ) in the panel dock to open the Swatches panel again. Tip
Notice the color called TRUMATCH 8-b. TRUMATCH is a library of color swatches built into InDesign that is specific to the CMYK printing process. Printed swatch books for both coated and uncoated paper are available.

Select All Unused Colors.
First, we’ll find all unused swatches. Before starting, make sure that both Fill Color (
 ) and Stroke Color (
 ) are set to [None]. Then choose Select All Unused from the Swatches panel menu. Choose Delete Swatch from the panel menu to remove the unused swatches. If this second blue color was not used, the problem would be solved. But since it remains, we’ll have to take another step.
Select the blue just below Blue-Bright, C=67 M=43 Y=0 K=0. Again choose Delete Swatch from the panel menu. This time, because this color is used somewhere in the document, a dialog opens that enables you to replace the swatch being deleted with a different swatch. From the menu, choose Blue-Bright. Because we know that the intention of the design is that this color be consistent throughout the document, it’s not necessary to find each instance where it might be used. Click OK.

Select Bright Green and notice the symbol to the right of the name (
 ). This indicates that this is a spot ink. But we’ve been instructed that this project is printing with CMYK inks only. Click the trash can at the bottom of the Swatches panel to delete this color. In the Delete Swatch dialog, replace it with the design’s theme color Green-Brightest, which is a process (CMYK) color. Click OK. This fixes the separation issue we saw on the cover in the Preflight exercise.
Next we want to find out whether any additional colors are in the file that were not saved as swatches. Choose Add Unnamed Colors from the Swatches panel menu. Three colors appear that were not there before. (This happens when you create colors in the Color panel and use them in the file but don’t take the step of adding them to the Swatches panel.) The important thing is whether these colors are using inks that will or will not work with this file’s printing process. These are CMYK colors, so they are not a problem.
Add Unnamed Colors.
Locating colors
You can find colors in your InDesign document using the Find/Change dialog. The two major uses of this ability are 1) to find objects of a particular color and change them to another color as a design decision, and 2) to find objects that are using colors that will cause problems in the printing process or other media so that you can change these objects to the correct colors.
In this exercise, you’ll use this feature to find colors that will cause problems in the printing process.
Return to the Swatches panel and scroll to the top. Select the color below the default Black swatch, c70m67y64k74. From the panel menu, choose Find This Color. In the Find/Change dialog, click Find Next. InDesign selects the first object it finds that uses this color, the grasshopper graphic to the left of the story at the top of page 2. (You may remember that the grasshopper was still visible when you turned off the black plate in a previous exercise. If an object is made with black ink only, it will disappear when you turn off the black plate.)

The grasshopper looks like it’s black, but it’s colored with this swatch that actually consists of all four inks. Colors like this one are a typical result of working in the RGB color space in Adobe Illustrator, converting the file to CMYK color space, and then pasting the object into InDesign. Any objects using this color need to be the default [Black] so that they print on the black plate only.
Under Change Color, choose [Black] and click Change. You won’t see a visible change because onscreen the colors look the same. But in the Swatches panel, [Black] will now be selected. You can change the color of this graphic because it’s an InDesign vector object, not a linked graphic.

Click Find Next again. InDesign selects the next object that uses the c70m67y64k74 swatch. The type in the return address on the back page will be selected. Click Change and then click Find Next again. InDesign returns a message that says the search is complete and lists how many instances were found. Click OK in this message and then click Done to close the Find/Change dialog. Choose Edit > Deselect All.
NoteWith the Find Color feature, you can find objects and text during the same search.
Choose Select All Unused from the Swatches panel menu again to confirm that the c70m67y64k74 swatch is no longer in the document. Click the Delete button (
 ) at the bottom of the Swatches panel, and choose File > Save.
Finding graphics with spot colors
The Locate Colors feature can also find imported graphics with spot colors. You’ll have to open them in their original application to fix this if InDesign’s Ink Manager features won’t work for the situation (such as spot colors with transparency effects) or if your preference is to correct the color in the graphic file.
Open the Swatches panel again if necessary, and then choose Sort > All Swatches By Name from the Swatches panel menu.
Notice that there is one Pantone spot color, PANTONE 130 C. Select this color, and choose Find This Color from the panel menu.
The Find/Change dialog will open, and PANTONE 130 C will be selected for Find Color. Click Find Next. InDesign selects the next object that is PANTONE 130 C. In this case, it moves to page 3 and selects the yellow flower graphic.
To quickly check whether this is InDesign vector art that you can change within InDesign or if it’s an imported graphic, choose Window > Links or click the Links button (
 ) in the panel dock. YellowFlower.ai is selected in the Links panel. Your choice is to open this graphic in Illustrator and change the colors to process colors or use the Ink Manager in InDesign to convert this color to process when the document is printed or exported.
Close the Links panel and the Find/Change dialog.
Next you will learn to use the Ink Manager to set this graphic to output with process inks without opening it in Illustrator.
Using the Ink Manager
The Ink Manager provides control over the inks used at output time. Changes you make using the Ink Manager affect only the output. They do not change how the colors are defined in the document.
The Ink Manager options are especially useful for controlling how inks will print without having to go back and change imported graphics. For example, if a publication will be printed with CMYK process inks but a graphic uses a spot color, the Ink Manager provides the option of changing the spot color to the equivalent CMYK process color.
![]() Tip
Tip
If a document contains two similar spot colors when only one is required or if the same spot color has two different names, the Ink Manager lets you map the variations to a single spot color. This is called an “ink alias.”
Open the Separations Preview panel, choose Separations from the View menu, and then turn off PANTONE 130 C. Parts of the flower graphic disappear, which are the objects colored with PANTONE 130 C. Then turn PANTONE 130 C back on. Choose Ink Manager from the panel menu.
In the Ink Manager dialog, click the spot icon (
 ) to the left of the PANTONE 130 C color swatch. It changes to a CMYK icon (
 ). The color will now print as a combination of CMYK colors instead of printing on a separate color plate. Click OK to close the Ink Manager.
Now open the Separations Preview again and select Separations from the View menu. You see that PANTONE 130 C is no longer there. Set View to Off and close the Separations Preview panel.
The All Spots To Process option at the bottom of the Ink Manager dialog lets you convert all spot colors to process colors. This is a good solution if you want to limit the printing to the CMYK process without having to change the spot colors in the source files of the imported graphics. However, if the spot color graphics use transparency, the results from the Ink Manager are not reliable. In those cases, you must open the graphic and change the spot colors to process in the original application.
TipIf the file will in fact print with spot color inks, you can use transparency effects without a problem, as long as you are careful that the effect uses the same inks as the rest of the file.
In many workflows, you’ll have both CMYK and spot versions of the same art so that you can link to the one that is correct for the printing process of each particular document. If the project is printing in CMYK and spot colors and transparency effects are used in imported graphics, you can’t convert to CMYK in InDesign because there will be errors such as white boxes where the effect is supposed to be. In this case, you must use a CMYK version of the imported graphic.
Previewing transparency effects
In the past, documents that contain objects to which transparency effects had been applied needed to undergo a process called flattening when they were printed or exported. Flattening divides the objects into vector-based areas and rasterized areas, which are further divided into squares called “tiles.” Even if you use the High Resolution setting when flattening, rasterized areas will be a much lower resolution than the image processor at a commercial printer, and the effect won’t look as good when printed compared to not flattening. The flattening strategy was needed before image processors at commercial printers could process transparency.
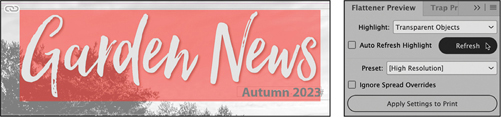
Modern image processors can process transparency without flattening. The best final appearance is achieved by not flattening at any point in the production process. The Flattener Preview panel can help you see which objects in the file are using transparency effects so that you can make sure you’ve used them intentionally and not by accident. It enables you to quickly find objects with transparency and check the settings.
Next, you’ll use the Flattener Preview panel to determine the objects to which transparency effects have been applied.
Navigate to page 1, and choose View > Fit Spread In Window.
Choose Window > Output > Flattener Preview, or click the Flattener Preview icon (
 ) in the panel dock, and then position the Flattener Preview panel so that you can see the entire page.
In the Flattener Preview panel, choose Transparent Objects from the Highlight menu and click the Refresh button. The entire page is displayed with a dimmed grayscale preview, except for the areas with transparency effects.
If it’s not already selected, choose [High Resolution] from the Preset menu. Notice how the masthead at the top of the page is displayed with a red highlight. This object has a drop shadow, which is a transparency effect.
TipTransparency can be applied in Adobe Photoshop, in Illustrator, or directly in an InDesign layout. The Flattener Preview panel identifies transparent objects, regardless of whether the transparency was created using InDesign or in an imported graphic.
Scroll or click through to the next spread. Now nothing is highlighted in red, and the spread looks the same as when Flattener Preview is off. That’s because there are no objects with transparency on this spread.
Choose None from the Highlight menu to disable Flattener Preview, and then close the panel.
Previewing the pages
Now that you’ve previewed the color separations and areas of transparency in the layout, you’ll preview the page to get an idea of how the magazine will look when printed.
At the bottom of the Tools panel, press and hold the Screen Mode icon (
 ) and then choose Preview from the menu. The guides, frame edges, invisible characters, pasteboard, and other nonprinting items are hidden. This is the best onscreen view of how the document will look when it is printed and trimmed. It also enables you to quickly preview a page, rather than turning the nonprinting items off one at a time.
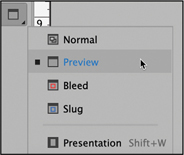
Press and hold down the Screen Mode icon again, and then choose Bleed. Additional space outside the perimeter of the final document trim size is displayed. This view is used to confirm that objects that need to bleed do in fact extend beyond the edge of the document. After the job is printed, this excess area is trimmed to the final printed size.
NoteFor more information about bleed, review the section about printing to the edge of the paper in Lesson 3, “Setting Up a Document and Working with Pages.”
Scroll through the entire document and look over everything before printing or exporting. In Bleed mode, you can see whether items at the edge are extended far enough into the pasteboard, in addition to looking at everything else you can see in Preview mode. Confirm once again that the Preflight status shows No Errors (
).
Choose Normal from the Screen Mode menu, and then choose File > Save.
After confirming that the file looks acceptable, you are ready to print it.
Creating an Adobe PDF proof
If your documents need to be reviewed by others, you can easily create Adobe PDF files to transfer and share. Those with whom you share the PDF can review the project without having InDesign or the fonts and links. PDFs can be compressed to a smaller size; all fonts and graphics are self-contained in a single composite file, and files are displayed onscreen and print the same whether opened in Windows or in macOS. InDesign exports directly to Adobe PDF.
![]() Note
Note
PDF is the acronym for Portable Document Format, which is the industry-standard way to share layouts throughout the creative and production process.
Exporting your publication as an Adobe PDF document also has many advantages for commercial printing. You can create a compact, reliable file that contains all the elements in the InDesign file, including high-resolution graphics and all the fonts, so that your service provider can work with the file and get the same high-quality results they would from working directly with the InDesign file, and you don’t have to send all the fonts and links. A properly exported PDF from InDesign is ready for your service provider to use with the tools for commercial printing such as preflight checks, trapping, imposition, and color separation.
These two purposes for using a PDF have different requirements. You can use presets to save settings that are appropriate for various purposes so that you don’t have to select multiple choices in the Export dialog each time you export. In other words, presets allow you to set up requirements for different purposes and then use them reliably every time. You can also share presets with colleagues to ensure that all PDFs are exported with the same settings by everyone.
You will now create an Adobe PDF file suitable for review and proofing purposes using one of the built-in presets.
Choose File > Export.
Choose Adobe PDF (Print) from the Save As Type (Windows) or Format (macOS) menu. For the filename, type 13_Proof.pdf. If necessary, navigate to the Lesson13 folder, and then click Save. The Export Adobe PDF dialog opens.
In the Adobe PDF Preset menu at the top of the dialog, choose [High Quality Print]. This setting creates PDF files suitable for output on desktop printers and for onscreen proofing without creating a file that is too large to easily share, while also being a high enough resolution for a reviewer to evaluate the quality of pixel-based (raster) graphics.
TipThe presets available in the Adobe PDF Preset menu are used for creating a range of Adobe PDF files, from small files suitable for onscreen viewing to press-ready files suitable for high-resolution output.
Select View PDF After Exporting. This will open the PDF file in Adobe Acrobat as soon as it’s finished exporting, which saves you the step of switching to Acrobat and opening the file. Leave the default choices for the remaining settings.
 Note
NoteAdobe PDF (Print) export in InDesign is performed in the background, which enables you to continue working while an Adobe PDF is being created. If you try to close your document before the background process is completed, InDesign will display a warning message.
Click Export. A progress circle rotates in the upper right of the menu bar (
 ). An Adobe PDF file is generated and displays on your monitor in Adobe Acrobat Pro DC or Adobe Acrobat Reader DC. Tip
You can also view the PDF export progress by opening the Background Tasks panel (Window > Utilities > Background Tasks).
Review the Adobe PDF. This type of PDF is appropriate to share with colleagues or customers for review purposes or to print to an office printer for review on paper.
TipTo learn more about the review process, explore the Share For Review feature and the PDF Comments feature. Start by choosing Help > InDesign Help to access Adobe’s InDesign support website.
Creating a press-ready PDF and saving a PDF preset
InDesign files are submitted to commercial printers either as native files (which you’ll learn about later in this lesson) or as press-ready PDFs. Press-ready PDFs are high resolution and include the bleed area. In this exercise, you will learn about creating an Adobe PDF file suitable for commercial printing.
InDesign includes a PDF export preset called [Press Quality] that has most of the necessary settings already defined. However, it’s not correct for documents that include any objects that bleed. You will start with that preset and modify it so that you have a press-ready preset that includes the bleed.
Choose File > Adobe PDF Presets > Define. The Adobe PDF Presets dialog opens. Scroll down to [Press Quality], select it, and click New. This enables you to create a new preset based on the options already set up in the default Press Quality preset.
In Preset Name, type Press Quality With Bleed.
Click Marks And Bleeds on the left and make the following changes: Under Marks, select Crop Marks. In Offset, type .125. In the Bleed And Slug area, for Bleed enter .125 in the Top field, and make sure the Same Settings icon (
 ) is turned on to set the same bleed settings on all sides. Note
You can also choose Use Document Bleed Settings, but by setting a bleed amount in the preset, even documents without a bleed amount set in Document Setup will export with the specified bleed area.

Click OK and then Done. This preset will now be available whenever you export to PDF.
Choose File > Adobe PDF Presets > Press Quality With Bleed. This is a faster way to use PDF presets than choosing File > Export. Name the file 13_Press_HighRes.pdf, and then click Save. The Export Adobe PDF dialog opens. Make sure that View PDF After Exporting is selected, and then click Export.
When the PDF opens in Acrobat, notice how the cover photo extends past the crop marks. The crop marks indicate where the blade will cut through the paper to trim the magazine to the final size. In this case, it will cut through the printed image and produce a clean edge with no unprinted paper showing.

The most important required characteristics of a PDF for commercial printing are:
High-resolution pixel-based (raster) graphics
Bleed included
PDF compatibility of at least Acrobat 5 so that transparency effects are not flattened
The preset you have made does all of these things. However, you may want to edit it. For example, you may want to increase the version of Acrobat compatibility because you know that everyone in your production workflow is up to date and there is no reason to be compatible back to Acrobat 5.
To check whether a PDF will have live transparency or will be flattened, examine the different options available when compatibility with Acrobat 4 is selected rather than later versions of Acrobat. Since Acrobat 5 was the first version to support transparency, the Acrobat 4 file format uses the strategy of flattening to approximate the visual appearance of transparency effects.
Switch back to InDesign, and choose File > Adobe PDF Presets > Define. The Adobe PDF Presets dialog opens. Scroll down to Press Quality With Bleed, and choose Edit.
Click the Advanced category on the left. Notice that the Transparency Flattener settings are dimmed and not available. This means the transparency will not be flattened. Now change the Compatibility setting to Acrobat 4. The Transparency Flattener settings are now available because exporting to Acrobat 4 means exporting to a file format that can’t process transparency effects, and therefore you must compensate for that by flattening these effects. Click Cancel and then Done to exit the dialog.
TipIf you need to create a flattened press-ready PDF, use the [High Resolution] Transparency Flattener preset in the Advanced panel of the Export Adobe PDF dialog.

Sharing a preset
Choose File > Adobe PDF Presets > Define. The Adobe PDF Presets dialog opens. Scroll down to Press Quality With Bleed. Click this name and then choose Save As.
Choose a name for your preset and navigate to a location on your hard drive where you wish to save it. Click Save. You can now share this file with others.
To import a preset, you use the Load button in the Adobe PDF Presets dialog. Click Load and navigate to the Lesson13 folder on your hard drive. Select Proof-Facing-Pages.joboptions, and then click Open. Click Done to exit the Adobe PDF Presets dialog. The preset is now available.
This preset creates a high-quality proof that will display in Acrobat with the left and right pages of a spread next to each other on the screen.
Choose File > Adobe PDF Presets > Proof Facing Pages and export the file again, naming it as you wish. In Acrobat, scroll or click through the file to the first spread after the cover to see it displayed as a spread rather than single pages. Controlling the view this way ensures that the reviewer will see the document in the closest parallel to paging through the printed magazine.
Printing a proof and saving a print preset
In this section, you’ll create a print preset to save settings—and save time in the future—without having to individually set each option for the same device each time. The process is similar to saving a PDF preset. You will use this preset for proofing on your office printer, assuming the printer has only Letter or A4 paper.
![]() Note
Note
If you do not have access to a printer, you can choose PostScript File from the Printer menu. You can then choose an Adobe PDF PPD (if available) and complete all the steps in the remainder of the lesson. If no other PPDs are available, you can choose the Device Independent PPD; however, some controls covered in the remainder of the lesson are not available if you choose Device Independent.
Choose File > Print.
From the Printer menu in the Print dialog box, choose your inkjet or laser printer.

The options you see throughout this exercise will be different depending on the device selected. Follow the steps with your printer’s options as best you can.
From the left side of the Print dialog, select Setup, and then choose the following options:
Paper Size: US Letter (or A4)
Orientation: Portrait
Scale To Fit
From the same list on the left side of the Print dialog, select Marks And Bleed, and then choose these options:
Crop Marks
In the Offset field, enter .125.
Page Information
In the Bleed And Slug area, the Use Document Bleed Settings option will be selected because this document was set up with a bleed amount in Document Setup.
NoteIf you want to enter a bleed amount yourself, deselect Use Document Bleed Settings.
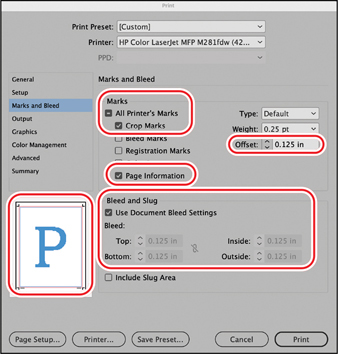
Notice the preview in the lower left of the dialog. This illustrates the options you’ve turned on and how the document will fit on the paper.
The crop marks print outside of the page area and provide guides showing where the final document is trimmed after printing, just as we saw in the press-ready PDF. The page information automatically adds the document name and the page number, along with the date and time it was printed, to the bottom of the printout. Since the document itself is already letter size, and the crop marks and page information are printed outside the page edges, you must select Scale To Fit in order to fit the page, bleed, and marks onto a Letter or A4 piece of paper.
TipIf your document contains transparency that is flattened during the printing process, select Simulate Overprint in the Output area of the Print dialog when printing to achieve the best printed result.
On the left side of the Print dialog, select Output. Choose Composite RGB or Composite CMYK from the Color menu. (If you are printing to a black-and-white printer, choose Composite Gray.)
Choosing Composite CMYK causes any RGB colors, including those in RGB graphics, to be converted to CMYK at the time of printing. This setting changes neither the original, placed graphic files nor any colors applied to objects. Which setting you should choose depends on your device.
On the left side of the Print dialog, select Graphics. Choose Optimized Subsampling from the Send Data menu.
When Optimized Subsampling is selected, InDesign sends only the image data necessary for the printer selected in the Print dialog. This can reduce the time it takes to send the file to print. To send the complete high-resolution graphic information to the printer, which may take longer to print, select All from the Send Data menu.
NoteThe Optimized Subsampling option cannot be selected if you are using the Device Independent PPD, because this generic driver can’t determine what information a selected printer may need later.
Choose Subset from the Fonts Download menu. This causes only the fonts and characters that are actually used in the document to be sent to the output device and can reduce the time it takes to print single-page documents and short documents without much text. This option may be dimmed with your device.
Leave the settings in the Color Management and Advanced categories at their defaults for this lesson.
Click Save Preset at the bottom of the Print dialog, name the preset Proof Fit To Page in the Save Preset dialog, and click OK. InDesign returns to the Print dialog with your settings in place. Next time you want to print with these settings, you can do so in one step by choosing the preset you just made.
TipTo quickly print using a preset, choose File > Print Presets and select the desired preset. Holding down the Shift key while doing this will print using the settings in the selected preset without opening the Print dialog.

Click Print to print the file or click Cancel.
Creating a print preset saves Print dialog settings so that you don’t need to individually set every option each time you print with the same requirements to the same device. You can create multiple presets to meet various quality capabilities of individual devices and to meet your various project needs. When you want to use these settings in the future, you can choose them from the Print Preset menu at the top of the Print dialog. You can also share print presets with colleagues.
Print Booklet
A very useful way to proof documents that will be stitched into a booklet is to use the Print Booklet feature. This feature enables you to make a proof on paper that will be constructed similarly to the commercially printed booklet. When you print a document this way, you can fold the stack of pages in half, staple them on the fold (spine), and page through the proof to review it.
Choose File > Print Booklet to open the Print Booklet dialog.
Click the Print Settings button at the bottom of the dialog. In the Print dialog, select the Setup category, and change Orientation to Landscape (Horizontal). Click OK. InDesign returns to the Print Booklet dialog.
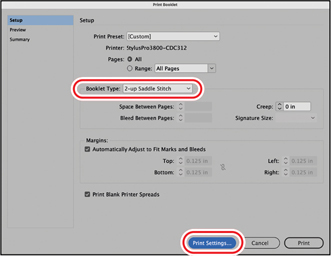
Leave Booklet Type set to 2-Up Saddle Stitch, and then click Preview on the left side of the dialog. Notice how the last page is next to the cover. This is called a “printer’s spread”—in this case, the outside covers. Click Cancel (or print the document if you choose).
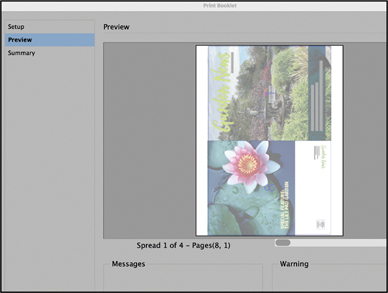
Printer’s spread of the outside covers from the lesson file.
Open the file named 13_SixteenPager.indd. Choose File > Print Booklet, and follow steps 2 and 3. Click through the spreads using the slider at the bottom of the preview window. This file is set up with large page numbers so that you can easily see how the pages fit together in printer spreads. Click Cancel (or print the document if you choose), and then close the 13_SixteenPager.indd file.
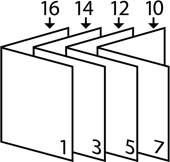
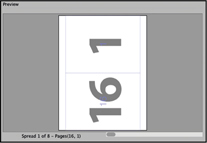
Printer’s spread of the outside covers of a sample 16-page file.

Printer’s spread of the inside covers of a sample 16-page file.
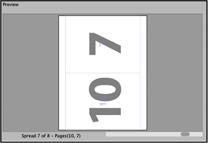
Printer’s spread of an interior spread in the sample 16-page file.

Printer’s spread of the center spread in the sample 16-page file.
Packaging files
The Package feature assembles a copy of your InDesign document, all linked graphics, and the fonts needed for printing into a single folder. Packaging a document ensures that a project can be provided to a vendor with no worry that something might be missing and cause a delay in the production process. InDesign packaged projects and press-ready PDFs are the two industry-standard ways of providing an InDesign project to a commercial printer.
Packaging is also used to share the project with others and to archive finished projects in a way that gathers all components together.
Now you’ll package the files for the magazine in preparation for sending them to your print provider.
Choose File > Package. The Summary area of the Package dialog notifies you of one more printing-related issue.
NoteAdobe Fonts available as part of your Creative Cloud membership are not included when you use the Package command.
Because the document contains RGB images, InDesign alerts you to their presence. This alert is standard because some printers want you to convert all images to CMYK before submitting the file. But others want to do the conversion from RGB to CMYK using standards for their presses, so read this alert but don’t change anything. A best practice is to talk to your print provider and ask what they prefer.
Leave Create Printing Instructions unselected.
TipInDesign can create a text file of instructions and your contact information that will accompany the InDesign file, links, and fonts in the package folder. The recipient of the package can use the instructions file to better understand what you want done and how to contact you if questions arise.

Click Package. If asked to save the document, click Save.
In the Create Package Folder dialog, browse to locate the Lesson13 folder. Notice that the folder that will be created for the package is named 13_Press Folder. InDesign automatically names the folder based on the document name, which you assigned at the beginning of this lesson. You can change this name if you wish.
Confirm that the following options are selected:
TipWhen Copy Fonts (Except Activated From Adobe Fonts And Non-Adobe CJK Fonts) is selected in the Create Package Folder dialog, InDesign generates a folder called “Document fonts” in the package folder. If you open an InDesign file located in the same folder with the Document fonts folder, InDesign will activate these fonts for you and make them available, but only for that document.
Copy Fonts (Except Activated From Adobe Fonts And Non-Adobe CJK Fonts)
Copy Linked Graphics
Update Graphic Links In Package (relinks the packaged InDesign file to the links in the packaged Links folder, not their original location)
Include IDML (so that others can open the file in a previous version of InDesign if necessary)
Include PDF(Print) (so that you can’t forget to send a PDF proof along with the native files)

Choose [High Quality Print] from the Select PDF Preset menu.
Click Package.
Read the warning message that informs you about the licensing restrictions that may affect your ability to include the fonts when you send the file, and then click OK.
Switch to File Explorer (Windows) or the Finder (macOS), and then navigate to the 13_Press Folder in the Lesson13 folder (located inside the Lessons folder within the InDesignCIB folder on your hard drive). Open the folder.
Notice that InDesign created a duplicate of the InDesign document, the IDML file, and the PDF of your document. It also copied all fonts into a Document Fonts folder and all graphics and other linked files necessary for high-resolution printing into a Links folder. Because you selected Update Graphic Links In Package, the duplicate InDesign file now links to the copied graphic files located in the package folder instead of to the original linked files on your hard drive or server. This makes the document easier for a printer or service provider to manage and also makes the packaged folder ideal for archiving and sharing.
Review the PDF created by the packaging process to check that all text and graphics are correct. When you have finished viewing its contents, close the 13_Press Folder and return to InDesign. Typically, this folder is zipped and uploaded to the service provider, with the included PDF serving as the proof for them to check their work.
Exporting graphics for the web and other digital destinations
You can export graphics from InDesign into files that can be used by a web developer or for other digital purposes. The advantage of doing this is that the developer does not have to spend time re-creating your work, and you’ll know that objects you’ve spent a lot of time and care creating in InDesign will be correctly represented on a web page, mobile device, social media, or email graphic.
You’ll want to talk to the developer who’ll be working with your files and ask what specifications they prefer, such as for resolution. For example, the old 72 dpi standard for the web may not apply to projects that are intended for display on modern tablets that have a much higher screen resolution.
You’ll try a couple of examples using general settings for this exercise.
Navigate to page 5. There are two graphics that were created with InDesign objects and type. The red one also includes InDesign effects.
Select the yellow graphic. Choose File > Export, and from the Save As Type (Windows) or Format (macOS) menu, choose PNG. This format is better for graphics with clean edges such as these circles and type. Use JPEG for photographic objects. Name the file Tomatoes-Peas-Carrots-Yellow.png and save it to the Lesson13 folder.
In the Export area of the Export PNG dialog, click Selection so that only this object is exported, and in the Image area, choose:
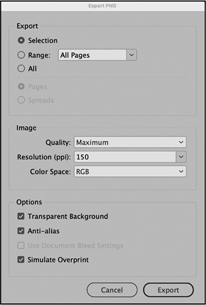
Quality: Maximum
Resolution (ppi): 150
Color Space: RGB
In the Options area, choose:
Transparent Background (because this object is a circle and has an inner circle cutout)
Anti-alias (creates smoother edges)
Simulate Overprint (to preserve the look of effects)
Then click Export.
Switch to the desktop and locate the file you just exported. Drag it over the icon of a web browser to view it. If you have Photoshop, you can open it there as well.
Switch back to InDesign and select the red circle graphic. Repeat steps 2–4, naming this file Tomatoes-Peas-Carrots-Red.png. When you view this file in a web browser or Photoshop, notice that the appearance of the applied InDesign effect is preserved, as is the transparency in the middle and outside of the circle.

Original objects in InDesign.

Exported PNG file in Photoshop.
Another method is to export multiple objects at once. To do this, you’ll use a couple of features that you may not have used before. One is the Export To HTML feature, but for the purpose of exporting graphics, you don’t have to know anything about HTML coding. We’ll use the feature just to get the images it generates. The second is the Articles panel, which is a way to organize elements in InDesign files that are intended for digital output such as EPUB or web pages.
Navigate to page 4 by holding down the spacebar and clicking. The hand icon (
 ) appears. Keep the spacebar pressed and drag until you can see the images on page 4. These are some of the final images from Lesson 11.
With the Selection tool (
 ), drag across all four images to select them.
Choose Window > Articles. The Articles panel opens. It’s empty except for some instructional text.
Drag the selected images over the Articles panel window. A gripping hand with a + sign appears. Release the mouse button. A dialog appears allowing you to name this article; type Flowers and click OK. The Articles panel shows the name of the article and the four images you just added.


Choose File > Export, and from the Save As Type (Windows) or Format (macOS) menu, choose HTML. Name the file Flowers-for-web. Navigate to the Lesson13 folder, and click Save.
The HTML Export Options dialog box opens. In the first panel, General, choose Same As Articles Panel in the Content Order area.
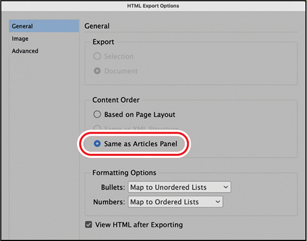
Choose Image from the list at the left. Make sure that Copy Images is set to Optimized (the default). Click Preserve Appearance From Layout (For Graphic/Media Objects). This is what will keep the cropping, sizing, and positioning within the frame of the images, as well as any InDesign effects that may have been applied. For Resolution, select 150, and for Image Conversion, select PNG. The PNG file format will preserve transparency, and objects that are not rectangles will export with a transparent background. You’ll see this with the circular picture frame in this example.

Click OK. The images will open in your default web browser. This is part of the default setting for exporting to HTML. Close this browser window, switch to your desktop, and open the Lesson13 folder. There will be a new folder called Flowers-for-web-web-resources and a file called Flowers-for-web.html.
Open the Flowers-for-web-web-resources folder and the image folder inside. The four images you added to the Articles panel are there, converted to PNG, and they have other web-required characteristics such as RGB color. These files are ready to use in a digital format. You can delete the other files generated by the HTML export.
If you have Photoshop, open the images to examine the results. Notice that the images look exactly the same as in InDesign (cropping, size, and position within the frame) and that the round picture frame is transparent outside the circle.

You can also export whole pages for use in emails and social media posts. A variation of the menu cover from Lesson 12 is an example.
Choose File > Open, navigate to the Lesson13 folder, and open Edible-Blossoms-Cover.indd inside the Edible-Blossoms-Cover Folder. Choose File > Export, and from the Save As Type (Windows) or Format (macOS) menu, choose JPEG and click Save. JPEG is the usual format when exporting whole pages.
In the Export area, click Range, and choose 1 (since there is only one page in this document it will be selected automatically). In the Image area, choose:
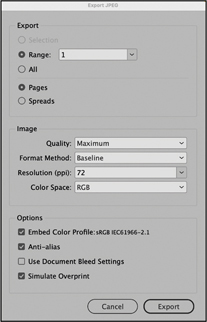
Quality: Maximum
Format Method: Baseline
Resolution (ppi): 72
Color Space: RGB
In the Options area, choose:
Embed Color Profile
Anti-alias (creates smoother edges)
Simulate Overprint (to preserve the look of effects)
Then click Export.
Switch to the desktop and open the folder where you saved this file. You can view it in a browser or Photoshop.

Congratulations! You’ve completed this lesson.
Exploring on your own
Create new print presets by choosing File > Print Presets > Define. Define presets to use for oversized formats or for printing to various color or black-and-white output devices you may use. For example, if you have a printer that uses tabloid paper, create a preset that allows you to print letter-size pages at full size with a specified bleed amount. Or create a preset for a small format, such as a postcard, that will fit on letter size paper at 100%.
Practice using the Press Quality With Bleed preset you saved with other documents, such as those from other lessons in this book or your own files.
Practice using the Package feature with other documents, such as those from other lessons in this book or your own files. Examine the contents of the resulting folder to become familiar with what is needed when sending your file to a service provider such as a commercial printer.
Learn how to open imported graphics that need to be fixed for printing. Click a graphic from the Links panel. Choose Edit With from the Links panel menu. Choose Photoshop to open raster images and Illustrator to open vector graphics. Make changes to the imported art, and then save and close the file. Go back to InDesign, and notice how the links have updated.
Practice exporting for social media platforms. Open the folder Social Media Posts inside the Lesson13 folder. Inside is the front of the postcard from Lesson 1 reformatted to fit the differing dimensions of each platform, Facebook, Instagram, Pinterest, and Twitter. Open each file and export using the JPEG settings used in the previous exercise. Try uploading to any platform of your choice.

Facebook, 1200 × 630 pixels.

Twitter, 1200 × 675 pixels.

Pinterest, 1000 × 1500 pixels.

Instagram, 1080 × 1080 pixels.
Review questions
1 What problems does InDesign look for when using the [Basic] (Working) profile in the Preflight panel?
2 What elements does InDesign gather when it packages a file?
3 How can you find where a color is used in an InDesign file?
4 What functions does the Ink Manager provide?
5 What are the two industry-standard ways of preparing final files to send to a service provider such as a commercial printer?
Review answers
1 By default, the [Basic] (Working) profile in the Preflight panel confirms that all fonts used in the document or inside placed graphics are available. It also looks for linked graphic files and linked text files to confirm that they have not been modified since they were initially imported, and it warns you of missing graphic files and overset text frames (as well as unresolved caption variables, inaccessible URL links, and missing fonts).
2 InDesign gathers a copy of the InDesign document along with copies of all the fonts and graphics used in the original document. The original files remain untouched. If you choose Update Graphic Links In Package, the links in the packaged InDesign file will be linked to the packaged links folder and not to their original location. If you select Include IDML, InDesign creates an IDML version of the document that can be opened in previous versions of InDesign. If you select Include PDF(Print), InDesign creates an Adobe PDF (Print) version of the document. If you choose to include a PDF, you can also choose a PDF preset. Note that Adobe Fonts are not packaged.
3 Click the swatch in the Swatches panel and then choose Find This Color from the panel menu. It’s helpful to first choose Add Unnamed Colors so that all colors in the document are displayed in the Swatches panel. Or open the Find/Change dialog and click the Color tab. Then choose a color from the Find Color menu.
4 The Ink Manager provides control over inks at output time, including the ability to convert spot colors to process colors and to map individual ink colors to different colors, without changing the colors in InDesign or in imported graphics.
5 The two standard methods are using a press-ready PDF with bleed and using the InDesign Package feature to create a folder with all components the service provider needs to work with the file (InDesign file, fonts, and linked graphics).