
5. Quick Fixes
Lesson overview
In this lesson, you’ll learn how to do the following:
• Remove red eye.
• Brighten an image.
• Combine images to create a panorama.
• Blur the background of an image using Iris Blur.
• Merge two images to extend depth of field.
• Apply optical lens correction to a distorted image.
• Move an object seamlessly.
• Use Perspective Warp to place an object into an image with a different perspective.
This lesson will take about an hour to complete. Download the Lesson05 project files from the Lesson & Update Files tab on your Account page at www.peachpit.com, if you haven’t already done so. As you work on this lesson, you’ll preserve the start files. If you need to restore the start files, download them from your Account page.

Sometimes just one or two clicks in Photoshop can turn an image from so-so (or worse) to awesome. Quick fixes get you the results you want without a lot of fuss.
Getting started
Not every image requires a complicated makeover using advanced features in Photoshop. In fact, once you’re familiar with Photoshop, you can often improve an image quickly. The trick is to know what’s possible and how to find what you need.
In this lesson, you’ll make quick fixes to several images using a variety of tools and techniques. You can use these techniques individually, or team them up when you’re working with an image that needs just a little more help.
1. Start Photoshop, and then immediately hold down Ctrl+Alt+Shift (Windows) or Command+Option+Shift (Mac OS) to restore the default preferences. (See “Restoring default preferences” on page 4.)
2. When prompted, click Yes to delete the Adobe Photoshop Settings file.
Improving a snapshot
If you’re sharing a snapshot with family and friends, you may not need it to look professional. But you probably don’t want glowing eyes, and it would be good if the picture isn’t too dark to show important detail. Photoshop gives you the tools to make quick changes to a snapshot.
Correcting red eye
Red eye occurs when the retina of a subject’s eye is reflected by the camera flash. It commonly occurs in photographs taken in a dark room, because the subject’s irises are wide open. Fortunately, red eye is easy to fix in Photoshop. In this exercise, you will remove the red eye from the boy’s eyes in the portrait.
You’ll start by viewing the before and after images in Adobe Bridge.
1. Choose File > Browse In Bridge to open Adobe Bridge.
2. In the Favorites panel in Bridge, click the Lessons folder. Then, in the Content panel, double-click the Lesson05 folder to open it.
3. Adjust the thumbnail slider, if necessary, so that you can see the thumbnail previews clearly. Then look at the Boy_Start.jpg and Boy_End.psd files.
![]() Note
Note
If you haven’t installed Bridge, you’ll be prompted to do so when you choose Browse In Bridge. For more information, see page 3.

Not only does red eye make an ordinary person or animal appear sinister, but it can distract from the subject of the image. It’s easy to correct red eye in Photoshop, and you’ll quickly lighten this image too.
4. Double-click the Boy_start.jpg file to open it in Photoshop.
5. Choose File > Save As, choose Photoshop for the Format, name the file Boy_Working.psd, and click Save.
6. Select the Zoom tool (![]() ), and then drag to zoom in to see the boy’s eyes. If Scrubby Zoom isn’t selected, drag a marquee around the eyes to zoom in.
), and then drag to zoom in to see the boy’s eyes. If Scrubby Zoom isn’t selected, drag a marquee around the eyes to zoom in.
7. Select the Red Eye tool (![]() ), hidden under the Spot Healing Brush tool (
), hidden under the Spot Healing Brush tool (![]() ).
).
8. In the options bar, reduce the Pupil Size to 23%, and the Darken Amount to 30%.
The Darken Amount specifies how dark the pupil should be.
9. Click on the pupil in the boy’s left eye. The red reflection disappears.
10. Click on the pupil in the boy’s right eye to remove the red reflection there, too.

If the red reflection is directly over the pupil, clicking the pupil removes it. However, if the red reflection is slightly off the pupil, try clicking the highlight in the eye first. You may need to try a few different spots, but it’s easy to undo and try again.
11. Choose View > Fit On Screen to see the entire image.

12. Choose File > Save to save your work so far.
Brightening an image
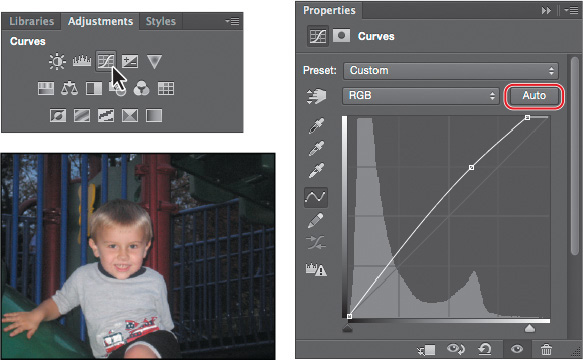
The boy’s eyes no longer glow, but the image is a bit dark. In Photoshop, you can brighten an image in several different ways, as you’ve already seen. Choosing only from adjustment layers, you can try modifying Brightness/Contrast, Levels, Curves, and Exposure. Sometimes the best option is to try them all and see which one you like best. That’s easy to do with adjustment layers. But when you’re really looking for a quick fix, a Curves adjustment layer is a great way to go.
1. Click Curves in the Adjustments panel.
2. Click Auto to see what Photoshop applies. The image brightens.
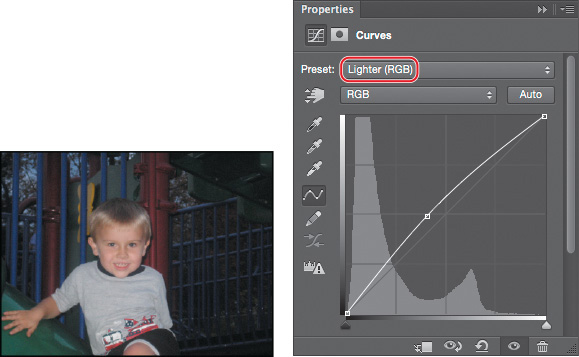
3. Choose Lighter from the Preset menu. Photoshop applies some subtle changes.
4. Select the White Point eyedropper in the Curves panel, and then click in the white area of the decal on the child’s shirt. That brightens the image nicely, and also improves the contrast.
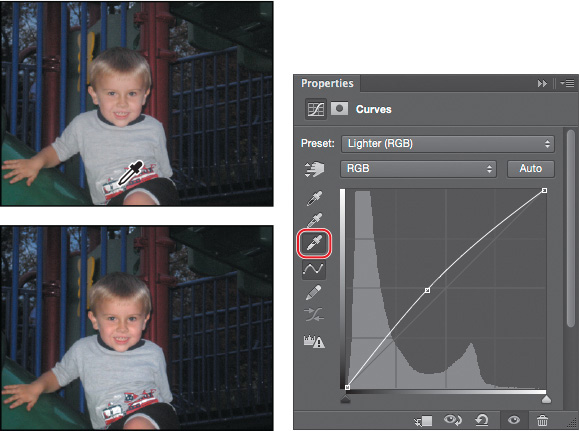
5. If you’d like to continue tweaking the settings, you can move the curve manually, or choose a black or gray point. To see how you’ve brightened the image, hide the Curves layer and then show it again.
6. Save the file, and then close it. The snapshot is ready to share.
Blurring a background
The interactive blurs in the Blur Gallery let you customize a blur as you preview it on your image. You’ll use an iris blur to blur the background in an image, focusing the viewer’s attention on the egret. You’ll apply the blur as a Smart Filter so that you can modify it later if you want to.
You’ll start by looking at the start and end files in Bridge.
1. Choose File > Browse In Bridge to open Adobe Bridge.
2. In the Favorites panel in Bridge, click the Lessons folder. Then, in the Content panel, double-click the Lesson05 folder to open it.
3. Compare the Egret_Start.jpg and Egret_End.psd thumbnail previews.

In the final image, the egret appears sharper, as its reflection and the grass around it have been blurred. Iris Blur, one of the interactive blurs in the Blur Gallery, makes the task an easy one—no masking required.
4. Return to Photoshop, and choose File > Open As Smart Object.
5. Select the Egret_Start.jpg file in the Lesson05 folder, and click OK or Open.

Photoshop opens the image. There is one layer in the Layers panel, and it’s a Smart Object.
6. Choose File > Save As, choose Photoshop for the Format, name the file Egret_Working.psd, and click Save. Click OK in the Photoshop Format Options dialog box.
7. Choose Filter > Blur Gallery > Iris Blur.
A blur ellipse is centered on your image. You can adjust the location and scope of the blur by moving the center pin, feather handles, and ellipse handles. Photoshop also opens the Blur Gallery, which includes the Blur Tools, Blur Effects, and Motion Blur Effects panels.
8. Drag the center pin so that it’s at the bottom of the bird’s body.
9. Click the ellipse, and drag inward to tighten the focus around the bird.
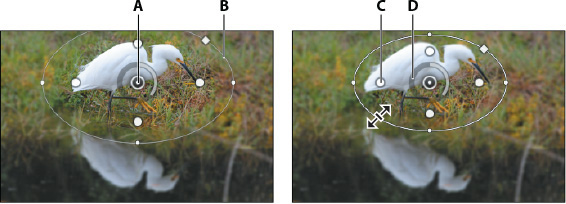
A. Center
B. Ellipse
C. Feather handle
D. Focus
10. Press Alt (Windows) or Option (Mac OS) as you click and drag the feather handles to match those in the first image below. Pressing Alt or Option lets you drag each handle separately.
11. Click and drag on the focus ring to reduce the amount of blur to 5 px, creating a gradual but noticeable blur. You can also change the amount of blur by moving the Blur slider in the Iris Blur area of the Blur Tools panel.

12. Click OK in the options bar to apply the blur.
The blur may be a little too subtle. You’ll edit the blur to increase it slightly.
13. Double-click the Blur Gallery in the Egret layer in the Layers panel to open it again. Adjust the blur to 6 px, and click OK in the options bar to apply it.
Because you applied the filter to a Smart Object, you can hide it or edit it without affecting the original image.
14. Save the file and close it.
The egret is accentuated by the blur.


Creating a panorama
Sometimes a vista is just too large for a single shot. Photoshop makes it easy to combine multiple images into a panorama so that your viewers can get the full effect.
Once again, you’ll take a look at the end file first, to see where you’re going.
1. Choose File > Browse In Bridge.
2. Navigate to the Lesson05 folder, if you’re not there already. Then, look at the Skyline_End.psd thumbnail preview.
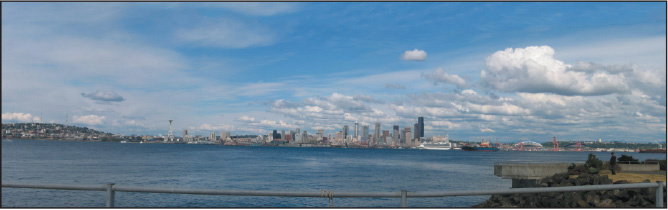
Skyline_End.psd
You’ll combine four shots of the Seattle skyline into a single wide panorama image so that viewers get a sense of the whole scene. Creating a panorama from multiple images requires only a few clicks. Photoshop does the rest.
3. Return to Photoshop.
![]() Tip
Tip
You can also open selected images from Bridge directly into Photomerge by choosing Tools > Photoshop > Photomerge.
4. With no files open in Photoshop, choose File > Automate > Photomerge.
5. In the Source Files area, click Browse, and navigate to the Lesson05/Files For Panorama folder.
6. Shift-select all the images in the folder, and click OK or Open.
7. In the Layout area of the Photomerge dialog box, select Perspective.
8. At the bottom of the Photomerge dialog box, select Blend Images Together, Vignette Removal, Geometric Distortion Correction, and Content Aware Fill Transparent Areas. Then click OK.
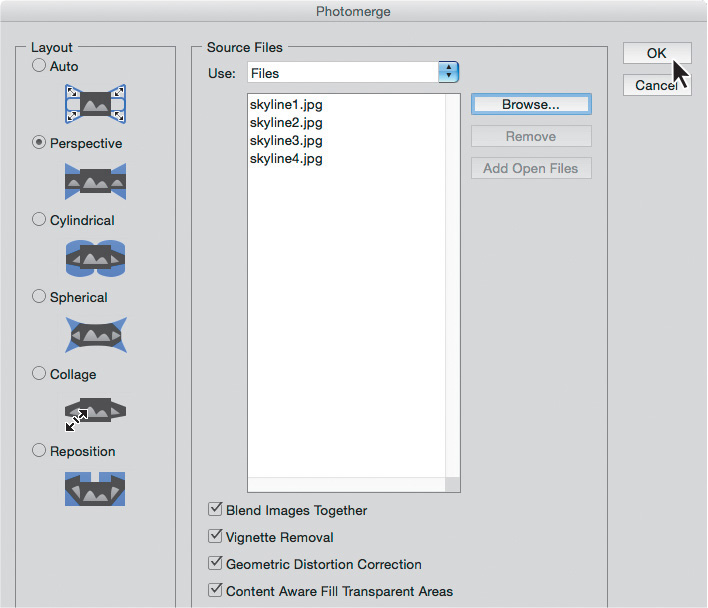
Blend Images Together blends images based on the optimal borders between them, instead of just creating a simple rectangular blend. Vignette Removal performs exposure compensation in images with darkened edges. Geometric Distortion Correction compensates for barrel, pincushion, or fisheye distortion. Content Aware Fill Transparent Areas automatically patches the empty areas between the merged image edges and the sides of the canvas.
Photoshop creates the panorama image. It’s a complex process, so you may have to wait a few moments while Photoshop works. When it’s finished, you’ll see the full vista in the image window with five layers in the Layers panel. The bottom four layers are the original four images you selected. Photoshop identified the overlapping areas of the images and matched them, correcting any angular discrepancies. The top layer, containing “(merged)” in the layer name, is a single panorama image blended from all of the images you selected, combined with formerly empty areas filled in by Content Aware Fill. Those areas are indicated by the selection.

![]() Tip
Tip
If you want to see how the panorama looks without the areas created by Content Aware Fill, hide the top layer.
9. Choose Select > Deselect.
10. Choose Layer > Flatten Image.

11. Choose File > Save As. Choose Photoshop for the Format, and name the file Skyline_Working.psd. Save the file in the Lesson05 folder. Click Save.
The panorama looks great, but it’s a little dark. You’ll add a Levels adjustment layer to brighten it a little bit.
12. Click the Levels icon in the Adjustments panel to add a Levels adjustment layer.
13. Select the White Point eyedropper, and then click on a white area of the clouds.

The sky gets bluer, and the entire image brightens.
14. Save your work. Click OK in the Photoshop Format Options dialog box and close the file.
It’s that easy to create a panorama!
Correcting image distortion
The Lens Correction filter fixes common camera lens flaws, such as barrel and pincushion distortion, chromatic aberration, and vignetting. Barrel distortion is a lens defect that causes straight lines to bow out toward the edges of the image. Pincushion distortion is the opposite effect, causing straight lines to bend inward. Chromatic aberration appears as a color fringe along the edges of image objects. Vignetting occurs when the edges of an image, especially the corners, are darker than the center.
Some lenses exhibit these defects depending on the focal length or the f-stop used. The Lens Correction filter can apply settings based on the camera, lens, and focal length that were used to make the image. The filter can also rotate an image or fix image perspective caused by tilting a camera vertically or horizontally. The filter’s image grid makes it easier and more accurate to make these adjustments than using the Transform command.
1. Choose File > Browse In Bridge.
2. Navigate to the Lesson05 folder if you’re not already there, and then look at the Columns_Start.psd and Columns_End.psd thumbnail previews.
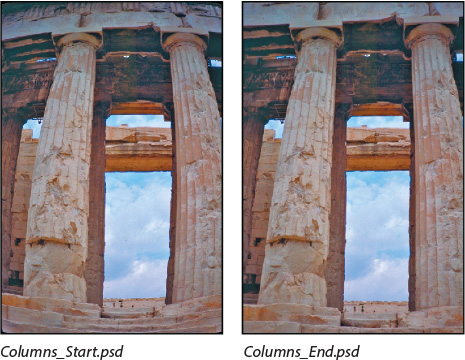
In this case, the original image of a Greek temple is distorted, with the columns appearing to be bowed. This photo was shot at a range that was too close with a wide-angle lens. You’ll quickly correct the lens barrel distortion.
3. Double-click the Columns_Start.psd file to open it in Photoshop.
4. Choose File > Save As. In the Save As dialog box, name the file Columns_Working.psd, and save it in the Lesson05 folder. Click OK if the Photoshop Format Options dialog box appears.
5. Choose Filter > Lens Correction. The Lens Correction dialog box opens.
6. Select Show Grid at the bottom of the dialog box, if it’s not already selected.
An alignment grid overlays the image, next to options for removing distortion, correcting chromatic aberration, removing vignettes, and transforming perspective.

The Lens Correction dialog box includes auto-correction options. You’ll adjust one setting in the Auto Correction tab and then customize the settings.
7. In the Correction area of the Auto Correction tab, make sure Auto Scale Image is selected, and that Transparency is selected from the Edge menu.
8. Select the Custom tab.
9. In the Custom tab, drag the Remove Distortion slider to about +52.00 to remove the barrel distortion in the image. Alternatively, you could select the Remove Distortion tool (![]() ) and drag in the image preview area until the columns are straight. The adjustment causes the image borders to bow inward. However, because you selected Auto Scale Image, the Lens Correction filter automatically scales the image to adjust the borders.
) and drag in the image preview area until the columns are straight. The adjustment causes the image borders to bow inward. However, because you selected Auto Scale Image, the Lens Correction filter automatically scales the image to adjust the borders.
![]() Tip
Tip
Watch the alignment grid as you make these changes so that you can see when the vertical columns are straightened in the image.
10. Click OK to apply your changes and close the Lens Correction dialog box.
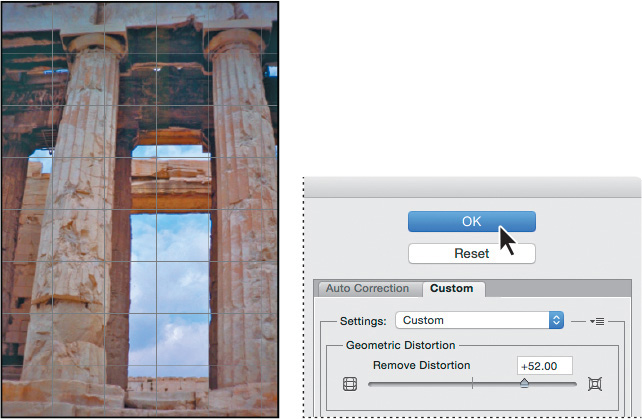
The curving distortion caused by the wide-angle lens and low shooting angle is eliminated.
11. (Optional) To see the effect of your change in the main image window, press Ctrl+Z (Windows) or Command+Z (Mac OS) twice to undo and redo the filter.
12. Choose File > Save to save your changes, click OK if the Photoshop Format Options dialog box appears, and then close the image.
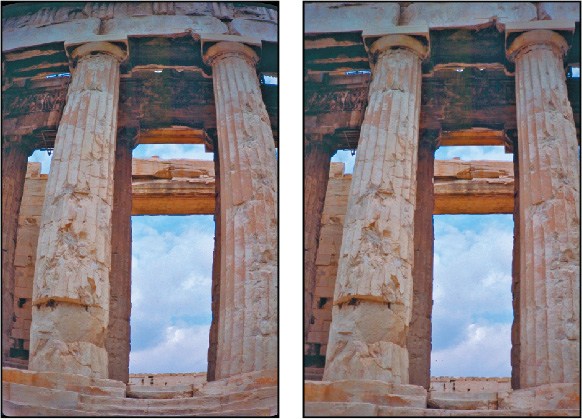
The temple looks much more stable now!
Adding depth of field
When you’re shooting a photo, you often have to choose to focus either the background or the foreground. If you want the entire image to be in focus, you can take two photos—one with the background in focus and one with the foreground in focus—and then merge the two in Photoshop.
Because you’ll need to align the images exactly, it’s helpful to use a tripod to keep the camera steady. Even with a handheld camera, though, you can get some amazing results. You’ll add depth of field to an image of a wine glass in front of a beach.
1. Choose File > Browse In Bridge.
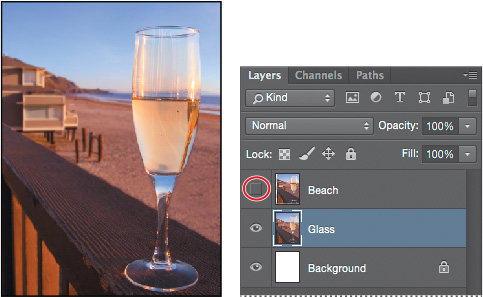
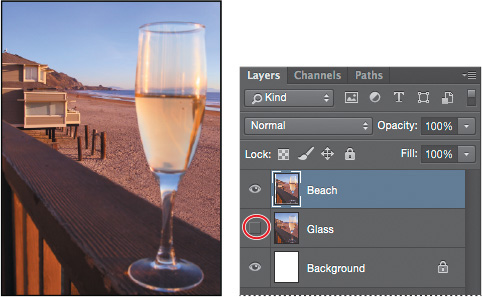
2. Navigate to the Lesson05 folder, if you’re not there already, and then look at the Glass_Start.psd and Glass_End.psd thumbnail previews.

The first image has two layers. Depending on which layer is visible, either the glass in the foreground or the beach in the background is in focus. You’ll extend the depth of field to make both clear.
3. Double-click the Glass_Start.psd file to open it.
4. Choose File > Save As. Name the file Glass_Working.psd, and save it in the Lesson05 folder. Click OK if the Photoshop Format Options dialog box appears.
5. In the Layers panel, hide the Beach layer, so that only the Glass layer is visible. The glass is in focus, but the background is blurred. Then, show the Beach layer and hide the Glass layer. Now the beach is in focus, but the glass is blurred.
You’ll merge the layers, using the part of each layer that is in focus. First, you need to align the layers.
6. Show both layers again, and then Shift-click to select both of them.

7. Choose Edit > Auto-Align Layers.
Because these images were shot from the same angle, Auto will work just fine.
8. Select Auto, if it isn’t already selected. Make sure neither Vignette Removal nor Geometric Distortion is selected. Then click OK to align the layers.

Now that the layers are perfectly aligned, you’re ready to blend them.
9. Make sure both layers are still selected in the Layers panel. Then choose Edit > Auto-Blend Layers.
10. Select Stack Images and Seamless Tones And Colors, if they aren’t already selected. Make sure Content Aware Fill Transparent Areas is not selected, and then click OK.

11. Save your work, and close the file.
Both the wine glass and the beach behind it are in focus.
Moving objects with the Content-Aware Move tool
You’ve used the content-aware features in some pretty impressive ways in earlier lessons, and to fill in the sky in the panorama project in this lesson. Now you’ll use the Content-Aware Move tool to move something in an image (in this case, a duck) and have Photoshop convincingly fill in the area where the item you moved used to be. You can also use the Content-Aware Move tool to extend a portion of an image, such as a stand of trees or fenceposts, seamlessly.
1. Choose File > Browse In Bridge.
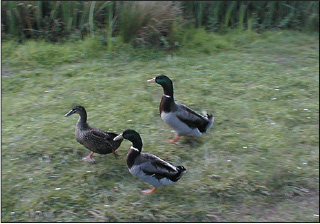
2. Navigate to the Lesson05 folder, if you’re not there already, and then look at the Ducks_Start.jpg and Ducks_End.psd thumbnail previews.

You’ll use the Content-Aware Move tool to nudge the last duck into a cluster with its companions.
3. Double-click the Ducks_Start.jpg file to open it in Photoshop.
4. Choose File > Save As, choose Photoshop for the format type, and name the new file Ducks_Working.psd. Click Save.
5. Select the Content-Aware Move tool (![]() ), which is hidden beneath the Red Eye Removal tool (
), which is hidden beneath the Red Eye Removal tool (![]() ).
).
6. In the options bar, choose Move from the Mode menu, and enter 3 in the Structure field.
7. Draw a selection marquee around the third duck, with a margin large enough to include the grass and dirt around it.
8. Drag the selection to the left, slightly above the second duck, so that the ducks are clustered.

When you release the mouse, the dragged duck appears with a transformation rectangle and handles. These transformation controls give you an opportunity to rotate and scale the content, but you don’t need to do that in this step.
9. Click the Commit Transform button in the options bar.
10. Change the Structure setting to 5, which requires stricter adherence to the pattern, and observe how the image changes. Then change the Structure setting to 1, which results in a much looser adaptation. You can also experiment with different Color settings, from 0 to 10.
Now that you’ve committed to the move, Photoshop fills in the area the duck left behind. How it creates the area depends on the Structure and Color settings in the Options bar. You can try different options while the selection remains active.
11. Choose the Structure and Color options you think look best. Then choose Select > Deselect. Save the file and close it.
The three ducks are in a tighter formation now, and you can’t tell that the third duck used to be in a different position.
Transformations with the Content-Aware Move tool
1. Open Thistle.psd in your Lesson05/Extra_Credit folder.
2. Select the Content-Aware Move tool (![]() ).
).
3. In the options bar, choose Extend from the Mode menu. Choosing Extend duplicates the thistle; if you just want to reposition the single thistle, you would choose Move.
4. Draw a selection marquee around the thistle, with a margin large enough to include the grass around it.
5. Drag the selection to the left, and drop it in the empty area of grass.
6. Right-click (Windows) or Control-click (Mac OS) the dragged thistle, and choose Flip Horizontal.
7. Drag the top left transformation handle to make the thistle smaller. If you think the copy of the thistle should be farther from the original, position the pointer inside the transformation rectangle (but not over the anchor point) and drag the thistle copy slightly to the left.
8. Press Enter or Return to make the transformations permanent, leaving the content selected so you can adjust the Structure and Color options.
9. Choose Select > Deselect, and save your changes.

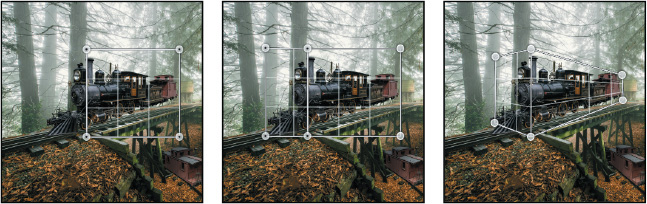
Adjusting perspective in an image
The Perspective Warp feature lets you adjust the way objects in your image relate to the scene. You can correct distortions, change the angle from which an object appears to be viewed, or shift the perspective of an object so that it merges smoothly with a new background.
Using the Perspective Warp feature is a two-step process: defining the planes and adjusting them. You start in Layout mode, drawing quads to define two or more planes; it’s a good idea to align the edges of the quads so that they are parallel with the lines of the original object. Then you switch to Warp mode, and manipulate the planes you defined.
You’ll use Perspective Warp to merge images with different perspectives.
1. Choose File > Browse In Bridge.
2. Navigate to the Lesson05 folder, if you’re not there already, and then look at the Bridge_Start.psd and Bridge_End.psd thumbnail previews.

In the Bridge_Start.psd file, the image of the train has been combined with the image of a trestle bridge, but their perspectives don’t match. If you’re illustrating a story about a flying train that is making a landing on a trestle bridge, this might be perfect. But if you want a more realistic image, you’ll need to adjust the perspective of the train to put it firmly on the tracks. You’ll use Perspective Warp to do just that.
3. Double-click the Bridge_Start.psd file to open it in Photoshop.
4. Choose File > Save As, and rename the file Bridge_Working.psd. Click OK in the Photoshop Format Options dialog box.

The tracks are on the Background layer. The train is on the Train layer. Because the Train layer is a Smart Object, you can apply Perspective Warp and then modify the results if you’re not satisfied.
6. Choose Edit > Perspective Warp. This feature requires a fair amount of processing power. If Perspective Warp is grayed out when you try to select it, make sure you have a current video card and a minimum of 512 MB VRAM.
A small animated tutorial appears, showing you how to draw a quad, which defines a plane.
7. Watch the animation, and then close it.
In the first step of the process, you want to enclose the object in quads that represent the current planes of the object.
8. Draw the quad for the side of the train: Click above the top of the smokestack, drag down to the railroad tie below the front wheel, and then drag across to the end of the caboose. The plane is currently a rectangle.
9. Drag a second quad for the front of the train, dragging across the cowcatcher at the bottom and into the trees at the top. Drag it to the right until it attaches to the left edge of the first quad.
10. Drag the corners of the planes to match the angles of the train. The bottom line of the side plane should run along the bottom of the train wheels; the top edge should border the top of the caboose. The front plane should mirror the lines of the cowcatcher and the top of the light.
Now that the quads are drawn, you’re ready for the second step in the process: warping.
11. Click Warp in the options bar. Close the tutorial box that shows you how to warp the plane.
12. Click the Automatically Straighten Near Vertical Lines button, next to Warp in the options bar.
This makes the train appear properly vertical, making it easier to adjust the perspective accurately.
13. Drag the handles to manipulate the planes, moving the back end of the train down and into perspecive with the tracks. Exaggerate the perspective toward the caboose for a more dramatic result.
14. Warp other parts of the train as needed. You may need to adjust the front of the train. Pay attention to the wheels; make sure you don’t distort them as you warp the perspective.
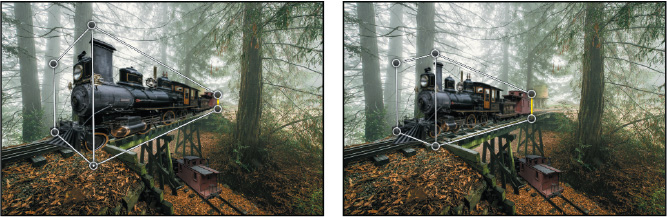
There is no precise right or wrong way to adjust perspective. Trust your eyes to tell you when it looks right. Remember you can return to tweak it again later, because you’re applying Perspective Warp as a Smart Filter.
15. When you’re satisfied with the perspective, click the Commit Perspective Warp button in the options bar.
16. To compare the changed image with the original, hide the Perspective Warp filter in the Layers panel. Then show the filter again.
If you want to make further adjustments, double-click the Perspective Warp filter in the Layers panel. You can continue to adjust the existing planes, or click Layout in the options bar to reshape them.
Changing the perspective of a building

In this image, as the perspective of the building shifted, so did the perspective of the trees surrounding it.

Before applying the Camera Shake Reduction filter
After applying the Camera Shake Reduction filter
Review questions
1. What is red eye, and how do you correct it in Photoshop?
2. How can you create a panorama from multiple images?
3. Describe how to fix common camera lens flaws in Photoshop. What causes these defects?
4. What conditions provide the best results when using the Content-Aware Move tool?
Review answers
1. Red eye occurs when the retinas of a subject’s eyes are reflected by the camera flash. To correct red eye in Photoshop, zoom in to the subject’s eyes, select the Red Eye tool, and then click the eye.
2. To blend multiple images into a panorama, choose File > Automate > Photomerge, select the files you want to combine, and click OK.
3. The Lens Correction filter fixes common camera lens flaws, such as barrel and pincushion distortion, in which straight lines bow out towards the edges of the image (barrel) or bend inward (pincushion); chromatic aberration, where a color fringe appears along the edges of image objects; and vignetting at the edges of an image, especially corners, that are darker than the center. Defects can occur from incorrectly setting the lens’s focal length or f-stop, or by tilting the camera vertically or horizontally.
4. The Content-Aware Move tool works best in images that have consistent backgrounds so that Photoshop can seamlessly replicate the patterns.