6. Masks and Channels
Lesson overview
In this lesson, you’ll learn how to do the following:
• Create a mask to remove a subject from a background.
• Refine a mask to include complex edges.
• Create a quick mask to make changes to a selected area.
• Edit a mask using the Properties panel.
• Manipulate an image using Puppet Warp.
• Save a selection as an alpha channel.
• View a mask using the Channels panel.
• Load a channel as a selection.
• Isolate a channel to make specific image changes.
This lesson will take about an hour to complete. Download the Lesson06 project files from the Lesson & Update Files tab on your Account page at www.peachpit.com, if you haven’t already done so. As you work on this lesson, you’ll preserve the start files. If you need to restore the start files, download them from your Account page.

Photography © Image Source, www.imagesource.com
PROJECT: MAGAZINE COVER IMAGE
Use masks to isolate and manipulate specific parts of an image. The cutout portion of a mask can be altered, but the area surrounding the cutout is protected from change. You can create a temporary mask to use once, or you can save masks for repeated use.
Working with masks and channels
In Photoshop, masks isolate and protect parts of an image, just as masking tape protects window panes or trim from paint when a house is painted. When you create a mask based on a selection, the area you haven’t selected is masked, or protected from editing. With masks, you can create and save time-consuming selections and then use them again. In addition, you can use masks for other complex editing tasks—for example, to apply color changes or filter effects to an image.
In Photoshop, you can make temporary masks, called quick masks, or you can create permanent masks and store them as special grayscale channels called alpha channels. Photoshop also uses channels to store an image’s color information. Unlike layers, channels do not print. You use the Channels panel to view and work with alpha channels.
A key concept in masking is that black hides and white reveals. As in life, rarely is anything black and white. Shades of gray partially hide, depending on the gray levels.
Getting started
First, you’ll view the image that you’ll create using masks and channels.
1. Start Photoshop, and then immediately hold down Ctrl+Alt+Shift (Windows) or Command+Option+Shift (Mac OS) to restore the default preferences. (See “Restoring default preferences” on page 4.)
2. When prompted, click Yes to delete the Adobe Photoshop Settings file.
3. Choose File > Browse In Bridge to open Adobe Bridge.
![]() Note
Note
If Bridge isn’t installed, you’ll be prompted to install it when you choose Browse In Bridge. For more information, see page 3.
4. Click the Favorites tab on the left side of the Bridge window. Select the Lessons folder, and then double-click the Lesson06 folder in the Content panel.
5. Study the 06End.psd file. To enlarge the thumbnail so that you can see it more clearly, move the thumbnail slider at the bottom of the Bridge window to the right.
In this lesson, you’ll create a magazine cover. The model for the cover was photographed in front of a different background. You’ll use masking and the Refine Mask feature to place the model on the appropriate background.
6. Double-click the 06Start.psd thumbnail to open it in Photoshop. Click OK if you see an Embedded Profile Mismatch dialog box.
Creating a mask
You’ll use the Quick Selection tool to create the initial mask in order to separate the model from the background.
1. Choose File > Save As, rename the file 06Working.psd, and click Save. Click OK if the Photoshop Format Options dialog box appears.
Saving a working version of the file lets you return to the original if you need it.
2. Select the Quick Selection tool (![]() ). In the options bar, set up a brush with a size of 15 px and hardness of 100%.
). In the options bar, set up a brush with a size of 15 px and hardness of 100%.
3. Drag to select the man. It’s fairly easy to select his shirt and face, but the hair is trickier. Don’t worry if the selection isn’t perfect. You’ll refine the mask in the next exercise.

4. At the bottom of the Layers panel, click the Add Layer Mask button (![]() ) to create a layer mask.
) to create a layer mask.

The selection becomes a pixel mask, and it appears as part of Layer 0 in the Layers panel. Everything outside the selection is transparent, represented by a checkerboard pattern.
Refining a mask
The mask is pretty good, but the Quick Selection tool couldn’t quite capture all of the model’s hair. The mask is also a little choppy around the contours of the shirt and face. You’ll smooth the mask, and then fine-tune the area around the hair.
1. Choose Window > Properties to open the Properties panel.
2. If it isn’t already selected, click the mask on Layer 0 in the Layers panel.
3. In the Properties panel, click Mask Edge. The Refine Mask dialog box opens.

4. In the View Mode area of the dialog box, click the arrow next to the preview window. Choose On Black from the pop-up menu.
The mask appears against a black background, which makes it easier to see the edge of the white shirt and the face.
5. In the Adjust Edge area of the dialog box, move the sliders to create a smooth, unfeathered edge along the shirt and face. The optimal settings depend on the selection you created, but they’ll probably be similar to ours. We moved the Smooth slider to 15 to create a smoother outline, Contrast to 40% to make the transitions along the selection border more abrupt, and Shift Edge to -8% to move the selection border inward and help remove unwanted background colors from selection edges. (Adjusting Shift Edge to a positive number moves the border outward.)

6. In the Output area of the dialog box, select Decontaminate Colors. Choose New Layer With Layer Mask from the Output To menu.
Decontaminate Colors replaces color fringes with the color of fully selected pixels nearby. Because it changes pixel color, this option requires you to output to a new layer or document.
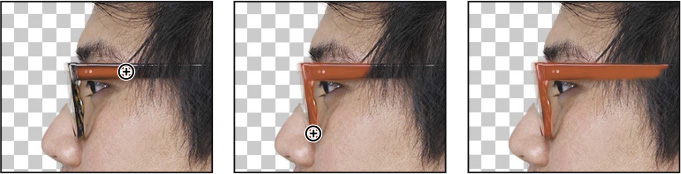
7. Select the Zoom tool in the Refine Mask dialog box, and then click the face to zoom in so you can see its edges more clearly.
8. Select the Refine Radius tool (![]() ) in the Refine Mask dialog box. Use it to paint out any white background that remains around the lips and the nose. Press the left bracket ([) to decrease the brush size and the right bracket (]) to increase it.
) in the Refine Mask dialog box. Use it to paint out any white background that remains around the lips and the nose. Press the left bracket ([) to decrease the brush size and the right bracket (]) to increase it.

Tool tips from the Photoshop evangelist

Zoom tool shortcuts
• With any tool selected, press Ctrl (Windows) or Command (Mac OS) with the plus sign (+) to zoom in, or with the minus sign (-) to zoom out.
• Double-click the Zoom tool in the Tools panel to return the image to 100% view.
• When Scrubby Zoom is selected in the options bar, just drag the Zoom tool to the left to zoom out or drag it to the right to zoom in.
• Press Alt (Windows) or Option (Mac OS) to change the Zoom In tool to the Zoom Out tool, and click the area of the image you want to reduce. Each Alt/Optionclick reduces the image by the next preset increment.
9. When you’re satisfied with the mask around the face, click OK.
A new layer, named Layer 0 copy, appears in the Layers panel. You’ll use this layer to add the spikes to the mask of the hair.
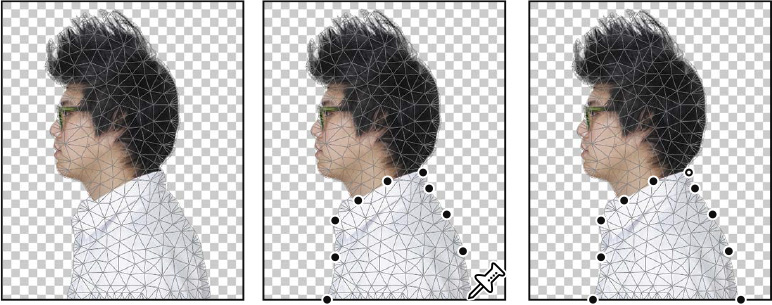
10. With Layer 0 copy active, click Mask Edge in the Properties panel to open the Refine Mask dialog box again.
11. From the View pop-up menu, choose On White. The black hair shows up well against the white matte. If necessary, zoom out or use the Hand tool to reposition the image so that you can see all of the hair.
12. Select the Refine Radius tool in the Refine Mask dialog box. Press the ] key to increase the size of the brush. (The options bar displays the brush size; we used 300 px at first.) Then, begin brushing along the top of the hair, high enough to include the spikes.

13. Press the [ key a few times to decrease the brush size by about half. Then, paint along the right side of the head, where the hair is a solid color, to pick up any small, fine hairs that protrude.
As you paint, Photoshop refines the mask edge, including the hair, but eliminating most of the background. If you were painting on a layer mask, the background would be included. The Refine Mask feature is good, but it’s not perfect. You’ll clean up any areas of background that are included with the hair.
14. Select the Erase Refinements tool (![]() ), hidden behind the Refine Radius tool in the Refine Mask dialog box. Click once or twice in each area where background color shows. When you erase an area, the Refine Mask feature erases similar colors, cleaning up more of the mask for you. Be careful not to erase the refinements you made to the hair edge. You can undo a step or use the Refine Radius tool to restore the edge if necessary.
), hidden behind the Refine Radius tool in the Refine Mask dialog box. Click once or twice in each area where background color shows. When you erase an area, the Refine Mask feature erases similar colors, cleaning up more of the mask for you. Be careful not to erase the refinements you made to the hair edge. You can undo a step or use the Refine Radius tool to restore the edge if necessary.
15. Select Decontaminate Colors, and move the Amount slider to 85%. Choose New Layer With Layer Mask from the Output To menu. Then click OK.

16. In the Layers panel, make the Magazine Background layer visible. The model appears in front of an orange patterned background.

Creating a quick mask
You’ll create a quick mask to change the color of the glasses frames. First, you’ll clean up the Layers panel.
1. Hide the Magazine Background layer so you can focus on the model. Then delete the Layer 0 and Layer 0 copy layers. Click Yes or Delete to confirm deletion of the layers or their masks, if prompted; you do not need to apply the mask to the current layer because Layer 0 copy 2 already has the mask applied.

2. Double-click the Layer 0 copy 2 layer name, and rename it Model.
3. Click the Edit In Quick Mask Mode button in the Tools panel. (By default, you have been working in Standard mode.)

In Quick Mask mode, a red overlay appears as you make a selection, masking the area outside the selection the way a rubylith, or red acetate, was used to mask images in traditional print shops. You can apply changes only to the unprotected area that is visible and selected. Notice that the highlight for the selected layer in the Layers panel appears gray instead of blue, indicating you’re in Quick Mask mode.
4. In the Tools panel, select the Brush tool (![]() ).
).
5. In the options bar, make sure that the mode is Normal. Open the Brush pop-up panel, and select a small brush with a diameter of 13 px. Click outside the panel to close it.
6. Paint the earpiece of the glasses frames. The area you paint will appear red, creating a mask.
7. Continue painting with the Brush tool to mask the earpiece of the frames and the frame around the lenses. Reduce the brush size to paint around the lenses. Don’t worry about the hair overlapping the earpiece; go ahead and paint over it.
In Quick Mask mode, Photoshop automatically defaults to Grayscale mode, with a foreground color of black and a background color of white. When using a painting or editing tool in Quick Mask mode, keep these principles in mind:
• Painting with black adds to the mask (the red overlay) and decreases the selected area.
• Painting with white erases the mask (the red overlay) and increases the selected area.
• Painting with gray partially adds to the mask.
8. Click the Edit In Standard Mode button to exit Quick Mask Mode.
The unmasked area is selected. Unless you save a quick mask as a more permanent alpha-channel mask, Photoshop discards the temporary mask once it is converted to a selection.
9. Choose Select > Inverse to select the area you originally masked.
10. Choose Image > Adjustments > Hue/Saturation.
11. In the Hue/Saturation dialog box, change the Hue to 70. The new green color fills the glasses frame. Click OK.

12. Choose Select > Deselect.
13. Save your work so far.
Manipulating an image with Puppet Warp
The Puppet Warp feature gives you flexibility in manipulating an image. You can reposition areas, such as hair or an arm, just as you might pull the strings on a puppet. Place pins wherever you want to control movement. You’ll use Puppet Warp to tilt the model’s head back, so he appears to be looking up.
1. Zoom out so you can see the entire model.
2. With the Model layer selected in the Layers panel, choose Edit > Puppet Warp.
A mesh appears over the visible areas in the layer—in this case, the mesh appears over the model. You’ll use the mesh to place pins where you want to control movement (or to ensure there is no movement).
3. Click around the edges of the shirt. Each time you click, Puppet Warp adds a pin. Approximately 10 pins should work.
The pins you’ve added around the shirt will keep it in place as you tilt the head.
4. Select the pin at the nape of the neck. A white dot appears in the center of the pin to indicate that it’s selected.
5. Press Alt (Windows) or Option (Mac OS). A larger circle appears around the pin and a curved double arrow appears next to it. Continue pressing Alt or Option as you drag the pointer to rotate the head backwards. You can see the angle of rotation in the options bar; you can enter 135 there to rotate the head back.
![]() Note
Note
Be careful not to Alt-click or Option-click the dot itself, or you’ll delete the pin.

6. When you’re satisfied with the rotation, click the Commit Puppet Warp button (![]() ) in the options bar, or press Enter or Return.
) in the options bar, or press Enter or Return.
7. Save your work so far.
Working with channels
Just as different information in an image is stored on different layers, channels also let you access specific kinds of information. Alpha channels store selections as grayscale images. Color information channels store information about each color in an image; for example, an RGB image automatically has red, green, blue, and composite channels.
To avoid confusing channels and layers, think of channels as containing an image’s color and selection information; think of layers as containing painting and effects.
You’ll use an alpha channel to create a shadow for the model. Then, you’ll convert the image to CMYK mode and use the Black channel to add color highlights to the hair.
Using an alpha channel to create a shadow
You’ve already created a mask of the model. To create a shadow, you want to essentially duplicate that mask and then shift it. You’ll use an alpha channel to make that possible.
1. In the Layers panel, Ctrl-click (Windows) or Command-click (Mac OS) the layer icon in the Model layer. The masked area is selected.
2. Choose Select > Save Selection. In the Save Selection dialog box, make sure New is chosen in the Channel menu. Then name the channel Model Outline, and click OK.

Nothing changes in the Layers panel or in the image window. However, a new channel named Model Outline has been added to the Channels panel.
3. Click the Create A New Layer icon (![]() ) at the bottom of the Layers panel. Drag the new layer below the Model layer, so that the shadow will be below the image of the model. Then double-click the new layer’s name, and rename it Shadow.
) at the bottom of the Layers panel. Drag the new layer below the Model layer, so that the shadow will be below the image of the model. Then double-click the new layer’s name, and rename it Shadow.
4. With the Shadow layer selected, choose Select > Refine Edge. In the Refine Edge dialog box, move the Shift Edge slider to +36%. Then click OK.

5. Choose Edit > Fill. In the Fill dialog box, choose Black from the Contents menu, and then click OK.
The Shadow layer displays a filled-in black outline of the model. Shadows aren’t usually as dark as the person that casts them. You’ll reduce the layer opacity.
6. In the Layers panel, change the layer opacity to 30%.

The shadow is in exactly the same position as the model, where it can’t be seen. You’ll shift it.
7. Choose Select > Deselect to remove the selection.
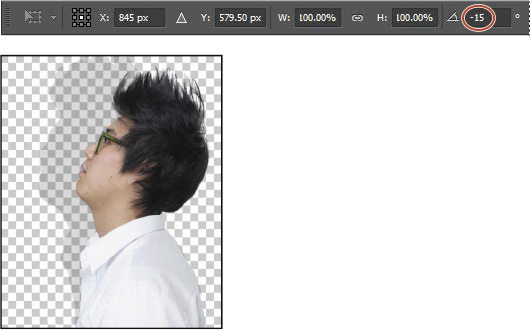
8. Choose Edit > Transform > Rotate. Rotate the shadow by hand, or enter -15° in the Rotate field in the options bar. Then drag the shadow to the left, or enter 845 in the X field in the options bar. Click the Commit Transform button (![]() ) in the options bar, or press Enter or Return, to accept the transformation.
) in the options bar, or press Enter or Return, to accept the transformation.
9. Choose File > Save to save your work so far.
Adjusting an individual channel
You’re almost done with the magazine cover image. All that remains is to add color highlights to the model’s hair. You’ll convert the image to CMYK mode so you can take advantage of the Black channel to do just that.
1. Select the Model layer in the Layers panel.
2. Choose Image > Mode > CMYK Color. Click Don’t Merge in the dialog box that appears, because you want to keep your layers intact. Click OK if you’re prompted about color profiles.
3. Alt-click (Windows) or Option-click (Mac OS) the visibility icon for the Model layer to hide the other layers.
4. Select the Channels tab. In the Channels panel, select the Black channel. Then choose Duplicate Channel from the Channels panel menu. Name the channel Hair, and click OK.

Individual channels appear in grayscale. If more than one channel is visible in the Channels panel, the channels appear in color.
5. Make the Hair channel visible, and hide the Black channel. Then select the Hair channel, and choose Image > Adjustments > Levels.

6. In the Levels dialog box, adjust Black to 85, Midtones to 1, and White to 165. Moving the Black and White points creates contrast in the hair. Click OK.

7. With the Hair channel still selected, choose Image > Adjustments > Invert. The channel appears white against a black background.
8. Select the Brush tool, and click the Switch Foreground And Background Colors icon in the Tools panel to make the Foreground color black. Then paint over the glasses, eyes, and anything in the channel that isn’t hair.

9. Click the Load Channel As Selection icon at the bottom of the Channels panel.
10. Select the Layers tab. In the Layers panel, select the Model layer.

11. Choose Select > Refine Edge. In the Refine Edge dialog box, move the Feather slider to 1.2 px, and then click OK.
12. Choose Image > Adjustments > Hue/Saturation. Select Colorize, and then move the sliders as follows, and click OK:
• Hue: 230
• Saturation: 56
• Lightness: 11

13. Choose Image > Adjustments > Levels. In the Levels dialog box, move the sliders so that the Black slider is positioned where the blacks peak, the White slider where the whites peak, and the Midtones in between. Then click OK. We used the values 58, 1.65, 255, but your values may vary.

14. In the Layers panel, make the Shadow and Magazine Background layers visible.
15. Choose Select > Deselect.
16. Choose File > Save.
Your magazine cover is ready to go!

Review questions
1. What is the benefit of using a quick mask?
2. What happens to a quick mask when you deselect it?
3. When you save a selection as a mask, where is the mask stored?
4. How can you edit a mask in a channel once you’ve saved it?
5. How do channels differ from layers?
Review answers
1. Quick masks are helpful for creating quick, one-time selections. In addition, using a quick mask is an easy way to edit a selection using the painting tools.
2. The quick mask disappears when you deselect it.
3. Masks are saved in channels, which can be thought of as storage areas for color and selection information in an image.
4. You can paint on a mask in a channel using black, white, and shades of gray.
5. Channels are used as storage areas for saved selections. Unless you explicitly display a channel, it does not appear in the image or print. Layers can be used to isolate various parts of an image so that they can be edited as discrete objects with the painting or editing tools or other effects.