
15. Printing 3D Files
Lesson overview
In this lesson, you’ll learn how to do the following:
• Create a simple 3D object using a mesh preset.
• Use 3D tools in Photoshop.
• Manipulate 3D objects.
• Adjust the camera view.
• Prepare 3D files for printing.
• Export a file for remote printing.
This lesson will take about 30 minutes to complete. Download the Lesson15 project files from the Lesson & Update Files tab on your Account page at www.peachpit.com, if you haven’t already done so. As you work on this lesson, you’ll preserve the start files. If you need to restore the start files, download them from your Account page.

PROJECT: 3D LUGGAGE TAG
You can print 3D objects directly from Photoshop. If you have a 3D printer on site, you can print locally. Otherwise, you can export your file for printing by an online vendor.
Getting started
This lesson explores 3D features, which are available only if your video card has at least 512MB of dedicated VRAM and supports OpenGL 2.0, and if OpenGL 2.0 is enabled on your computer. To learn about your video card, choose Edit > Preferences > Performance (Windows) or Photoshop CC > Preferences > Performance (Mac OS). Information about your video card is in the Graphics Processor Settings area of the dialog box.
![]() Note
Note
Features covered in this lesson require Mac OS 10.7 or later, or Windows 7 or later, and at least 512MB VRAM. For more complete Photoshop system requirements, visit https://helpx.adobe.com/photoshop/system-requirements.html.
In this lesson, you’ll create a three-dimensional luggage tag. First, you’ll view the finished tag.
1. Start Photoshop, and then immediately hold down Ctrl+Alt+Shift (Windows) or Command+Option+Shift (Mac OS) to restore the default preferences. (See “Restoring default preferences” on page 4.)
2. When prompted, click Yes to delete the Adobe Photoshop Settings file.
3. Choose File > Browse In Bridge to open Adobe Bridge.
4. In Bridge, click Lessons in the Favorites panel. Double-click the Lesson 15 folder in the Content panel.
5. View the 15End.psd file in Bridge.

The 15End.psd file contains a 3D rendering of a luggage tag. In this lesson, you’ll combine elements to create the luggage tag, and then prepare it for printing. If you want to, you can print it locally to a 3D printer or export it to an online vendor for printing. (You’ll see estimated costs before placing the order.)
Before you create the luggage tag, you’ll play with the 3D tools to become familiar with the 3D environment.
6. Return to Photoshop.
Understanding the 3D environment
The advantage to working with 3D objects is, obviously, that you can work with them in three dimensions. You can also return to a 3D layer at any time to change lighting, color, material, or position without having to re-create a lot of the art. Photoshop includes several basic tools that make it easy to rotate, resize, and position 3D objects. The 3D tools in the options bar manipulate the object itself. The Camera widget in the lower left corner of the application window manipulates the camera so you can view a 3D scene from different angles.
You can use the 3D tools whenever a 3D layer is selected in the Layers panel. A 3D layer behaves like any other layer—you can apply layer styles, mask it, and so on. However, a 3D layer can be quite complex.
Unlike a regular layer, a 3D layer contains one or more meshes. A mesh defines the 3D object. For example, in the following exercise, the mesh is the cone shape. Each mesh, in turn, includes one or more materials—the appearance of a part or all of the mesh. Each material includes one or more maps, which are the components of the appearance. There are nine typical maps, and there can be only one of each kind; however, you can also use custom maps. Each map contains one texture—the image that defines what the maps and materials look like. The texture may be a simple bitmap graphic or a set of layers. The same texture might be used by many different maps and materials.
In addition to meshes, a 3D layer also includes one or more lights, which affect the appearance of 3D objects and remain in a fixed position as you spin or move the object. A 3D layer also includes cameras, which are saved views with the objects in a particular position. The shader creates the final appearance based on the materials, object properties, and renderer.
That may all sound complicated, but the most important thing to remember is that the 3D tools in the options bar move an object in 3D space and the Camera widget moves the cameras that view the object.
You’ll start by creating a simple 3D object from a plain colored layer.
1. In Photoshop, choose File > New. Click OK to accept the default values.
2. Choose Select > All to select the entire background layer.
3. Choose Edit > Fill. In the Fill dialog box, choose Color from the Contents menu, and then select a vivid blue color in the Color Picker. Click OK to close the Color Picker, and click OK again to close the Fill dialog box.
4. Choose Select > Deselect.

5. Choose 3D > New Mesh From Layer > Mesh Preset > Cone. If you see a message asking whether you want to switch to the 3D workspace, click Yes.
![]() Tip
Tip
If you see an Embedded Profile MIsmatch message, click OK.
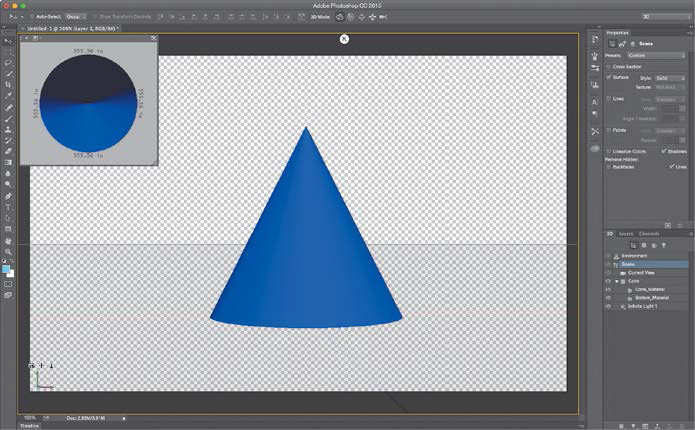
Your blue layer becomes a blue cone. Photoshop displays a grid, a Secondary View window, a Camera widget, and other 3D resources. Now that you have a 3D object, you can use the 3D tools.
6. In the Tools panel, select the Move tool (![]() ).
).
All the 3D capabilities are embedded into the Move tool, which recognizes when a 3D layer is selected and enables the 3D tools.
7. Select the Pan the 3D Camera tool (![]() ) in the 3D Mode area of the options bar.
) in the 3D Mode area of the options bar.
8. Click the edge of the cone, or just outside it, and drag to move it from side to side or up and down. Return the cone to the center. (If you click the cone itself, Photoshop recognizes the 3D Axis widget, and switches to the tool that corresponds with the active area of the widget, which you’ll learn about shortly.)

9. Select the Orbit the 3D Camera tool (![]() ) in the options bar, and then click and drag the cone to rotate the view. Experiment with the other tools to see how they affect the view of the object.
) in the options bar, and then click and drag the cone to rotate the view. Experiment with the other tools to see how they affect the view of the object.

10. With the Move tool, click the cone to select it.
When you select a 3D object, Photoshop displays the colorful 3D Axis widget, with green, red, and blue representing different axes. Red represents the x axis, green represents the y axis, and blue represents the z axis. (Hint: Think of RGB color to remember the order.)
![]() Tip
Tip
As you move the object, the 3D Axis widget shifts, too. For example, the x and y axis arrows may be available, while the z axis is pointing directly into the scene. The yellow center box may also be obscured by an axis.
If you hover the mouse over the center box until it turns yellow, you can click the box and drag to scale the object uniformly. Click an arrow to move the object along that axis; click the curved handle just before the arrow to rotate on that axis; click the smaller handle to scale along that axis.
11. Rotate, scale, and move the cone using the widget.
12. Right-click (Windows) or Control-click (Mac OS) the Camera widget in the lower left corner of the application window (it has two axes visible), and choose Top.

Options in the Camera menu determine the angle from which you see the object. The camera angle changes, but the object itself does not. Don’t be fooled by its relationship to the background; the background is not 3D, so it remains in place when Photoshop moves the camera for the 3D object.
13. Choose other camera views to see how they affect the perspective.
14. When you’re done experimenting, close the file. You can save your creation if you want to, or close without saving.
Positioning 3D elements
Now that you’ve gotten a feel for the 3D tools, you’ll use them to position the text on a luggage tag.
1. Choose File > Open, navigate to the Lesson15 folder, and double-click the 15Start.psd file.

![]() Tip
Tip
If you see an Embedded Profile MIsmatch message, click OK.
The file contains two 3D elements: the text and the tag itself. Currently, the text is in an awkward position, overlapping the tag. You’ll start by centering it.
2. Make sure the Move tool is selected in the Tools panel.
3. Click the front of the “Visit Paris” text to activate the 3D Axis widget.
4. Hover the cursor over the tip of the green arrow until the Move On Y Axis tool tip appears.
5. Click the tip of the green arrow, and drag the type down until it’s centered vertically on the red tag.
6. Click the tip of the red arrow, and drag the type to the right so that it’s horizontally centered on the red tag.

Your tag is ready to print!
7. Choose File > Save As. Navigate to the Lesson15 folder, and save the file as 15Working.psd. Click OK in the Photoshop Format Options dialog box.
Printing a 3D file
When you think of printing, you usually think of producing a flat page of two-dimensional text and images. They may be high-quality, amazing images, but you can’t see them from different angles, and what you hold in your hand remains a piece of paper or other relatively simple media.
3D printers open up a whole new world of printing opportunities. Instead of printing an image of a thing, you can print the thing itself. The possibilities are endless, including medical uses, prototyping, and creative enterprises such as making jewelry and one-of-a-kind souvenirs.
3D printers were once the province of well-funded labs, but have recently become much more accessible. In many cities, you can use one at a “maker” or do-it-yourself (DIY) space, a shared workshop area where, for a fee, you can use many advanced resources. If you don’t have a 3D printer yourself or easy access to one, you can also send your 3D creations to online vendors who will print them using the material you specify and mail them to you.
You can create 3D objects in Photoshop—or import 3D objects that have been created elsewhere—and print them directly from Photoshop.
Specifying 3D print settings
You don’t use the standard Print dialog box to print 3D objects from Photoshop. And before you print, you need to make sure the settings are appropriate.
1. Choose 3D > 3D Print Settings.
The Properties panel displays the 3D print settings, and the image window shows a preview of your 3D object. The preview shows you how it will look when printed, based on the printer you select.
2. Choose Shapeways from the Print To menu in the Properties panel.

Shapeways is an online vendor that prints 3D objects and mails them to you for a fee. There are other online vendors, but Shapeways is easiest to use because you can choose its printers directly within Photoshop. If you use another vendor, ask them for instructions for printing from Photoshop.
If you own a 3D printer, choose Local from the Print To menu, and then choose your printer from the Printer menu. If your printer isn’t listed in the menu, choose Get Latest Printers from the Print To menu, and then download the profiles for all supported printers.
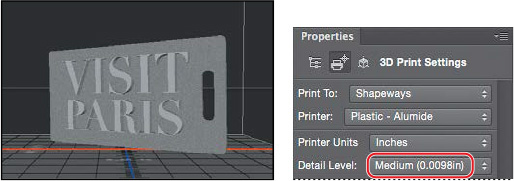
3. Choose Plastic - Alumide from the Printer menu. Plastic alumide is a plastic that simulates metal.

When you choose Shapeways from the Print To menu, the Printer menu lists dozens of material options. The material you select affects the appearance and cost of the object you print.
![]() Tip
Tip
You can learn more about the materials available through Shapeways, and compare costs of various options, by visiting http://www.shapeways.com/materials.
The preview of the 3D object changes in the image window to reflect the choices you’ve made. When you choose Plastic - Alumide, the preview shows a silver-gray tag with extruded text.
4. Make sure Inches is selected in the Printer Units menu to specify how printer volume should be measured.
3D printers have different capacities, and it’s important to consider whether your object will fit within the printer’s volume. The Printer Units values are dimmed, because you can’t change them; they describe the volume for the printer you’ve chosen. The Scene Volume values reflect the size of your 3D scene (in this case, a single object). If the Show checkbox is selected, the preview shows a cube outline to represent the printer volume that the scene lies within.
If the scene volume is larger than the printer volume, click Scale To Print Volume in the Properties panel to reduce its size so that your printer can print it. In this case, the scene volume is comfortably smaller than the printer volume.
5. Choose Medium from the Detail Level menu. This option determines how detailed the preview image is.
The Surface Detail options preserve bump maps and other texture and opacity settings when you print. You can leave those options selected, though there are no bump maps or opacity settings in this object.
You’re ready to print.
Exporting a 3D object
Printing a 3D object is a little more complicated than printing a two-dimensional image. It’s not that much more challenging for the person doing the printing, but Photoshop has to do a lot of behind-the-scenes calculations.
3D printers build objects from the bottom. If you’re printing a cube, for example, or another object with a significant base, the printer can create it without further support. However, many 3D objects are irregularly shaped, and the bottom of the object may actually be a set of disconnected surfaces. For example, think of a model of an animal. The bottom of the animal is composed of the four separate feet. In order to print such an object, the printer requires a support structure. That structure typically includes a raft, which provides a base to print from, and scaffolding, which supports portions of the object so they don’t collapse while the rest of the object is being printed.
When you choose 3D Print, Photoshop prepares the object for printing, and calculates any necessary raft and scaffolding as well.
1. Choose 3D > 3D Print, or click the Start Print icon at the bottom of the Properties panel.
Photoshop displays a progress bar as it prepares the print job.
2. Click OK in the dialog box that informs you that the estimated price may differ from the final purchase price.
3. In the Photoshop 3D Print Settings dialog box, review the estimated price and print size.

Click options in the Preview area of the dialog box to see the size, shadows, raft, scaffolding, and other aspects of the job. This object requires no raft or scaffolding, so those options are dimmed.
Use the 3D tools at the top of the dialog box to see your object from different angles.
Printing prices vary dramatically depending on the material you choose. You can click Cancel, choose a different printer, and then let Photoshop calculate the price again. You’ve made no commitments at this point in the process.
4. Click Export.
5. Click Save in the Save dialog box.
Photoshop saves the 3D print file information in the 15Working.psd file.
6. When you’re prompted to upload your file to the Shapeways site for printing, click Yes to continue to the site, or click No to stop the process.
7. If you continue to the Shapeways site, sign in if you have an account, or create one if you don’t. (Creating an account is free.)
8. On the Shapeways web site, click Upload. When prompted, select the file you just saved and click Choose. It will be in the Lesson15 folder, called 15Working.stl.zip. Then click Upload.
![]() Note
Note
You are not committed to a purchase until you check out and pay for the object.
Shapeways uploads and unzips the file. It displays the object and lists possible materials and their prices.

9. Click Add To Cart next to the material you want to print, and then follow the onscreen instructions to place your order. The printed object will be shipped to you.

Review questions
1. How does a 3D layer differ from other layers in Photoshop?
2. How can you change the camera view?
3. Which color represents each axis on the 3D Axis widget?
4. How do you print a 3D object?
Review answers
1. A 3D layer behaves like any other layer—you can apply layer styles, mask it, and so on. However, unlike a regular layer, a 3D layer also contains one or more meshes, which define 3D objects. You can work with meshes and the materials, maps, and textures they contain. You can also adjust the lighting for a 3D layer.
2. To change the camera view, you can move the Camera widget, or right-click (Windows) or Control-click (Mac OS) the widget to choose a camera view preset.
3. In the 3D Axis widget, the red arrow represents the X axis; the green arrow represents the Y axis, and the blue arrow represents the Z axis.
4. To print a 3D object from Photoshop, first choose 3D > 3D Print Settings, and set up your printer options. Then choose 3D > 3D Print, or click the Start Print icon at the bottom of the Properties panel.