
Adding text messages to your photos is another way to make your images and compositions even more memorable and personal.
Whether you want to add straightforward classic typography, or use effects, masks, and transparencies to turn your text into a striking design element in its own right, Photoshop Elements has all the right tools to make the job easy.
In this lesson you’ll learn the skills and techniques you need to work with text in Photoshop Elements:
Working with the canvas
Adding a border to an image
Formatting and editing text
Overlaying text on an image
Applying effects and Layer Styles
Hiding, revealing, merging, and deleting layers
Copying a text layer from one image to another
Working with multiple image windows
Warping text
Creating a type mask
You’ll probably need between one and two hours to complete this lesson.

Photoshop Elements provides you with the tools you’ll need to add crisp, flexible, and editable type to your pictures. Whether you want classic typography or wild effects and wacky colors, it’s all possible in Photoshop Elements. Apply effects and layer styles to make your text really stand out or blend it into your image using transparency. Create a type mask and fill your text with any image you can imagine.
Before you start working on the exercises in this lesson, make sure that you have installed the software on your computer from the application CD (see the Photoshop Elements 9 documentation) and that you have correctly copied the Lessons folder from the CD in the back of this book onto your computer’s hard disk. (See “Copying the Classroom in a Book files” on page 2.)
This lesson assumes that you are already familiar with the main features of the Photoshop Elements workspace. Should you need to brush up on the basic concepts review “Getting Started” and “A Quick Tour of Photoshop Elements” at the start of this book, or refer to Photoshop Elements Help.
Each of the projects in this lesson builds on skills learned in the previous exercises.
Start Photoshop Elements and click the Organize button in the Welcome screen. Check the name of the currently loaded catalog displayed in the lower left corner of the Organizer workspace. If your CIB Catalog is not already loaded, choose File > Catalog and select it from the list in the Catalog Manager.
Choose File > Get Photos And Video > From Files And Folders. In the Get Photos And Videos From Files And Folders dialog box, locate and open your Lessons folder. Select the Lesson10 folder, disable any automatic processing option that is currently active, and then click Get Media. In the Import Attached Keyword Tags dialog box, click Select All, and then click OK.
Click the Show All button in the Find bar. If you don’t see filenames below the thumbnails in the Media Browser, choose View > Show File Names.
The first project involves creating a text layer, and then formatting and arranging text on a photograph. You’ll also add a border and a greeting to the photo so it can be printed as a card or even mounted in a picture frame.

If you’ve worked through the previous lessons, you’re already familiar with locating files by their keyword tags. The image files for this lesson are tagged “Lesson 10” but all of them also have descriptive names, which will make it easy to find just the pictures required for each exercise rather than all the files in your Lesson10 folder.
With such a relatively small number of sample images in your Lessons folder these methods may seem like overkill, but as your photo library grows you’ll appreciate having as many options as possible to help find the file you want quickly and easily.
Type the letters sis in the Text Search box, at the left of the bar above the Media Browser.

Note
For detailed information on using the text search feature in the Organizer, see the section “Using a text search to find photos” on page 100 in Lesson 3.
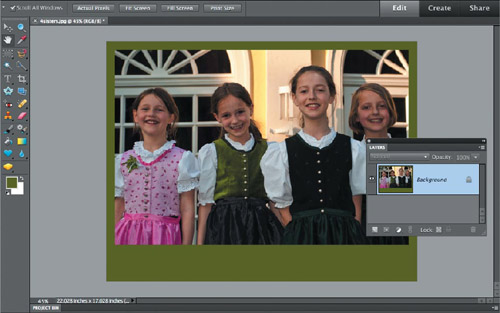
The Media Browser displays a single image: 4sisters.jpg—a photograph of four young girls on vacation in Europe. Select the image in the Media Browser.
Click the small arrow on the Fix tab above the Task Pane and choose Full Photo Edit from the menu.
You can think of the canvas as the equivalent of the paper on which a photo is printed.
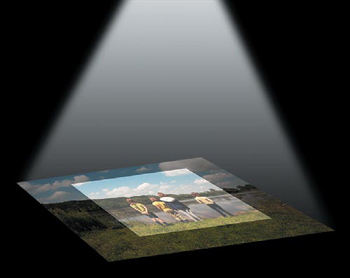
While you’re working with a digital photo, image data may temporarily lie outside the canvas space, but it will be clipped to the boundary of the canvas as soon as the image is flattened. To extend our limited analogy just a little further, think of the layer data as the image projected by a photographic enlarger in the darkroom. Although the projected image may be offset or enlarged so that it falls outside the borders of the paper, the data still exists; you can continue to work with it right up until the moment that the photographic paper is exposed.
By default, the canvas is the same size as the image; if you increase the size of the image file, the canvas is enlarged automatically. You can also enlarge the canvas independently from the image size; the result is just as if you printed a photo at the same size on a larger sheet of paper.
In this exercise you’ll do just that—enlarge the canvas without increasing the size of the image—effectively adding a border around the photo. By default, the extended canvas, and therefore the border, takes on the Background color as set in the color swatches at the bottom of the toolbox.
You’ll create the border in two stages in order to make it asymmetrical.
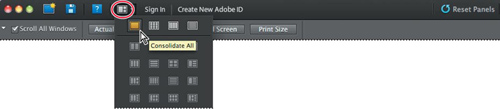
If the photo has opened in a floating image window, click the Arrange button at the top of the workspace, and then click the Consolidate All button at the upper left of the Arrange menu.
Drag the Layers panel out of the Panels Bin by its header bar, and then hide the Panels Bin by un-checking its name in the Window menu. Hide the Project Bin by double-clicking its header bar.

If you don’t see a reasonable amount of blank canvas surrounding the image, choose View > Zoom Out or press Ctrl+- (minus) / Command+− (minus).
Choose Image > Resize > Canvas Size. Move the Canvas Size dialog box, if necessary, so that you can see at least the left half of the image.
Set the Canvas Size dialog box as shown in the illustration:
Activate the Relative option.
Choose Inches from the units menus and type a value of 1.2 for both the Width and Height of the border.
Leave the Anchor control at the default centered setting.
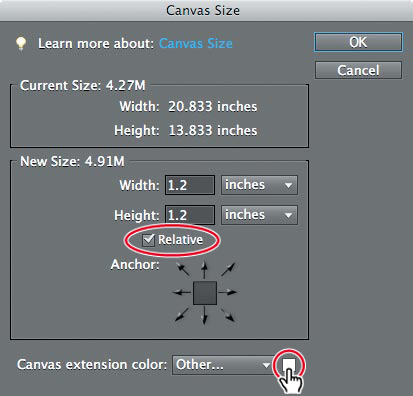
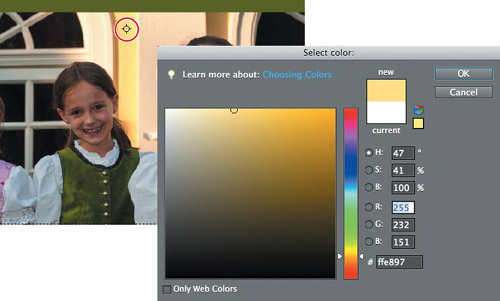
Click the small color swatch beside the Canvas Extension Color menu.
A color picker appears and the pointer becomes an eye-dropper cursor when you move it over the image. Sample a rich moss green from one of the brighter areas on the second girl’s top. If you can’t pick up exactly the color you want with the eye-dropper, try dragging the circular indicator in the large color field in the color picker, or type new values for Hue (H), Saturation (S), and Brightness (B). The Brightness value should not be above about 45% or the color will compete with both the photo and the text you’ll place in the next exercise.

Click OK to close the Color Picker and again to close the Canvas Size dialog box. The new colored border appears around the photo in the image window.
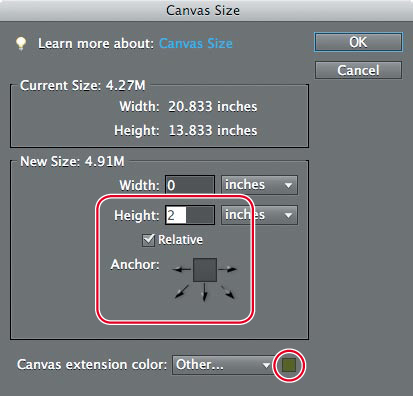
Now you’ll extend the border below the image to create a space for the text message. Choose Image > Resize > Canvas Size.
In the Canvas Size dialog box, confirm that the Relative check box is still activated. Leave the Width value at 0 and set the Height to 2 inches. In the Anchor control diagram, click the center square in the top row. Leave the Canvas Extension Color setting unchanged and click OK.
If you can’t see all of the border framing the image, double-click the Hand tool or choose View > Fit On Screen.???
Adding a quick border
When precision isn’t an issue, you can quickly add a border to an image by using the Crop tool, rather than increasing the size of the canvas.
Zoom out far enough so that you can see some of the blank art-board surrounding the image in the edit window.
Use the crop tool to drag a cropping rectangle right around the image.
Drag the corner handles of the crop marquee outside the image area onto the art-board to define the size and shape of border that you wish to create.
When you’re satisfied, click the Commit button in the lower right corner of the image. The canvas expands to fill the cropping rectangle, taking on the background color set in the color swatch at the bottom of the toolbox.
With the Type tools you can place editable type anywhere on your image.
In the toolbox, select the Horizontal Type tool (
 ).
).Set up the tool options bar as shown in the illustration below. Choose Myriad Pro from the Font Family menu and Bold from the Font Style menu. In the Font Size text box, type 80 pt and then press Enter / Return in your keyboard. Choose Center Text (
 ) from the paragraph alignment options. Click the small white triangle beside the color swatch—not the swatch itself—and select white as the text color.
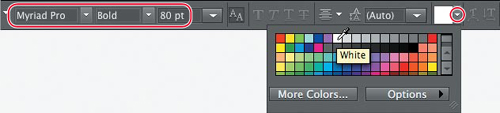
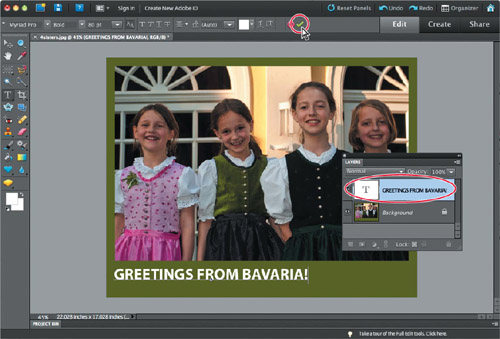
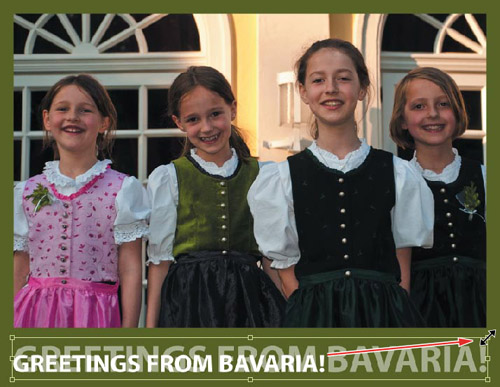
Click inside the extended border area below the photo to set the text input cursor, and then type GREETINGS FROM BAVARIA! in uppercase. Click the Commit button (
 ) in the tool options bar to accept the text. Don’t worry about the positioning of the text—you’ll adjust that later.
In the Layers panel the image now has two layers: a locked Background layer containing the image and a text layer containing your greeting. Most of the text layer is transparent, so only the text itself interrupts your view of the Background layer.
When you use the Type tool, Photoshop Elements automatically creates a new text layer in your image. The type you enter remains active on the text layer, just like type in a word processing document—you can edit its content, scale it, reposition it, or change its color at any time.
Tip
Don’t press the Enter or Return keys on the main part of your keyboard to accept text changes. When you have active text in your file, these keys add a line break in the text. Click the Commit button in the tool options bar to accept the text or press the Enter key in the numeric keypad section of your keyboard.
Make sure the text layer is still selected in the Layers panel, and then select the Move tool (
 ) in the toolbox.
Place the cursor inside the text box and drag to position it so that the message is aligned with the left edge of the photo, and roughly the same distance from the lower edge of the border as it is from the left edge.
With the move tool, drag the handle on the upper right corner of the text box to scale the text so that the right side is aligned with the right edge of the photo.
You don’t need to hold down the Shift key as you drag; the text will be scaled proportionally by default.
If necessary, drag the text to adjust its position or use the arrow keys on your keyboard to nudge it into place; then click Commit button (
) on the text object bounding box.
Adding vector-based text is a nondestructive process; your original image is not overwritten by the text. If you save your file in native Photoshop (PSD) format with layers enabled, you can reopen it and still move, edit, or delete the text layer without affecting the image.
Using the Type tool is much like typing in a word processing application. If you want to edit the message, select the text and type over it. To change the typeface, font style, size or text color, select the characters you want to change and adjust the settings in the tool options bar accordingly.
If necessary, choose View > Zoom In to enlarge the image until you can comfortably read the text you added in the previous exercise.
Confirm that the text layer GREETINGS FROM BAVARIA! is still selected in the Layers panel and select the Type tool again.
Now you’ll change the text color for just part of the message.
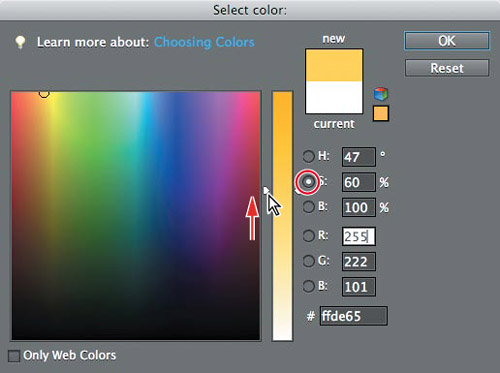
Swipe to select just the word “GREETINGS” or simply double-click the word, and then click the Text Color swatch in the tool options bar to open the Color Picker. Sample the color from the sunlit yellow wall in the background.
Tip
If you need to correct any typing errors or make other changes to text, remember that using the Type tool is like working in a word processing application. Click once to place the insertion point within the text. Use the arrow keys to move the text cursor forward or back. Drag to select multiple characters. Type to add text or to overwrite selected characters. Press the Backspace or Delete key to erase characters. Click the Commit button in the tool options bar to accept any changes.
Click the radio button beside the Saturation (S) value in the Color Picker to activate the Saturation controls. The sampled color is a little weak for the background green, so you can use the slider to increase the Saturation to 60%, and then click OK.
Click the Commit button (
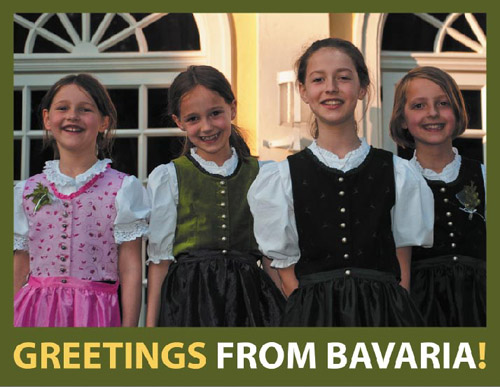
) in the tool options bar.Swipe to select the exclamation mark (!) at the end of the message, and then click the Text Color swatch in the tool options bar to open the Color Picker. With the eyedropper cursor, sample the color from the word “GREETINGS.”
Click OK, and then click the Commit button in the tool options bar.
You can save your work file complete with layers so you can return to edit it later. As long as you save your work in the right format and enable layers, your text and adjustment layers remain “live” and editable.
Choose File > Save.
In the Save As dialog box, navigate to your My CIB Work folder and choose Photoshop (PSD) as the file format. Under Save Options, confirm that the option Layers is activated. Activate the option Include In The Organizer and disable Save In Version Set With Original.
Name the new file 4sisters_card_work, and then click Save.
If the Photoshop Elements Format Options dialog box appears, keep Maximize Compatibility selected and click OK.
Choose File > Close.
Bravo, you’ve finished your first text project. In this section, you’ve formatted and edited text, and worked with a text layer. You’ve also created a photo border by increasing the canvas size without enlarging the image itself and gained experience with using the color picker.???
Distinguishing between pixel-based and vector graphics
Computer graphics can be divided into two types: pixel-based images (otherwise called bit-mapped, or raster images), which are primarily created by cameras and scanners, and vector images—graphics constructed with drawing programs.
Pixel-based images such as photos are made up of pixels that you can detect when you zoom in. To produce a medium quality print of a photo, you need to make sure that the file is at least 250 ppi (pixels per inch). For viewing on screen, 72 ppi is fine.
Vector images consist of artwork formed from paths, like a technical line drawing. Vectors may form the outlines of an illustration, a logo, or type. The big advantage of vector images over pixel-based images is that they can be enlarged or reduced by any factor without losing detail. Live type on a text layer has this advantage.

In the last exercise, you preserved the layering of your work file by saving in a file format that supports layers. This gives you the flexibility to make changes to the images, text, and effects even after the file has been saved, without needing to rebuild the image from the beginning or modify the original. Your layers have kept the text and effects separate from the image itself.
In this project, you’ll do what many professional photographers and studios sometimes do to protect proprietary images: stamp a copyright notice over the photos. You’ll apply a style to a text layer so that it appears as if the type is set in clear glass overlaid on the images.
Your first task for this project is to prepare the text in its own file.
If you’re not already in the Editor in Full Edit mode from the previous exercise, switch to it now by clicking the arrow on the Fix tab above the Task Pane and choosing Full Photo Edit.

In the Editor, either choose Window > Reset Panels or click the Reset Panels button (
 ) at the top of the workspace.
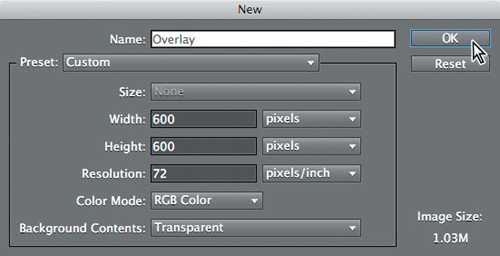
Choose File > New > Blank File. In the New dialog box, name the file Overlay. From the units menu to the right of the Width text box, choose Pixels. Type 600 for both the Width and Height values.
Set the file Resolution to 72 pixels/inch, the Color Mode to RGB Color, and the Background Contents to Transparent; then, click OK.
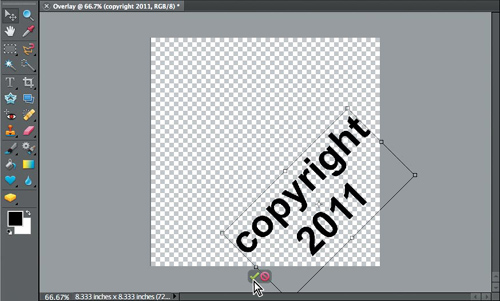
The image window should show only a checkerboard pattern, representing the background transparency you specified when you created the file. This pattern indicates 100% transparency; the layer will act like a pane of clear glass onto which you can place text or graphics.

If you don’t see the checkerboard pattern, close the new file without saving, and then repeat the last two steps, being careful to select Transparent from the Background Contents menu.
If you still don’t see a checkerboard pattern, check your preferences. Choose Preferences > Transparency from the Edit menu on Windows / Photoshop Elements menu on Mac OS. From the Grid Size menu, choose any of the options other than None, and then click OK to close the Preferences dialog box.
Select the Type tool (
), and then set up the tool options bar as shown in the illustration below. Choose Arial from the Font Family menu, and Bold from the Font Style menu. Type 120 pt in the Font Size box; then, press Enter / Return. Choose Center Text () from the paragraph alignment options. Click the triangle beside the color swatch—not the swatch itself—and choose black as the text color. Make sure that Leading (to the left of the color swatch) is set to Auto.
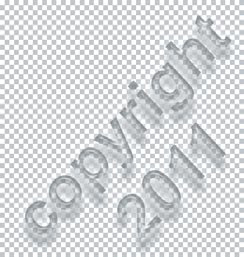
Click near the center of the image window and type copyright; then press Enter / Return and type 2011. Click the green Commit button (
) in the tool options bar to accept the text you typed.Select the Move tool (
) in the toolbox and click one of the corner handles of the text bounding box. In the tool options bar, make sure that the option Constrain Proportions is activated, and then type 85% in either the Width (W) or Height (H) text box.Note
You can scale or reshape the text by dragging the handles on the bounding box with the Move tool. Because Photoshop Elements treats text as vector shapes, the letter shapes remain smooth even if you enlarge the text. If you tried this with bit-mapped text, you’d see jagged, stair-step edges in the enlarged text.
With the Move tool still selected, move the pointer outside a corner of the text bounding box. When the pointer changes to the curved double-arrow rotate cursor, drag the text counter-clockwise to rotate it around its center by 45°. Hold down the Shift key as you drag to constrain the rotation to 15° increments.
Drag the text to the lower right of the square image as shown in the illustration below, and then click the Commit button at the edge of the bounding box.
Next, you’ll apply an effect to your text by adding a Layer Style. Layer Styles are preset combinations of several adjustments that can be applied to your text layer in one easy action. Photoshop Elements gives you a wide variety of choices, from bevels and drop shadows to imaginative chrome and neon effects.
Make sure the text layer is still selected. At the top of the Effects panel in the Panel Bin, click the Layer Styles button (
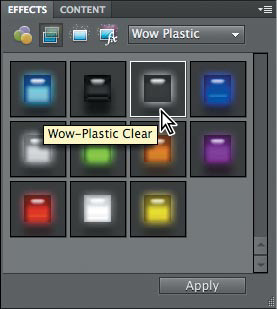
 ), and then open the menu to the right to see the available effects categories. For this exercise, you’ll use one of the effects from the Wow Plastic category.
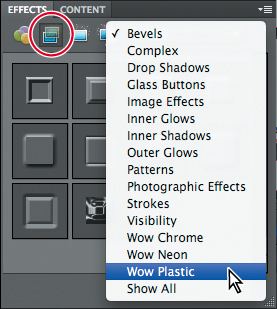
In the top row of the Effects panel, select the Wow-Plastic Clear effect and click Apply. You could also apply the effect to the selected text layer by double-clicking the swatch, or simply dragging it directly onto your text.
When you apply a Layer Style to a text layer, both the text and the effect remain editable. You could go back and edit the text without affecting the layer style, or edit, replace, or remove the effect without affecting your ability to edit the text.
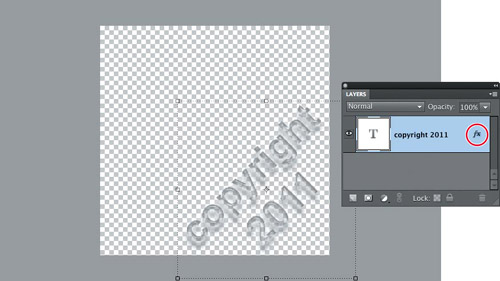
In the Layers panel, a layer to which a layer style effect has been applied can be identified by the fx icon. Double-clicking the fx icon will open the Style Settings dialog box, where you can modify each of the preset components that contribute to that effect.
Choose File > Save and save the file to your My CIB Work folder in Photoshop (PSD) format, making sure you activate the Layers option. Make sure that the file will be included in the Organizer, but not in a Version Set; then, click Save. If the Photoshop Elements Format Options dialog box appears, keep Maximize Compatibility selected, and then click OK, keeping the file open.
Choose Preferences > General from the Edit / Photoshop Elements menu. Activate Allow Floating Documents In Full Edit Mode, and then click OK.
Now that you’ve prepared the copyright text, you’ll place it onto a series of images. Once again, you can use a text search to find the files you want.
Switch to the Organizer by clicking the Organizer button (
 ) at the top right of the Editor workspace, leaving your Overlay file open.
In the Organizer, click the Show All button in the Find bar, and then type the word paint in the Text Search box above the Media Browser.
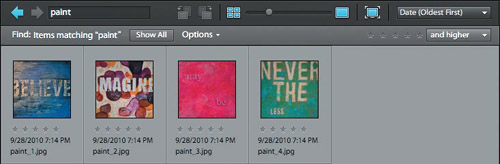
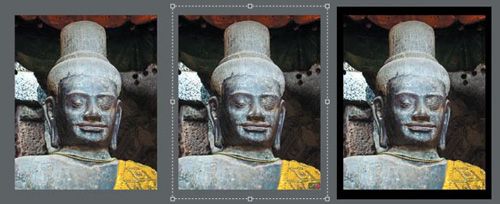
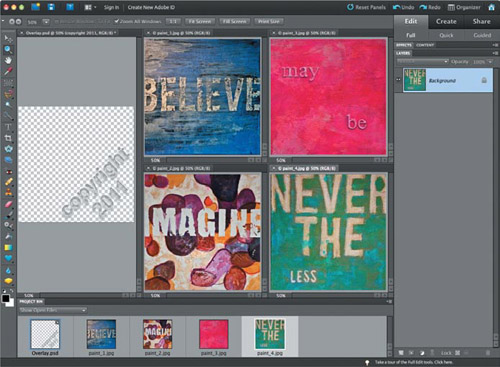
The Media Browser displays four images: paint_1.jpg to paint_4.jpg: photographs of paintings. Select all four images, and then click the small arrow on the Fix tab above the Task Pane and choose Full Photo Edit.
A great advantage of having your text on its own layer is that it can be copied from one image to another, complete with any layer style that has been applied.
Make sure you have the Project Bin open. Collapse the grouped Effects and Content panels by double-clicking the group’s header bar.
Click the Arrange button (
 ) at the top of the workspace and choose the last of the “5 Up” layouts—the second layout in the last row.
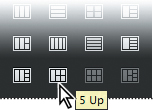
Click the name tab of any of the paintings to make it the active window. Press Ctrl+− (minus sign) / Command+− (minus sign) repeatedly to zoom out until you can see the entire image. Choose Window > Images > Match Zoom. The view in all of the open image windows is matched to the active image.
Watch the Layers panel as you double-click each of the thumbnail images in the Project Bin in turn; each has a single layer named “Background.”
Make Overlay.psd the active image; then hold down the Shift key and drag the text layer from the Layers panel onto the image paint_1.jpg.
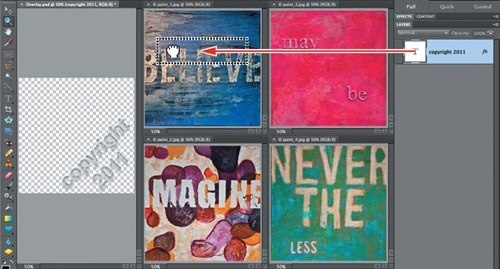
To make the new text layer more transparent, reduce its opacity to 45%, either by typing 45 into the Opacity value box, or by dragging the slider to the left.

Make sure that the image paint_1.jpg is still the active file. In the Layers panel, double-click the fx icon on the text layer.
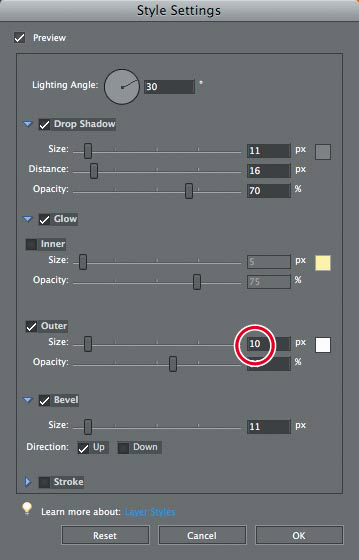
Under Glow in the Style Settings dialog box, change the size of the Outer Glow from 22 pixels to 10 pixels. Click OK to close the Style Settings dialog box.
Hold down the Shift key and drag the text layer with its refined layer style from the image paint_1.jpg onto the other three images.
The text message is more visible on the files paint_3.jpg and paint_4.jpg. In both these cases, you can decrease the opacity of the text layer to 35%.
Experiment with the text layer’s opacity for the image paint_2.jpg. This file is far more problematic; an opacity value high enough to make the whole copyright message visible produces too strong an effect over the lighter areas. You’ll need to apply a different technique.
Increase the layer opacity to 100%, and then choose Layer > Simplify Layer. Note the change in the Layers panel: the text layer thumbnail has been replaced by a standard image thumbnail with large areas of transparency and the fx icon has disappeared.
The text and its layer style have been merged into a bit-mapped image. While the text was still “live” it was resolution independent—but if you enlarged the content of the layer now you would see jagged, pixelated edges.
You can no longer edit the message with the Text tool, and the layer style can no longer be modified; however, simplifying the layer has made it possible to change its blending mode.
In the Layers panel, set the blending mode for the copyright 2011 layer to Hard Light. Even at 100% opacity, the effect is still a little vague. Set the Opacity value to 65%, and then choose Layer > Duplicate Layer. Voilà—130%!

Choose File > Close All. If you wish, you can save your efforts to your My CIB Work folder. If you do save the files, be sure to activate the Layers option for the Photoshop (PSD) format so that the layers in the files are preserved.
Done! In this project, you’ve created a new document to set up and store a live text layer, applied a Layer Style from the Effects panel, and copied layers between image files. You’ve also gained a little more experience with blending modes.???
About type
A font is a collection of characters—letters, numerals, punctuation marks, and symbols—in a particular typeface, which share design characteristics such as size, weight, and style. A typeface family is a collection of similar fonts designed to be used together. One example is the Myriad typeface family, which is a collection of fonts in a number of styles including Regular, Bold, Italic, Condensed and other variations. Other typeface families might consist of different font style variations.

Traditionally, font sizes are measured in points, but can also be specified in millimeters or inches, as with large lettering on signs, for example. The most common formats for computer fonts are Type 1 PostScript, TrueType, and OpenType.
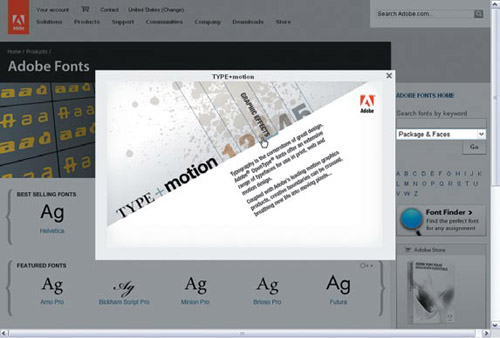
Each font conveys a feeling or mood. Some are playful or amusing, some are serious and businesslike, while others might convey an impression of elegance and sophistication. To get a feel for which typeface best suits your project, it’s a good idea to try out several fonts. One way to find out more about type is to go to www.adobe.com/type. Adobe Type offers more than 2,200 fonts from the world’s leading type designers, which you can browse by categories such as style, use, theme, classification, and designer. This will make it easy to find the perfect font for any assignment. You can even type in your sample copy and compare different fonts.
In this exercise you’ll have more fun with text. You’ll distort text and apply effects, all the while keeping the text layer live and editable.
If you’re still in the Editor from the last exercise, switch to the Organizer now by clicking the Organizer button (
 ) at the top right of the Editor workspace.
In the Organizer, click the Show All button in the Find bar, and then type the word any in the Text Search box at the left of the bar above the Media Browser.
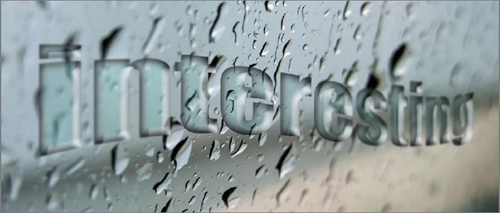
The Media Browser displays a single image: anything.jpg, a cropped photograph of raindrops on a car window.

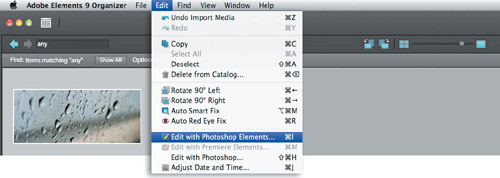
Click to select the image anything.jpg in the Media Browser, and then choose Edit > Edit With Photoshop Elements.
In the first exercise, you’ll place some text, and then add a layer style that will give the letters a three-dimensional look to integrate them with the background image.
In the Editor, either choose Window > Reset Panels or click the Reset Panels button (
) at the top of the workspace.Choose Window > Images > Consolidate All To Tabs. Alternatively, drag the title bar of the image window to the top of the Edit pane and release the mouse button when the image dims and a blue line appears around the Edit pane.
Select the Type tool (
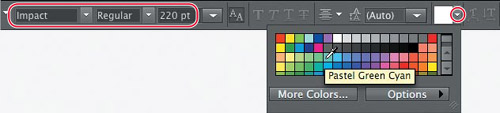
) from the toolbox, and then set up the tool options bar as shown in the illustration below:From the Font Family menu, choose a bold sans-serif style such as Impact (as an alternative, you could choose Arial Black).
Type 220 pt in the Font Size box; then, press Enter / Return.
Choose Center Text (
) from the paragraph alignment options.Click the triangle beside the color swatch (not the swatch itself) and choose Pastel Green Cyan for the text color.
Using the Horizontal Type tool, click a little below the center of the image and type the word anything in lower case.
Click the Commit button (
) in the tool options bar to accept the text.Choose the Move tool (
) in the toolbox and drag the text to center it as shown in the illustration below.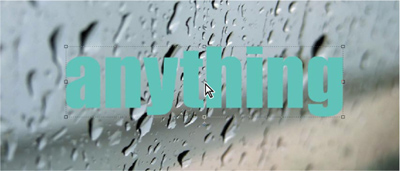
In the Effects panel, click the Layer Styles button (
), and then choose the category Glass Buttons from the effects categories menu to the right. Double-click the fourth effect in the third row: Translucent Glass.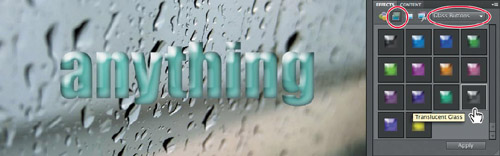
The Translucent Glass style, like all the Effects panel presets, is made up of a combination of image adjustments that are all applied to the image at once. The effect, in this case a Layer Style, remains “live” and editable. You can change the settings for each of the component adjustments to fine-tune the layer style.
In the Layers panel, double-click the fx icon on the text layer to open the Style Settings dialog box. Set the style controls as you see in the illustration below:
Drag the Lighting Angle wheel or type in the text box to set an angle of −30°.
Click the Inner Glow color swatch to open the color picker. Type a value of 0 in the text boxes for Hue (H), Saturation (S), and Brightness (B); then, click OK to close the color picker.
Set the Size for the Inner Glow to 25 px, and the Opacity to 100%.
Set the Bevel Size to 22 px.
Click OK to close the Style Settings.

In the Layers panel, change the opacity of the text layer to 65%, either by typing the new value directly into the text box or by dragging the Opacity slider.

Choose File > Save As. Save the new file in Photoshop (PSD) format to your My CIB Work folder, making sure the Layers option is activated so that you can edit the type even after the file has been closed. Include the image in the Organizer, but not in a Version Set. Type the name anything_text, and then click Save.
It’s easy to stretch and skew text into unusual shapes using the Photoshop Elements Warp Text effects; the hard part is to avoid overusing them!
Make sure the Type tool is active, and then click anywhere on the text “anything” in the image window.
It’s not necessary to highlight the text because warp effects are automatically applied to the entire text layer.
In the tool options bar, click the Create Warped Text button (
 ) to open the Warp Text dialog box. Choose the Wave effect from the Style menu.
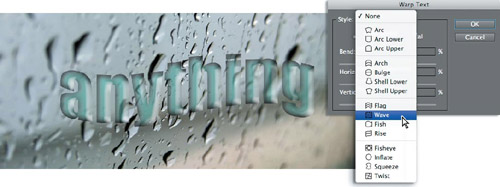
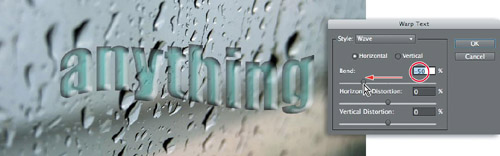
The Warp Text dialog offers a number of controls for changing the way the effect is applied. For this exercise you need only make one adjustment. Use the slider to set the Bend value to −50%, reversing the direction of the wave curve, and then click OK to close the Warp Text dialog box.
In the Layers panel, the text layer thumbnail now displays a Warped Text icon.
The text layer is still editable. To check this out, first click the text layer; then, double-click the text with the Type tool and type the word interesting over it.

Choose File > Save.
Many of the layer blending modes will not work for a layer with a live layer style. Various other editing operations are not possible for a live text layer. For example, although you can apply the Free Transform and Skew commands from the Image > Transform menu, the Distort and Perspective commands in that menu are dimmed. Painting tools and Enhance menu commands are also disabled for live text.
Tip
If you need to refresh your understanding of vector and bit-mapped graphics, please review the notes on page 322.
Before you can perform some of these operations, you must first simplify the text; for others you’ll need to simplify the layer style as well. When you simplify vector text it is converted to a bitmap image that cannot be edited with the Text tool.
If you simplify the text together with its layer style, they are merged into a single bit-mapped layer and can no longer be modified separately.
When you want to experiment with any of these techniques, it’s a good idea to use a copy of the text layer; that way, you’ll be able to preserve your text and layer style settings in editable form.
In the Layers panel, make sure the text layer is still selected. Click the Options menu icon at the right of the panel’s header bar to open the Layers panel Options menu. Choose Duplicate Layer. Click OK to accept the default name, “interesting copy.”
Click the eye icon to the left of the original text layer to make the layer invisible in the image window.
Right-click / Control-click the fx icon on the “interesting copy” layer and choose Simplify Layer from the context menu.
The text layer thumbnail is replaced by a standard image thumbnail and the fx icon has disappeared. The text and its layer style have been merged into a bit-mapped image. Like the layer style, the 65% opacity setting has been applied permanently; although the text still appears partially transparent you can see that the layer opacity value is now 100%. In other words, the simplified layer is partially transparent even at its maximum opacity setting.
You can also invoke the Simplify Layer command from the Layer Menu. This will produce the same result that you observed in step 3.
Choose Edit > Undo Simplify Layer.
Right-click / Control-click the layer “interesting copy,” avoiding both the fx icon and the layer thumbnail. Choose Simplify Layer from the context menu.
The text layer thumbnail is replaced by a standard image thumbnail, but this time the layer has retained the fx icon; the layer style is still live. Note that the simplified layer has also retained its opacity value of 65%.
Although the text is no longer live, the simplified layer can be edited just like any other image.
You should be careful, however, with any modification involving scaling. Unlike vector graphics, bit-mapped images are not resolution-independent; over-enlargement will result in a jagged, pixelated appearance.
In this exercise you’ll add some finishing touches that will make your stylized text appear more convincingly part of the background image.
Make sure the simplified layer is still selected in the Layers panel; then, choose Image > Transform > Perspective.
Drag the handle at the lower left corner of the bounding box downwards, about half of the distance to the bottom edge of the image.
Drag the handle at the lower right corner of the bounding box a slightly shorter distance upwards.
Use the arrow keys on your keyboard to re-center the text, and then click the Commit button (
) to accept the changes.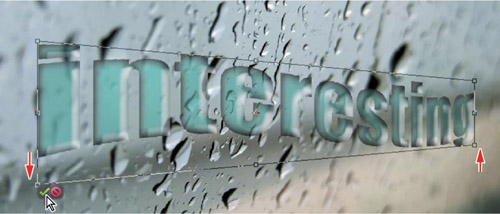
Select the Rectangular Marquee Tool and drag a selection marquee to surround the left third of the image. Hold down the Shift key and drag another marquee to add to the right third of the image to the selection.
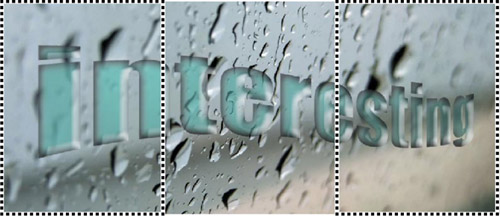
Choose Select > Feather. In the Feather Selection dialog box, type a value of 50 pixels for the Feather Radius, and then click OK.
Choose Filter > Blur > Gaussian Blur. In the Gaussian Blur dialog box, set the blur radius to 2 pixels, and then click OK.
Choose Select > Deselect, or press Control+D / Command+D.
In the Layers panel, change the blending mode for the layer “interesting copy” to Soft Light, and increase the layer’s opacity to 80%.
The simplified text is now matched more closely to the tone, perspective, and focal depth of the background image.
Choose File > Save.
Next, you’ll use a painting tool to create a different look for the simplified text.
In preparation, you’ll lock the transparent pixels on the layer, which will enable you to paint on the filled areas in the layer without the need to make a selection or be careful about painting over the edges.
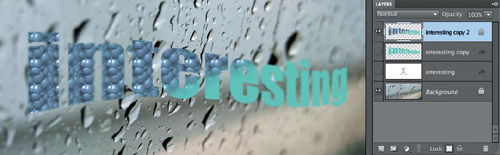
Right-click / Control-click the layer “interesting copy” and choose Duplicate Layer from the context menu. Click OK in the Duplicate Layer dialog box to accept the default name for the new layer. Hide the layer “interesting copy” by clicking the eye icon beside the layer thumbnail.
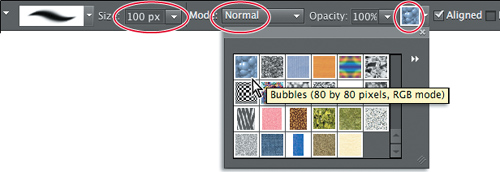
Select the Pattern Stamp tool, which is grouped with the Clone Stamp tool. Set the tool options as shown below: brush Size: 100 px, brush Mode: Normal, Opacity: 100%. Click the Pattern swatch and choose the first pattern, Bubbles.

Make sure that the layer “interesting copy 2” is still active, and then click the Lock Transparent Pixels button at the bottom of the Layers panel to prevent changes being made to the transparent areas of the simplified layer. A lock icon appears on the layer “interesting copy 2.”

Right-click / Control-click the fx icon on the layer “interesting copy 2” and choose Clear Layer Style from the context menu. Change the layer blending mode to Normal, and increase the opacity to 100%.
Make sure that the Pattern Stamp tool is still selected in the toolbox; then, paint over the text in the image window. The pattern is applied only to the simplified text; the locked transparent pixels remain unaffected.
Toggling the visibility of layers by clicking the eye icons in the Layers panel is a great way to assess different design solutions within one file.
Click the eye icon beside the thumbnail for the layer “interesting copy 2” to hide the layer. The eye icon is hidden also, leaving an empty box to indicate that the layer is not visible. Note that although the layer is selected, the Blending Mode and Opacity options are dimmed and unavailable; you can’t edit a hidden layer.
In the Layers panel, click the empty box to the left of the text layer “interesting.” The eye icon reappears and your live, warped text with its translucent glass effect is once more visible in the image window.
You can now delete the layer with the bubbles pattern, leaving just the Background layer with the original image, the live text layer, and your refined simplified layer. Deleting layers that you no longer need reduces the size of your image file.
To delete the layer “interesting copy 2,” right-click / Control-click the layer and choose Delete Layer from the context menu. Click Yes to confirm the deletion.
Tip
To delete more than one layer at once, Ctrl-click / Command-click to select the layers you wish to delete and right-click / Control-click any of them. You can also delete selected layers by choosing Layer > Delete Layer, or by simply dragging them to the Trash icon at the bottom of the Layers panel.
Select the original text layer, “interesting.” Right-click / Control-click the layer and choose Clear Layer Style from the context menu. Alternatively, choose the same command from the Layer menu or the Layers panel Options menu.
The type in the text layer no longer has the three-dimensional translucent glass look, but it’s still warped.
Select the Type tool. Drag across the text in the image window to select it, and then click the Create Warped Text button (
) in the tool option bar to open the Warp Text dialog box. Choose None from the Style menu, and then click OK to close the Warp Text dialog box.Hide the layer “interesting” and reveal the layer “interesting copy;” then, choose File > Save and close the file.
In this project, you’ve applied a Layer Style to live text; then, warped it and painted it with little blue bubbles. You should be ashamed of yourself! You’ve also gained a lot more experience in working with layers. You learned how to protect transparent pixels on a layer, how to edit and clear layer styles and warp effects, and how to hide, reveal or delete a layer.???
Working with paragraph type
With point type, or headline type, each line of type is independent—the line expands or shrinks as you edit it, but it doesn’t automatically wrap to the next line. Point type (the name derives from the fact that it is preceded by a single anchor point) is perfect for small blocks of text like headlines, logos, and headings for Web pages. Probably most of the text you add to your images will be of this type.
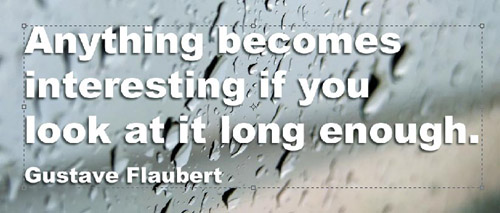
If you work with larger blocks of type and you want your text to reflow and wrap automatically, it’s best to use the paragraph type mode. By clicking and dragging with the type tool you’ll create a text bounding box on your image. The bounding box can be easily resized to fit your paragraph text perfectly.
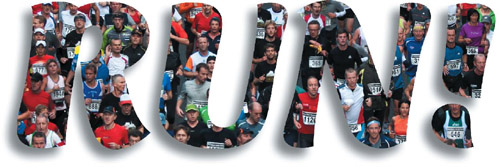
You can have a lot of fun with the Type Mask tool. Photoshop Elements offers two variants—one for horizontal type and the other for vertical type. The Type Mask tool turns text outlines into a mask through which an underlying image is visible.
If you’re still in the Editor from the last exercise, switch to the Organizer now by clicking the Organizer button (
) at the top right of the Editor workspace.In the Organizer, click the Show All button in the Find bar, and then type the word run in the Text Search box, at the left of the bar above the Media Browser.
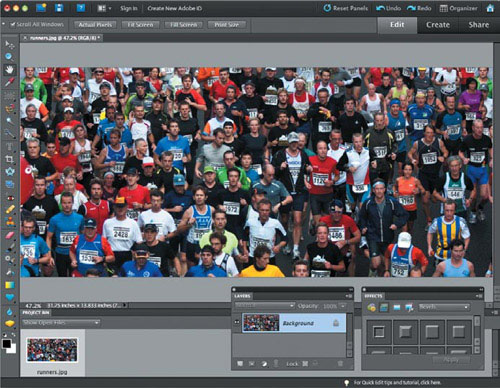
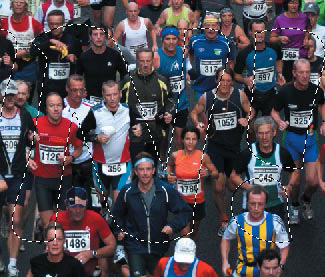
The Media Browser displays a single image: runners.jpg, a photo of competitors in a marathon. Click to select the image in the Media Browser; then, click the arrow on the Fix tab above the Task Pane and choose Full Photo Edit.
The Type Mask tool (![]() ) enables you to fill letter shapes with parts of an image. This can create a much more interesting graphic effect than plain text filled with a solid color.
) enables you to fill letter shapes with parts of an image. This can create a much more interesting graphic effect than plain text filled with a solid color.
In the Editor, either choose Window > Reset Panels or click the Reset Panels button (
) at the top of the workspace.Choose Window > Images > Consolidate All To Tabs. Alternatively, drag the title bar of the image window to the top of the Edit pane and release the mouse button when the image dims and a blue line appears around the Edit pane.
Drag the Layers and Effects panels out of the Panels Bin by their name tabs and position them at the bottom of the workspace where they won’t block your view of the image. Hide the Panels Bin by un-checking its name in the Window menu, and then double-click the Hand tool or choose View > Fit On Screen.
Select the Horizontal Type Mask tool (
 ) which you’ll find grouped with the other type tools in the tool box.
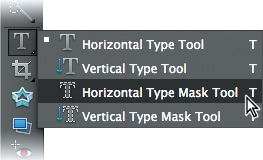
Set up the text attributes in the tool options bar:
Choose a font from the Font Family menu. We chose Mercurius CT Std, Black Italic, but if you don’t have that font, choose any typeface that’s blocky enough to let plenty of the image show through the letter forms.
Type a new value of 950 pt for the font Size (you may need to adjust that for a different font).
Choose Center Text (
) from the paragraph alignment options.You don’t need to worry about a color for the text; the type will be filled with detail from our marathon image.
Click at a horizontally centered point low in the image and type RUN!
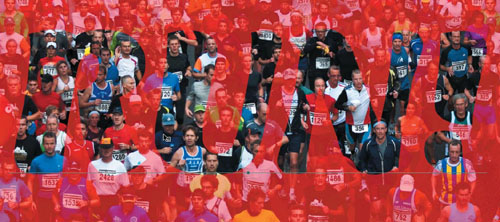
Hold down the Ctrl / Command key on your keyboard; a bounding box surrounds the text in the image window. Drag inside the bounding box to reposition the type mask.
If you wish to resize the text, hold down the Ctrl / Command key and drag a corner handle of the bounding box. The operation is automatically constrained so that the text is scaled proportionally. Alternatively, you can double-click the text with the Type Mask tool to select it, and then type a new font size in the tool options bar.
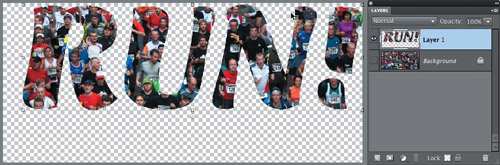
When you’re satisfied with the result, click the green Commit button in the tool options bar. The outline of the text becomes an active selection. If you’re not happy with the placement of the selection, use the arrow keys on your keyboard to nudge it into place.
Choose Edit > Copy, and then Edit > Paste. In the Layers panel, you can see that the cutout type image has been placed onto a new layer, surrounded by transparency.
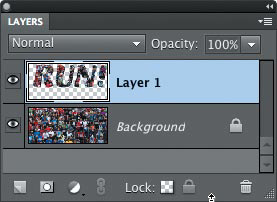
Hide the Background layer by clicking the eye icon beside the layer thumbnail.
The text is no longer live—the mask was converted to a selection outline, so it can no longer be edited with a text tool; however, you can still apply a layer style or an effect to enhance it or make it more prominent.
If necessary, select Layer 1 in the Layers panel to make it the active layer.
Select the Move tool (
) and drag the cut-out type to center it in the image window; then, press the up arrow and right arrow keys eight times each.Expand the Effects panel, if necessary, and click the Layer Styles button (
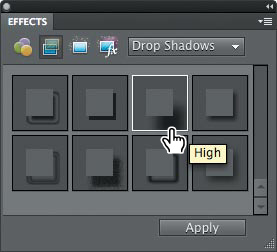
). Choose the effects category Drop Shadows from the menu.
In the Drop Shadows panel, double-click the drop-shadow effect named High: the third effect swatch in the first row.
In the Layers panel, select the Background Layer; then, choose Image > Rotate > Flip Layer Horizontal. Click OK to confirm the conversion of the background, and then click OK to accept the default name.
Choose Enhance > Adjust Color > Adjust Hue/Saturation. In the Hue/Saturation dialog box, reduce the Saturation value to −60 and increase the Lightness to +60; then, click OK.
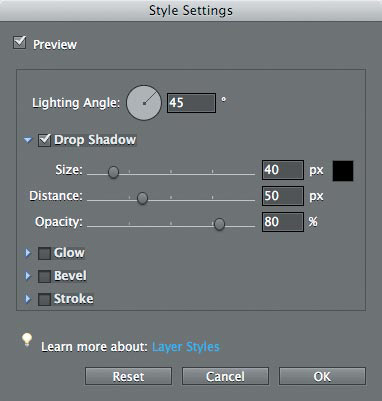
In the Layers panel, select the layer with the cut-out type; then, double-click the fx icon. In the Style Settings dialog box, set the Lighting Angle to 45°. Increase the Drop Shadow Size to 40 px, the Distance to 50 px, and the Opacity to 80%; then, click OK.

Choose File > Save As. In the Save As dialog box, choose Photoshop (PSD) as the file format, enable layers, and save the file to your My CIB Work folder. Make sure that the new file will be included in the Organizer, but not in a Version Set; then, name the file runners_mask and click Save. Close the file.
Congratulations! You’ve completed another lesson. You’ve learned how to format and edit text, and how to work with a text layer. You’ve created a photo border by working with the document canvas, used the Effects panel to apply Layer Styles, warped and painted text, and created a text mask. You learned about locking transparent pixels on a layer and how to edit and clear layer styles and text effects. You also learned how to hide, reveal and delete a layer. Take a few moments to work through the lesson review on the next page before you move on.