
Photoshop Elements makes it easy to fix images that are too dark or too light and rescue photos that are dull, flat, or simply fading away.
Start with Quick Fix and Guided Edit and work up to Full Edit as you learn how to make the most of poorly exposed images, retrieve detail from photos that are too dark and liven up images that look flat and washed-out. Photoshop elements delivers powerful, easy-to-use tools for correcting exposure and lighting problems in all three Edit modes.
In this lesson you’ll be introduced to a variety of techniques for dealing with a range of common exposure problems:
Brightening underexposed photographs
Correcting parts of an image selectively
Saving selection shapes to reuse in later sessions
Working with adjustment layers
Choosing layer blending modes
Using layer opacity settings
Adjusting lighting controls manually
Enhancing overexposed and faded photographs
You’ll probably need about one and a half hours to complete this lesson.
Learn how to make the most of images that were captured in unusual lighting conditions, retrieving detail from overly dark photos and putting the spark back into images that look dull or washed-out. Find out how Photoshop Elements can help you save those faded memories—no matter what your level of experience—with a suite of powerful, easy-to-use tools and the versatility of three Edit modes.
Before you start working on the exercises in this lesson, make sure that you have installed the software on your computer from the application CD (see the Photoshop Elements 9 documentation) and that you have correctly copied the Lessons folder from the CD in the back of this book onto your computer’s hard disk. (See “Copying the Classroom in a Book files” on page 2.)
This lesson builds on the skills and concepts covered in the earlier chapters and assumes that you are already familiar with the main features of the Photoshop Elements workspace. Should you need to brush up on the basic concepts see Lesson 1, “A Quick Tour of Photoshop Elements” and Photoshop Elements Help.
To start, you’ll import the sample images for this lesson to the CIB Catalog that you created at the beginning of Lesson 4:
Start Photoshop Elements and click Organize in the Welcome Screen.
Check the name of the active catalog in the lower left corner of the Organizer window. If your CIB Catalog is already loaded, you can skip step to step 4. If another catalog is currently loaded, continue with step 3.
Choose File > Catalog. In the Catalog Manager dialog box, click to select your CIB Catalog in the Catalogs list, and then click Open. If you don’t see the CIB Catalog listed, review “Creating a new catalog” at the beginning of Lesson 4.
Choose File > Get Photos And Video > From Files And Folders. In the Get Photos And Videos From Files And Folders dialog box, locate and open your Lessons folder. Select the Lesson08 folder, disable any automatic processing option that is currently active, and then click Get Media.
In the Import Attached Keyword Tags dialog box, click Select All, and then click OK. Click OK to close any other alert dialog box.
Before you start this lesson, you can set up automatic processing for the photos you’ll use in the exercises, as you did for the last two lessons. You can save the auto-adjusted files as copies so that at the end of each project you can compare the automatic fixes to the results you achieve using various other techniques.
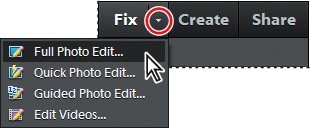
Make sure that you have no images selected in the Media Browser; then, click the small arrow on the Fix tab at the top of the Task Pane and choose Full Photo Edit from the menu.
In Full Edit mode, choose File > Process Multiple Files. From the Process Files From menu in the Process Multiple Files dialog box, choose Folder. Under Source, click the Browse button to locate and select the Lesson08 folder in your Lessons folder. Click OK / Choose to close the Browse For Folder / Choose A Folder For Processing Multiple Files dialog box. Under Destination, click Browse; then, find and select the My CIB Work folder that you created at the start of the book. Click OK / Choose.
Under Quick Fix on the right side of the dialog box, click the checkboxes to activate all four options: Auto Levels, Auto Contrast, Auto Color, and Sharpen.
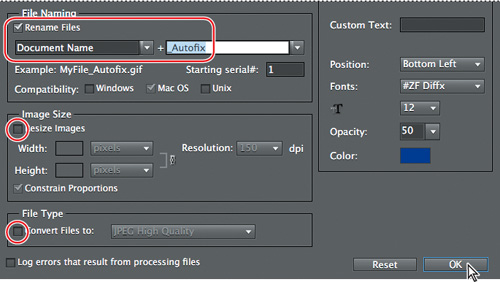
Under File Naming, activate the Rename Files option. Choose Document Name from the menu on the left and type _Autofix in the second field. This will add the appendix “_Autofix” to the existing document name as the files are saved.
Review the settings in the dialog box. Make sure that the Resize Images and Convert Files options are disabled, and then click OK.
Note
On Windows, an error message may appear after you click OK in the Process Multiple Files dialog box, warning you that some files could not be processed. You can safely ignore this alert; the error is often caused by a hidden system file that will have no effect on the success of your project.
When you batch-edit files in this way, the edited copies are not automatically added to your catalog—you need to bring the files into the Organizer yourself.
Switch to the Organizer; then, choose File > Get Photos And Videos > From Files And Folders.
In the Get Photos And Videos From Files And Folders dialog box, locate and open your My CIB Work folder, and then Ctrl-click / Command-click to select the two files frida_and _mina_Autofix.jpg and kat_and_kind_Autofix.jpg.
Disable any other automatic processing option that is currently active, and then click Get Media.
In the Import Attached Keyword Tags dialog box, click Select All; then, click OK. Click OK to dismiss any other dialog box.
At the end of this lesson, you can compare the results of these basic, automatic fixes with the results you achieve by applying the manual techniques you’ll learn as you work through the exercises. In some cases, the automatic method of fixing images may be sufficient to meet your needs.
Underexposed photographs tend to look dull and flat, or too dark. While the lighting auto-fix feature does a good job with most images, this exercise will teach you techniques that give you more control for correcting exposure in problem photos.
The first technique you’ll learn makes use of the Quick Edit mode.
In the Keyword tags panel, click the find box beside the Lesson 08 tag. In the Media Browser, select the file kat_and_kind.jpg; then, click the small arrow on the Fix tab at the top of the Task Pane and choose Quick Photo Edit.
Click the Smart Fix Auto button at the top of the Quick Fix panel. The photo becomes a little brighter overall, but the skin tones remain quite dark. Drag both the Shadows and Midtones sliders to set values of 27 and 25 respectively.
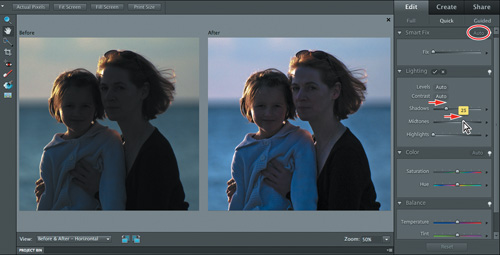
You’ve improved the image substantially with just a few clicks. However, although the skin tones have been lightened, they are still a little cool.
In the Color and Balance panes, drag both the Hue and Temperature sliders just fractionally to the right. Take care not to make the sky too pink or overly yellow; we set Hue and Temperature values of 4 and 52 respectively.
Commit the changes by clicking the Commit button (
 ) in the header bar of the pane in which you made your most recent adjustment.
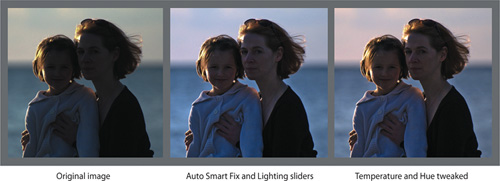
Choose File > Save. Name the file kat_and_kind_Quick and save it to your My CIB Work folder in JPEG format. Make sure that Include In The Elements Organizer is activated and Save In Version Set With Original is disabled.
Click Save. In the JPEG Options dialog box, choose High from the Quality menu, and then click OK. Choose File > Close, or click the Close button (x) in the upper right corner of the Edit pane.
Without much effort, you’ve improved the image significantly. Let’s try some other methods to adjust the lighting in the image, and you can compare the results later.
In Guided Edit mode, you can improve your photos quickly, at the same time as learning concepts and techniques that you can apply even in Full Edit mode.
When you’re not sure exactly what adjustments a poorly exposed image needs, the Guided Edit mode offers a choice of three procedures for correcting lighting and exposure—each with easy-to-follow prompts and instructions that make it easy for even a novice to get great results.
In the media browser, select the image kat_and_kind.jpg again; then click the small arrow on the Fix tab at the top of the Task Pane and choose Guided Photo Edit from the menu.

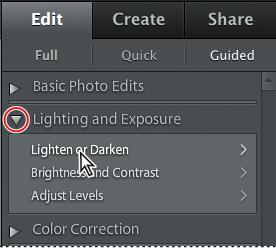
In the guided tasks menu, click the triangle beside Lighting and Exposure, if necessary, so that you can see the nested options; then, click Lighten Or Darken.
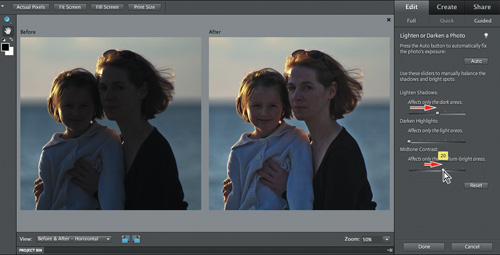
Click the Auto button at the upper right of the Lighten Or Darken A Photo pane. For this image, the result is not quite as good as we might wish, resulting in a noticeable color cast. Click the Reset button below the slider controls, or choose Edit > Undo Auto Levels to revert the image to its original state.
Whether you use the Auto button or not, you can adjust the lighting controls manually. Drag the sliders to set Lighten Shadows to a value of 50 and Midtone Contrast to 20; then click Done to close the Lighten Or Darken A Photo pane.
Choose File > Save As. Navigate to and open your My CIB Work folder, name the new file kat_and_kind_Guided and choose the JPEG format. Make sure the file will be included in the Organizer, but not saved in a Version Set.
Click Save, and then click OK to dismiss the JPEG Options dialog box. Choose File > Close or click the Close button (x) at the upper right of the Edit pane.
Again, the adjusted image looks considerably better than the original; however, it would be ideal if we could treat the mother and child in the foreground separately from the background of sea and sky, which still looks a little flat.
Underexposure problems are often caused by your camera automatically cutting down exposure to compensate for backlighting. In the case of our example image, the large area of relatively bright sea and sky may contribute to the problem in this way, compounded by the fact that the lighting on our subjects is low and indirect. It’s also possible that the camera’s exposure settings were incorrect.
If your photo is a particularly difficult case, more elaborate methods than those you’ve used in the Quick Fix and Guided Edit modes might be necessary to achieve the best results.
In the Full Edit mode you can work with multiple layers and blending modes, and also make selections to isolate specific parts of an image for special treatment.
In an image file with multiple layers, each layer has its own blending mode that defines the way it will interact with the layer or layers below it in the stacking order.
By default, a newly created layer has a Normal blending mode: it will not blend with the layer below except where it contains transparency or when the opacity for the layer is set to less than 100%. The Darken and Lighten blending modes will blend a layer with the layers below it only where the result will darken or lighten the lower layers. Other blending modes produce more complex results. If a photo is too dark, duplicating the background layer and applying the Screen blending mode to the new layer may correct the problem. If this technique produces too strong an affect, you can use the layer opacity setting to tone it down. Inversely, if your photo is overexposed—too light—duplicating the background layer and applying the Multiply blending mode may be a solution.
In the Media Browser, right-click / Control-click the image kat_and_kind.jpg, taking care not to confuse the original file with the edited copies, and choose Edit With Photoshop Elements from the context menu.
In Full Edit mode, choose Window > Reset Panels or click the Reset Panels button (
 ) at the top of the workspace. Hide the Project Bin and the grouped Effects and Content panels by double-clicking their header bars. Double-click the Hand tool in the toolbox, or choose View > Fit On Screen.
In the Layers panel you can see that the image has only one layer: the Background. Duplicate the Background layer by dragging it onto the New Layer button (
 ) at the lower left corner of the Layers panel.
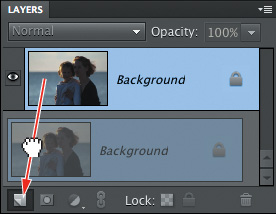
Tip
You can also duplicate a selected layer by choosing Duplicate Layer, either from the Layer menu or from the selected layer’s context menu.
The new Background copy layer is highlighted in the Layers panel, indicating that it’s currently the selected—or active—layer.
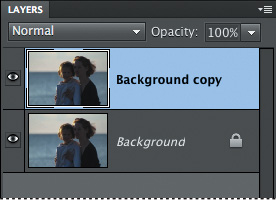
With the Background copy layer selected in the Layers panel, choose Screen from the layer blending mode menu. Notice that the image becomes brighter.

Choose File > Save As. Choose Photoshop (PSD) from the Format menu and make sure the Layers option is activated. Save the file to your My CIB Work folder, to be included in the Organizer, but not in a Version Set. Name the new file kat_and_kind_Screen, and then click Save. If the Format Options dialog box appears, activate Maximize Compatibility and click OK.
To quickly compare the adjusted image to the original, toggle the visibility of the Background Copy layer by clicking the eye icon beside the layer thumbnail. When you’re done, close the file without saving.
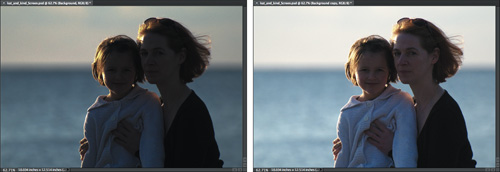
In this exercise you’ve seen how using a blending mode can brighten up a dull image. For many photos, however, you should be careful about applying a blending mode over the entire image, as it can sometimes adversely affect parts of the photos that were OK to begin with. In this example, the sky is now overexposed and some subtle color detail has been lost across the entire background.
An adjustment layer is like an overlay or lens filter over the underlying layers, perhaps darkening the photo, perhaps making it appear pale and faded or intensifying its hues—but remaining separate from the image itself. Effects applied on an adjustment layer can be easily revised, or even removed, because the pixels of the image layers are not permanently modified. You can even copy an adjustment layer from one photo and paste it on top of the image layers in another—a real time-saver when you wish to apply the same treatment to several images.
In this exercise you’ll work with the same underexposed photo that you used for the last few exercises, but this time you’ll open the image from the Editor.
In Full Edit mode, choose File > Open Recently Edited File and choose the file kat_and_kind.jpg from the menu.
Click the Create New Fill Or Adjustment Layer button (
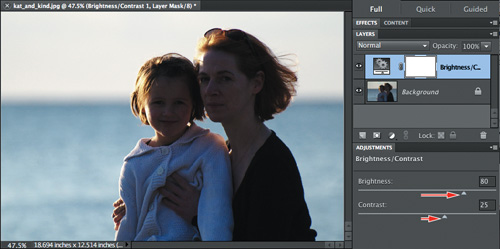
 ) at the bottom of the Layers panel and choose Brightness/Contrast from the menu. The Adjustments panel opens automatically to give you easy access to the Brightness and Contrast controls.
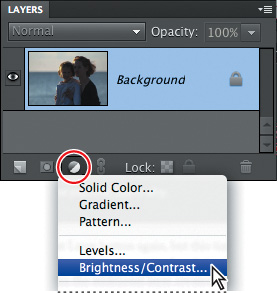
In the Adjustments panel, drag the sliders or type in the text boxes to set Brightness and Contrast values of 80 and 25 respectively.
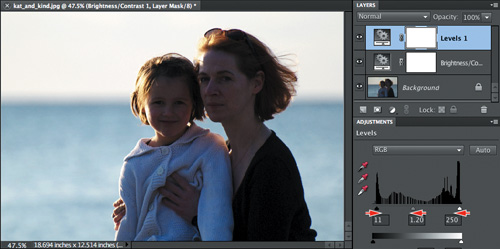
Click the Create New Fill Or Adjustment Layer button again, this time choosing Levels from the menu. Notice the new Levels 1 adjustment layer in the Layers panel. The Adjustments panel is updated to present the Levels controls.
In the Levels controls, drag the black, gray, and white arrows under the tonal distribution graph to adjust shadows, mid-tones, and highlights, respectively, until the tonal balance looks right to you. We set values of 11, 1.2, and 250.
Choose File > Save As. Choose Photoshop (PSD) from the Format menu, and make sure the Layers option is activated. Save the file to your My CIB Work folder, to be included in the Organizer, but not in a Version Set. Name the new file kat_and_kind_Adjustment, and then click Save. If the Format Options dialog box appears, activate Maximize Compatibility and click OK.
To quickly assess the effect of the adjustment layers, toggle the visibility of each layer by clicking the eye icon beside its thumbnail in the Layers panel. When you’re done, close the file without saving.
The beauty of adjustment layers is that you can always return to adjust your settings, even in future work sessions, as long as you have saved the file in the Photoshop (PSD) format, preserving the layers (the default).
If you reopen the file that you just closed and click the Brightness/Contrast layer, the Adjustments panel will show the Brightness and Contrast values set just as you left them: at 80 and 25. The adjustment is still live and can be refined; if necessary, you could even revert to the original, uncorrected image by either hiding or deleting the adjustment layers.
Although the adjustment layers did a lot to help bring out the color and image detail from our dark original photo, the background is now overexposed. So far in this lesson, all the corrections you’ve made to the photo have been applied to the image as a whole. In the next exercise you’ll apply adjustments selectively to just part of the image.
In this exercise you’ll divide the image into two parts, separating the background of sea and sky and our subjects in the foreground. You’ll start by selecting the silhouette of the mother and child and saving the selection.
There are a variety ways of making a selection—you’ve already explored some of them in Lesson 7. The choice of selection tool depends largely on the picture. For this exercise, we’ll start with the Quick Selection tool, which makes a selection based on similarities in color and texture; just scribble inside a pictured object and the Quick Selection tool automatically determines the selection borders for you.
Open the original image file kat_and_kind.jpg once again.
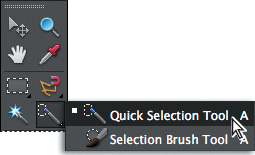
In the toolbox, select the Quick Selection tool (
 ), which is grouped with the Selection Brush tool.
In the tool options bar, make sure that the New Selection mode is activated for the Quick Selection tool. Set a brush diameter of between 20 and 30 px (pixels).

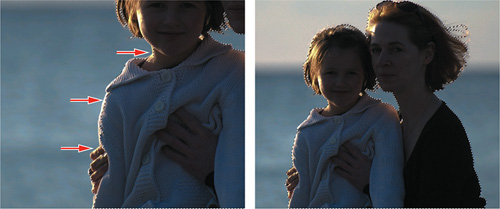
Place the cursor at the lower right corner of the woman and slowly drag a line to the top of her head and then down across the child’s face and body. Notice that the active selection automatically expands to create a border around the silhouette of our subjects. Not bad at all for a quick first pass.
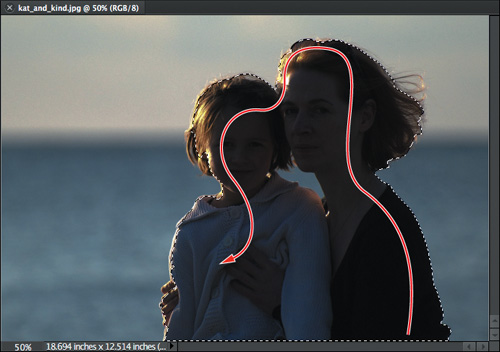
Next you need to refine the border a little to capture the silhouette as closely as possible. You’ll need to deselect the small area of background between the child’s shoulder and her mother’s chin and pay attention to hair and highlight areas. To refine your selection, you’ll alternate between the Quick Selection tool’s Add To Selection (
 ) and Subtract From Selection (
 ) modes. Buttons for these modes are located beside the New Selection mode button in the tool options bar.
Choose the Subtract From Selection (
) mode for the Quick Selection tool from the tool options bar. Reduce the brush size if you wish.With the Subtract From Selection tool, click in the space between the girl’s shoulder and her mother’s chin. The selection contracts to exclude this background area.
Keeping the Quick Selection tool active, press Ctrl+= (equal sign) to zoom in to the image, and hold the spacebar for the Hand tool to pan the image as required. Press the left bracket key ‘[’ on your keyboard repeatedly to reduce the brush size for the Quick Selection tool. Alternate between the Add To Selection (
) and Subtract From Selection () modes and use a combination of clicks and very short strokes to modify the selection border around the area you deselected in step 6, paying attention to the hair and the small spaces in-between.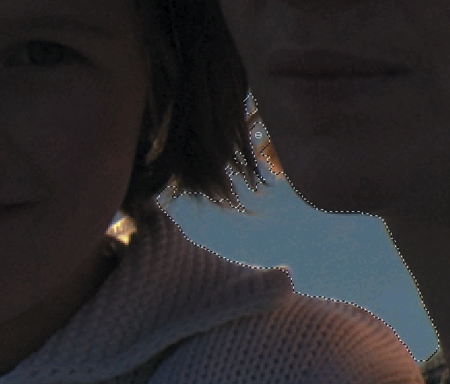
Without being overly fussy, continue to refine the selection around the subjects’ heads using the same technique. Your work will be much simpler if you use the keyboard shortcuts to navigate in the image and for the tool settings. Press Ctrl+= (equal) and Ctrl+− (minus) to zoom in and out. Hold the spacebar for the hand tool to move the image in the preview window. Increase and decrease the brush size by pressing the right and left bracket keys: ‘]’ and ‘[’. With the Quick Selection tool in New Selection mode, you can switch temporarily to Add To Selection mode by holding the Shift key, and to Subtract From Selection mode by holding the Alt / Option key.
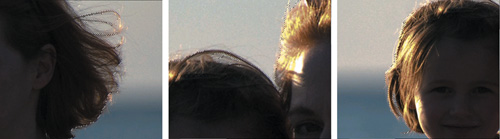
Finally, pay attention to the brightly highlighted area that runs from the little girl’s right cheek down her arm and includes a portion of her mother’s fingers. You should end up with a tight flashing selection outline around the silhouettes of both of the subjects.
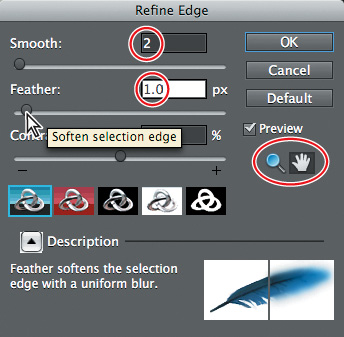
To soften the hard edges of the selection, you can smooth and feather the outline. Click Refine Edge in the tool options bar.

In the Refine Edge dialog box, use the sliders or type a value of 2 for Smooth and 1 px (pixel) for Feather. These settings are quite low, but should be appropriate for our lesson image, which has a relatively low resolution. Notice that the Refine Edge dialog box has its own Zoom and Hand tools to help you get a better view of the details of your selection. Click OK.
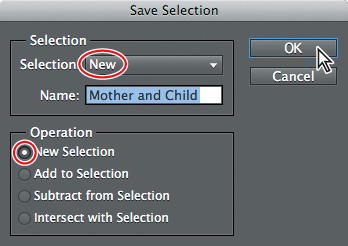
Choose Select > Save Selection. In the Save Selection dialog box, choose New from the Selection menu, type Mother and Child for the selection name, and then click OK. Once a selection is saved, you can always re-use it later—after assessing your adjustments you can reload the selection to modify them.
Now that you’ve created a selection that includes only the figures in the foreground of the photo, you can adjust the exposure and color for the subjects and the background independently. You can bring out the shaded detail in the faces without overexposing the sky, and accentuate the blues in the background without making the skin tones too cold. The next step in this process is to use your selection to isolate the foreground and background areas on separate layers. To make the job easier, let’s make sure that the layer thumbnails are of a satisfactory size.
Click the menu icon at the right of the Layers panel to open the Layers panel Options menu; then, choose Panel Options.
In the Layers Panel Options dialog box, select either the large or medium thumbnail option. Any thumbnail size will work, just as long as you don’t choose None—seeing the layer thumbnails can help you visualize the layers you’re working with. Click OK.
If necessary, choose View > Fit On Screen or, if the Zoom tool is active, click the Fit Screen button in the tool options bar so that you can see the entire image.
If the selection that you made in the previous exercise is still active, choose Select > Inverse, and then go on to Step 5. If the selection is not still active, choose Select > Load Selection. Choose Mother And Child from the Source Selection menu, click the check box to activate the Invert option and choose New Selection under Operation; then click OK.
Choose Edit > Copy to copy the selected area, and then choose Edit > Paste. The copied area is pasted onto a new layer, named Layer 1 by default. In the Layers panel, the new layer is already selected. The selection is no longer active in the image window.
In the Layers panel, select the Background layer once again, and then choose Select > Load Selection. Under Source, choose Mother And Child from the Selection menu, but this time disable the Invert option. Click OK.
Choose Edit > Copy, and then, keeping the Background layer selected, choose Edit > Paste.
Note
A new layer will always appear just above the layer that was selected (active) when you created it. The checker-board pattern you see in layers 1 and 2 represents transparent areas.
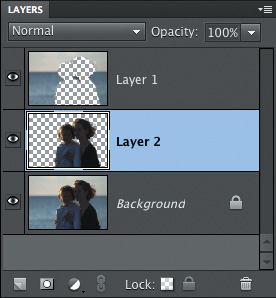
You now have three layers: Layer 1 with only the sea and sky, Layer 2 with just the figures from the foreground, and the Background layer with the entire image.
You’ll find it much easier to deal with layers—especially when you’re working with many of them—if you give your layers descriptive names in the Layers panel. Double-click the name text of Layer 2 and type Figures as the new name for the layer. Change the name of Layer 1 to Sea & Sky.
We can now apply the most effective technique from the earlier exercises to the subjects of our photo selectively, and then fine-tune the result.
In the Layers panel, select the Figures layer and choose Screen from the blending menu. The figures are brighter and clearer, while the Sea & Sky layer remains unchanged.
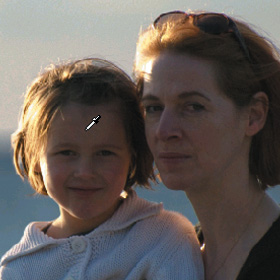
Choose Adjust Color For Skin Tone from the Enhance > Adjust Color menu. The pointer becomes an eyedropper. Sample a neutral skin tone from an area such as the center of the child’s forehead, and then click OK.
Now that the figures in the foreground look so much better, the sea and sky behind them need to be adjusted to appear less dull and murky.
In the Layers panel, select the Sea & Sky layer.
Choose Enhance > Auto Levels. The sea and sky look blue again—and far more vibrant—and we have also recovered a lot of textural detail in the background. However, the effect is just a little too strong to sit well with the subdued late-afternoon light on our subjects. Drag the Opacity slider or type in the text box to reduce the opacity of the Sea & Sky layer to 70%.
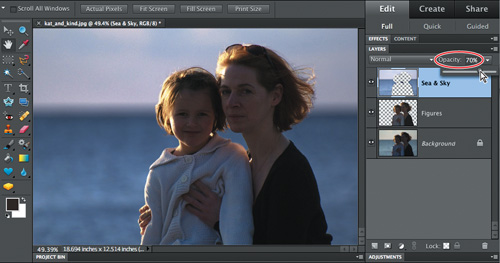
With these few adjustments to the separate layers, the photograph now looks far more lively.
There are still possibilities that you could play around with to improve different areas of the image; for example you could separate the sky onto a new layer and intensify the cloud contrast. There is also more you could do with blending modes and layer opacity—you’ll learn more about those techniques later in this lesson and as you work further through this book.
Choose File > Save As. Choose Photoshop (PSD) from the Format menu, and make sure the Layers option is activated. Save the file to your My CIB Work folder, to be included in the Organizer, but not in a Version Set. Name the new file kat_and_kind_Layers, and then click Save. If the Format Options dialog box appears, activate Maximize Compatibility and click OK.
Close the file.
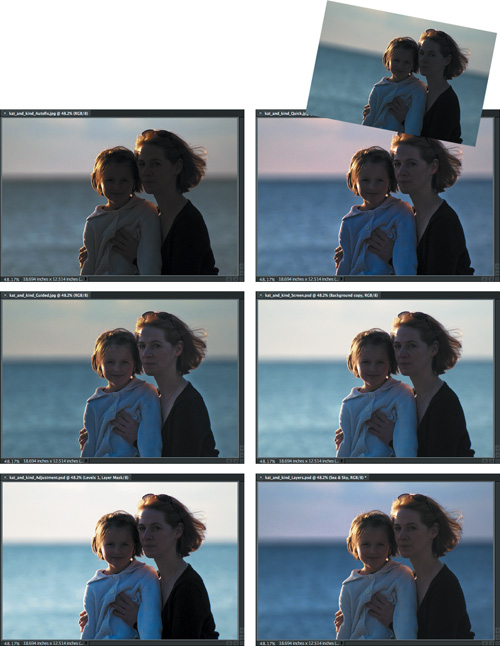
In Lesson 7 you learned how you can tile the image windows to best compare the results of your different methods for adjusting an image. It’s a good idea to make use of that technique now to compare the six adjusted and saved versions of this photograph before moving on to the next exercise.???
Adjusting color curves
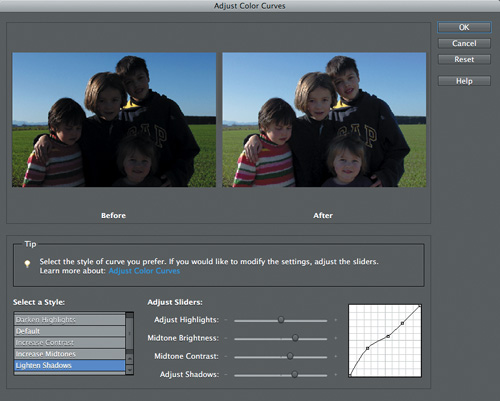
Using the Adjust Color Curves command is a great way to fix common exposure problems, from photos that are too dark as a result of backlighting to images that appear washed-out due to overly harsh lighting. You can improve color tones by adjusting the highlights, mid-tones, and shadows components of the curve separately or choose one of the preset adjustment styles—either as a solution in itself, or use it as a helpful starting point for making manual adjustments.
Experiment with color curve adjustments on a duplicate layer to preserve your original. In the Adjust Color Curves dialog box, you can see the results of each preset in the before and after preview, and then use the sliders to fine-tune the adjustment.
Choose Enhance > Adjust Color > Adjust Color Curves to open the Adjust Color Curves dialog box. To adjust only a specific area of the image, first select it with one of the selection tools before you open the Color Curves dialog box.
For the example shown below, the Lighten Shadows adjustment preset made a good starting-point for some manual fine-tuning of the shadows and mid-tones.
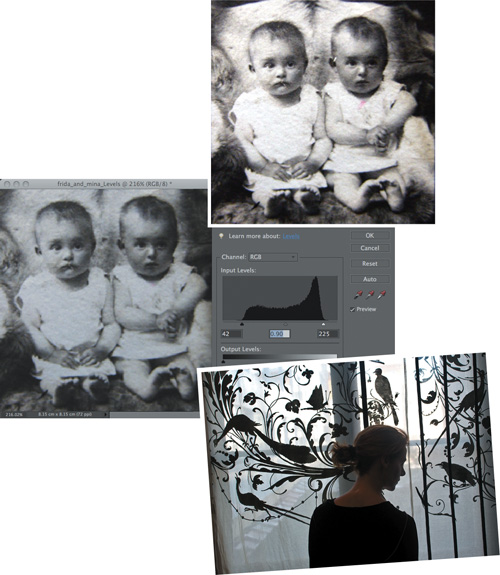
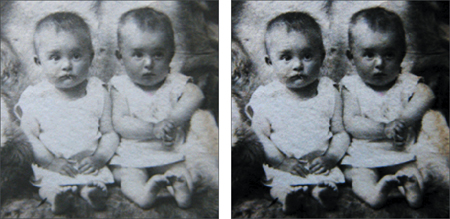
In this exercise, you’ll work with the scan of an old photograph that has faded badly and is in danger of being lost forever—a photo of a beloved grandmother and her twin sister as babies. Such a photo may not be an award-winning image, but it could represent a valuable and treasured record of personal history, well worth preserving for future generations.
The automatic fixes you applied to a copy of this image at the beginning of this lesson (see “Batch-processing the lesson files”) improved the photograph markedly. In this project, you’ll try to do even better using other techniques.
If you’re in the Organizer, switch to Full Edit mode in the Editor by clicking the arrow on the Fix tab and choosing Full Photo Edit from the menu.
Choose Preferences > General from the Edit / Photoshop Elements menu. Activate Allow Floating Documents In Full Edit Mode, and then click OK.
Choose File > Open. Navigate to and open your Lesson08 folder, select the image frida_and_mina.jpg, and then click Open.
You’ll compare a variety of editing techniques during the course of this series of exercises. You can begin by creating a separate file to test each method and naming each new file for the technique it will demonstrate.
Click the Reset Panels button (
) at the top of the Quick Edit workspace, and then double-click the Hand tool in the toolbox or choose View > Fit On Screen. Hide the grouped Effects and Content panels by double-clicking the header bar. If you don’t see the filename beneath the photo’s thumbnail in the Project Bin, right-click / Control-click the thumbnail and choose Show Filenames.Right-click / Control-click the thumbnail image in the Project Bin again and choose Duplicate from the context menu. In the Duplicate Image dialog box, name the new file frida_and_mina_Shad_High, and then click OK.
Perform step 2 twice more, naming the duplicates frida_and_mina_Bright_Con and frida_and_mina_Levels.
In the Project Bin, double-click the thumbnail frida_and_mina.jpg to make that image active. If you can’t see the whole of a filename under a thumbnail in the Project Bin, hold the pointer over the thumbnail; the name of the file is displayed as a Tooltip.
Choose File > Save As. Select your My CIB Work folder as the destination for the new file, then activate Include In The Elements Organizer and disable the option Save In Version Set With Original. Type frida_and_mina_Blend_Mode as the new filename and select Photoshop (PSD) from the Format menu.
Click Save. Click OK to accept the default settings in any dialog boxes or messages that appear. Leave all four images open for the rest of this project.
Choose Window > Images > Consolidate All To Tabs.
While you’re working in the Editor, you can always tell which images you have open—even when a single active photo fills the edit window—by looking in the Project Bin. When you can see more than one photo in the edit window, you can identify the active image by the un-dimmed text in its title bar or name tab, and the highlighted frame surrounding its thumbnail in the Project Bin.
Choose Window > Images > Tile.
Make sure that frida_and_mina_Blend_Mode.psd is the active image, and then choose Window > Images > Match Zoom. Click the Arrange button (
 ) at the top of the workspace and choose Match Location.
A layer’s blending mode can cause it to interact with the layers beneath it in a variety of ways. The Multiply mode intensifies or darkens pixels in an image. The Overlay mode tends to brighten the image while preserving its tonal range.
For this exercise, you’ll use the Overlay mode to add clarity and brilliance without negating the darkening effect of the Multiply blending mode you’ll use on the underlying layers.
Make sure that frida_and_mina_Blend_Mode.psd is still the active image. If necessary, double-click its thumbnail in the Project Bin to make it active. In the Layers panel right-click / Control-click the Background layer and choose Duplicate Layer from the context menu. Click OK in the Duplicate Layer dialog box, accepting the default name “Background copy.”
In the Layers panel, choose Multiply from the layer blending mode menu. Note the effect in the image window.

Drag the Background copy layer with its Multiply blend mode onto the New Layer button (
) at the bottom of the Layers panel to create a copy of the Background copy layer. Keep the default name, Background copy 2.In the Layers panel, change the blending mode for the layer Background copy 2 from Multiply to Overlay, watching the effect of the new blending mode on the image. Set the layer’s Opacity value to 50%, either by dragging the Opacity slider or by typing the new value in the text field.

Tip
The stacking order of the layers makes a difference to how their blending modes will affect the image. In our example, if you drag the layer with the Multiply blending mode above the layer with the Overlay mode, you’ll see slightly different results.
Adding a layer with the Multiply blending mode made the image bolder and the third layer in Overlay mode brightened it considerably. Taken together, our changes have made the detail in the photo clearer, but the contrast is still unimpressive.
Choose File > Save to save the file in your My CIB Work folder, leaving the file open. If a message appears about maximizing compatibility, click OK to close it, or follow the instructions in the message to prevent it from appearing again.
Although both the Auto-fix and the technique using blending modes do a good job of correcting many fading images, some of your own photos may be more challenging. You’ll try three more techniques in the exercises to follow.
The first method involves making manual adjustments to the Shadows, Highlights, and Midtone Contrast of the image.
In the Project Bin, double-click the thumbnail frida_and_mina_Shad_High to make it the active window. Choose Window > Images > Float In Window; then double-click the Hand tool or choose View > Fit On Screen.
Choose Enhance > Adjust Lighting > Shadows/Highlights.
Activate the Preview option in the Shadows/Highlights dialog box if it is not already active. If necessary, move the dialog box so that you can also see most of the frida_and_mina_Shad_High image window.
By default, the Lighten Shadows setting is 25%. You can see the effect on the image by toggling the Preview option on and off in the Shadows/Highlights dialog box.
In the Shadows/Highlights dialog box, set the Lighten Shadows value to 30%, the Darken Highlights value to 15%, and the Midtone Contrast value to +20%.
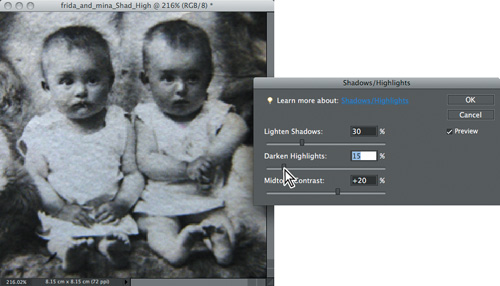
Adjust the three settings as needed until you think the image is as good as it can be. When you’re done, click OK to close the Shadows/Highlights dialog box.
Choose File > Save and save the file as frida_and_mina_Shad_High to your My CIB Work folder, in JPEG format. Make sure that the image will be included in the Organizer, but not in a Version Set. Click OK in the JPEG Options dialog box and leave the file open. Choose Window > Images > Tile.
The next approach you’ll take to fixing an exposure problem makes use of another option from the Enhance > Adjust Lighting menu.
In the Project Bin, double-click the image frida_and_mina_Bright_Con to make it active. Choose Window > Images > Float In Window; then click the Arrange button (
) at the top of the workspace and choose Fit On Screen.Choose Enhance > Adjust Lighting > Brightness/Contrast.
In the Brightness/Contrast dialog box, click the checkbox to activate Preview, if it is not already active. If necessary, drag the Brightness/Contrast dialog box aside so that you can see most of the frida_and_mina_Bright_Con image window.
Drag the Brightness slider to −20, or type −20 in the text field, being careful to include the minus sign when you type. Set the Contrast to 60.
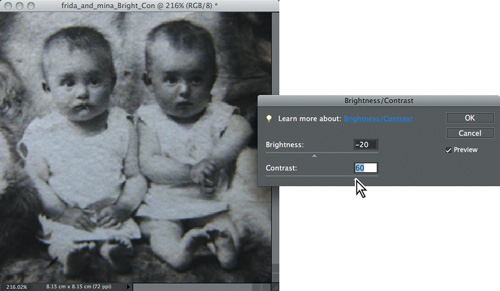
Adjust the Brightness and Contrast settings until you are happy with the look of the image. Click OK to close the Brightness/Contrast dialog box.
Choose File > Save and save the file as frida_and_mina_Bright_Con to your My CIB Work folder, in JPEG format. Make sure that the image will be included in the Organizer, but not in a Version Set; then, click Save. Click OK in the JPEG Options dialog box, but keep the file open. Choose Window > Images > Tile.
The Levels controls (again, available from the Enhance > Adjust Lighting menu) affect the range of tonal values in an image—the degree of darkness or lightness, regardless of color. In this exercise, you’ll enhance the photograph by shifting the reference points that define the spread of those tonal values.
In the Project Bin, double-click the image frida_and_mina_Levels to make it active. Choose Window > Images > Float In Window; then click the Arrange button (
) at the top of the workspace and choose Fit On Screen.Choose Enhance > Adjust Lighting > Levels. Activate the Preview option in the Levels dialog box, if it is not already active. If necessary, drag the Levels dialog box aside so that you can also see most of the image window.
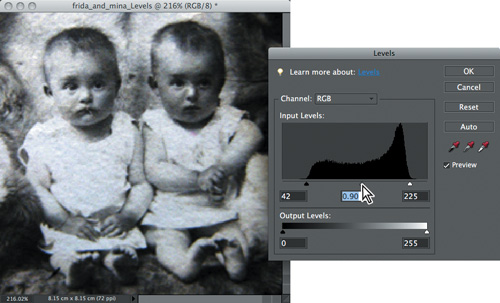
The Levels graph represents the distribution of tonal values across all the pixels in the image, from darkest at the left to lightest at the right. A trough (or gap) in the curve indicates that there are few (or no) pixels mapped to that part of the range; a peak shows the opposite.
As you can see from the graph, this image has no truly black pixels or completely white pixels. By dragging the end sliders inward to where the pixels start to register in the graph, you redefine which levels are calculated as black or white. This will enhance the contrast between the lightest and darkest tones in the image.
In the Levels dialog box, drag the black triangle below the left end of the graph to the right and position it under the point where the graphed curve begins to climb. The value in the first Input Levels box should be approximately 42.
Drag the white triangle from the right side of the graph until it reaches the end of the steepest part of the graphed curve. The value in the third Input Levels box should be approximately 225.
Drag the gray triangle below the center of the graph toward the right to set the mid-tone value to approximately 0.90. Click OK to close the Levels dialog box.
Choose File > Save and save the file to your My CIB Work folder in JPEG format as frida_and_mina_Levels. Make sure that the image will be included in the Organizer, but not in a Version Set. Click Save; then, click OK in the JPEG Options dialog box and leave the file open. Choose Window > Images > Tile.
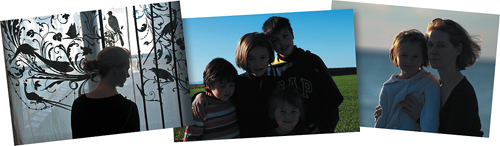
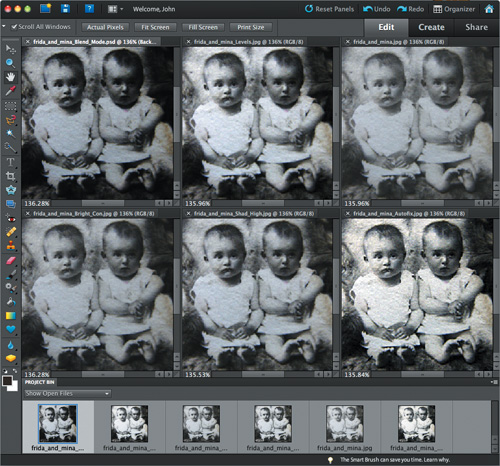
You can now compare the six versions of the image: the original file, the four files you created in this set of exercises, and the image that was fixed automatically as part of a batch process at the beginning of this lesson.
Choose File > Open. Locate and open the file frida_and_mina_Autofix.jpg in the My CIB Work folder. If you don’t see the file in the Open dialog box, make sure that All Formats / All Readable Documents is the active selection in the Files Of Type / Enable menu. Click Open; then, repeat the process for the original file frida_and_mina.jpg in your Lesson08 folder.
Check the Project Bin to make sure that all of the six files for this project are open: the original image, frida_and_mina.jpg and five others with the appendixes _Blend_Mode.psd, _Shad_High.jpg, _Bright_Con.jpg, _Levels.jpg, and _Autofix.jpg. If you can’t see the entire file name of an image, hold the pointer over the thumbnail in the Project Bin to see the file name in a Tooltip.

Hide the Panel Bin by un-checking its name in the Window menu; then, choose Window > Images > Tile.
Now you’ll set the zoom level for all the open windows. Select the Zoom tool; then, in the tool options bar, click the Zoom Out button and activate Zoom All Windows. Click in any of the image windows so that you can see enough of the photo to enable you to compare the different results. Zoom in to focus on details. Select an area of interest in any of the six windows, and then choose Window > Images > Match Zoom and Window > Images > Match Location.
Compare the results and pick your favorite. The best method for fixing a file depends on the type of problem being addressed, the areas of the image that are affected, and how you intend to use the adjusted image. For example, the requirements for an image to be used as a background behind text will be very different from those for a featured graphic.
Choose Preferences > General from the Edit / Photoshop Elements menu. Disable the floating documents option, and then click OK. Choose File > Close All. Save any changes to your CIB Work folder if you’re prompted to do so.
Congratulations! You’ve finished another lesson. In the exercises in this lesson you used a variety of both automatic and manual techniques for correcting exposure problems. You’ve tried auto-fixes, layer blending modes, and lighting adjustment controls. You’ve learned how to apply these different methods both separately and in combination to layers and selected areas to get the most from a problem image.
Before you move on to the next lesson, “Repairing, Retouching, and Recomposing Images,” take a few moments to review what you’ve learned by reading through the questions and answers on the next page.