
For some images you’ll need to deal with flaws other than color or exposure problems. A picture that was taken hurriedly might be spoiled by being tilted or poorly composed. Perhaps you have an antique photograph that is creased and worn or a scanned image marked by dust and scratches.
Sometimes the problem has nothing to do with the photograph itself, such as an extraneous object that clutters an otherwise striking composition or even just spots and blemishes on a portrait subject’s skin.
In this lesson, you’ll learn a range of techniques for restoring, retouching and rearranging the composition of such flawed images:
Using the Straighten tool
Improving the composition of an image with the Recompose tool
Removing unwanted objects with content-aware healing
Retouching skin with the Healing Brush tool
Repairing creases with the Clone Stamp tool
Working with opacity and blending modes in layers
Using the Selection Brush tool
Working with layer masks
You’ll probably need about one and a half hours to complete this lesson.

Not every image problem is a result of incorrect camera settings. Learn how to straighten a tilted photo, rearrange an image’s composition, and retouch spots and blemishes on your subject’s skin. The same tools, techniques and tricks used to remove spots or repair creases and tears when you’re restoring a treasured keepsake can also be used creatively to manipulate reality and produce exactly the image you want.
Before you start working on the exercises in this lesson, make sure that you have installed the software on your computer from the application CD (see the Photoshop Elements 9 documentation) and that you have correctly copied the Lessons folder from the CD in the back of this book onto your computer’s hard disk. (See “Copying the Classroom in a Book files” on page 2.)
This lesson includes five independent exercises—you can either work straight through or complete them in separate sessions. The first four projects vary only slightly in length and complexity, while the forth is a little more involved.
While you’re working on the projects in this lesson, you’ll use sample images from the CIB Catalog that you created in the “Getting Started” section at the beginning of this book. To open your CIB Catalog, follow these steps:
To start, you’ll import the sample images for this lesson to the CIB Catalog that you created at the beginning of Lesson 4:
Start Photoshop Elements and click Organize in the Welcome Screen.
Check the name of the active catalog in the lower left corner of the Organizer window. If your CIB Catalog is already loaded, you can skip step to step 4. If another catalog is currently loaded, continue with step 3.
Choose File > Catalog. In the Catalog Manager dialog box, click to select your CIB Catalog in the Catalogs list, and then click Open. If you don’t see the CIB Catalog listed, review “Creating a new catalog” at the beginning of Lesson 4.
Choose File > Get Photos And Video > From Files And Folders. In the Get Photos And Videos From Files And Folders dialog box, locate and open your Lessons folder. Select the Lesson09 folder, disable any automatic processing option that is currently active, and then click Get Media.
In the Import Attached Keyword Tags dialog box, click Select All, and then click OK. Click OK to close any other alert dialog box.
In the Media Browser, you can see thumbnails of the images you’ve just imported to your CIB catalog. In the Keyword Tags panel, the newly added Lesson 09 tag has been listed under Imported Keyword Tags.
If you don’t see filenames below the thumbnails in the Media Browser, choose View > Show File Names.
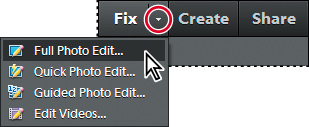
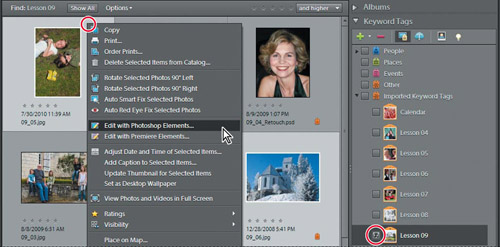
Select the file 09_01.jpg in the Media Browser; then, click the small arrow on the Fix tab above the Task Pane and choose Full Photo Edit. Alternately, you could select the file and choose Edit > Edit With Photoshop Elements.
Click the Reset Panels button (
 ) at the top of the Editor workspace. Hide the Project Bin by double-clicking its header bar or by un-checking its name in the Window menu. Hide the Panel bin by un-checking its name in the Window menu, and then double-click the Hand tool or choose View > Fit On Screen.
The picture for this exercise was taken by a child unused to handling the camera, but it can be easy for any of us to be distracted by our live subjects or rushed by awkward shooting conditions, and the result is often an image that would be just fine—if only it were straight! With the Straighten tool you can manually designate a line in your tilted image to be used as either a horizontal or vertical reference in relation to which the photo will be rotated.
Select the Straighten tool (
 ). In the tool options bar across the top of the Edit pane, make sure that Canvas Options is set to Grow Or Shrink Canvas To Fit. As there are no truly straight lines in the sculpture in the foreground, our best reference for a true level in this photo is the old building in the background. Drag a line along the ledge between the first and second stories.
When you release the mouse button, Photoshop Elements straightens the image relative to the line you’ve just drawn. Choose Fit On Screen from the View menu or the menu on the Arrange button (
 ) so that you can see all of the newly enlarged canvas surrounding the rotated image.
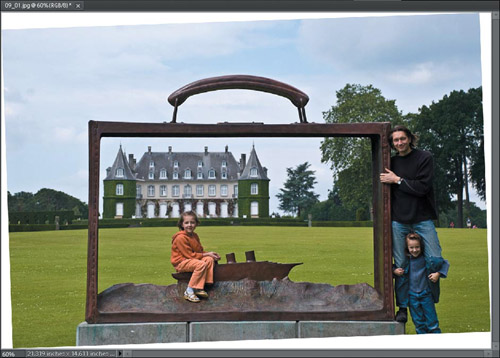
Tip
For this image we chose the Straighten tool option Grow Or Shrink Canvas To Fit because we wish to have manual control over cropping. When this is not an issue, try the options Crop To Remove Background and Crop To Original Size, which are also available from the Canvas Options menu in the tool options for the Straighten tool.
In the toolbox, select the Crop tool (
 ). From the Aspect Ratio menu in the tool options bar, choose Use Photo Ratio; this will constrain the cropping rectangle to the original proportions. Drag a cropping rectangle inside the image, which is now displayed at an angle—being careful not to include any of the blank area around the photo. When you’re satisfied with the crop, click the green Commit button in the lower right corner of the cropping rectangle. The straightened and cropped image is much more comfortable to look at than the tilted original.
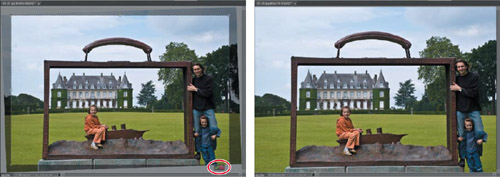
Choose File > Save As. Make sure the new file will be included in the Organizer, but not in a Version Set. Name the file 09_01_Straight.jpg to be saved to your My CIB Work folder in JPEG format. Click Save; then, click OK to dismiss the JPEG Options dialog box. Choose File > Close to close the file.
Staying in the Editor, choose File > Open; then, navigate to and open your Lesson09 folder, select the file 09_02.jpg, and click Open.
In this photo, the horizon is hidden, the river bank is irregular, and the horizontal lines of the building in the background are angled by perspective—so your best option is to use one of the vertical lines in the large apartment building. By default, the Straighten tool is set for a horizontal reference; to designate a vertical reference you need to use the tool together with the Ctrl / Command key.

Select the Straighten tool (
). In the tool options bar, make sure that Canvas Options is set to Grow Or Shrink Canvas To Fit. Click and hold down the mouse button on a point at the top of a vertical lines in the apartment building; then, press the Ctrl / Command key and drag a line down your vertical reference. Release the mouse button, and then the Ctrl / Command key.Select the Crop tool (
). In the tool options bar, set the cropping aspect ratio to No Restriction. Drag a rectangle inside the rotated photo, retaining as much of the image as possible without including any of the blank canvas surrounding it. When you’re satisfied with your crop, click the Commit button in the lower right corner of the cropping rectangle.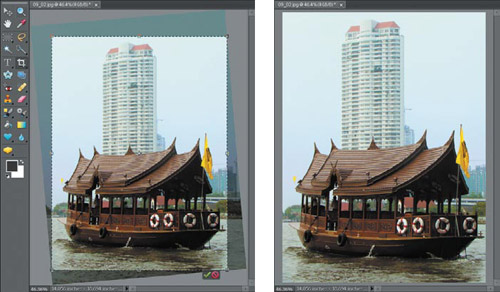
Choose File > Save As. Make sure the new file will be included in the Organizer, but not in a Version Set. Name the file 09_02_Straight.jpg, to be saved to your My CIB Work folder in JPEG format. Click Save; then, click OK to close the JPEG Options dialog box. Choose File > Close to close the file.
Have you ever wished you could convert a photo from landscape to portrait format without cropping off content at the sides? Do you have a group shot where you wish the group had stood a little closer together? Or a photo where a walk-on extra draws attention away from the stars and the main story? With the new Recompose tool you can fix these and other image composition problems in a few easy steps.
Essentially, the Recompose tool enables you to crop your photo from the inside, rather than at the edges. Whether you want to bring people closer together, fit a horizontal image to a vertical space, remove extraneous elements that spoil the composition, or increase the drama in an action shot, the Recompose tool puts image editing magic at your fingertips.
As with the Healing brushes and the Clone Stamp tool that are covered later in this chapter—and the Photomerge tools you’ll explore in Lesson 11—the Recompose tool is also a lot of fun to use creatively, making it possible to manipulate reality to produce exactly the image you want.
If you’re still in the Editor from the previous exercise, switch to the Organizer now by clicking the Organizer button (
 ) at the top right of the Editor work-space. In the Keyword Tags panel, click the Find box beside the Lesson 09 tag, if necessary, to isolate the images for this lesson.
In the Media Browser, right-click / Control-click the image 09_03.jpg and choose Edit With Photoshop Elements from the context menu.
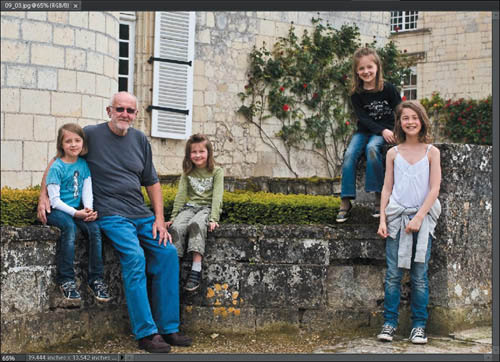
In this exercise, you’ll use the Recompose tool to tighten the arrangement of this group portrait—creating a square composition.
If you don’t already see some gray space around the edge of the photo in the image window, press Ctrl / Command together with the minus sign key (–) to zoom out a little.
In the toolbox, click the Crop tool (
) and hold the mouse button down until the tool variants menu appears. Select the Recompose tool ( ). A message appears with quick instructions on using the Recompose tool, including a link to a video tutorial. For now, click OK to dismiss the message.
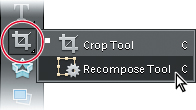
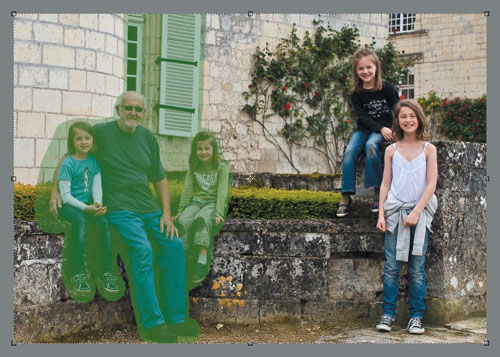
The image is now surrounded by a live bounding box, with control handles at the corners and at the mid-point of each side. For simple recomposing operations, all you need to do is drag the handles; the Recompose tool makes use of content-aware scaling technology that distinguishes people and other featured objects and attempts to prevent them being distorted as the background is compressed around them. For this exercise, however, we’ll use the special Recompose brushes instead. For more complex images, this generally produce better results.
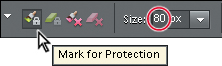
In the Tool options bar immediately above the toolbox, select the green Mark For Protection brush. Either type in the brush size text box or use the slider to increase the brush size to 80 px.
As its name suggests, you can use this brush to define those areas in the image that you want protected from any scaling operation.
Paint roughly over the three figures on the left side of the photograph. Cover a little extra space to the left of the girl in the blue T-shirt, and also mark the windows and the white shutter for protection. If you find that you’ve over-painted, use the green eraser (right beside the protection brush in the tool options bar) to modify your strokes. Use the left and right bracket keys ( [ , ] ) to decrease or increase the brush size as you work.
Right-click / Control-click the image. In the context menu, change the mode for the brush from the default Use Normal Highlight to Use Quick Highlight.
In the default mode, you need to paint over the entire area you wish to protect. The Quick Highlight mode enables you to quickly mark an area for protection by simply drawing a line to surround it.
Set the brush size to 20 px; then, draw a rough outline around the two girls at the right. Release the mouse button; the area you outlined is marked for protection automatically. Right-click / Control-click the image again. Switch back to Normal Highlight mode and paint over the two windows behind the girls.
In the tool options bar, select the red Mark For Removal brush.
You can use this brush to define any areas that you wish the Recompose tool to remove from the image. In this photo there is no extraneous object that we need to get rid of, but you can mark parts of the stone wall, as shown in the illustration below, and the Recompose tool will remove those areas before compressing others. This will help to retain the plants against the wall and lessen distortion elsewhere.
Alternate between the red Mark For Removal brush and its associated eraser, using the bracket keys to re-size the brush if necessary as you work.
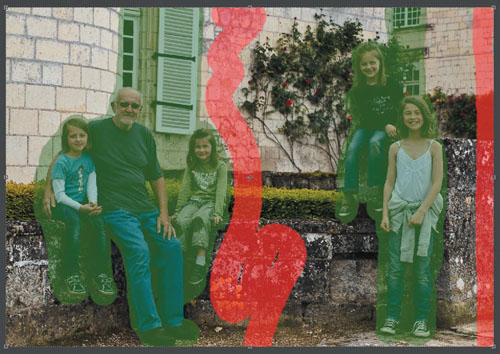
Now for the fun part! Move the pointer over the handle on the right side of the bounding box and when the double-arrow cursor appears, drag the handle slowly in towards the center of the photo. Watch the photo as you drag; some areas of the image are removed while others are compressed and merged with their surroundings. As the proportions of the image become closer to a square, keep an eye on the width (W) and height (H) values in the Tool options bar; stop dragging and release the mouse button when the two values are equal.
As this was a rather extreme operation, performed on an image of relatively low resolution, you may find some seam artifacts, especially near the edges of areas that were removed or protected. If these are noticeable enough to worry you, a few strokes with the Clone Stamp tool or the Healing Brush tool will fix the problem. You’ll learn about using those tools later in this lesson. Use the Zoom tool to inspect the area between the shutter, which was protected and the leaves on the wall, which were compressed. Experiment with recomposing the original image in different ways; try removing a slice of the image through the climbing roses, instead of down the stone wall, and compare the results.
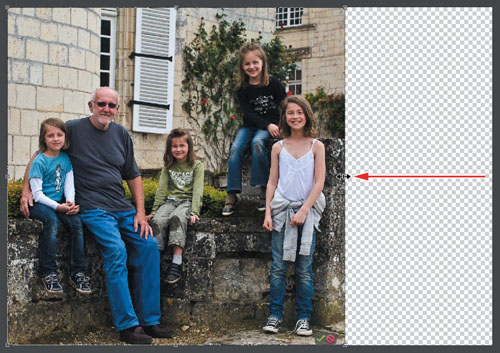
Click the green Commit button at the lower right of the recomposed photo or press Enter / Return to accept and render the new composition.
Choose Image > Crop. A cropping box appears on the image; drag the handles to crop the file to the new square format, trimming away the transparent area. The edges of the cropping box snap to the edges of the image to make the operation very easy. Click the green Commit button or press Enter / Return.
Choose File > Save As. Make sure the new file will be included in the Organizer, but not in a Version Set. Name the new image 09_03_Recompose.jpg, to be saved to your My CIB Work folder in JPEG format.
Click Save; then click OK to accept the default JPEG Options settings.
Choose File > Close to close the file.
The Recompose tool is as easy to use as it is powerful—with creative possibilities that are virtually limitless. Play with as many pictures as you can; you’ll learn how content-aware scaling works and what to expect from different types of image as you have fun finding creative new ways to make the most of your photos.???
Fixing blemishes
There are three main tools in Photoshop Elements for fixing flaws in your photos:
<division> <title>The Spot Healing Brush tool</title>The Spot Healing Brush is the easiest way to remove wrinkles in skin and other small imperfections in your photos. Either click once on a blemish or click and drag to smooth it away. By blending the information of the surrounding area into the problem spot, imperfections are made indistinguishable.

The Healing Brush can fix larger imperfections with ease. You can define one part of your photo as a source to be sampled and blended into another area. The Healing Brush is so flexible you can even remove large objects from a uniform background—such as a person in a wheat field.
</division>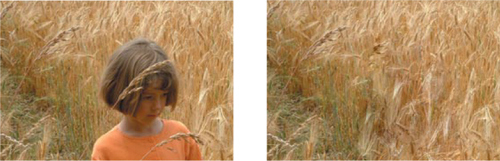
Rather than blending the source and target areas, the Clone Stamp tool paints directly with a sample of an image. You can use the Clone Stamp tool to remove or duplicate objects in your photo. This tool is great for getting rid of garbage, power lines, or a signpost that may be spoiling a view.
In this exercise, you’ll explore several techniques for retouching skin flaws and blemishes to improve a portrait photograph. Retouching skin can be a real art, but luckily Photoshop Elements provides several tools that make it easy to smooth out lines and wrinkles, remove blemishes, and blend skin tones.
If you’re still in the Editor from the previous exercise, switch to the Organizer now by clicking the Organizer button (
) at the top right of the Editor work-space. In the Keyword Tags panel, click the Find box beside the Lesson 09 tag, if necessary, to isolate the images for this lesson.Right-click / Control-click the image 09_04.jpg and choose Edit With Photoshop Elements from the context menu.
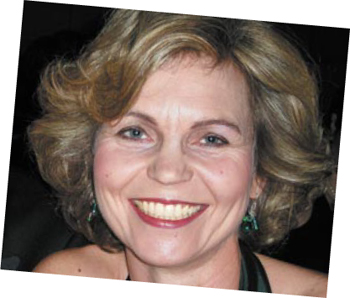
If you’ve already completed Lesson 7, you’ll recognise this photo from the teeth whitening exercise. The copy you’ll be working with in the following set of exercises has already visited the dentist; this time you get to play beauty therapist.
Before you start retouching, you’ll need to add two extra layers to the image. You can also set up the workspace for working at high magnification.
In the Editor, click the Reset Panels button (
) at the top of the workspace. Drag the Layers panel out of the Panel Bin by its header bar, and then hide the Panel Bin and the Project Bin by un-checking their names in the Window menu.Drag the Background layer to the New Layer button (
 ) at the bottom of the Layers panel to create another layer, named “Background copy” by default.
Drag the Background copy layer to the New Layer button to create a third layer.

If necessary, resize the Layers panel by dragging its lower right corner. You only need the panel to be just big enough to show your three layers.
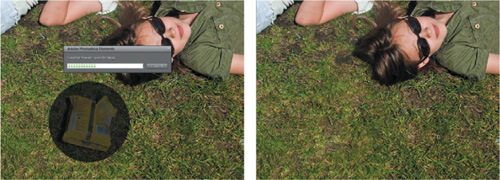
Use the Zoom tool to zoom in on the upper half of the photo, as you’ll be retouching the skin around the woman’s eyes first.

This photo is quite a challenging candidate for retouching; the harsh flash lighting has caused strong reflections on the skin that only serve to accentuate the wrinkles. You’ll begin the retouching process using the Healing Brush tool in botox mode.
Make sure that the top layer, Background copy 2, is still active, and then select the Healing Brush tool (
 ) which is grouped together with the Spot Healing Brush tool in the toolbox.
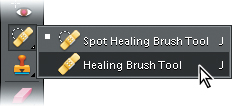
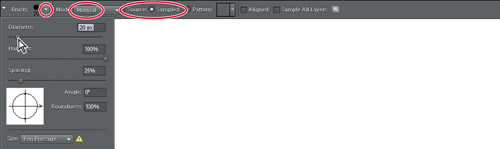
In the tool options bar, click the small arrow to open the Brush Picker. and set the Diameter to 20 px. Set the brush Mode to Normal and Source to Sampled. Make sure that the options Aligned and Sample All Layers are disabled.
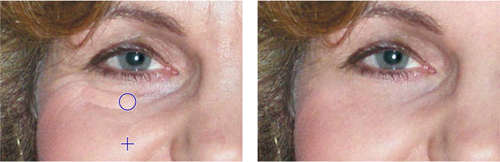
Alt-click / Option-click a smooth area on the woman’s right cheek to define the area sampled as a reference texture. Note that if you switch to another tool and then back to the Healing Brush, you’ll need to repeat this step.

Draw a short horizontal stroke under the left eye. As you drag, it may look as if you’re creating a strange effect, but when you release the mouse button, the color will be blended and natural skin tones will fill the area.
Continue to smooth the skin on the face and neck with the Healing Brush. Avoid the areas very close to the eyes, shadowed areas, and the hair-line. You can also reduce the worst of the shine caused by the harsh flash. As you work, re-establish the reference area occasionally by Alt-clicking / Option-clicking in new areas of the face to sample appropriate skin tone and texture. Press the left and right bracket keys ( [ , ] ) to decrease or increase the brush size as you work. Be sure to remove the moles om the woman’s right cheek and the spots on the left cheek and just below the lower lip
Be careful to keep your brush strokes short. Try just clicking rather than dragging, but take care to overlap your clicks to avoid creating a spotty effect. Longer strokes may produce unacceptable results—especially near shaded areas where the darker tones may spread. If that happens, choose Edit > Undo Healing Brush. If you’re still seeing results you don’t like, make sure that the Aligned option is not activated in the tool options bar. Try setting the brush to a smaller size or reversing the direction of your strokes. If the problem is related to the shadowed areas beside the nose or at the sides of the face, try stroking towards the shadows rather than away from them, or temporarily changing the mode for the Healing Brush tool from Normal to Lighten in the tool options bar.
Choose Window > Undo History. You can use the Undo History panel to quickly undo a series of steps. Every action you perform is recorded in chronological order from the earliest at the top to the most recent at the bottom of the panel. To restore the file to an earlier state, simply select an earlier (higher) action in the Undo History list.
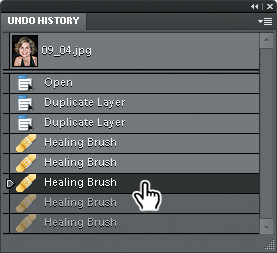
You can still return the image to a more recent state by selecting a step lower in the list—as long as you have not made any further changes to the file. Once you’ve used the Undo History panel to restore a photo to an earlier state, any change you make to the image will replace all the actions in the more recent history.
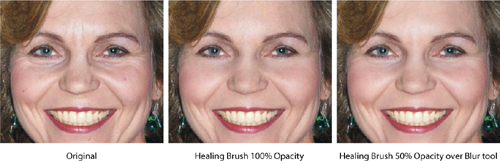
The Healing Brush tool copies texture from the source area, not color. It samples the colors in the target area—the area you’re brushing—and arranges those colors according to the texture of the reference area. Consequently, the Healing Brush tool appears to be smoothing the skin. So far however, the results are not convincingly realistic; you’ll work to improve that in the next exercise.
In this exercise, you’ll make your retouching work look a little more natural by altering the opacity of the layer you’ve been working on, and then use another of the texture tools to refine the resulting blend.
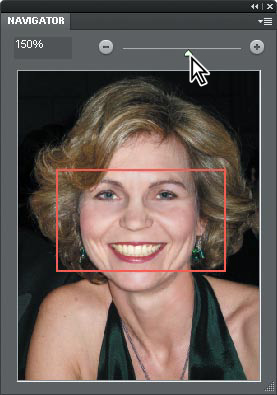
Choose Window > Navigator. In the Navigator panel, use the zoom slider and drag the red frame in the Navigator preview to focus the view in the image window on the area around the woman’s eyes and mouth.
Extensive retouching can leave skin looking artificially smooth, looking a little like molded plastic. Reducing the opacity of the retouched layer will give the skin a more realistic look by allowing some of the wrinkles on the un-edited Background layer to show through slightly.
In the Layers panel, change the Opacity of the layer “Background copy 2” to about 50%, using your own judgment to set the exact percentage.
We opted for quite a low setting, wishing a fairly natural look for this photo of a friend, but the opacity value you set will depend on the extent of your retouching and the purpose for which the edited image is intended.
The opacity change restores some realism, but three noticeable blemishes have also made a reappearance—one on each cheek and one just below the lower lip.
Select the layer “Background copy” to make it the active layer.
Set the brush size for the Healing Brush tool to 20 px and click once or twice on each blemish. Gone!
In the toolbox, select the Blur tool (
 ). In the tool options bar, set the brush diameter to approximately 13 px and set the Blur tool’s Strength to 50%.
With the layer “Background copy” still active, drag the Blur tool over some of the deeper lines around the eyes and brow. Use the Navigator panel to change the zoom level and shift the focus as needed. Reduce the Blur tool brush diameter to 7 px and smooth the lips a little, avoiding the edges.
Compare your results to those below—the original, the version retouched with the Healing Brush, and final refined version. Toggle the visibility of your retouched layers to compare the original image in your Background layer with the edited results.
Choose File > Save As. Make sure that the new file will be included in the Organizer, but not in a Version Set. Name the edited image 09_04_Retouch, to be saved to your My CIB Work folder in Photoshop (PSD) format.
Tip
For a quick and easy solution to portrait retouching, try the new Perfect Portrait procedure listed under Fun Edits in the Guided Edit mode, where you’ll be stepped through smoothing skin, removing spots, fixing red eye, increasing definition in facial features, whitening teeth, and even slimming your subject!
Make sure that the Layers option is activated, and then click Save.
Choose File > Close.
In this exercise, you’ve learned how to set an appropriate source for the Healing Brush tool, and to sample the texture of the source area to repair flaws in another part of the photograph. You also used the Blur tool to smooth textures, and an opacity change to achieve a more realistic look. You’ve also gained a little experience in working with both the Undo History and Navigator panels.
The impact of a photo can easily be spoiled by an unwanted object in the frame. In the modern world, it’s often impossible to photograph even a rural landscape without including a fence, or power lines, television aerials and satellite dishes, or litter—mundane clutter that can reduce the drama of an otherwise perfect shot.
Photoshop Elements offers several tools to help you improve an image by getting rid of extraneous detail. One method is to use the Recompose tool, which—as you’ve already seen—lets you mark areas to be removed as you scale a photo. In this set of exercises you’ll use the Spot Healing Brush tool to remove an object from an image without altering the overall composition.
If you’re still in the Editor from the previous exercise, switch to the Organizer now by clicking the Organizer button (
) at the top right of the Editor work-space. In the Keyword Tags panel, click the Find box beside the Lesson 09 tag, if necessary, to isolate the images for this lesson.In the Media Browser, Ctrl-click / Command-click to select the two images 09_05.jpg and 09_06.jpg; then, right-click / Control-click either selected thumbnail and choose Edit With Photoshop Elements from the context menu.
In the Editor, either choose Window > Reset Panels or click the Reset Panels button (
) at the top of the workspace.In the Project Bin, double-click the photo of the two girls to make it the active image and bring its image window to the front in the Edit pane.
Press Shift+Tab on your keyboard to hide everything but the image window and the toolbox.
Select the Zoom tool; then, check the tool settings right above the toolbox to make sure that the Zoom In Mode is activated. In the Edit pane, drag a marquee with the Zoom tool to closely surround the lower half of the photo.
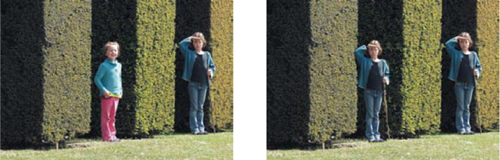
In the last project, you may have used the Spot Healing Brush in Proximity Match mode to help smooth skin blemishes in a portrait photo. In this exercise you’ll set the Spot Healing Brush to Content-Aware mode—new in Photoshop Elements 9.
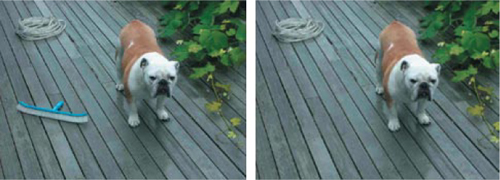
With the Content-Aware option activated, the Spot Healing Brush tool compares nearby image content to seamlessly fill the area under the pointer, realistically maintaining details such as shadows, object edges, and even perspective, as shown in the illustration above.
Select the Spot Healing Brush tool (
 ), which is grouped together in the toolbox with the Healing Brush tool.
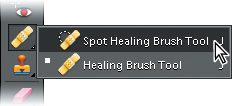
In the tool options bar, make sure that the Content-Aware option is activated. Type in the text box to set a brush diameter of 330 pixels.
Position the circular cursor so that it completely surrounds the yellow plastic package and its shadow; then click once.
If you notice any image artefacts such as blurring or obvious repetition of detail, reduce the brush size to 50 pixels and click a few points to break up the effect.
Choose File > Save As. Make sure that the new file will be included in the Organizer, but not in a Version Set Name the new file 09_05_Remove, to be saved to your My CIB Work folder in JPEG format, and then click Save. Click OK to accept the JPEG Options settings; then, close the file.
Now that you’ve seen how content-aware healing works, you can take on something a little more complex. A little practice will produce impressive results.
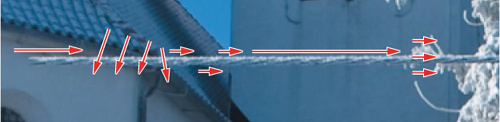
Use the Zoom tool to focus your view on the length of power line between the left edge of the photo and the sunlit wall at the left of the old church.
Select the Spot Healing Brush. In the tool options bar, set the brush diameter to 15 pixels, and check that the Content-Aware option is still activated.
Drag from right to left along the power line, starting just to the left of the tree as shown in the illustration below. Keep dragging until you’ve moved outside the left edge of the photo, and then release the mouse button.
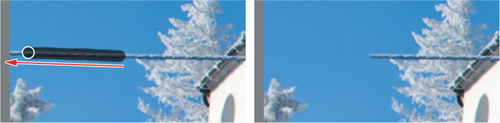
With the power line removed from the left edge of the photo, you can now work from left to right across the rest of the image. Press the space bar on your keyboard to switch temporarily to the Hand tool. Drag the image to the left to focus on the next length of power line.
Work along the line in short, overlapping strokes, releasing the mouse button after each. If a stroke produces an unwelcome artefact, press Ctrl+Z / Command+Z to undo, and then try again; try reversing the direction or changing the angle of the stroke.
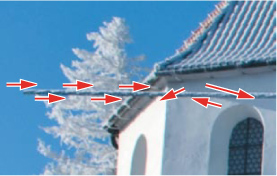
If an area proves to be particularly difficult, try clicking instead of dragging, or drag over the same area two or three times, being careful not to over-work the area. Reduce the brush size as needed. You’ll need to take extra care as you cross the roof-line and other mechanical edges. Don’t drag through too many textures with the one stroke; move across one border, and then stop.
If you find that you can’t deal with a problem area effectively, or you can’t avoid creating an unnatural-looking artefact, switch temporarily to the Clone Stamp tool, for which you can designate a precise source as you did with the Healing Brush in the portrait retouching exercise.
Although the Clone Stamp offers this extra level of control, the Spot Healing Brush in content-aware mode can help you get the job done much faster; once you’ve gained some experience, you’ll appreciate the fact that you don’t need to stop repeatedly to sample a new source. Try a combination of content-aware healing and cloning on some of your own images; practice makes perfect.
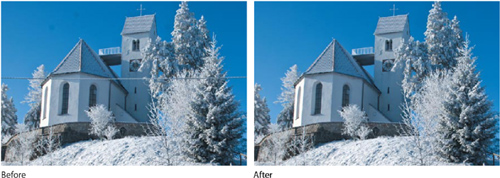
When you’ve removed the last of the power line, choose View > Fit On Screen to admire your work.
The photo is vastly improved now that it’s wire-less. However, there are still three unsightly spots in the sky caused by dirt or water droplets on the camera lens.
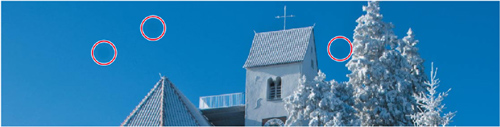
Set the brush size for the Spot Healing Brush to 60 px, and then click once or twice on each of the three spots. Done!
Choose File > Save As. Make sure that the file will be included in the Organizer, but not in a Version Set. Name the new file 09_06_Remove, to be saved to your My CIB Work folder in JPEG format; then, click Save.
Click OK to accept the JPEG Options settings, and then close the file.
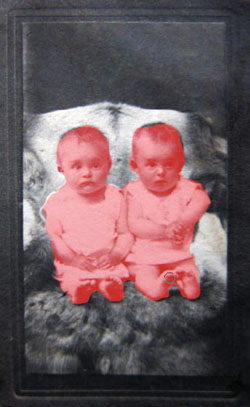
All sorts of nasty things can happen to precious old photographs—or precious new photographs, for that matter—and it is often impossible to locate the negative. For this series of exercises you’ll work with an uncropped version of one of the photos you adjusted in the previous chapter.
The scanned image of an antique photograph that you’ll use in this project is a challenging restoration job, because of large creases in the original print, among other flaws.
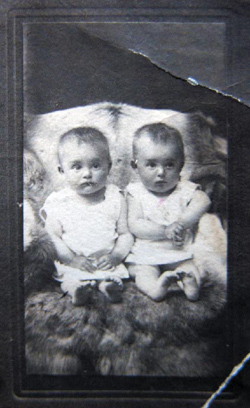
Unfortunately, there’s no way to fix such significant damage in just one or two keystrokes but to rescue an important heirloom photograph like this one, a little effort is worth-while and the results can be dramatic.
Photoshop Elements provides the tools you’ll need to restore this picture convincingly to an approximation of its original condition. You’ll repair creases, replace parts of the image that are actually missing, fix frayed edges and remove dust and scratches. You may be surprised to discover how easy it is to achieve impressive results.
If you’re still in the Editor from the previous exercise, switch back to the Organizer now by clicking the Organizer button (
) at the top right of the Editor workspace.In the Keyword Tags panel, click the Find box beside the Lesson 09 tag, if necessary, to isolate the images for this lesson.
In the Media Browser, right-click / Control-click the image 09_07.psd, a scanned antique photo of twin babies, and choose Edit With Photoshop Elements from the context menu.
In the Editor, either choose Window > Reset Panels or click the Reset Panels button (
) at the top of the workspace. Hide the Project Bin by double-clicking its header bar.Drag the grouped Effects and Content panels out of the Panel Bin by the header bar—not by the name tabs. Dragging the name tabs will float a single panel, separating the group. Click the menu icon at the right end of the group’s header bar and choose Close Tab Group from the panel Options menu.
You can begin your restoration work by setting up a work file with a duplicate layer.
Choose File > Save As. Make sure that the file will be included in the Organizer, but not in a Version Set. Name the new image 09_07_Repair, to be saved to your My CIB Work folder in Photoshop (PSD) format, and then click Save.
Make a duplicate of the Background layer by doing one of the following:
Choose Layer > Duplicate Layer.
Click the menu icon at the right end of the Layers panel’s header bar and choose Duplicate Layer from the panel Options menu.
Right-click / Control-click the Background layer in the Layers panel and choose Duplicate Layer from the context menu.
In the Duplicate Layer dialog box, click OK to accept the default name: Background copy.
Choose Window > Navigator, and then arrange your workspace as shown in the illustration below. In the Panel Bin, drag the divider bar between the Navigator and Layers panels upwards to make the Navigator preview as large as possible without losing sight of the two layers in the Layers panel.
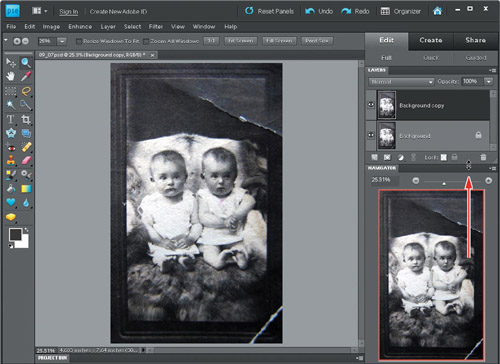
You could also work with your panels floating, but as you’ll need to move around the image at high magnification this arrangement might be the most convenient.
The first thing you’ll do is to eliminate the creases using the Clone Stamp tool. The Clone Stamp tool paints with information sampled from another part of the image, which is perfect for both covering unwanted objects and replacing missing detail, as you’ll be doing for the worn areas along the creases.
Using the Clone Stamp feels very much like using the Spot Healing Brush in content-aware mode—except that you get to specify precisely which part of the image will be sampled as you paint.
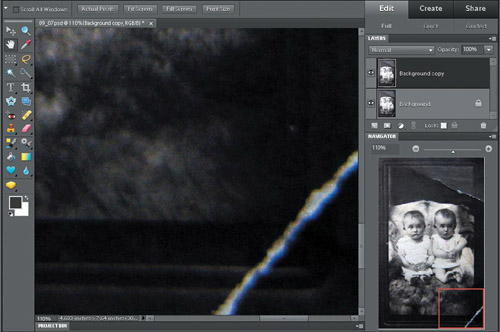
With the help of the Navigator panel or the Zoom tool, zoom in on the crease in the lower right corner.
Select the Clone Stamp tool (
 ), which is grouped with the Pattern Stamp tool in the toolbox.
Click the small white triangle at the far left of the tool options bar and choose Reset Tool from the menu.

The Reset Tool command reinstates the default values for the Clone Stamp tool: Size: 21 px, Mode: Normal, Opacity: 100%, with the Aligned option activated.
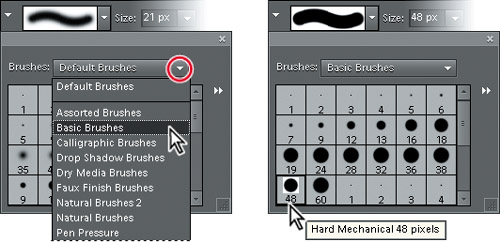
In the tool options bar, open the Brush Picker. Choose Basic Brushes from the Brushes menu, and then select a hard mechanical brush with a diameter of 48 pixels. You can leave the other tool options at their default settings.
Move the Clone Stamp tool to the left of the crease at the bottom of the picture. Hold down the Alt / Option key and click to set the source point—the area to be sampled. Centering the source on a horizontal line makes it easier to align the brush for cloning. The tool duplicates the pixels from this point in your image as you paint elsewhere.
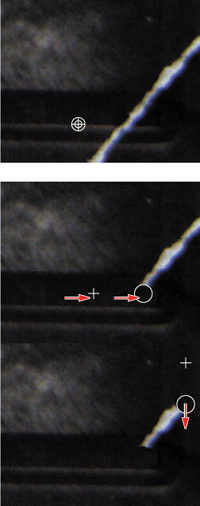
Position the brush over the damaged area so that it is aligned horizontally with the source reference point. Click and drag to the right over the crease to copy the source image over the damaged area. As you drag, cross-hairs appear, indicating the source—that is, the area that the Clone Stamp tool is sampling.
To repair the upper part of the crease, set the source position in the area above the crease and drag downwards. This will help you blend the repair with the vertical edges of the photograph’s mount.
Continue to drag the brush over the creased, damaged area, resetting the source position as necessary, until the repair is complete.
The cross-hairs follow the movement of the brush. With the Aligned option activated in the tool options bar, the cross-hairs maintain the same position relative to the brush that was established when you made the first brush stroke. When the Aligned option is disabled, the cross-hairs return to their original position at the beginning of each new stroke, regardless of where it is made.
Now you can smooth out the fold across the upper right corner. The fold is quite severe; there is a significant difference in the background tones on either side of it, as well as surface damage and wrinkling. For this relatively complex operation the Healing Brush tool (
) is the best choice.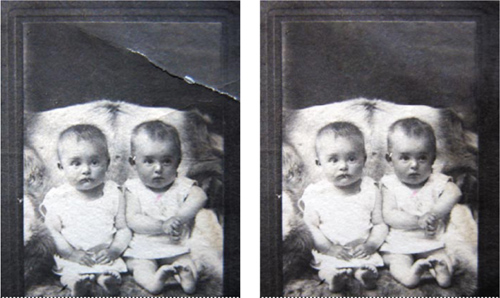
When you’re done, choose File > Save to save your changes.
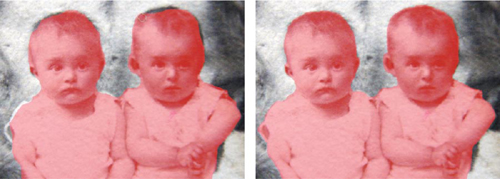
The next step in restoring this photo is to use the Dust & Scratches filter to remove the stray spots and scuffed edges from the scanned image. This filter smooths the pixels by blurring the image just slightly, which is fine for the background, but the children should be kept as detailed and sharp as possible. To do that, you’ll need to make a selection to isolate our subjects from the background.
Activate the Selection Brush tool (
 ), which is grouped with the Quick Selection tool in the toolbox. Be careful not to choose one of the painting brush tools by mistake.
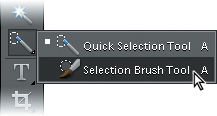
Although the Quick Selection tool can be faster than the Selection Brush, it automatically expands a selection based on similarities in color and texture—for this grainy black and white image the Selection Brush will give you far more control.
In the tool options bar, select a round brush shape and set the brush size to about 60 px (pixels). Leave the other options at the default values: Mode should be set to Selection and Hardness should be set to 100%.
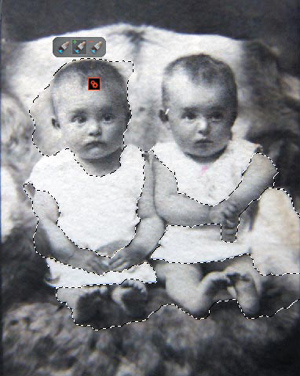
Drag the Selection Brush around the edges of the photograph first, and then work your way inward. Decrease or increase the brush size as needed, using the left and right bracket keys ( [ , ] ) on your keyboard, as you paint the selection to include everything but the children. Don’t worry if some of your strokes overlap on the babies; you’ll learn how to refine the selection in the next exercise.

Choose Select > Save Selection. Type Backdrop as the name of the saved selection and click OK to close the Save Selection dialog box.
Painting with the Selection Brush tool is a very intuitive way to create a complex selection. In images like this one, where there are no distinct color blocks, few sharp boundaries between pictured items and few crisp geometric shapes, the Selection Brush tool is especially useful.
Another advantage of the Selection Brush tool is that it is very forgiving. You can hold down the Alt / Option key as you paint to remove an area from a selection. Alternatively, you can use the Selection Brush in Mask mode—another intuitive and natural-feeling way to refine the selection—as you’ll do in the next exercise.???
As you progress through this book, you’re gathering lots of experience with saving selections. In this procedure, you’ll amend the selection you saved in the previous exercise and replace it with an improved version.
Make sure that your Backdrop selection is still active in the image window. If it’s not still active, choose Select > Load Selection, choose the saved selection, and then click OK.
Make sure the Selection Brush tool (
) is still selected in the toolbox.In the tool options bar, select Mask from the brush Mode menu. You can see the mask as a semi-transparent colored overlay on the un-selected—or protected—areas of the image. In this mode, the Selection Brush tool paints a mask rather than a selection.
Examine the image, looking for unmasked areas with details that should be protected (places where the Selection Brush strokes overlapped onto the children) and parts of the backdrop that are masked and should not be.
Use the Navigator panel slider or the Zoom tool (
 ) to adjust your view of the image, as necessary.
Reduce the brush size for the Selection Brush to about 30 pixels, and then paint out any areas that you want to mask. If you over-paint onto the background area, press the Alt / Option key as you paint to erase part of the mask.
Switch between Selection and Mask modes, making corrections until you’re satisfied that all the details you want to preserve are masked.
Choose Select > Save Selection. In the Save Selection dialog box, choose Backdrop from the Selection menu. Under Operation, activate the option Replace Selection, and then click OK.

While the Selection Brush tool is still active, make sure that the Selection mode, not the Mask mode, is active in the tool options bar. Keep the selection active for the next procedure.
You’ve just learned about the concept of masking as a method for editing a selection. In this section we’ll look at a more permanent kind of mask.
You could use your selection (even in a later session, now that you’ve saved it) to temporarily isolate part of an image layer for editing—or protect the rest of the image from modification, depending on which way you look at it.
A layer mask serves the same purpose, but is both more convenient and more versatile. Unlike a saved selection, a layer mask doesn’t need to be loaded—it can be permanently linked to a particular layer in an image. so that any modification made to that layer will be applied only to those areas not protected by the layer mask. The parts of the layer protected by the layer mask are hidden from view when it’s blended with the other layers in your image.
Like the selection mask you worked with in the previous exercise, layer masks can be edited by painting and erasing. You can add to or subtract from the layer mask without affecting the image pixels on the layer to which it is attached.
If the Backdrop selection is not still active in the image window from the previous exercise, choose Select > Load Selection, choose your saved selection, and then click OK.
Make sure the layer Background copy is still selected, and then click the Add Layer Mask button (
 ) at the bottom of the Layers panel.
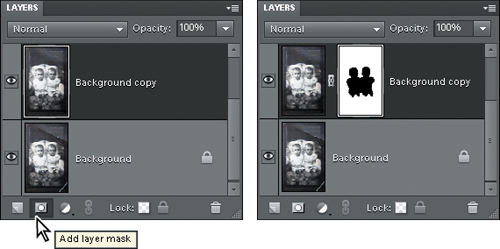
Your active selection in the image window is converted to a layer mask on the currently selected layer. A mask thumbnail appears on the background copy layer.
The white frame around the layer mask thumbnail indicates that the mask is currently selected—any change you make right now will modify the mask, not the image pixels on this layer. To edit the image instead, you would first need to click the image thumbnail.
Alt-click / Option-click the layer mask thumbnail to make the mask visible in the image window. With the mask selected, as it is now, you can edit it in the image window using painting and selection tools—or even the Text tool. Alt-click / Option-click the layer mask thumbnail again to hide the mask in the image window.
Changes made to a masked layer will be applied at full strength through the white parts of the mask; black areas in a layer mask represent the parts of your image that are completely protected.
A gray area will allow a modification to be applied at a strength equivalent to the percentage of white present; a layer mask containing a simple gradient from white to black can be a great way to fade one image into another.
Shift+Alt-click / Shift+Option-click the layer mask thumbnail to make the mask visible in the image window as a semi-transparent overlay. You can change the color and opacity of the mask overlay by right-clicking / Control-clicking the layer mask thumbnail and choosing Mask Options from the context menu. Shift+Alt-click / Shift+Option-click the layer mask thumbnail again to hide the layer mask overlay.
Click the eye icon beside the image thumbnail on the original Background layer to make the layer temporarily invisible. You can see that the protected areas of the masked layer are actually hidden from view.
While this layer mask is active, any change made to the underlying layer will be visible only in the figures of the babies; any change you make to the masked layer will be applied only the backdrop around them.
Right-click / Control-click the layer mask thumbnail and choose Disable Layer Mask from the context menu. The mask thumbnail is marked with a red X. In the image window, you can see that the image pixels on this layer have not been permanently modified by the layer mask.
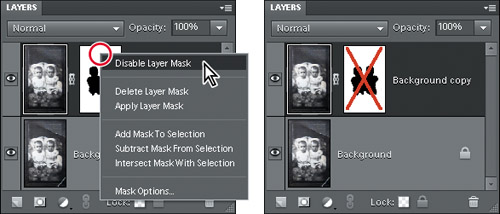
If you keep the layer mask linked to the Background copy layer as it is now, it will remain editable—even in a later work session. You can switch the mask on or off, as you just did, and you can even use it to modify an active selection in the image window by choosing from the commands in the context menu.
For the purposes of this exercise however, we’ve already refined our selection, and we have no other reason to keep the mask active.
Right-click / Control-click the layer mask thumbnail and choose Apply Layer Mask from the context menu.
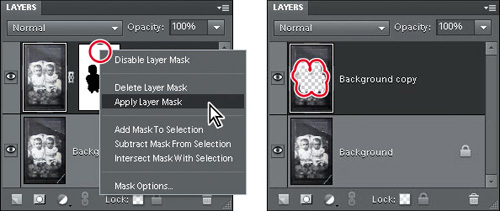
The layer mask can no longer be edited; it has been permanently merged with the Background copy layer. The babies are no longer simply hidden—they have been permanently deleted from the image on this layer; the checkerboard pattern in the layer thumbnail indicates that they have been replaced by an area of transparency.
Click the box at the left of the image thumbnail on the original Background layer to make the layer visible once more.
Now that you’ve applied the layer mask to your working layer to isolate the twins from their surroundings, you’re ready to use a filter that will soften the backdrop of the image, effectively hiding any tiny scratches and dust specks.
Make sure that the Background copy layer is still selected in the Layers panel.
Choose Filter > Noise > Dust & Scratches.
In the Dust & Scratches dialog box, make sure that Preview is selected, and then set the Radius to 6 pixels and the Threshold to 10 levels. Move the dialog box so that you can see most of the image window.
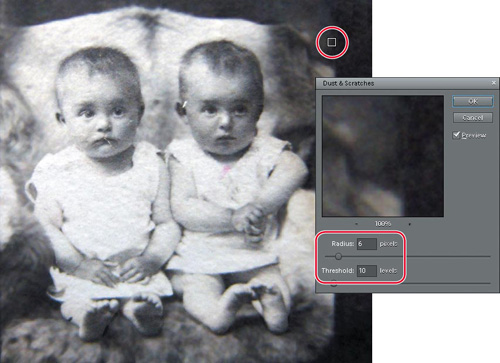
Examine the results in the image window and in the the Dust & Scratches dialog box preview. To change the image area visible in the magnified preview, drag in the preview or click with the square cursor in the image window. The scuffed edges of the image have been softened and the flecks of dust and tiny scratches have been eliminated.
Click OK to close the Dust & Scratches dialog box.
Choose File > Save to save your work.
Being a selection tool and an adjustment tool in one, the Smart Brush provides a quick and easy way to apply an adjustment to just part of a photo. Unfortunately, like the Quick Selection tool, the Smart Brush makes its selection based on similarities in color and texture in an image, which makes it a little difficult to use on an image such as our example. However, you’ve already spent time creating an accurate selection with the Selection Brush and, as you’ve seen, you can use that selection to create a mask that will effectively hide any effect from the Smart brush that extends outside the area you intend to adjust.
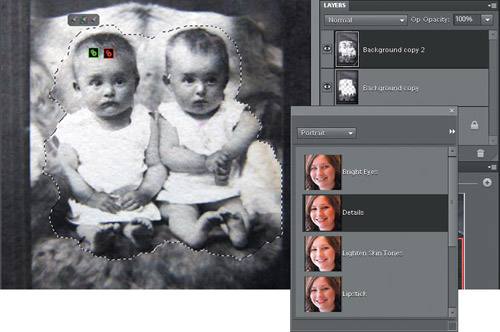
In the Layers panel, right-click / Control-click the original Background layer and choose Duplicate Layer from the context menu. In the Duplicate Layer dialog box, click OK to accept the default name: Background copy 2. Drag the new layer to the top position in the Layers panel, above the Background copy layer.
Select the Smart Brush tool (
 ) in the toolbox. The floating Smart Paint panel appears. If the panel does not appear, you can open it by clicking the colored thumbnail in the tool options bar. Drag the Smart Paint panel aside so that you can see the two babies in the image window. From the categories menu at the top of the Smart Paint panel, choose Lighting, and then select Darker from the list of Smart Paint adjustments.
In the tool options bar, open the Brush Picker and set the brush Diameter to 30 pixels, and the Hardness to 75%.
Make sure the layer Background copy 2 is selected in the Layers panel. With the Smart Brush, paint over the face of the baby on the left and over the arms and legs of both babies. Don’t worry about the selection spilling over onto the background, but try to exclude the babies’ clothes. Hold down the Alt / Option key as you paint to subtract from the Smart Brush selection.
Choose Select > Deselect Layers to make the adjustment inactive.
From the categories menu at the top of the Smart Paint panel, choose Portrait, and then select Details from the list of Smart Paint adjustments.
With the Smart Brush, paint completely over both babies and their clothes. This time you can be even more casual with your brushwork; don’t worry at all if the effect spills over onto the background—you’ll tidy it up in a moment.
Choose Select > Deselect Layers to make the new adjustment inactive; then, close the floating Smart Paint adjustments panel.
You’ll now merge the two new Smart Brush adjustment layers with the layer Background copy 2 below them.
Ctrl-click / Command-click to select the top three layers in the Layers panel: Details 1, Darker 1, and Background copy 2.
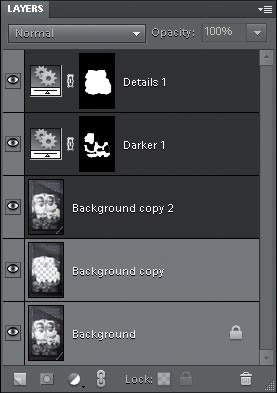
Choose Layer > Merge Layers. The three selected layers are merged into one. The new merged layer takes its name from the layer that was on top in the stacking order: Details 1. The Smart Brush adjustments are no longer live; they can no longer be edited.
Make sure the new merged layer is still active in the Layers panel and choose Select > Load Selection.
In the Load Selection dialog box, choose the saved selection Backdrop from the Selection menu. Activate the Invert option, and then click OK.
Click the Add Layer Mask button (
) at the bottom of the Layers panel. Right-click / Control-click the new layer mask thumbnail on the Details 1 layer and choose Apply Layer Mask from the context menu.To assess the effects of your Smart Brush adjustments, toggle the visibility of the layer Details 1 by clicking the eye icon beside its thumbnail in the Layers panel.

In the Layers panel, Ctrl-click / Command-click to select the top two layers: Details 1 and Background copy.
Choose Layer > Merge Layers. The two selected layers are merged into one. The new merged layer takes its name from the layer that was on top in the stacking order: Details 1.
Compared to the original condition of the photograph, the image is already vastly improved, but it needs just a few finishing touches before you save your work.
Use the Zoom and Hand tools—or the Navigator panel—to examine the entire image, looking for dark or light flecks created by dust on the negative or the ravages of time, especially in the dark areas of the photograph.
In the toolbox, select the Blur tool (
) and type 40 px as the brush Size in the tool options bar.Click or drag the tool over any dust spots you find, to blend them into the surrounding area.
Use the Clone Stamp tool to remove the pink smudge from the dress of the baby on the right and the Healing Brush to remove the black mark on the calf of the child on the left and the white mark on the ear of the other baby.
Choose File > Save, and then close the file.
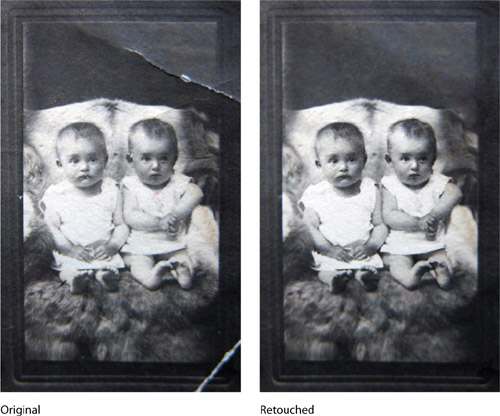
Congratulations, you’ve finished this lesson on recomposing, repairing and retouching images. You’ve explored a variety of techniques for fixing visual flaws in your photos, from straightening an image to smoothing wrinkles from skin. You sampled one area of an image to repair another with both the Clone Stamp and the Healing Brush and worked with selections and masks. You learned how to reset a tool to its default settings and worked more with layers and the Smart Brush. You also learned how to crop an image from the inside, rearranging its composition and altering its proportions without trimming away important elements.
Take a moment to review the lesson by reading through the review on the next page before you move on to chapter 10, “Working with Text.”