
Tools & Methods
As we focus on the tools in Photoshop proper, know that there are tools in Adobe Camera Raw and Lightroom as well. See “Spot Removal Tool: Removing Blemishes” (page 360) for more on those.
All methods involve using “good” bits of imagery to replace or, better, obscure the bad. I say “better” because we sometimes change our minds or catch mistakes late in the game. Working nondestructively, we can remove the imagery we used to cover what we deemed flaws. To do so usually means creating a layer to hold the good stuff, and configuring each tool to sample from all the layers we see, rather than just the active one. Content-Aware Fill can create a layer on the fly. Some methods, sadly, can’t use empty layers, and so we have to find alternatives.
Clone Stamp
The eldest of the retouching tools, the Clone Stamp tool uses a brush, usually soft (in that it fades off at the edges), to paint over blemishes with parts of an image we designated earlier.
It’s usually best to use a brush that is about as big as the blemishes we’re facing. If the problem is a stray hair, a brush that’s slightly wider would be appropriate.
- Create a new, empty layer (it’s best to give it a name—“Retouching” sounds good).
- Choose the Clone Stamp tool. In the Options Bar, set its Sample option to Current & Below so it can sample from anything you see, without being influenced by layers above (like adjustments).
- Set the size of the brush. You can use the bracket keys: [ for smaller, ] for larger.
- Hold down option/Alt and click on a patch of good material approximately one brush-width away from the first flaw. You will now see that material in the cursor.
- With no keys held, paint with the Clone Stamp tool on the first blemish. Cover it over completely. Notice that only while you’re painting, a crosshair appears where you option/Alt-clicked. That’s the source point. The source can be in a different open image!
- There is now an alignment between source and cursor. If your first source point was down and to the left of the cursor, it will be below and to the left of anywhere you paint, until you perform a new sampling by option/Alt-clicking. In this way, it will pick up material that is likely to be similar to that around the blemish.
Healing Brush
This tool is used in a manner very similar to that of the Clone Stamp tool. You option/Alt-click to set a source, then you paint elsewhere to apply that material over a blemish. However, there are two major differences. When you apply the repair, it contextualizes: that is, it adjusts to the tone and color around where you apply it, painting only the texture of the source.
Since it blends into its surroundings, the source doesn’t need to follow the cursor like it does with the Clone Stamp tool. The Healing Brush tool will continue to pick up the same material until you sample a new source. So, if you’re retouching skin, it is necessary only to sample other skin texture whether it’s in shadow or light.
- Create a new, empty layer (it’s best to give it a name—“Retouching” sounds good).
- Choose the Healing Brush tool. In the Options Bar, set its Sample option to Current & Below so it can sample from anything you see, without being influenced by layers above (like adjustments).
- Set the size of the brush. You can use the bracket keys: [ for smaller, ] for larger.
- Hold down option/Alt and click on a patch of good material that matches the texture of the area around the blemishes. It needn’t match color or tone. You will now see that material in the cursor.
- With no keys held, paint on blemishes, covering them completely in one stroke, if possible. Notice that only while you’re painting, a crosshair appears where you option/Alt-clicked. That’s the source point. The source can be in a different open image!
With both the Clone Stamp tool and the Healing Brush tool, the source can be set from another image. Just option/Alt-click in one image, return to the image needing that material, and apply the fix.
Clone Source Panel
There are times when either you need precision in how the source is selected relative to the repair, or you need the source transformed in some way to be an effective patch. The Clone Source panel can provide these. With it, you can specify the exact spacial relationship between source and cursor, and how the source should be scaled, rotated, or reflected.
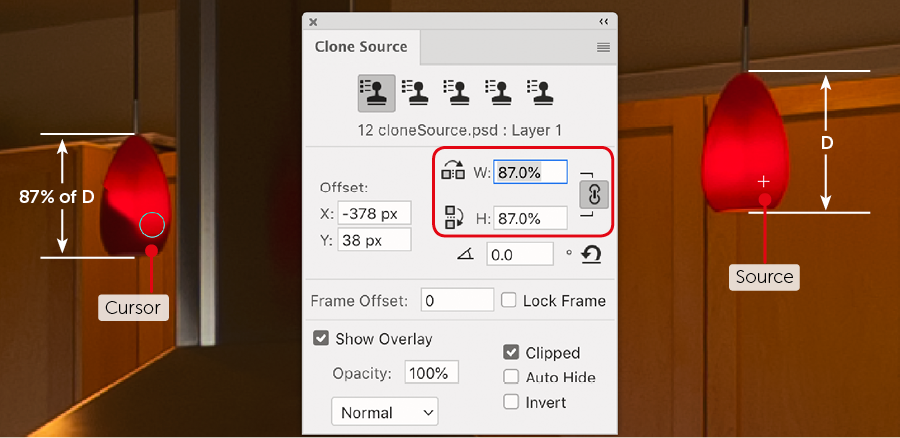
In the previous example, one of the lights wasn’t lit, but a slightly closer one was. After creating a retouching layer and setting the Clone Stamp tool to Sample Current & Below, I did a preliminary sample (option/Alt-click) at the top edge of the illuminated lamp, followed by a unmodified click at the top of the dark lamp. That sets the Offset you see in the Clone Source panel. Since the source is too big, I undid that (⌘-Z/Ctrl-Z), but the offset values remain.
To determine the correct scaling, I scrubbed the W and H fields (just dragging their labels). As I did so, a translucent overlay appeared with the lit lamp over the dark one. I continued to reduce the size until the lamps were the same size. Now the scaling was set.
With a small brush size, I then painted with the Clone Stamp tool until I had what I needed. I used even smaller sizes near the edge.
Spot Healing Brush
The tool I use the most! We don’t set a source for this one—it figures that out. In the Options Bar, we still set sampling, but in this case it’s just a checkbox to Sample All Layers, and it can handle adjustment layers wherever they are. As always, you should create a retouch layer in case you or the tool make a bad decision.
It’s easy to use too:
- Size the brush to that of the blemishes.
- Just paint on a blemish, covering it completely in one pass. Photoshop then finds something that fills that area, blending it into the surrounding content.
The algorithm it uses is drawn from the powerful Content-Aware Fill command.
Content-Aware Fill

Particularly useful for large areas needing replacement, Content-Aware Fill is a process that uses whatever material you or Photoshop deems appropriate to fill an area. It will even create a new layer for you for what it outputs.
- Select the area to be filled.
- Choose Edit > Content-Aware Fill….
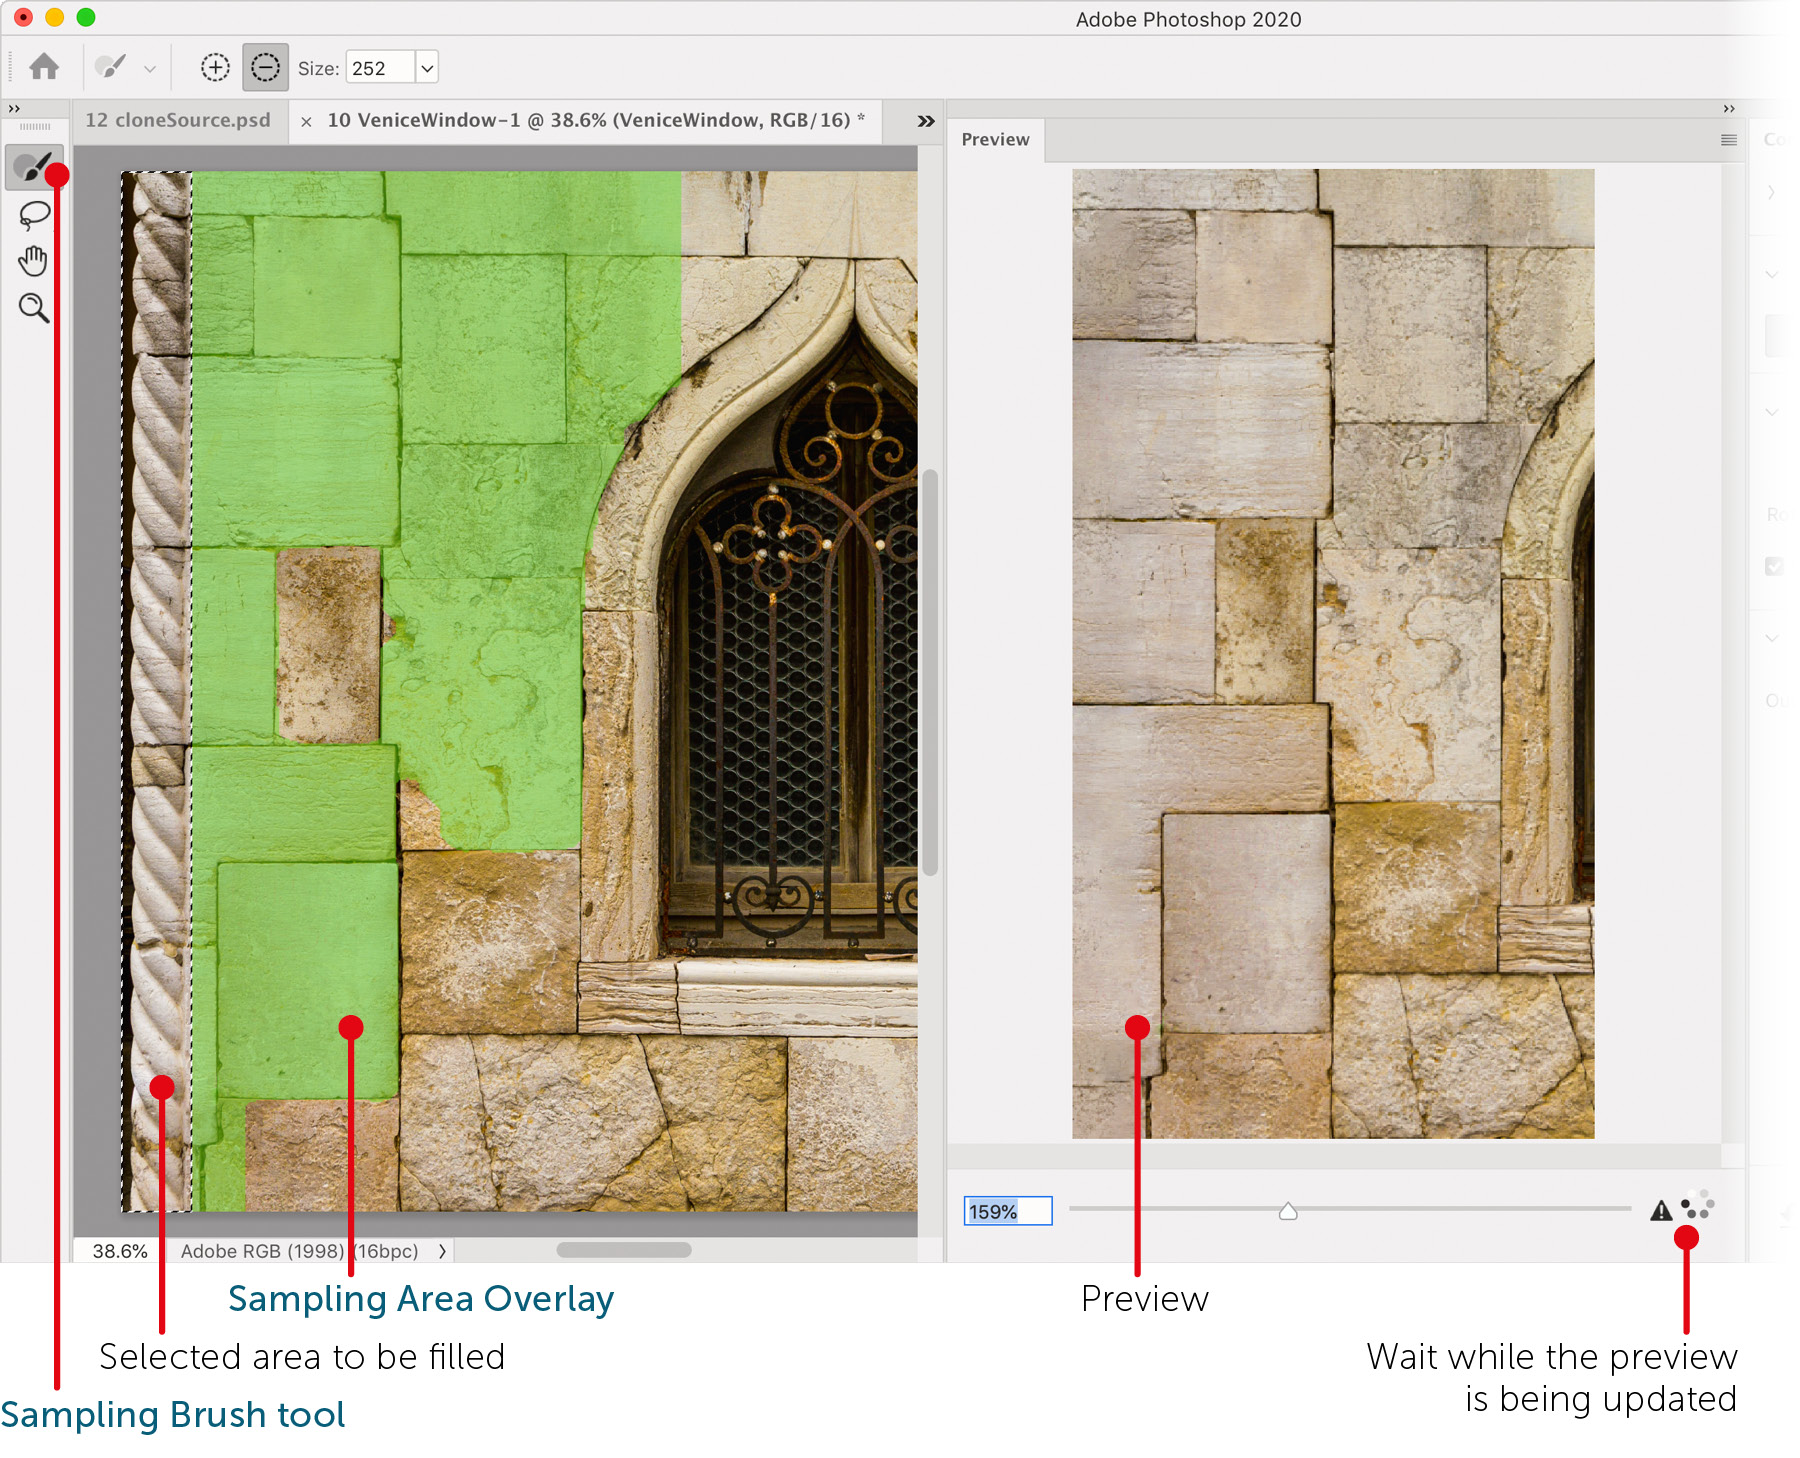
A large dialog box appears. On the right side of the box are your options. The topmost options are for choosing what gets used to fill in your selection.
Auto is what the Spot Healing Brush tool uses. This works well much of the time. In the image window, you will see a translucent overlay indicating what material may be enlisted in the fill.
Rectangular will force that area to be rectangular. This is useful when straight lines are present, like in the following example. However, I found Auto to work at least as well.
Custom requires the use of the Sampling Brush tool. Use it to literally paint on the areas that should be used to fill your area. Sometimes you really do know best.
After each choice, an indicator spins below the Preview panel. Wait for it to complete before judging the result.
Note the Fill Settings too. Higher settings for Color Adaptation allow Photoshop to alter the color of your repair to better match its new surroundings, somewhat like the Healing Brush tool. The rest allow the source material to be transformed: rotated, scaled, or mirrored. Rotation Adaptation is great when you’re repairing an area on the edge of a curve. Another part of the curve could be rotated into place! That plus Scale and Mirror can help immensely when there’s a large-scale texture (like brickwork or skyscraper windows). As the warning messages will tell you, these transformation allowances work best with Custom sampling, but I still attempt them with the others.
Wonderfully, it can (and should) Output To a New Layer.
Watch for improvements with each new Photoshop release.
Patch
The Patch tool is a combo function. You could use it like the Lasso tool to make a selection of what should be “patched” (or, if you like, the area to be used as a patch). You may use a selection made with any selection tool too. Dragging a selection with the Patch tool provides an animated preview within the selected area of the texture of where you’re dragging. When you release, the result will contextualize by default, in the manner of the Healing Brush tool.
The fatal flaw with this tool is that it cannot sample any layer other than the active one. Thus, it can’t be used nondestructively like the other tools we’ve seen. Content-Aware Fill is far superior for contexts where the Patch tool may once have been useful.
Content-Aware Move
Like a combination of Content-Aware Fill and a perfected Patch tool (in that this tool can Sample All Layers), this tool allows you to move a selected sample to another part of the image, transform it, and fill the area where it had been—all in one step.
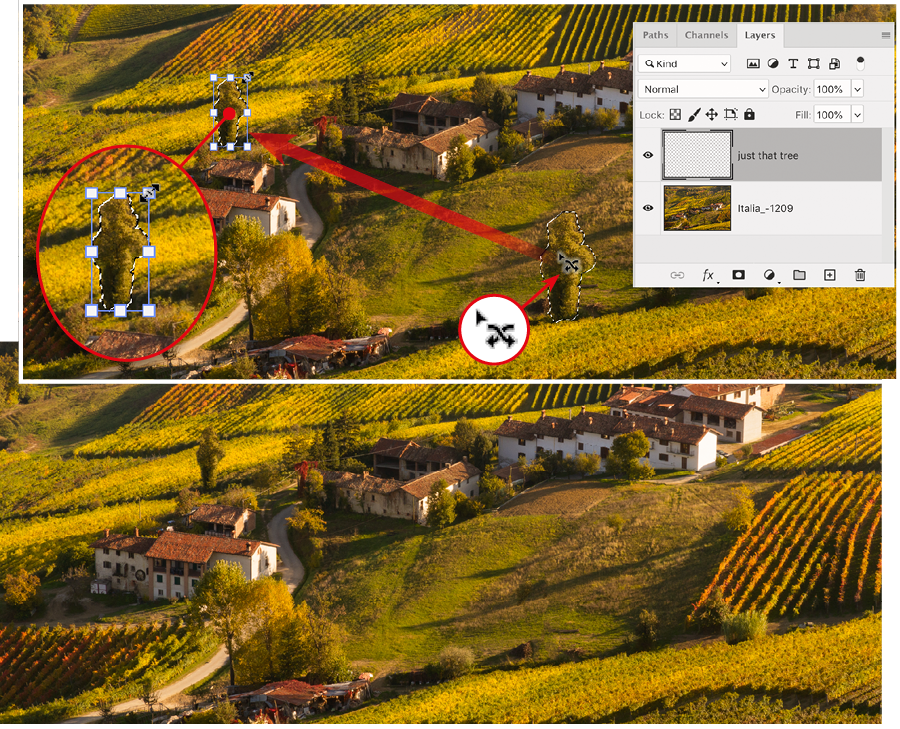
Below, with an empty layer active, I made a selection of a tree I wanted to move. Using the Content-Aware Move tool, I dragged the tree elsewhere, made it smaller, then pressed Enter.
Vanishing Point Filter
The user interface of this filter is an entire workspace with its own tools, including a hybrid Clone Stamp/Healing Brush tool. Within this workspace, we can indicate perspective in the image by tracing out planes in it. Then we can do retouching that uses that perspective, using material in the foreground to hide flaws farther away.
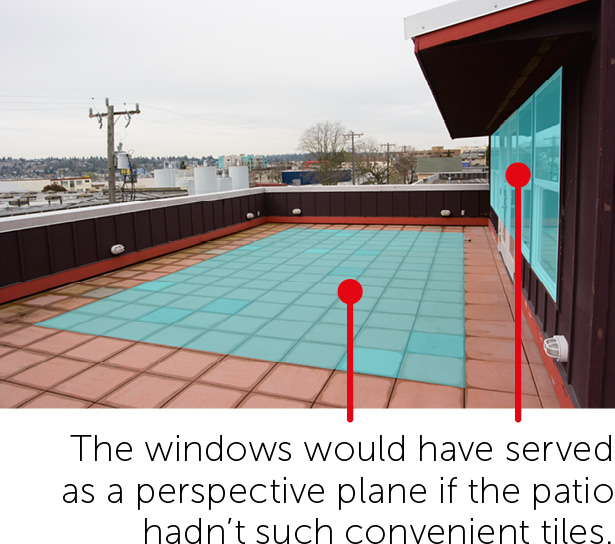
Start by creating an empty layer, just as we do with most of our retouching techniques. Look over the image to find clear rectangular areas. Well, they’d be rectangles were they not in perspective.
With the empty layer highlighted, choose Filter > Vanishing Point…. Note that instructions appear along the top. As they tell us to, we click at the corners of the chosen portion of the plane. We extend it by dragging the handles in the center of each edge.
We create places perpendicular to that one by ⌘/Ctrl-dragging. In this way, we can perform retouching by pulling material from any plane and bringing it to any other.
Use the Stamp tool as a Clone Stamp or Healing Brush by changing its settings at the top of the dialog. The Marquee tool makes selections in perspective! After you’ve drawn one, you can use it as a Patch tool by option/Alt dragging the selection.
In my case, I copied some “graffiti” I painted on an empty layer. Then I entered Vanishing Point, pasted, and dragged the art onto one or more planes.
Those are the very basics. If you’re intrigued, I strongly recommend a particular video tutorial by my friend Matt Warren. This video has the unique attributes of being informative without wasting your time, and it’s very entertaining. Search the web for “docbadwrench vanishing point video,” and prepare to be impressed.