
Adobe Camera Raw & Lightroom
Why We Need Them
The millions of microscopic sensors that collect light in our cameras’ photosensor arrays don’t actually record an image. Those sensors experience a bump in electric current when light hits them. The camera records the current passed along by every one of those millions of sensors. That doesn’t sound like an image, does it? It takes special software to interpret that electrical data and make pixels from it. So, Adobe has created these applications.
When we ask our cameras to produce JPEGs or TIFFs, which are made of pixels, the software that creates the image files is in the camera. However, we can often set our cameras to supply the raw data to us for other software (Lightroom or Adobe Camera Raw) to interpret. In turn, these pieces of software can either hand off that data to Photoshop as pixels interpreted from that raw data, or they can put that data inside a Smart Object.
Lightroom and Adobe Camera Raw (ACR) use the same software base to do adjustments. The user interface may look a bit different, but they do the same thing when processing raw data. The difference is that Lightroom has other jobs too. In fact, it’s primary use is as an asset manager to help us find, sort, and deliver our many images. I hear from many Lightroom users that they use Lightroom only for its great asset-management features. However, I want to be clear that the most efficient workflows tend to be those that maximize use of these raw “development” tools. Only after I’ve done all the adjustments that ACR or Lightroom offer do I move an image to Photoshop—if at all.
Why? As we go through what ACR (and therefore Lightroom) allows us to do, try to keep in mind that it is all nondestructive. No matter how we interpret the raw data, the data itself, the changes in electrical current in those sensors, isn’t altered. We can revisit our processing as often as we wish with no ill effect.
When I need a feature that neither ACR nor Lightroom possesses, or one that is much easier to use in Photoshop, that is when I move a copy of that raw data to Photoshop encased in a Smart Object. This is not a book about Lightroom and its fine image-management functions. However, as we discuss ACR, you’ll learn a great deal about those same functions in Lightroom.
Adobe Camera Raw
Adobe Camera Raw (ACR) is an unusual piece of software in that it needs to be “hosted” by either Adobe Bridge or Photoshop. That is, one of those programs must be running for us to be able to use (or even see) ACR.
Photoshop does not directly edit raw data. When you try to open one or more raw files in Photoshop, the software will launch (if it isn’t running already) and then, when it realizes that you’re opening raw data, it will launch ACR and open the images there. If you are browsing raw files with Bridge, you highlight one or more of them, then, if you prefer to not launch Photoshop, use the shortcut ⌘-R/Ctrl-R. This forces Bridge to host ACR and Photoshop isn’t troubled. Standard techniques to open files, like double-clicking or ⌘-O/Ctrl-O launch Photoshop, and Photoshop hosts Adobe Camera Raw.
ACR Workflow
When the Adobe Camera Raw dialog box first opens, there is a subtle but important element to configure early on. At the bottom of the dialog, near the center, you’ll see some underlined text. Click it to get to ACR’s Workflow Options. Who would think to look at the bottom for a thing you’d like to do first?
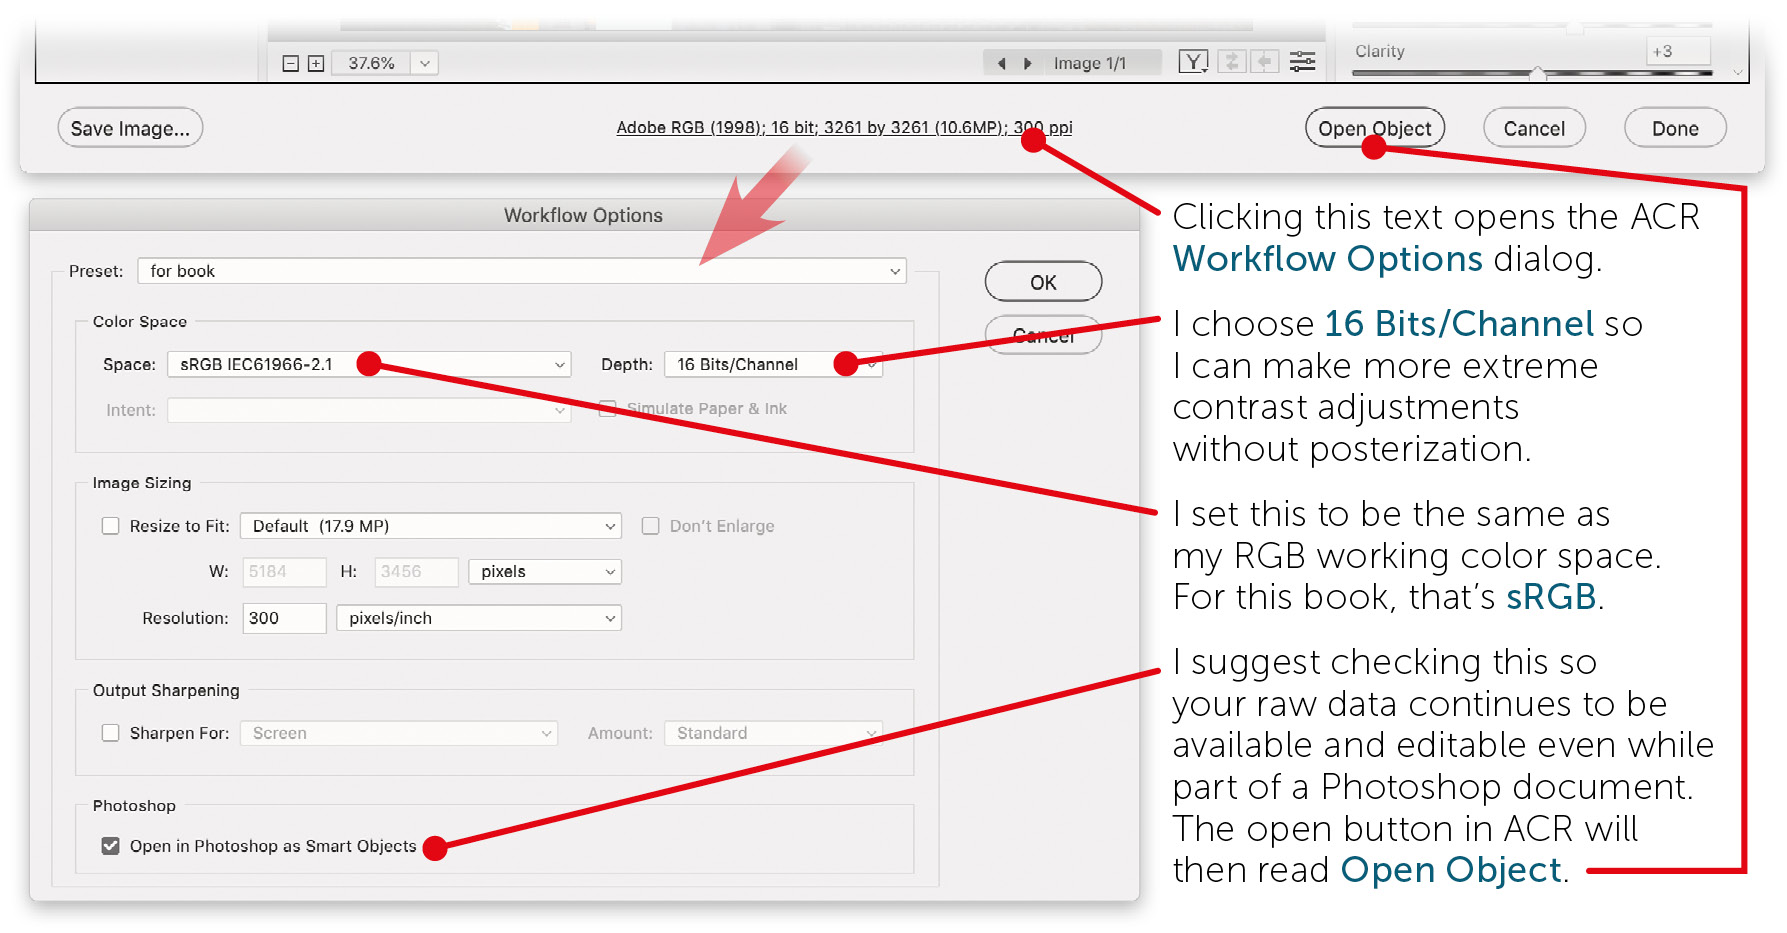
See the figure above for my recommended settings, the most important of which is choosing to open processed raw files in Photoshop as Smart Objects (bottom checkbox).
The vast majority of edits you’ll need to perform can be done with the tools and adjustments you see now: the Basic panel has the most significant controls, and the tools along the top stay with you from panel to panel. The first adjustment to be done, white balance, is usually easy and important.
Although many of ACR’s adjustments are similar to those in Photoshop, there are a few that are unique. Below, I’ll go over most of the features of ACR (and therefore Lightroom), making reference, when appropriate, to the Photoshop features from which they’re derived.
Much of ACR’s capability is available as a Photoshop filter too—making the Camera Raw filter one of the most powerful. Using that filter, of course, doesn’t convert a layer or Smart Object into raw data.
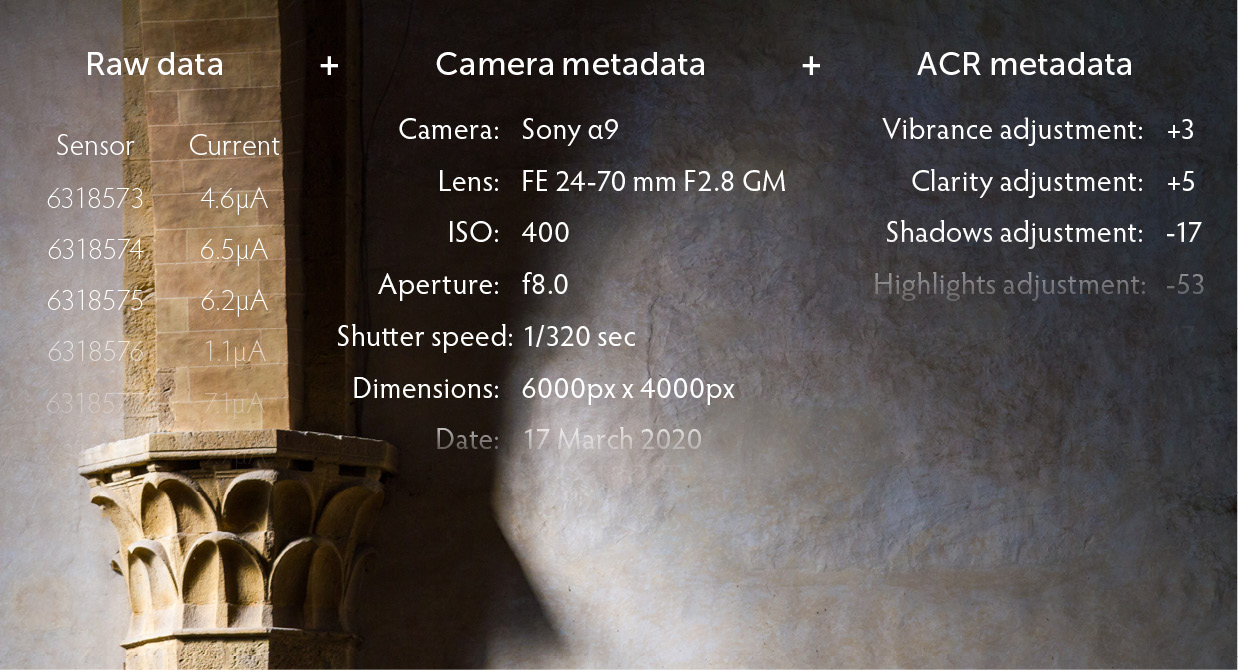
When we’re done making adjustments (interpreting the raw data), we simply click the Done button! This creates metadata for the raw file that records our settings. All digital captures already have some metadata in the file: camera and lens data, such as make and model; exposure; date and time; and sometimes GPS coordinates. If we ever create a JPEG or TIFF of this image to share with others, the metadata serves as a recipe for how the raw data and our adjustments in ACR should be baked together to make ordinary pixels. The final image is the sum of all this data.
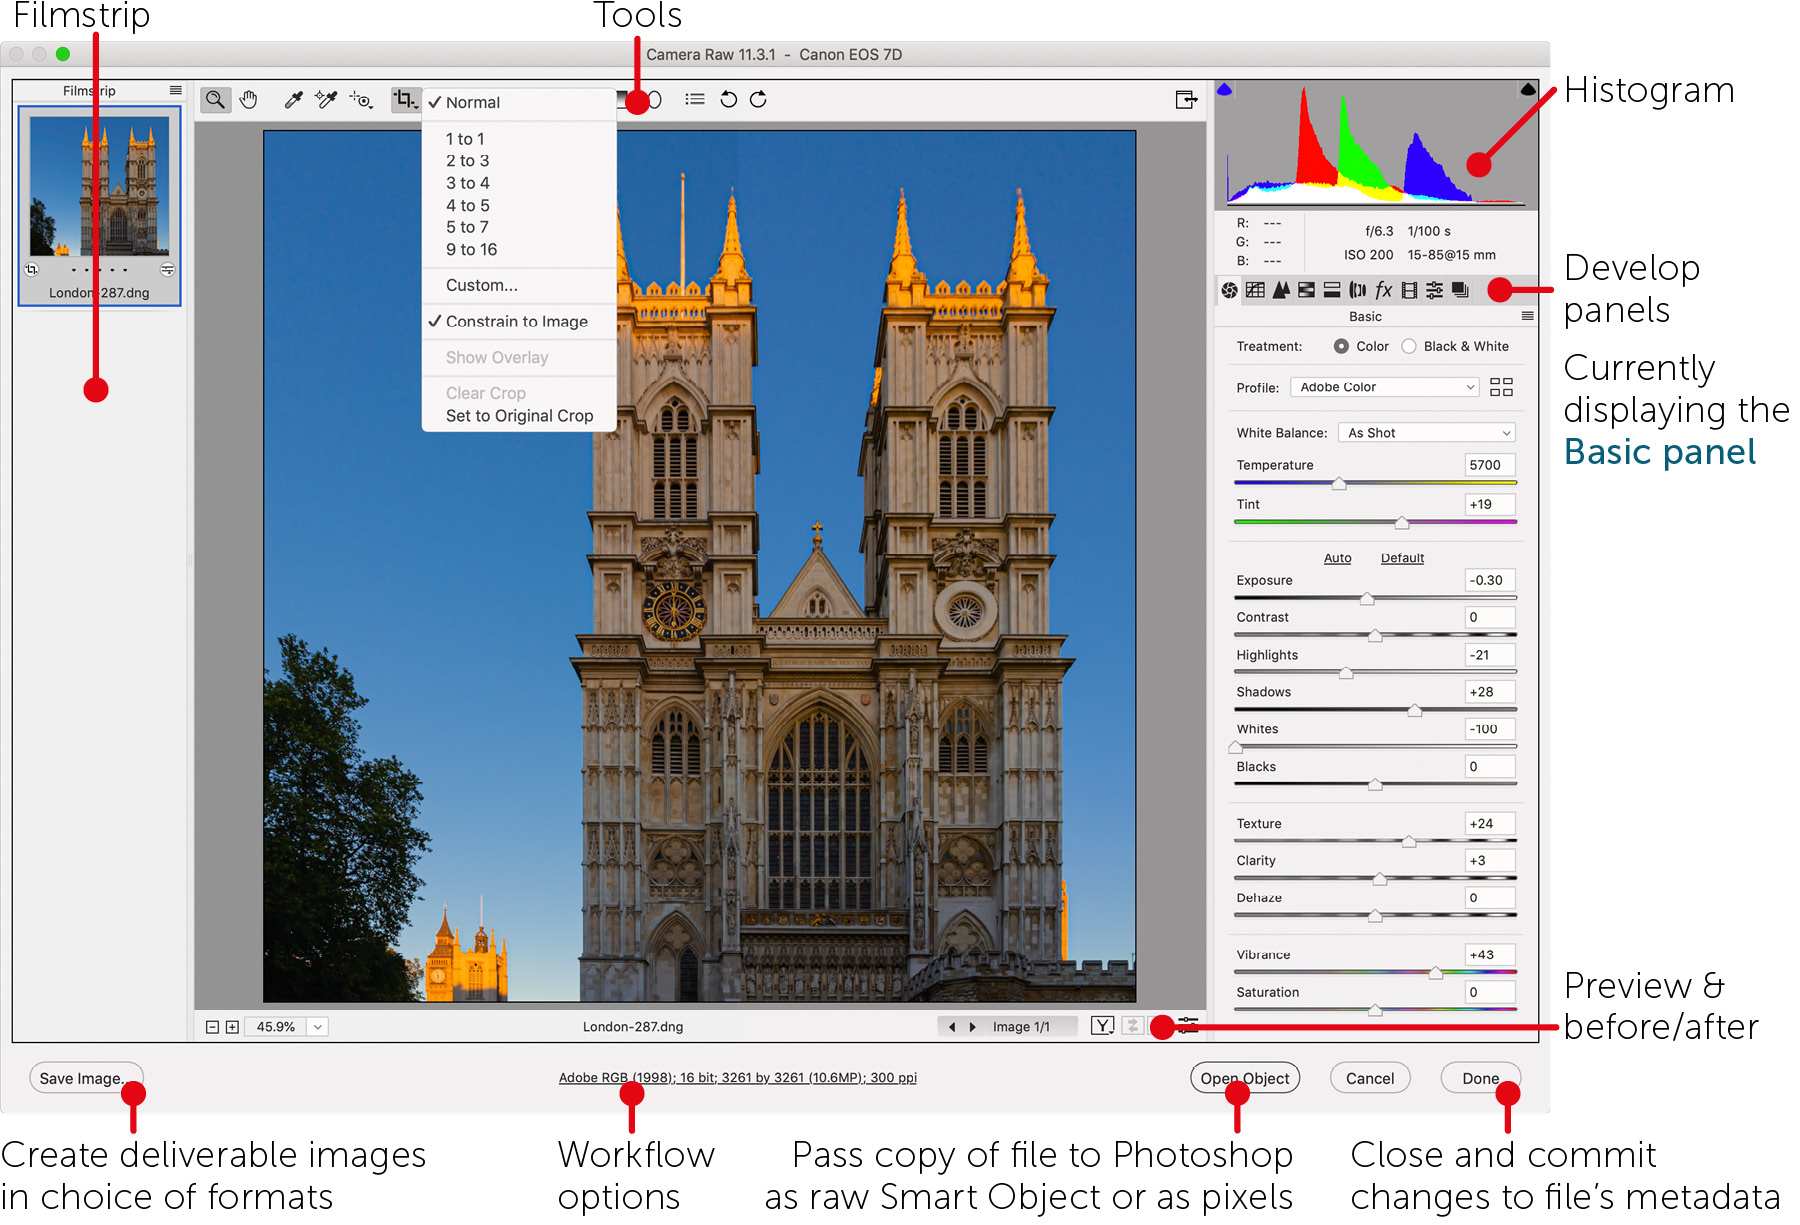
On the left side of the ACR interface is the Filmstrip. If you select multiple images there, every edit you make is performed on them all. That is both extremely cool and a bit dangerous. Most of the edits we make are achieved with the panels on the right and the tools at the top.
Raw Adjustments
White Balance
When adjusting our images in Camera Raw or Lightroom, one of the first things we do is set the white balance, specifying the color of the light in the scene so the software can compensate for it. So if the light was very yellow indoor lighting, the Tungsten preset may add the right amount of blue to compensate.
If you choose that preset, the Temperature slider will have a value of 2850, as in 2850 kelvin, the literal temperature at which a tungsten filament in an incandescent bulb glows. The sun is hotter than that, as you’d expect, so its temperature is around 5500K, which is what you get when you choose the Daylight preset. As we go from candlelight, a rather low temperature and a deep yellow light, through tungsten to daylight, the light gets progressively less yellow (more blue). At color temperatures higher than daylight, we need yellow to compensate for the bluishness of the light. Some camera flashes require this.
A graph of the color of light from candlelight to strobe is not a perfect line from yellow to blue; a bit of magenta or green may be needed to compensate more perfectly. That’s the job of the Tint slider, which also changes a bit when presets are chosen.
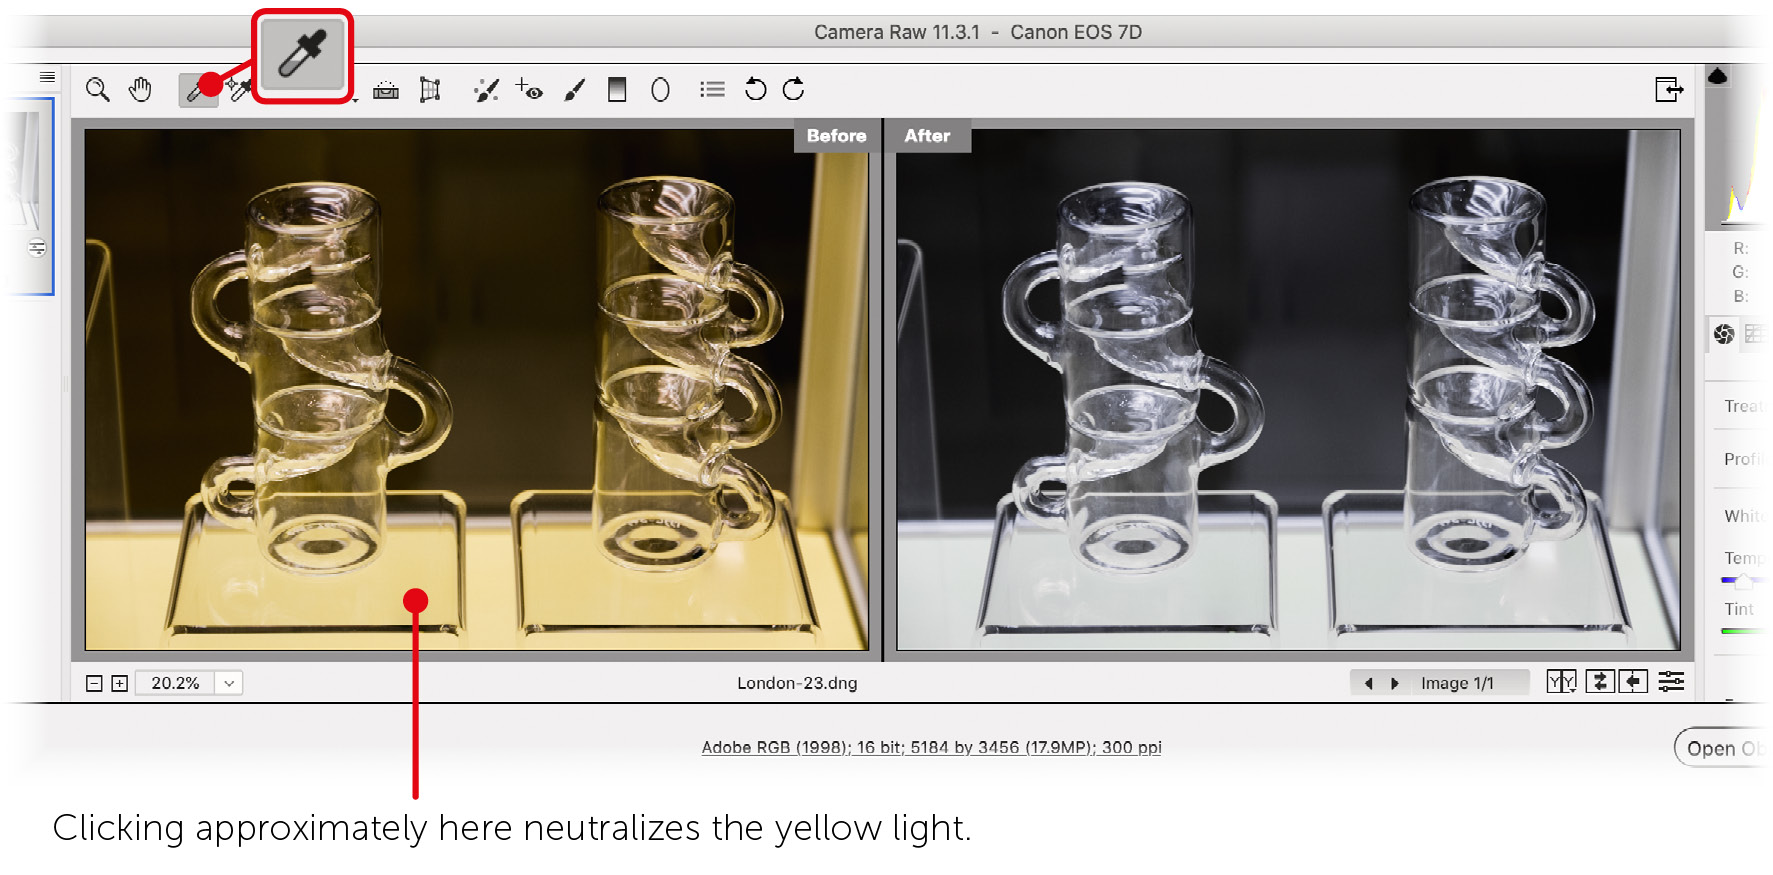
To make this process easier, look in your image for something that ought to be a nice neutral gray (a light gray is best). The eyedropper-like tool at the top of the ACR dialog is called the White Balance tool. Click on what should be neutral, and the Temperature and Tint sliders will move to make it so!
Remember, if you have multiple images highlighted in the filmstrip, you can click a gray in one image to adjust all of the images at once. This is why I usually carry a light gray object (my camera bag!) with me when I do photography. I also have a smaller gray card I can use when I’m photographing smaller subjects or I don’t want to ask my subject to pose with my bag.
Basic Panel
On the right side of the ACR interface are the panels we use to adjust our image (interpret the raw data). The first of these, and the most vital, is Basic. This is where we make the biggest adjustments to color and tone.
As mentioned previously, the first adjustment is white balance. The sliders below those for white balance (Temperature and Tint) are for tone and contrast. The expectation is that we’ll start at the top and work our way down, and that is good advice. However, I find myself returning to earlier sliders when I’ve made strong adjustments to later ones. The largest contributor to light and dark in the image is the Exposure slider. It simulates increasing or decreasing the exposure in 1 EV, or stop, increments. If there are clipped highlights or shadows, decreasing global Contrast may help. Looking for spikes on either end of the histogram is one way to know if there’s clipping. Another is to look at the small triangles in the top corners of the histogram window. Black means no clipping, colors mean that only one or two channels are clipping, and white means all three are. Clicking those triangles enables a clipping preview in the image: blue covers shadow pixels that are clipped to black, and red covers blown highlights.
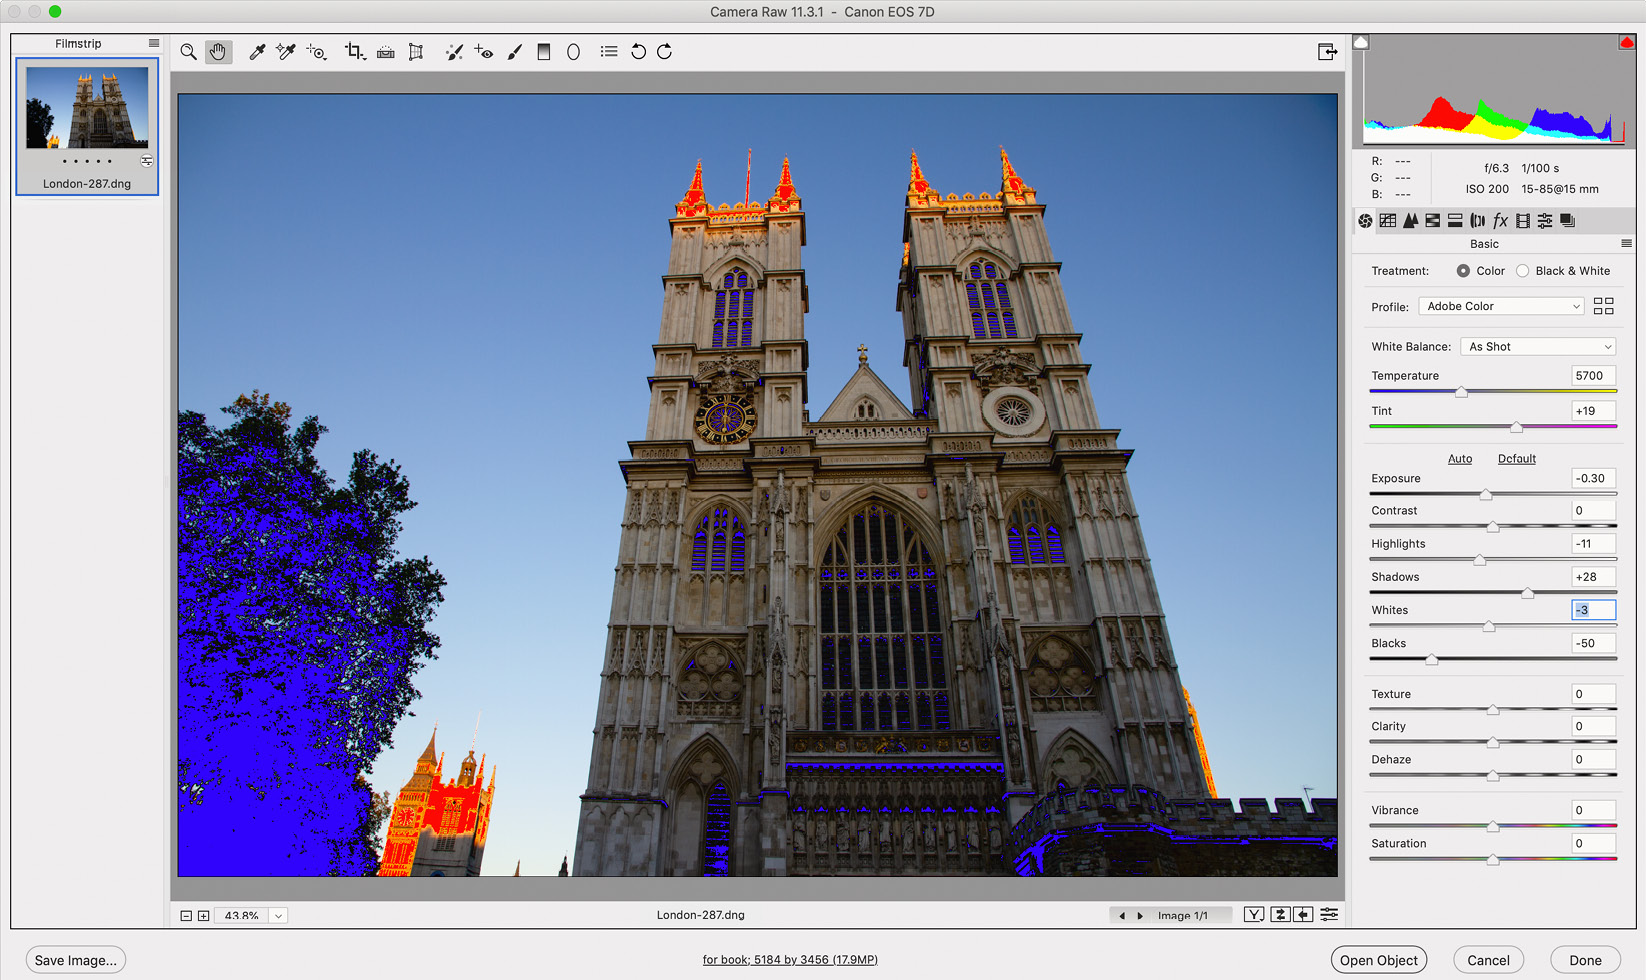
I will allow the intuitive reader to figure out what parts of the tonal range the Highlights and Shadows sliders most affect. Both also impact the midtones somewhat. The Whites and Blacks sliders can most readily incur or cure clipping at either end of the tonal range. So, if I’m pleased with my Exposure setting but have clipped highlights, for example, I may be able to recover them with the Whites slider.
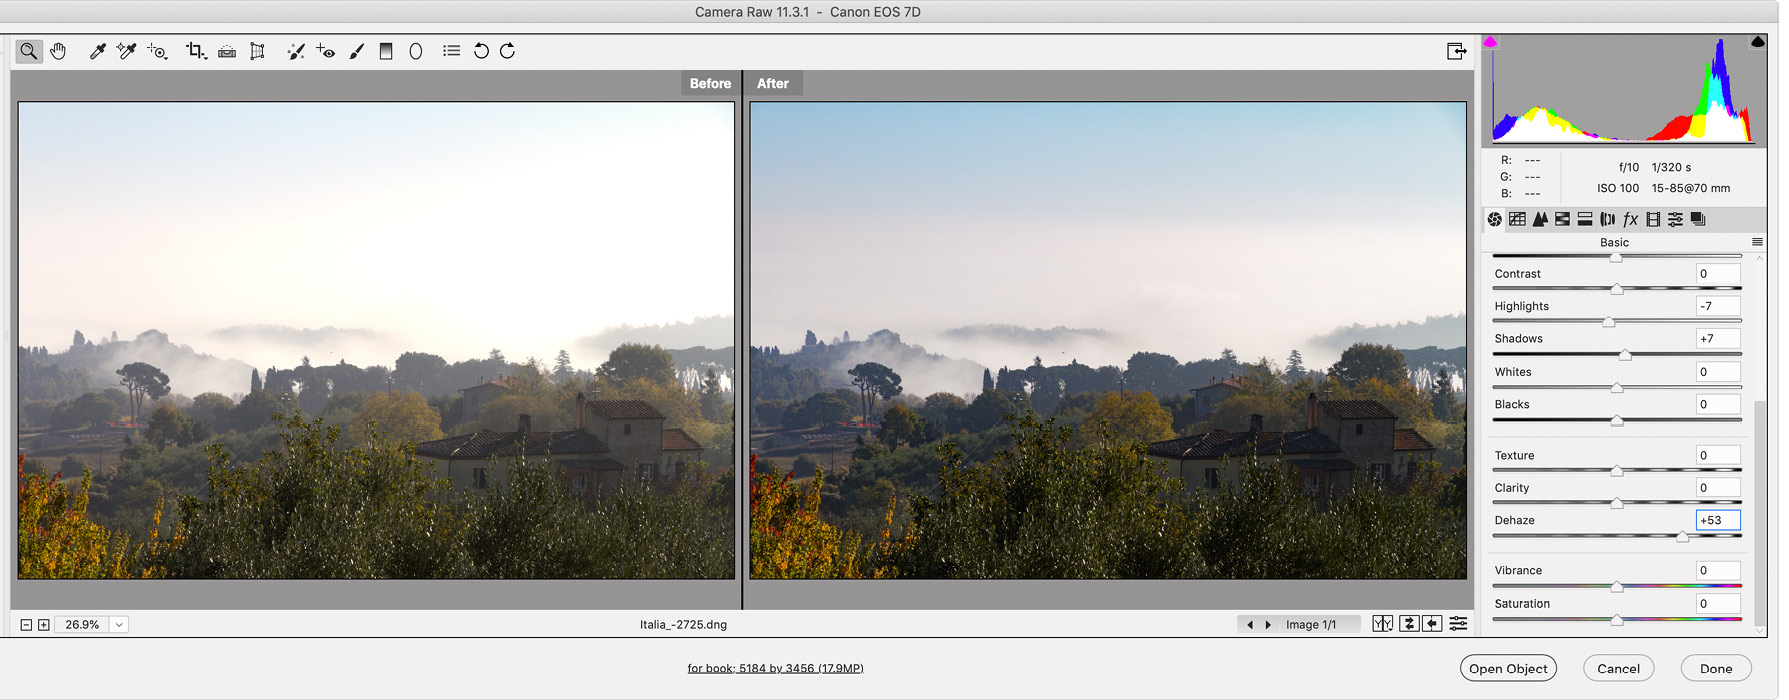
The last five sliders are for affecting “presence.” Texture and Clarity affect local contrast and can make an image look gently sharper or softer. Texture is more fine-grained and is intended for enhancing (or concealing) texture in hair or skin. Dehaze attempts to help us with images that would have been aided by the use of a polarizing filter on the lens. It tries to enhance details in atmospheric haze, like in the image below.
Finally, Vibrance and Saturation both affect saturation (color intensity) in an image. However, the Saturation slider is more aggressive and can clip colors, causing a loss of gradation and details in the most vibrant areas. I strongly suggest trying to limit yourself to the Vibrance slider, except when working with those images that are nearly monochromatic at the start.
Black & White Treatment
Just below the row of icons that we use to navigate from panel to panel, we find Treatment, with choices of Color or Black & White.
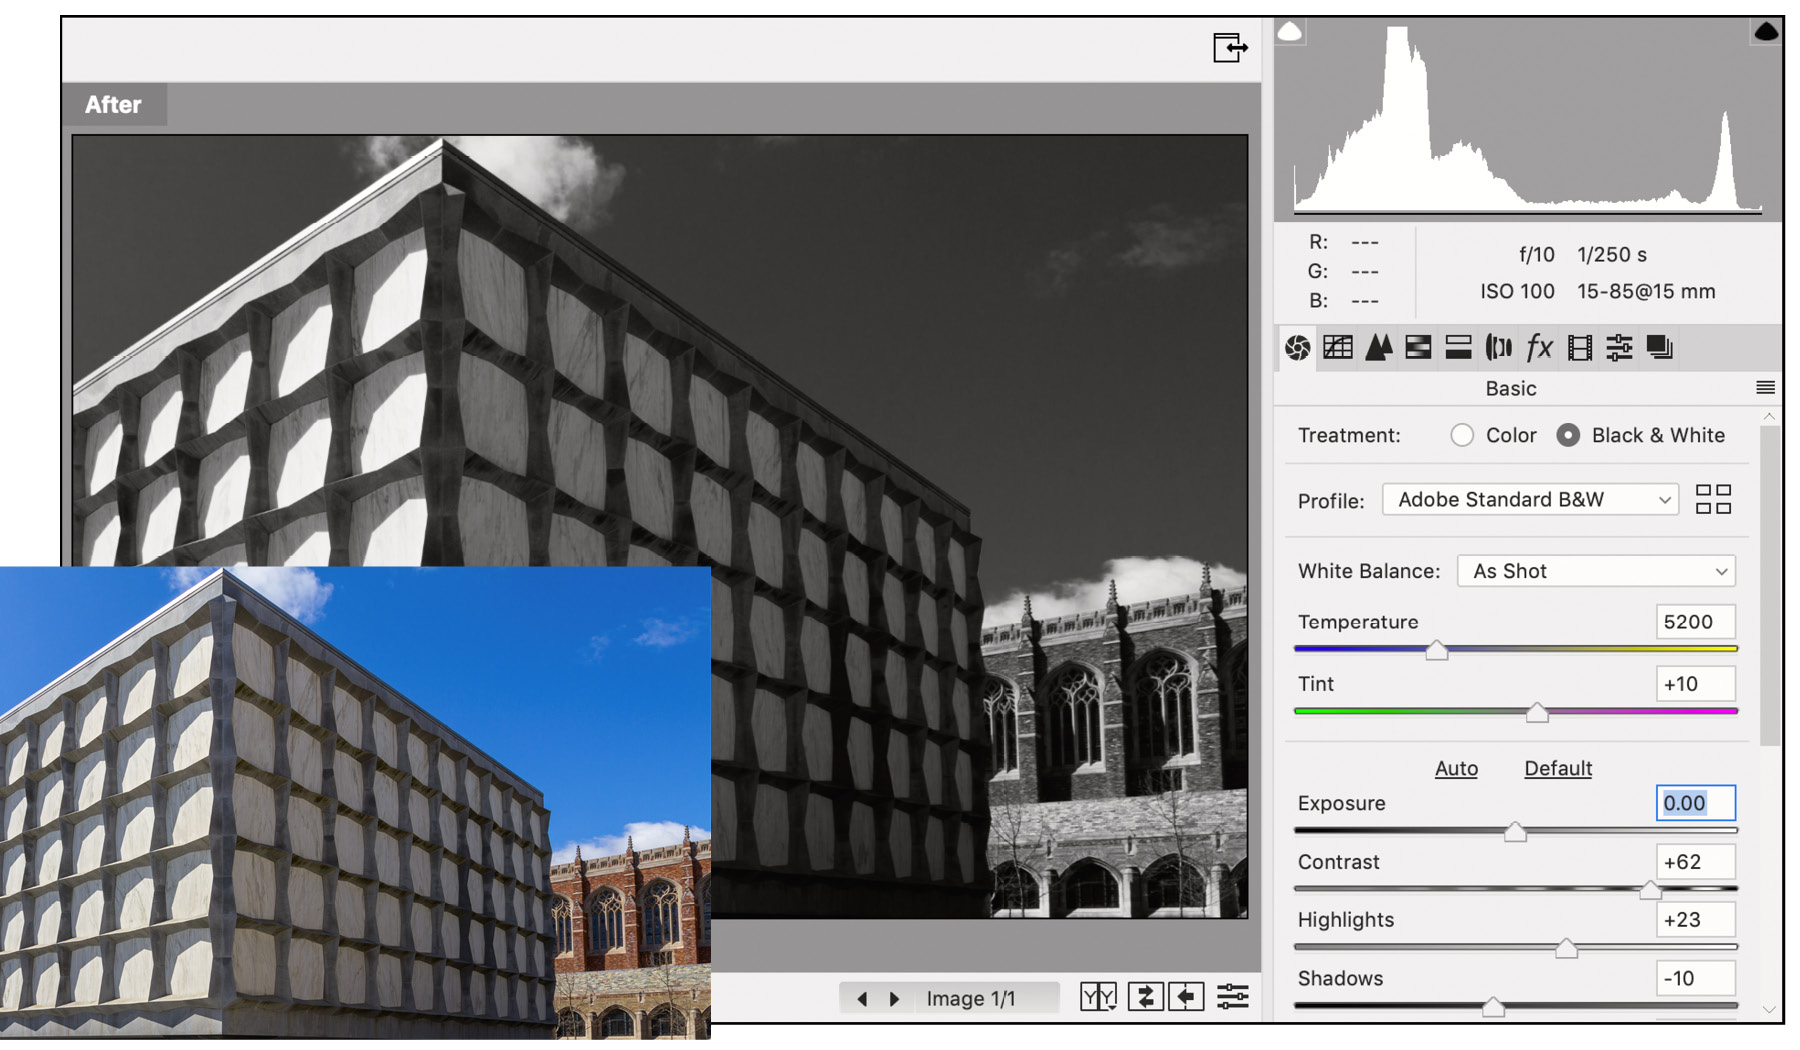
When choosing Black & White, we are likely to make very different decisions about contrast than we would in color. Also, ACR’s HSL Adjustments panel adapts to become very similar to Photoshop’s adjustment called “Black & White” (page 246). With either, we can decide which hues in the original image become dark or light shades of gray.
Tone Curve Panel
Since this panel is derived from (and extremely similar to) Photohop’s Curves adjustment, see “Curves” (page 233).
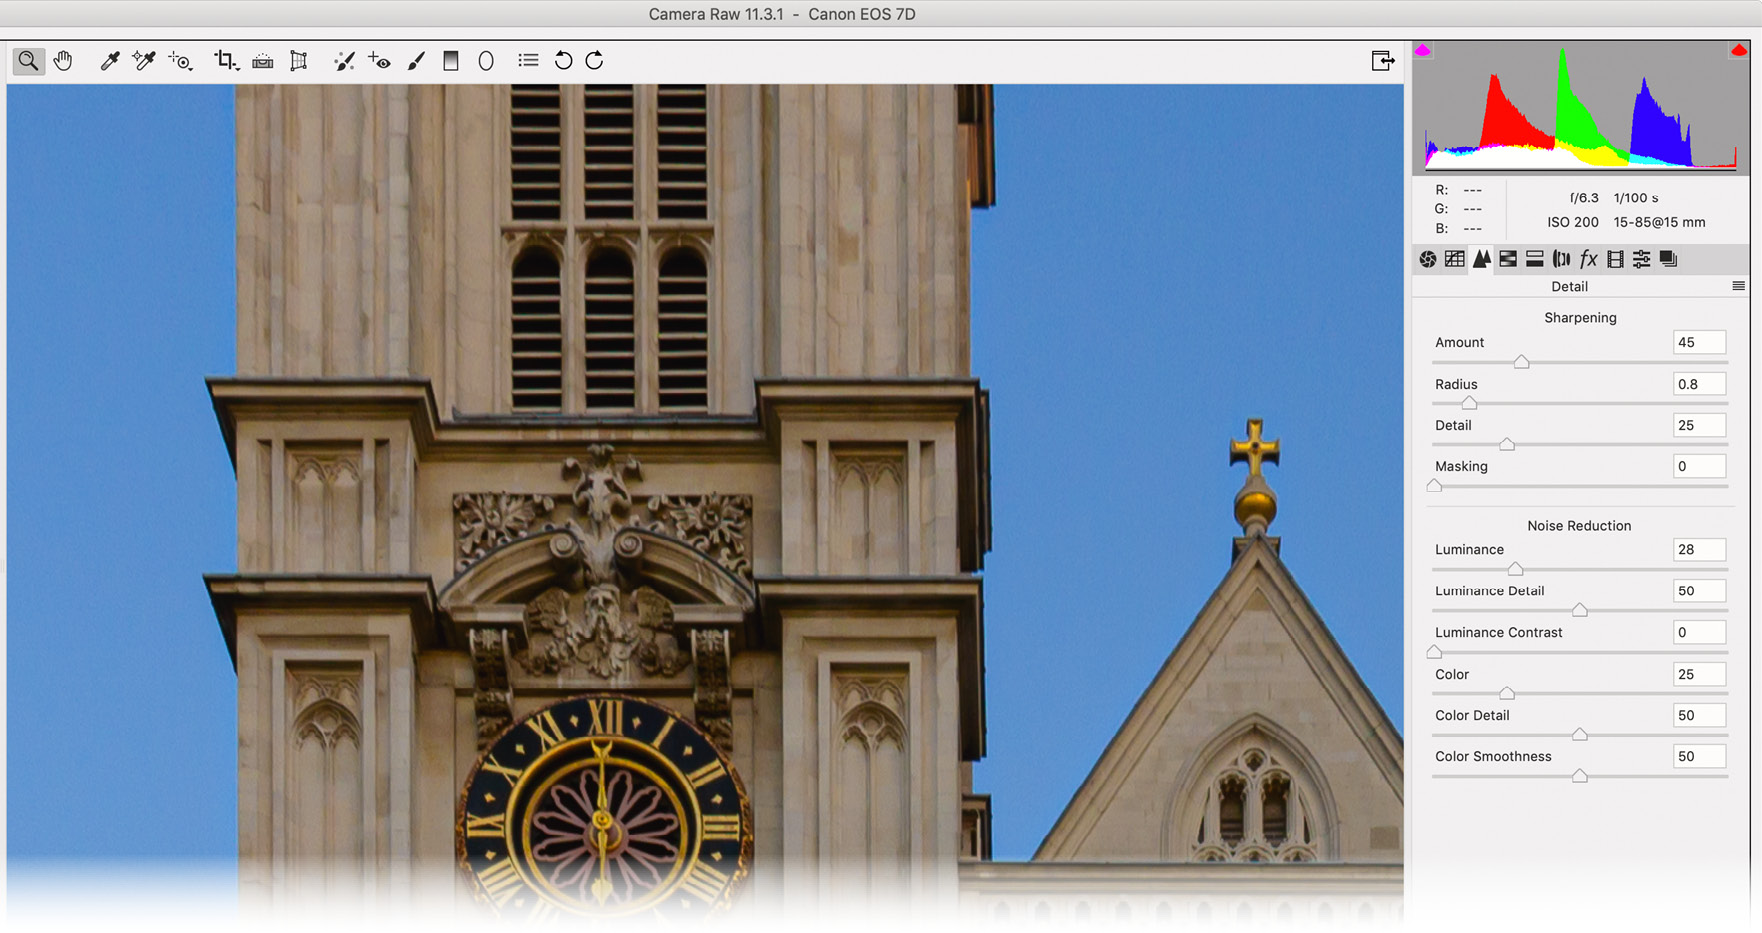
Detail Panel: Sharpening & Noise Reduction
For a variety of reasons, many images from digital cameras have a small amount of inherent softness (bluriness). This is why Camera Raw and Lightroom add a small amount of sharpening to every image. You can, of course, control just how much sharpening is applied with the Detail panel. For much more on sharpening, see “Camera Raw Sharpening” (page 310) in the “Filters & Transforms” chapter of this Compendium.
The Detail panel also helps us manage noise in images. Using either high ISO or long exposures can cause speckles to appear in images, especially in dark areas. By default, a small amount of color noise reduction is applied to all images. As with sharpening, you can adjust this to taste. Luckily, the software is very good at knowing the difference between noise and small, colorful elements in our photos.
When the noise is variations of light and dark (luminance noise), we have to be more careful. In reducing that noise, we may also be losing fine details. So, I find I often have to adjust the Luminance Detail and Luminance Contrast to maintain those details, or at least strike a balance between noise and detail. We have similar controls for color noise, but we need them less often.
The image below had a bit of luminance noise in the sky, but a little reduction took care of that.
HSL Adjustments Panel
See “Hue/Saturation” (page 238) and “Black & White” (page 246).
Split Toning Panel
Interestingly, this feature doesn’t affect tone (light and dark) at all, but adds a color tint to highlights and/or shadows. The name is derived from a darkroom process in which the practitioner may add a cool “tone,” for example, to the dark parts of an image that is printed on a warm-tone paper. It could go the other way as well, of course.
To experiment, I’d suggest increasing the Saturation sliders to an obnoxiously high level (temporarily!) so you can see the Hue that is applied to highlights and shadows as you adjust each. You can shift the Balance toward one end of the tonal range or the other, to allow the shadow’s hue to affect midtones, for example, before lowering the Saturation to tolerable values. In color images, this can produce an interesting effect. As a practical adjustment, I will sometimes add a warm shadow hue to an image with very blue shadows. Most often, however, split toning is applied to images with a Black & White treatment to echo traditional darkroom techniques.
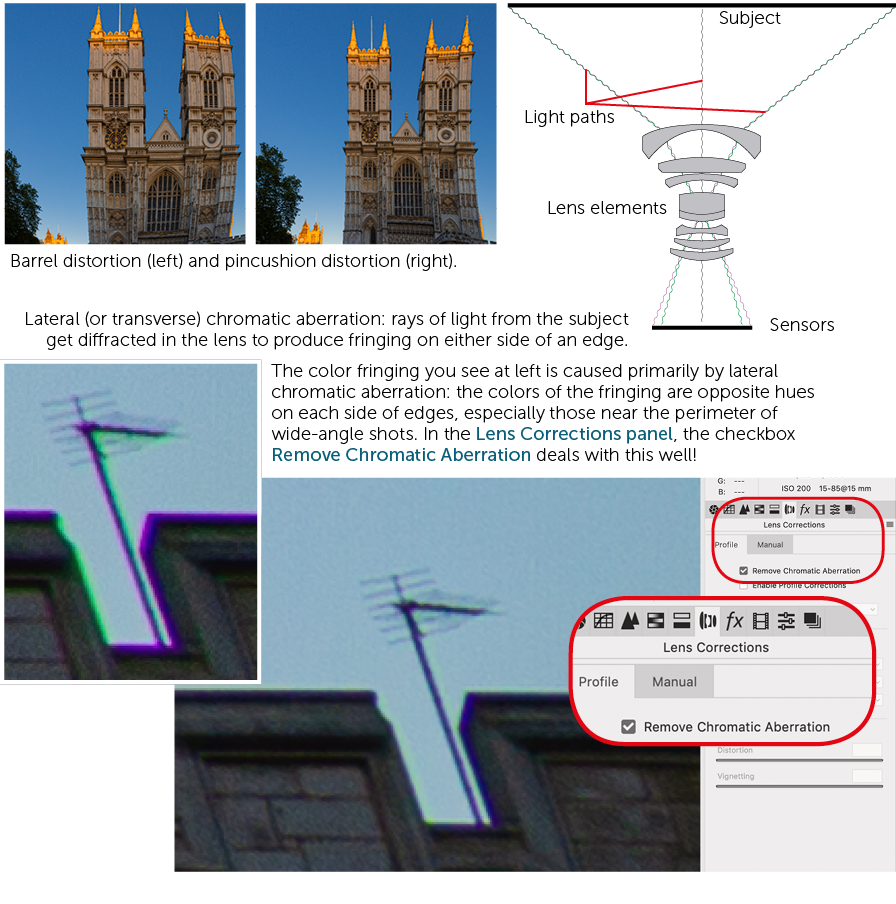
Lens Corrections Panel: For Distortions and More

Many lenses, especially wide-angle lenses, produce images that exhibit overall distortions of the image (barrel and pincushion distortions are the most familiar) and chromatic aberration, which is noticeable as color fringing at high-contrast edges.
Any lens will produce distortions nearly identical to that of every other lens of the same make and model. So, Adobe acquires every lens made and creates a profile for it that describes that lens model’s distortions, including any vignetting (darkening at the edges). At the top of the Lens Corrections panel are two checkboxes: Remove Chromatic Aberration and Enable Profile Corrections. I enthusiastically recommend enabling both for all images unless you see a problem (very unlikely).
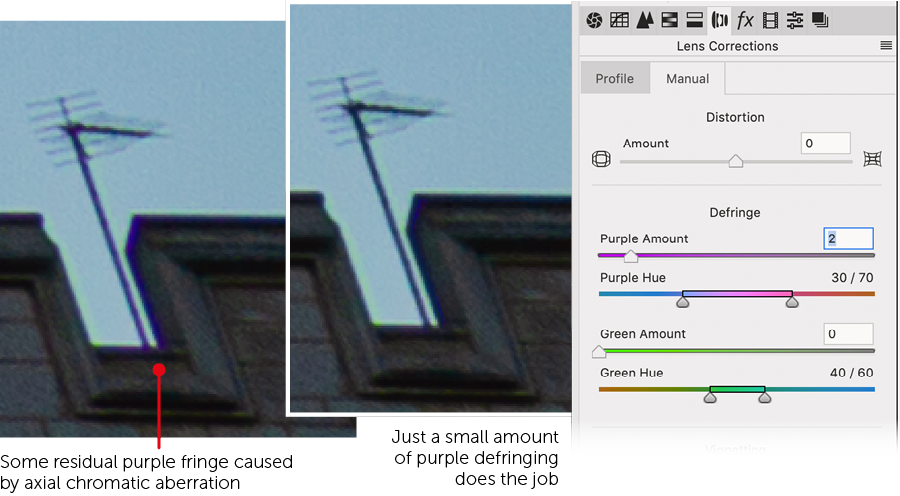
Although those checkboxes do extraordinarily well, you may still detect some remaining purple or green fringing caused by axial (sometimes called longitudinal) chromatic aberration. Usually seen in backlit subjects, this kind requires the use of the Defringe section of the Manual tab in the Lens Corrections panel. Choose the appropriate color’s sliders (purple or green), and increase the Amount until the fringe is reduced or removed. You may need to adjust the color’s Hue slider to better restrict the fringe reduction to warmer or cooler versions of the green or purple fringe. This last adjustment is important if there are desirable elements in the photo that are green or purple because Defringe may affect them too.
Spot Removal Tool: Removing Blemishes
The Spot Removal tool in ACR and Lightroom is an interesting interpretation and combination of Photoshop’s Clone Stamp and Healing Brush. Read more about those in the “Retouching & Repair” chapter, under “Tools & Methods” (page 338). When editing raw images, every edit has to be writable to the file’s metadata, and thus be editable and nondestructive. So, when we click on a blemish using ACR’s Spot Removal tool, two circles appear: one with a red edge, surrounding the blemish, and the other with a green edge, designating the source of the repair—that is, the area used to “patch” the blemish. The sizes and locations of all pairs of circles created this way are recorded in metadata. As you work, you may change the size or edge softness (“Feather”) of the brush. You can choose what Type of repair each use of the tool creates, Heal or Clone.
You may return to a raw file weeks later, choose the Spot Removal tool, and you’ll see the circles that are obscuring the blemishes. You can select, move, feather, resize, and delete them, along with their associated source circles. Their Type (Heal or Clone) can also be changed later. Instead of clicking to create a circular repair, you may drag to create irregular shapes to cover irregularly shaped blemishes. This will automatically create a nearby source in the same shape. Instead of circles to indicate these, red and green pins are used. These may be moved or deleted, and their Type or Feather may be changed, but they may not be resized or amended.
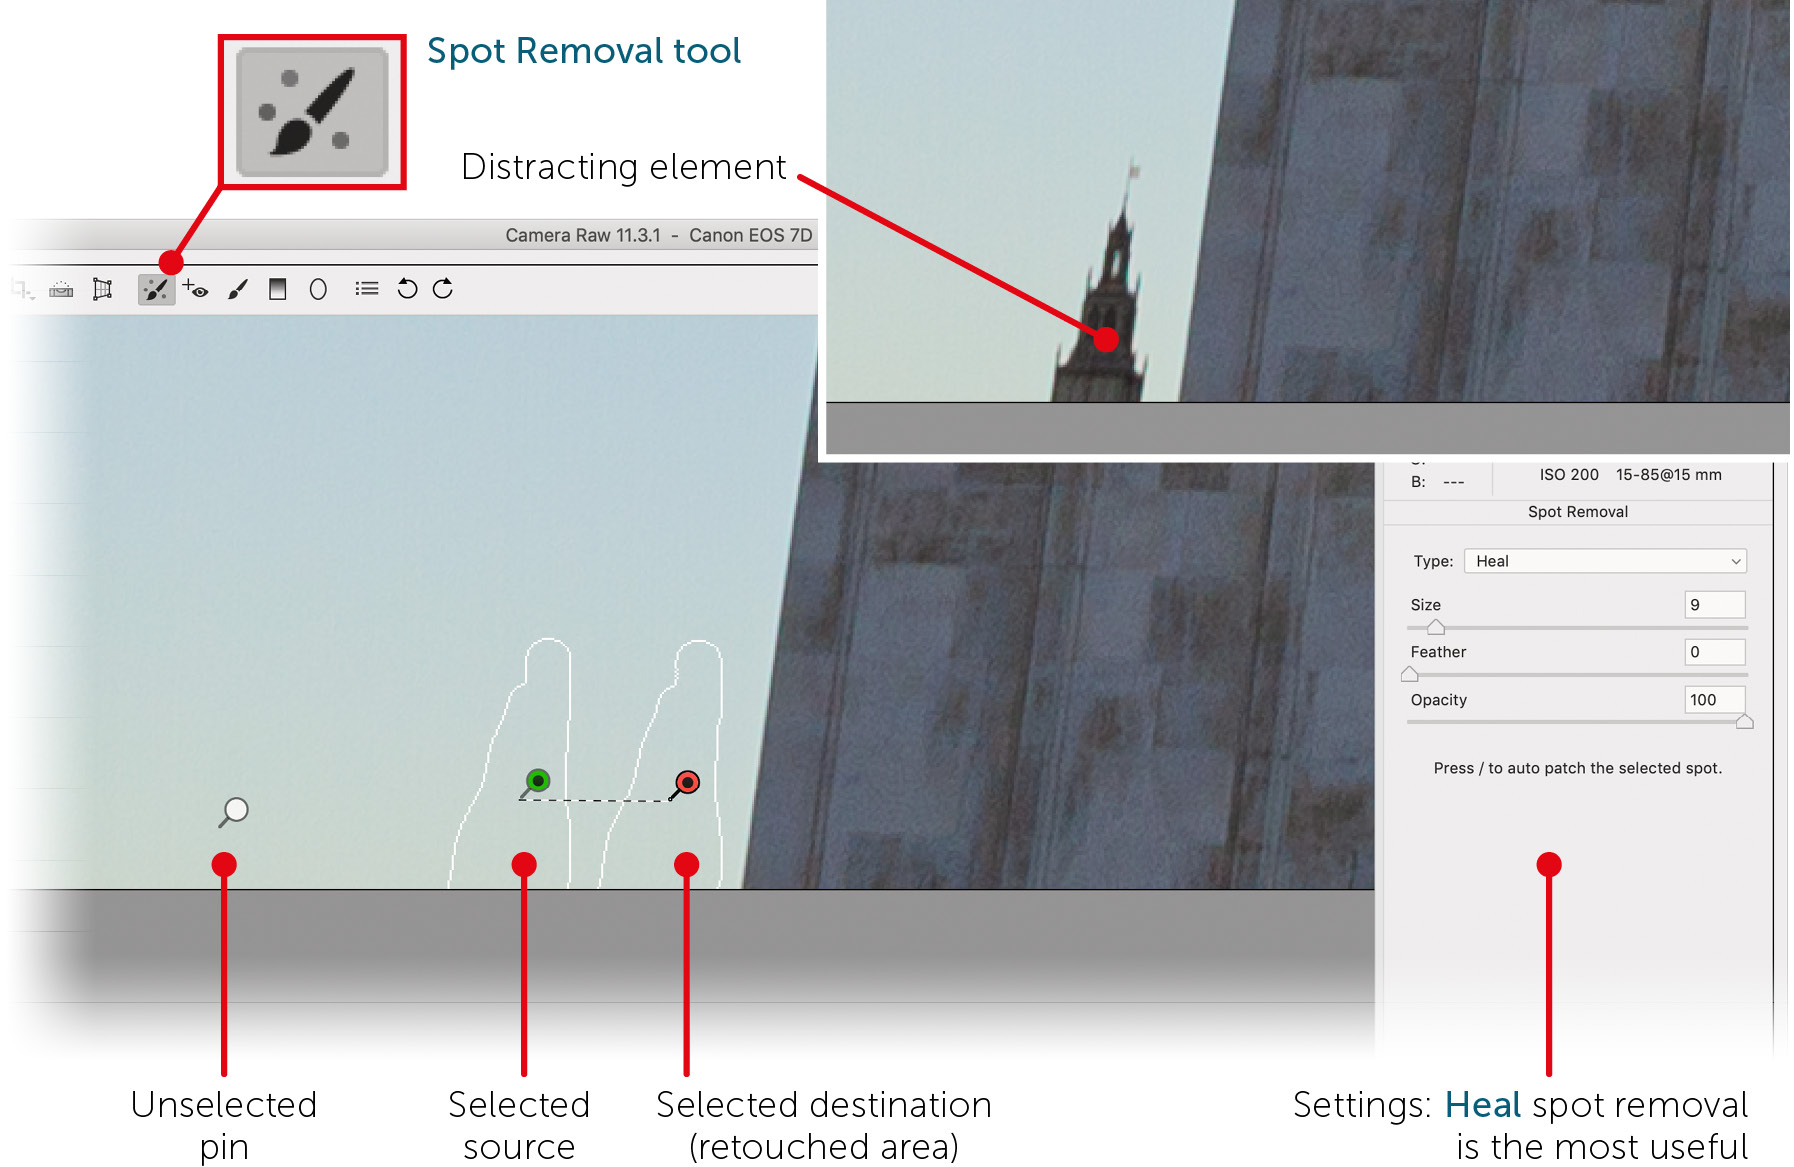
With a retouch pin or circle selected, tapping the forward slash key (/) will allow ACR to choose a new source position. I usually move those manually to get just the texture I desire. When creating a Clone Type repair, I often use some amount of Feather to help the repair blend into its surroundings. That is usually unnecessary when healing.
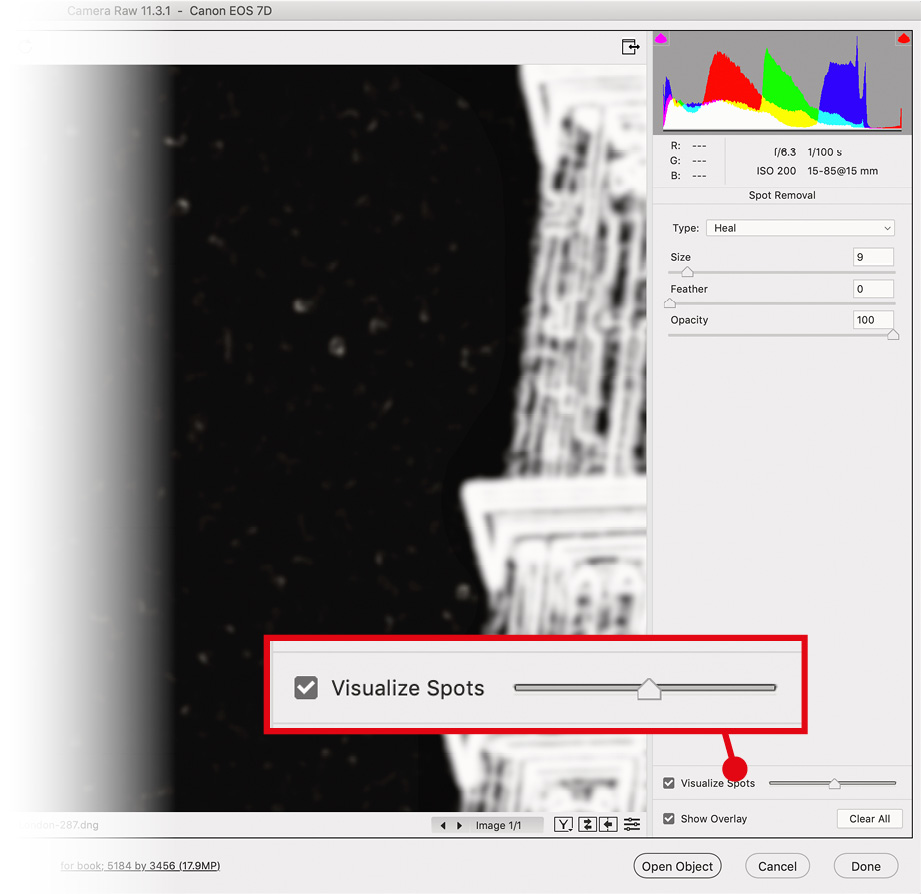
For those blemishes that are hard to see, like sensor dust, you should enable Visualize Spots and adjust its slider. Edges are accentuated in a black-and-white view of the image. Sensor dust, in particular, often appears as roughly circular blobs. You may use the Spot Removal tool in this mode, then disable it to see the image in color again.
Transform Tool & Upright Perspective Correction
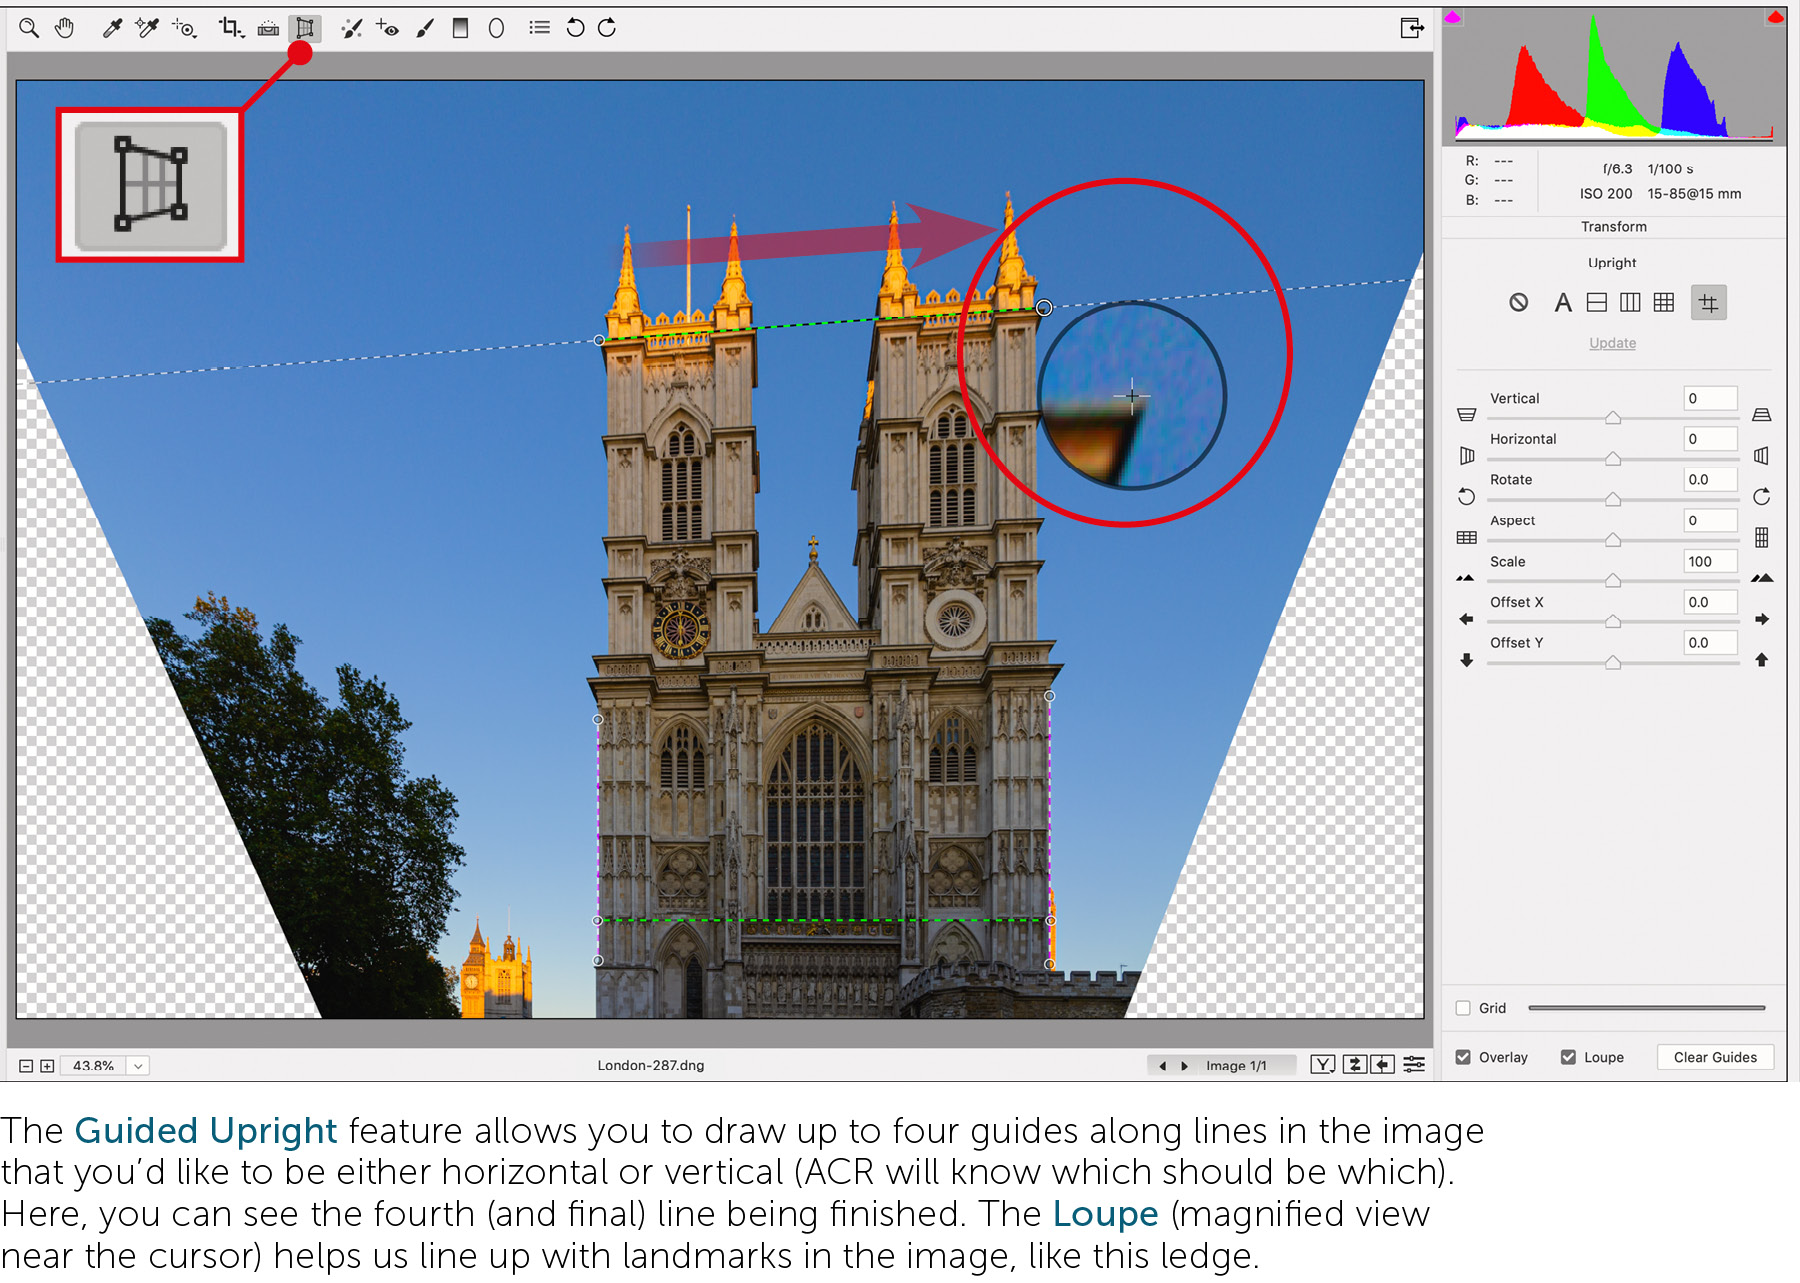
When you activate the Transform tool, manual and automatic options appear for perspective correction. Always try the various auto buttons before working with the manual sliders: you may save yourself a lot of time! Each button under the word Upright does something a bit different. The A is for auto, which tries to apply a pleasing amount of both vertical and horizontal adjustment. The next two are Level and Vertical, which straighten prominent horizontal and vertical lines in the image, respectively, making them parallel to the edges of the image. The Full button does both at once, and often does an excellent job. When these buttons fall short, there is the last one, Guided. With this, you draw from two to four lines along elements in the image that should be perfectly level and/or vertical. A Loupe (magnifier) near the cursor aids precision. The lines you make can be adjusted by their small circular handles.
Once all lines are made, ACR makes an adjustment that can be further modified with the sliders. I often adjust Aspect to correct for any stretching, and Offset X and Y to fine-tune the composition.
The Scale slider can be handy to be rid of blank regions introduced during the transformation. If those are significant, I follow up with the Crop tool.
Crop Tool: It’s Nondestructive Too!
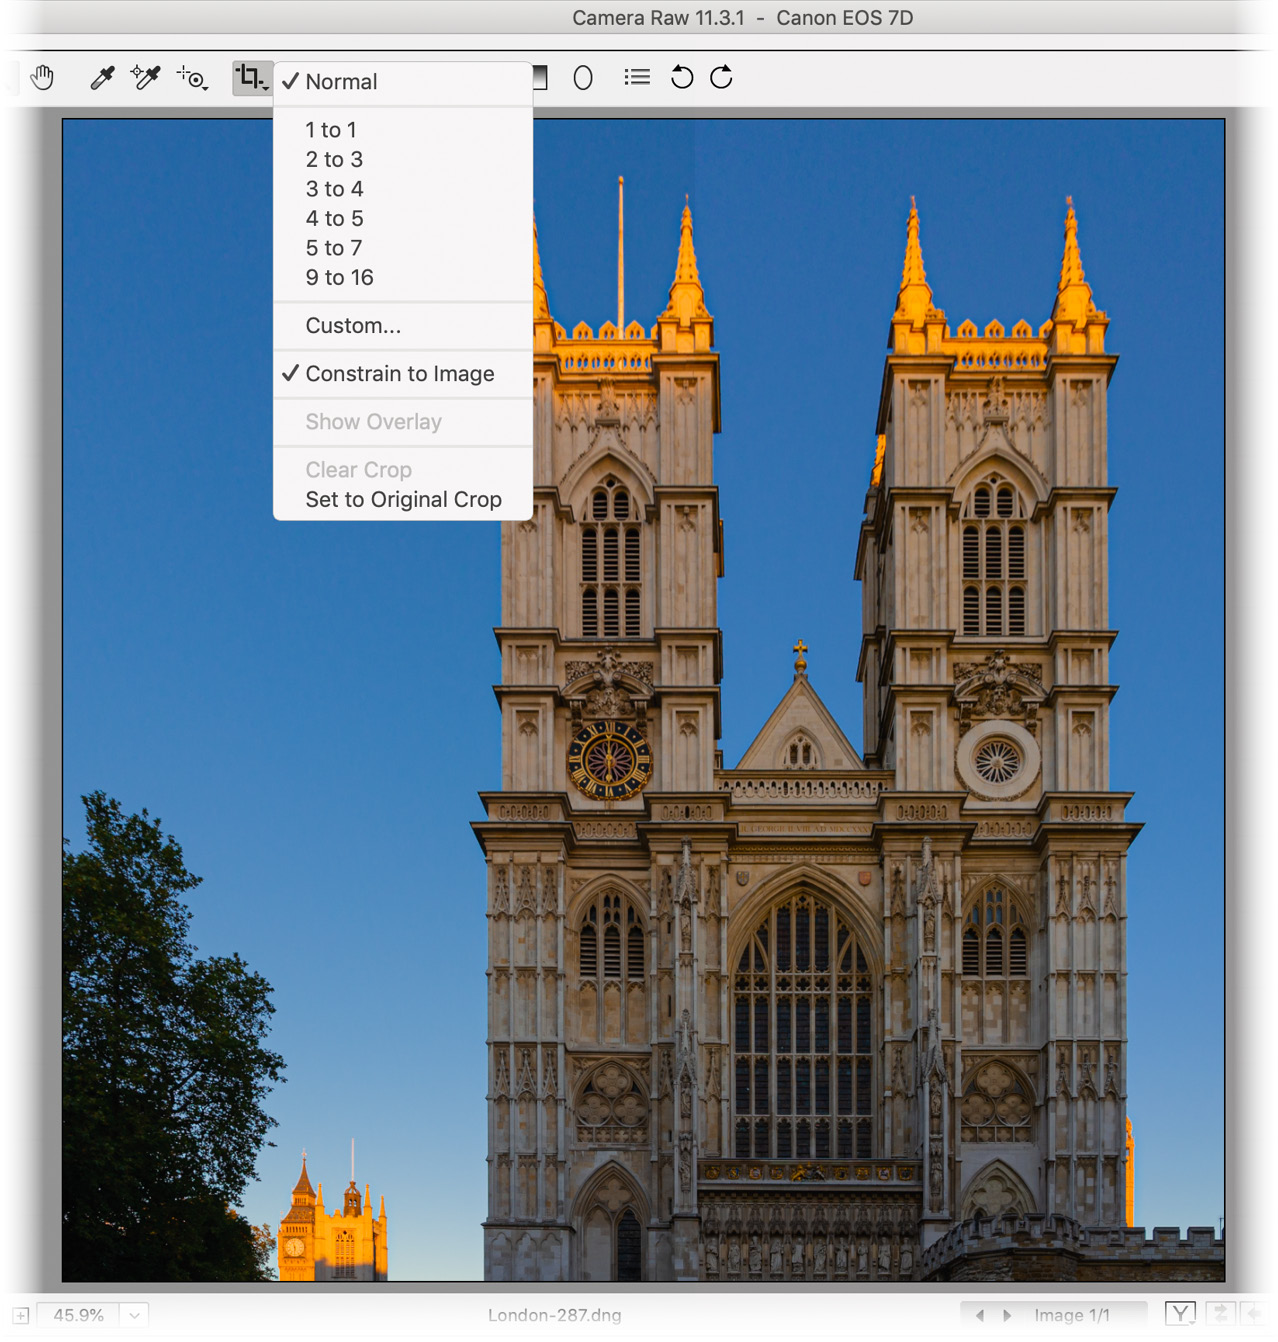
When choosing the Crop tool, first press and hold on it so you can see a few options. If the image possesses transparent areas like the one shown in the previous example, you can ensure they are not part of the final image by choosing Constrain to Image. I sometimes disable that so I can retouch those later. You may also choose an aspect ratio (shape) for the final crop, including Custom… to set your own.
Draw the crop overlay (box), then adjust it by dragging its handles. I usually commit it by choosing another tool, although tapping the Enter key works too.
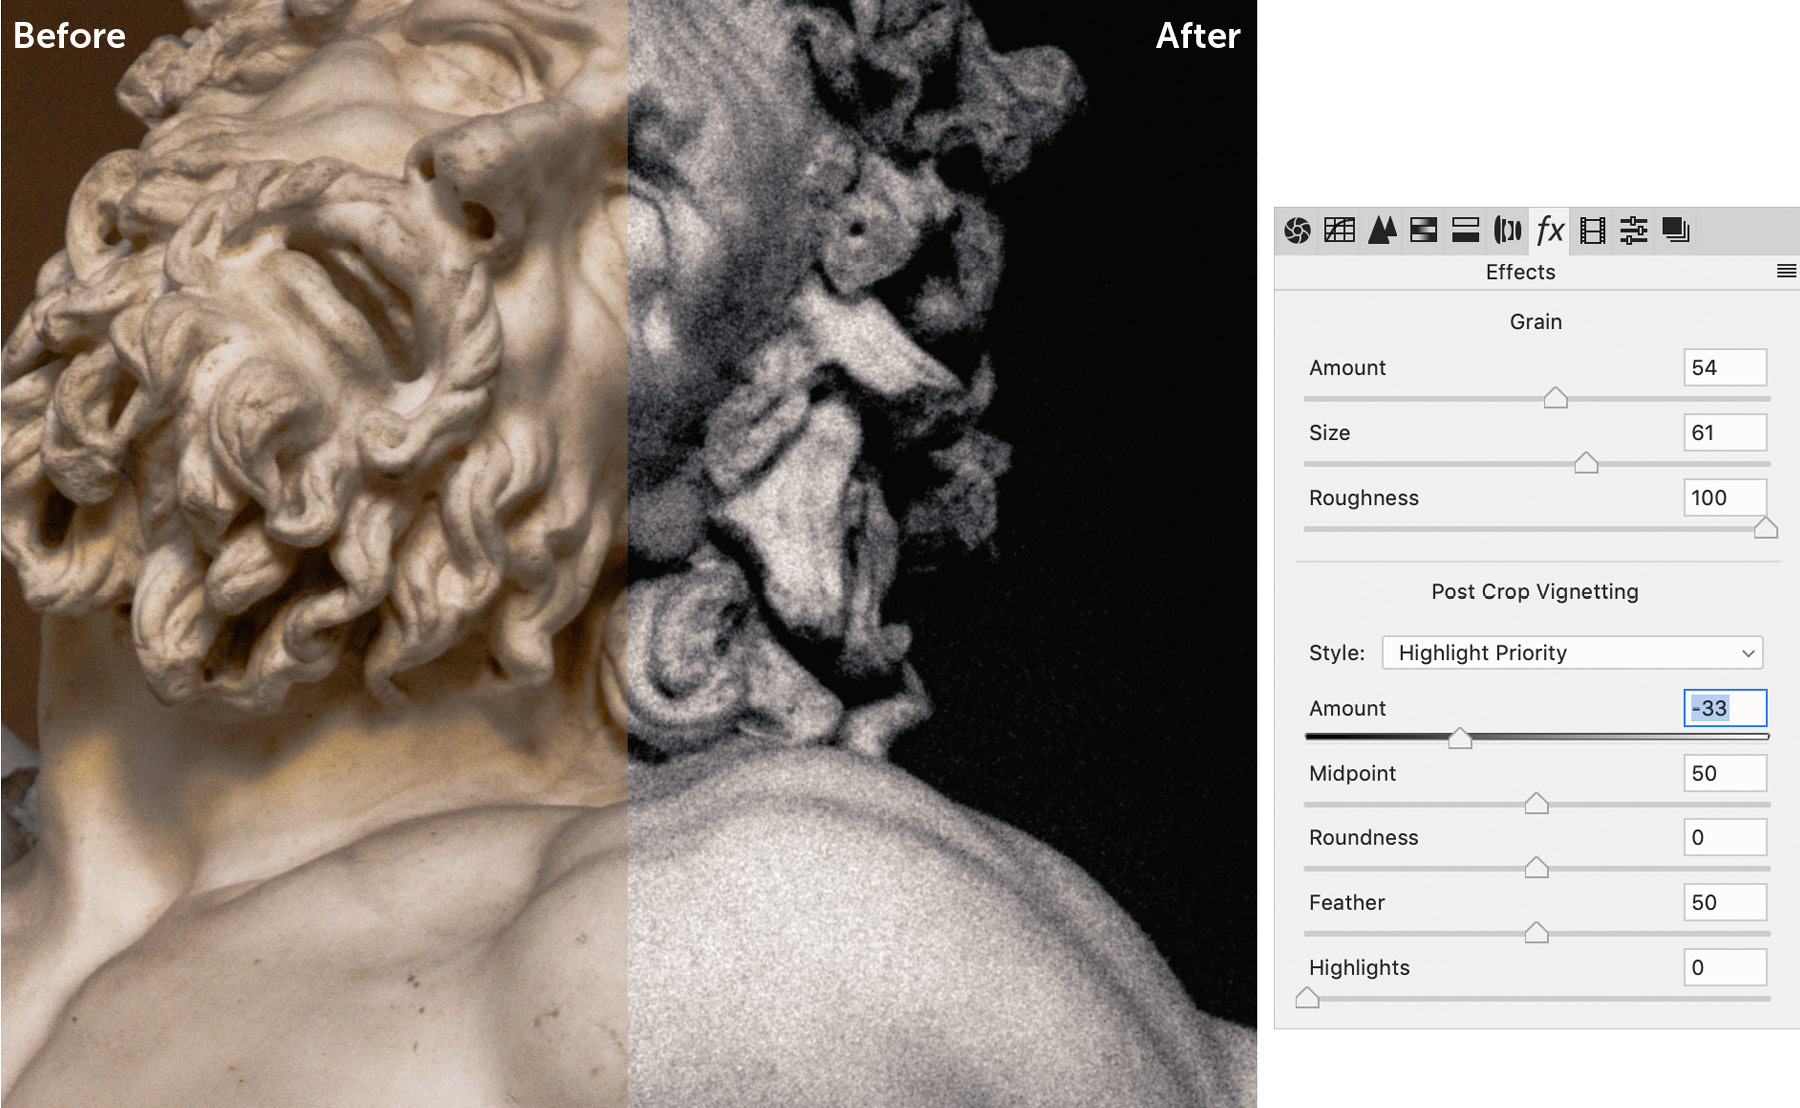
Effects: Film Grain & Vignetting
In the Effects (fx) tab, you can simulate old-style film grain and add lightness or darkness around the current, possibly cropped edges of your image. Three sliders let you control the Grain: Amount, Size, and Roughness, and they’re as intuitive as they sound.
Post Crop Vignetting has more options and subtlety. Once you adjust the Amount at all, to the left for darker edges or to the right for lighter ones, both the Style menu and the other sliders become available. The easiest Style to understand is Paint Overlay, as it simply covers the underlying image with black or white, with increasing opacity the farther you drag the Amount slider from the center.
The Midpoint slider moves the vignette inward or outward, and refers to the point midway between the most and least opaque parts of the vignette. To see the vignette farther from the corners of the crop, use a higher value.
Lower Roundness values make the vignette conform to the aspect ratio of the current crop. Higher values make it more circular.
Feather controls the blurriness of the vignette’s edge.
The Highlight slider is active only with the Styles Highlight Priority and Color Priority, and when the Amount is negative (the vignette is dark). If you want some highlights in the darkened areas to shine through, choose Highlight Priority, then use the Highlights slider to control how much. To better preserve highlight color rather than its detail, use Color Priority.
Lightroom to Photoshop
Many photographers manage raw captures and other images with Lightroom, and perform with it the same development tasks that can be done in ACR. I use Lightroom Classic, currently the more full-featured version. If and when you’ve done all that you can do in Lightroom and find you need the power of Photoshop to do more, I recommend a particular workflow.
The most common way to push an image to Photoshop from Lightroom is to right-click its thumbnail and choose Edit In, a menu with several choices. Since you cannot directly edit raw files in Photoshop, Lightroom generates a TIFF file. If you simply choose Edit in Adobe Photoshop from that Edit In menu, the image will open as a Background layer in that TIFF. However, I recommend going farther down that list to Open as Smart Object in Photoshop.
With the raw data passed as a Smart Object in that TIFF, you can still perform all the tasks you likely wanted to do, with an added benefit. If partway through those tasks you realize that you should have done something more to the raw data, you can do so by editing the Smart Object’s contents (double-clicking its thumbnail). You won’t be editing the original capture managed by Lightroom, but rather a copy ensconced in the S.O. So you’ll have all of Photoshop’s tools and all of Adobe Camera Raw and rich raw data to perform it on.

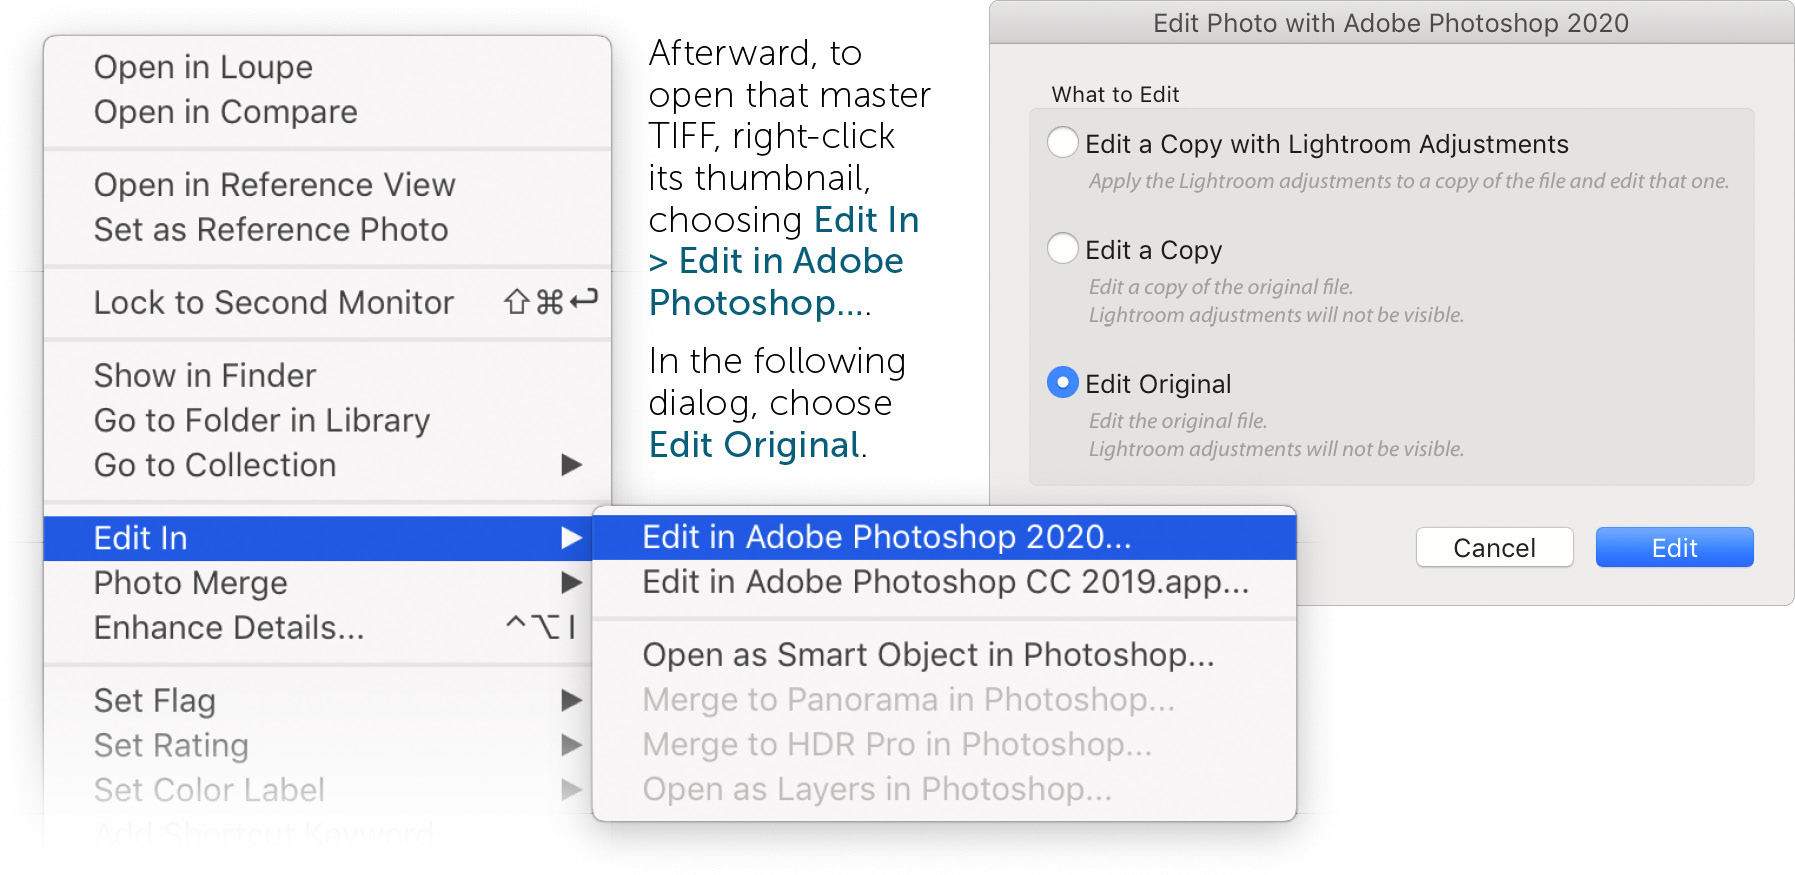
When (and if) you save that TIFF with a simple ⌘-S/Ctrl-S, it gets saved to the same folder as the original capture, and is another file that Lightroom manages. You’ll recognize it by its name: there will be “-Edit” appended to it and the extension will be “.tif.” For me, that file wouldn’t exist if I hadn’t exhausted Lightroom’s capabilities. So that TIFF becomes my master version of that image, and all future edits should be performed in Photoshop—not in Lightroom!
That means to edit it again, I’d click on its Lightroom thumbnail, but from now on choose Edit In > Edit in Adobe Photoshop. I don’t need to create another file with all my previous edits embedded in another Smart Object. I want to open the same TIFF Lightroom made last time. When I choose Edit in Adobe Photoshop, Lightroom will show a dialog box offering choices that can be confusing. You should choose Edit Original, which does not mean the original capture, but the file you right-clicked on! The other choices create yet more copies. I am willing to have as many copies as I need, but absolutely no more than that.