Chapter 7. Rotoscoping and Paint

Effective rotoscoping has always been about combining a variety of techniques, and Roto Brush is, in After Effects CS5, a novel addition to the conventional bag of tricks. Rotoscoping (or roto) is simply the process of adjusting a shot frame by frame (generally with the use of masks, introduced in Chapter 3). Cloning and filling using paint tools are variations on this task.
After Effects is not exactly famed as a bread-and-butter rotoscoping tool, yet many artists use it effectively for just that purpose. Combine paint and roto with tracking and keying, or let the software do so for you with Roto Brush, and you have in After Effects a powerful rotoscoping suite.
Notes
![]()
Rotoscoping was invented by Max Fleischer, the animator responsible for bringing Betty Boop and Popeye to life, and patented in 1917. It involved tracing over live-action movement, a painstaking form of motion capture. The term has come to stand for any frame-by-frame manipulation of a moving image.
Here are some overall guidelines for roto and paint:
• Your basic options are as follows, from most automated and least difficult to the higher-maintenance techniques:
• Roto Brush
• keying (color and contrast)
• motion-tracked masks and paint
• hand-animated masks (conventional roto)
• paint via individual brushstrokes
• Paint is generally the last resort, although it can in certain cases be most expedient.
• Keyframe deliberately: My own ideal is to use as few keyframes as possible. Some artists keyframe every frame. Either approach is valid for a given mask or section, depending mostly on whichever seems less challenging in that instance.
• Review constantly, and keep your system and project as responsive as possible to support this process.
• Notice opportunities to switch approaches, and combine strategies, as none of them is perfect.
It can be satisfying to knock out a seamless animated matte, and once you have the tools under your fingertips it can even be pleasant to chill out and roto for a few hours, or perhaps even as a full-time occupation.
Roto Brush
Wouldn’t it be great if your software could learn to roto so effectively that you never had to articulate a matte by hand again? That’s the lofty goal of Roto Brush. Although the version making its debut in After Effects CS5 doesn’t quite deliver at that level, once you get the hang of it you may find it a useful component of the matting process, reducing rather than omitting the need to roto by hand. It may also lead you generally to create and use articulated selections more often for tasks where complete isolation isn’t needed. This tool can’t magically erase the world’s rotoscoping troubles, but it opens new possibilities for using selections that you might not otherwise consider.
To get a feel for how Roto Brush works, let’s work with a fairly challenging clip that shows strengths and limitations of this tool. Create a new composition containing the “gatoraid” clip found in the 07_roto_gator folder on the book’s disc, which is 23.976 in the nonsquare DVCPRO HD 720 format. Make sure that you’re at full resolution (Ctrl+J/Cmd+J) and view the clip with Pixel Aspect Ratio Correction on ![]() (head back to Chapter 1 if you are confused about pixel aspect ratios).
(head back to Chapter 1 if you are confused about pixel aspect ratios).
Double-click to open the layer in the Layer viewer. If you haven’t previewed the footage already, scrub through it and notice what a challenge procedural removal of the gator from the water presents. For example, you can flip through the color channels (Alt+1, 2, 3/Opt+1, 2, 3) and notice how little contrast there is in any of them. That neutral-colored gator is well camouflaged in neutral greenish water. In no way could a luma or color key help here.
Go to a frame somewhere in the middle of the clip, such as frame 57. Click the Roto Brush tool ![]() in the toolbar to make it active. Scale the brush if necessary by Ctrl-dragging (Cmd-dragging) the brush in the Layer panel. Make it about 50% of the size of the nose to stay well within the gator’s boundaries (Figure 7.1, left).
in the toolbar to make it active. Scale the brush if necessary by Ctrl-dragging (Cmd-dragging) the brush in the Layer panel. Make it about 50% of the size of the nose to stay well within the gator’s boundaries (Figure 7.1, left).
Figure 7.1. Size the Roto Brush by Ctrl- or Cmd-dragging (left), then paint the form of the foreground inside its boundaries (middle) to get an initial segmentation boundary, outlined in pink (right).
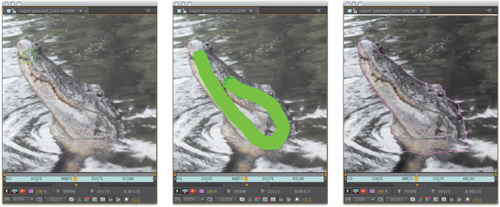
Now comes the strange part: Paint the skeletal form of he head, never touching its edges. Travel down the mouth and loop back to the forehead, like you’re sketching the shape of the head within its boundaries (Figure 7.1, middle). As soon as you release, the tool shows the segmentation boundary in pink, its first guess as to where the foreground boundaries may be. Notice that some areas of the head were missed on this first pass, a little bit of the water may have also been inadvertently selected, and it’s a little unclear where the head disappears in the water (Figure 7.1, right).
Tip

The idea when swiping with Roto Brush is explicitly not to paint along the outline to refine the edge. If it’s a human figure being roto-brushed, paint the appropriate form of a stick figure. If it’s a head, draw a circle; if a car, just draw along the center of its structure, around its wheels, and so on.
Now improve upon the initial selection just on this one frame by adding to and subtracting from it. First fill any areas of the snout, head, and neck by painting those in. You can travel closer to the edge this time, but if you paint into the background at all, undo before painting any more strokes and try again. Eliminate any other background included in the original boundary by Alt- or Opt-swiping those areas, again being careful not to cross the foreground edges. The result on this frame may look lumpy and bumpy, but it should at least be reasonably complete (Figure 7.2) within a pixel or two of the actual edge.
Figure 7.2. Carefully Alt- or Opt-paint any areas where the segmentation boundary includes background.

Thoroughly defining the shape on this base frame gives you the best chance of holding the matte over time without an inordinate number of corrections. Press the spacebar and watch as the matte updates on each frame. Watch closely as more of the body emerges from the water. Roto Brush adapts to these changes but you have to add the detail that emerges from out of the water at the back of the neck, somewhere after frame 60. Add that detail on a couple of consecutive frames, until you see it picked up on the following frames.
Work your way backward in time from the base frame and you’ll notice that the head remains selected; the only trouble seems to be the highlight areas of the waves that ripple along the edges (Figure 7.3). Leave these alone until they propagate over more than a single frame, picking up a whole section of water. Any details that simply come and go on a single frame are best handled with Refine Matte settings described in the next section.
Figure 7.3. Moving a few frames ahead, and viewing in Alpha Overlay mode, it’s apparent that reflections in the water are creeping in and darker areas of the head are being masked out. Instead of fixing these, wait and see how they improve with Refine Matte settings.

As errors do occur and propagate, look for the frame closest to the base frame, where the first errors occur. Any fixes you make there will affect the following frames, but it doesn’t work in the other direction. So if, for example, you fixed the boundary way out at frame 75, you would then also need to go back and fix the preceding frames, because the changes only propagate in one direction, outward from the base frame (backward and forward in time).
By frame 75, where the gator fully emerges from the water for the tasty snack, the segmentation is definitely off target, as the mouth is now open and the edges heavily motion-blurred (Figure 7.4). When a shape changes this fundamentally, it’s probably time to create a new span, that set of light gray adjacent frames, by creating a new base frame. It’s the appropriate thing to do as a figure radically changes its profile. Drag the end frame of the span to wherever you want it, just as you would the end frame of a layer, and create a new base frame at the point that contains the clearest and most exposed frame of the next section of action—perhaps frame 78, in this case. It probably goes without saying that the spans do extend in both directions from the base frame.
Figure 7.4. By this frame the figure is so different from the source that it is probably time to limit the previous span and begin again with a new base frame.

RAM preview shortcuts have been augmented for the purpose of working with Roto Brush spans. Alt+0 (Opt+0) (on the numeric keypad) begins the preview a specific number of frames before the current one—the default 5 frame setting can be changed in Preferences > Previews.
Strengths & Limitations
Because Roto Brush isn’t a one-trick pony relying on anything so simple as contrast (like a luma or extract matte), color (like Linear Color Key or Keylight), or even automated tracking of pixels (Timewarp), it can offer surprising success in situations where other tools fail completely.
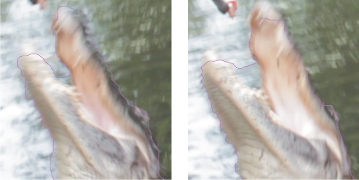
Move forward in the example clip and you hit the type of section that gives Roto Brush the greatest trouble. The gator’s mouth snaps rapidly open and shut as the body turns, causing heavy motion blur and small details (the teeth) and a gap between the jaws to emerge. All of these—rapid changes of form, blur, fine detail, and gaps—are difficult for this tool to track (Figure 7.5).
Figure 7.5. Even on the base frame, the blurred edges of the lower jaw and the gap in the mouth are not easy to define within a pixel or two of the edge, and on the following frame (right), that gap and the ends of the snout lose detail.
Script
![]()
Purview is included on the book’s disc in the scripts folder and via download from Adobe Exchange. It places the Alternate RAM Preview setting right in a UI panel so you can change the number of preceding frames previewed without digging into Preferences. You might create a workspace for Roto Brush with this panel open and the Layer panel prominent.
Once you have as much of the segmentation boundary as possible within a couple pixels of the foreground boundary (Figure 7.6), you can improve the quality of the resulting selection quite a bit by enabling Refine Matte under the Roto Brush controls in the Effect Controls. The effect is set automatically as soon as you paint a stroke, but the refine setting is off because it takes longer to calculate and actually changes the segmentation boundary. Work with it off; preview with it on.
Figure 7.6. The unrefined matte can look pretty rough, but don’t waste time fixing it with more brushstrokes; instead, work on the Refine Matte settings for a much better result (right) with the exact same outline.

Tip

The Use Alternate Color Estimation option can make a big difference in some cases as to how well Roto Brush holds an edge.
It’s easy to miss the Propagation settings at the top of the Roto Brush effect, but it’s worth working with these, as they change how the matte itself is calculated. There’s a huge difference between changing Edge Detection from Balanced to either Favor Predicted Edges (which uses data from the previous frame) or Favor Current Edges (which works only with the current frame). Neither is absolute—there is always information used from previous and current frames—but predicted edges tend to work better in a case like this, where the contrast at the object boundary is weak.
The Smooth and Reduce Chatter settings are most helpful to reduce boiling edges; of course, there’s only so much they’ll do before you lose detail, but with a foreground subject that has few pointy or skinny edge details, you can increase it without creating motion artifacts. If you’re trying to remove the object from its background entirely, edge decontamination is remarkably powerful and can be increased in power. And when it’s time to render, you can enable Higher Quality under Motion Blur if your subject has this kind of motion (Figure 7.7).
Figure 7.7. These settings resulted in the improvement shown in Figure 7.6.

The overall point about Roto Brush is as follows. Were you to rely on it to single-handedly remove the gator from the swamp in the example shot, you’d put in quite a bit of work and quickly reach a point of diminishing returns. But suppose you need merely to isolate the gator to, say, pop its exposure, contrast, and color to get it to stand out a bit, and for that, you can live with something less than a perfect extraction, which will be a much quicker process with this tool.
Notes
![]()
The Refine Matte tools under the Roto Brush effect are also available as a separate effect, detailed later in this chapter.
Even when a full extraction can take advantage of an automated or procedural approach, it often also requires a hand-articulated matte—good old roto—but even that can be greatly aided by enhanced techniques for creating and refining the matte.
How would you go about completing the extraction of this figure? Possibly by limiting the Roto Brush pass to the areas of the shot where it has more natural success, or possibly by abandoning the toolset altogether in this case. Either way, a hand-articulated matte is the reliable fix.
The Articulated Matte
An “articulated” matte is one in which individual mask points are adjusted to detail a shape in motion. For selections such as the one above that are only partially solved by Roto Brush, this is the complete solution. This method of rotoscopy is a whole skill set of its own and a legitimate artistic profession within the context of large-scale projects such as feature films. Many professional compositors have made their start as rotoscopers, and some choose to focus on roto as a professional specialty, whether as individuals or by forming a company or collective.
Notes
![]()
Keyframing began at Disney in the 1930s, where top animators would create the key frames—the top of the heap, the moment of impact—and lower-level artists would add the in-between frames thereafter.
Hold the Cache Intact
Each adjustment made to an animated mask redraws the entire frame. That can waste time in tiny increments, like the proverbial “death by a thousand cuts.” To rotoscope effectively you need to remain focused on details in motion. If you’re annoyed at how After Effects deletes the cache with every small adjustment you make, try this:
- Create a comp containing only the source plate.
- Add a solid layer above the plate.
- Turn off the solid layer’s visibility
 .
. - Lock the plate layer
 .
. - Select the solid layer and draw the first mask shape, then press Alt+Shift+M (Opt+Shift+M) to keyframe it.
Now any changes you make to the masked solid have no effect on the plate layer or the cache; you can RAM preview the entire section and it is preserved, as is each frame as you navigate to it and keyframe it (Figure 7.8). When it comes time to apply the masks, you can either apply the solid as a track matte or copy the masks and keyframes to the plate layer itself. Genius!
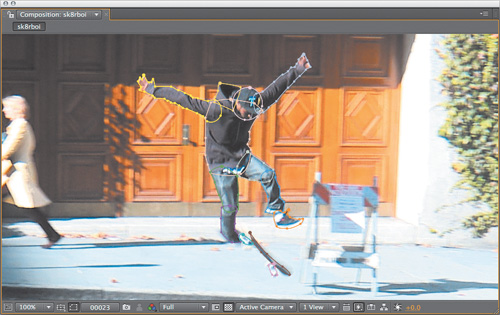
Figure 7.8. Multiple overlapping masks are most effective as parts of the figure move in distinct directions.

Ready, Set, Roto
Following are some broad guidelines for rotoscoping complex organic shapes. Some of these continue with the gator shot as an example, again because it includes so many typical challenges.
• As with keying, approaching a complex shot in one pass will compromise your result. You can use multiple overlapping masks when dealing with a complex, moving shape of any kind (Figure 7.9).
Figure 7.9. It is crazy to mask a complex articulate figure with a single mask shape; the sheer number of points will have you playing whack-a-mole. Separated segments let you focus on one area of high motion while leaving another area, which moves more steadily, more or less alone.
Notes
![]()
There’s one major downside to masking on a layer with its visibility off: You cannot drag-select a set of points (although you can Shift-select each of them).
Suppose you drew a single mask around the gator’s head, similar to the one created with Roto Brush in the previous set of steps. You’re fine until the mouth opens, but at that point it’s probably more effective to work instead with at least two masks: one for the top and bottom jaw.
Tip

Enable Cycle Mask Colors in Preferences > User Interface Colors to generate a unique color for each new mask. You can customize the color if necessary to make it visible by clicking its swatch in the timeline.
It’s not that you can’t get everything with one mask, but the whole bottom jaw moves one direction as one basic piece, and the upper part of the head moves the opposite direction. By separating them you take advantage of the following strategies to be quick and effective.
• Begin on a frame requiring the fewest possible points or one with fully revealed, extended detail, adding more points as needed as you go. As a rule of thumb, no articulated mask should contain more than a dozen or so points.
Frame 77 is the frame with the most fully open mouth, so overlapping outlines on this frame for the upper and lower jaws, as well as the head and neck, can be animated backward and forward from here.
As recommended in the previous section, create a solid layer above the plate layer, turn off its visibility, and lock the plate. Now, with that layer selected, enable the Pen tool (shortcut G), click the first point, and start outlining the top jaw, dragging out the Bezier handles (keep the mouse button down after placing the point) with each point you draw, if that’s your preference. You can also just place points and adjust Beziers after you’ve completed the basic shape.
In this particular case, the outline is motion-blurred, which raises the question of where exactly the boundary should lie. In all cases, aim the mask outline right down the middle of the blur area, between the inner core and outer edge, as After Effects’ own mask feather operates both inward and outward from the mask vector.
Notes
![]()
By default, After Effects maintains a constant number of points under Preferences > General > Preserve Constant Vertex Count when Editing Masks, so that if you add a point on one keyframe, it is also added to all the others.
The blur itself should be taken care of by animating the mask and enabling motion blur. For now, don’t worry about it.
• Block in the natural keyframe points first, those which contain a change of direction, speed, or the appearance or disappearance of a shape.
You can begin the gator example with the frame on which the mouth is open at its widest. Alt+M (Opt+M) will set a Mask Path keyframe at this point in time, so that any changes you make to the shape at any time are also recorded with a keyframe. The question is where to create the next keyframe.
Some rotoscopers prefer straight-ahead animation, creating a shape keyframe on each frame in succession. I prefer to get as much as possible done with in-between frames, so I suggest that you go to the next extreme, or turning point, of motion—in this case, the mouth in its closed position to either side of the open position, beginning with frame 73.
• Select a set of points and use the Transform Box to offset, scale, or rotate them together instead of moving them individually (Figure 7.10). Most objects shift perspective more than they fundamentally change shape, and this method uses that fact to your advantage.
Figure 7.10. Gross mask transformations can be blocked in by selecting and double-clicking all, then repositioning, rotating, and scaling with the free-transform box, followed by finer adjustments to each mask.

At frame 73, with nothing but the layer containing the masks selected, double-click anywhere on one of the masks and a transform box appears around all of the highlighted points. With any points selected, the box appears around those points only, which is also useful; but in this case, freely position (dragging from the inside) and rotate (dragging outside) that transform box so that the end and basic contour of the snout line up.
This is a tough one! The alligator twists and turns quite a bit, so although the shape does follow the basic motion, it now looks as though it will require keyframes on each frame. In cases where it’s closer, you may only need to add one in-between keyframe to get it right. Most animals move in continuous arcs with hesitation at the beginning and perhaps some overshoot at the end, so for less sudden movements, in-betweening can work better.
• Use a mouse—a pen and tablet system makes exact placement of points difficult.
• Use the arrow keys and zoom tool for fine point placement. The increments change according to the zoom level of the current view.
As you move the individual points into place one or more at a time, the arrow keys on your keyboard give you a finer degree of control and placement than dragging your mouse or pen usually does. The more you zoom in, the smaller the increment of one arrow-press, down to the subpixel level when zoomed above 100%.
• Lock unselected masks to prevent inadvertently selecting their points when working with the selected mask.
You may have inadvertently clicked the wrong mask at an area of the frame where two or more overlap. Each mask has a lock check box in the timeline, or you can right-click to lock either the selected mask or all other masks to prevent this problem.
Tip

It’s a little known fact that you can hide (or reveal) locked masks via a toggle in Layer > Masks (or right-clicking the layer), choosing one of the Lock/Unlock options at the bottom of the menu.
• To replace a Mask shape instead of creating a new one, in Layer view, select the shape from the Target menu and start drawing a new one; whatever you draw replaces the previous shape. Beware: The first vertex point of the two shapes may not match, creating strange in-between frames.
Notes
![]()
Look carefully at any mask, and you’ll notice one vertex is bigger than the rest. This is the first vertex point. To set it, context-click on a mask vertex and choose Mask and Shape Path > First Vertex.
Rotobeziers
Rotobezier shapes are designed to animate a mask over time; they’re like Bezier shapes (discussed in Chapter 3) without the handles, which means less adjustment and less chance of pinching or loopholes when points get close together (Figure 7.11). Rotobeziers aren’t universally beloved, partly because it’s difficult to get them right in one pass; adjoining vertices change shape as you add points.
Figure 7.11. Overlapping Bezier handles result in kinks and loopholes (left); switching the mask to Rotobezier (right) eliminates the problem.

Activate the Pen tool (G key) and check the Rotobezier box in the Tools menu, then click the layer to start drawing points; beginning with the third point, the segments are, by default, curved at each vertex.
Tip

You can freely toggle a shape from Bezier to Rotobezier mode and back, should you prefer to draw with one and animate with the other.
The literal “key” to success with rotobeziers is the Alt (Opt) key. At any point as you draw the mask, or once you’ve completed and closed it by clicking on the first point, hold Alt (Opt) to toggle the Convert Vertex tool ![]() . Drag it to the left to increase tension and make the vertex a sharp corner, like collapsed Bezier handles. Drag in the opposite direction, and the curve rounds out. You can freely add
. Drag it to the left to increase tension and make the vertex a sharp corner, like collapsed Bezier handles. Drag in the opposite direction, and the curve rounds out. You can freely add ![]() or subtract
or subtract ![]() points as needed by toggling the Pen tool (G key).
points as needed by toggling the Pen tool (G key).
The real advantage of the rotobezier is that it’s impossible to kink up a mask as with long overlapping Bezier handles; other than that, rotobeziers are essentially what could be called “automatic” Beziers (Figure 7.12). By drawing enough Bezier points to keep the handles short, however, you may find that you don’t need the handles.
Figure 7.12. You can carefully avoid crossing handles with Beziers (left); convert this same shape to rotobeziers (right) and you lose any angles, direction, or length set with Bezier handles.

Refined Mattes
OK, so you have the basics needed to draw, edit, and keyframe a mask, but perhaps you picked up this book for more than that. Here is a broad look at some easily missed refinements available when rotoscoping in After Effects.
• After Effects has no built-in method for applying a tracker directly to a mask, but there are now several ways to track a mask in addition to Roto Brush. See details below and more in Chapter 8, which deals specifically with tracking.
• Adding points to an animated mask has no adverse effect on adjacent mask keyframes. Delete a point, however, and it is removed from all keyframes, usually deforming them.
• There is no dedicated morphing tool in After Effects. The tools to do a morph do exist, though, along with several deformation tools described later in this chapter and again in Section III of the book.
• The Refine Matte tools within Roto Brush are also available as a separate Refine Matte effect that can be used on any transparency selection, not just those created with Roto Brush.
Details follow.
Tracking and Translating
You can track a mask in After Effects, and you can take an existing set of Mask Path keyframes and translate them to a new position, but neither is the straightforward process you might imagine. There’s no way to apply the After Effects tracker directly to a mask shape, nor can you simply select a bunch of Mask Path keyframes and have them all translate according to how you move the one you’re on (like you can with the layer itself).
You can track a mask using any of the following methods:
• Copy the mask keyframe data to a solid layer with the same size, aspect, and transform settings as the source, track or translate that layer, then apply it as a track matte.
• If movement of a masked object emanates from camera motion and occurs in the entire scene, you can essentially stabilize the layer, animate the mask in place, and then reapply motion to both. See Chapter 8 for details.
• Use Roto Brush to track a matte selection, as above.
• Use mocha-AE to track a shape and apply the tracked shape in After Effects via the mocha shape plug-in. Additional benefits to this approach are described in the next section on Mask Feather.
• Use mocha-AE to track a shape and copy and paste it as mask data in After Effects. Yes, you understood correctly—you can do that.
Script
![]()
Key Tweak by Matthias Möhl (http://aescripts.com/keytweak/) lets you translate a whole set of keyframes by translating just the start or end keyframe of a sequence.
Mask shapes can be linked together directly with expressions. Alt-click (Opt-click) the Mask Path stopwatch, then use the pick whip to drag to the target Mask Path. Only a direct link is possible, no mathematical or logical operations, so all linked masks behave like instances of the first.
Mask Feather & Motion Blur
An After Effects mask can be feathered (F key). This softening of the mask edge by the specified number of pixels occurs both inward and outward from the mask border in equal amounts and is applied equally all the way around the mask. This lack of control over where and how the feathering occurs can be a limitation, as there are cases where it would be preferable to, say, feather only outward from the edge, or to feather one section of the mask more than the others.
To work around the need to vary edge softness using the built-in mask tools requires compromises. Pressing the MM key on the keyboard on a layer with a mask reveals all mask tools, including Mask Expansion, which lets you move the effective mask boundary outward (positive value) or inward (using a negative value). The only built-in way to change the amount of feather in a certain masked area is to add another mask with a different feather setting. As you can imagine, that method quickly becomes tedious.
Instead, you can try creating a tracked mask with mocha-AE and adjusting the feather there. Although mocha-AE isn’t really covered until Chapter 8, Figure 7.13 shows how you can adjust a mask edge in that application to have varying feather and then import that mask into After Effects.
Figure 7.13. Mocha-AE has the facility to set a feather region of a mask per vertex, and export the tracked result to After Effects via mocha shape.
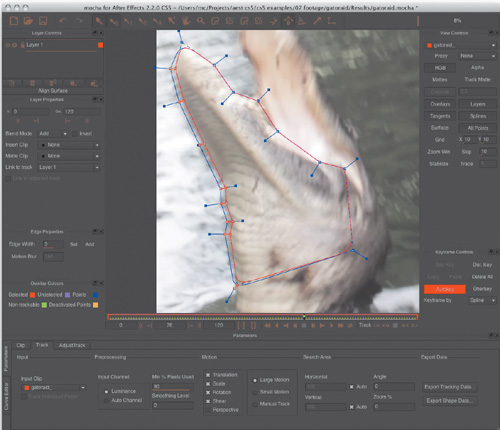
Animated masks in After Effects obey motion blur settings. Match the source’s motion blur settings correctly (Chapter 2) and you should be able to match the blur of any solid foreground edge in motion by enabling motion blur for the layer containing the mask in motion. In other words, animate the mask with edges matching the center of the blurred edge, enable motion blur with the right settings, and it just works.
Refine Matte Effect
Among the most overlooked new features of After Effects CS5 is the Refine Matte effect. This is essentially the bottom half of the controls used to make the difference in the matte back in Figure 7.6.
Imagine being able to reduce chatter of roto created by hand, add feather or motion blur to an animated selection that was created without it, or decontaminate spill from the edges of an object that wasn’t shot against a uniform green or blue.
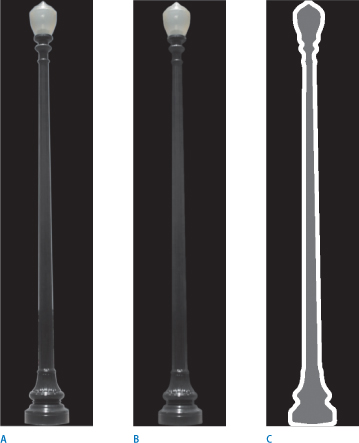
This is what Refine Matte allows you to do, and it is more effective than some kludges you might have tried in the past to solve these problems. Figure 7.14 shows a clearly defined matte line around the selected lamppost. Instead of choking the matte, apply Refine Matte in this situation and you are much closer to complete control of that matte.
Figure 7.14. Exaggerated for effect, this heavy matte line in (a) can be managed with an equally heavy Decontamination map to isolate the edges (b) and kill the background bleed in the edges (c), a built-in feature of Refine Matte.
Deformation
After Effects includes a number of effective tools to deform footage. These are related to rotoscoping and paint in as much as they can also involve selections, manual or tracked animation, and, in the case of Liquify, even paint strokes. Among the most useful:
• Corner Pin skews a 2D layer to make it appear aligned with a 3D plane, useful for billboard and screen replacement, among others. The After Effects tracker and, more usefully, mocha-AE can produce a Corner Pin track (Chapter 8).
• Mesh Warp covers the entire layer with a grid whose corners and vertices can be transformed to bend the layer in 2D. This is highly useful for animating liquid, smoke, and fire types of effects (Chapter 13).
• Displacement Map uses the luminance of a separate layer to displace pixels in X and Y space. It’s great for creating heat ripple (Chapter 14).
• DigiEffects Freeform is the 3D version of both Mesh Warp and Displacement Map; it includes the main features from both, with the difference that its warps and displacements occur in Z-space for true 3D effects (Chapter 9).
• Liquify is a brush-based distortion effect (Chapter 13). You can choose a brush to smear, twirl, twist, or pinch the area you brush, and control the brush itself. This is great for smaller, more detailed instances of distorting liquids and gases, as an alternative to the full-frame Mesh Warp.
• Optics Compensation re-creates (or removes) lens distortion (Chapter 9).
• Turbulent Displace uses built-in fractal noise generators to displace footage, freeing you from setting up an extra noise source layer as with Displacement Map. This is great for making stuff just look wavy or wobbly.
• Reshape is specifically useful for morphing; it stretches the contents of one mask to the boundaries of another. A tutorial featuring Reshape’s usage for morphing is included on the book’s disc.
• Puppet is a pin-based distortion tool for instant character-animation type of deformation.
Puppet is an unusual tool; a version of it is included in Photoshop, but most other compositing and even animation software doesn’t have a direct equivalent.
Notes
![]()
Puppet examples are found in the 07_burgher_rotobrush_puppet and 07_lamppost_refine_puppet folders on the disc.
To get started with Puppet, select a layer (perhaps a foreground element with a shape defined by transparency, such as the lamppost shown in the example), and add the Puppet Pin tool ![]() (Ctrl+P/Cmd+P) simply by clicking points to add joints. Click two points, drag the third, and behold: The layer is now pliable in an organic, intuitive way (Figure 7.15).
(Ctrl+P/Cmd+P) simply by clicking points to add joints. Click two points, drag the third, and behold: The layer is now pliable in an organic, intuitive way (Figure 7.15).
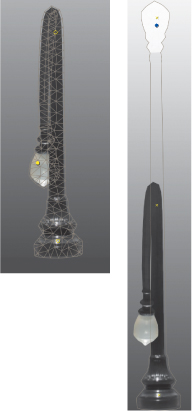
Figure 7.15. The Puppet mesh in beige is the range of influence of the pins, in yellow; they are effectively the joints.

Here are the basic steps to continue:
- No matter the source, use the Puppet Pin tool to add at least three pins to a foreground layer. Experimentation will tell you a lot about where to place these, but they’re similar to the places you might connect wires to a marionette: the center, joints, and ends.
- Move a point, and observe what happens to the overall image.
- Add points as needed to further articulate the deformation.
- To animate by positioning and timing keyframes: Expose the numbered Puppet Pin properties in the timeline (shortcut UU); these have X and Y Position values matching many other properties in After Effects.
- To animate in real time: Hold Ctrl (Cmd) as you move the cursor over a pin, and a stopwatch icon appears; click and drag that pin, and a real-time animation of the cursor movement records from the current time until you release the mouse. You can specify an alternate speed for playback by clicking Record Options in the toolbar.
Practice with the simple lamppost and you’ll quickly get the feel for how Puppet is used. The basic usage is simple, but there are relatively sophisticated methods available to refine the result as needed.
In the toolbar is a toggle to show the mesh. The mesh not only gives you an idea of how Puppet actually works, it can be essential to allow you to properly adjust the result. There’s no reason not to leave it on if it’s helpful (Figure 7.16).
Figure 7.16. Wireframes are displayed when Show is enabled in the toolbar.
![]()
The Expansion and Triangles properties use defaults that are often just fine for a given shape. Raising Expansion can help clean up edge pixels left behind in the source. Raising Triangles makes the deformation more accurate, albeit slower. The default number of triangles varies according to the size and complexity of the source.
Starchy and Husk
The Puppet Pin tool does the heavy lifting, but wait, that’s not all: Ctrl+P (Cmd+P) cycles through two more Puppet tools to help in special cases.
To fold a layer over or under itself requires that you control what overlaps what as two regions cross; this is handled by the Puppet Overlap ![]() tool. The mesh must be displayed to use Puppet Overlap, and the Overlap point is applied on the original, undeformed mesh shape, not the deformation (Figure 7.17).
tool. The mesh must be displayed to use Puppet Overlap, and the Overlap point is applied on the original, undeformed mesh shape, not the deformation (Figure 7.17).
Figure 7.17. The Overlap tool gives full control over which areas are forward. It is displayed on an outline of the source shape, and with a positive setting, causes the top lamp to come forward.
Tip

Pins disappeared? To display them, three conditions must be satisfied: The layer is selected, the Puppet effect is active, and the Puppet Pin tool is currently selected.
Overlap is not a tool to animate (although you can vary its numerical settings in the timeline if the overlap behavior changes over time). Place it at the center of the area intended to overlap others and adjust how much “in front” it’s meant to be as well as its extent (how far from the pin itself the overlap area reaches). If you add more than one overlap, raise the In Front setting to move the given selection closer to the viewer. Areas with no specified setting default to 0, so use a negative value to place the selection behind those. Play with it using multiple overlaps and you’ll get the idea.
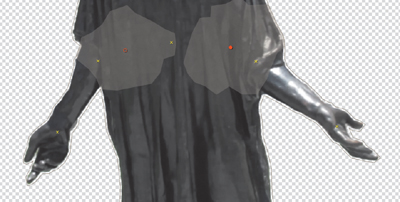
The Starch ![]() tool prevents an area from deforming. It’s not an anchor—position it between regular puppet pins, preventing the highlighted area (expanded or contracted with the tool’s Extent setting) from being squished or stretched (Figure 7.18).
tool prevents an area from deforming. It’s not an anchor—position it between regular puppet pins, preventing the highlighted area (expanded or contracted with the tool’s Extent setting) from being squished or stretched (Figure 7.18).
Figure 7.18. Starch pins (in red) and the affected regions are designed to attenuate (or eliminate, depending on the Amount setting) distortion within that region.
Paint and Cloning
Paint is generally a last resort when roto is impractical, and for a simple reason: Use of this tool, particularly for animation, can be painstaking and more likely to show flaws than approaches involving masks. There are, of course, exceptions. You can track a clone brush more easily than a mask, and painting in the alpha channel can be a handy quick fix.
For effects work, then, paint controls in After Effects have at least a couple of predominant uses:
• Clean up an alpha channel mask by painting directly to it in black and white.
• Use Clone Stamp to overwrite an area of the frame with alternate source.
Once you fully understand the strengths and limitations of paint, it’s easier to decide when to use it.
Paint Fundamentals
Two panels, Paint and Brush Tips, are essential to the three brush-based tools in the Tools palette: Brush ![]() , Clone Stamp
, Clone Stamp ![]() , and Eraser
, and Eraser ![]() . These can be revealed by choosing the Paint workspace.
. These can be revealed by choosing the Paint workspace.
The After Effects paint functionality is patterned after equivalent tools in Photoshop, but with a couple of fundamental differences. After Effects offers fewer customizable options for its brushes (you can’t, for example, design your own brush tips). More significantly (and related), Photoshop’s brushes are raster-based, while After Effects brushes are vector-based. Vector-based paint is more flexible, allowing you to change the character of the strokes—their size, feather, and so on—even after they’re drawn.
Suppose that you have an alpha channel in need of a touch-up; for example, the matte shown in Figure 7.19. This is a difficult key due to tracking markers and shadows. With the Brush tool active, go to the Paint palette and set Channels to Alpha (this palette remembers the last mode you used); the foreground and background color swatches in the palette become grayscale, and you can make them black and white by clicking the tiny black-over-white squares just below the swatches.
Figure 7.19. Touch up an alpha channel matte (for example, to remove a tracking marker): In the Paint palette, select Alpha in the Channels menu, then display the alpha channel (Alt+4/Opt+4).
To see what you are painting, switch the view to Alpha Channel (Alt+4/Option+4); switch back to RGB to check the final result.
When using the paint tools keep in mind:
• Brush-based tools operate only in the Layer panel, not the Composition panel.
• Paint strokes include their own Mode setting (analogous to layer blending modes).
• With a tablet, you can use the Brush Dynamics settings at the bottom of the Brush Tips panel to set how the pressure, angle, and stylus wheel of your pen affect strokes.
• The Duration setting and the frame where you begin painting are crucial (details below).
• Preset brushes and numerical settings for properties such as diameter and hardness (aka feather) live in the Brush Tips panel.
For a more effective workflow experience, try the following shortcuts with the Brush tool active in the Layer viewer.
• Hold Ctrl (Cmd) and drag to scale the brush.
• Add the Shift key to adjust in larger increments and Alt (Opt) for fine adjustments.
• With the mouse button still held, release Ctrl (Cmd) to scale hardness (an inner circle appears representing the inside of the threshold, Figure 7.20).
Figure 7.20. Modifier keys (Ctrl/Cmd to scale, Alt/Opt to feather, all with the mouse button held) let you define a brush on the fly. The inner circle shows the solid core; the area between it and the outer circle is the threshold (for feathering).

• Alt-click (Opt-click) to use the eyedropper (with brushes) or clone source (with the clone brush).
Tip

There is a major gotcha with Constant (the default mode): Paint a stroke at any frame other than the first frame of the layer, and it does not appear until that frame during playback. It’s apparently not a bug, but it is certainly an annoyance.
By default, the Duration setting in the Paint menu is set to Constant, which means that any paint stroke created on this frame continues to the end of the layer. For cleaning up stray holes on given frames of an alpha channel, this is probably not desirable because it’s too easy to leave the stroke active too long. The Single Frame setting confines your stroke to just the current frame on which you’re painting, and the Custom setting allows you to enter the number of frames that the stroke exists.
The other option, Write On, records your stroke in real time, re-creating the motion (including timing) when you replay the layer; this stylized option can be useful for such motion graphics tricks as handwritten script.
The Brush Tips panel menu includes various display options and customizable features: You can add, rename, or delete brushes, as well. You can also name a brush by double-clicking it if it’s really imperative to locate it later; searching in the Timeline search field will locate it for you. Brush names do not appear in the default thumbnail view except via tooltips when the cursor is placed above each brush.
For alpha channel cleanup, then, work in Single Frame mode (under Duration in the Paint panel), looking only at the alpha channel (Alt+4/Opt+4) and progressing frame by frame through the shot (Pg Dn).
After working for a little while, your Timeline panel may contain dozens of strokes, each with numerous properties of its own. New strokes are added to the top of the stack and are given numerically ordered names; it’s often simplest to select them visually using the Selection tool (V) directly in a viewer panel.
Tip

As in Photoshop, the X key swaps the foreground and background swatches with the Brush tool active.
Cloning Fundamentals
When moving footage is cloned, the result retains grain and other natural features that still images lack. Not only can you clone pixels from a different region of the same frame, you can clone from a different frame of a different clip at a different point in time (Figure 7.21), as follows:
• Clone from the same frame: This works just as in Photoshop. Choose a brush, Alt-click (Opt-click) on the area of the frame to sample, and begin painting. Remember that by default, Duration is set to Constant, so any stroke created begins at the current frame and extends through the rest of the composition.
Notes

The Aligned toggle in the Paint panel (on by default) preserves 1:1 pixel positions even though paint tools are vector-based. Nonaligned clone operations tend to appear blurry.
• Clone from the same clip, at a different time: Look at Clone Options for the offset value in frames. Note that there is also an option to set spatial offset. To clone from the exact same position at a different point in time, set the Offset to 0,0 and change the Source Time.
• Clone from a separate clip: The source from which you’re cloning must be present in the current composition (although it need not be visible and can even be a guide layer). Simply open the layer to be used as source, and go to the current time where you want to begin; Source and Source Time Shift are listed in the Paint panel and can also be edited there.
Tip

To clone from a single frame only to multiple frames, toggle on Lock Source Time in the Paint panel.
• Mix multiple clone sources without having to reselect each one: There are five Preset icons in the Paint panel; these allow you to switch sources on the fly and then switch back to a previous source. Just click on a Preset icon before selecting your clone source and that source remains associated with that preset (including Aligned and Lock Source Time settings).
Figure 7.21. Clone source overlay is checked (left) with Difference mode active, an “onion skin” that makes it possible to precisely line up two matching shots (middle and right images). Difference mode is on, causing all identical areas of the frame to turn black when the two layers are perfectly aligned.

That all seems straightforward enough; there are just a few things to watch out for, as follows.
Notes
![]()
Clone is different from many other tools in After Effects in that Source Time Shift uses frames, not seconds, to evaluate the temporal shift. Beware if you mix clips with different frame rates, although on the whole this is a beneficial feature.
Tricks and Gotchas
Suppose the clone source time is offset, or comes from a different layer, and the last frame of the layer has been reached—what happens? After Effects helpfully loops back to the first frame of the clip and keeps going. This is dangerous only if you’re not aware of it.
Edit the source to take control of this process. Time remapping is one potential way to solve these problems; you can time stretch or loop a source clip.
You may need to scale the source to match the target. Although temporal edits, including time remapping, render before they are passed through, other types of edits—even simple translations or effects—do not. As always, the solution is to precompose; any scaling, rotation, motion tracking, or effects to be cloned belong in the subcomposition.
Finally, Paint is an effect. Apply your first stroke and you’ll see an effect called Paint with a single check box, Paint on Transparent, which effectively solos the paint strokes. You can change the render order of paint strokes relative to other effects. For example, you can touch up a greenscreen plate, apply a keyer, and then touch up the resulting alpha channel, all on one layer.
The View menu in the Layer panel (Figure 7.22) lists, in order, the paint and effects edits you’ve added to the layer. To see only the layer with no edits applied, toggle Render off; to see a particular stage of the edit—after the first paint strokes, but before the effects, say—select it in the View menu, effectively disabling the steps below it. These settings are for previewing only; they will not enable or disable the rendering of these items.
Figure 7.22. Isolate and solo paint strokes in the View menu of the Layer panel.

You can even motion-track a paint stroke. To do so requires the tracker, covered in the next chapter, and a basic expression to link them.
Wire Removal
Wire removal and rig removal are two common visual effects needs. Generally speaking, wire removal is cloning over a wire (typically used to suspend an actor or prop in midair). Rig removal, meanwhile, is typically just an animated garbage mask over any equipment that appeared in shot.
After Effects has nothing to compete with the state-of-the-art wire removal tool found in the Foundry’s Furnace plug-ins (which sadly are available for just about every compositing package except After Effects).
The CC Simple Wire Removal tool is indeed simple: It replaces the vector between two points by either displacing pixels or using the same pixels from a neighboring frame. There are Slope and Mirror Blend controls, allowing you a little control over the threshold and cloning pattern, and you can apply a tracker to each point via expressions and the pick whip (described in Chapter 10).
Close-up: Photoshop Video
![]()
Photoshop offers an intriguing alternative to the After Effects vector paint tools, as you can use it with moving footage. The After Effects paint tools are heavily based on those brushes, but with one key difference: Photoshop strokes are bitmaps (actual pixels) and those from After Effects are vectors. This makes it possible to use custom brushes, as are common in Photoshop (and which are themselves bitmaps). You can’t do as much overall with the stroke once you’ve painted it as in After Effects, but if you like working in Photoshop, it’s certainly an option. After Effects can open but not save Photoshop files containing video. Render these in a separate moving-image format (or, if as Photoshop files, a .psd sequence).
The net effect may not be so different from drawing a two-point clone stroke (sample the background by Alt- or Option-clicking, then click one end of the wire, and Shift-click the other end). That stroke could then be tracked via expressions.
Rig removal can very often be aided by tracking motion, because rigs themselves don’t move, the camera does. The key is to make a shape that mattes out the rig, then apply that as a track matte to the foreground footage and track the whole matte.
Dust Bust
This is in many ways as nitty-gritty and low-level as rotoscoping gets, although the likelihood of small particles appearing on source footage has decreased with the advent of digital shooting and the decline of film. Most of these flaws can be corrected only via frame-by-frame cloning, sometimes known as dust busting. If you’ve carefully read this section, you already know what you need to know to do this work successfully, so get to it.
Tip

Dust busting can be done rapidly with a clone brush and the Single Frame Duration setting in the Paint panel.
Alternatives
You would think that at the high end, there must be standard tools and all kinds of extra sophisticated alternatives to roto, but that’s not entirely true. There are full-time rotoscope artists who prefer to work right in After Effects, and there are many cases where working effectively in After Effects is preferable to taking the trouble to exit to another application.
Notes
![]()
Silhouette is available as both a standalone application and a shape import/export plug-in for After Effects. The software is designed to rotoscope and generate mattes using the newest research and techniques. If you’re curious about it, there is a demo you can try on the disc.
A lot of the more elegant ways to augment roto involve motion tracking, which is the subject of the next chapter.
