Chapter Six. Planning and Embedding Site Elements
If your Web site is just a handful of pages, you can manage the content on each page more or less independently. That is, you can open each page, one at a time, and edit content.
However, when your site is more complex than just a few pages (and most are), you’ll find Dreamweaver’s features for managing embedded site content essential.
Dreamweaver allows you to create page elements, such as navigation bars, page banners, icons, and bits of text (for example, a copyright notice), and then embed these elements in any of your site’s pages. These elements can be text, images, or a combination of text and images. There are two different kinds of site elements in Dreamweaver:
• Template pages provide a common design for all pages to which they are attached.
• Library items are objects that are embedded in any number of pages.
Both template pages and library items are updatable sitewide. This means that if you embed a logo, copyright notice, text, or image (or a combination of text and images) in your pages and you edit the template or library item that defines that object, all pages that are created from the template or that have the library item embedded in them will update automatically.
This chapter explains how to create template pages, how to generate new pages from a template, how to define library items, and how to embed library items in pages.
#45. Creating Template Pages
The central concept in creating and using template pages is that they include editable and noneditable regions. Noneditable template page regions are parts of the page that are defined in the template; they can only be edited in the template file. Once they are edited, they apply to all pages with which the template is associated.
Let’s explore a typical template page. The page might have a banner across the top, a navigation bar on the left, and a copyright/navigation bar at the bottom. The template defines these elements. A region in the middle of the page could function as an editable region—and would have different content on every page on the site (Figure 45a).
Figure 45a. A page that uses a template.
To create a template page, choose File > New to open the New Document dialog. Select Blank Page in the category (left side) column of the dialog, and click the HTML Template in the Page Type page column. If you wish, you can use one of the available layouts in the Layout column as a basis for your template, but normally you will want to select <none> in the Layout column in order to design your template from scratch. Click the Create button (Figure 45b). The template page will open.
Figure 45b. Creating a new template.

The Document window for a template page looks just like the Document window for a regular page, except that <<Template>> appears in the title bar of the window.
Tip
Just to review where we are in the process: At this stage, you are defining the template page. This page will then be used to generate an unlimited number of actual site pages, based on the template you are defining.
There are two steps to creating a template page. First, create all the noneditable elements that will appear on every page. Then, create the editable regions.
When you define template pages, you don’t draw editable regions; you take existing page elements (such as a table, table cell, or CSS layer), and you make these elements editable when you use the template to generate new pages. Therefore, the standard strategy for creating a template page is to first create a page layout using either CSS layers or tables. You can then place noneditable content in tables or table cells (if you are designing with tables) or in a CSS layer.
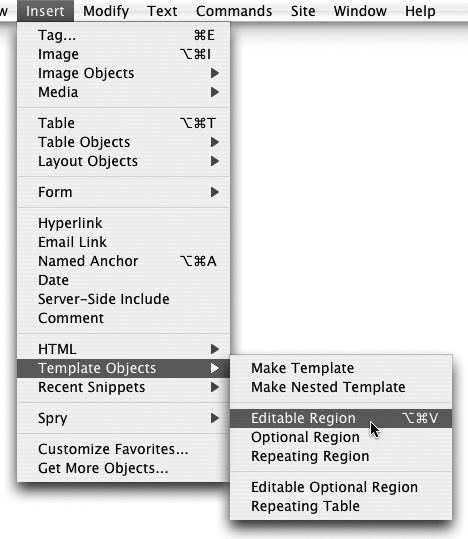
To make an element on the page—like a table, table cell, or AP object—into an editable region, click inside the element, and then choose Insert > Template Objects > Editable Region (Figure 45c). The New Editable Region dialog will open. Enter a name for the region in the Name field, and then click the OK button to define the region.
Figure 45c. Defining an editable region on a template page.
In addition to editable regions, template pages can (but do not have to) include noneditable content. Any text, image, or media that you place on a template page that is not in an editable region becomes part of every page generated by that template.
You might, for example, have copyright information that appears at the bottom of every page generated by the template, or you might have contact information or a navigation bar on every page. You can include on a template page anything you can put on a regular Web page. Just keep in mind that any content that is not in an editable region will appear on every page generated using the template you are defining.
Template pages can be rather complex. Optional editable regions can or cannot be on a page. This is at the discretion of the designer of the individual page. For example, you might make it possible for content authors to include an image on a page, but you might not want to display an empty image box if no image is available. In this case, you could include an optional editable region where the image would appear—if there was one.
Repeating regions are used for highly complex commercial data-driven sites. They allow data to pour into a template page, and for editable regions like tables to expand to accommodate the data. Again, this kind of site development is complex and beyond the scope of this book. However, if you were embedding a table to display the results of a search query that might have any number of results (between 1 and 10, for instance), you could design a repeating region that would display anywhere from 1 to 10 search results. You can even embed editable regions inside other editable regions.
Once you have defined a template page with a noneditable region (if you wish to make it part of the template) and at least one editable region, you’re ready to save the page and use it to generate an unlimited number of pages. Save the page by choosing File > Save. The Save As Template dialog will open. Enter a short description in the Description field, and enter a filename in the Save as field (Figure 45d).
Figure 45d. Saving a template.

Note
By default, Dreamweaver will automatically create a Templates folder on your site and will save all template pages in that folder. Dreamweaver templates are saved with a .dwt file extension.
#46. Generating New Pages from Templates
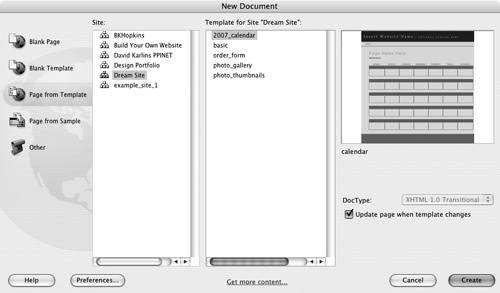
To create a new page from a template, choose File > New to open the New Document dialog. In the New Document dialog, click the Page from Template category on the left side of the dialog. In the Site column, click the site on which you are working (if you have more than one). In the Templates for Site column, click (don’t double-click) one of the templates. You can preview any available template page by clicking it to see a thumbnail image of the template in the Preview area of the dialog (Figure 46a).
Figure 46a. Viewing templates for a Web site.
Tip
The Update page when template changes check box is selected by default. Most of the point of designing with templates is that when you edit the template, all pages generated by that template will update to reflect the changes to the template file. So, normally you will leave this check box selected.
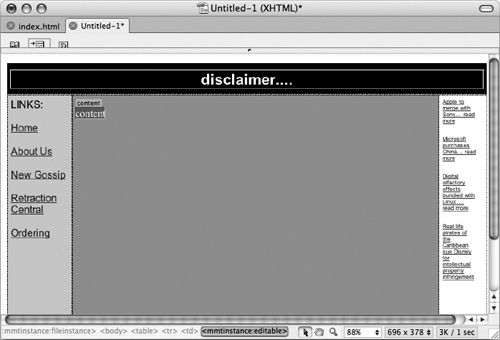
After you select a template, click the Create button in the dialog to generate a new page. The new page will include all noneditable content (images, text, or media) that is part of the template. To enter unique content for the generated page, click in the editable region for the template, and enter text, images, or other content. If there are multiple editable regions, click in every region and enter content (Figure 46b).
Figure 46b. Entering an image and text in an editable region.

After editing the editable region on a template page, save the page by choosing File > Save. Assign a filename, and save the page as you would any Web page.
#47. Updating Templates
Your Web site consists of 2,304,451 pages. Okay, let’s say it consists of 230 pages. In any case, consider this scenario: You need to change an element that appears on every page. That might be a newly designed company logo, an updated news notice, or a drastic personnel change.
In any case, you can easily update all the affected pages on your site in minutes by editing the template on which your site pages are based.
Then comes the slow part: After you update a template, you still need to upload all changed pages to your server. Because this is confusing to many people, I included a separate How-To at the end of this chapter on managing template updates at a remote server (see #51, “Uploading Templates and Library Items”).
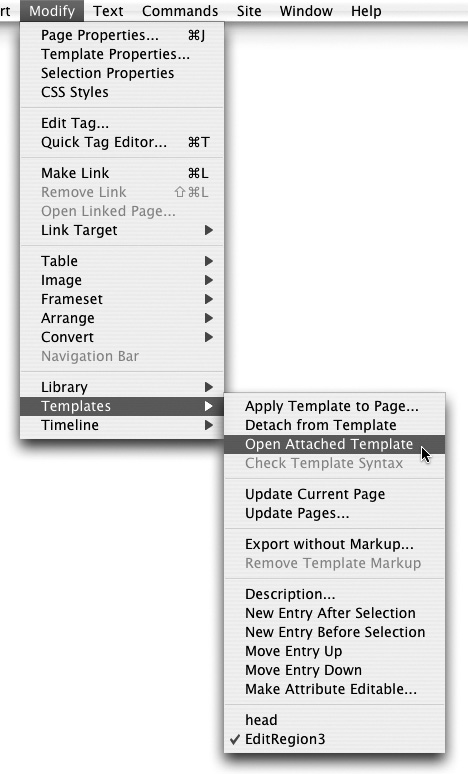
You can easily open and edit a template either from the File menu or from an open page that is associated with the template. If you have a page open that was generated from the template you want to edit, choose Modify > Templates > Open Attached Template (Figure 47a).
Figure 47a. Opening a template page.
If a page associated with your template is not open, choose File > Open, and navigate to the template file in the Open dialog.
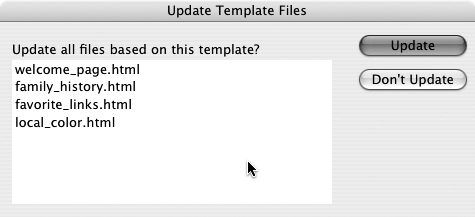
With the template page open, edit the noneditable regions (that is, any region that is not defined as an editable region). After you edit the page content, choose File > Save. The Update Template Files dialog will open. The dialog lists all files generated from the template you are saving. If you only want to update some of the pages generated from the template, select the files to update. Then click the Update button to apply the changes in the template to all (or selected) pages (Figure 47b).
Figure 47b. Saving a template page and updating files.
The Update Pages dialog will then appear. Here, you can select the Show log check box to generate a list of affected pages (Figure 47c). When the update process is completed, click the Close button to close the Update Pages dialog.
Figure 47c. Viewing a log of updated pages.

#48. Creating and Placing Library Items
Library items are like templates in that they are associated with pages and they update sitewide. They are different in that library items are embedded in a page, and they can be placed in pages generated by templates, in template pages themselves, or in just a regular Web page. Another way to think of it is that templates are entire pages, while library items are just individual elements that can be inserted into any page.
Library items can be text, images, or even media plug-ins (like a Flash animation), or they can be a combination of these. For example, if you want to place an article on every page or on several pages, you could embed the article as a library item. When the time comes to update or change the article, you can edit the library item and update the article on every Web page in which it is embedded.
You can define a library item two ways. You can drag content from an existing page into the Library window, or you can define library content from scratch in the Library window.
Library items and templates often provide alternative ways of accomplishing similar tasks. Both can be updated. For example, you could create all pages on a Web site using a template that has company contact information on the page as noneditable content. If the company moves, you can update the address on every page generated from a template by making a change to the noneditable content in the template.
Another approach would be to embed company contact information as a library item. When the contact information changes, you can update the library item and the change will be reflected in the content of every page in which the item is embedded.
I personally tend to avoid using both templates and library items. When you mix and mesh the two, it becomes confusing to keep track of where the content is coming from. If the main object is to create consistent-looking pages, templates are often the best option for updating content. If you’re embedding updatable content for an existing site or for a site where consistent page layout is not critical, library items are often an easy way to embed updatable content in your site.
To drag existing content into the Library window, follow these steps:
- Choose Window > Assets to view the Assets panel.
- In the column on the left side of the Assets panel, click the Library icon (the last icon in the column). Any existing library items will display (Figure 48a).
Figure 48a. Viewing the Library category of the Assets panel.

- Click and drag to select the content on your page that will become a library item. Drag the content to the top window in the Library category of the Assets panel (Figure 48b).
Figure 48b. Dragging content to the Library category of the Assets panel.

- Enter a name for the new library item by clicking the item in the Names list at the bottom of the Library category of the Assets panel and entering a new name.
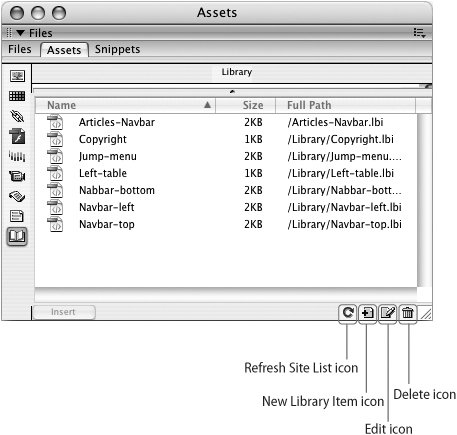
You can also create a library item from scratch. There are four icons at the bottom of the Library category of the Assets panel (Figure 48c):
• The Refresh Site List icon generates an updated list of library items associated with the open Web site.
• The New Library Item icon creates a new library item.
• The Edit icon opens a window to edit the selected library item.
• The Delete icon deletes the selected library item.
Figure 48c. Icons in the Library category of the Assets panel.
To create a new library item, follow these steps:
- To generate a new library item, first create any kind of content (including text or images) in the Document window. Select that content and drag it into the top half of the Library category of the Assets panel. As you do, a new library item named Untitled appears in the bottom half of the Library category of the Assets panel.
- Create a new name for the library item by clicking Untitled in the bottom half of the Library category of the Assets panel, and entering a new name for the new library item.
- To create additional library items, click the New Library Item icon at the bottom of the Library category in the Assets panel.
Once you create a library item, you can drag it from the Library category of the Assets panel to any page on your Web site. Do this by simply dragging the library item to an open page in the Document window (Figure 48d).
Figure 48d. Dragging a library item to a page.

#49. Updating Library Items
When you edit a library item, the item will update on every page in which it is embedded. To edit a library item, click the item in the Library category of the Assets panel, and click the Edit icon at the bottom of the panel. The library item will then open in the Library Item window, which looks like the Document window, except that the title bar includes <<Library Item>> (Figure 49a).
Figure 49a. The Library Item window.

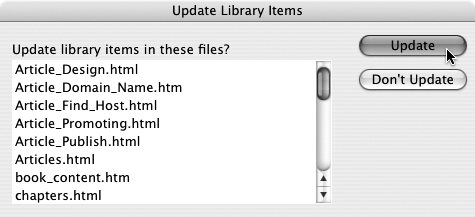
The Library Item window is just like the Document window, except that it is used to edit library items. You can edit in the Library Item window just as you would in the Document window. After you edit the library item in the Library Item window, choose File > Save to save your changes. The Update Library Items dialog will then appear with a list of all pages in which the library item is embedded.
You can select some of the pages in the list to update, or simply click the Update button to update the entire list (Figure 49b).
Figure 49b. Updating pages with a library item embedded in them.
After Dreamweaver finishes updating pages with embedded library items, the Update Pages dialog will appear. You can select the Show log check box to see a list of all updated pages (Figure 49c).
Figure 49c. Viewing a list of updated pages with an embedded library item.

#50. Including Navigation in Templates and Library Items
It’s often useful to create templates with navigation bars in them, or with navigation bars that are library items, which can be embedded in any page. Whether you place navigation bars (or just regular links) in templates or library items, Dreamweaver will make sure they link when you generate pages from a template with links, or when you pop a navigation bar onto a page by dragging a library item to that page.
Including navigation links in a template or library item works because when you create new pages from templates or embed library items in pages, any links in those templates or library items automatically get updated to reflect the location within your site’s directory structure.
To appreciate the handiness of this, image a scenario where you have created dozens of Web pages from a template that included a link bar. You save those pages to different folders (directories) in your Web site. If Dreamweaver didn’t update links for each saved page, the links would all be corrupted since the paths between pages are different, depending on the folder in which a page is saved.
Here’s how Dreamweaver updates links in template pages and library items: When you save a page generated from a template that has links, for example, a blank dialog appears and Dreamweaver prompts you to “update links” (Figure 50a).
Figure 50a. Updating links when a page generated from a template is saved.

Note
A navigation bar refers simply to a set of links (sometimes in a one-row, multiple-column table) or sometimes just a set of links separated by spacing or vertical bars (“|”). The essential point is that you can create this navigation bar and use it in library items or template pages.
As long as the links are defined correctly for a template or library item, you can use embedded library-item navigation bars or template-page navigation bars to easily create global uniform navigation bars on your pages. And these navigation objects can be easily updated, either by editing a template or by editing a library item.
#51. Uploading Templates and Library Items
One of the things my clients and students (and fellow developers) find most confusing in Dreamweaver is managing changes to templates and library items on a remote server. Here’s why: When you edit a library item (or template), all pages associated with that library item or template are automatically updated on your local site. These pages are not automatically updated at the remote server. Because this can be confusing and frustrating, I’ll walk you through the process.
When you save changes to an edited template, you are prompted to update all pages generated by the template. When you edit and save changes to a library item, you are prompted to save all changes to pages in which the library item is embedded.
This changes the pages on your local site. You cannot update the pages on your remote server by simply uploading the revised template or library page. It is not possible to update pages on a remote server by uploading a library item or template page. You update the pages on your local server, and then you have to upload all changed pages to the remote server.
How do you keep track of which pages need to be uploaded to the remote server after you edit them by changing a template or library item? One way is to actually pay attention to the logs generated by Dreamweaver that list the changed pages. These logs can be copied and pasted into a word processor for easier management.
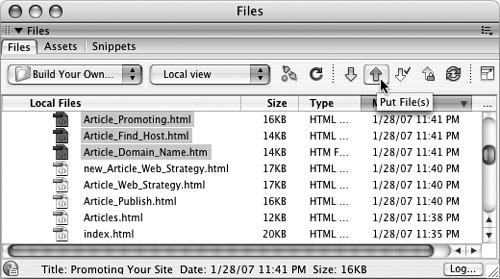
I usually use this trick: After I update files by editing a template or library item, I sort my files in the expanded Files panel by modified date. Do this by clicking the Modified column title in the Files panel (Figure 51a).
Figure 51a. Files sorted by the date on which they were modified.

With the files sorted by modified date, Shift-click to select all the files modified on the current date. Click the Put File(s) icon in the Files panel to upload the files to the remote server (Figure 51b).
Figure 51b. Uploading selected (recently changed) files.