
Chapter Twelve. Testing and Maintaining Sites
It ain’t the glamorous side of Web design, but basic site maintenance like checking and fixing bad links, cleaning up bad HTML imported with text from Microsoft Word, and checking browser compatibility and accessibility makes the difference between a professional site, and—as long as we’re in the vernacular here—crappy Web pages.
Dreamweaver provides a robust set of tools for making sure your site is error free, and ensuring that visitors’ experience at your site is not marred with busted links. And Dreamweaver CS3 incorporates Device Central, where you can preview your Web pages in a wide variety of browsing devices.
This chapter will explore the most useful of those tools.
#95. Checking Browser Compatibility
Buried in the Dreamweaver Document toolbar is an icon that controls how Dreamweaver checks your Web pages to ensure compatibility with browsers. This icon also opens menus that produce reports on browser compatibility issues.
Dreamweaver can check your page to make sure it is compatible with any combination of Firefox, Internet Explorer for Windows, Internet Explorer for Mac, Mozilla, Netscape Navigator, Opera, and Safari. Several versions of each of these browsers are supported by this feature.
To define the browsers with which Dreamweaver will check your page for compatibility, click the Check Page icon in the Document toolbar, and choose Settings (Figure 95a).
Figure 95a. Accessing Browser Check settings in the Document toolbar.

Tip
If the Document toolbar is not visible, choose View > Toolbars > Document to display it.
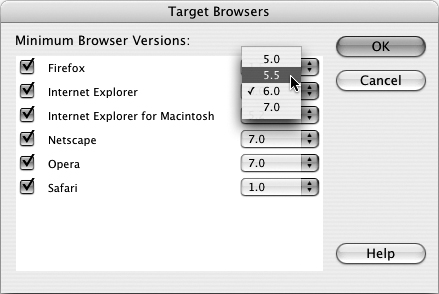
The Settings selection will open the Target Browsers dialog. Here, you define which browsers, and which version of each selected browser, will be used to test your page. Choose browsers by selecting the check box next to the browser, and choose a version of that browser from the accompanying pop-up menu (Figure 95b).
Figure 95b. Defining the set of browsers for which Dreamweaver will test your page for compatibility.
After you OK the Target Browsers dialog, your pages will be tested for browser compatibility issues with the set of browsers you defined.
You can automatically check pages for browser compatibility issues by choosing Auto—check on Open from the Browser Check menu in the Document toolbar. Or, you can view a list of all browser compatibility issues in any open document by choosing Show All Errors from the menu. When you do this, a list of errors appears, telling you what features are not supported in different browsers (Figure 95c).
Figure 95c. Viewing a list of browser compatibility issues for a page.
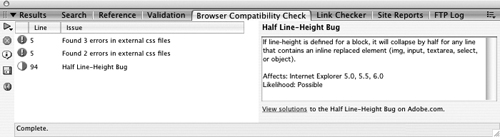
The list of browser compatibility issues that appears in the Browser Compatibility Check window requires some familiarity with coding or ability to decipher coding in order to interpret. The Issue column describes the support issue, and the Line column identifies the line of coding in code view. If you know some HTML, you might be able to tweak the code yourself. Or even if you don’t, you can often figure out what the problem is, and delete the element in your Web page (a CSS style, for example) that shows up on the list of issues.
#96. Previewing Web Pages in Device Central
Are you curious as to how your Web page will look when viewed by various models of cell phones? When you preview Web pages in Adobe Device Central CS3, you can see how your Web page will look in a wide range of viewing devices.
To preview an open page in Device Central, choose File > Preview in Browser > Device Central. Device Central opens in a new window. From the list of devices on the left side of the window, click an expand arrow to see a list of all versions of the mobile phone or other device. For example, if you want to see how your page will look in a Motorola RAZR phone, expand the Motorola listing, and choose one of the models of RAZR phones (Figure 96a).
Figure 96a. Previewing a Web page as it will appear in a Motorola RAZR phone.
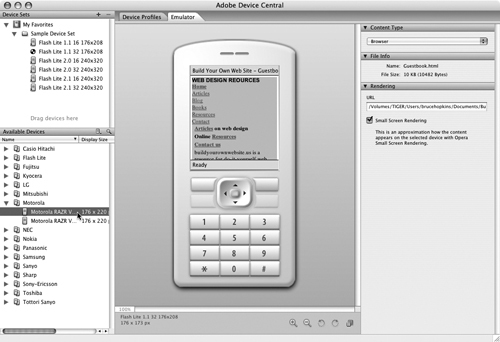
You will see that the list of devices in Device Central also indicates the display size of the viewing area in that device. This information is listed right next to the device model.
Not only can you preview your open Web page in Device Central, but once you open the page, you can also navigate around your Web site (or around the Web if you need to for some reasons) right in the preview environment device you selected.
#97. Testing Links Sitewide
The dreaded “404 (page not found)” error is not an experience you want visitors to your Web site to go through. When visitors follow links on your site to pages that don’t work—either on or outside your site—an error message appears in their browser, and—of course—they do not see the page that the link was supposed to open. Dreamweaver can easily and quickly test all the links in your site, both internal (links to files on your site) and external (links to pages and other files outside your site). Dreamweaver can also identify orphan pages—pages to which there is no link.
To test all links and identify orphan pages, follow these steps:
- With or without a page open in the Document window, choose Site > Check Links Sitewide.
- You can choose from the three reports in the Show pop-up menu in the Report window that opens after you check links. The Broken Links view shows bad links within your site. The External Links view lists links to Web sites or pages outside your site that are no longer good. The Orphaned Files view displays files to which there is no link from any page in your site (Figure 97a).
Figure 97a. Viewing broken links to files outside your site.

- You can fix a broken link by double-clicking a link in the list of either the Broken Links or the External Links reports. The page with the bad link will open, and the link will be highlighted. You can delete or edit the URL for the bad link in the Document window just as you would normally edit a page.
#98. Cleaning Up Word HTML
Frequently, text used in your Web pages is created in Microsoft Word. There are a number of ways to convert that text to HTML. You can choose to save a Word file as HTML, and then open that HTML file in Dreamweaver and edit it, or you can copy and paste text from Word into a Dreamweaver document. If you choose File > Paste Special, the Paste Special dialog provides a number of options for how to handle Word formatting when text is copied from Word to Dreamweaver.
Depending on the options you choose when importing Word text into Dreamweaver, the HTML that is generated will range from slightly flawed to really weird. If you elect to preserve all formatting from Word documents (which happens if you save a Word document as an HTML page and open it in Dreamweaver), the HTML code is full of proprietary Microsoft codes that make the page confusing to edit and format.
To clean up HTML pages with imported Word text, choose Commands > Cleanup Word HTML. The Clean Up Word HTML dialog will open (Figure 98a).
Figure 98a. Cleaning up Word HTML.
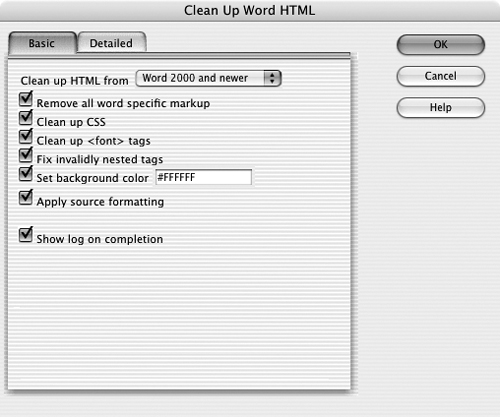
Normally, you can accept the defaults in this dialog (all options are checked), and click OK. If you are using a pre–Word 2000 version of Microsoft Word, choose that version from the Clean up HTML from pop-up menu.
If you are curious as to what kind of nonstandard HTML is fixed by this process, or if you are an HTML and CSS coder and want to manage this process in detail, click the Detailed tab in the Clean Up Word HTML dialog. You can observe or change the fixes applied to Word HTML. After you click OK in the Clean Up Word HTML dialog, a dialog opens telling you what Word HTML was fixed in the process.
#99. Adding Design Notes
If you are working on a Web site with others, or simply want to add Post-it–type notes to pages reminding yourself of things to fix, you can attach Design Notes to pages. Design Notes can be configured to open when a page is opened in Dreamweaver.
To add a Design Note to an open page, choose File > Design Notes. The Design Notes dialog will open (Figure 99a). Here you can define a status from the Status pop-up menu. There are eight available status settings, including draft, final, and needs attention.
Figure 99a. Defining a Design Note.
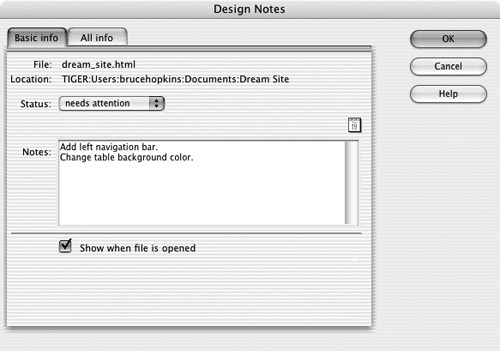
In the Notes area, enter any text you wish. Select the Show when file is opened check box to have the notes appear when you open a page for editing in Dreamweaver. These notes never appear in a browser.
Note
The All info tab in the Design Notes dialog does not enable any additional, easily defined notes options. It displays a Behaviors panel–type environment where you can see the options you selected in the Basic info tab. It is possible to generate additional JavaScript in this tab.
#100. Testing Browsers for Media Support
Media files require plug-in software to be played in a browser. A large percentage of folks who browse the Web have downloaded and installed players for Windows Media, QuickTime, and Flash files.
On the other hand, not everyone has downloaded players that support all the main media file types. Dreamweaver generates a quick, easy behavior that will detect browsers that do not have a defined media player installed, and that can reroute these visitors to an alternate page in your site that does not require that particular plug-in to make the page work.
The behavior that tests a visitor’s browser for plug-in support is triggered by a page loading in a browser window. To facilitate this happening correctly, select the <body> tag in the tag selection area on the left side of the status bar in the Document window generating the behavior.
Tip
By selecting the <body> tag before defining a behavior, you are allowing an action that affects the entire Web page (like loading the page in a browser) to be the triggering action for that behavior. See a more developed discussion of how Dreamweaver uses behaviors to generate JavaScript and other interactive and dynamic script and code, in Chapter 11, “Adding Interactivity with Behaviors.”
Follow these steps to generate a behavior that will test browsers for plug-in support for a media player.
- With the <body> tag selected in the open page’s tag selection area, click the “+” button in the Behavior panel, and choose Check Plugin. The Check Plugin dialog will open.
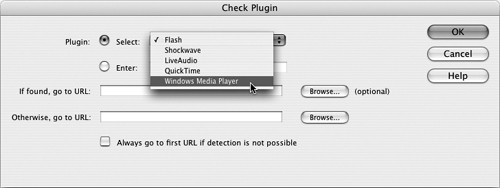
- With the Select radio button selected, choose one of the available media types from the pop-up menu (Figure 100a).
Figure 100a. Choosing a plug-in to test for when the page is opened.
Tip
For all practical purposes, the plug-ins you can test for with a generated behavior are constrained to the list in the Select pop-up menu. Theoretically, you could enter the name of another plug-in in the Enter field, but this option requires knowing exactly how to formulate the name of a plug-in in a way that generated JavaScript can manage it.
- The If found, go to URL field is optional and typically not used. If the page to which you are applying the behavior is the page with the media that requires a plug-in, visitors who do have that plug-in will stay on this page by default.
- In the Otherwise, go to URL field, enter the (full) URL of the alternate page that contains a version of the page content that does not require the selected plug-in. If the alternate page is a file in your Web site, you can navigate to and select that file with the Browse button.
- Selecting the Always Go to first URL if detection is not possible check box opens the current page if the script is not able to determine whether the plug-in is installed. Not infrequently, visitors have Flash or another plug-in installed, but the testing script is unable to determine this. If you select this check box, visitors will be diverted to the alternate page only if the testing script definitively determines that they do not have plug-in support for the selected media type. After you define the whole behavior, click OK.