
Chapter One. Creating a Web Site
Many people think of Web design in terms of simply creating a Web page. However, before you start designing Web pages, you should define a Dreamweaver CS3 Web site. Defining a Web site before you create pages allows Dreamweaver to connect your Web pages to each other with links. It makes it possible to embed images or other nontext content in pages. When you move or rename a Web page (or any file in your site), Dreamweaver updates any links that are affected by that change. And, your Dreamweaver Web site can manage (usually one, but sometimes more) style sheet files that control the formatting of multiple pages across a site.
Defining a Dreamweaver Web site is necessary to manage your files and make them all work together. It is also necessary when you get ready to transfer your site content from your local computer to a remote server—where others can access your content.
Dreamweaver CS3 has essentially two work environments—the Document window and the Files window. The bulk of this book is devoted to using the Document window, and most of your time creating Web sites will be spent in the Document window. This is where you create and edit Web pages. But before you do that, you should understand how Dreamweaver manages Web sites and files in the Files window. The Files window provides tools to control your Web site. The Files window also has tools that allow you to manage your files once you define your site.
This chapter will help you understand how to manage files in your Web site. In it, you will learn how to define a remote Web site and transfer files from your local Web site (your computer) to your remote site, where they will be accessible to everyone over the Internet.
#1. Collecting Site Content
The most basic elements of Web site content are text and images. But the Web is rapidly becoming more accessible and friendly to other types of content; media files, Adobe PDF files, FlashPaper files, and other types of content are increasingly moving to the “accessible” list. Content beyond text and images, however, requires plug-in software—programs like Adobe Flash Player, Apple QuickTime Player, Microsoft Windows Media Player, Adobe Reader, and other programs that add capacity to browsers.
Web browsers can interpret and display text and images without plug-ins. For this reason, and because a large percentage of Web site content remains text and images, this How-To will focus on preparing text and images for your site.
The most accessible Web content is HTML text. HTML stands for Hypertext Markup Language—the “hyper” referring not to drinking too many caffeinated beverages, but to the fact that Web text includes links, clickable text (or images).
Not all formatting features work the same way on a Web page as they do on a printed page. This poses a challenge when you copy or import text into Dreamweaver.
Note
Technically speaking, bringing text intended for a printed page into a Web page involves translating the formatting from PostScript (the coding language used for most printing) into HTML (the markup language used for formatting Web text).
Preparing text for Web pages requires bridging the gap between formatting markup language that translates into print formatting (usually PostScript), and formatting markup language that is supported by Web pages. There are several ways to move text to a Web page, but none of them is completely satisfactory. This is because type formatting in a word processor, like Microsoft Word, has features that are not available in Web formatting, and vice versa.
There are three basic options for bringing type to a Web page:
• Copying relatively unformatted text into Dreamweaver, and formatting it in Dreamweaver
• Using export tools in your word processor and import tools in Dreamweaver to translate the markup language from PostScript to HTML
• Saving the text file as an Adobe PDF or FlashPaper file, opening the file in a browser using plug-in software, and defining links to the file in a Dreamweaver Web page
There are important advantages to using the first two options. If you copy and paste text from your word processor into Dreamweaver, you can avail yourself of all the formatting tools provided by Dreamweaver. These tools are designed to apply formatting that can be interpreted well and consistently by browsers. The downside of this method is that you’ll need to reapply formatting in Dreamweaver.
On the other hand, saving your word processing file as an HTML file (some word processors have a Save As Web Page option) allows you to bring as much formatting as possible with the text as you move it into Dreamweaver. The downside of this method is that the formatting generated by your word processor is unlikely to hold up as consistently in browsers as text formatted in Dreamweaver.
Tip
If you’re not using Microsoft Word, other word processors like TextEdit, WordPerfect, and OpenOffice all save to Word format. Or, you can copy and paste text from any source (including a Web page that is open in a Web browser) into a Dreamweaver page in the Design window. If you copy and paste, you will lose most or all of your formatting.
If you save a Word file as an HTML page, or if you use the Windows-only option for importing a Word file into a Dreamweaver Web page, you can clean up the HTML that results by choosing Commands > Clean Up Word HTML. From the Clean Up HTML from pop-up menu, choose a version of Word. Then accept the default check box settings. Doing this will strip from the generated HTML any coding that would confuse browsers (Figure 1a).
Figure 1a. Cleaning up imported HTML code.

Many programs (Adobe Photoshop and Photoshop Elements among the most prominent) allow you to export image files to JPEG, GIF, or PNG format. These programs provide you with advice on when to use which format. Here, I’ll list a few basic attributes of the various formats:
• JPEG images support millions of colors and are best for photographs. Progressive JPEG files “fade in” as they download, rather than appearing line by line.
• GIF images support far fewer colors than the JPEG format, and are not usually used for photos. But GIF images support transparency, which allows the background of a Web page to show through empty spots in the image. GIF images can be defined as interlaced. Interlacing, like the progressive attribute in JPEG images, allows the image to fade in as it downloads.
• PNG images support more colors, like JPEG, and allow you to define a transparent color, like GIF files. However, PNG format is generally not acceptable for photos because it lacks the JPEG format’s capacity to manage colors and photo detail.
Programs like Photoshop allow you to preview how images will look in all three formats, with different settings for quality. Higher quality preserves color and image quality. But higher-quality images (and larger ones) take longer to download than small or lower-quality images.
Programs like Adobe Illustrator, Photoshop, and Photoshop Elements have Save for Web features that can assist you in preparing images for the Web.
Lower-quality images are generated using compression. Compression “looks for” pixels in an image that do not need to be saved as part of the file information, and it reduces file size by saving less of the image definition.
#2. Defining a Local Site
“I’m a designer, not a file manager!” I hear this protest each time I teach Dreamweaver, and I sympathize. But you need a basic understanding of how Web sites manage and organize files, or your site will fall apart. Links won’t work; embedded images won’t appear in pages; media files won’t open; and style sheets, which control page format, won’t attach.
The good news is that Dreamweaver will manage all your file connection issues, as long as you play by a few simple rules. The first of these rules is always start by defining a Dreamweaver Web site. This Web site will manage your files for you. If you change a filename, Dreamweaver will update links throughout your site. If you go on an organizing binge and decide to move all your images into appropriate file folders, Dreamweaver will update links throughout your Web site. Again, to emphasize: This works as long as you 1) set up a Dreamweaver Web site, and 2) do all your file management (renaming or moving files) in the Dreamweaver Site panel.
Now that I’ve emphasized the importance of creating a local site, here’s how you do it:
- Start by collecting your entire site content in a single folder. You can create subfolders (subdirectories) for images, media, Web pages, and so on. But all these folders must be within the folder that will serve as your local site folder.
- From the Document window menu, choose Site > New Site. The Site Definition dialog opens.
- At the top of the dialog, click the Advanced tab to see all options at once, instead of a wizard that reveals only one element of the site at a time. In the Category list, choose Local Info (Figure 2a).
Figure 2a. Defining a local site.
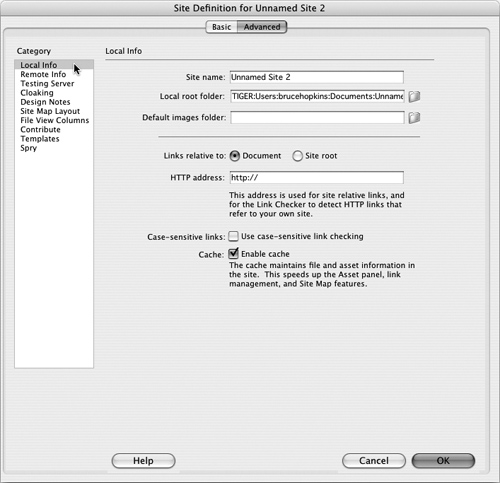
- In the Site name box, enter any text you wish. Nobody will see this but you and other developers; it is simply descriptive information to help you remember which Web site this is.
- In the Local root folder area, click the folder icon at the right and navigate to the folder in which you saved all your files.
- If you want Dreamweaver to automatically save images to one folder on your local storage system (usually a hard drive), you can navigate to a folder using the folder icon next to the Default images folder field. This is not a particularly essential option, and it can get in your way if you want to make conscious decisions on where files are stored.
- Choose the Links relative to Document radio button; this is the most efficient and reliable way to generate and update links between files, and to define links for embedded images.
- The only other important option is the Enable cache check box. This activates the Asset panel that displays all site content.
- With your local site defined, click OK. Dreamweaver is now ready to organize your files for you.
#3. Organizing a Local Site
When it’s time for housekeeping and moving files from one folder to another, you can also rely on the Dreamweaver Files panel. You can display the Files panel by choosing Window > File, or pressing the F8 function key (to toggle between displaying and hiding the Files panel).
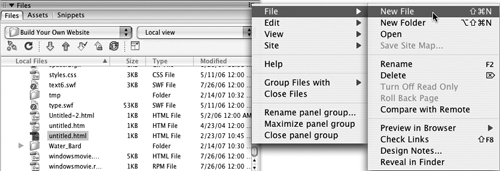
The Files panel menu has options for typical file management actions, like creating new files or folders, renaming files, copying or pasting files, deleting files, and so on (Figure 3a).
Figure 3a. Using the Files panel menu to create a new file.
The theme of this technique is as essential as it is simple: Never change filenames or move files between folders using your operating system’s file management tools. Instead, always rely on Dreamweaver’s Files panel to manage filenames and to move files between folders. The Site folder looks and works like the Finder (for Mac) and Windows Explorer (for Windows) utilities. It allows you to drag files between folders, copy and paste files, rename files, and delete files, just as you would do in Finder or Explorer.
Why should you use Dreamweaver’s Files panel? Because in a Web site, files are almost always connected to other files. You might have an image embedded in a page. If you change the name of that image file or move it to another folder, the link between that image and the page in which it is embedded becomes corrupted.
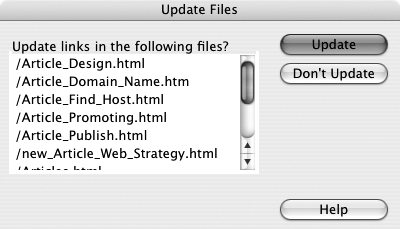
However, if you do all your file management in Dreamweaver, Dreamweaver will fix the problems caused by moving or renaming a file by redefining links that involve that file. For instance, if files in your Web site contain links to a file and that filename is changed, Dreamweaver will prompt you to change those links in an Update Files dialog (Figure 3b).
Figure 3b. Dreamweaver redefining links to match a changed filename.
When you define your local Web site in Dreamweaver, you define a local site folder. Dreamweaver knows that this folder is where all your site files should be kept. If you open a file from another folder or copy or move a file from another folder, Dreamweaver will prompt you to save a copy of that file in your Web folder. For example, if you embed an image in a Web page, Dreamweaver will prompt you to save that image to your site root or image folder when you place it on the page.
#4. Managing Site Views
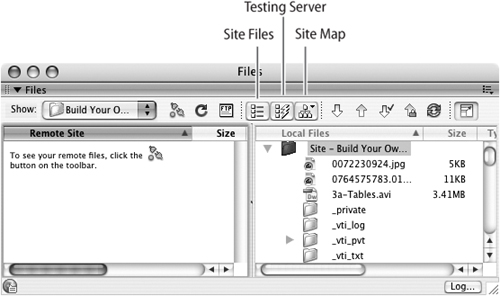
Dreamweaver CS3’s expanded Files window provides three ways to look at your site. The default view is the Site Files view. Here, you can see a list of all files at your local site, and if you have defined a remote site, you can see all files there as well. The Testing Server view is for data-driven Web sites, where data from a database at a remote server is embedded in Web pages. That advanced approach to building Web sites relies on extensive server scripting and database programming, and is beyond the scope of this book. The third view is the Site Map view. You select an expanded Files window view using the group of three view icons in the expanded Files window toolbar (Figure 4a).
Figure 4a. Three view options in the expanded Files window.
The Site Map view in the expanded Files window provides a flowchart of your Web site links. You can draw a Web site navigation diagram in a program like Adobe Illustrator or Microsoft Visio. But Dreamweaver allows you to generate site navigation while you create Web pages.
When you prototype site navigation, or sketch out a flowchart representing site links in Dreamweaver, you generate bare-bones pages that contain only links to other pages. The navigation bars that get generated are simple (Figure 4b).
Figure 4b. Links generated by Dreamweaver.
Tip
Once you prototype a site, you can save a graphical map of the links you create, and print or display that.
You can also use the Site Map view to prototype a Web site, and in the process generate pages with links.
To design a Web site using Site Map view, follow these steps:
- From the Files panel menu, choose File > New File.
- In the Files panel, rename the new file you created as index.htm.
- Control-click (Mac) or right-click (Windows) the file you created and named index.htm. From the context menu, choose Set as Home Page.
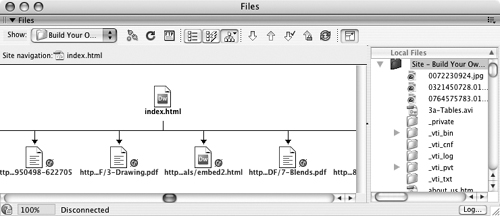
- From the Files panel menu, choose View > Site Map. The home page appears as an icon (Figure 4c).
Figure 4c. Viewing a home page in Site Map view.

- Expand the Files panel by clicking the Expand icon (Figure 4d).
Figure 4d. Expanding the Files panel.

- Choose File > New File from the Files panel menu. Create several new files, and assign filenames (with no special characters like $, ^, or #). Add an .htm or .html filename extension to each file.
Note
Almost all Web servers and browsing environments support both .htm or .html as a filename extension for Web pages. Which option you select is basically a matter of taste. However, it is best to be consistent, and either use .htm or .html. If you create both an index.htm and an index.html page, it will be very confusing to figure out which one of these is actually your home page, and which one will open in a browser when a visitor comes to your site.
- Click the link icon next to the home page, and click and drag to create a connection to one of the files you created. You can draw links from the home page to other pages, from other pages to the home page, or between any two pages. The page you draw a link from has a link placed on it to the page you draw a link to.
- Select any page icon and click and drag to another page icon to create links. As you do, a site map schematic appears in the Files panel (Figure 4e).
Figure 4e. Generating links in the Files panel.

- To see one of your pages with the generated link bar, double-click the page to open it in Page view.
#5. Managing Sites
In addition to creating new sites, you can edit site properties, duplicate a site (to create a copy of that site), remove a Web site from your computer, or export and import sites using the Manage Sites dialog.
To access the Manage Sites dialog, choose Site > Manage Sites. If you have multiple Web sites on your computer, choose the site you wish to edit from the list on the left side of the dialog (Figure 5a).
Figure 5a. Selecting a site to edit.

Note
You might well manage many Web sites from a single computer. A professional Web designer, for example, will likely work on the sites of many clients from his or her computer.
With a site selected, choose from the set of options on the right side of the dialog.
Use the Edit option to reopen the Site Definition dialog. Here, you can revise any of the information that defines the local or remote sites. So, for example, if you change your remote Web host provider, you can enter new Web host information this way.
The Copy option is sometimes useful in creating an experimental site. Or, if you are using one site as a “template” to create other sites, you can copy the original site, and then edit the definition of the new site and make changes to customize it.
The Export feature in the Manage Sites dialog allows you to save site settings as a distinct STE file. This file can then be used to restore the site settings on another computer.
You can export your site settings as an XML file that you can import into Dreamweaver later. This enables you to move sites between machines and product versions or to share settings with other users.
To export site settings, follow these steps:
- Select Site > Manage Sites, and select a site from the list on the left side of the Manage Sites dialog. With the site selected, click the Export button on the right side of the dialog. The Exporting Site dialog opens.
- To back up your site settings, including user name and password as well as local path information, choose the first option. To back up site settings without user name and password so you can give the password to other users, select the second option (Figure 5b).
Figure 5b. Backing up site information, including user name and password.

- Click OK, and then click Done in the Manage Sites dialog.
When you back up site information, you create an XML file to which Dreamweaver CS3 attaches an .ste filename extension. This file can be opened using the Import feature in the Manage Sites dialog to install Web site settings for a site that has already been exported.
#6. Defining a Remote Server Connection
Normally, a remote server reflects content developed on a local site. In other words, most developers first create and test their Web pages on their own computer and then upload that content to a remote server once it has been tested, proofread, vetted and approved, and deemed ready to share.
When you launch Dreamweaver, the site you had open at the end of your last session will open. Your open site is indicated in the Files panel, but if that panel is not displayed, there is nothing that indicates which site is open. To determine which site is open, choose Site > Manage Sites. The Manage Sites dialog opens, and the current open site is highlighted (Figure 6a).
Figure 6a. Identifying the open site in the Manage Sites dialog.

With a site selected in the Manage Sites dialog, click Edit to open the Site Definition dialog. In the Site Definition dialog, choose the Advanced tab.
Tip
Both the Basic and Advanced tabs provide access to the tools necessary to define a remote server connection, but the Basic tab marches you through multiple wizard-type screens, while the Advanced tab provides easier access to an overview of your connection options.
In the Advanced tab of the Site Definition dialog, click the Remote Info category. Then, follow these steps to define your remote server (Figure 6b):
Figure 6b. Defining FTP location, login, and password.

- From the Access drop-down menu, choose FTP to define a connection to a remote server, or Local/Network if the remote site will be on another computer on your internal network.
- In the FTP host field, enter the FTP location provided by your Web host provider.
- In the Host directory field, enter the server folder information provided by your Web hosting company, if needed.
- If your Web hosting company requires a host directory, enter the information the hosting company provided in the Host directory field.
- In the Login field, enter the login or user name provided by your Web host provider.
- In the Password field, enter the password provided by your Web host provider.
- If your Web host provider allows you to connect using passive FTP, select the Use passive FTP check box. You can try connecting to your site without this check box selected, and then try enabling passive FTP if your connection fails.
- If you are working behind a firewall, your system administrator might need to configure the firewall settings in the Site Definition dialog. However, normally Dreamweaver adopts the same firewall settings you use with other programs to connect to the Internet, so custom settings are not necessary.
- After you define the remote connection, click the Test button. If your connection works, the confirmation dialog appears (Figure 6c).
Figure 6c. A successful server connection test.

Note
For now, ignore the three check boxes at the bottom of the dialog that define synchronized, automatic, and shared file management options. The check-in feature is for large sites with multiple developers. Synchronization is examined in #9, “Synchronizing Local and Remote Content.”
#7. Connecting to a Remote Server
Simply defining a remote server connection does not automatically connect you to that server. When you open a Web site in Dreamweaver, you normally open only the local site.
Only after you actually connect to your remote site can you see what files are on that site and manage files at the remote server.
When you define your remote site, you can add a URL for the site to the local site panel in the HTTP Address field of the Site Definition dialog. But this information is not necessary to begin designing your Web site.
After you pay for your remote server space, your Web host provider will give you three essential pieces of information: the FTP address, your login (user name), and your password. Some Web host providers also assign a host directory. If you didn’t get that information, you can probably assume it is not necessary, but you might confirm with your site provider that there is no host directory.
With a site open, you connect to your remote server by clicking the Connects to remote host icon in the Files panel (in either expanded or collapsed view) (Figure 7a).
Figure 7a. Connecting to a remote server via the Files panel.

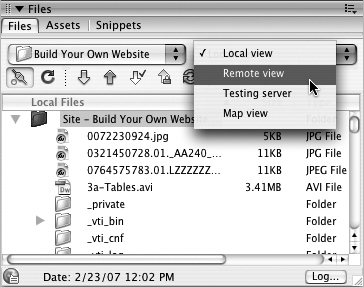
Once you connect to a remote server, you can see either local or remote server content using the View pop-up menu in the Files panel (Figure 7b).
Figure 7b. Viewing the content of the remote site.
To see the content of both the local and remote sites at the same time, click the Expand icon in the Files panel toolbar. In expanded mode, click the Site Files icon in the Files panel toolbar (Figure 7c).
Figure 7c. Comparing local and remote site content.

Note
If you choose Site Map view, you can’t see the remote site. The third view option, Testing Server, displays connections to live data—a topic that is beyond the scope of this book. The topic is covered in excellent detail in Macromedia Dreamweaver 8 Advanced for Windows and Macintosh: Visual QuickPro Guide, by Lucinda Dykes (Peachpit Press).
#8. Transferring Files Between Remote and Local Sites
You can transfer files from the local site to the remote site, or vice versa, in the expanded Files panel. You can upload files to the remote site directly in the Document window. And you can view both the local and remote sites in the collapsed Files panel.
Getting comfortable with transferring files in all three environments (Document window, expanded Files panel, and collapsed Files panel) allows you to conveniently and quickly transfer files and easily keep track of what is where.
There are two basic phases to transferring files to a remote server. The first phase is when you design and test the original site on your local computer, and then upload the whole site to your remote server. The second phase is when you edit elements of your site—first making changes to the local version, and then uploading only the changed parts of your site to the remote server.
Although you can edit Web pages while files transfer to (or from) a remote server, you cannot do other file management activity on the server while files are in transit. This means, for example, that you cannot edit your site in the Site Definition dialog while you are transferring files. But you can open a Web page on your local site and edit it.
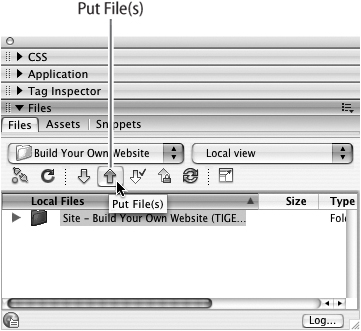
To upload an entire site from your local folder to the remote server, click the root folder of your local site in the Files panel—either in expanded or collapsed view. With the root folder selected, click the Put File(s) icon in the Files panel toolbar (Figure 8a).
Figure 8a. Uploading an entire Web site.
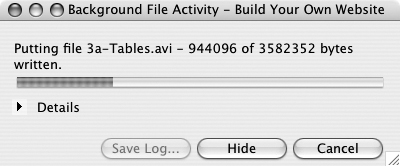
Dreamweaver will prompt you to confirm the action by clicking OK, and then it will upload your entire Web site. The Background File Activity dialog will track the progress of uploading your site (Figure 8b).
Figure 8b. Transferring files in the background—you can continue editing pages in Dreamweaver while files transfer.
Once you have uploaded your site, you won’t want to waste time re-uploading the entire site each time you change a file. Instead, you can upload selected files. Use Shift-click or Command-click (Mac) or Ctrl-click (Windows) to select files in the Files panel, and choose Put to upload the selected files.
You can also upload open pages directly from the Document window. Do this by clicking the File Management tool in the Document toolbar and choosing Put (Figure 8c).
Figure 8c. Uploading an open Web page.

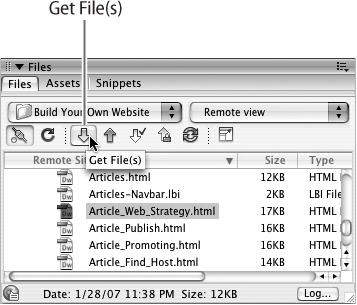
In addition to putting (uploading) files to your server, you can also download files from your server. If you are working on a Web site by yourself (you are the only person who places files on the server in Dreamweaver), you will rarely need to transfer files from the remote server to your local computer, since all files originate on your local computer, and you can overwrite files on the server by uploading the matching file from your local computer. However, if you are working with other developers on a site, you might well need to download a file that was updated by someone else. In that case, click the file in the server, and click the Get File(s) icon in the Files panel toolbar (Figure 8d).
Figure 8d. Downloading a file using the Get File(s) icon in the Files panel.
#9. Synchronizing Local and Remote Content
If you are editing one or a few files at a time, you can fairly easily download (Get) the file, edit it, and then upload (Put) the file back to the server. Or, on the other hand, if you are uploading an entire site, you can click the root folder in the local site, and click Put to upload the entire site.
What about in-between scenarios, when you have edited too many files to remember what has been updated but you haven’t done an entire site? If you upload only files you remember editing, you might neglect to upload important site content changes. If you play it safe and upload the entire site, you might end up transferring way more data than you need to, tying up Dreamweaver’s site tools, and tying up and straining your Internet connection. Dreamweaver CS3 introduces the Synchronize feature.
To identify files on your remote server that are newer than those on your local computer (that is, files that have been edited on another computer, or by another developer since you downloaded them), click the Files panel menu (not the top menu bar, but the panel menu) and choose Edit > Select Newer Remote. Newer files on the server will be selected and can be easily downloaded (Figure 9a).
Figure 9a. Selecting newer files at the remote server to download to a local site.

To synchronize files by updating the server with newer files from the currently open local site, follow these steps:
- If you want to manually select files to synchronize, Shift-click or Command-click (Mac) or Ctrl-click (Windows) to select those files. Otherwise, by default, Dreamweaver will automatically detect changed files.
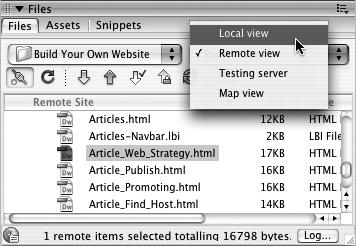
- In the Files panel, choose either Remote view or Local view, depending on which direction you want to transfer files. Select Local view to transfer files to the remote server, and select Remote view to transfer files from the remote server to the local computer (Figure 9b).
Figure 9b. Choosing Local view in the Files panel.
- Choose Window > Files to view the Files panel if it is not open. From the Files panel menu, choose Site > Synchronize. The Synchronize Files dialog appears. From the Synchronize pop-up menu in the Synchronize Files dialog, choose either selected files or the whole site.
- In the Direction pop-up menu, choose from the options—get from server, put to server, or both—that allow you to transfer files from local site to server, server to local site, or both ways, replacing older files with more recent ones.
- In the Synchronize Files dialog, click the Preview button. Dreamweaver connects to your remote site and creates a list of files that meet your criteria (new at the remote site, newer at the local site, or both). The list is displayed in a dialog (again) called Synchronize. Click OK, and Dreamweaver will update all files according to the criteria you defined (Figure 9c).
Figure 9c. Synchronizing files.
