
Much of this book is about the nuts and bolts of technology—how to make games. And I hope you're having as much fun learning these techniques as I am writing about them. But it's important to remember that the games we make are not about you or me. Games are for players, and players play games because they're fun.
All the technology in the world can't make a game fun. And, what is fun, anyway? In the middle of a big project, it's easy to lose sight of what makes games enjoyable to play.
In this chapter, I'm going to show you how to add several essential game design pieces that help make games fun.
Sound effects and music
Interaction by clicking buttons
Simple but versatile AI routines, including how to figure out if enemies can "see" the player
Different game screens to bookend your games
Of course, adding these types of elements makes your games more complex. How can you manage this complexity without losing control of the game project?
In this chapter's case study, we'll look at how to structure a very complex sci-fi action game prototype that puts all of these new techniques to work. You'll be able to use it as a model for building your own complex games.
Before we get to the code, let's take a look at the bigger picture. Here are some tips to help you make your game fun:
Make it responsive: For every action, have a reaction. If a player collects objects or bumps into something, make a burst of color and play a sound. Our real world is like this. Accelerate too fast, and your tires squeal. Bump your head, and you see stars. Why should games be any different?
Giving players multisensory tactile information about the game world adds a sense of immersion—players feel that they're inhabiting and interacting with a parallel universe inside the game. That wondrous sense of escape into an alternate reality is part of what makes games so enjoyable to play.
Responsive feedback from the game, like flashes of color or bursts of sound, will instruct players about how to play the game while they're playing it. Get this right, and you won't need rules or instructions. Pick up and play, all the way!
Yes, simpler really is more fun: Fun doesn't need to be complex or difficult. Watch a kitten playing with a ball of string. Watch most human beings for most of human history play with a ball and a flat surface. Find an amusing interactive toy to play with, like a circle bouncing off a square, and build a game around it.
This applies to your user interface, too. Use logical keys for game actions, and use the mouse or touch as input wherever you can. The less time players spend figuring out how to play your game, the more time they will have to enjoy playing it.
Players decide within the first few seconds whether or not they like your game. There's a lot of competition out there, so pull them in right away and keep them playing.
Have a goal: Players like challenges. They like to have a clear goal and then fail to achieve it. Let them play again to see if they can learn from their mistakes. For some strange reason, this makes humans happy! Having a goal is what turns a toy into a game.
Your goal can be anything you dream up. Find the exit, save the princess, get a high score, find the right pattern, make an interesting object, or just try to survive to the end of the game. But whatever it is, make sure that everything in your game reminds players what that goal is and nudges them toward achieving it.
That means that if the players do something wrong, tell them! Sound an alarm, create an explosion, or shake them about. If they do something right, make happy sounds, shower them with bright flower petals, or give them some flashing bonus points. Your game world can direct the player into succeeding with the right combination of positive and negative feedback.
Give them little victories: As a child, I was mortified by a story my dad told me. He was watching my sister and I play Super Mario World. "Ah yes, just like rats!" he said.
"What?" I asked in a hyper-focused, mid-level, bleary-eyed stammer.
"If rats press a lever, and they get food," he explained, "the rats will keep pressing that lever endlessly, even if they get fed only once in every 100 attempts."
He was right. I had played that level countless times, but I kept falling off a ledge somewhere in the middle. What kept me going was that I was able to succeed at collecting little coins and stars, and stomping on easy enemies along the way. The fact that I kept falling off that ledge at a critical point didn't matter. I knew I could win, even if I wasn't winning right now. The buzz of my little victories kept me going.
My dad, a psychologist, was referring to a well-known phenomenon described by B.F. Skinner called intermittent reinforcement. It's the crack cocaine of human survival. But unlike crack cocaine, it's free and legal. Use it in your games whenever you can! Reward players for completing small, easy tasks, and they'll approach the more difficult tasks with compulsive abandon. If they know they can succeed eventually, they'll keep pressing that lever over and over again.
Involve the player in creating and modifying the game world: Games with the greatest replay value are those that allow players to contribute something to the game world. Players' actions can interactively change the shape of the game level, or modify the goal. Players can be given a choice of multiple strategies to reach the goal, each with differing outcomes. Let players make something, uniquely on their own, that they can use in the game.
Wind them up and let them loose: Program the enemy AI with simple rules so that they interact with the game world in a specific way. If the game world changes in unexpected ways, the AI should be able to adapt to those changes in equally unexpected ways. This makes the AI seem like intelligent living creatures and adds to the sense of immersion.
Far from being afterthoughts, these tips should be the very first things on your mind when you start designing a game. Tear these pages from this book, and tape them to your bedroom ceiling so that they are the first and last things you see each day (besides your teddy bear, of course!). If you remember to put fun first, the rest of your task becomes so much easier.
The more senses you can involve in your game, the more immersive and fun it will become. Sound and music are essential for games, and AS3.0 has some great built-in classes and methods for adding and controlling sounds.
In this section, we're going to a look at the following topics:
As you'll see, with just a bit of code and a little understanding of the concepts AS3.0 uses to play sounds, you'll find it quick and easy to add sound and music to your games. This chapter covers all the sound and music techniques you need to know.
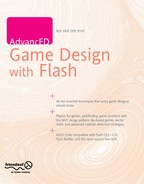
Run the SoundEffects SWF in the chapter's source files. You'll find two buttons on the stage, as shown in Figure 7-1. If you click them, a sound will play.
The structure and logic of the code behind this is not difficult to grasp:
Here's the entire SoundEffects class that does all of this:
package
{
  import flash.events.Event;
  import flash.display.*;
  import flash.events.MouseEvent;
  import flash.ui.Mouse;
  import com.friendsofed.utils.*;
//Classes needed to play soundsimport flash.media.Sound; import flash.media.SoundChannel; [SWF(width="130", height="100", backgroundColor="#FFFFFF", frameRate="60")] public class SoundEffects extends Sprite {//Embed and create the sounds://Laser gun[Embed(source="../assets/sounds/laserGun.mp3")] private var LaserGun:Class; private var _laserGun:Sound = new LaserGun(); private var _laserGunChannel:SoundChannel = SoundChannel();//Explosion[Embed(source="../assets/sounds/bigExplosion.mp3")] private var Explosion:Class; private var _explosion:Sound = new Explosion(); private var _explosionChannel:SoundChannel = new SoundChannel();//Status boxprivate var _statusBox:StatusBox = new StatusBox; public function SoundEffects():void {//1. LASERvar laserButton:EasyButton = new EasyButton("Laser gun", 12, 100, 25); addChild(laserButton);//Position the button on the stagelaserButton.x = 20; laserButton.y = 30;//Add the button event listenerlaserButton.addEventListener (MouseEvent.CLICK, laserHandler);//2. EXPLOSIONvar explosionButton:EasyButton = new EasyButton("Explosion", 12, 100, 25); addChild(explosionButton);
//Position the button on the stageexplosionButton.x = 20; explosionButton.y = laserButton.y + 30;//Add the button event listenerexplosionButton.addEventListener (MouseEvent.CLICK, explosionHandler);//Add the status boxaddChild(_statusBox); _statusBox.text = "SOUND EFFECTS:"; } private function explosionHandler(event:Event):void {//Play the button sound_explosionChannel = _explosion.play(); } private function laserHandler(event:Event):void {//Play the button sound_laserGunChannel = _laserGun.play(); } } }
First, this class imports two essential classes required for playing sounds: the Sound and SoundChannel classes.
import flash.media.Sound;
import flash.media.SoundChannel;
You need to use both these classes together to play sounds.
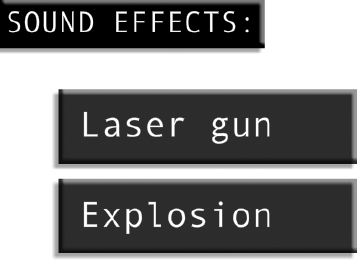
Soundcontains the actual sound that you want to play.SoundChannelhelps you play the sound.
You can think of the Sound class as a CD, and a SoundChannel as the CD player that actually loads and plays it, as illustrated in Figure 7-2.
To create a new sound to use in a game, you need to embed it, create its Sound object, and then create its SoundChannel object:
//Embed the sound[Embed(source="../assets/sounds/laserGun.mp3")] private var LaserGun:Class;//Create the Sound object from the embedded soundprivate var _laserGun:Sound = new LaserGun();//Create a SoundChannel object that will play the soundprivate var _laserGunChannel:SoundChannel = new SoundChannel();
The SoundChannel can then play the Sound whenever it's called on to do so. In this case, it happens with a button click:
private function laserHandler(event:Event):void
{
//Play the button sound
  _laserGunChannel = _laserGun.play();
}
And that's really all there is to it. The only thing to keep in mind is this strangely unintuitive syntax:
_laserGunChannel = _laserGun.play();
_laserGun.play() is assigned to the _laserGunChannel object. Strangely, the play method is on the Sound, not the SoundChannel. But apart from that little quirk, this is a very routine line of code. It's the equivalent to putting a CD into a CD player and pressing the play button.
Playing music is the same as playing any other sound effects. But music is usually longer than the second or two that a simple sound effect might be. If you have a 2-minute music clip, you'll probably need some way of controlling when it starts and stops. You may also need to pause, resume, or loop it. Those are all features of any software music player, and luckily for us, AS3.0 has built-in methods and classes that automate most of these tasks.
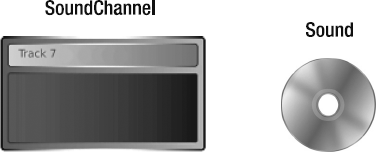
You'll find an example of a very basic music player in the MusicPlayer folder. Start playing the music, and you'll hear some ethereal space-game music that loads from an MP3 file. Click some of the other buttons to see what happens. You can rewind, fast-forward, pause, restart, adjust the volume up and down, and pan the music to the left and right. The POSITION indicator in the status box tells you for how long, in milliseconds, the music has been playing, as shown in Figure 7-3.
If you think it might be reasonably complex to build something like this, you're in for a surprise. Just import the sound classes, set up a few common-sense variables, apply some straightforward logic, and you're good to go. The MusicPlayer class is quite long, but follows the same format as the SoundEffects class, so I won't reprint it in its entirety here. But let's take a tour of the main features that make the music player work.
First, the MusicPlayer class imports the SoundTransform class.
import flash.media.SoundTransform;
The SoundTransform class is used to adjust the volume and the panning of the sound to the left and right speaker. You'll see how it's used in the explanations ahead.
Next, embed the sound, and set up all the objects and variables that you'll need to control it. Here they are:
[Embed(source="../assets/sounds/music.mp3")]
    private var Music:Class;
    private var _music:Sound = new Music();
    private var _musicChannel:SoundChannel = new SoundChannel();
    private var _playHeadPosition:int = _musicChannel.position;
    private var _musicIsPlaying:Boolean = false;
    private var _volume:Number = 1;
    private var _pan:Number = 0;
For controlling music, these are all the standard variables you'll need.
The MusicPlayer class then creates buttons and adds listeners to them. All the functionality of the music player happens in the button event handlers. Let's take a closer look at those event handlers.
Playing sounds and pausing sounds are very closely related actions. Playing music is the same as playing a sound effect: just assign the music.play method to the music's SoundChannel.
private function playHandler(event:Event):void
{
   if (!_musicIsPlaying
   && _musicChannel != null)
   {
      _musicChannel = _music.play(_playHeadPosition);
      _musicIsPlaying = true;
   }
 }
However, you'll notice a few small differences from the code we were using to play sound effects.
First, we don't want to make the music play if it's already playing. The _musicIsPlaying Boolean variable can help us check for that.
if (!_musicIsPlaying
 && _musicChannel != null)
 {...
Without that check, another instance of the music sound will start playing every time you click the play button.
_musicIsPlaying is set to true when the music starts to play, and to false when the pause button is clicked.
If there's any chance that the SoundChannel object might not be assigned any value, you need to check for that, too:
if (!_musicIsPlaying
&& _musicChannel != null)
{
There's a greater chance of the SoundChannel object being null in a music player application where sound is likely to be added and removed from the channel. If you don't do this extra check, and _musicChannel does have a null value, you'll get a runtime error.
We also need to know whether we are starting the music from the beginning or if it has already been played and paused. If it has been paused, we need to know at which point to start playing it. A variable called _playHeadPosition tracks the current position of the music. If you provide this value as an argument to the sound's play method, the music will play from that point onward.
_musicChannel = _music.play(_playHeadPosition);The SoundChannel class has a property called position. If the SoundChannel is like a CD player, its position property is like the little glowing minutes and seconds on the CD player that tell you how long the track has been playing. Whenever a sound plays, the position property tracks how long it has been playing. You can see the position property output in the status box. It's displayed like this:
_statusBox.text
  += "
" + "POSITION: " + uint(_musicChannel.position);
The position property is read-only. That means you can use it to find out the current position of the music, but you can't change that position to make that music play from another spot.
To get around that limitation, this program uses a variable called _playHeadPosition. It helps to control where the music should start and stop playing.
When the program is initialized, _playHeadPosition is set to the value of the SoundChannel's read-only position property.
private var _playHeadPosition:int = _musicChannel.position;
Because the music hasn't started playing yet, the position value will be zero. And that means that _playHeadPosition will also be zero. Zero is always a good place to start!
As soon as the music starts playing, the position value will start to increase, which you can clearly see in the status box. If you click the pause button, the position value is assigned to the _playHeadPosition, and the SoundChannel pauses the sound. (Technically, it "stops" the sound, but it stops it at its current position. It doesn't reset the music to the start point, and so behaves more like CD player's pause button.)
private function pauseHandler(event:Event):void
{
  if(_musicChannel != null)
  {
  _playHeadPosition = _musicChannel.position;
    _musicChannel.stop();
    _musicIsPlaying = false;
  }
}
This means that _playHeadPosition now has a record of the current position value. And what's more, you can change its value.
To resume playing directly at the position that the music was stopped, just feed the current value of _playHeadPosition to the play method. The music will start playing from that point onward.
_musicChannel = _music.play(_playHeadPosition);
We now have an efficient system that allows the music to resume playing from where it was stopped.
Couldn't we just have used the _musicChannel.position property directly to resume playing the sound?
_musicChannel = _music.play(_musicChannel.position);Yes, for just pausing and resuming a sound, that would work just fine. The only problem is that there's far more going on in this music player application than just starting or pausing, as you'll see in the next example.
The real usefulness of the _playHeadPosition variable pays off when you make the music play from a position other than the current position.
The restart button sets the _playHeadPosition variable to 0, stops the music, and then starts playing it again from that point. Position zero is the start of the music.
private function restartHandler(event:Event):void
{
  if(_musicIsPlaying
  && _musicChannel != null)
  {
    _playHeadPosition = 0;
      _musicChannel.stop();
      _musicChannel = _music.play(_playHeadPosition);
    }
  }
}
Remember that there's no way to change the value of _musicChannel.position, because it's read-only. But now that we've forced the music to play from position zero, _musicChannel.position blindly follows along and acquires the new value automatically.
We can use this same bit of trickery to fast-forward and rewind the music. The rewind and fast-forward handlers add and subtract 1000 milliseconds (1 second) to the current position, and then tell the music to resume playing from that new point.
private function rewindHandler(event:Event):void
{
  if(_musicChannel != null
  && _musicIsPlaying
  && _musicChannel.position - 1000 > 0)
  {
  _playHeadPosition = _musicChannel.position - 1000;

    _musicChannel.stop();
    _musicChannel = _music.play(_playHeadPosition);
  }
}

private function fastForwardHandler(event:Event):void
{
  if(_musicChannel != null
  && _musicIsPlaying
  && _musicChannel.position + 1000 < _music.length)
  {
  _playHeadPosition = _musicChannel.position + 1000;

    _musicChannel.stop();
    _musicChannel = _music.play(_playHeadPosition);
  }
}
The other check these two handlers need to make is to ensure that the new rewind and fast-forward values are actually valid for the length of the music. That means that they shouldn't be able to rewind to a position that's less than zero.
if(_musicChannel != null
&& _musicIsPlaying
&& _musicChannel.position - 1000 > 0)
{...
And similarly, you shouldn't be able to fast-forward to a position that's greater than the actual length of the music.
if(_musicChannel != null
&& _musicIsPlaying
&& _musicChannel.position + 1000 < _music.length)
{...
The Sound class has a property called length that tells you the total length of the sound in milliseconds.
As you can see, this is a very simple system, but it works well.
Sound volume and speaker panning are handled together by a separate SoundTransform object. First, you need to create a SoundTransform object.
var transform:SoundTransform
  = new SoundTransform(_volume, _pan);
The two arguments in the SoundTransform's constructor are the volume and panning:
Volume: How loud or quiet the sound is. This can be any number, but it's usually set between
0and1. A0means that the sound is completely inaudible,0.5is mid-volume,1is normal volume, and2is twice normal volume.Pan: Determines whether the sound is played through the left or right speaker, or at equal volume through both speakers. This can be any number ranging from
−1to1. At0, the sound will come through both speakers equally. At−1, it will be heard only through the left speaker. At1, it will be heard only through the right speaker.
Next, apply the SoundTransform object to the SoundChannel's soundTransform property.
_musicChannel.soundTransform = transform;
The new volume and speaker panning values will then take effect.
Yes, this can be a bit confusing. The SoundChannel class has a soundTransform property. It has the same name as the SoundTransform class, except for the different capitalization. These are two different things! To change a sound's volume or panning, you need to create an instance of the SoundTransform class and apply it to the SoundChannel's soundTransform property. Confusing as this might appear, just stick to the format in these examples, and you won't go wrong.
With that basic format in place, let's look at the event handlers that make these changes in the MusicPlayer program, beginning with volume adjustments.
The _volume variable in the MusicPlayer program is initialized to 1.
private var _volume:Number = 1;
Clicking the Volume Up button increases the _volume's value by 0.2. It creates a new SoundTransform object with the new volume value, and applies that new volume to the _musicChannel's soundTransform property.
private function volumeUpHandler(event:Event):void
{
  if(_musicChannel != null)
  {
   _volume += 0.2;
     var transform:SoundTransform
       = new SoundTransform(_volume, _pan);
    _musicChannel.soundTransform = transform;
  }
}
In this example, you can see that _pan has also been included as an argument in the SoundTransform constructor. This is optional. I've done it here because the pan value might have already been changed. If it's not reassigned again to the _musicChannel, along with the volume, the pan will default back to 0, and its previously changed value will be lost.
Turning down the volume follows the same logic. The only difference is that its lowest value is limited to 0. You could, in theory, give it a value less than zero, but there would be no audible difference—you can't hear less than complete silence, can you?
private function volumeDownHandler(event:Event):void
{
if(_musicChannel != null
&& _volume > 0)
  {
  _volume -= 0.2;
  if(_volume < 0)
  {
    _volume = 0;
  }
    var transform:SoundTransform
      = new SoundTransform(_volume, _pan);
    _musicChannel.soundTransform = transform;
  }
}
Panning follows the same format as changing the volume. The only difference is that the pan values need to be limited to between −1 and 1. That's the range used for panning.
private function panLeftHandler(event:Event):void
{
  if(_musicChannel != null
  && _pan > −1)
  {
     _pan -= 0.2;
     if(_pan < −1)
     {
       _pan = −1;
     }
     var transform:SoundTransform
       = new SoundTransform(_volume, _pan);
    _musicChannel.soundTransform = transform;
  }
}

private function panRightHandler(event:Event):void
{
  if(_musicChannel != null
  && _pan < 1)
  {
     _pan += 0.2;
     if(_pan > 1)
{
_pan = 1;
}
var transform:SoundTransform
= new SoundTransform(_volume, _pan);
_musicChannel.soundTransform = transform;
}
}Panning has useful applications for games, because you could make sounds play through the speaker that matches the side of the screen where an object is located. This gives a great sense of spatial immersion. You'll see an example of this effect at work in the pages ahead.
There are two different ways you can loop sounds and music: with a play method argument or with a SOUND_COMPLETE event handler.
The Sound class's play method has a second optional argument, which determines the number of times you want the sound to loop.
_musicChannel = _music.play(_playHeadPosition, timesToLoop);If you want the sound to start at position zero (the beginning of the track) and loop ten times, you could use code that looks like this:
_musicChannel = _music.play(0, 10);
If you want it to loop indefinitely, you can assign the loop argument the value int.MAX_VALUE.
_musicChannel = _music.play(0, int.MAX_VALUE);
int.MAX_VALUE is the highest possible value that an integer can be: 2,147,483,647. That means the sound won't loop forever, but it will loop long enough for the player to finish the game, and possibly even continue to loop a few decades well beyond that. That should be long enough!
For simple looping, this technique will work fine. On occasions where you need a bit more flexibility and control, you can create a loop using a SOUND_COMPLETE event. First, add a SOUND_COMPLETE event handler to the SoundChannel object when you play the music.
_musicChannel = _music.play(0);
_musicChannel.addEventListener(Event.SOUND_COMPLETE, loopMusicHandler);
Next, create a loopMusicHandler that plays the music again, and then adds another new SOUND_COMPLETE listener.
public function loopMusic(event:Event):void
{
  if (_musicChannel != null)
  {
   //Play the music
     _musicChannel = _music.play(0);
//Add a new listener
_musicChannel.addEventListener
(Event.SOUND_COMPLETE, loopMusicHandler);
}
}You also need to remove the listener anywhere in your program whenever the music stops.
_musicChannel.stop();
_musicChannel.removeEventListener
  (Event.SOUND_COMPLETE, loopMusicHandler);
Note
If you loop continuous sounds that don't have a discernible start or end, you might hear a moment of silence before the sound plays again. This is because some MP3 formats store the ID3 tag information (the name of the song, name of the artist, and so on) at the beginning or end of the file. That's the silence you hear. If this proves to be a problem, make sure that you export the MP3 file from your audio software without the ID3 information. Most sound editors have this as an option. If you don't have access to the original uncompressed sound file, use an audio editor to trim the few milliseconds of silence from the beginning or end of the file.
In the UsingSounds folder, you'll find an example of how to use these techniques to add sounds and music to a game. Run the SWF, and you'll find that the bullet-firing and explosion effects now have accompanying sounds, and music plays in the background.
Speaker panning matches the position of the effects on the stage. If the explosion happens on the right side of the stage, it can be heard in the right speaker. The bullet-firing sound is also in the speaker that matches its stage position, as shown in Figure 7-4. The amount of right and left speaker panning is proportionate to where the effects are in relation to the left and right side of the stage.
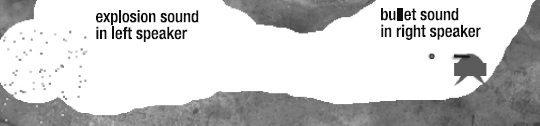
The bullet-firing sound is played whenever the player fires a bullet, and the explosion sound is played when the bullet hits the cave wall.
Panning values range from −1 (the left speaker) to +1 (the right speaker). To create the panning effect, the code needs to convert the x position of the effects on the stage to a value within the −1 to +1 range. This is slightly awkward, but easy to do if you start with a value that represents the half the stage's width.
private var _halfStage:uint = uint(stage.stageWidth * 0.5);
A simple if/else statement can then use that value to figure out whether the pan value should be between −1 and 0 (the left speaker) or 0 and +1 (the right speaker) based on the bullet's position on the stage.
if(_bulletModels[i].xPos < _halfStage)
{
//Left speaker
  _explosionPan = (_bulletModels[i].xPos - _halfStage) / _halfStage;
}
else
{
//Right speaker
  _explosionPan = (_bulletModels[i].xPos / _halfStage) - 1;
}
The _explosionPan value can then be used to create the SoundTransform object.
var explosionTransform:SoundTransform
  = new SoundTransform(_volume, _explosionPan);
This new explosionTransform object is then used as the third argument in the SoundChannel's play method
_explosionChannel = _explosion.play(0, 1, explosionTransform);The bullet-firing sound is created in an identical way.
Note
The techniques we've covered so far are all the basics you'll need to know for sound and music in games. For building a full-featured music player, you'll obviously need a bit more refinement control. You can start by reviewing all of the properties and methods in the Sound, SoundChannel, and SoundTransform classes in Adobe's online ActionScript 3.0 Language and Components Reference. There are a lot of them! Most usefully, the Sound class's id3 property can be used to find quite a bit of information about the music that's playing.
Where can you find music and sound effects for games? Here are some places to start:
Record your own sounds: Record real sounds and add effects to them with audio software. I made the sounds of the lander's thruster in the case study later in this chapter by recording myself saying "Shhhhhhh" into a microphone. I looped it, added phase and delay effects with GarageBand, and ended up with a pretty convincing spaceship sound. You'll be surprised at how many useful game sounds you'll find in your everyday environment once you start listening.
Note
Most of the iconic sound effects in the original Star Wars series were created by sound designer Ben Burtt, who recorded real environmental sounds. The famous Star Wars laser gun sound was the sound of a hammer hitting a high-tension wire that was holding up an antenna tower. The sound of the Imperial Walkers in the Empire Strikes Back was created by combining the sound of a machinist's punch press and the sound of a bicycle chain being dropping on concrete. The sound of Luke Skywalker's famous landspeeder was nothing more than a busy Los Angeles highway recorded through a vacuum cleaner tube. Interesting sounds are everywhere!
Buy music and sounds: Purchase royalty-free sounds and music from a sound library. Royalty-free means that you need to pay for the sounds only once. You don't need to pay for them every time you use them in a game.
Use software to create music and sounds: There is software that can help you to create interesting sounds and melodies, even if you can't play an instrument. Take a look at GarageBand on Mac OS X and Magix Music Maker on Windows. For creating old-skool 8-bit video game sounds, the free software sfxr (Windows) and cfxr (Mac OS X) will do the trick. That's what I used to create the laser gun and explosion sounds in these examples. It's great for creating sounds quickly while you're building and testing a game.
All the music in this book was created using WolframTones (http://tones.wolfram.com). It's free online software that generates an entire musical score mathematically using cellular automata. Cellular automata are essentially grids of ones and zeros created by algorithms that mimic organic patterns found in nature. No two patterns generated by the algorithms are ever the same. It's like the musical version of Perlin noise, which we looked at in Chapter 6.
The quality of most of the music generated by WolframTones would be defined by most normal human artistic standards as "patently horrible," but occasionally, you'll discover something quite nice. The fact that the music is essentially completely random means you never know what you're going to get. The music is generated as a MIDI file, which you can import into audio software to tweak, mix, edit, and add your own instrumentation.
In the case study later in this chapter, you'll see how the sounds and music used in these examples are put to work in a real game project.
The sound effects and music from the previous examples were generated by clicking buttons. In a game, most of the sounds will be triggered when something happens, like an explosion. But buttons are useful for many other game elements, like menus and start screens. Let's look at the basics of building buttons that you can use in your games.
AS3.0 has a built-in class called SimpleButton, which helps you make buttons quickly. The SimpleButton class has built-in properties that determine how the button looks in its various states. Here are the most important of them:
downState: What the button looks like when it's pressed down.overState: What the button looks like when the mouse is hovering over it.upState: The button's normal state, when the mouse isn't interacting with it.hitTestState: A display object that determines the area of the button that is sensitive to the mouse.
These four properties can contain any display object. To change how any of the button states look, just assign a different Sprite, MovieClip, or Bitmap object to any of these properties. I'll show you how to do this in the example ahead.
The SimpleButton class also has a few more properties that you may find useful:
useHandCursor: A Boolean value that determines whether the Flash player should display a hand icon when the mouse is over the button.enabled: A Boolean value that determines whether a button is currently active. If you want to disable a button, set itsenabledproperty tofalse.SoundTransform: Sets a sound's volume and panning. We used it in previous examples in this chapter.TrackAsMenu: A Boolean variable that determines whetherSimpleButtonorMovieClipobjects can receive mouse release events
Be sure to check Adobe's online ActionScript 3.0 Language and Components Reference for more information about how to use these properties.
To make a custom button, create a new class that extends SimpleButton. You can then use all the class's properties to help you create the button.
I've done just that in my own custom class called EasyButton. I used this EasyButton class to create the buttons in the SoundEffects example. You can find the EasyButton class in the com.friendsofed.utils package. You can use it as a model for creating your own custom buttons. Here's the entire EasyButton class:
package com.friendsofed.utils
{
  import flash.display.*;
  import flash.filters.*;
  import flash.text.*;

  public class EasyButton extends SimpleButton
  {
  //Button properties
    private var _upColor:uint = 0x333333;
    private var _overColor:uint = 0x666666;
    private var _downColor:uint = 0x333333;
    private var _width:uint = 80;
    private var _height:uint = 80;
    private var _text:String;

  //Text properties
    [Embed(systemFont="Andale Mono", fontName="embeddedFont",
    fontWeight="normal", advancedAntiAliasing="true",
    mimeType="application/x-font")]
    private var EmbeddedFontClass:Class;
    private var _fontSize:uint;
    private var _fontColor:uint;

    public function EasyButton
      (
        textContent:String = "",
        fontSize:uint = 12,
        width:int = 50,
        height:int = 50,
        fontColor:uint = 0xFFFFFF
      ):void
    {
      this._text = textContent;
      this._width = width;
      this._height = height;
      this._fontSize = fontSize;
      this._fontColor = fontColor;
//Button properties.//These are all built-in properties of the SimpleButton class.//They call the displayState method which determines//how these button states look.downState = displayState(_downColor); overState = displayState(_overColor); upState = displayState(_upColor); hitTestState = overState; useHandCursor = true; }//The displayState method creates a Sprite for each//button state. The only difference between button states in this example//is the background colors used to differentiate themprivate function displayState(backgroundColor:uint):Sprite { var sprite:Sprite = new Sprite() sprite.graphics.beginFill(backgroundColor); sprite.graphics.drawRect(0, 0, _width, _height); sprite.graphics.endFill(); var filters:Array = []; filters = sprite.filters; filters.push ( new BevelFilter ( 2, 135, 0xFFFFFF, 0.50, 0x000000, 0.50, 2, 2 ) ); filters.push ( new DropShadowFilter ( 2, 135, 0x000000, 0.35, 2, 2 ) ); sprite.filters = filters;//Create a text format objectvar format:TextFormat = new TextFormat(); format.size = _fontSize; format.color = _fontColor; format.font = "embeddedFont"//Create a TextField objectvar textField:TextField = new TextField(); textField.embedFonts = true;
textField.autoSize = TextFieldAutoSize.LEFT;
      textField.text = _text;
      textField.setTextFormat(format);
      textField.antiAliasType = flash.text.AntiAliasType.ADVANCED;

    //Add the text to the sprite
      sprite.addChild(textField);
      textField.x = 5;
      textField.y = 3;

      return sprite;
    }
  }
}
It could be easy to miss how the button states are created in all that code, so let's take a closer look.
When the button is initialized, three variables determine what the colors of each button state will be:
private var _upColor:uint = 0x333333;
private var _overColor:uint = 0x666666;
private var _downColor:uint = 0x333333;
These are the colors that differentiate each button state.
Next, the four button states are assigned.
downState = displayState(_downColor);
overState = displayState(_overColor);
upState = displayState(_upColor);
hitTestState = overState;
useHandCursor = true;
They each call the displayState method, but they send a different color as an argument. The displayState method returns a Sprite. That's what determines how each state looks. The display states all hold a reference to the Sprite that's returned to them.
The displayState method has the job of creating a Sprite for each state based on the unique color assigned to that state. It also adds the button text.
private function displayState(backgroundColor:uint):Sprite
{
  //Draws a rectangle using the supplied background color.
  //Adds the text.
  //Returns a Sprite back to the caller
}
This is a quick way of giving each button state a unique look.
In this simple example, the only difference I've made to each button state is the background color. This is fine for building a quick prototype, but for a finished professional game, you could create a much more complex button class that changes many more visual details and possibly the text as well. Feel free to rip my EasyButton class apart and use it as the basis for your own custom buttons.
Note
When you're working on an exciting new game project, there's nothing that can kill the enthusiasm quicker than the tedium of building a user interface. It always helps if you have a few easy-to-use classes for creating text and buttons in your back pocket, so you can quickly add them to a game while you're building and testing a prototype.
The com.friendsofed.utils package contains a custom class called EasyText. It lets you quickly add text to the stage without needing to create all the accompanying text objects or embedding any fonts. Create an EasyText object like this:
var anyText:EasyText
    = new EasyText("Hello World!", 32);
addChild(anyText);
This will display "Hello World" on the stage. It's a sprite, so you can position it using x and y properties. The second argument in the constructor, 32, is the font size.
A great resource for simple but effective UI elements is Keith Peters' Minimal Comps (http://www.minimalcomps.com). They are easy to use and superb for building quick prototypes with a low overhead.
It seems like all those noises and explosions have attracted some unwelcome attention! Just as the lander was leaving the rocky planet's outer atmosphere, it was spotted by an enemy UFO. Can the lander outfly it? Run the LineOfSight SWF and try. It's a fun game of cat and mouse.
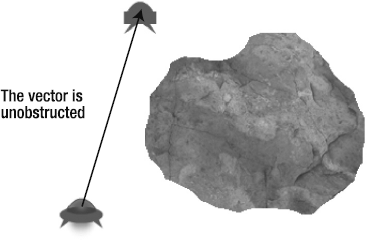
If the lander is hiding behind the asteroid, the UFO can't see it. But as soon as there's a direct line of sight without obstruction between the lander and UFO, the UFO's red light switches on and it attacks.
This works because a vector has been plotted between the lander and UFO. When the vector is unobstructed by the asteroid, the UFO can "see" the lander. Figures 7-5 and 7-6 illustrate the effect you'll notice when you run the SWF.

Figure 7.5. When the lander is hiding behind the asteroid, the UFO can't see it. The vector between the objects is obstructed. The UFO waits patiently for the lander to reemerge.
Line of sight is one of the most useful video-game AI techniques. The concept is quite simple:
Plot a vector from the enemy to the player's object.
Test points at fixed spaces along the vector to see if they are touching the asteroid or the lander, as shown in Figure 7-7. You can use
hitTest(for bitmaps) orhitTestPoint(for sprites or movie clips) to check for these collisions.If any of those points don't touch the asteroid, you know the enemy can see the player, as shown in Figure 7-8.
If the points are spaced too widely along the vector, you could miss small objects. Because of this, the space between each point should not be greater than the smallest object you hope to detect, as shown in Figure 7-9.
Checking the collisions of points along the vector is done inside a while loop.
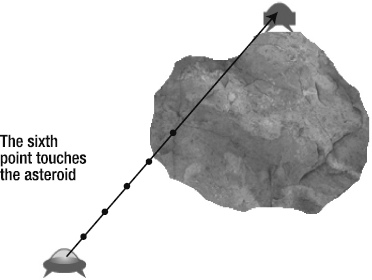
Figure 7.7. Test points along the vector and check to see what they touch. It's almost like an insect's feeler.

Figure 7.8. If none of the points touch the asteroid, then the UFO can see the lander and start to attack.

Figure 7.9. The distance between each point should be no greater than the size of the smallest object. The space between each point along the vector is a segment.
Our job now is to translate this logic into code. Because we know all about vectors and while loops, it becomes a very simple problem to solve.
I'll first list the entire code in context from the enterFrameHandler, and then explain how it works.
Note
The UFO is an instance of the UfoModel and UfoView classes that you'll find in the com.friendsofed.gameElements.ufo package. The view draws the UFO, and the model contains a _playerIsVisible property that is set to true when the lander can be seen. I want to completely expose the vector math in this example, so I haven't used the VectorModel class to create vector objects.
//1. Find the center points of the lander and UFO//These points are measured from the top-left corners of the objectsvar lander_X:int = int(_lander.xPos + _lander.width * 0.5); var lander_Y:int = int(_lander.yPos + _lander.height * 0.5); var ufo_X:int = int(_ufo.xPos + _ufo.width * 0.5); var ufo_Y:int = int(_ufo.yPos + _ufo.height * 0.5);//2. Create the distance vector between the UFO and landervar vx:Number = lander_X - ufo_X; var vy:Number = lander_Y - ufo_Y;//3. Find the vector's magnitudevar magnitude:Number = Math.sqrt(vx * vx + vy * vy);//4. Find the unit vectorvar dx:Number = vx / magnitude; var dy:Number = vy / magnitude;//5. Create a segment that is the size of the space//between each point.//The segment should be no bigger than the smallest object//in the game that enemy needs to find. The lander's width//will do for this examplevar segment:int = _lander.width;//6. Figure out the maximum number of times//you'll need to run the loopvar numberOfPoints:uint = uint(magnitude / segment);//7. Create vectors of increasing length from the UFO in//the direction of the lander.//If the end point of the vector hits the asteroid//then you know that the lander isn't visible.var counter:int = 0;
while (counter++ != numberOfPoints)
{
//Scale the vector to the size of the lander's width,
//multiplied by the current counter value
var vectorLength:int = segment * counter;
//Create a Point object at the end of the vector
var point:Point
= new Point
(
ufo_X + dx * vectorLength,
ufo_Y + dy * vectorLength
);
//Check whether that Point is touching the asteroid
if(_asteroidBitmapData.hitTest
(
new Point(_asteroidBitmap.x, _asteroidBitmap.y),
255,
point
)
)
{
//If the Point does touch the asteroid, then the
//lander can't be visible and we can break the loop
_ufo.playerIsVisible = false;
break;
}
else
{
//If it's not touching the asteroid, then
//the player could be visible. If this remains
//true by the end of the loop, then the UFO
//can clearly see the player
_ufo.playerIsVisible = true;
}
}
//Ease the UFO towards the lander if
//it has line of sight
if(_ufo.playerIsVisible
&& magnitude > 1)
{
_ufo.vx += dx * 0.1;
_ufo.vy += dy * 0.1;
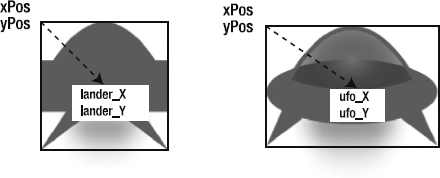
}The vector between the objects needs to be plotted from their centers in order for it to be accurate. The code first creates four variables that work out the center x and y positions of the lander and UFO from their top-left corners, as illustrated in Figure 7-10.
var lander_X:int = int(_lander.xPos + _lander.width * 0.5);
var lander_Y:int = int(_lander.yPos + _lander.height * 0.5);
var ufo_X:int = int(_ufo.xPos + _ufo.width * 0.5);
var ufo_Y:int = int(_ufo.yPos + _ufo.height * 0.5);
Next, the code creates a distance vector between the lander and UFO's center x and y positions, calculates its magnitude, and figures out the unit vector (the dx and dy).
var vx:Number = lander_X - ufo_X;
var vy:Number = lander_Y - ufo_Y;
var magnitude:Number = Math.sqrt(vx * vx + vy * vy);
var dx:Number = vx / magnitude;
var dy:Number = vy / magnitude;
These are all the standard vector calculations that we covered in Chapter 2.
We need to figure out how much space should be between each point along the vector. I've called these spaces between the points segments. Each segment should be no longer than the smallest thing that the UFO needs to find. In this case, the segment will be the width of the lander. You can see these segments in Figure 7-8.
var segment:int = _lander.width;
We then figure out how many points we'll need along the vector.
var numberOfPoints:uint = uint(magnitude / segment);
If the vector is 100 pixels long, and each segment is 10 pixels, we'll have 10 points that we'll need to check.
Next, we create a while loop that will run for as many times as we have points
var counter:int = 0;
while (counter++ != numberOfPoints)
{...
Every repetition of the loop will check for a collision between one of the points along the vector and the asteroid.
Each time the loop repeats, it creates a point along the vector in the direction of the lander. In the first loop, the distance of this point from the UFO will be one times the width of the lander, or about 30 pixels. On the second loop, it will be twice that: 60 pixels. On the third loop, it will be 90.
while (counter++ != numberOfPoints)
{
//Scale the vector to the size of one segment,
//multiplied by the current counter value
  var vectorLength:int = segment * counter;

//Create a Point object at the end of the vector
  var point:Point
    = new Point
    (
      ufo_X + dx * vectorLength,
      ufo_Y + dy * vectorLength
    );
  //...
}
These points work their way along the entire length of the vector.
This works because we're using the original vector's dx and dy values to scale the vector by the amount of vectorLength. Figure 7-11 illustrates the process.
When we plot a new point on the vector, we then need to run a simple collision test against the point and the asteroid. If the point hits the asteroid, then we know the lander won't be visible, and we can quit the loop.
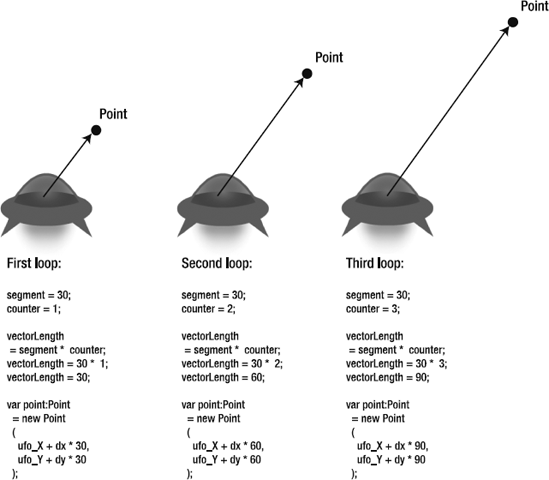
Figure 7.11. The while loop uses the dx and dy values of the vector between the objects to place points at ever-increasing positions along the vector.
if(_asteroidBitmapData.hitTest
    (
      new Point(_asteroidBitmap.x, _asteroidBitmap.y),
      255,
      point
    )
  )
{
  _ufo.playerIsVisible = false;
  break;
}
else
{
_ufo.playerIsVisible = true;
}The _ufo model has a property called playerIsVisible. When it's true, the UFO's glowing light turns from green to red. The UFO also switches on its thruster when it's flying upward. Both these features are handled by the UFO's model and view classes, so be sure to check them out in the source for the details if you're curious about how they work.
Now that you know how to find the line of sight, let's look at how to use that information.
If the UFO can see the lander, it goes into attack mode and flies toward it. If you run the SWF, you'll see it flies in a very natural and organic path. It's a challenge to evade the UFO, but with enough fancy flying, you can outmaneuver it, as shown in Figure 7-12.
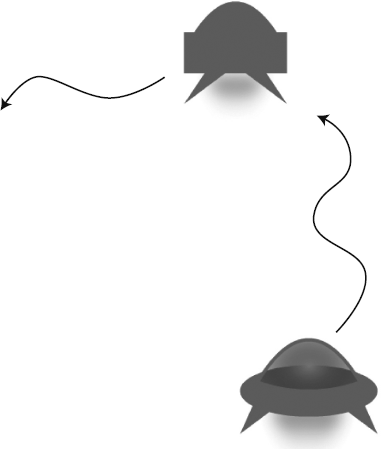
Figure 7.12. The UFO chases the lander by changing its position each frame based on the distance vector between them.
The end result looks complex and eerily lifelike, but it's all done using an extremely simple easing calculation.
if(_ufo.playerIsVisible
&& magnitude > 1)
{
  _ufo.vx += dx * 0.1;
  _ufo.vy += dy * 0.1;
}
It's calculating the shortest path between the UFO and the lander based on the distance vector, and pushing the UFO's velocity in the correct direction. But the final effect is complex because the distance vector is changing each frame, and friction and acceleration are also at play.
This is a simple and effective chase engine, and for most games, it will probably be all you need. However, you could always throw more variables into the mix to keep the game unpredictable. Here are a few ideas:
Have the enemy attack only if the player is within a certain radius of it. You'll see an example of this in the case study coming up next.
Add some randomness to the distance vector between the objects so that the enemy's path is less precise.
Vary the enemy's speed of attack, and possibly work out a system for determining when the enemy gets tired. Perhaps it could become confused if the player does a bit of fancy flying.
There are many possibilities, but effective enemy AI always comes down to simple logic and a lot of experimentation. In Chapter 9, we'll return to the subject of line of sight and pathfinding, and discover how to navigate complex maze environments.
We've covered a lot of exciting techniques so far. In fact, you now have everything you need at your fingertips to build some very complex games. To give you an idea of what's possible, I've created a sample game prototype called Escape! You'll find it in the Escape folder in the chapter's source files.
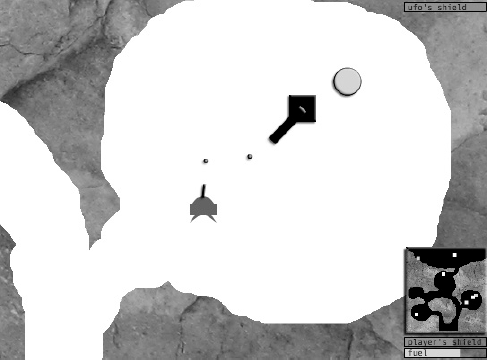
It's a classic cave-flyer style game, as shown in Figure 7-13, and concludes the plot that we've been gradually developing. Our poor lander has been captured by the UFO and imprisoned deep under the planet's surface. To make matters worse, the lander's cannon has been taken away, leaving it without any defenses. How will it escape? Play the game and see if you can find the cannon, escape from the cave, and destroy the UFO mother ship on the planet's surface before you run out of fuel or shield power. Figure 7-14 illustrates how to play through the game.
Escape! uses all the techniques that we've covered in the book so far:
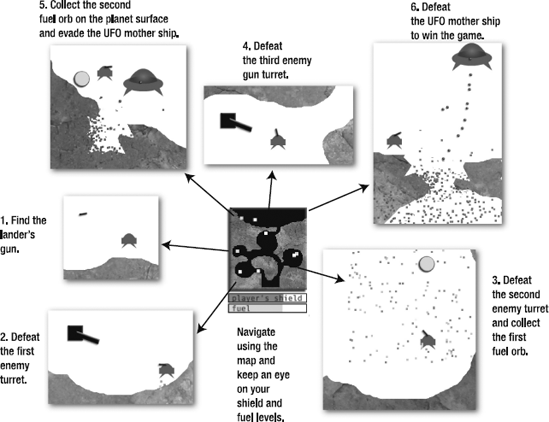
Figure 7.14. Escape from the underground cave by collecting fuel orbs, destroying enemies, and finding your way to the planet surface.
It also introduces two new techniques:
Multiple game screens
AI systems for the rotating enemy gun turrets and the UFO mother ship
Escape! is a prototype model for a sci-fi arcade game. You could easily apply the techniques and concepts to build a fantasy role-playing action game, too.
This game has the most complex game structure in the book. We'll start by examining this structure.
I've purposely made Escape! very complex to help illustrate how you can manage complexity in a game project. As I mentioned earlier in the book, "monstrous complexity" is what game designers refer to as "normal complexity." We need to confront it head on. Escape! uses a structure that can be extended to handle any degree of added complexity and detail. But as you'll see, all the components of this structure will be comfortingly familiar.
The entire game is built around a big MVC system, which is identical to the game template we looked at in Chapter 4. However, because there's much more going on in this game, many tasks—like sound, scrolling, and collision—have been delegated to subclasses.
When designing a complex game like this, you'll always need to find the right balance between keeping code together in big classes and breaking those classes down into smaller, abstracted components. There are advantages and disadvantages to both tactics:
A few big classes: If you keep code together in long, rambling classes, you'll always know where to look when something goes wrong. For example, for most of the examples in this book, I've tried to keep all the code in one big application class. This is because if you haven't written the code yourself, it can sometimes be very difficult to grasp how all the different classes work together. However, if you have a really complex game, you could end up with classes that are thousands of lines long, and scrolling through them could become an insufferable chore. You'll soon forget what you were looking for and why.
Many small classes: If you break code down into many little classes, you'll need to remember exactly how those classes work together and share data. If you don't have a good idea of this and don't stick to a consistent set of naming and architecture conventions right from the beginning, debugging could become a nightmare. If something goes wrong, you'll need to follow a trail of scant clues from one class to the next, and hope that you've remembered how you put everything together.
I've taken a pretty conservative, middle-of-the-road approach to structuring Escape!. The discipline of using MVC as a skeletal framework is helpful in reminding me which classes do what. If I have a doubt, I just ask myself, "Hmmm... is displaying the map on the stage the job of the model, view, or controller? It's the job of the view!" Because I understand the well-defined responsibilities of each class, it's easy to find what I need.
But at a certain point, this starts to break down. For example, the job of the controller is to handle all the game logic. That makes sense, but game logic happens to be extremely complex in this game (and in most games). It involves not just tracking shield and fuel levels, but all these jobs as well:
Playing sounds
Detecting collisions
Managing the scrolling of all the objects on the stage
These jobs are very well defined. It makes sense to have dedicated classes that do these things. But how can we make a lot of new classes while still maintaining the structure of the MVC? The answer is to create helper classes for the main MVC classes.
A helper class is a specialized class that helps the main class do its job. You've already seen a number of helper classes in this book: the performance manager class and explosion manager classes from Chapter 6 are examples.
Here's an example of how you could create a helper class to play game sounds. The GameController can create an instance of a SoundController helper class that does all the work of playing sounds. Whenever it needs to play a sound, it asks this class to do the job of playing it. The GameController class might look like this:
package
{
  public class GameController
  {
    public function GameController(gameModel:GameModel):void
    {
    //Create the Sound Controller object
      private var _sound:SoundController = new SoundController(gameModel);

      stage.addEventListener(Event.ENTER_FRAME, enterFrameHandler);
    }

    private function enterFrameHandler(event:Event):void
    {
      if(there's a collision)
      {
      //Use the SoundController object to play the sound
        _sound.smallExplosion();
      }
    }
  }
}
The Controller class creates an instance of the SoundController, and sends it a reference of the GameModel. The SoundController class might look like this:
package
{
  import flash.media.Sound;
  import flash.media.SoundChannel;

  public class SoundController
  {
  //Explosion sound
    [Embed(source="../assets/sounds/smallExplosion.mp3")]
    private var SmallExplosion:Class;
    private var _smallExplosion:Sound = new SmallExplosion();
    private var _smallExplosionChannel:SoundChannel;
      = new SoundChannel();
public function SoundController(gameModel:GameModel):void
{
//Use the gameModel to access any game data if needed
}
public function smallExplosion():void
{
_smallExplosionChannel = _smallExplosion.play();
}
}
}You can see that all the functionality for playing sounds is now the responsibility of the SoundController helper class. The main Controller class doesn't need to know anything about how to actually play sounds or what those sounds are.
If the main Controller class wants to play a sound, all it needs to do is this:
_sound.smallExplosion();
Figure 7-15 illustrates the relationship between the two classes. As you can see, there's nothing complex about creating a helper class like this. It's very similar to how we created and used the ExplosionManager class in the previous chapter. It's basic OOP, but it neatly solves the problem of needing to delegate responsibilities to other classes while still maintaining a clear structure. You can pile on as many of these helper classes as you need—even hundreds—without breaking the essential elegance of the underlying MVC system.

Note
From a technical MVC standpoint, the SoundController class in this example is actually a combined view/controller. It imports sounds, which are a type of view, but also contains the logic to play them. It's very common to have combination view/controller classes if the view and controller are very closely linked. View/controller classes are also often used for classes that contain buttons. If you don't need to separate the view and controller, keep them together.
In this example, the classes communicate using public methods, but you could just as effectively dispatch events to communicate if you prefer.
Escape! is structured using the basic MVC game template from Chapter 4, and then creating helper classes as needed for each of the three main classes. Figure 7-16 shows the classes used and how they relate to each other. (In addition to these classes, the game uses classes in the com.friendsofed.gameElements folder to create the enemy turrets, UFO, and the explosions.)
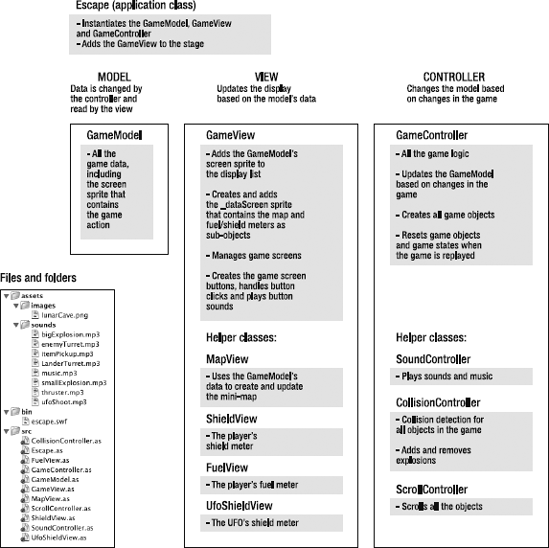
If someone had shown me Figure 7-16 before I started coding the game and said, "Make your game like this," I would have burst into tears. It looks complex, and that's because it is complex. But you'll be happy to know that I didn't plan any of this before I started building the game. In fact, I had no idea how the final structure was going to turn out until I was finished with it. I just added new classes as I thought I needed them, testing things as I went, and this is the end result.
But if you wipe away your tears for a moment and take a closer look at Figure 7-16, you'll notice that it's really nothing more than a very straightforward and strict implementation of the MVC. It's exactly the same structure that we've been using since Chapter 1. The only difference is that responsibilities have been distributed to additional helper classes.
This diagram only makes sense to me now, after I've finished the game. This is good news! It means you can do the same with your games. As long as you understand the MVC structure and how to build helper classes, just start coding. Use the game template from Chapter 4 and start from there. Experiment with new game ideas as you go, and keep what you like. You don't need to plan anything, think about the final structure, or draw any diagrams. Just begin with something very simple and add helper classes as you need them, for whatever seems appropriate. You might end up with a structure that looks like Figure 7-16, or it might look very different. However it turns out, the structure will naturally fall into place, as long as you're disciplined about sticking to the rules of the MVC pattern. This makes creating games organic and spontaneous, like writing a novel or composing music. You'll find your own individual style.
Note
Many programmers use Unified Modeling Language (UML) models to help them plan complex programs. UML is a standard way of visually drawing your program as a flowchart of interconnected classes. It's a great way of getting a complete overview map of your entire program on one page. If you're working on a very complex project, taking a bit of time to learn UML will help you from getting lost in your own code. A simple web search will bring up many helpful resources to help you learn how to make UML diagrams.
It's quite normal that your view classes will be among your most complex, and this game is a good example of this. Not only does the GameView need to manage three different game screens, but it also contains an intricate mini-map as well as level meters for the shields and fuel. These are all the responsibility of the GameView, and there's a lot that it needs to keep track of. So let's take a closer look at how the GameView is creating this complex display.
Escape! uses three main game screens to control the flow of the game, as shown in Figure 7-17:
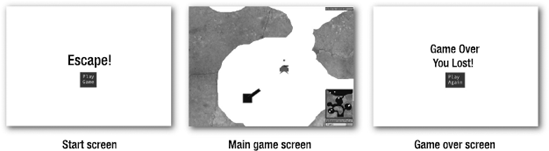
All three screens are sprites that are created and managed inside the GameView class. Remember that the GameView class is the only object that has been instantiated on the stage, so it is in the privileged position to be able to decide what is displayed on the stage and when. Figure 7-18 illustrates how all these display relationships fit together.
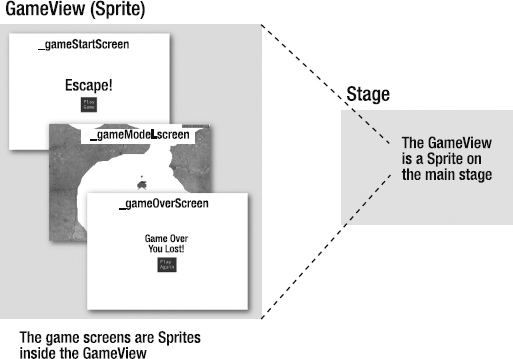
Figure 7.18. The GameView is a Sprite object on the stage, but the game screens are Sprite objects in the GameView. The GameView switches the game screens as needed, depending on the status of the game.
When the game starts, the GameView creates these three screens as sprites. It then adds the start screen and game screen to the display list:
//1. Add the start screen
addChild(_gameStartScreen);
//2. Add the game screen, but make it invisible
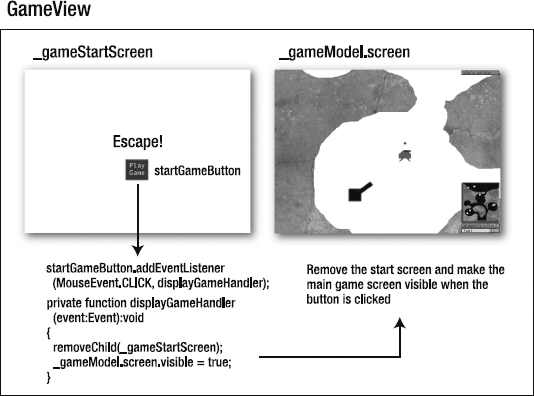
addChild(_gameModel.screen);
_gameModel.screen.visible = false;The game screen is invisible so that it has a moment to initialize. It means that when the Play Game button is clicked and calls the displayGameHandler, the GameView just needs to set the main game screen's visible property to true.
private function displayGameHandler(event:Event):void
{
//Remove the game start screen
  removeChild(_gameStartScreen);

//Make the main game screen visible
  _gameModel.screen.visible = true;

  //...

//Return focus to the stage
  stage.focus = stage;
}
It also removes the start screen. Figure 7-19 illustrates this.
A little technical detail to take care of is that the code also needs to return focus to the main stage.
stage.focus = stage;
When an object has focus, it's sensitive to mouse and keyboard input. Whenever you click something, like a button, AS3.0 automatically gives it focus. But when the game screen is displayed, the new screen doesn't have focus because it hasn't been clicked yet. That means you won't be able to fly the lander around the cave without first clicking the stage. The preceding code gives the game screen the focus it needs. It means that the game screen will immediately be sensitive to the mouse and keyboard, without the player needing to click it first.
At the end of the game, the game screens are switched in a similar way. After the final showdown with the UFO mother ship, the game-over screen is displayed. How does the GameView know that the game is over?
Remember that the GameView is always listening for CHANGE events in the GameModel. If the GameModel sets its gameOver property to true, the GameView knows that it can display the game-over screen.
private function changeHandler(event:Event):void
{
  if(_gameModel.gameOver)
{
  //Make the game screen invisible
    _gameModel.screen.visible = false;

  //Add the game over screen
    addChild(_gameOverScreen);
}
}
It very simply makes the game screen invisible and adds the game-over screen, as shown in Figure 7-20.
The main game screen isn't removed or destroyed, because it might still be needed if the player wants to play again. If you know that an object is going to be used again in a game, find other ways of taking it out of the game without using removeChild. This makes it easier to reuse the object, and saves a bit of CPU power and memory, because the object doesn't need to be destroyed and re-created.
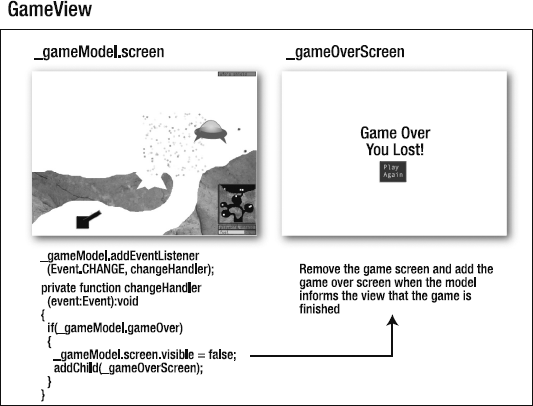
Figure 7.20. When the game finishes, the main game screen is made invisible and the game over screen is displayed.
When the player clicks the Play Again button, the game-over screen is removed, and the main game screen is made visible again. The GameView also calls the GameController's resetGame method, which resets the game values to their initial states.
I actually oversimplified the explanation of how the game-over screen is displayed in the previous section. When you play the game, you'll notice that the game-over screen appears 2 seconds after the game finishes. This gives the player a chance to watch the final explosion before the screens are switched.
It's very common for games to delay displaying the game-over screen so that final animations or sounds have a chance to play to completion. In Escape!, the delay is handled in the GameView with a simple Timer event. The timer is initialized to 2 seconds
private var _timer:Timer = new Timer(2000);
When the GameModel sends a CHANGE event, the GameView adds a listener to the timer and starts it.
private function changeHandler(event:Event):void
{
  if(_gameModel.gameOver)
  {
    _timer.addEventListener
      (TimerEvent.TIMER, displayGameOverHandler);
    _timer.start();
  }
}
After a pause of 2 seconds, the displayGameOverHandler is called. It tells the GameController to display the game-over screen, reset the timer to zero so that it can be used again, and remove the timer's event listener.
private function displayGameOverHandler(event:TimerEvent):void
{
  _gameModel.screen.visible = false;
  addChild(_gameOverScreen);

  _timer.removeEventListener
    (TimerEvent.TIMER, displayGameOverHandler);
  _timer.reset();
}
There's nothing technically difficult about any of this; it's very basic programming and logic. You should find it quite easy to implement multiple game screens like this in your own games. Keep this basic structure in mind, and you can't go wrong.
The great strength of the MVC framework is that the data is completely separate from the display. You can display the same data in many different ways, without changing or corrupting that underlying data. What you see on the stage is just a visual interpretation of data.
The main game screen of Escape! displays a lot of data. Not only does it display the action in the game, but it shows the mini-map and the shield and fuel meters. All of this is displayed by the GameView.
Remember that the job of a view class is to mindlessly read data from the model. The mini-map, the meters, and the game itself are just based on the model's data. As long as the GameView class has access to the GameModel, it can use that data to create the display. The only logic in the GameView is the logic it needs to create and manage these different displays.
All of these displays are quite complex. It would be impractical to cram them into one big class. So Escape! distributes the work among a few different helper classes. Figure 7-21 shows which components of the GameView are handled by helper classes.
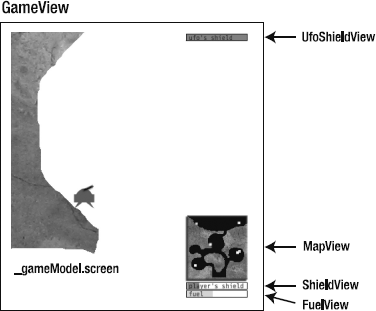
Figure 7.21. The GameView has helper view classes that display the GameModel's data in different ways.
Because the helper classes are themselves views, they all need a reference to the GameModel. So when the GameView creates a helper class, it sends it a reference to the GameModel in the constructor arguments.
var mapView:MapView = new MapView(_gameModel, _stage);Some of the helper views also need a reference to the stage so that they can work out their sizes and positions using the stage's stageHeight and stageWidth properties.
Note
If you browse through the GameView class in the source files, you'll notice that all the helper views are contained within a sprite called _dataDisplay. Keeping them all together in one sprite makes it easier to add and remove them from the display as a single unit. This is entirely optional.
Again, this is basic OOP and basic MVC. You can break down each visual component into a helper class so that you declutter the main GameView class. This keeps everything organized and more readable, because you won't need to hunt through reams and reams of code to find the section of code relating to the mini-map or fuel meter, for example. If you delegate tasks to helper classes logically and use consistent naming conventions, you'll make it easy to find the relevant sections of code.
This structure is a good place to start for building views that need to display a lot of data, such as for a fantasy role-playing game. In a classic role-playing game, you might need a large number of view classes to display the game data, as well as an equally large number of game screens. You'll probably need to keep track of these data display screens in arrays, and build a little mini-application to help you to display them when needed. But the basic format for reading and displaying that data, as well as keeping your classes organized, will be the same as in this example.
The other new feature of Escape! is the twist it takes on enemy AI:
You'll find all the code for these enemies in the turret and ufo folders in the com.friendsofed.gamelements package. I'll walk you through how these enemy AI systems work and communicate with the rest of the game.
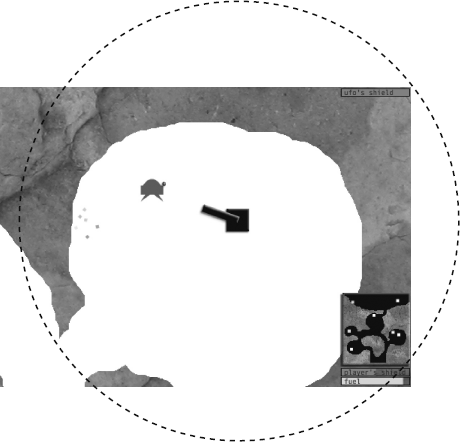
The enemy turrets lie in wait until the lander comes to within a radius of 300 pixels.
The enemy turrets are an MVC system. The turret models have two important properties that indicate the enemy (the lander) and attack range (300 pixels).
public var enemy:Object;
public var attackRange:int = 300;
The turret's enemy property is assigned when the turret is created by the GameController.
The turret's view listens for CHANGE events from its enemy property (the lander).
_turretModel.enemy.addEventListener
  (Event.CHANGE, changeHandler);
When it detects a change in the lander's position, it uses a basic distance calculation to check whether the lander is within range.
private function changeHandler(event:Event):void
{
  var enemy:Object = _turretModel.enemy;

//Create the vector
  var vx:Number = enemy.xPos - _turretModel.xPos;
  var vy:Number = enemy.yPos - _turretModel.yPos;

//Calculate the distance (the vector's magnitude)
  var distance:int = Math.sqrt(vx * vx + vy * vy);

//If the lander is within range and visible, rotate the turret
//toward the lander and tell the turret's controller to attack
  if(distance < _turretModel.attackRange
  && enemy.visible)
  {
    var angle:Number
      = Math.atan2
      (
        _turretModel.yPos - enemy.yPos - enemy.height * 0.5,
        _turretModel.xPos - enemy.xPos - enemy.width * 0.5
      );
    _turretModel.angle = angle;
    _controller.attack();
  }
}
The turret's controller doesn't actually fire any bullets. The turret's controller just "arms" the turret so that it's ready to fire, and sets the turret model's fireBullet property true. To add a bit of variation, a timer is used to randomly set the fire time between 200 and 1000 milliseconds.
Here's the important section of the code that sets the fireBullet property to true:
internal function attack():void
{
  var fireTime:Number;

  if(!_turretArmed)
  {
    if(_turretModel.randomFire)
    {
    //Figure out the random fire time, which will be
    //a number between 200 and 1000 milliseconds.
    //(The _turretModel.fireFrequency propery has a
    //default value of 1000 milliseconds)
      fireTime
        = Math.round(Math.random() * turretModel.fireFrequency) + 200;
      }
      _timer = new Timer(fireTime);
           _timer.addEventListener
        (TimerEvent.TIMER, timerEventHandler);
      _timer.start();
    }
    _turretArmed = true;
  }
  private function timerEventHandler(event:TimerEvent):void
  {
  //When the timer finishes, set the turret model's
  //fireBullets property to true.
  //This gives the GameController permission
  //to add bullets to the stage. The turret itself
  //doesn't fire any bullets.
  //The GameController does the actual job of adding,
  //managing and removing the bullets in the game.

    _turretModel.fireBullet = true;
    _turretArmed = false;
    _timer.removeEventListener(TimerEvent.TIMER, timerEventHandler);
  }
The turret's model dispatches a CHANGE event when the value of fireBullet becomes true.
public function set fireBullet(value:Boolean):void
{
  _fireBullet = value;
  dispatchEvent(new Event(Event.CHANGE));
}
The GameController is listening for this CHANGE event. It adds a bullet to the stage and positions it at the end point of the turret. The Game Controller is the only object that adds and removes objects in the game.
private function turretChangeHandler(event:Event):void
{
  for(var i:int = 0; i < _gameModel.turretModels.length; i++)
  {
    if(event.target == _gameModel.turretModels[i])
    {
      var turret:TurretAIModel = _gameModel.turretModels[i];

      if(turret.fireBullet
      && turret.visible)
      {
        //Create the bullet model and push
        //it into the GameModel's bulletModels array
          var bulletModel:CircleModel = new CircleModel(2);
          _gameModel.bulletModels.push(bulletModel);

        //Position the bullet model at the end of the turret
        //and give it an initial velocity
          bulletModel.setX
             = turret.xPos - turret.width * Math.cos(turret.angle);
          bulletModel.setY
             = turret.yPos - turret.width * Math.sin(turret.angle);
          bulletModel.vx = Math.cos(turret.angle) * −5;
          bulletModel.vy = Math.sin(turret.angle) * −5;
          bulletModel.friction = 1;

        //Add the bullet view and push it
        //into the GameModel's bulletViews array
          var bulletView:CircleBlockView
             = new CircleBlockView(bulletModel);
          _gameModel.screen.addChild(bulletView);
          _gameModel.bulletViews.push(bulletView);

        //Play the sound
          _sound.enemyTurret();

        //Reset the turret so that it can fire again
          turret.fireBullet = false;
      }
    }
  }
}
The last thing the GameController does is to set the turret's fireBullet property to false. This allows the turret to fire again.
You can find all the classes for the enemy turret MVC system in the com.friendsofed.gameElements.turret package. It's composed of these three classes: TurretAIModel, TurretAIView, and TurretAIController.
Figure 7-23 illustrates how all these classes work together to help the enemy turrets fire bullets. The enemy turrets are self-contained MVC systems. The game itself is also a self-contained MVC system. These two systems communicate by using events and public properties. There is some dependency, but it's well defined by the mechanics of the MVC structure.

Figure 7.23. The enemy turret MVC system figures out whether it should fire bullets. The GameController does the job of adding the bullets to the game.
As you know, only a controller should change a model's properties. If you look again at Figure 7-23, you'll notice that the turret actually has two controllers: its own TurretAIController and the GameController. It's quite acceptable for a model to have more than one controller. What's slightly unusual is that the controller is listening for a model's CHANGE events. In an MVC system, shouldn't it just be the view that listens for model events?
Yes, but the difference here is that the GameController is listening for events in a model from an MVC system that it created itself. The enemy turret's model, view, and controller are all objects that the GameController instantiates when it initializes the game. The turrets exist within the GameController alone as subobjects. It's not listening for events in the GameModel. Using events like this to allow sub-MVC systems to communicate with a parent controller is very efficient and helps reduce dependencies between them.
The UFO mother ship uses the same system as the enemy turrets to fire bullets at the lander. However, unlike the turrets, it's moving. It flies in a fixed elliptical path across the planet surface, as shown in Figure 7-24.
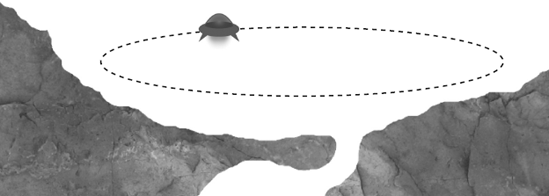
Two pairs of values determine the position and shape of the ellipse:
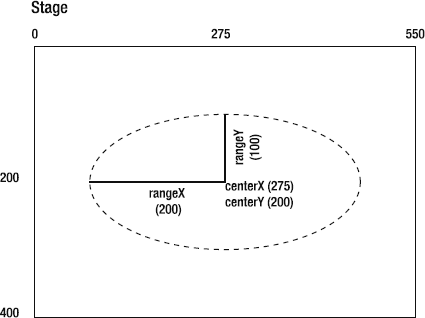
centerX/centerY: You need to know where on the stage the center of the ellipse will be—thecenterXandcenterYvalues. For example, to place the center of the ellipse in the center of the stage, use these two values:centerX = 275; centerY = 200;
rangeX/rangeY: You need to know how wide and how high the ellipse will be. I call thisrangeXandrangeY. For example, if you want the ellipse to be 400 pixels wide and 200 pixels high, use these two values:rangeX = 200; rangeY = 100;
This is similar to a radius, but unlike a circle's radius, the width and height are not the same.
Figure 7-25 shows what kind of ellipse you would end up with if you used these values.
These four values are properties of the UFO model. The GameController sets them when the game initializes.
//Set the center point for the UFO's elliptical flight path_ufoModel.centerX = _caveBitmap.x + 800; _ufoModel.centerY = _caveBitmap.y + 200;//Set the range of the UFO's elliptical flight path_ufoModel.rangeX = 500; _ufoModel.rangeY = 50;
This places the center of the ellipse near the top of the scrolling background, above the planet surface. The ellipse is long and narrow, so the UFO traverses a complete flight path of 1000 pixels from left to right.
The UFO's model has a method called fly that moves the UFO along this ellipse. The GameController calls this fly method every frame to make the UFO move.
public function fly():void
{
  xPos = centerX + Math.sin(_angle) * rangeX;
  yPos = centerY + Math.cos(_angle) * rangeY;
  _angle += 0.01;
}
This is bit of very simple trigonometry that calculates the ellipse. By changing the amount by which the _angle value is incremented, you can alter the speed of the UFO. A lower number, like 0.005, will make it fly more slowly. A larger number, like 0.02, will make it move more quickly.
This is a useful bit of code that you can use whenever you want to make an object fly on a fixed orbit. You can also dynamically change the ellipse's center and range properties based on changing game conditions. This will give the object a very organic, natural-looking motion.
You'll find all the code for the UFO in the com.friendsofed.gameElements.ufo package.
There is a widely used system to manage game states that, while not used in Escape!, is something that you should know about it. You'll probably find a use for it at some point.
What is a game state? It's what the game is currently busy doing. Escape! has three main game states:
Waiting to start
Game running
Game over
It could be important that objects in your game know about these game states. And you might want to run certain blocks of code only during a specific state.
You can define any game states you think you might need as constants in the GameModel.
public const STATE_WAITING:uint = 1;
public const STATE_RUNNING:uint = 2;
public const STATE_OVER:uint = 3;
//Initialize the first game state
public var state:uint = STATE_WAITING;
After the player clicks the start button, the GameController can change the state to show that the actual game is now running.
_gameModel.state = _gameModel.STATE_RUNNING;
The GameController can then use those states to figure out what code the game should run, depending on the current state. This typically happens in an enterFrameHandler. A switch statement figures out what the current state is and calls the appropriate method for that state.
private function enterFrameHandler(event:Event):void
{
  switch(_gameModel.state)
  {
    case _gameModel.STATE_WAITING:
    wait();
      break;

    case _gameModel.STATE_RUNNING:
    runGame();
      break;

    case _gameModel.STATE_OVER:
    gameOver();
      break;
  }
}
Each of those methods has a specialized task in the game. The enterFrameHandler will call the correct method every frame.
internal functionwait():void { //Code you want to run before the game starts } internal functionrunGame():void { //All the game logic and animation } internal functiongameOver():void { //Code you want to run at the end of the game }
The alternative would be to put all the code into one big enterFrameHandler and use if statements to make sure blocks of code run at the correct time, only when certain conditions are true. However, by using defined states, you put a firewall between code that should and shouldn't run at given time. It can lead to fewer errors and code that is easier to manage.
I'm actually going to suggest that you don't look at the complete source code for Escape! right now. It will just confuse you. It's a specific solution to a specific problem, and we've covered all the techniques it uses, with one exception: the game logic, which encompasses the conditions for winning and losing the game. But that amounts to no more than a few simple if statements in the GameModel update method. it checks the fuel and shield levels and sets the GameModel's gameOver property to true if it finds the game is finished.
public function update():void
{
//The game is over if the player or
//UFO's fuel or shield
//values drop below zero
  if(playerModel.fuel <= 0
  || playerModel.shield <= 0
  || ufoModel.shield <= 0)
  {
    gameOver = true;

    if(ufoModel.shield <= 0)
    {
      winner = "player";
    }
    else
    {
      winner = "ufo";
    }

  //Let the GameView know by dispatching a CHANGE event
    dispatchEvent(new Event(Event.CHANGE));
  }
}
The best way to learn how Escape! works is to build a similar game, using your own code, your own art, and your own ideas. Instead of a sci-fi action game, how about building a fantasy role-playing game or dungeon crawler? Or how about a children's action adventure game set in a garden, starring insects, flowers, and trees? The process, structure, and techniques will be the same. If you get stuck, you now have a model of a very complex game that you can use to help you detangle and organize your code.
By solving problems as you encounter them in your own game design, you'll begin to see how the solutions that I came up with for Escape! make sense. You can think of this little tour of how the game was made as a scrapbook of holiday snapshots. You can use them to help plan your own trip, but don't be afraid to find your own routes and make your own maps.
If you do have more specific questions about Escape!, you'll find the source code liberally commented and quite linear. I've erred on the side of having redundant code and keeping the methods very concrete, so that it will be easy for you to see how everything works.
Fun doesn't need to be complex or difficult. Fun just has to be fun. That's an obvious statement, of course, but fun is often the first thing that you can lose sight of in the middle of a big, technically challenging game project.
The art of video-game design is all about making the player feel in control of an alternate reality just on the other side of the screen. Our job as game designers is to build a living, breathing world that responds with relentless feedback to even the slightest user input. Noises, flashes of light, bubbling, and bursting fluffy things that cascade and ripple in patterns of color around the player—all of that makes the world come alive and make it feel like a real place. Immediate and complex responses from the game using multiple senses can instruct the player how to play the game and indicate how well they are doing. Give players enough tactile feedback, and they won't need to read any rules or keep track of their score. It all adds to that warm and tingly sense of wonder and escape that, like a good novel or film, makes games such a pleasure to play.
In this chapter, we've taken a detailed look at some of the things that make games fun to play: sound effects, music, and AI. You've seen how they can all work together in a big, very complex game project. Yes, it's possible to make fun games and have fun making them at the same time.
In the next chapter, we're going to look at a completely different game-design approach, called tile-based design. This approach lets you create game levels quickly using compact code that makes efficient use of system resources. It's an essential skill you need.