
This is by far the most common problem that novice Flash game designers face. It's the result of two factors:
Not keeping the data that is used to make decisions in your game separated from the visuals on the stage
Not centralizing the code that updates the positions of objects on the stage
It's common for game designers to write code that checks where objects are on the stage, and then use that information to figure out where other objects should be. Instead, your code should first create an abstract model of the game, and that game model should tell the objects where on the stage they should go. This allows you to resolve any conflicts before the result is displayed on the stage.
The other problem is that game designers will often write separate ENTER_FRAME events for each moving object. If you have three objects on the stage, each running its own ENTER_FRAME event, you have no control over the order in which these events run. Your collision checks might not resolve correctly because the game thinks two objects aren't colliding, when in fact they are. The result is that when the next frame swings by, two objects appear to be stuck together and can't be separated.
In this chapter, I'll show you how to solve these problems once and for all. We're going to look at two techniques that will become the foundation of the rest of the projects in this book:
Verlet integration: A highly reliable game physics system
Model-View-Controller: A design pattern that clearly separates the responsibilities of an object into three parts
With these two techniques under your belt, you'll be well on your way to building solid and easily configurable games.
This chapter also provides two quick primers: one on the drawing API and one on interfaces.
If you've done any game design in the past, you've probably written sections of code that look a lot like this:
_vx += _accelerationX;
_vy += _accelerationY;
player.x += _vx;
player.y += _vy;
vx is the player object's horizontal velocity, and vy is its vertical velocity.
The player object is moved by adding its velocity to its current position. If you do this repeatedly through an ENTER_FRAME loop, the object appears to move.
This bit of code is essentially saying, "The object is here. It's moving at a certain speed and in a certain direction. So we know that in the next frame it should be over there."
This makes a lot of sense. If you're driving a car at 100 kilometers an hour, you know that in 10 minutes, you'll have covered 10 kilometers. Easy stuff!
This is a system for calculating an object's position called Euler integration (named after the eighteenth century mathematician Leohnard Euler). It predicts where an object will be based on its current position and its velocity. It's widely used because it doesn't put a lot strain on the processor and it's easy to implement. It's accurate if the velocity is constant, but if the velocity changes due to friction and acceleration, it can become wildly inaccurate. In complex physics scenarios with a lot of fast-moving objects, it also has a tendency to fall apart.
Imagine that you're driving that car at 100 kilometers an hour. Your friend, Leohnard Euler, has hatched a plan to predict where your car will be next by photographing your position every 10 minutes. He needs to figure out where you're going to be next, but all he has to work from is your velocity and position at the moment he takes each photograph.
It sounds reasonable enough, but the problem is that physical forces, like friction and wind resistance, are working on your car the entire time, and Leohnard has no idea how they're affecting you between those 10-minute snapshot intervals. That means there's no guarantee that your velocity will remain constant and that you'll actually end up at the spot that Leohnard thinks you will. And what happens if you decide to pull over for coffee and a doughnut?
So poor Leohnard is in a bit of a fix. He can improve his predictions of where you'll be if he takes snapshots more frequently, such as every minute. But there's still a huge gray area. He has no way of accounting for the unexpected, like the coffee-and-doughnut scenario. (And it tends to be those coffee-and-doughnut scenarios that cause game objects to stick together or get trapped in walls.) He would need to be taking photographs between intervals of close to infinity to account for all possible forces and events if he wants his predictions to be completely accurate.
You can think of each loop of an ENTER_FRAME event as a single photograph. In a practical Flash game design scenario, if our game is running at 60 frames per second, we're taking snapshots of our game 60 times each second. If we wanted to use absolutely accurate Euler integration, we would need to set our frame rate to infinity, which obviously is impossible!
This inaccuracy alone is not a huge problem in itself, because the trade-off that you get with Euler integration is increased game performance. That's worth it. And its inaccuracy isn't noticeable in the context of a game.
Its Achilles' heel for game design is that it calculates an object's position based on its acceleration and velocity. When combined with its inherent inaccuracy, it can sometimes lead to situations where it overshoots its mark, and an object's velocity will continue to increase without any apparent reason. In other words, crazy stuff starts happening on the stage, and you can't figure out why.
Sound familiar? Let's find a solution.
The first part of the solution removes velocity from the equation. Enter Verlet integration.
Note
For deadly accurate, textbook-grade physics calculations, you may also want to consider an alternate game physics system called Runge-Kutta (RK). RK is a little more complex to implement than Verlet integration and puts quite a bit more load on the processor, so it's not a good general-purpose system for Flash game design like Verlet. But if you need precision physics, definitely look into this system. Keith Peter's AdvancED ActionScript 3.0 Animation (friends of ED, 2008) includes a good introduction to using RK with AS3.0.
Imagine now that you're out on the highway with your friend Loup Verlet. He is following you with his camera, taking a snapshot every 10 minutes. However, he doesn't actually know how fast you're driving. Instead, he uses a simple calculation to figure out your velocity.
He knows that in the first snapshot you were at the 30-kilometer mark. In the second snapshot, you were at the 40-kilometer mark. Loup subtracts 30 from 40, which is 10. That's your velocity: 10. If Loup takes six snapshots per hour, your speed is 60 kilometers per hour.
Verlet integration doesn't figure out your new position based on your velocity. Instead, it works out your velocity based on the difference between your current position and your previous position. Here's the basic Verlet formula:
velocity = currentPosition - previousPostion;
newPosition += velocity;
The most important thing to know about Verlet integration is that when you change the position of an object, you also change its velocity. This may sound like a small thing, but its implications are big:
It means that if two or more objects are colliding, they just need to change their positions, and the Verlet formula will figure out their new velocities automatically.
You still don't know what's happening to objects between snapshots. Because object-movement code is updated in fixed intervals, this is always going to be a limitation, no matter which physics system you implement. However, because Verlet integration isn't dependent on an unstable velocity variable, the inaccuracy doesn't result in unexpected changes in velocity.
The positions of the objects are modeled in your code before they're applied to the positions of objects on the stage. That means that any conflicts regarding their positions in complex collision scenarios can be tested and fixed in advance of being displayed.
Figure 1-1 illustrates the difference between Euler and Verlet integration.

A small sacrifice that we need to make to use Verlet integration in our games is slightly more complex code. We need a system for keeping track of an object's previous position, as well as a way to calculate its velocity. This isn't hard to do, but it does require a bit more planning.
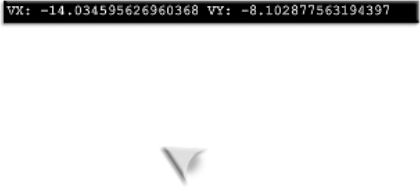
In the Chapter01 source files for this book, you'll find a folder called VerletIntegration. It's a practical example of how you can use Verlet integration for a game component: a keyboard-controlled character.
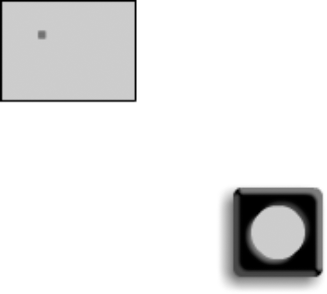
Run VerletIntergration.swf. A black square with a white circle will appear on the stage, as shown in Figure 1-2. You can move it with the arrow keys, and a status box displays its velocity. That itself is nothing to write home about, but what is important is the code that calculates the object's velocity.

The code is composed of two parts:
Player: This class contains the Verlet integration code.VerletIntegration: The main application class (also known as the document class). It adds the_playerobject to the stage, sets stage boundaries, and, most important, calls the player'supdatemethod that actually makes it move.
Let's look at the Player class first. If you've done any game design, you'll recognize most of this code, I've highlighted the core Verlet integration code in bold so you can clearly see how it's used in a practical context.
package
{
  import flash.display.*;
  import flash.events.Event;
  import flash.filters.*;
  import flash.events.Event;
  import flash.events.KeyboardEvent;
  import flash.ui.Keyboard;

  public class Player extends Sprite
  {
    private const SPEED:uint = 10;
    private var _shape:Shape;
    //Variables required for Verlet integration
    private var _previousX:Number = 0;
    private var _previousY:Number = 0;
private var _temporaryX:Number = 0;private var _temporaryY:Number = 0;public var xPos:Number = 0;public var yPos:Number = 0;public function Player():void { addEventListener(Event.ADDED_TO_STAGE, onAddedToStage); } private function onAddedToStage(event:Event):void {//Draw the playerdraw();//Add listenersaddEventListener(Event.REMOVED_FROM_STAGE, onRemovedFromStage); stage.addEventListener(KeyboardEvent.KEY_DOWN, onKeyDown); stage.addEventListener(KeyboardEvent.KEY_UP, onKeyUp);//Remove the onAddedToStageHandlerremoveEventListener(Event.ADDED_TO_STAGE, onAddedToStage); } private function onRemovedFromStage(event:Event):void { removeEventListener (Event.REMOVED_FROM_STAGE, onRemovedFromStage); } private function draw():void {//Draw the outer shapevar outerShape:Shape = new Shape(); outerShape.graphics.beginFill(0x000000); outerShape.graphics.drawRoundRect(−25, −25, 50, 50, 10, 10); outerShape.graphics.endFill(); addChild(outerShape);//Add a bevel and drop shadow and bevel filtervar outerFilters:Array = outerShape.filters;//1. Bevel filterouterFilters.push ( new BevelFilter (5, 135, 0xFFFFFF, 0.50, 0x999999, 0.50, 2, 2) );
//2. Drop shadow filterouterFilters.push ( new DropShadowFilter (5, 135, 0x000000, 0.60,10, 10) );//3. Apply the filters to the shape's filters arrayouterShape.filters = outerFilters;//Draw the inner shapevar innerShape:Shape = new Shape(); innerShape.graphics.beginFill(0xCCCCCC); innerShape.graphics.drawCircle(0, 0, 15); innerShape.graphics.endFill(); addChild(innerShape);//Add a bevel filter to the inner shapevar innerFilters:Array = innerShape.filters; innerFilters.push ( new BevelFilter (3, 315, 0xFFFFFF, 0.50, 0x999999, 0.50, 4, 4, 1, 1,"outer") ); innerShape.filters = innerFilters; } private function onKeyDown(event:KeyboardEvent):void { if (event.keyCode == Keyboard.LEFT) { vx = -SPEED; } if (event.keyCode == Keyboard.RIGHT) { vx = SPEED; } if (event.keyCode == Keyboard.UP) { vy = -SPEED; } if (event.keyCode == Keyboard.DOWN) { vy = SPEED; } }
private function onKeyUp(event:KeyboardEvent):void
    {
      if (event.keyCode == Keyboard.LEFT
      || event.keyCode == Keyboard.RIGHT)
      {
        vx = 0;
      }
      if (event.keyCode == Keyboard.UP
      || event.keyCode == Keyboard.DOWN)
      {
        vy = 0;
      }
    }

    //The update function is called by the application class's
    //onEnterFrame event
    public function update():void
    {
    //Verlet integration in action:
    //1. Temporarily store the current x and y positions
    _temporaryX = xPos;
    _temporaryY = yPos;

    //2. Move the object
    xPos += vx;
    yPos += vy;

    //3. The position before the object was moved becomes the
    //previous position, which is used calculate velocity
    _previousX = _temporaryX;
    _previousY = _temporaryY;
    }

    //Getters and setters
    //vx
    public function get vx():Number
    {
    return xPos - _previousX;
    }
    public function set vx(value:Number):void
    {
    _previousX = xPos - value;
    }

    //vy
    public function get vy():Number
    {
    return yPos - _previousY;
    }
public function set vy(value:Number):void{_previousY = yPos - value;}//setXpublic function set setX(value:Number):void{_previousX = value - vx;xPos = value;}//setYpublic function set setY(value:Number):void{_previousY = value - vy;yPos = value;}} }
You'll notice that nowhere does this code refer to the x and y sprite properties. The position of the object is being worked out abstractly. The object's current x and y positions are represented by these variables:
xPos;
yPos;
It's the job of the main application class, VerletIntegration, to actually move the object. It does this by calling the Player's update method every frame. It then applies the _xPos and _yPos values to the _player sprite's actual x and y properties. You'll see how it does this in the pages ahead, but here's what the Player class's update method looks like:
public function update():void
{
  _temporaryX = xPos;
  _temporaryY = yPos;

  xPos += vx;
  yPos += vy;

  _previousX = _temporaryX;
  _previousY = _temporaryY;
}
Verlet integration works by comparing the difference between where the object is now with where it was in the previous frame. The first thing the code does is capture the object's current position:
_temporaryX = xPos;
_temporaryY = yPos;
The code temporarily stores the current position in its pristine state, before any changes are made to it.
Next, the object is moved according to the velocity.
xPos += vx;
yPos += vy;
Where are the vx and vy velocity values coming from? Not from a private variable, but from public getters:
public function get vx():Number
{
  return xPos - _previousX;
}
public function get vy():Number
{
  return yPos - _previousY;
}
Here's the key to understanding Verlet integration: The velocity isn't stored as a variable. It's being dynamically calculated by subtracting the object's previous position from its current position. That's the job of the vx and vy getters.
The velocity is set by pressing the arrow keys. But even then, its value isn't stored. It's calculated in real-time based on the current and previous positions:
public function set vx(value:Number):void
{
  _previousX = xPos - value;
}
public function set vy(value:Number):void
{
  _previousY = yPos - value;
}
So when the velocity is being set, it's actually just modifying the _previousX and _previousY variables, which in turn are used to calculate velocity.
The last thing the update method does is to copy the temporary positions, which record the position of the object before it was adjusted by velocity, into the _previousX and _previousY variables:
_previousX = _temporaryX;
_previousY = _temporaryY;
_previousX and _previousY will now be used in the next frame as the object's previous position.
Thanks to this bit of clever programming acrobatics, we can refer to the object's velocity without needing to store it as a variable. We've essentially taken velocity out of the equation, and this will make our physics code much more stable.
The benefits of this approach are not obvious in this simple example. In fact, if all you wanted to do was move an object around the stage with a keyboard, Euler integration would probably be a better choice, because the code would be much simpler. Using Verlet integration really pays off in physics simulations with multiple objects interacting, as you'll see in the chapters ahead. But it's important for you to understand how Verlet integration works in a simple example before we start building in more complexity.
As I mentioned earlier, an interesting feature of Verlet integration is that whenever you change the object's position, you're also going to change its velocity. This line of code, which changes the object's position, will also affect its velocity:
xPos = 10;
It will move the object to an x position of 10 on the stage, but it will also automatically set vx to 10.
It may seem like a small thing, but the fact that you can reposition the object and affect its velocity simultaneously will greatly simplify your code and reduce the amount of debugging you'll need to do.
There is one drawback to this. Let's say you want to position an object in the center of the stage, like this:
xPos = 275;
yPos = 200;
This will also set the vx to 275 pixels per frame, and vy to 200 pixels per frame. Can you imagine what will happen? You'll see little more that a flicker of the object on the stage before it flies off at an impossible speed!
This means that we need to come up with way to reposition the object on the stage without changing its velocity. The Player class has setters called setX and setY that do just that.
public function set setX(value:Number):void
{
  _previousX = value - vx;
  xPos = value;
}
public function set setY(value:Number):void
{
  _previousY = value - vy;
  yPos = value;
}
setX and setY neutralize the _previousX and _previousY values so that the velocity isn't affected by a change of position. Use setX and setY to reposition objects on the stage.
The Player class doesn't actually do the job of animating the object. It doesn't have an ENTER_FRAME event or even reference its x and y sprite positions. How does the player object actually move?
At the beginning of the chapter, I mentioned some very important things your code should do to be reliable and easy to debug:
ENTER_FRAMEevents should be centralized. You should have only one that controls all the objects in the entire game.First, model the object's position abstractly. Then use that abstract model to apply it to the object's real position on the stage.
Here's how our two classes work together to do this:
The
Playerclass models its position with thexPosandyPosproperties.The
VerletIntegrationclass'senterFrameHandlercalls the_player'supdatemethod. This runs the Verlet motion engine and finds the_player's newxPosandyPosproperties.The
xPosandyPosvalues are applied to the_player'sxandysprite properties. This is what actually changes the position of the_playerobject on the stage.
Figure 1-3 illustrates how this works.
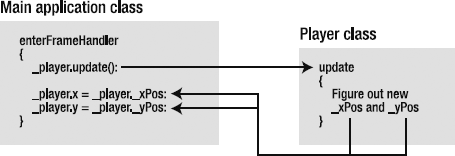
The VerletIntegration class uses that model to move the object within its ENTER_FRAME event by calling the _player object's update method.
VerletIntegration is the main application class. If you're using Flash Professional, you'll recognize it right away as the beloved document class. It's the first class called by the program, and it's used to get the program running, instantiate the first objects, and import and coordinate all the other classes. Here's what it looks like:
package
{
  import flash.events.Event;
  import flash.display.Sprite;
  import com.friendsofed.utils.StatusBox;
  import com.friendsofed.utils.StageBoundaries;

  [SWF(backgroundColor="0xFFFFFF", frameRate="60",
  width="550", height="400")]

  public class Mainextends MovieClip
  {
    private var _player:Player;
    private var _status:StatusBox;

    public function VerletIntegration()
    {
      _player = new Player();
      addChild(_player);

    //Set the _player object's position on the
    //stage without affecting its velocity
      _player.setX = 275;
      _player.setY = 200;

      _status = new StatusBox();
      addChild(_status)

      addEventListener(Event.ENTER_FRAME,enterFrameHandler);
    }

    private function enterFrameHandler(event:Event):void
    {
      //1. Update the player position
      _player.update();

     //2. Check collisions (like stage boundaries)
      StageBoundaries.stop(_player, stage);

     //3. Move the player's position
      _player.x = _player.xPos;
      _player.y = _player.yPos;

     //4. Display player's velocity in the status box
      _status.text = "VX: " + _player.vx + " VY: " + _player.vy;
    }
  }
}
I've commented the most important bits of code, but let's take a close look at how all the pieces fit together.
Two custom classes are imported: StatusBox, which displays the velocity, and StageBoundaries, which stops the player object at the edges of the stage. Both of these classes are imported from the utils folder in the com/friendsofed folder.
import com.friendsofed.utils.StatusBox;
import com.friendsofed.utils.StageBoundaries;
The compiler will look for the com folder based on the classpath you set in Flash Professional or Flash Builder, or the source path you included in the flex-config.xml file. If you followed my suggestion for setting this up (in this book's introduction), its location is absolute. The compiler will know where on your computer to look for these folders and classes.
Next, the code creates the _player object from the Player class and uses addChild to display it on the stage. We want to set the _ player object in the center of the stage when the SWF first runs. However, remember that, because we're using Verlet integration, as soon as we change the object's position, we also change its velocity.
We can't position the object like this:
_player.xPos = 275;
_player.yPos = 200;
This would give it an x velocity of 275 and a y velocity of 200. If the stage boundaries weren't set, we might just see a briefly flicker as it flashes of the edge of the stage at light speed toward the Planet X. If that sounds strangely appealing to you, however, go ahead and try it!
Instead, the code uses the Player class's special setX and setY setters to position it without affecting its velocity.
_player.setX = 275;
_player.setY = 200;
The enterFrameHandler controls all the action. First, it calls the _player's update method.
_player.update();
The
_playerobject calculates its new velocity.It sets the
_player'sxPosandyPosproperties, which tell the player where it should go next.
Before the code visually changes the position of the _player object on the stage, it's important to check to see whether its new xPos and yPos values cause it to collide with any other objects. This allows us to resolve any positioning conflicts before the result is displayed.
In this example, the collision we're checking for is with the edge of the stage. The custom StageBoundaries class has a static method called stop that does this for us.
static public function stop(object:Object, stage:Object):void
{
  if (object.xPos + (object.width* 0.5) > stage.stageWidth)
  {
    object.setX = stage.stageWidth - (object.width* 0.5);
    object.vx = 0;
  }
  else if (object.xPos - (object.width * 0.5) < 0)
  {
    object.setX = 0 + (object.width* 0.5);
    object.vx = 0;
  }
  if (object.yPos - (object.height* 0.5) < 0)
  {
    object.setY = 0 + (object.height* 0.5);
    object.vy = 0;
  }
  else if (object.yPos + (object.height* 0.5) > stage.stageHeight)
  {
    object.setY = stage.stageHeight - (object.height* 0.5);
    object.vy = 0;
 }
}
As you can see, it's pretty run-of-the-mill stage boundary code. But what's important to notice is that it's not changing the position of the object on the stage. It's just modifying the _player object's position and velocity properties. That means that if the code finds out that _player has actually overshot the stage boundaries, it can make a correction before any other collision code runs or the result is displayed. And because we're using Verlet integration, it also automatically adjusts velocity.
After fine-tuning the _player object's position, it's visually placed on the stage based on the final values of its xPos and yPos properties.
_player.x = _player.xPos;
_player.y = _player.yPos;
What you now have is a centralized system for deciding the order in which collisions are checked and resolved. In a complex game, this is vital in making sure that your system is stable.
Even in this simple example, you can see how important a centralized system is by making a small change to the code in the enterFrameHandler. Switch the code order so that the StageBoundaries.stop method runs after the _player's x and y positions are adjusted.
_player.x = _player.xPos;
_player.y = _player.yPos;

StageBoundaries.stop(_player, stage);
Now compile and run the SWF. Use the arrow keys to move the _player object to the edge of the stage. It overshoots by 10 pixels, which is its velocity. Figure 1-4 shows what you'll see.

Figure 1.4. Every game designer's worst nightmare! If you change the order in which the code runs, the stage boundary collision appears to be off by one frame.
This is why collision objects get stuck together or collisions can seem maddeningly off by one frame. By running after the _player object's position changed, the stage boundary collision code is using the _player's position data for the next frame.
If you have different ENTER_FRAME events running in different objects, you have no way of controlling the order that the code runs, and these kinds of problem crop up all the time. By centralizing the control system, as we've done in this example, you can test and fine-tune the order that objects should check collisions and correct their positions.
Over the course of the next few chapters, we're going to fine-tune and formalize this control system.
With Verlet integration, we have the physics equivalent of a Zonda or Lamborghini parked in our driveway, but so far haven't taken it for more than quick spin around the block. Let's take it onto the highway and rev the engine a bit.
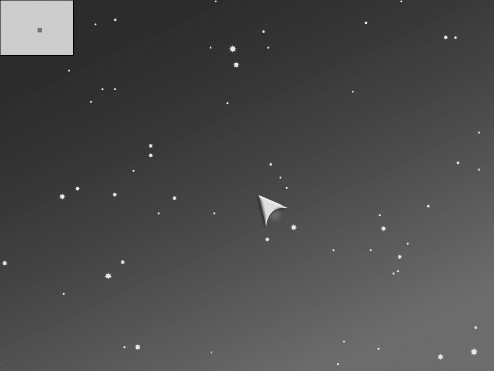
Browse to the VerletSpaceShip folder in the chapter's source files and run the spaceShip.swf file in the bin folder. It's a spaceship that you can fly around the stage with the arrow keys, as shown in Figure 1-5. The ship wraps when it reaches the edges of the stage.
Unlike the simple square block in the previous example, this is a full-blown physics model, including acceleration and friction, based on Verlet integration. Most of the code is very similar to the spaceship code covered in Chapter 10 of Foundation Game Design with Flash (friends of ED, 2009). If you've read that book or done similar motion-based animation, much of it will be familiar. A very important change is that it has been adapted to run the same Verlet physics engine that we have been exploring here.
The SpaceShip class is quite long, but most of it is used for drawing the ship. We'll take a close look how the graphics for the ship were created in the "A crash course in the drawing API" section later in this chapter. Here, we're interested in how the spaceship speeds up and slows down using acceleration and friction.
When the player presses the up arrow key, the _acceleration variable is increased by 0.2, and _friction gets a value of 1, which means no friction. This allows the ship to accelerate freely, without additional drag. To slow down an object, you need to multiply an object's velocity by a value less than 1. When the up key is released, acceleration is set to 0 and friction is set to 0.96, which when multiplied by velocity will give us a number we can use to gradually slow down the spaceship.
private function keyDownHandler(event:KeyboardEvent):void
{
  if (event.keyCode == Keyboard.LEFT)
  {
    rotationSpeed = −10;
    }
    if (event.keyCode == Keyboard.RIGHT)
    {
      rotationSpeed = 10;
    }
    if (event.keyCode == Keyboard.UP)
    {
      acceleration = 0.2;
      friction = 1;
      thrusterFired = true;
      _thrusterShape.visible = true;
    }
  }

  private function keyUpHandler(event:KeyboardEvent):void
  {
    if (event.keyCode == Keyboard.UP)
    {
      acceleration = 0;
      friction = 0.96;
      thrusterFired = false;
      _thrusterShape.visible = false;
    }
    if(event.keyCode == Keyboard.LEFT
    || event.keyCode == Keyboard.RIGHT)
    {
      rotationSpeed = 0;
    }
  }
The update method takes those values and mixes them into the vx and vy velocity calculations:
public function update():void
{
  //Temporarily store the current x and y positions
  temporaryX = xPos;
  temporaryY = yPos;

  //Calculate the rotationValue
  rotationValue += rotationSpeed;
//Calculate the angle and acceleration_angle = rotationValue * (Math.PI / 180); _accelerationX = Math.cos(_angle) * acceleration; _accelerationY = Math.sin(_angle) * acceleration; frictionX = vx * friction; frictionY = vy * friction;//Speed trap: Stop the object moving//if the up arrow isn't being pressed//and its speed falls below 0.1if(!thrusterFired) { if((Math.abs(vx) < 0.1) && (Math.abs(vy) < 0.1)) { _accelerationX = 0; _accelerationY = 0; frictionX = 0; frictionY = 0; } }//Apply acceleration to the positionxPos += _accelerationX + frictionX; yPos += _accelerationY + frictionY;//The temporary values become the//previous positions, which are used calculate velocitypreviousX = temporaryX; previousY = temporaryY; }
This is a very good example of how Verlet integration is typically used. Physical forces, like friction and acceleration, are just added to the object's position:
xPos += _accelerationX + _frictionX;
yPos += _accelerationY + _frictionY;
It's very readable in a common-sense way. It says, "The object's position is the result of a combination of acceleration and friction."
If you had any more physical forces, you could simply add them in the same way.
xPos += _accelerationX + frictionX + wind;
yPos += _accelerationY + frictionY + gravity;
This is a very elegant way of dealing with physics. See, physics can be easy!
And nowhere is the object looking to its velocity to help it figure out where to move next. The only place velocity is explicitly referenced is to work out friction.
frictionX =vx* friction; frictionY =vy* friction;
But even that's unnecessary. You could remove all references to vx and vy completely if you wanted to do that. You could just as easily use a line of code that looks like this:
frictionX = (xPos - previousX) * friction;
frictionY = (yPos - previousY) * friction;
Our little velocity engine is running quietly in the background, and the code really doesn't need to directly interact with it in any way.
The main application class, VerletSpaceShip, makes the spaceship move. Its enterFrameHandler is almost identical to our first example. The only differences are that the ship's rotation is adjusted and that the code is using the StageBoundaries.wrap method to create the stage-wrapping effect. (Take a look at comfriendsofedStageBoundaries.as if you're curious to see how it works.)
private function enterFrameHandler(event:Event):void
{
  //1. Update the player position
  _spaceShip.update();

  //2. Check collisions
  StageBoundaries.wrap(_spaceShip, stage);

  //3. Move the ship
  _spaceShip.x = _spaceShip.xPos;
  _spaceShip.y = _spaceShip.yPos;
  _spaceShip.rotation = _spaceShip.rotationValue;

  //4. Display the ship's velocity in the status box
  _status.text = "VX: " + _spaceShip.vx + " VY: " + _spaceShip.vy;
}
If this is the first time you've used Verlet integration, it's probably going take a bit of mental rewiring before you feel confident using it in your own games. Now might be a good time to take a short break from this chapter and see if you can rewrite one of your favorite player control systems using this technique. It works for any moving object and, as you'll see in the chapters ahead, it will become an essential part of a stable game physics system.
The simple system that we're using so far has actually brought us quite a long way in solving the two big game design pitfalls that I listed at the beginning of the chapter. Our game events are now centralized, and we're modeling and testing game data before displaying the result on the stage. "Yay! Programmers, one— bugs, zero!"
Not bad, but to keep our score up, we need to go one better.
A few pages earlier, I described a big problem that faces game animation: We know where objects are and where they're going at specific snapshots in time, but we don't know what they're doing between each snapshot.
To build a really robust system, we need our game objects to tell us if something happens to them between snapshots. So even if we're not watching them or expecting them to change, they should be able to tell us if they do.
We can do this by implementing a design pattern called Model-View-Controller (MVC). In addition to having a wonderfully thematic science-fiction sounding name, MVC is not only the great granddaddy of design patterns, but it's also probably the single most useful design pattern for games. If you take the time to learn only one pattern, then MVC should be it.
Note
Design patterns are ways of organizing code into well-defined sections and responsibilities. The sections communicate with each other using the rules defined by the pattern they follow. Programmers love using them because each pattern has been bomb-proofed and battle-hardened by years of development and testing. If you choose the right pattern for the right problem and implement it correctly, your games and programs will be much easier to maintain and debug.
There are loads of design patterns to choose from, and each is specialized for solving a particular type of problem. For example, if you need to make a lot of invading carnivorous dandelions sprouting from the ground in your platform game, you could use the Factory pattern. If you want a global control center for your game to manage the score and track all the dandelions that your game hero has trampled, you can use a Singleton pattern. If you are making a complex puzzle game with switches and levers that must be set in just the right position, the State pattern might work well for that. You need to have a fairly advanced understanding of OOP to be able to use design patterns confidently, but you'll surely have that confidence by the end of this book. Some excellent books on using patterns with AS3.0 are available, including Object-Oriented ActionScript 3.0 by Todd Yard, Peter Elst, and Sas Jacobs (friends of ED, 2007).
If you think carefully about the spaceship we built in the previous example, you'll realize that what it does and how it behaves can be broken up into three parts:
Model: All the data it contains, including acceleration, velocity, rotation speed, angle, and any nonvisual information that the spaceship needs to move. This would include all the getters and setters. It can also include the
updatemethod that processes that data internally.View: Anything you can see on the stage, as well as the keyboard controls you use to move the ship. It's anything that the player can directly interact with.
Controller: All the logic that works out how user interaction should change the spaceship's data. For example, the controller deals with an issue like this: The player pressed the up arrow key, so let's set friction to 1 and the acceleration to 0.2.
MVC is a system that divides these responsibilities among three classes. (Often the view and controller can be part of the same class, but for learning purposes, it's better to separate them until you have a little more experience using MVC.)
In our spaceship example, all of these responsibilities have been jumbled up together in one class. There's nothing wrong with this, because it works perfectly. However, our design is completely rigid and will be very difficult to change or extend. If we want to add a feature, we'll need to navigate a tangled rats' nest of code and hope that our rewiring job doesn't mess up everything else.
For example, what if we decided that we actually want the ship to be controlled by the mouse instead of the keyboard? We would need to rewrite that section of the class, and then carefully recode the rest of the ship's properties. But if we had designed our ship according to the MVC framework, we could simply swap in a mouse-control system with one line of code. It would work with the rest of the ship's data automatically, without requiring us to rewrite any code. And we could also switch back to the original keyboard-control system at any time, if we decided that was the way to go.
Now let's imagine that after building this spaceship, we realize that we can use the same motion engine for our enemy ships as well. The enemy ships will behave the same way, but will look different and be controlled by an artificial intelligence (AI) script instead of the keyboard. The spaceship code is more than 300 lines long. It's going to be a tedious and complex job to extract the basic engine and rebuild it. But if we use an MVC framework, the ship's engine will be a completely separate component, and all we will need to do is snap on the ship's graphics to make a completely new type of ship. The AI system will be a separate system as well, so we can mix and match it with whatever different types of ships we have to see which combination we like best.
If we divide our objects between these three components—the model, the view, and the controller—how do they communicate with each other?
The model dispatches a
CHANGEevent when its data changes.The view builds its visual display based on data from the model. The view also listens for changes in the model's data. When it detects that data changes, it automatically makes changes to its visual display to match those changes. For example, if the spaceship model tells the view that its rotation value has changed, the view rotates the spaceship to match the model's value. The view also captures user interaction, such as text input or mouse clicks, and sends that information to the controller.
The controller processes the user input that is sent to it from the view, figures out what to do with it, and updates the model based on this analysis. For example, if the view tells the controller that the left arrow key is being pressed, the controller figures out that this means "rotate the ship to the left." It then tells the model to change its rotation value.
Figure 1-6 is a simple diagram of how an MVC system works.

The MVC is programming's answer to Mr. Potato Head. You can mix and match views, models, and controllers in any combination. You're going to love using it when you see how much flexibility it will give your design.
Let's see how MVC works in a real ActionScript 3.0 (AS3.0) application. In the chapter's source files, you'll find a folder called BasicMVC. Run the SWF file and press the arrow keys. A status box displays the name of the key you've pressed, as shown in Figure 1-7. It's an example of what is just about the most basic MVC application that can be written.
Figure 1.7. When you press an arrow key, the view informs the controller, the controller updates the model, and the view reads the new data from the model.
We're going to take a careful look at this simple application because if you understand it, you'll understand all MVC systems, no matter how much larger or more complex they appear.
Before we look at the code itself, let's see how the code is structured, as shown in Figure 1-8.

BasicMVC is the main application class. It imports the model, view, and controller from the mvc package. It instantiates them and composes them in just the right way so that they work together. These are the most important lines of code in the BasicMVC class:
_model = new Model();
_controller = new Controller(_model);
_view = new View(_model, _controller);
addChild(_view);
You can see here that the controller has access to the model because it's being fed a reference to the model in its constructor argument:
_controller = new Controller(_model);This makes the model part of the controller's DNA, and the controller can use this reference to the model anywhere in its class. To help visualize this, think of the model as a kind a parasitic worm that has infected the controller and is living inside it. OK, maybe don't visualize it then! But anyway, this is a very cool OOP technique called composition.
Composition is also used to feed the view references of the model and controller:
_view = new View(_model, _controller);The view can now use the model and controller anywhere in its class.
If your mind is anything like mine, you might find it difficult to understand how the pieces of this puzzle all fit together, especially if the code is spread across three different classes. To help with what is the most crucial stage in the learning curve to understanding the MVC, take a look at Figure 1-9, also known as The Monster Diagram. It shows all the classes on one page and how they communicate with each other. You can follow the path the communication takes, from 1 to 5, to see how information flows through the system. (To save space, I've omitted the package block, import directives, variable declarations, and a few other small details, but the most important code from each class is shown.)
The best way to read this diagram is to have the BasicMVC.swf file running in front of you. Press one of the arrow keys, and then follow the information flow in the diagram. See if you can match up in your mind what you see on the stage with what you see in the diagram.
This diagram is the Rosetta Stone for understanding the MVC. Take as much time as you need to with it before continuing with this chapter. Really, I'm not going anywhere! When you get your "Aha!" moment, read on!

The view's constructor accepts two parameters: the model and controller objects:
public function View(model:Object, controller:Object):void
{..
It needs references to them so that it can read data from the model and send the controller requests to process user input.
The view copies the value of the model parameter into its _model variable, and adds a CHANGE event listener to it.
_model = model;
_model.addEventListener(Event.CHANGE, changeHandler);
Now, whenever the model dispatches a CHANGE event, the view's changeHandler will be called. This is a key feature of MVC, and one of the things that makes it such a robust system. It means that the view will automatically synchronize with the model. This takes care of our "in-between-snapshots" problem. The program doesn't need to monitor or babysit the view, because the view always knows the model's current state and is able to update itself accordingly.
The view's other job is to accept user interaction, like key presses.
public function keyDownHandler(event:KeyboardEvent):void
{
  _controller.processKeyPress(event);
}
But the view shouldn't make any decisions about what to do with this input. Its job is just to dutifully pass the information along to the controller. In this example, the event property (which is a KeyboardEvent) is being passed to the controller's processKeyPress method.
Note
Confusingly, user input, like key presses, is regarded as a type of "view." If you used sound in an MVC system, it would also be considered a view. You can think of the view as encompassing any sense that you use to interact with the game, such as sight, touch, and sound.
It's also very common in an MVC system to divide these different types of views into separate classes. For example, you might have two view classes for a spaceship: one for the visual design of the ship and another view for the keyboard input. Even though the work would be distributed between two view classes, they would share the same model and same controller. You'll need to decide for each project how many views you'll have, depending on how much flexibility you'll want to mix and match them.
It's very important that the view not make any logical decision about user input so that the MVC system remains modular. The view can, however use logic to help it display the model's data. If you were making a charting application, for example, the view would need to use some pretty complex logic to graph the model's data.
Although the controller accepts information from the view, it doesn't need to know any other information about it. It does need to know about the model, however, and so it's passed a reference to the model as a constructor parameter:
public function Controller(model:Object):void
{...
The controller has one method: processKeyPress. The view has been written so that when the user presses the keys, it sends the KeyboardEvent to the controller's processKeyPress method.
public function processKeyPress(event:KeyboardEvent):void
{...
The controller uses this event to figure out which key is being pressed.
public function processKeyPress(event:KeyboardEvent):void
{
  switch (event.keyCode)
  {
    case Keyboard.LEFT:
      _model.direction = "Left";
      break;

    case Keyboard.RIGHT:
      _model.direction = "Right";
      break;

    case Keyboard.UP:
      _model.direction = "Up";
      break;

   case Keyboard.DOWN:
     _model.direction = "Down";
     break;
  }
}
(Because the controller refers to keyboard events and key codes, it also needs to import flash.events.KeyboardEvent and flash.ui.Keyboard.)
The controller's job is to handle all the logic and to change the model's properties. And because the view is listening for CHANGE events on the model, the view is automatically updated as well.
A feature of the Model class is that because it doesn't display anything on the stage, it doesn't need to extend Sprite or MovieClip. Instead, it extends EventDispatcher:
public class Model extends EventDispatcher
{...
The model's main job is to store data and dispatch events when the data changes.
The model doesn't need to know anything about the view or controller; it is completely independent from them. It isn't passed a reference to either of them in its constructor:
public function Model()
{...
It's this independence that that makes the MVC system so flexible. It means that other views can share this model, and other controllers can modify it. You can think of the model as a central hard drive full of data that other computers on a network can read.
When the controller sets any of the model's properties, the model dispatches a CHANGE event:
public function set direction(value:String):void
{
  _direction = value;
  dispatchEvent(new Event(Event.CHANGE));
}
This is like shouting out to the rest of the program, "Hey guys, I've updated one of my properties! If you're listening, you better make sure that you've got the right value!" However, the model doesn't know or care who is listening.
Because the view has subscribed to listen to CHANGE events in the model, the view knows about this change and calls its changeHandler. This keeps the view and model completely synchronized.
Is your brain feeling ready to explode yet? If you're new to using MVC or juggling data between many classes, this can be a lot to absorb all at once. Now might be a good time to take a short break from this chapter, and make some modifications to this example to help you get a better sense of how MVC works.
One simple change you can try to make on your own is to use the arrow keys to change the x and y position of the status box on the stage, as shown in Figure 1-10. Here's a hint: A well-placed switch statement in the view class might be all you need to make this work. You'll find the solution in the MoveKeyboardMVC folder.

As a more challenging puzzle, you can try to make the status box display the x and y position of the mouse, as shown in Figure 1-11. You will need to import the flash.events.MouseEvent class and use the stage.mouseX and stage.mouseY properties to find the mouse's position. You will also need to import the flash.events.MouseEvent class into both the view and controller. The controller will need to use the stage.mouseX and stage.mouseY properties to find the mouse's position. The only problem is that mouseX and mouseY are properties of the stage. The only class that has access to the stage is the view. (The view has been added to the stage with addChild, by the application class, unlike the model and controller.) That means the view will need to send the controller a reference to the stage. Let's consider how to do that.
The view will first need to create a property called _stage so that it can store a local reference to the stage:
private var _stage:Object;
The view will need to initialize it to the value of stage in the addedToStageHandler:
public function addedToStageHandler(event:Event):void
{
  _stage = stage;
}
You'll need to add a MOUSE_MOVE event handler in the view to listen for changes to the mouse's position. This also needs to be added to the stage object in the addedToStageHandler:
public function addedToStageHandler(event:Event):void
{
  _stage = stage;
  stage.addEventListener(MouseEvent.MOUSE_MOVE, mouseMoveHandler);
}
The controller will need to have access to the stage object. But the controller is never added to the stage, so it can't access the stage object directly. That means the view must pass it a reference to stage when it asks the controller to figure out the mouse's position. You might end up with a method that looks like this:
public function mouseMoveHandler(event:MouseEvent):void
{
  _controller.processMouseMove(event, _stage);
}
Notice how the _stage is passed as a parameter to the controller's processMouseMove method. This will let the controller access the stage and all of its properties.
Make sure that the controller's processMouseMove method is set up to accept those parameters:
public function processMouseMove
  (event:MouseEvent, stage:Object):void
{...
That should be enough to get you started. If you get stuck, you'll find the solution in the DisplayMouseMVC folder.
These will be good little puzzles for you to solve. They will help you to become more comfortable using the MVC framework.
The previous MVC example was important to look at to understand how the MVC pattern works, but it's rather useless from a practical game design point of view. How can we take these MVC principles and apply them to a real-world problem, like building a keyboard-controlled player character?
Let's take the Verlet player control system that we started earlier in this chapter and fuse it with the MVC framework. And to show you just how easy it is to extend an MVC system, this next example uses two views that share the same model data.
Run PlayerMVC.swf in the PlayerMVC folder in the chapter's source files, and you'll see something like Figure 1-12. You can move the square around the stage with the keyboard, and the map in the top-right corner tracks the square's position at 1/15 scale. It's the kind of map display you've seen used in countless games, and it is especially useful for displaying the player's position in a large game world.
It was easy to add this map with MVC, because the map is just another view. It reads data from exactly the same model as the player's view. Take a look at the main application class, PlayerMVC, and you'll see the code that composes the objects:
_model = new PlayerModel(); _controller = new PlayerController(_model); _view = new PlayerView(_model, _controller); addChild(_view);_map = new MapView(_model);addChild(_map);
The model is just fed into the map's constructor. And that's all—it just works! The map is completely independent from the player's view and controller, and would work perfectly even if they didn't exist. This is why using an MVC framework makes it so easy to change and extend your game without breaking code that's already working. The map has no dependency on any other classes. And, in fact, you could feed it a completely different model, and it would work fine.
Let's look at the code that makes this example work. There's a lot code here, but don't let that scare you. The principals are exactly the same as the first MVC example. When you start building your own MVC-based control system, you'll find this a handy reference. You may want to just glance at Figure 1-9 (the Monster Diagram!) for a reminder of the way the classes communicate. Exactly the same communication is happening in this new example, except there are many more properties involved.
There are a few very important things you need to note about the model. One is that height and width are two of its properties. The view uses these to figure out what size to draw itself.
But aren't height and width visual things you see on the stage? Shouldn't they be part of the View class rather than the Model class?
Height and width are actually a kind of data, so they should be part of the model. The model doesn't make any decisions about how that data is displayed. The view's job is to decide how to use that data to make something visible on the stage. The model's job is to store this kind of "visual data." You'll see many more examples of this in the chapters ahead.
Also note that the update method, which figures out velocity based on the Verlet formula, is part of the model. In an MVC system, models can contain methods that process some of their internal data. For example, a model could contain a method that does a basic number conversion, like formatting a date.
The update method uses the public xPos and yPos properties, not the private ones (_xPos and _yPos). This is very important because it means that when those properties are set, the CHANGE event will be dispatched.
Apart from that, most of this class is just composed of getters and setters.
package player
{
  import flash.events.Event;
  import flash.events.EventDispatcher;

  public class PlayerModel extends EventDispatcher

  {
    private const SPEED:uint = 10;
    private var _xPos:Number = 0;
    private var _yPos:Number = 0;
    public var temporaryX:Number = 0;
    public var temporaryY:Number = 0;
    public var width:Number = 50;
    public var height:Number = 50;
    public var previousX:Number = 0;
    public var previousY:Number = 0;

    public function PlayerModel():void
    {
    }

    public function update():void

    {
      //Verlet integration
      temporaryX = xPos;
      temporaryY = yPos;
xPos += vx;
yPos += vy;
previousX = temporaryX;
previousY = temporaryY;
}
//Getters and setters
//vx
public function get vx():Number
{
return xPos - previousX;
}
public function set vx(value:Number):void
{
previousX = xPos - value;
}
//vy
public function get vy():Number
{
return yPos - previousY;
}
public function set vy(value:Number):void
{
previousY = yPos - value;
}
//xPos
public function get xPos():Number
{
return _xPos;
}
public function set xPos(value:Number):void
{
_xPos = value;
dispatchEvent(new Event(Event.CHANGE));
}
//yPos
public function get yPos():Number
{
return _yPos;
}public function set yPos(value:Number):void
{
_yPos = value;
dispatchEvent(new Event(Event.CHANGE));
}
//setX
public function set setX(value:Number):void
{
previousX = value;
//Sets the public xPos setter
//which forces the CHANGE event
//to be dispatched
xPos = value;
}
//setY
public function set setY(value:Number):void
{
previousY = value;
//Sets the public yPos setter
//which forces the CHANGE event
//to be dispatched
yPos = value;
}
//speed
public function get speed():uint
{
return SPEED;
}
}
}The PlayerView uses the model's data to draw and position itself. The PlayerModel contains height and width properties that give the PlayerView its dimensions. The view uses these values to draw its outside rectangle shape in this line of code:
outerShape.graphics.drawRoundRect
  (
    -(_model.width * 0.5),
    -(_model.height * 0.5),
_model.width, _model.height,
10,
10
);It also scales the inner circle shape to match:
innerShape.graphics.drawCircle(0, 0, _model.width * 0.25);
The rest of the PlayerView class is identical to the code earlier in the chapter. The only differences are the two lines highlighted in the preceding code.
The PlayerView also keeps its position synchronized to the model when the model dispatches a CHANGE event.
private function changeHandler(event:Event):void
{
  this.x = _model.xPos;
  this.y = _model.yPos;
}
Because it has subscribed to listen to changes in the model's values, any changes in the model will automatically affect the view.
Here's the PlayerView class:
package player
{
  import flash.display.*;
  import flash.events.Event;
  import flash.filters.*;
  import flash.events.Event;
  import flash.events.KeyboardEvent;
  import flash.ui.Keyboard;

  public class PlayerView extends Sprite
  {
    //Object that contains the player model
    private var _model:Object;

    //Object that contains the player controller
    private var _controller:Object;

    public function PlayerView(model:Object, controller:Object)
    {
      _model = model;
      _controller = controller;
//Listen for changes on the model.//The event handler that reacts to changes//in the model's value is below_model.addEventListener(Event.CHANGE, changeHandler); addEventListener(Event.ADDED_TO_STAGE, onAddedToStage); } private function onAddedToStage(event:Event):void {//Draw the playerdraw();//Add listenersstage.addEventListener(KeyboardEvent.KEY_DOWN,onKeyDown); stage.addEventListener(KeyboardEvent.KEY_UP,onKeyUp);//Remove this listenerremoveEventListener (Event.ADDED_TO_STAGE, onAddedToStage); } private function onKeyDown(event:KeyboardEvent):void { _controller.processKeyDown(event); } private function onKeyUp(event:KeyboardEvent):void { _controller.processKeyUp(event); } private function draw():void {//Draw the outer shapevar outerShape:Shape = new Shape(); outerShape.graphics.beginFill(0x000000); outerShape.graphics.drawRoundRect ( -(_model.width * 0.5), -(_model.height * 0.5), _model.width, _model.height, 10, 10 ); outerShape.graphics.endFill(); addChild(outerShape);//Add a bevel and drop shadow and bevel filtervar outerFilters:Array = new Array(); outerFilters = outerShape.filters; outerFilters.push
(
        new BevelFilter
        (
          5, 135, 0xFFFFFF, 0.50, 0x999999, 0.50, 2, 2
        )
      );
      outerFilters.push
      (
        new DropShadowFilter
        (
          5, 135, 0x000000, 0.60, 10, 10
        )
      );
    outerShape.filters = outerFilters;

    //Draw the inner shape
    var innerShape:Shape = new Shape();
    innerShape.graphics.beginFill(0xCCCCCC);
    innerShape.graphics.drawCircle(0, 0, _model.width * 0.25);
    innerShape.graphics.endFill();
    addChild(innerShape);

    //Add a bevel and drop shadow and bevel filter
    var innerFilters:Array = new Array();
    innerFilters = innerShape.filters;
    innerFilters.push
      (
        new BevelFilter
        (
          3, 315, 0xFFFFFF, 0.50, 0x999999,
          0.50, 4, 4, 1, 1, "outer"
        )
      );
    innerShape.filters = innerFilters;
    }

    //When the model changes its values,
    //it fires a CHANGE event which triggers
    //this changeHandler event handler
    private function changeHandler(event:Event):void
    {
      this.x = _model.xPos;
      this.y = _model.yPos;
    }
  }
}
The PlayerController analyzes the keyboard input and sets the PlayerModel's vx and vy based on its speed property. It doesn't display anything or dispatch events, so it doesn't need to extend any other class.
package player
{
  import flash.events.Event;
  import flash.events.EventDispatcher;
  import flash.events.KeyboardEvent;
  import flash.ui.Keyboard;

  public class PlayerController

  {
    private var _model:Object;

    public function PlayerController(model:Object):void
    {
      _model = model;
    }
    public function processKeyDown(event:KeyboardEvent):void
    {
      switch (event.keyCode)
      {
        case Keyboard.LEFT:
           _model.vx = -_model.speed;
           break;

        case Keyboard.RIGHT:
           _model.vx = _model.speed;
           break;

        case Keyboard.UP:
           _model.vy = -_model.speed;
           break;

        case Keyboard.DOWN:
           _model.vy = _model.speed;
           break;
      }
    }

    public function processKeyUp(event:KeyboardEvent):void
    {
      if (event.keyCode == Keyboard.LEFT
      ||  event.keyCode == Keyboard.RIGHT)
{
_model.vx = 0;
}
if (event.keyCode == Keyboard.UP
|| event.keyCode == Keyboard.DOWN)
{
_model.vy = 0;
}
}
}
}The MapView works almost identically to the PlayerView, but it's a little simpler because it doesn't need to send input to a controller. The MapView multiplies the model's data values by 0.15 (the value of its _scaleFactor property) to scale those values to a 1:15 ratio. The map boundary's size is found by taking the stage's height and width and multiplying it by the _scaleFactor.
_mapBoundary.graphics.drawRect
  (
    0, 0,
    stage.stageWidth *  _scaleFactor,
    stage.stageHeight * _scaleFactor
  );
This draws the map in exactly the correct dimensions. (Because the MapView is added to the stage by the application class, it can freely access the stage object and the stage's properties.)
Because it's listening to the model's CHANGE events, the position of the red dot that represents the player (the _positionMarker) is also updated automatically whenever the model is updated.
private function changeHandler(event:Event):void
{
  _positionMarker.x = _model.xPos * _scaleFactor;
  _positionMarker.y = _model.yPos * _scaleFactor;
}
And because the values are multiplied by 0.15, the position is perfectly scaled.
package map
{
  import flash.display.*;
  import flash.events.Event;
public class MapView extends Sprite
{
//Object that contains the player model
private var _model:Object;
private var _scaleFactor:Number;
private var _mapBoundary:Shape;
private var _positionMarker:Sprite;
public function MapView(model:Object)
{
_model = model;
_model.addEventListener(Event.CHANGE, changeHandler);
addEventListener(Event.ADDED_TO_STAGE, onAddedToStage);
}
private function onAddedToStage(event:Event):void
{
_scaleFactor = 0.15;
//Draw the map
draw();
//Remove this listener
removeEventListener(Event.ADDED_TO_STAGE, onAddedToStage);
}
private function draw():void
{
//Draw the map boundary
_mapBoundary = new Shape();
_mapBoundary.graphics.lineStyle(1);
_mapBoundary.graphics.moveTo(0, 0);
_mapBoundary.graphics.beginFill(0xCCCCCC);
_mapBoundary.graphics.drawRect
(
0, 0,
stage.stageWidth * _scaleFactor,
stage.stageHeight * _scaleFactor
);
_mapBoundary.graphics.endFill();
addChild(_mapBoundary);//Draw the player position marker
_positionMarker = new Sprite();
_positionMarker.graphics.lineStyle();
_positionMarker.graphics.moveTo(0, 0);
_positionMarker.graphics.beginFill(0xFF0000);
_positionMarker.graphics.drawRect(−2, −2, 4, 4);
_positionMarker.graphics.endFill();
addChild(_positionMarker);
}
private function changeHandler(event:Event):void
{
_positionMarker.x = _model.xPos * _scaleFactor;
_positionMarker.y = _model.yPos * _scaleFactor;
}
}
}Finally, the last class that makes all of this work together is the application class, PlayerMVC. It works very much like the BasicMVC class you saw earlier, with one important addition: the enterFrameHandler that calls the model's update method and checks stage boundaries
private function enterFrameHandler (event:Event):void
{
  _model.update();
  StageBoundaries.stop(_model, stage);
}
It's the same kind of code that we needed for our Verlet engine.
You may be wondering how this bit of code fits into the whole MVC system? Technically, the application class is a controller. For now, let's call it the "game controller." This means that the model has two controllers: one for user-input events and the other for game events. In an MVC system, this is perfectly fine, Models can have numerous controllers and views. In future chapters, we'll look at how you can formally create a GameController class to centralize the game's events and logic.
Here's the full PlayerMVC application class:
package
{
  import flash.events.Event;
  import flash.display.Sprite;
  import com.friendsofed.utils.StageBoundaries;
//Import the MVC components from subfoldersimport player.*; import map.MapView; [SWF(backgroundColor="0xFFFFFF", frameRate="60", width="550", height="400")] public class PlayerMVC extends Sprite { private var _model:PlayerModel; private var _view:PlayerView; private var _controller:PlayerController; private var _map:MapView; public function PlayerMVC() { _model = new PlayerModel(); _controller = new PlayerController(_model); _view = new PlayerView(_model, _controller); addChild(_view); _map = new MapView(_model); addChild(_map);//Position the player in the center of the stage_model.setX = 275; _model.setY = 200; addEventListener(Event.ENTER_FRAME,enterFrameHandler); } private function enterFrameHandler(event:Event):void { _model.update(); StageBoundaries.stop(_model, stage); } } }
Wow, we've come a long way in this chapter, haven't we? I've walked you through all the building blocks of Verlet integration and the MVC design pattern in quite a bit of detail, so that you'll have all the resources you need to build these systems yourself from scratch. The last piece in this puzzle is to add some physics.
Run the SpaceShipMVC.swf file in the SpaceShipMVC/src folder of the chapter's source files. Figure 1-13 shows what you'll see: a keyboard-controlled spaceship with a map view and parallax scrolling background. This example includes all the techniques we've looked at so far in this chapter.
There's quite a bit of code here, so I'm going to let you dig around in the source files if you want to double-check any of the details. But there's absolutely nothing new going on here that we haven't already covered.
Here's how it works:
I've applied the MVC framework to the Verlet-based spaceship we looked at earlier. The code is almost identical, but it has been broken down into three classes in exactly the same way that the previous MVC examples were organized. Take a look at the source code, and you'll see there are no surprises.
I've added two additional views: the star field and the map. The map view uses identical code to the previous example. I didn't need to make modifications at all. All I did was drop it in and feed it the spaceship's model. Yay, MVC!
The star field effect is made up of two classes:
Star(which draws each star) andStarFieldView. StarFieldViewis the view class. It randomly plots the stars on the stage and updates their positions based on the model.
Figure 1-14 shows how the files are organized.
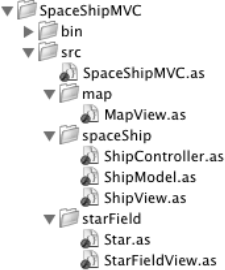
You can see that each view is organized into a separate folder and package. The application class, SpaceShipMVC imports these classes:
import spaceShip.*;
import starField.*;
import map.MapView;
It then elegantly composes them by feeding the ship's model into the three views
_model = new ShipModel();

_starField = new StarFieldView(_model);
addChild(_starField);

_map = new MapView(_model);
addChild(_map);

_controller = new ShipController(_model);
_shipView = new ShipView(_model, _controller);
addChild(_shipView);
You should be starting to recognize the MVC's signature in this code. And the entire system is thrown into action by this very simple enterFrameHandler:
private function enterFrameHandler(event:Event):void
{
  _model.update();
  StageBoundaries.wrap(_model, stage);
}
It's amazingly simple, but hides a whole lot of complexity going on behind the scenes. Fortunately, because I've implemented the MVC framework, that complexity is completely under control. If you're like me and looking at clean, neatly organized and bug-free code makes you really, really happy, then I have only one thing to say: use MVC!
A fun feature of this example is the parallax scrolling star field. Sixty stars are plotted on the stage at various sizes, from 1 to 10. The smaller stars move more slowly, and the bigger stars move more quickly, which gives it very realistic sense of depth. There are also more stars in the background than in the foreground, which also adds to the effect. Take a look at the StarFieldView class to see how it all works. Here, we'll go over its major features.
First, an empty array is created to store the stars:
_starArray = [];
The code creates 60 stars (the default value of _numberOfStars) in a for loop. It gives them a random size and position on the stage, and pushes them into the _starArray.
for (var i:uint = 0; i < Math.round(_numberOfStars); i++)
{
  //Find a random star size. The random number will be weighted
  //to smaller sizes so that more stars appear in the background

  var starSize:uint = weightedRandomNumber(_starSize / 2);

  //Create a new star and position it randomly

  var star:Star = new Star(starSize, _starColor);
  star.x = Math.random() * stage.stageWidth;
  star.y = Math.random() * stage.stageHeight;

  //Push the star into the _starArray and add it to the stage

  _starArray.push(star);
  addChild(star);
}
The size of the stars is found by a method called weightedRandomNumber. It finds a value between 3 and 10, but weights the result so that it's far more likely for stars to be smaller size. This is important because for the star field effect to look realistic, there should be more small stars in the background than big stars in the foreground.
private function weightedRandomNumber(weight:uint):uint
{
  var randomNumber:int = Math.ceil(Math.random() * _starSize);
  var weightedNumber:int = randomNumber - (uint(Math.random() * weight));
  if(weightedNumber < 3)
{
weightedNumber = 3;
}
return weightedNumber;
}The method first finds a random number between 1 and 10 (10 is the default value of _starSize).
var randomNumber:int = Math.ceil(Math.random() * _starSize);
It then finds another random number between 1 and 5 (the value of weight) and subtracts that from the first number.
var weightedNumber:int = randomNumber - (uint(Math.random() * weight));
For example, let's say the first random number (between 1 and 10) is 7. The second random number, (between 1 and 5) is 3. If you subtract 3 from 7, the result is 4.
Most of the numbers will be low, which is good, because it will give us a lot of small stars and only a few bigger ones. But the smallest size the stars should be is 3 pixels, so there's a check for that.
if(weightedNumber < 3)
{
  weightedNumber = 3;
}
This forces stars that are smaller than 3 up to a minimum size of 3.
This gives a good range of star sizes. There are certainly many more solutions to this problem, and maybe you can think of a better one.
The star field is a view of the spaceship's model, so I can use the model to move the stars. But, there's a problem: 60 stars to move! To do this, the changeHandler needs to loop through all the stars in the _starsArray and set their velocities and positions.
private function changeHandler(event:Event):void
{
  for (var i:uint = 0; i < _starArray.length; i++)
  {
    //Scale the velocity of the star based on its size
    var scale:Number = _starArray[i].size / _starSize;
//Move stars_starArray[i].x -= _model.vx * scale; _starArray[i].y -= _model.vy * scale;//Screen wrappingStageBoundaries.wrap(_starArray[i], stage); } }
First, a scale value is worked out so big stars in the foreground will move faster than small stars in the background. This is done by dividing the star's size by 10 (the value of _starSize).
var scale:Number = _starArray[i].size / _starSize;
This scale value is then multiplied by the model's vx and vy properties. This gives them a unique velocity that proportionately matches their size. Small stars will move slowly, and big stars will move more quickly. This makes the stars appear to occupy different planes and creates the parallax perspective effect.
_starArray[i].x -=  _model.vx * scale;
_starArray[i].y -=  _model.vy * scale;
The new velocity is subtracted from the star's position so that the stars move in the opposite direction from the spaceship.
And finally, the stars are wrapped around the edges of the stage, which makes the background appear to scroll endlessly.
StageBoundaries.wrap(_starArray[i], stage);
And there we have a very convincing star field effect! Make sure you check out the complete StarFieldView class to see all this code in its complete context, and also take a look at the Star class, which draws the stars. Both of these classes are in the chapter's source files.
The drawing API allows you to use AS3.0 code to draw lines, shapes, and colors on the stage. All the objects in this chapter were drawn using with the drawing API. If you've used it before but are a bit fuzzy on the details, I've put together this quick-reference guide. Check Adobe's documentation for detailed explanations and examples of the drawing methods. Keith Peter's AdvancED ActionScript 3.0 Animation is also an excellent introduction to the drawing API.
In the chapter's source files you'll find working examples of all this code in the DrawingAPI folder.
Note
What is an API? It stands for application programming interface. It's essentially a set of custom classes that help you perform specific tasks, like drawing shapes.
The following code will draw the line shown in Figure 1-15.
var line:Shape = new Shape();
line.graphics.lineStyle(1);
line.graphics.moveTo(−40, −30);
line.graphics.lineTo(40, 20);
addChild(line);

The square in Figure 1-16 is drawn so that its center point is at 0,0. This is useful for games where you often want your objects to be centered. (It makes collision-detection calculations a little simpler.)
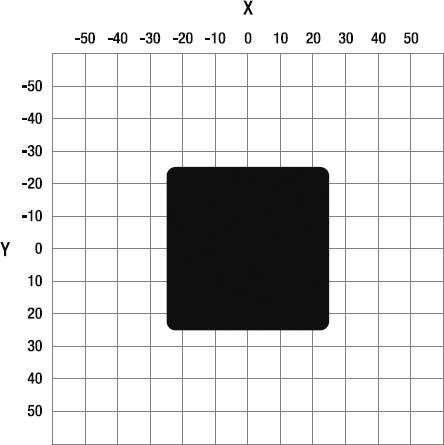
var square:Shape = new Shape();
square.graphics.beginFill(0x000000);
square.graphics.drawRoundRect(−25, −25, 50, 50, 10, 10);
square.graphics.endFill();
addChild(square);
To draw an outline around a square, add a lineStyle method.
var square:Shape = new Shape();
square.graphics.lineStyle(3, 0xCE1114);
square.graphics.beginFill(0x000000);
square.graphics.drawRoundRect(−25, −25, 50, 50, 10, 10);
square.graphics.endFill();
addChild(square);
This new code will draw a 3-pixel wide red line around the square.
When you draw a rectangle, the first four arguments represent x, y, height, and width.
drawRect(−25, −25, 50, 50);
With drawRoundRect, the last two arguments are the corner radius. They determine how rounded the corners are.
drawRoundRect(−25, −25, 50, 50, 10, 10);
This code draws a black circle from 0,0 with a 25-pixel radius (see Figure 1-17):
var circle:Shape = new Shape();
circle.graphics.beginFill(0x000000);
circle.graphics.drawCircle(0, 0, 25);
circle.graphics.endFill();
addChild(circle);

The drawCircle method takes three arguments: x, y, and radius
drawCircle(0, 0, 25);
All display objects have a property called filters. This is an array that stores all the filters that have been placed on an object. Use this strategy to apply a filter to an object:
Remember to import the filter classes:
import flash.filters.*.Make a copy of the object's
filtersproperty in a new array variable.Push the filters into the copy of the filter array.
Give the original
filtersproperty the value of the copied array variable.
This is a confusing sequence of code to remember, but its actual application is very routine.
The following code shows how you can add a bevel and drop-shadow filter to a square shape (see Figure 1-18).
var squareFilters:Array = sqaure.filters;
squareFilters.push
  (
    new BevelFilter
    (
      5, 135, 0xFFFFFF, 0.50, 0x999999, 0.50, 2, 2
    )
  );
squareFilters.push
  (
    new DropShadowFilter
    (
      5, 135, 0x000000, 0.60, 10, 10
    )
  );
square.filters = squareFilters;
Gradients are a big, complex subject. In the source files, you'll find a file called GradientFill.as, which you can use as a starting point for understanding and experimenting with gradient fills.
The following code draws a rectangle and fills it with a gradient, as shown in Figure 1-19.
var matrix:Matrix = new Matrix();
matrix.createGradientBox(50, 50, 0, 0, 0);
var colors:Array = [0xCCCCCC, 0x333333];
var alphas:Array = [255, 255];
var ratios:Array = [0, 255];

var square:Shape = new Shape();
square.graphics.lineStyle(1)
square.graphics.beginGradientFill
  (GradientType.LINEAR, colors, alphas, ratios, matrix);
square.graphics.drawRect(0, 0, 50, 50);
square.graphics.endFill();
addChild(square);
Does it look confusing? Don't worry, even seasoned AS3.0 programmers need to look up this stuff before they use it! Let's break this down to see what's going on.
First, import the classes that you need for a gradient fill.
import flash.display.GradientType;
import flash.geom.Matrix;
Then you need to create a Matrix object. A matrix is used to help you control the math behind the way that objects are positioned on the stage (moved, scaled, skewed, or rotated). Matrices have many applications in AS3.0, including being necessary for adding gradient fills. The createGradientBox method belongs to the Matrix class.
var matrix:Matrix = new Matrix();
matrix.createGradientBox(50, 50, 0, 0, 0);
createGradientBox makes an invisible box that is used to contain the gradient. In this example, it has the same dimensions as the square, but you can make it larger or smaller if you want to. createGradientBox takes five arguments: height, width, rotation, x offset, and y offset. The rotation is the amount to rotate the gradient, in radians. If you have a number in degrees, convert it to radians first: degrees = radians / (Math.PI / 180). x offset (referred to in Adobe's documentation as "translate x" or tx) is the amount by which you offset the start of the gradient on the x axis. In our example, if you change the x offset to 20, you'll see a result like the gradient shown in Figure 1-20.
matrix.createGradientBox(50, 50, 0, 20, 0);
The gradient only starts at an x position of 20. Similarly, the y offset (referred to in Adobe's documentation as "translate y" or ty) allows you to offset the start of the gradient on the y axis. (You'll be able to see this effect if you rotate the gradient 90 degrees.)

Figure 1.20. The tx parameter allows you to specify by how much you want to offset the start of the gradient.
Next, you need to create three arrays that store details about how you want the gradient to look. This is an example of a two-color gradient, but you can use as many colors in the gradient as you like by adding more array elements.
var colors:Array = [0xCCCCCC, 0x333333];
var alphas:Array = [255, 255];
var ratios:Array = [0, 255];
The arrays are as follows:
The
colorsarray contains the two colors that you want to use.The
alphasarray has the alpha values of the two colors. These can be values between 0 and 255. 0 means that the color will be completely transparent. 255 means that it will be completely opaque.The
ratiosarray represents how much of each color should be solid. You need to use a number between 0 and 255. Confusingly, this number represents a percentage. It's the percentage of the gradient's width. It represents the point at which you want the color to be solid.
Does the ratios array sound like an impossible concept to comprehend? You're not alone! Let's look at a concrete example.
Let's say you want the second color to be solid from the 40% point of the gradient's width. You would need to give it a value of 102 (102 is 40% of 255). 0 represents the leftmost side of gradient, and 255 represents the rightmost side. Your code would look like this:
var ratios:Array = [0, 102];
Figure 1-21 shows the effect this will have on the example code. The gradient continues up to the 40% mark. After that, the color is solid.
It takes a lot of practice to get used to this system, so experiment with the GradientFill.as source file and see if you can predict how the ratio numbers you enter affect the gradient.

The last step is to use the beginGradientFill method to apply the gradient.
var square:Shape = new Shape(); square.graphics.lineStyle(1)square.graphics.beginGradientFill(GradientType.LINEAR, colors, alphas, ratios, matrix);square.graphics.drawRect(0, 0, 50, 50); square.graphics.endFill(); addChild(square);
beginGradientFill takes five arguments. The last four are your arrays and the matrix object itself. The first is the type of gradient you want to create. You can choose between linear and radial gradients.
GradientType.LINEAR
GradientType.RADIAL
By combining all these techniques, you have almost infinite flexibility in the kinds of gradients you can create.
When you're creating complex graphics, it's often a good idea to create a few simple shapes individually and then combine them together into a parent sprite. That way, you need to deal with only one sprite, rather than many shapes.
The following code shows how the spaceship graphic was drawn, and the details of how the drawing commands work are shown in Figure 1-22.

var ship:Shape = new Shape();//1. Leave the lineStyle parameters empty or omit//including it altogether for an invisible line around the shapeship.graphics.lineStyle();//2. Set the optional starting x and y position (the default is 0,0)ship.graphics.moveTo(0, 50);
//3. Start the color fillship.graphics.beginFill(0x666666);//4. Draw the connecting linesship.graphics.lineTo(25, 0); ship.graphics.lineTo(50, 50); ship.graphics.curveTo(25, 25, 0, 50);//5. End the color fill and display the shapeship.graphics.endFill(); addChild(ship);
To make the flame appear under the ship's body, the code that draws the flame should appear before the code that draws the body of the ship (see Figure 1-23).

//Create the gradient box and arraysvar matrix:Matrix = new Matrix(); matrix.createGradientBox(25, 17, (90 * Math.PI / 180), 0, 50); var colors:Array = [0xFF3300, 0xFFFF00]; var alphas:Array = [100, 0]; var ratios:Array = [0, 255];//Draw the thruster flamevar flame:Shape = new Shape(); flame.graphics.lineStyle(1, 0x000000, 0); flame.graphics.beginGradientFill (GradientType.LINEAR, colors, alphas, ratios, matrix); flame.graphics.moveTo(13, 38); flame.graphics.curveTo(25, 50, (13 * 3), 38); flame.graphics.lineTo(13, 38); flame.graphics.endFill(); addChild(flame);
The ship and flame shapes are added to a container sprite. Filters are added, and then the container sprite is centered and rotated 90 degrees (see Figure 1-24). It's rotated by 90 degrees to make it simpler for the code in the ship's model that works out its angle.
_angle = _rotationValue * (Math.PI / 180);
If the ship isn't rotated by 90 degrees, it won't appear to move in the correct direction, and you'll need to add 90 degrees to its rotation to compensate. It's simper just to rotate the graphic into the correct position at its source.
//Create a new sprite to contain the shapesvar spaceShip:Sprite = new Sprite(); spaceShip.addChild(flame); spaceShip.addChild(ship); addChild(spaceShip);//Add a bevel and drop shadow filter to the space shipvar shipFilters:Array = new Array(); shipFilters = spaceShip.filters; shipFilters.push ( new BevelFilter ( 2, 135, 0xFFFFFF, 0.50, 0x000000, 0.50, 2, 2 ) ); shipFilters.push ( new DropShadowFilter ( 2, 135, 0x000000, 0.35, 2, 2 ) ); spaceShip.filters = shipFilters;//Center and rotate it to the rightspaceShip.rotation = 90; spaceShip.x += 25; spaceShip.y -= 25;
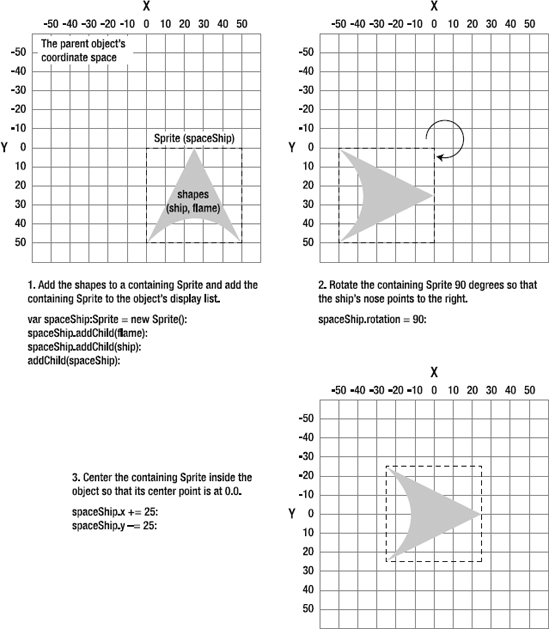
Flash Player 10 includes a new graphics method called drawPath. You can use it to draw really complex shapes with a lot of points using relatively little code.
Figure 1-25 shows the star shape that the Star class draws. How many times do you think you would need to use lineTo to draw this shape? It would take 16 lineTo commands. Imagine typing all that code in line by line—it would be very tedious and strain to look at.

The drawPath command makes drawing complex shapes like this much easier. Here's the general procedure for using it:
Push all the points of your shape into an array.
Push all the commands you need to connect them together into another array.
Use
drawPathto draw the shape using the points and commands arrays.
I used the term array in these steps, but more correctly I should have said vector. In AS3.0, a vector is an array whose elements all have the same data type. It's known as a typed array. As an example, the following code creates a Vector object called numbers in which all the elements are int types.
var numbers:Vector.<int> = new Vector.<int>();
This is just an array—the same as the arrays you already know and love. The only difference is that its elements can only be integers. That means that you can add elements like this:
numbers = [12, 33, 56];
But you can't add elements like this:
numbers = [12, "Hello!", 3.14];
All the elements must be integers, because they were typed using this syntax:
<int>
This may seem like odd syntax, but it's been borrowed from C++ and Java, which also have Vector classes and type them in the same way. AS3.0, welcome to the club!
The following are the advantages of using a vector over an array:
Because vector elements are all of the same type, they're much faster to process than arrays. How much faster? This gets mixed reviews. You would need to test this in the context of your game, but it may not be all that significant.
The compiler can give you an error message if you try to add an element to a vector that's the wrong data type. That's very useful for debugging, because it immediately tells you if your code is trying to do something it shouldn't be doing. Without that extra check, the simple mistake of feeding the wrong data to the wrong array could easily be missed and be very difficult to track down.
Note
The Vector class has nothing to do with Euclidean vectors, which are the subject of Chapter 2. The Vector class is just a typed array.
So how can we use the Vector class and the drawPath method to help us draw the star shape? The DrawingAPI folder contains a subfolder called Star with a working example. Here's the most important section of code:
//Create a new Vector object for the drawing coordinates//This must be typed as Numbervar starCoordinates:Vector.<Number> = new Vector.<Number>();//Push the coordinates into the starCoordinates VectorstarCoordinates.push ( 30,0, 35,15, 50,10, 45,25,60,30, 45,35, 50,50, 35,45, 30,60, 25,45, 10,50, 15,35, 0,30, 15,25, 10,10, 25,15, 30,0 );
//Create a Vector object for the drawing commandsvar starCommands:Vector.<int> = new Vector.<int>();//Push the drawing commands into the starCommands Vector//1 = moveTo(), 2 = lineTo(), 3 = curveTo()starCommands.push(1,2,2,2,2,2,2,2,2,2,2,2,2,2,2,2,2,2);//Create the starShape objectvar starShape:Shape = new Shape();//Begin the fillstarShape.graphics.beginFill(0xFFFF00);//Use the drawPath command to draw the shape using the//starCommands and starCoordinates VectorsstarShape.graphics.drawPath(starCommands, starCoordinates);//End the fillstarShape.graphics.endFill();//Position the star in the center of the spritestarShape.x -= starShape.width / 2; starShape.y -= starShape.height / 2; addChild(starShape);
Let's look at how this code works. First, a Vector object is created to store all of the x and y coordinates for the shape. These coordinates match those of Figure 1-23.
var starCoordinates:Vector.<Number> = new Vector.<Number>();
starCoordinates.push
  (
    30,0, 35,15, 50,10,
    45,25,60,30, 45,35,
    50,50, 35,45, 30,60,
    25,45, 10,50, 15,35,
    0,30, 15,25, 10,10,
    25,15, 30,0
  );
Next, it creates another Vector object to store the commands used to connect the coordinates. Each number in the vector represents a drawing command:
1formoveTo()2forlineTo()3forcurveTo()
var starCommands:Vector.<int> = new Vector.<int>();
starCommands.push(1,2,2,2,2,2,2,2,2,2,2,2,2,2,2,2,2,2);
Yes, that's 1 moveTo command and 16 lineTo commands!
Finally, it uses the drawPath command to draw the shape. It takes two arguments, the commands vector and the coordinates vector, in that order. These must be vectors; they can't be arrays.
starShape.graphics.drawPath(starCommands, starCoordinates);
And there you have a very efficient way to draw complex shapes!
Before I close this chapter, I want to introduce the topic of interfaces. This is only for reference, however, because none of the code in this book uses interfaces, and I'll never mention them again. So you can skip this section, and you won't have missed a thing. Still interfaces are an important OOP concept, and you'll almost certainly come across them in your programming career. If you need to know what they are and how to use them, here's a quick primer.
What is an interface? It's an AS file, like a class file, that describes the methods that a class can use. If a class then chooses to implement the interface, it must use exactly those methods—no more and no less. The class signs a contract that says, "I'm only going to implement the methods in the interface." Why is this important? Because it means that the view can use any model or views that implement the interface, and they will be guaranteed to work.
In the chapter's source files, you'll find a folder called BasicInterfaceMVC. It's exactly the same as the example we looked at in this chapter, except that the model and controller implement the two interfaces: IModel and IController. Let's take a quick look at how it works.
IModel is an interface. (By convention, all interface names start with an I.) It describes all the methods that any class implementing it must use.
package mvc
{
  import flash.events.IEventDispatcher;

  public interface IModel extends IEventDispatcher
  {
    function get direction():String
    function set direction(value:String):void
  }
}
This is an interface, not a class, even though it looks very similar to a class. Interfaces need to import any classes they refer to, such as IEventDispatcher in this example. Because the model will be dispatching events, it also needs to extend AS3.0's built-in IEventDispatcher class.
If the Model class wants to use this interface, it needs to say this in its class definition by using the implements keyword.
public class Model extends EventDispatcher implements IModel
{...
Now the model must use the methods in the interface—it's signed a contract.
The controller also uses an interface called IController.
package mvc
{
  import flash.events.KeyboardEvent;

  public interface IController
  {
    function processKeyPress(event:KeyboardEvent):void
  }
}
The controller can now implement the IController interface.
public class Controller implements IController
{...
The view can now type both the model to IModel and the controller to IController.
public function View(model:IModel, controller:IController):void
{...
Does this seem like a lot of extra code to produce something completely insignificant? Here's why using interfaces is actually very useful:
The view knows that any object that implements
IModelorIControllerwill work. It means that the model is guaranteed to dispatch theCHANGEevent that it depends on, and that the methods it calls in the controller actually exist. Without these formal guarantees, the program will generate reams of error message if you accidentally pass the view the wrong type of objects. Or worse, the code could simply fail silently, and you'll never know except for strange bugs that might be extremely difficult to track down.It means that you can create other models or controllers that also implement these interfaces, and they'll be guaranteed to work with your existing views. This keeps your code completely modular, and means you can mix and match without the danger of breaking anything.
This is a lot to absorb! My suggestion is that you don't use interfaces while doing your own first experiments with the MVC framework. You have enough on your plate to worry about. Good programming practice suggests that you should always use interfaces with MVC, but don't worry, I'll turn a blind eye! I certainly haven't used them in the game examples in this book.
When you feel confident using the MVC framework, come back to this section in the chapter and try to rework your code using interfaces. It may seem like a bit of overkill now, but it's essential for bug-proofing your code in large projects.
Have you ever started what you thought was a simple game project and realized after a few days of working on it that it was actually monstrously complex? Well, it turns out that "monstrous complexity" is what game designers refer to as "normal complexity." By their very nature, game-design projects are among the most complex things that programmers can attempt.
In this chapter, we've tamed this monster somewhat by implementing the MVC framework and a reliable Verlet integration physics system. Some of the later examples in this chapter had very complex code, but as you can see, their structure makes them predictable, self-managing, easy to read, and easy to extend.
We now have a rock-solid foundation on which to build the rest of the projects in this book. And you can start using the techniques we looked at immediately in your own projects. You might be surprised by how pleasantly bug-free your code becomes when you start implementing the MVC pattern and Verlet integration.
In the next chapter, we're going solve the mystery of collision detection once and for all with a detailed introduction to Euclidean vectors. You'll never need to blindly copy/paste your collision code from a dubious website again!