
A far better approach to building a game prototype is to plan from the beginning that the prototype will become the final product. In fact, that almost always turns out to be the case. It's important to build prototypes and mini-test cases so that you can test how certain components of your game are working in isolation. But if you can keep one eye open for the final form that you hope your game will take, you'll save yourself a great deal of extra work and frustration.
Fortunately, the short history of video-game development has provided us with an extremely efficient and widely used system for building games: tile-based game design (sometimes referred to as grid-based game design).
In this chapter, I'm going to walk you through the process of building a tile-based game engine from scratch. I'll show you some focused examples that document each important step in building the game world. We're going to build a classic tile-based platform game, and then use those same techniques to build a car-racing game prototype with the same engine. In addition, I'll show you how to create a dynamic collision map for broad-phase collision detection.
I'm also going to use this chapter as an opportunity to demonstrate how to create a game entirely using the blit technique, which is the fastest game-display method. Blitting combined with a tile-based game engine is a match made in heaven. If you're a bit hazy about how blitting works, review the coverage of it in Chapter 6 before continuing here.
Tile-based systems for building games are so widely used that they've become the de facto standard approach for building games not just with Flash, but most other game-design technologies. This is true not only for 2D games, but 3D as well. Odds are that any professional games you've played have used a tile-based system, and by the time you've finished reading this chapter, you might find that most of the games you make will, too.
The tile-based system is popular because it automatically solves a number of problems that are very complex to solve by other means. Here are some of its advantages:
Array storage: Intile-based games, game levels are stored in arrays. Once your tile-based engine is in place, you can add limitless numbers of new game levels quickly, just by creating new arrays to describe the levels. You can test and tweak your level design without touching the underlying game engine code, and also create visual tools for players to create their own levels.
Extremely efficient collision detection: Objects check for collisions only with other objects in their immediate vicinity. This means that there's very little unnecessary checking going on, and that's a big performance savings.
Simplified AI: In a tile-based world, game objects are aware of their surroundings. They can make decisions based on simple rules about what to do when their environment changes. Intricate AI behavior can often be created with code that is no more complex than one if statement. Pathfinding (the subject of the next chapter) is also a breeze to implement in a tile-based game world.
Efficient use of graphics: Tile-based games make very efficient use of graphics by reusing as much artwork as possible. This results in small file sizes, low memory usage, and quick processing.
The concepts involved for making tile-based action games are the same as the concepts for making logic and board games. Once you understand the basic theory and techniques for building tile-based games, game projects that seem very complicated suddenly won't seem so complex anymore.
You'll be happy to know that in this chapter, we're going to diverge from the dark and brooding universe of sci-fi games and enter the bubbly, Technicolor world of platform and racing games.
Unsurprisingly, for a tile-based game, the first step is creating some tiles.
Tiles are rectangles that contain the graphics that you want to use in your game. The rectangles can be any height or width, but their size will place certain constraints on the dimensions of the stage. It's important to decide right from the beginning what size your tiles will be.
You can create tiles using any image-editing software you like, including the free GIMP image editor or Aviary, the online, Flash-based image and sound-editing suite.
All the tiles for the examples in this chapter are bitmaps that are 64 by 64 pixels. As noted in Chapter 6, computers handle bitmap sizes that are multiples of 2 very efficiently. Because of this, tile dimensions of 16 by 16, 32 by 32, and 64 by 64 are popular choices. But if you need tiles that are unusual sizes, like 23 by 77, go for it!
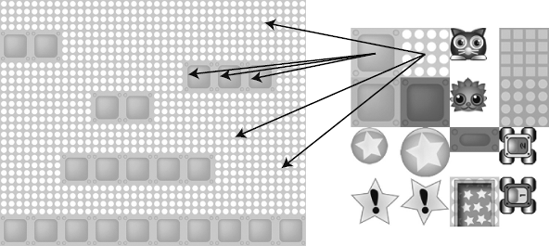
The tiles for all the examples in this chapter are stored in a single 256-by-256 square bitmap image—the tile sheet—as shown in Figure 8-1. You'll find this in the images folder of the chapter's source files. I created all these game characters and objects individually using Adobe Illustrator, and then used Adobe Fireworks to scale them down to size and put together the single composite PNG file.
Note
When working in Fireworks, I selected Show grid from the View menu and edited the grid settings so that each cell was 64 by 64 pixels. This made it easy to position each tile in the correct place. I also made sure that the background was transparent.
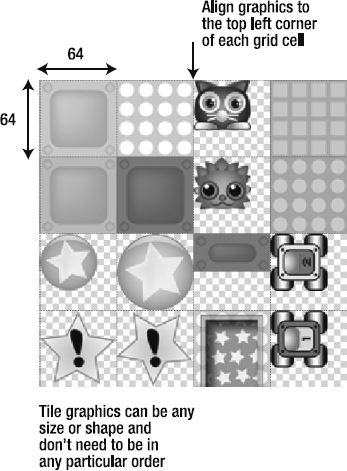
Figure 8.1. The tile sheet in Adobe Fireworks. All the game objects and environment graphics are contained in the cells of a single bitmap image called a tile sheet.
You can also see from Figure 8-1 that the images in the tiles are all different shapes and sizes. The 64-by-64 dimension is only the maximum size that a tile should be. Notice that images in the tiles that are smaller than the maximum size are aligned to the top-left corner of the cell they occupy. This will become a very important detail when we look at how tiles are copied from the tile sheet into the game.
There's no particular order to how these tiles are organized on the tile sheet. And the tile sheet itself can be any dimension you choose. You don't even need to decide how many tiles you need before you start coding a game—just add them to the tile sheet as you need them.
All of the games in this chapter were made using just this one tile sheet. Can you see how convenient this is? With just one small PNG file in your back pocket and a little code, you have a surprisingly large number of options available to make a wide variety of games.
Also, you can completely change the graphic style of a game by keeping all the code the same, and just swapping out the tile sheet for another one. This is great for prototyping. It means that even if you don't think you have any art or illustration skills, you can design and test a game with a tile sheet using simple images, and then hire an illustrator to create flashy graphics for you. All you need to do is drop in the illustrator's tile sheet—a single bitmap file—and you have a game that looks completely different.
In the game code, we need a way to refer to each of these tiles individually. A simple way to do this is to assign each tile a unique ID number.
As shown in Figure 8-2, you can think of the tile sheet as a grid of columns and rows. Each tile has a unique column/row coordinate position. By putting the column number first and the row number second, you can give each tile a unique number. For example, in Figure 8-2, the cat has been assigned the number 20. The cat is in column 2, row 0.
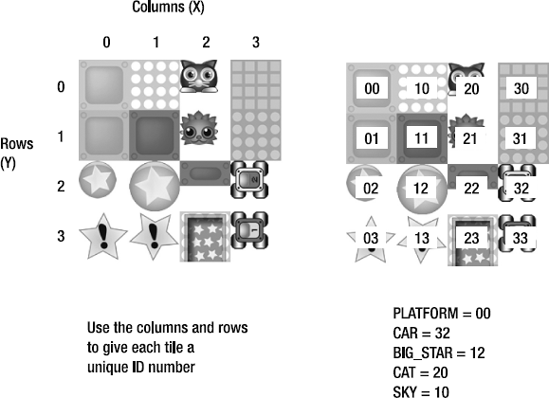
Figure 8.2. A unique ID number can tell your game what kind of thing the tile is as well as its position on the tile sheet.
This system is useful because it not only gives every tile a unique number, but its number tells the game where to find it on the tile sheet. Knowing these coordinates will be essential to copying the tile from the tile sheet into the game.
It's a little awkward to refer to every tile by a number, so it's good idea to define these numbers as constants at the start of the program. For example, these three constants define the ID numbers for the platform, sky, and cat tiles:
private const PLATFORM:uint = 00;
private const SKY:uint = 10;
private const CAT:uint = 20;
Now we just need to use the name PLATFORM whenever we want to refer to a platform tile.
Now that we have tiles, we can use those tiles to build a game world. Let's create some platforms and a sky backdrop. Run the SWF file in the Map folder in the chapter's source files, and you'll see something that looks like Figure 8-3.
Two of the tiles from the tile sheet have been used to make this game environment, as shown in Figure 8-4. They were copied from the tile sheet and plotted on the stage. The two tiles were repeated many times over. Because of the way the tiles are designed, the finished layout cleverly looks like one single image. But how was this scene made?
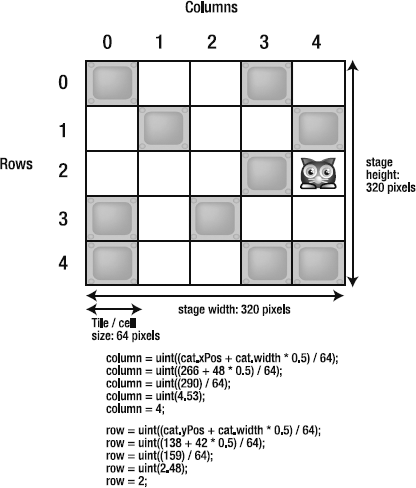
First, let's consider some of the constraints we face. It should be obvious from Figures 8-3 and 8-4 that the size of the game world will be partially determined by the size of the tiles. If you look carefully, you'll see that the finished game world is composed of ten columns and eight rows of tiles, as shown in Figure 8-5.
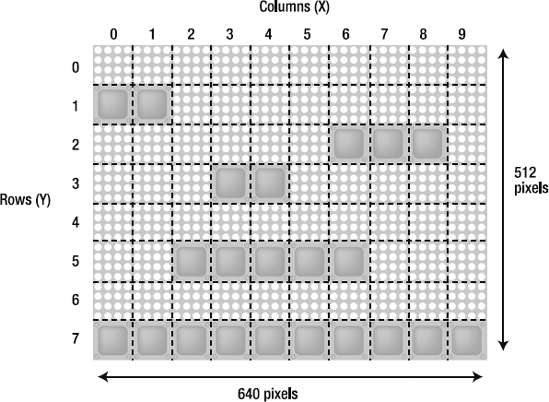
If each tile is 64 pixels wide and high, the game world will be 640 pixels wide (64 * 10 = 640) and 512 pixels high (64 * 8 = 512). It makes sense to create a SWF file to match those same dimensions.
SWF(width="640", height="512",
backgroundColor="#FFFFFF", frameRate="60")]
As you will soon see, the size of the tiles and the number of rows and columns are crucial to most aspects of a tile-based game engine. So it's important to define these values as constants at the start of the program.
private const MAX_TILE_SIZE:uint = 64;
private const MAP_COLUMNS:uint = 10;
private const MAP_ROWS:uint = 8;
To keep your head straight around some of the number juggling we'll be doing in a moment, make sure to keep this fact in mind:
Columns refer to the stage's x axis coordinates.
Rows refer to the stage's y axis coordinates.
This may seem obvious when it's printed in black and white on a page, but be careful. If you mix these up, it can lead to some dizzying confusion while you're still getting used to a tile-based view of the world.
You can see from Figure 8-5 that the game world is a grid. The cells in the grid are the same size as the tiles on the tile sheet. But how will the program know which tiles to copy into which grid cells? We can provide this information by using a two-dimensional array.
You'll recall from Chapter 5 that a two-dimensional array is an array containing other arrays. It's often used to describe a grid of information. The inner arrays describe the rows, and the elements of those arrays describe the columns. It turns out that a two-dimensional array is the perfect way to describe how we want our game map to look.
The game map in Figure 8-5 was made using a two-dimensional array that looks like this:
private var _platformMap:Array
  = [
        [10,10,10,10,10,10,10,10,10,10],
        [00,00,10,10,10,10,10,10,10,10],
        [10,10,10,10,10,10,00,00,00,10],
        [10,10,10,00,00,10,10,10,10,10],
        [10,10,10,10,10,10,10,10,10,10],
        [10,10,00,00,00,00,00,10,10,10],
        [10,10,10,10,10,10,10,10,10,10],
        [00,00,00,00,00,00,00,00,00,00]
    ];
The columns and rows of the array match the columns and rows of our game world: ten by eight. But look closely at the numbers that the array contains. What do you see?
Remember that we've given each of our tiles a unique ID number. Here we use two tiles: 10 is the ID for the sky tile, and 00 is the ID for the platform tile. If you hold this book at arms length and squint a bit, it should all snap into focus—see Figure 8-6.
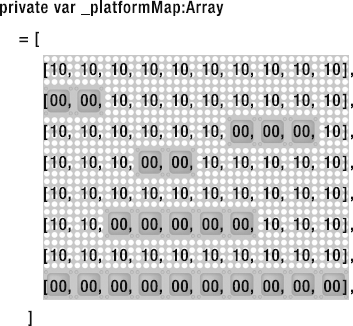
What looks at first like abstract data turns out to be a perfect visual representation of the game world. This is one of the great benefits of making tile-based games. You have complete control of your game layout just by changing the tile ID numbers in the array. It's an extremely quick, fun, and precise way to build game levels. As long as the rows and columns of the two-dimensional array match the rows and columns you've decided on for your game, you have free rein to layout your game however you choose. Modifying the map is as simple as changing one number in the array.
We now know where to find our tiles and where to place them on the game map.
There's a lot of useful information here, which we might be able to store and use in our game. Before we go any further, let me introduce you to the TileModel class.
Note
In this book, I've chosen to use Array objects to store game map data, mainly because 2D Array syntax is very easy to understand. However, you may want to consider using the Vector class for this in your own games. AS3.0 processes numbers stored in Vector objects faster than numbers stored in Array objects. Here is the syntax for a two-dimensional vector tile map.
var map:Vector.<Vector.<int>>
    = Vector.<Vector.<int>>
   (
     [
       Vector.<int>([10,10,10,10,10,10,10,10,10,10]),
       Vector.<int>([00,00,10,10,10,10,10,10,10,10]),
       Vector.<int>([10,10,10,10,10,10,00,00,00,10]),
       Vector.<int>([10,10,10,00,00,10,10,10,10,10]),
       Vector.<int>([10,10,10,10,10,10,10,10,10,10]),
       Vector.<int>([10,10,00,00,00,00,00,10,10,10]),
       Vector.<int>([10,10,10,10,10,10,10,10,10,10]),
       Vector.<int>([00,00,00,00,00,00,00,00,00,00])
     ]
   );
Two-dimensional vectors should be faster in theory, but in practice, they might not be any faster than two-dimensional arrays, and could even be slower, depending on which version of Flash Player you're using. You will need to test this in your own games with the latest version of Flash Player.
As you can see, we need to know a lot information about each tile: the tile sheet it's on; where on the game map to plot it; and its height, width, and x and y stage positions. It makes a lot of sense to create a class to store this information for every tile in our game. If you need to access this information quickly, it will be easy to find.
The custom TileModel class stores all of these properties. You'll find it in the com.friendsofed.gameElements.primitives package. It extends the AVerletModel class, so it inherits all the other properties you know so well, like xPos and yPos. TileModel adds a few more properties that are specific to tile-based games. It also adds some interesting new get methods, which you'll see near the end of the class. They won't make much sense to you now, but I will explain how they work in detail when we discuss tile-based collision detection later in this chapter. Two of the properties, jumping and coordinateSpace, are specific to a few examples that we will look at soon. You can ignore them for now. One property, direction, is used only for the tile-based maze game in the next chapter.
Here's the entire TileModel class for your reference:
package com.friendsofed.gameElements.primitives
{
  import flash.events.Event;
  import flash.events.EventDispatcher;
  import flash.display.*;

  public class TileModel extends AVerletModel
  {
    public var tileSheetRow:uint;
    public var tileSheetColumn:uint;
    private var _mapRow:uint;
    private var _mapColumn:uint;
    private var _currentTile:uint;
    private var _maxTileSize:uint;

    //Optional properties for platform
    //game characters
    public var jumping:Boolean = false;
    public var coordinateSpace:DisplayObject;

    //Optional property for maze game characters
    //(This is only used in Chapter 9)
    public var direction:String = "";

    public function TileModel
      (
        maxTileSize:uint = 64,
        tileSheetColumn:uint = 0,
        tileSheetRow:uint = 0,
        mapRow:uint = 0,
        mapColumn:uint = 0,
        width:uint = 0,
        height:uint = 0,
        setX:Number = 0
      ):void
    {
      this._maxTileSize = maxTileSize;
      this.tileSheetColumn = tileSheetColumn;
      this.tileSheetRow = tileSheetRow;
      this._mapRow = mapRow;
      this._mapColumn = mapColumn;
      this.width = width;
      this.height = height;
      this.setX = mapColumn * maxTileSize;
      this.setY = mapRow * maxTileSize;
    }
//Rows and column that the object occupiespublic function get mapColumn():uint { _mapColumn = uint((xPos + width * 0.5) / _maxTileSize); return _mapColumn; } public function set mapColumn(value:uint):void { _mapColumn = value; } public function get mapRow():uint { _mapRow = uint((yPos + height * 0.5) / _maxTileSize); return _mapRow; } public function set mapRow(value:uint):void { _mapRow = value; }//Quick access to the tile's ID number if you need itpublic function get id():uint { var id:uint = tileSheetColumn * 10 + tileSheetRow; return id; }//Top, bottom, left and right sidespublic function get top():uint { var top:uint = uint(yPos / _maxTileSize); return top; } public function get bottom():uint { var bottom:uint = uint((yPos + height) / _maxTileSize); return bottom; } public function get left():uint { var left:uint = uint(xPos / _maxTileSize); return left; } public function get right():uint { var right:uint = uint((xPos + width) / _maxTileSize); return right; }
public function get centerX():uint
    {
       var centerX:uint = uint((xPos + width * 0.5) / _maxTileSize);
       return centerX;
    }
    public function get centerY():uint
    {
       var centerY:uint = uint((yPos + height * 0.5) / _maxTileSize);
       return centerY;
    }
  }
}
Now we have enough information to start making a tile-based game.
To build the game world, create a nested for loop that simulates the game map's grid. This is the same nested for loop that we've used in other examples in this book to loop through grid data. The outer loop handles the columns, and the inner loop handles the rows. This means that the grid cells are read column by column, starting from the top left of the game world map. It reads the first cell in the column, works its way down each row, and then returns to the top of the next column.
for(var mapColumn:int = 0; mapColumn < MAP_COLUMNS; mapColumn++)
{
  for(var mapRow:int = 0; mapRow < MAP_ROWS; mapRow++)
  {
    //The tile ID number of the current cell in the game world
    var currentTile:int = _platformMap[mapRow][mapColumn];
  }
}
If you trace the value of currentTile, you'll see that it matches the value of the tile ID number in the _platformMap array. This is what the first two columns of trace data would look like after the outer loop has repeated once and the inner loop has run through twice:
10
0
10
10
10
10
10
0
10
0
10
10
10
10
10
0
You can see how these numbers match up with the actual game map in Figure 8-7. (The numbers in the trace have their leading zeros removed because a double zero is mathematically meaningless.)
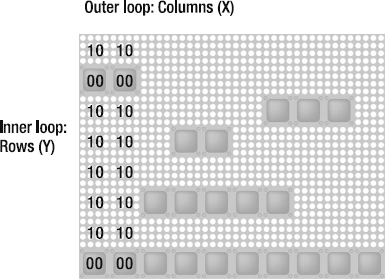
Figure 8.7. The value of currentTile after the outer loop has repeated twice and the inner loop has run twice
In total, the outer loop (the columns) will run once and repeat ten times. The inner loop (the rows) will run eight times. This covers all 80 cells in the game world's grid.
Now we have a way to figure out which tiles should be in which cells. The next step is to blit the tiles from the tile sheet onto their correct positions on the stage. You'll remember from Chapter 6 that to do this, we need to know two things:
The x and y position of the tile we want to use from the tile sheet
The x and y position on the destination bitmap that we want to copy it to.
We're on the verge of having that information. Our code now needs to do the following:
Convert the tile's ID number into real x and y coordinates on the tile sheet.
Use the nested
forloop's current column and row numbers to find the real x and y positions on the stage to plot the tile.
The Map example source file uses a method called buildMap to do this. The buildMap method takes one argument, which is the name of the map array to build. To build the _platformMap array, use a line of code that looks like this:
buildMap(_platformMap);
Here's the entire buildMap method:
private function buildMap(map:Array):void
{

  //Loop through all the cells in the game map
  for(var mapColumn:int = 0; mapColumn < MAP_COLUMNS; mapColumn++)
  {
        for(var mapRow:int = 0; mapRow < MAP_ROWS; mapRow++)
        {
           //Find out which tile ID number is in
           //the current cell. This will be either
           //"00" (a platform) or "01" (sky)
           var currentTile:int = map[mapRow][mapColumn];

           //"-1" means that the tile destination grid will be blank
           //(This example doesn't use any blank tiles)
           if(currentTile > −1)
           {
              //Find the tile's column and row position
              //on the tile sheet
              var tileSheetColumn:uint = uint(currentTile / 10);
              var tileSheetRow:uint = uint(currentTile % 10);

              //Now the code checks what type of tile
              //the ID numbers says should be in the
              //game map's grid cell
              switch (currentTile)
              {
                case PLATFORM:
                  //If it finds a match, it creates
                  //a TileModel object
                  var platform:TileModel = new TileModel();
                  platform.tileSheetColumn = tileSheetColumn;
                  platform.tileSheetRow = tileSheetRow;
                  platform.mapRow = mapRow;
                  platform.mapColumn = mapColumn;
                  platform.width = MAX_TILE_SIZE;
                  platform.height = MAX_TILE_SIZE;
                  platform.setX = mapColumn * MAX_TILE_SIZE;
                  platform.setY = mapRow * MAX_TILE_SIZE;

                  //Blit the tile from the tile sheet onto the
                  //background bitmap using the
                  //drawGameObject method (discussed ahead)
                  drawGameObject(platform, _backgroundBitmapData);
                  break;
case SKY:
//Create a TileModel object
var sky:TileModel = new TileModel();
sky.tileSheetColumn = tileSheetColumn;
sky.tileSheetRow = tileSheetRow;
sky.mapRow = mapRow;
sky.mapColumn = mapColumn;
sky.width = MAX_TILE_SIZE;
sky.height = MAX_TILE_SIZE;
sky.setX = mapColumn * MAX_TILE_SIZE;
sky.setY = mapRow * MAX_TILE_SIZE;
//Blit the tile from the tile sheet onto the
//background bitmap
drawGameObject(sky, _backgroundBitmapData);
break;
}
}
}
}
}The code first checks to see if the value of _platformMap[row][column] is greater than −1. In the system I've used for this chapter, −1 means a blank tile without any graphics.
if(currentTile > −1)
{...
This Map example doesn't use any blank tiles, so this first check is passed. (In later examples, you'll see how blank tiles are used to create empty spaces in the game world.)
Next, the code needs to extract the x and y coordinates of the tile on the tile sheet from its ID number. To do this, each digit in the ID must be read individually. This is done with a little bit of help from the modulus operator (%).
var tileSheetColumn:uint = uint(currentTile / 10);
var tileSheetRow:uint = uint(currentTile % 10);
The modulus operator is used to get the remainder of a division calculation. For example, 13 divided by 10 is 1 with a remainder of 3, which is the value returned by the modulus operator.
A concrete example will give you a better idea of how this works. Let's say that the tile ID is 24. The 2 represents the tile sheet column, and the 4 represents the tile sheet row. But there's a problem: we need to extract the column number and row number, and store them as separate variables.
Finding the column number is easy enough. Just divide the ID number by 10:
24 / 10 = 2
As you can see, that's absolutely correct. The first digit of the ID 24 is 2. That's how the tileSheetColumn value is found.
But how can we find the row number? That's where the modulus operator can help us. It will tell us the remainder:
24 % 10 = 4
24 divided by 10 is 2, but the remainder is 4. That's perfect! The second digit of the ID 24 is 4. That exactly matches the tile sheet row number.
The tileSheetColumn and tileSheetRow variables find the column and row numbers in the same way. Do these two lines of code make more sense to you now?
var tileSheetColumn:uint = uint(currentTile / 10);
var tileSheetRow:uint = uint(currentTile % 10);
Next, the code checks to see whether the currentTile ID number matches any of the ID numbers that it knows about. In this example, it knows that PLATFORM tiles equal 00 and SKY tiles equal 01. A switch statement checks for these. If it finds either of them, it creates a TileModel object. The following section looks for a PLATFORM ID number and creates the platform TileModel object. It also sets all the important properties on the TileModel object.
switch (currentTile)
{
  case PLATFORM:

    //Create the TileModel object
    var platform:TileModel = new TileModel();

    ///Set the tile sheet coordinates
    platform.tileSheetColumn = tileSheetColumn;
    platform.tileSheetRow = tileSheetRow;

    //Set the column and row coordinates where
    //the tile will be displayed on the game map
    platform.mapRow = mapRow;
    platform.mapColumn = mapColumn;

    //Set the size of the tile to match the game's
    //maximum tile size value
    platform.width = MAX_TILE_SIZE;
    platform.height = MAX_TILE_SIZE;

    //Set the actual x and y position values of the tile on the stage
    platform.setX = mapColumn * MAX_TILE_SIZE;
    platform.setY = mapRow * MAX_TILE_SIZE;
//Blit the tile from the tile sheet onto the//background bitmap using the//drawGameObject method (discussed ahead)drawGameObject(platform, _backgroundBitmapData); break; //... }
This code creates a TileModel object called platform, and sets some of its initial properties
It assigns the
tileSheetColumnandtileSheetRowvalues that we figured out earlier:platform.tileSheetColumn = tileSheetColumn; platform.tileSheetRow = tileSheetRow;
It assigns its
mapRowandmapColumnproperties to the loop's currentmapRowandmapColumnproperties:platform.mapRow = mapRow; platform.mapColumn = mapColumn;
It assigns its
heightandwidthvalues to the maximum height and width of tiles in the game:platform.width = MAX_TILE_SIZE; platform.height = MAX_TILE_SIZE;
The code then sets the tile's actual x and y stage position:
platform.setX = mapColumn * MAX_TILE_SIZE;
platform.setY = mapRow * MAX_TILE_SIZE;
This bit of code highlights a very important calculation. If you multiply the size of the tile by the current column or row number, you can find its x and y positions on the stage. For example, we know that the tile size is 64. If the tile is at column number 6 and row number 3, you can find its x and y positions like this:
x = 6 * 64
x = 384

y = 3 * 64
y = 192
That turns out to be a very important fact, as you shall soon see.
But there's also a flip side to this. If you know an object's x and y positions, you can also find out which map column and map row it's in. Just divide the x and y positions by the tile size. For example, let's take the x and y values we just looked at.
x = 384
y = 192
Divide these numbers by the tile size, which is 64.
mapColumn = 384 / 64
mapColumn = 6

mapRow = 192 / 64
mapRow = 3
That gives us the column and row that the tile occupies.
This works out neatly if the x and y positions are evenly divisible by 64. But what if you have a free roaming object in your game that could be at any x or y position? To figure this out, do the same calculation, but round the resulting value down. For example, let's say you have a game character jumping between platforms at these x and y positions:
x = 341
y = 287
Divide those numbers by 64 to find out which column and row it's in
mapColumn = 341 / 64
mapColumn = 5.3

mapRow = 287 / 64
mapRow = 4.4
That's very accurate, but we need to truncate those pesky decimal values. We can do this by using Math.floor. Or, better yet, we can cast the result as a uint. Here's an example:
mapColumn = uint(341 / 64)
mapColumn = 5

mapRow = uint(287 / 64)
mapRow = 4
Using uint is a faster alternative to Math.floor and has the same effect of rounding the numbers down.
Being able to convert from x and y positions to column and row positions is an important skill for tile-based game engines. You'll see just how useful this is in the upcoming examples.
The very last thing that the code in the previous section did was to display the tile on the stage using the drawGameObject method.
drawGameObject(platform, _backgroundBitmapData);
Let's take a close look at exactly how it does this.
You'll recall from Chapter 6 that to blit objects, you need two things:
A source
BitmapDataobject. That's the tile sheet.A destination
BitmapDataobject. That's the stage bitmap.
In the Map example file, the tile sheet is embedded and its BitmapData created like this:
[Embed(source="../../images/tileSheet.png")]
private var TileSheet:Class;
private var _tileSheetImage:DisplayObject = new TileSheet();
private var _tileSheetBitmapData:BitmapData
  = new BitmapData
  (
    _tileSheetImage.width,
    _tileSheetImage.height,
    true,
    0
  );
When the application class initializes, it draws the _tileSheetImage into the
_tileSheetBitmapData using the draw method.
_tileSheetBitmapData.draw(_tileSheetImage);
We need another bitmap on which to display the tiles. _backgroundBitmap is a bitmap that is the same size as the stage. We can blit the tiles onto it.
private var _backgroundBitmapData:BitmapData
  = new BitmapData(stage.stageWidth, stage.stageHeight, true, 0);
private var _backgroundBitmap:Bitmap
  = new Bitmap(_backgroundBitmapData);
It needs to be added to the stage so that we can see the game world.
addChild(_backgroundBitmap);
The custom drawGameObject method does the work of blitting from the tile sheet to the backgroundBitmap. It takes two parameters: a TileModel object and the destination BitmapData.
drawGameObject(tileModelObject, destinationBitmapData);
Remember that the TileModel class contains the coordinates of where on the tile sheet to find the correct tile. It also contains the coordinates of where on the game map the tile should be placed. This information and the name of the destination BitmapData are all we need to blit the tile.
Here's the drawGameObject method that copies the tile from the tile sheet onto the correct place on the backgroundBitmap:
private function drawGameObject
  (
    tileModel:TileModel,
    screen:BitmapData
  ):void
{
var sourceRectangle:Rectangle
  = new Rectangle
  (
    tileModel.tileSheetColumn * MAX_TILE_SIZE,
    tileModel.tileSheetRow * MAX_TILE_SIZE,
    tileModel.width,
    tileModel.height
  );
var destinationPoint:Point
  = new Point
  (
    tileModel.xPos,
    tileModel.yPos
  );
screen.copyPixels
  (
    _tileSheetBitmapData,
    sourceRectangle,
    destinationPoint,
    null, null, true
  );
}As you can see, this is identical to the system we used to blit the particle explosions in Chapter 6.
A Rectangle object defines where on the tile sheet the tile is located. It gets this information from the TileModel object that we initialized earlier. Notice how the x and y positions are found by multiplying the tile sheet column and row numbers by the maximum tile size.
var sourceRectangle:Rectangle
= new Rectangle
(
tileModel.tileSheetColumn * MAX_TILE_SIZE,
tileModel.tileSheetRow * MAX_TILE_SIZE,
tileModel.width,
tileModel.height
);Next, we find the destination point on the bitmap where we want to blit the tile. This will be whatever the TileModel object's xPos and yPos values are.
var destinationPoint:Point
= new Point
(
tileModel.xPos,
tileModel.yPos
);Finally, we copy the tile onto the bitmap using the BitmapData's copyPixels method.
screen.copyPixels
(
_tileSheetBitmapData,
sourceRectangle,
destinationPoint,
null, null, true
);This is an all-purpose blit method that will be used, unchanged, for the blitting we'll be doing for all the examples in this chapter and the next.
All the code that we've looked at so far in this chapter is from the Map.as application class. It forms the core of our tile-based game engine, so it's very important that you see all the code in its full context.
package
{
  import flash.events.Event;
  import flash.display.*;
  import flash.geom.Point;
  import flash.geom.Rectangle;
  import com.friendsofed.utils.*;
  import com.friendsofed.gameElements.primitives.*;

  [SWF(width="640", height="512",
  backgroundColor="#FFFFFF", frameRate="60")]

  public class Map extends Sprite
  {
    private const MAX_TILE_SIZE:uint = 64;
    private const MAP_COLUMNS:uint = 10;
    private const MAP_ROWS:uint = 8;

    //The PLATFORM and SKY constants define
    //the position of tile images in the tile sheet
    private const PLATFORM:uint = 00;
    private const SKY:uint = 10;

    private var _platformMap:Array
      = [
          [10,10,10,10,10,10,10,10,10,10],
          [00,00,10,10,10,10,10,10,10,10],
          [10,10,10,10,10,10,00,00,00,10],
          [10,10,10,00,00,10,10,10,10,10],
          [10,10,10,10,10,10,10,10,10,10],
[10,10,00,00,00,00,00,10,10,10],
[10,10,10,10,10,10,10,10,10,10],
[00,00,00,00,00,00,00,00,00,00]
];
//Create a blank BitmapData object as the canvas for this bitmap
private var _backgroundBitmapData:BitmapData
= new BitmapData(stage.stageWidth, stage.stageHeight, true, 0);
private var _backgroundBitmap:Bitmap
= new Bitmap(_backgroundBitmapData);
//Tile sheet
//Variables required to display the tile sheet bitmap
[Embed(source="../../images/tileSheet.png")]
private var TileSheet:Class;
private var _tileSheetImage:DisplayObject = new TileSheet();
private var _tileSheetBitmapData:BitmapData
= new BitmapData
(
_tileSheetImage.width,
_tileSheetImage.height,
true,
0
);
//Status box
private var _statusBox:StatusBox = new StatusBox;
public function Map():void
{
//Draw the tile sheet
_tileSheetBitmapData.draw(_tileSheetImage);
//Add the stage bitmap.
//This displays the contents of the _backgroundBitmapData.
//It will be updated automatically when
//the _backgroundBitmapData is changed
addChild(_backgroundBitmap);
//Run the buildMap method to convert the
//map's array data into a visual display
buildMap(_platformMap);
//Display the status box
addChild(_statusBox);
_statusBox.text = "MAP:";
_statusBox.text += "
" + "TILE SIZE: " + MAX_TILE_SIZE;
_statusBox.text += "
" + "MAP_ROWS: " + MAP_ROWS;
_statusBox.text += "
" + "MAP_COLUMNS: " + MAP_COLUMNS;
}//Create tile models and map them to the//correct positions on the tile sheetprivate function buildMap(map:Array):void {//Loop through all the cells in the game mapfor(var mapColumn:int = 0; mapColumn < MAP_COLUMNS; mapColumn++) { for(var mapRow:int = 0; mapRow < MAP_ROWS; mapRow++) {//Find out which tile ID number is in//the current cell. This will be either//"00" (a platform) or "01" (sky)var currentTile:int = map[mapRow][mapColumn];//"-1" means that the tile destination grid will be blank//This example doesn't use any blank tilesif(currentTile > −1) {//Find the tile's column and row position//on the tile sheetvar tileSheetColumn:uint = uint(currentTile / 10); var tileSheetRow:uint = uint(currentTile % 10);//Now the code checks what type of tile//the ID number says should be in the//game map's grid cellswitch (currentTile) { case PLATFORM://If it finds a match, it creates//a TileModel objectvar platform:TileModel = new TileModel(); platform.tileSheetColumn = tileSheetColumn; platform.tileSheetRow = tileSheetRow; platform.mapRow = mapRow; platform.mapColumn = mapColumn; platform.width = MAX_TILE_SIZE; platform.height = MAX_TILE_SIZE; platform.setX = mapColumn * MAX_TILE_SIZE; platform.setY = mapRow * MAX_TILE_SIZE;//Blit the tile from the tile sheet onto the//background bitmap using the//drawGameObject methoddrawGameObject(platform, _backgroundBitmapData); break;
case SKY://Create a TileModel objectvar sky:TileModel = new TileModel(); sky.tileSheetColumn = tileSheetColumn; sky.tileSheetRow = tileSheetRow; sky.mapRow = mapRow; sky.mapColumn = mapColumn; sky.width = MAX_TILE_SIZE; sky.height = MAX_TILE_SIZE; sky.setX = mapColumn * MAX_TILE_SIZE; sky.setY = mapRow * MAX_TILE_SIZE;//Blit the tile from the tile sheet onto the//background bitmapdrawGameObject(sky, _backgroundBitmapData); break; } } } } }//Basic blit methodprivate function drawGameObject ( tileModel:TileModel, screen:BitmapData ):void { var sourceRectangle:Rectangle = new Rectangle ( tileModel.tileSheetColumn * MAX_TILE_SIZE, tileModel.tileSheetRow * MAX_TILE_SIZE, tileModel.width, tileModel.height ); var destinationPoint:Point = new Point ( tileModel.xPos, tileModel.yPos );
screen.copyPixels
        (
          _tileSheetBitmapData,
          sourceRectangle,
          destinationPoint,
          null, null, true
        );
  }
 }
}
Spend as much time as you need to understand how the Map example works before moving on to the more complex examples ahead. It's the heart of the tile-based game engine we're using in this chapter. If you're thinking of making your own tile-based game, now might be a good time to take a short break from reading to see if you can create your own game world map using these techniques.
Now that we have a game world, we can start to add characters and objects. Run the SWF file in the Character folder, and you'll see something that looks like Figure 8-8.

The character doesn't move yet; it just hangs in space. Before we make it run and jump around the screen, let's take a close look at how it was added to the game.
The cat character is quite a different kind of thing than the platforms or the sky. The platforms and sky are very much in the background; the cat is in the foreground. You can see from Figure 8-8 that the cat is in front of one of the sky tiles. The cat's alpha transparency is allowing the sky tile to show through from behind. This is thanks to the PNG file that represents the tile sheet. It has a transparent background and was exported with 32-bit alpha, which preserves transparency.
If you look at the Character.as application class, you'll see that the cat has been assigned a constant that matches its tile ID of 20.
private const CAT:uint = 20;
That's the cat's column and row number on the tile sheet. You can use the ID 20 to add the cat to the game world in the map array.
But we have a small problem. The map array is already full of sky and platform tiles. We want the cat to appear in a cell that is already occupied by a sky tile. How can we solve this problem?
A common strategy in tile-based games is to create different maps for different types of objects. You can then layer the maps. This allows you to easily place more than one tile in the same map grid cell, and also simplifies depth management.
For the examples in this chapter, there is one map for platform and sky objects, and another map for foreground game objects, like the cat. The maps have the same number of columns and rows, but they contain different kinds of objects.
In the Character document class, you'll see that two map arrays are being used to describe the game world.
private var _platformMap:Array
  = [
      [10,10,10,10,10,10,10,10,10,10],
      [00,00,10,10,10,10,10,10,10,10],
      [10,10,10,10,10,00,00,00,00,10],
      [10,10,00,10,10,10,10,10,10,10],
      [10,10,10,10,10,10,10,10,10,10],
      [00,00,00,00,10,10,10,00,10,10],
      [00,00,00,00,00,10,10,10,10,10],
      [00,00,00,00,00,00,00,00,00,00]
    ];

private var _gameObjectMap:Array
  = [
      [−1,−1,−1,−1,−1,−1,−1,−1,−1,-1],
      [−1,−1,−1,−1,−1,−1,−1,−1,−1,-1],
      [−1,−1,−1,−1,−1,−1,−1,−1,−1,-1],
      [−1,−1,−1,−1,−1,−1,−1,−1,−1,-1],
[−1,−1,−1,−1,−1,20,−1,−1,−1,-1],
[−1,−1,−1,−1,−1,−1,−1,−1,−1,-1],
[−1,−1,−1,−1,−1,−1,−1,−1,−1,-1],
[−1,−1,−1,−1,−1,−1,−1,−1,−1,-1],
];The _platformMap follows the same format as our first example, but the _gameObjectMap is new. Can you see where the cat has been positioned? It should be obvious!
As noted earlier, −1 means that a cell contains a blank tile. In fact, the _gameObjectMap is blank except for the cat, which has an ID of 20. However, as we add more game objects in later examples, you'll see how it starts to fill up with more image tiles.
You may recall from the discussion on blitting in Chapter 6 that, in a blit display environment, you need to handle all the depth management yourself. Fortunately, this is not difficult. The basic principle is this: tiles that are drawn last appear above those that are drawn earlier. If you want an object to appear above other objects, draw it later.
You can make your depth management easier by creating two or more display bitmaps. In a blit display system, there's always a "stage bitmap" onto which tiles are copied. Instead of having just one of these stage bitmaps, use two: one for background objects and the other for foreground objects. It's logical that certain types of objects will occupy similar planes in your game world. This is the same concept as using drawing layers in Photoshop to help manage the stacking order of images.
It's easy enough to do this in a tile-based game that uses blitting. You'll see in the Character source file that there are two bitmaps.
//Background bitmapprivate var _backgroundBitmapData:BitmapData = new BitmapData(stage.stageWidth, stage.stageHeight, true, 0); private var _backgroundBitmap:Bitmap = new Bitmap(_backgroundBitmapData);//Foreground bitmapprivate var _foregroundBitmapData:BitmapData = new BitmapData(stage.stageWidth, stage.stageHeight, true, 0); private var _foregroundBitmap:Bitmap = new Bitmap(_foregroundBitmapData);
These are then added to the stage in the order that you want them to appear.
addChild(_backgroundBitmap);
addChild(_foregroundBitmap);
To create these two game maps and display them on the correct bitmap layer, run the buildMap method twice. Supply the name of the map you want to build in the argument.
buildMap(_platformMap);
buildMap(_gameObjectMap);
(The order that you run these in doesn't matter. The only thing that affects the stacking order is the order that they're added to the stage by addChild.)
This is good so far, but we haven't yet told the program whether we want to blit the cat character on the foreground or background bitmap. This is handled by the specific code in the buildMap method.
The buildMap method in the Character class is identical to our first example, except that it has an additional check to see whether any of the tiles match the value of CAT (20). If it finds a match, it creates a cat TileModel object, and tells the drawGameObject method to blit the cat onto the foreground. Here's the code that does this (with the line that blits the cat onto the correct bitmap layer highlighted):
case CAT:
  _catModel
    = new TileModel
    (
      MAX_TILE_SIZE,
      tileSheetColumn, tileSheetRow,
      mapRow, mapColumn,
      48, 42
    );

    drawGameObject(_catModel, _foregroundBitmapData);
    break;
The only other new thing here is that all the cat's initial properties are set in the TileModel constructor. This saves a bit of space and is a little more efficient than initializing each property line by line, as in the previous example. Here's the format for initializing TileModel objects in the constructor:
_tileModelObject
  = new TileModel
  (
    Maximum tile size,
    tileSheetColumn,
    tileSheetRow,
    game mapRow,
    game mapColumn,
    width,
    height
  );
Notice that the cat's width is 48 pixels and its height is 42 pixels. This shows that you can use any size tile. You're not limited to a 64-by-64 tile size. You can also see that tiles can be any shape. They don't need to be rectangular.
Note
It's also possible to use tiles that are larger than the maximum tile size. You'll need to make a second tile sheet for big objects, and modify the tile game engine a bit to handle them. By the end of this chapter, you'll understand the concepts of tile-based games well enough that this shouldn't pose too big a challenge.
The Character application class is identical to the first example except for these modifications. Our next step is to make the cat run and jump around the stage.
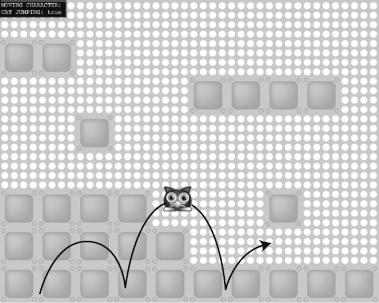
Run the SWF in the MovingCharacter folder. You can use the mouse to make the cat run and jump, as shown in Figure 8-9. It can't jump on the platforms yet, but it does stop at the stage boundaries, like the bottom of the stage.
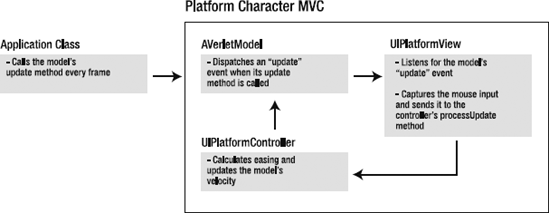
Because the TileModel class extends the AVerletModel class, we can use the same physics system we've been using in all the other chapters in this book. And because our data is completely separate from the display, the physics code in a tile-based blit environment is identical to the physics code for sprites or movie clips. All we need to do is create a UIView and UIController to create the platform game control.
UIPlatformView and UIPlatformController handle the cat's jump physics. You'll find these classes in the com.friendsofed.gameElements.primitives package. The UIPlatformView captures the mouse input and sends it to the UIPlatformController to process. Both of these classes are instantiated in the buildMap method at the same time as the cat's TileModel class.
case CAT:
  _catModel
    = new TileModel
    (
      MAX_TILE_SIZE,
      tileSheetColumn, tileSheetRow,
      mapRow, mapColumn,
      48, 42
    );

    //Add some gravity
    _catModel.gravity_Vy = 0.98;

    //Add the UIView and UIController
    _UIPlatformController
      = new UIPlatformController(_catModel);
    _UIPlatformView
      = new UIPlatformView
      (_catModel, _UIPlatformController, stage);

    drawGameObject(_catModel, _foregroundBitmapData);
    break;
The cat's gravity is set at the same time. This is the standard MVC system that you should know quite well by now.
The TileModel has a property called jumping. It's a Boolean variable that can be used to tell the game whether the cat is jumping or is on the ground. In this example, it's set to true in the enterFrameHandler whenever the cat is at the bottom of the stage.
if(_catModel.yPos + _catModel.height >= stage.stageHeight)
{
  _catModel.jumping = false;
}
When the UIView detects that the mouse button is pressed, it contacts the controller's processMouseDown method. The controller has a constant called JUMP_FORCE, which determines with how much force the cat should jump.
private const JUMP_FORCE:Number = −25;
If the cat is not already jumping, it adds the JUMP_FORCE to the cat's vy, and sets its jumping property to true. (JUMP_FORCE is a negative number because "moving up the stage" means subtracting values from an object's y position.)
internal function processMouseDown
  (event:MouseEvent):void
{
  jump();
}

internal function jump():void
{
  if(!_model.jumping)
  {
    _model.jumping = true;
    _model.vy += JUMP_FORCE;
  }
}
jumping is set to false again by the MovingCharacter application class's enterFrameHandler when the cat hits the ground.
if(_catModel.yPos + _catModel.height >= stage.stageHeight)
{
  _catModel.jumping = false;
}
This prevents the player from making the cat jump while it's still in the air.
In later examples, you'll see how this code works just as well with platforms without any other modification.
You can make the cat move left and right by moving the mouse. There are a few unexpected pitfalls that you need to be aware of, so let's take a closer look at how this works.
The cat follows the mouse using a simple easing formula that you've probably used before at some point. At its most basic, it looks like this:
var vx:Number = stage.mouseX - (_model.xPos + _model.width * 0.5);
_model.vx = vx * 0.2;
The code measures the distance between the mouse and the center of the cat. That distance is then multiplied by an easing value, 0.2, and the result is assigned to the cat's velocity.
These two lines of code are at the heart of the cat's motion system. But how does the cat's controller know when to run this code? To be accurate, it must run every frame. Somehow, the code must connect the cat's controller to the game's frame rate.
To do this, first the application class calls the _catModel's update method in the enterFrameHandler.
private function enterFrameHandler(event:Event):void
{
  //Update the cat's model
  _catModel.update();

  //...
}AVerletModel, the cat's superclass, has an update method. The update method dispatches a custom "update" event every time it's called.
public function update():void
{
  //Verlet motion code...

  dispatchEvent(new Event("update"));
}
Because this event is dispatched each frame, it is the perfect event to listen for if you want to synchronize an object's controller with the game's frame rate. The cat's UIPlatformView listens for this event.
_model.addEventListener("update", updateHandler);Its updateHandler calls the UIPlatformController's processUpdate method and sends it a reference to the stage.
private function updateHandler(event:Event):void
{
  _controller.processUpdate(_stage);
}
The UIPlatformController's processUpdate method implements the easing formula. But it also does two checks:
Whether the cat's velocity is within the allowed speed limit. The
SPEED_LIMITconstant is set to100. This is needed to prevent the cat from moving around the stage too quickly.From which coordinate space to read the mouse position. I'll explain in detail how this works when we discuss scrolling later in this chapter. For now, know that the cat's default
coordinateSpaceproperty is set tonull. This means that the code will use the stage'smouseXvalue to calculate velocity.
Here's the complete processUpdate method that runs these checks and implements the easing.
internal function processUpdate(stage:Object):void
{
  var vx:Number;

  //If the TileModel has no coordinateSpace
  //value, then assume that the stage's
//coordinate space will be used to read//the mouseX valueif(_model.coordinateSpace == null) { vx = stage.mouseX - (_model.xPos + _model.width * 0.5); }//If coordinateSpace isn't null, use that//space to calculate the mouseX valueelse { vx = _model.coordinateSpace.mouseX - (_model.xPos + _model.width * 0.5); }//Limit the velocity to the speed limitif(vx < -SPEED_LIMIT) { vx = -SPEED_LIMIT } if(vx > SPEED_LIMIT) { vx = SPEED_LIMIT }//Apply the easing formula to the model's velocity_model.vx = vx * EASING; }
Figure 8-10 is a diagram of this entire process.
Note
If you would prefer to create a platform game character that can be moved using the keyboard, take a look at the comments in the UIPlatformView and UIPlatformController classes. They include methods that will you help implement this quickly.
This is an example of a fairly advanced character control system. It's not essential to implement something like this to create a tile-based game. For your first tile-based game or experiment, I suggest using a very basic character control system without any physics, such as the keyboard control system we looked at in Chapter 1. That will be a good learning step. When you feel more confident, look over the cat's control system and see if it can help you with your own physics-based character control system.
As you can see, even though we're now working in a tile-based world, all of our old physics skills still apply. We can use our whole bag of tricks. The only really big difference is the way in which the images are displayed on the stage.
You'll recall from Chapter 6 that to blit a moving object you need to do two things each frame:
Every frame needs to start with a blank canvas. You need to completely clear the bitmap that you're blitting the tile onto using the
fillRectmethod. In this example, the cat tile is being blitted onto the_foregroundBitmap. You can clear the_foregroundBitmaplike this:_foregroundBitmapData.fillRect(_foregroundBitmapData.rect, 0);
Copy the moving object's tile to its new place on the bitmap. In this example, that cat
TileModelstores all of its position information. That means we can just reuse the samedrawGameObjectmethod we discussed in the previous section.drawGameObject(_catModel, _foregroundBitmapData);
Yes, those two lines are all you need to blit a moving tile!
All of this happens inside the enterFrameHandler. To keep your positions and collision detection accurate, make sure you add code to the enterFrameHandler in the following order:
Update the models.
Check for collisions.
Blit the objects.
If you follow that order, everything will be peachy!
Here's the enterFrameHandler from the MovingCharacter application class:
private function enterFrameHandler(event:Event):void
{
  //1. UPDATE THE MODELS

  //Update the cat's model
  _catModel.update();

  //2. CHECK FOR COLLISIONS

  //Stop the cat at the stage boundaries
  StageBoundaries.stopBitmap(_catModel, stage);

  if(_catModel.yPos + _catModel.height >= stage.stageHeight)
  {
    _catModel.jumping = false;
  }

  //3. BLIT THE OBJECTS

  //Clear the stage bitmap from the previous frame so that it's
  //blank when you add the new tile positions
  _foregroundBitmapData.fillRect(_foregroundBitmapData.rect, 0);

  //Blit the cat on the foreground bitmap
  drawGameObject(_catModel, _foregroundBitmapData);

}
Be sure to take a look at the complete MovingCharacter application class in the chapter's source files to see all the code in its proper context.
We have a game world and a game character. Now, let's add some real interactivity!
Note
Objects that are displayed using blitting are called blit objects, which is sometimes shortened to bob. If you overhear some game designers casually discussing their "bobs," you now know what they're talking about!
Efficient collision detection is one of the big strengths of a tile-based game engine. An inefficiency with all the collision-detection strategies in the book so far is that they check for collisions with objects that have no chance of ever colliding. For example, a ball at the top-left corner of the stage has no hope of ever colliding with a ball in the bottom-right corner of the stage in the current frame, or even in the next frame. This may not have any noticeable performance impact on a small game, but it's nonetheless an irksome and wasteful inefficiency. For a complex game with hundreds of moving objects, it could be a deal-breaker.
In Chapter 4, I explained the difference between broad-phase and narrow-phase collision detection. Here's a quick refresher.
Broad-phase: Checking for objects that are in the immediate vicinity of one another. It tells you which objects are most likely to collide.
Narrow-phase: Checking for actual collisions between those objects. This is most commonly a distance-based check.
All the collision detection that we've done in the book so far has been narrow-phase. With a tile-based game engine, we have a fantastically efficient system for implementing broad-phase collision detection. Specifically, it's a type of broad-phase collision detection called a spatial grid (also referred to as a uniform grid).
You'll find an example of spatial-grid broad-phase collision detection in the PlatformCollision folder. Now the cat can jump from platform to platform, as shown in Figure 8-11.
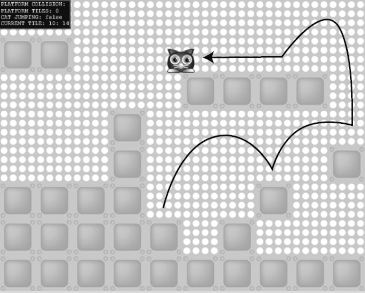
The collision detection is clean and accurate, but the cat is only checking for collisions with platforms within its immediate vicinity. Let's take a close look at how this works
We know that our game world is a grid of cells. All the objects in the game, moving or stationary, occupy a cell.
The cat can collide only with objects that are in adjacent cells, so we just need to check the contents of those cells. If any of them contain objects that the cat needs to collide with, we will run a collision check on those objects.
To get you started thinking about this problem, I have a puzzle for you. Figure 8-12 is an illustration of a simple game world grid. The cat is in a cell at the center of the grid. Looking at that grid, can you tell which cells you need to check for collisions? Take a moment to think about it, and try not to peek at the answer.
Now I feel bad ... it was a trick question! The only cell that needs to be checked is the center cell that the cat occupies, 2-2. The cat is completely inside a single cell, so there's no likelihood that it will come into contact with any object from an adjacent cell.
But as you can see from the PlatformCollision SWF, the cat is hardly ever neatly contained within a single cell. It runs and jumps freely all over the stage, and is usually between cells. It's very likely that the cat will overlap more than one cell.
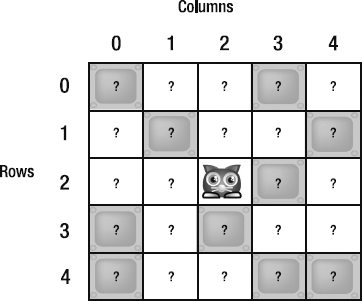
Figure 8-13 shows the second puzzle. The cat is overlapping four cells. Can you figure out which cells need to be checked for a collision?
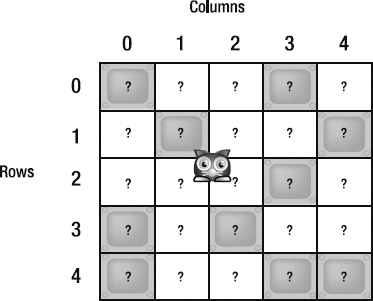
Figure 8.13. Puzzle 2: If the cat is overlapping more than one cell, which cells do you need to check for a collision?
The answer is that you must check every cell that the cat's four corners occupy. As shown in Figure 8-14, these are cells 1-1, 2-1, 1-2, and 2-2. By "the cat's four corners," I mean the tips of the cat's left and right ears, and the ends of its left and right paws.
Figure 8.14. Find out which cells the four corners of the cat are in, and check those cells for collisions.
There are ten platforms on that grid. You don't need to do a collision check with all ten of them. Instead, you check the cat's four corners, and if any of those corners are in a cell that is occupied by a platform, you do a collision check on that cell. In a typical platform game where you might have hundreds of platforms, this is a huge savings. At most, you'll need to check for four platforms each frame. Even if your game has a thousand platforms, you'll never need to do more than those four checks.
But of course, this all hinges on knowing which cells the cat's four corners occupy. How can we figure this out?
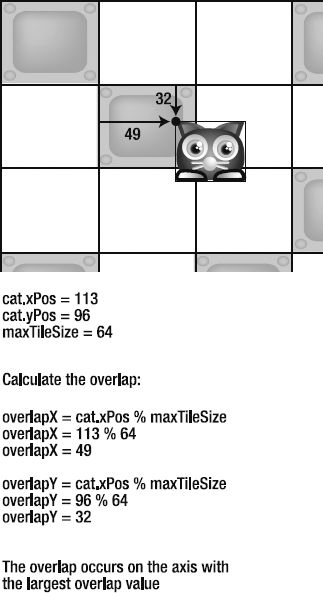
Let's first look at how we can figure out which cell the center of the cat occupies. To do this, find its center x and y stage position and divide it by the maximum tile size (64). Round it down to truncate the remainder. (This assumes the cat's xPos and yPos position is its top-left corner).
column = uint((cat.xPos + cat.width * 0.5) / 64);
row = uint((cat.yPos + cat.height * 0.5) / 64);
This is the same formula we looked at earlier in the chapter. Figure 8-15 illustrates how to find the cat's position.
Now we know the column and row of the cat's center point. To find its corner points, all we need to do is apply the same formula to the cat's corner points: top left, top right, bottom left, and bottom right, as shown in Figure 8-16.
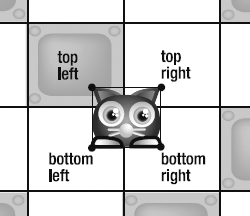
Figure 8.16. Apply the same formula to the cat's four corner points to find out which cells you need to check for collisions.
Calculating these points is basic to tile-based games, and the custom TileModel class introduced earlier in this chapter does this for us automatically. Remember that after the listing of that class, I told you to ignore the get methods at that time, because they wouldn't make sense to you yet. Now they certainly should make sense. Here are the getters from the TileModel class:
public function get top():uint
{
   var top:uint = uint(yPos / _maxTileSize);
   return top;
}
public function get bottom():uint
{
   var bottom:uint = uint((yPos + height) / _maxTileSize);
   return bottom;
}
public function get left():uint
{
   var left:uint = uint(xPos / _maxTileSize);
   return left;
}
public function get right():uint
{
   var right:uint = uint((xPos + width) / _maxTileSize);
   return right;
}
public function get centerX():uint
{
var centerX:uint = uint((xPos + width * 0.5) / _maxTileSize);
return centerX;
}
public function get centerY():uint
{
var centerY:uint = uint((yPos + height * 0.5) / _maxTileSize);
return centerY;
}You can use these six values to find the columns and rows for all the corner points plus the object's center point. Here's what's you need to do this:
A
TileModelobjectA platform map array that contains the tile ID numbers of the platforms
The ID numbers for the platform tiles, such as
00
On each frame, you check which cells on the map the TileModel object's four corners are overlapping.
Here's a simplified, pseudo code version of how this all works:
var _platformMap:Array
  = [
      [10,10,10,10,10,10,10,10,10,10],
      [00,00,10,10,10,10,10,10,10,10],
      [10,10,10,10,10,00,00,00,00,10],
      [10,10,00,10,10,10,10,10,10,10],
      [10,10,10,10,10,10,10,10,10,10],
      [00,00,00,00,10,10,10,00,10,10],
      [00,00,00,00,00,10,10,10,10,10],
      [00,00,00,00,00,00,00,00,00,00]
    ];

var platform = 00;
var tileModel = new TileModel(MAX_TILE_SIZE, etc...);

enterFrameHandler
{
  //Move the tile model around the stage

  //Start the spatial grid, broad-phase collision check:

  //1. Check the top-left corner
  if(platformMap[tileModel.top][tileModel.left] == platform)
  {
    //Perform a narrow-phase collision check...
  }
//2. Check the top-right cornerif(platformMap[tileModel.top][tileModel.right] == platform) { //Perform a narrow-phase collision check... }//3. Check the bottom-left cornerif(platformMap[tileModel.bottom][tileModel.left] == platform) { //Perform a narrow-phase collision check... }//4. Check the bottom-right cornerif(platformMap[tileModel.bottom][tileModel.right] == platform) { //Perform a narrow-phase collision check... } }
If your game objects are moving in only one direction at a time and not employing any physics, your collision methods could be as simple as just four if statements. As you will see, it becomes a little more complex in a practical application, but in essence, this is really all there is to it.
Remember that broad-phase collision can tell you only which objects are likely to be colliding. Its job is to weed out objects that will never collide, and tell you which objects you should probably check for a collision. It can't tell you if those objects actually are colliding or how you should handle those collisions. For that, you need to use any of these narrow-phase collision techniques:
Particle versus line
Circle versus line
SAT
Circle versus circle
Bitmap collision
These are the same delightful little techniques we've spent much of this book discussing. The technique you use depends on the kinds of objects that are colliding. They're all completely compatible with a tile-based game engine.
Conveniently enough, the platforms in these examples are squares. That means that once we know that a collision is likely, we can use the SAT AABB collision technique discussed in Chapter 4 to resolve it.
Now that you understand the concept, let's look at how the spatial grid is used in the example file.
We will be using many different collision methods in this chapter. To keep things organized, you'll find all of them in the TileCollisionController class in the com.friendsofed.utils package. The method in that class that checks for platform collisions is called platformCollision.
To use platformCollision, first create a new instance of the TileCollisionController class.
private var _collisionController:TileCollisionController
  = new TileCollisionController();
Then call its platformCollision method each frame.
private function enterFrameHandler(event:Event):void
{
  //...

  _collisionController.platformCollision
    (_catModel, _platformMap, MAX_TILE_SIZE, PLATFORM);

  //...
}
The platformCollision method takes four arguments:
A
TileModelobjectThe array that stores the platform map
The maximum tile size
The ID number for the platform tiles (in this example,
00or the value ofPLATFORM)
The platformCollision method checks all four corners of the TileModel object to find out whether any of them are in a cell containing a platform tile. If this is true, it does a SAT-based collision check and moves the object out of the collision. And, because this is a platform game, the object's jumping property also must be set to false when it hits the bottom side of a platform. (Why? If you jump too high and bump your head on the ceiling, you usually stop jumping!)
The following is the full platformCollision method. Apart from a shortcut to simplify the SAT collision using the modulus operator (which I'll explain after the listing), it should be quite self-explanatory. It's a version of the code we discussed in detail in Chapter 4.
public function platformCollision
  (
    gameObject:TileModel,
    platformMap:Array,
    maxTileSize:uint,
    platform:uint
  ):void
{
  //Variables needed to figure out by how much the object
  //is overlapping the tile on the x and y axes
  //The axis with the most overlap is the axis on which
  //the collision is occurring. This is an inverted SAT system
  var overlapX:Number;
  var overlapY:Number;

  //If the object's top-left corner is overlapping the cell
  //on its upper left side...
  if(platformMap[gameObject.top][gameObject.left] == platform)
  {
    //Figure out by how much the object's top-left corner
    //point is overlapping the cell on both the x and y
    //axes
    overlapX = gameObject.xPos % maxTileSize;
    overlapY = gameObject.yPos % maxTileSize;

    if(overlapY >= overlapX)

    {
      //Extra check to see whether the object is moving up
      //and that its bottom-left corner isn't also touching a platform
      if(gameObject.vy < 0
      && platformMap[gameObject.bottom][gameObject.left] != platform)
      {
        //Collision on top side of the object
        //Position the object to the bottom
        //edge of the platform cell
        //which it is overlapping and set its vy to zero
        gameObject.setY = (gameObject.mapRow * maxTileSize);
        gameObject.vy = 0;
      }

    }

    else
    {
      //Collision on left side of the object
      //Position the object to the right
      //edge of the platform cell and set its vx to zero
      gameObject.setX
        = gameObject.mapColumn * maxTileSize;
      gameObject.vx = 0;
    }
  }
//If the object's bottom-left corner is overlapping the cell//on its lower left side...if(platformMap[gameObject.bottom][gameObject.left] == platform) { overlapX = gameObject.xPos % maxTileSize;//Measure the y overlap from the far left side of the tile//and compensate for the object's heightoverlapY = maxTileSize - ((gameObject.yPos + gameObject.height) % maxTileSize);
if(overlapY >= overlapX)
    {
      //Extra check to see whether the object is moving down
      //and that its top-left corner isn't also touching a platform
      if(gameObject.vy > 0
      && platformMap[gameObject.top][gameObject.left] != platform)
      {
        //Collision on bottom
        gameObject.setY
          = (gameObject.mapRow * maxTileSize)
          + (maxTileSize - gameObject.height);
        gameObject.vy = 0;
        gameObject.jumping = false;
      }
    }
    else
    {
      //Collision on left
      gameObject.setX
         = gameObject.mapColumn * maxTileSize;
      gameObject.vx = 0;
    }
  }

  //If the object's bottom-right corner is overlapping the cell
  //on its lower right side...
  if(platformMap[gameObject.bottom][gameObject.right] == platform)
  {
    //Measure the x and y overlap from the far right and bottom
    //side of the tile and compensate for the object's
    //height and width
    overlapX
     = maxTileSize
     - ((gameObject.xPos + gameObject.width) % maxTileSize);
    overlapY
     = maxTileSize
     - ((gameObject.yPos + gameObject.height) % maxTileSize);
    if(overlapY >= overlapX)
    {
      //Extra check to see whether the object is moving up
      //and that its top-right corner isn't also touching a platform
      if(gameObject.vy > 0
      && platformMap[gameObject.top][gameObject.right] != platform)
      {
        //Collision on bottom
        gameObject.setY
          = (gameObject.mapRow * maxTileSize)
          + (maxTileSize - gameObject.height);
        gameObject.vy = 0;
        gameObject.jumping = false;
      }
    }
    else
    {
      //Collision on right
      gameObject.setX
        = (gameObject.mapColumn * maxTileSize)
        + ((maxTileSize - gameObject.width) - 1);
      gameObject.vx = 0;
    }
  }
  //If the object's top-right corner is overlapping the cell
  //on its upper right side...
  if(platformMap[gameObject.top][gameObject.right]  == platform)
  {
    //Measure the x overlap from the far right side of the
    //tile and compensate for the object's width
    overlapX
      = maxTileSize
      - ((gameObject.xPos + gameObject.width) % maxTileSize);
    overlapY = gameObject.yPos % maxTileSize;

    if(overlapY >= overlapX)
    {
      //Extra check to see whether the object is moving down
      //and that its bottom-right corner isn't also touching a platform
      if(gameObject.vy < 0
      && platformMap[gameObject.bottom][gameObject.right]
      != platform)
{
gameObject.setY = (gameObject.mapRow * maxTileSize);
gameObject.vy = 0;
}
}
else
{
//Collision on right
gameObject.setX
= (gameObject.mapColumn * maxTileSize)
+ ((maxTileSize - gameObject.width) - 1);
gameObject.vx = 0;
}
}
}The narrow-phase collision detection between the cat and platforms is handled using SAT. It's a standard rectangle-versus-rectangle (AABB) collision test. It just so happens that in this platform collision system, the platforms are the same size as the maximum tile size. We can use this to our advantage to take a sneaky shortcut in the SAT calculations to avoid needing to calculate any vectors.
All four sides of the platform are checked for a collision using the cat's four corner points. The top-left corner is the easiest to calculate. Let's look at how that works.
First, check whether the cat's top-left corner is inside a platform tile.
if(platformMap[gameObject.top][gameObject.left] == platform)
{...
If this is true, calculate the amount of overlap. All we need to do is find the remainder of the object's position divided by the maximum tile size. Finding the remainder means using the modulus operator (%).
overlapX = gameObject.xPos % maxTileSize;
overlapY = gameObject.yPos % maxTileSize;
This will tell us the distance of the point to the cell's top-left corner. It works no matter which cell in the grid we need to check. We don't need to know the column or row number, because all the cells are the same size. Figure 8-17 illustrates how the overlap value is found.
You can see in Figure 8-17 that the cat is colliding with the platform on the x axis, from the left. Because we are measuring the overlap based on the distance between the top-left corner of both the cat and the cell, it's the axis with the largest overlap that indicates the collision axis. This is an inversion of the usual SAT system, but the principle is exactly the same.
Now that we know the collision is happening on the left side of the platform, we can position the cat so that it's flush against the edge of the column it's currently occupying.
cat.setX = cat.mapColumn * maxTileSize;
cat.vx = 0;
The TileModel class has properties called mapColumn and mapRow, which tell you which column and row the center of the object is occupying. You can use these properties to move the object out of the collision, as in the preceding code. Here are the mapColumn and mapRow getters and setters from the TileModel class:
public function get mapColumn():uint
{
   _mapColumn = uint((xPos + width * 0.5) / _maxTileSize);
   return _mapColumn;
}
public function set mapColumn(value:uint):void
{
   _mapColumn = value;
}
public function get mapRow():uint
{
   _mapRow = uint((yPos + height * 0.5) / _maxTileSize);
   return _mapRow;
}
public function set mapRow(value:uint):void
{
   _mapRow = value;
}
The other three corners of the object are checked in the same way. However, the overlap is a bit trickier to calculate. For example, here's how to find the amount of overlap for the bottom-right corner:
overlapX
  = maxTileSize
  - ((gameObject.xPos + gameObject.width) % maxTileSize);
overlapY
  = maxTileSize
  - ((gameObject.yPos + gameObject.height) % maxTileSize);
We need to find the distance from the cat's bottom-right corner to the bottom-right corner of the cell.
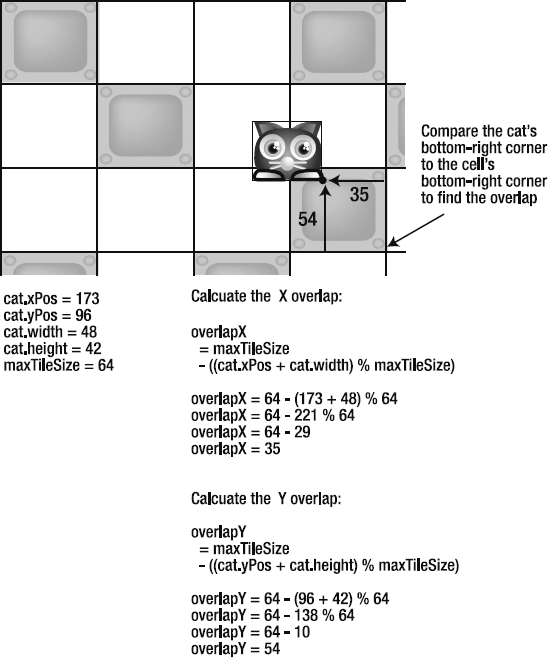
Figure 8.18. To calculate the overlap on the bottom-right corner, take the object's width and height into account.
The bottom-left and top-right corners are checked in a similar way. Again, because all the cells are exactly the same size, you don't need to know the actual stage position of the cell. It could be any cell; the formula will work the same for all of them.
This platform collision-detection system is one approach that solved the problem for the examples in this chapter, but it is certainly not a one-size-fits-all solution. You'll almost certainly need to tailor your collision-detection methods to suit the particular problems of your games. If you understand the basic principle of how to check which cells the four corners of your game objects are overlapping, that's really all you need to know. You can build on and adapt any of the collision-detection systems presented in this book.
The cells of the game map can contain any kind of objects. They don't need to be square or rectangular. They can be filled with any kinds of shapes, and you can employ any kind of collision strategy you choose.
For an example, run the SWF in the RoundTiles folder. Use the mouse to make the small star button bounce around the stage and ricochet off the big buttons, as shown in Figure 8-19.
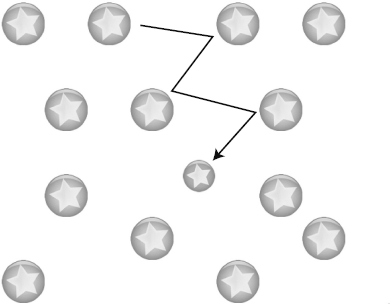
Figure 8.19. Tiles can be any size or shape, and you can employ any kind of collision-detection strategy.
At first glance, this seems like it would use a radically different kind of game engine than the platform game example. But the tile-based game engine is exactly the same.
The only difference is in the narrow-phase collision, which uses a circle-versus-circle collision-detection strategy. It's really just one line of code:
_collisionController.roundPlatformCollision
    (_playerModel, _platformMap, MAX_TILE_SIZE, ROUND_TILE);
You'll find specifics of this method in the TileCollisionController class. These two methods do all the work:
roundPlatformCollisionchecks the four corners of the small star and calls theroundTileCollisionmethod if it suspects a collision might be occurring.roundTileCollisionperforms a standard circle-versus-circle collision check. The code is almost identical to the code that we looked at in Chapter 3.
Make sure to check out the specifics of the code in the TileCollisionController class. You won't find any surprises, and the code is actually simpler than the code we've just looked at for platform collisions.
Note
If your tile objects travel to the bottom or far right of the stage, there's a chance that they might check for a row or column that doesn't exist. For example, let's say your game map has eight rows. If your tile object is on the bottom row, it might check for objects in row 9, the next one down. But row 9 doesn't exist, and you'll get this nasty runtime error:
TypeError: Error #1010: A term is undefined and has no properties.
To avoid this, limit the cells that the tile object checks to the maximum numbers of columns and rows.
if(tileModelObject.bottom < platformMap.length
&& tileModelObject.right < platformMap[0].length)
{...
This will constrain the search to the dimensions of the game map.
From the RoundTiles example, you can see how a tile-based game engine would be great for quickly building a game like Peggle or Pinball.
Now that we have a game world, it's time to make it more interactive. We'll add ways to move around and explore, objects to collect, and enemies to overcome.
Platform games usually feature a very common type of platform that I call a soft platform. A soft platform is like a one-way door. It's a platform that allows the player to jump up through it from below, onto its top surface. But when the player is on top of the platform, it stops the player from falling through. This gives the game a sense of shallow depth, as if the platforms were layered ledges or steps.
Soft platforms are a good example of how a tile-based game engine can help you easily solve what would otherwise be a complex logic problem.
You'll find an example of soft platforms at work in the SoftPlatform folder. Run the SWF, and you'll see the cat can jump up through the pink platforms, as shown in Figure 8-20.
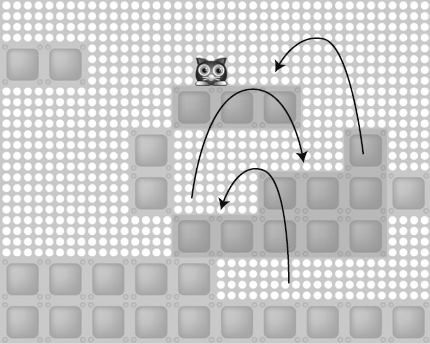
Figure 8.20. Soft platforms allow the cat to jump up onto them, but prevent it from falling through.
Take a look at the SoftPlatform application class, and you'll see that platform tiles are added to the game world just like all the other tiles, using the buildMap method. The enterFrameHandler checks for collisions with soft platforms each frame by calling the collision controller's softPlatformCollision method.
_collisionController.softPlatformCollision
   (_catModel, _platformMap, MAX_TILE_SIZE, SOFT_PLATFORM);
The _collisionController has a Boolean variable called _softPlatformOpen, which is initialized to true when the game first starts. As soon as the cat jumps up through the platform, it sets it to false. This locks the platform and prevents the cat from falling through it. _softPlatformOpen is set back to true when the cat jumps off the platform.
The code that does all this has a very interesting feature. It needs to know when the bottom of the cat has cleared the top of the platform so that the platform can be closed. It does this by checking what kind of tile the bottom of the cat occupied in the previous frame. The only reason for the previous tile being different from the current tile is that the cat has cleared the top of the platform.
This check acts as a tripwire to close the platform. Because we're using Verlet integration, we already know what the cat's previous position was. It's stored in the cat's previousY property that it inherited from the AVerletModel class. And because we're using a tile-based engine, we can easily analyze which tile the bottom of the cat occupied in both the current frame and the previous one. All this comes together in a few lines of surprisingly simple code.
Here's the softPlatformCollision method that achieves this effect:
public function softPlatformCollision
  (
    gameObject:TileModel,
    platformMap:Array,
    maxTileSize:uint,
    softPlatform:uint
  ):void
{
  //Check whether the object is moving down
  if(gameObject.vy > 0)
  {
    //If the object's bottom-left corner is overlapping the
    //soft platform cell
    //on its lower-left side or right side...
    if(platformMap[gameObject.bottom][gameObject.left]
      == softPlatform
    || platformMap[gameObject.bottom][gameObject.right]
      == softPlatform)
    {
      //Find out which cell the bottom of the object
      //was in on the previous frame
      var previousTile:uint
        = uint((gameObject.previousY
        + gameObject.height) / maxTileSize);

      //Compare the current tile to the previous tile.
      //If they're not the same, then you know that the
      //object has crossed above the top of the tile
      if(gameObject.bottom != previousTile
      || !_softPlatformOpen)
      {
        //Collision on bottom
        gameObject.setY
          = (gameObject.mapRow * maxTileSize)
          + (maxTileSize - gameObject.height);
        gameObject.vy = 0;
        gameObject.jumping = false;

        //Close the platform so that the object
        //can't fall through
        _softPlatformOpen = false;
      }
    }
  }
//Open the platform if the object is//moving upwards againif(gameObject.vy < 0) { _softPlatformOpen = true; } }
You can use this same technique for any kind of door or passageway where you want to permit the player to move in only one direction.
So far, all the platforms in our tile-based game engine have been stationary. Let's give the cat a bit of a challenge: a moving elevator to jump on, as shown in Figure 8-21. You'll find this in the Elevator folder

The elevator moves from the ground up to the platforms on the third row, and back down again. The cat can jump onto it at any point and take a ride to the top or bottom. The cat can also jump up through the elevator from the bottom, just as it can jump through soft platforms.
The concepts behind the elevator are quite simple. The game reverses the elevator's velocity when it detects that it's moving too far up or down. When the cat is on top of the elevator, its velocity is set to the velocity of the elevator.
Let's look at a few of the specifics in greater detail.
The elevator is added to the _gameObjectMap.
private const ELEVATOR:uint = 22;

private var _gameObjectMap:Array
   = [
        [−1,−1,−1,−1,−1,−1,−1,−1,−1,−1],
        [−1,−1,−1,−1,−1,−1,−1,−1,−1,−1],
        [−1,20,−1,−1,−1,−1,−1,−1,−1,−1],
        [−1,−1,−1,−1,−1,−1,−1,−1,−1,−1],
        [−1,−1,−1,−1,−1,−1,−1,−1,−1,−1],
        [−1,−1,−1,−1,−1,−1,−1,−1,−1,−1],
        [−1,−1,−1,−1,−1,−1,22,−1,−1,−1],
        [−1,−1,−1,−1,−1,−1,−1,−1,−1,−1],
     ];
Its location is its start position on row 7 near the bottom of the map.
It's added to the game world by the buildMap method.
case ELEVATOR:
  _elevatorModel
    = new TileModel
    (
      MAX_TILE_SIZE,
      tileSheetColumn, tileSheetRow,
      mapRow, mapColumn,
      64, 32
    );
  _elevatorModel.friction = 1;
  _elevatorModel.vy = −2;
  drawGameObject
    (_elevatorModel, _foregroundBitmapData);
  break;
It's given a velocity of −2, which causes it to start moving toward the top of the stage when the game first starts.
The enterFrameHandler updates the elevator's model. It also checks to see which row on the game map the elevator is currently occupying. If the top of the elevator reaches row 1 or its bottom reaches row 7, the elevator's velocity is reversed.
_elevatorModel.update();

if(_elevatorModel.top == 1
|| _elevatorModel.bottom == 7)
{
  _elevatorModel.vy = -_elevatorModel.vy;
}
The enterFrameHandler also blits the elevator to the foreground bitmap each frame.
drawGameObject(_elevatorModel, _foregroundBitmapData);
A collision check between the cat and the elevator is also done each frame.
_collisionController.elevatorCollision
    (_catModel, _elevatorModel);
This method runs a standard SAT collision check, which tests for overlapping rectangles. The one modification to the code we looked at in Chapter 4 is that it blocks the player only when the player is striking it from the top. This is the same soft platform effect described in the previous section. It allows the player to jump up through the elevator from the bottom and come to rest on its top side for a very natural-looking effect.
The following is the complete elevatorCollision method from the TileModelController class. This is an ordinary distance-based collision check using vectors, and doesn't use a spatial grid.
public function elevatorCollision
  (gameObject:TileModel, elevator:TileModel):void
{
 var v0:VectorModel
    = new VectorModel
    (
      gameObject.xPos + gameObject.width * 0.5,
      gameObject.yPos + gameObject.height * 0.5,
      elevator.xPos + elevator.width * 0.5,
      elevator.yPos + elevator.height * 0.5
    );

  if(Math.abs(v0.vy) < gameObject.height * 0.5 + elevator.height * 0.5)
  {
     //A collision has occurred!
     //Find out the size of the overlap on both the x and y axes
     var overlap_X:Number
       = gameObject.width * 0.5
       + elevator.width * 0.5 - Math.abs(v0.vx);
     var overlap_Y:Number
       = gameObject.height * 0.5
       + elevator.height * 0.5 - Math.abs(v0.vy);

     //The collision has occurred on the axis with the
     //smallest amount of overlap. Let's figure out which axis that is
     if(overlap_X >=  overlap_Y)
     {
       //The collision is happening on the x axis
       //But on which side? (top or bottom?)
       //v0's vy can tell us
       if(v0.vy > 0)
         {
           //Collision on top
           //Check whether the gameObject is completely
           //above the platform.
//"-2" is added to provide a bit of//tolerance that might be needed if the//downward velocities of the gameObject and//platform are very similar.if ( gameObject.previousY - 2 < elevator.yPos - gameObject.height || !_elevatorOpen || (uint(gameObject.vy) == 0 && elevator.vy < 0) ) {//Move the gameObject out of the collisiongameObject.setY = elevator.yPos - gameObject.height;//Set the gameObject's vy to the elevator's vygameObject.vy = elevator.vy; gameObject.jumping = false;//Close the elevator so that the object//can't fall through_elevatorOpen = false; } } } } else {//No collision}//Open the elevator if the gameObject is//moving upwards again and its velocity//isn't exactly the same as the elevator'sif(gameObject.vy < 0 && gameObject.vy != elevator.vy) { _elevatorOpen = true; } }
The elevator uses a different tripwire from the soft platforms we looked at earlier to prevent the cat from falling through. It checks whether the bottom of the cat was above the platform in the previous frame.
if
   (
     gameObject.previousY - 2
       < elevator.yPos - gameObject.height
     || !_elevatorOpen
     || gameObject.vy == 0 && elevator.vy < 0
   )
{
  //... stop the object on the surface of the elevator
The −2 value is a bit of tolerance that I added while testing the example. I found that if the vertical velocity of the elevator and the cat are too close, the cat will sometimes appear to unnaturally miss a collision with the top of the elevator.
If this wire is tripped, the code sets the cat's vertical velocity to the elevator's vertical velocity, and closes the elevator to prevent the cat from falling through. It does this by setting the _elevatorOpen variable to false. _elevatorOpen is set to true again when the cat moves upward at a velocity that doesn't equal the elevator's velocity. In other words, when it jumps off the elevator.
if(gameObject.vy < 0
&& gameObject.vy != elevator.vy)
{
  _elevatorOpen = true;
}
This can only mean that the cat is jumping off the elevator.
There's another check that the code needs to make:
|| gameObject.vy == 0 && elevator.vy < 0
This means "If the object isn't moving and the elevator is moving up ...." This allows the cat to hop on an elevator when it's standing on the edge of platform and one of its bottom corners catches the lip of elevator as the elevator is moving up. It won't be apparent in this example how it works, but you'll see it in action in the Enemies example coming up soon.
Run the SWF in the CollectingObjects folder for an example of how to make objects that can be collected in a tile-based blit environment. Ride the elevator up to the platform and collect the star. The star disappears when the cat touches it, as shown in Figure 8-22.
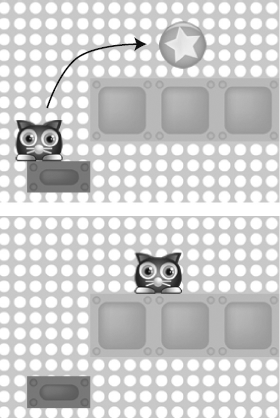
It's easy to achieve this effect using Sprite or MovieClip objects, because you just need to set the object's visible property to false to make it disappear. But in a blit display environment, we don't have that option. Things become invisible when they stop being drawn to the stage. This means that the logic for making things invisible in a blit environment looks something like this:
if(the object exists){blit the object to the stage bitmap}
As soon as you stop blitting the object, it disappears.
This is an extra little consideration in a blit display environment, but it's not difficult to implement.
The cat-versus-star collision detection uses a spatial grid. That means it first checks to see whether one of the cat's corner points is in the same cell as the star. If that turns out to be true, a distance check tests whether the cat and star are overlapping. If they are, the collision method returns true to the application class.
Here's the starCollision method from the TileCollisionController class that handles both this broad-phase and narrow-phase collision check:
public function starCollision
   (
     gameObject:TileModel,
     starTileObject:TileModel,
     platformMap:Array,
     maxTileSize:uint,
     star:uint
   ):Boolean
{
  var collision:Boolean = false;

  //Make sure that the code doesn't check for rows that
  //are greater than the number of rows and columns on the map
  if(gameObject.bottom < platformMap.length
  && gameObject.right < platformMap[0].length)
  {
     //If the object's corners are overlapping a tile
     //that contains a star...
     if(platformMap[gameObject.top][gameObject.left] == star
     || platformMap[gameObject.top][gameObject.right] == star
     || platformMap[gameObject.bottom][gameObject.left]  == star
     || platformMap[gameObject.bottom][gameObject.right] == star)
     {
        //Plot a vector between the gameObject's center point and the star
        var v0:VectorModel
          = new VectorModel
          (
            gameObject.xPos + (gameObject.width * 0.5),
            gameObject.yPos + (gameObject.height * 0.5),
            starTileObject.xPos + (starTileObject.width * 0.5),
            starTileObject.yPos + (starTileObject.height * 0.5)
          );

        //Calculate the the combined widths of the objects
        var totalRadii:Number
          = gameObject.width * 0.5
          + starTileObject.width * 0.5;

        if(v0.m < totalRadii)
        {
           //There's a collision if the distance between the objects
           //is less than their combined widths
           collision = true;
        }
     }
  }
//Return the true or false value of "collision"//back to the application classreturn collision; }
All this method really does is return a true or false value. The application class must decide what to do with this information. This is what it needs to consider:
if(the star exists...){Blit the star to the foreground bitmap.Check for a collision between the cat and the star...If(the collision method returns "true"){... set the star to null. It no longer exists.}}
The actual code in the CollectingObjects application class that does this is not much different from the pseudo code.
_foregroundBitmapData.fillRect(_foregroundBitmapData.rect, 0);//If the star exists...if(_starModel != null) {//Blit the star on the stagedrawGameObject(_starModel, _foregroundBitmapData);//Check for a collision with the cat.//(This will be either "true" or "false")var collisionIsHappening:Boolean = _collisionController.starCollision ( _catModel, _starModel, _gameObjectMap, MAX_TILE_SIZE, STAR );//Set the _starModel to null if a collision is happening.//This will prevent it from being displayed//in the next frame, which makes it "invisible"if(collisionIsHappening) { _starModel = null; } }
It's very important to remember to add this code after the foregroundBitmapData is cleared, because the code blits the star to the stage.
_foregroundBitmapData.fillRect(_foregroundBitmapData.rect, 0);
If you accidentally add it before this line of code, the star will be cleared as soon as it's added, and you won't see it on the stage.
Objects in tile-based games are aware of their environment. They know whether they're on a platform, in the sky, or next to a wall. This means that you can create general rules about how enemies behave. You can program objects to always change direction when they hit a wall, to jump over lava pits, or take to the air if they reach the edge of a cliff. If you program your objects carefully, they will be able to make autonomous decisions about how to behave depending on the kinds of environmental obstacles that are in their way. You can create completely new game maps and drop your objects in to watch how they behave.
A simple example of this "wind them up and let them loose" effect is in the Enemies folder. A hedgehog enemy moves back and forth across the platform, and the elevator moves up and down between two levels of platforms, as shown in Figure 8-23.
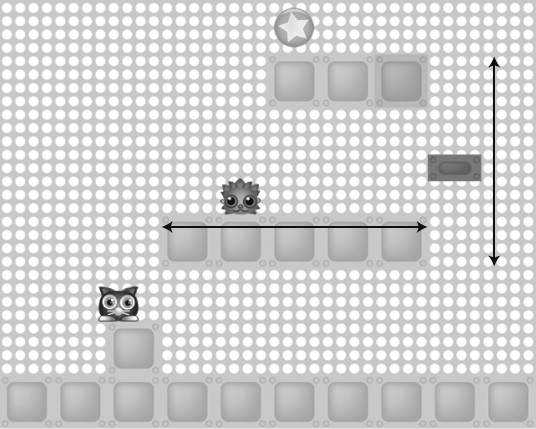
Figure 8.23. The hedgehog and elevator make decisions about where to move based on their changing environment.
Neither object has been preprogrammed to move between specific map cells. Instead, they're sensing where they are in the world and making a decision to act when their environment changes.
The hedgehog doesn't like heights. Whenever it reaches the edge of a platform, it gets spooked and reverses direction. But how does it know it's on "the edge of a platform"? Our code needs to find some way of describing this boundary. Look carefully at Figure 8-23, and you'll notice that this isn't too hard to figure out. When the tile in the row below the hedgehog becomes SKY, we know the hedgehog has reached the end of the platform. Check this for both the hedgehog's left and right side, and reverse the velocity if this turns out to be true. Figure 8-24 illustrates this logic.
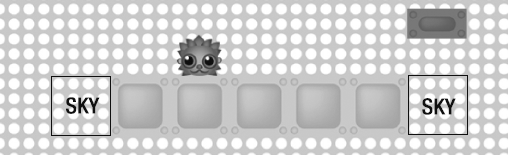
You can find the cell in the row below the hedgehog like this:
_platformMap[_hedgehogModel.centerY + 1][_hedgehogModel.centerX]This will tell you what kind of tile is in the cell directly below the center of the hedgehog. The + 1 means "one greater than the current row." So, if the hedgehog is currently on row 6, adding +1 will refer to row 7.
The preceding line of code uses the hedgehog's center point to find the cell below it. If we used this line of code in the game, it would work, but the hedgehog would move halfway over the edge of the platform before it noticed that the bottom tile had changed to SKY. In this example, we want the hedgehog to change direction as soon as its extreme left and right edges sense that the lower tile has changed. To do this, we can use the TileModel's left and right properties.
Here's how to find the tile at the bottom left:
_platformMap[_hedgehogModel.centerY + 1][_hedgehogModel.left]And here's how to find the tile at the bottom right:
_platformMap[_hedgehogModel.centerY + 1][_hedgehogModel.right]All you need to do is use these in an if statement and check whether they equal the value of SKY. If they do, reverse the hedgehog's vx.
if
  (
_platformMap
      [_hedgehogModel.centerY + 1]
      [_hedgehogModel.left]
      == SKY
    ||
    _platformMap
      [_hedgehogModel.centerY + 1]
      [_hedgehogModel.right]
      == SKY
  )
{
  _hedgehogModel.vx = -_hedgehogModel.vx;
}
The hedgehog's entire AI is this one simple if statement. And because it's based on a very general rule, it will work no matter how long the platform is or where on the map the hedgehog is placed. This means you can make maps with platforms and hedgehogs, place them anywhere, and they will work as expected, without changing a single line of code. It's a feature of the game engine.
The elevator follows the same logic, but needs to check for more conditions, as shown in Figure 8-25.
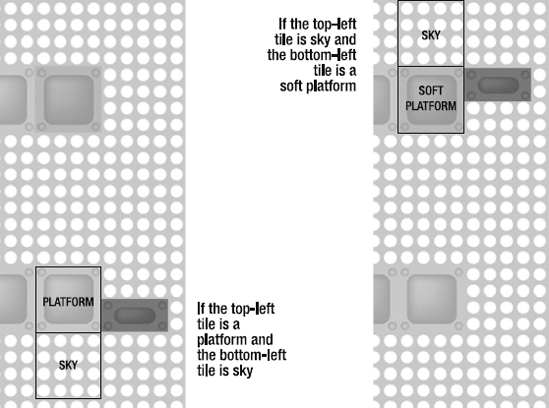
If you can conceptualize this problem logically, it's a small step to turn it into working code. Here's the code from the Enemies application class that does this:
//If the elevator is going down...if(_elevatorModel.vy > 0) { if ( _platformMap [_elevatorModel.bottom] [_elevatorModel.centerX - 1] == SKY && _platformMap [_elevatorModel.top] [_elevatorModel.centerX - 1] == PLATFORM ) { _elevatorModel.vy = -_elevatorModel.vy; } }//If the elevator is going up...else { if ( _platformMap [_elevatorModel.top] [_elevatorModel.centerX - 1] == SKY && _platformMap [_elevatorModel.bottom] [_elevatorModel.centerX - 1] == SOFT_PLATFORM ) { _elevatorModel.vy = -_elevatorModel.vy; } }
Complex conditional checks like this are possible because we can check the object's top and bottom corners simultaneously. This is a simple example, but using the same technique could result in sophisticated AI if you program your objects to react to changing game and environmental conditions.
In this next example, I'll show you how to vanquish an enemy in the time-honored tradition of jumping on its head. Run the SquashEnemy SWF, and you'll see that you can now make the hedgehog disappear by jumping on it. The collision will also cause the cat to bounce. Figure 8-26 shows the action.
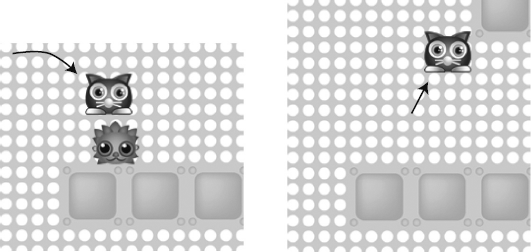
This effect is much easier to implement than it might at first appear. For collision-detection purposes, the cat and the hedgehog are circles. This is a basic circle-versus-circle collision-detection system. The object's half widths are the collision circles' radii. A tweak is that a collision is checked only if the cat is above the hedgehog. The bounce effect is the standard circle bounce effect that we covered in Chapter 3.
As with the star object, the hedgehog needs to disappear from the stage when a collision is detected. This means setting its value to null after the collision. To ensure that the code doesn't try to access any null objects, we need to wrap the hedgehog's update, movement, collision, and blit code in a single if statement block.
if(_hedgehogModel != null)
{
  //1. Update the model
  _hedgehogModel.update();

  //2. Check platform boundaries
  if
    (
      _platformMap
         [_hedgehogModel.centerY + 1]
         [_hedgehogModel.left]
         == SKY
||
_platformMap
[_hedgehogModel.centerY + 1]
[_hedgehogModel.right]
== SKY
)
{
_hedgehogModel.vx = -_hedgehogModel.vx;
}
//3. Collision check.
//Set the _hedgehogModel to "null" if the
//enemyCollision method returns "true"
if
  (
    _collisionController.enemyCollision
       (_catModel, _hedgehogModel)
  )
{
  _hedgehogModel = null;
}
//4. Blit the hedgehog if enemyCollision returns "false"
else
{
drawGameObject(_hedgehogModel, _foregroundBitmapData);
}
}This if statement does the job of deciding whether or not to set the _hedgehogModel to null while also running the actual collision method:
if
(
_collisionController.enemyCollision
(_catModel, _hedgehogModel)
)
{
_hedgehogModel = null;
}Note that the enemyCollision method is run directly in the conditional statement. This will work because the enemyCollision method returns either true or false, which are the values that conditional statements check for.
Here's the enemyCollision method from the TileCollisionController class:
public function enemyCollision
  (gameObject:TileModel, enemy:TileModel):Boolean
{
  var gameObject_Radius:Number = gameObject.width * 0.5;
  var enemy_Radius:Number = enemy.width * 0.5;
  var enemySquashed:Boolean = false;

  //Vector between circles
  //Measure from the center points
  var v0:VectorModel
    = new VectorModel
    (
      gameObject.xPos + gameObject_Radius,
      gameObject.yPos + gameObject_Radius,
      enemy.xPos + enemy_Radius,
      enemy.yPos + enemy_Radius
    );

  //Calculate the radii of both circles combined
  var totalRadii:Number = gameObject_Radius + enemy_Radius;

  //If the totalRadii is less than the distance
  //between the objects and the cat is above the enemy...
  if(v0.m < totalRadii
  && gameObject.yPos + enemy_Radius < enemy.yPos)
  {
    //A collision is happening.
    //Find the amount of overlap between circles
    var overlap:Number = totalRadii - v0.m;

    gameObject.setX = gameObject.xPos - (overlap * v0.dx);
    gameObject.setY = gameObject.yPos - (overlap * v0.dy);

    //The cat's motion vector
    var v1:VectorModel
      = new VectorModel
      (
        gameObject.xPos, gameObject.yPos,
        gameObject.xPos + gameObject.vx,
        gameObject.yPos + gameObject.vy
      );
//Create the cat's bounce vectorvar bounce_Player:VectorModel = VectorMath.bounce(v1, v0.ln);//Bounce the catgameObject.vx = bounce_Player.vx; gameObject.vy = bounce_Player.vy; enemySquashed = true; } else {//No collision} return enemySquashed; }
This is a distance-based collision check. If the method returns true, _enemySquashed is set to true, and the application class stops blitting the hedgehog and stops checking for a collision.
The squashing effect can be improved with a little explosion when the cat hits the hedgehog. Run the PlayAnimation SWF and squash the hedgehog. You'll see a quick, two-frame cartoon explosion, as shown in Figure 8-27.

The animation is made up of two tiles from the tile sheet. A timer is used to display the tiles 200 milliseconds apart. Each frame of the animation is blitted to the stage, much as we've been blitting all the other game objects. However, because the animation frames must be displayed persistently on the stage between clicks of the timer, we need to employ a little programming gymnastics. Let's see how it all works.
When the code detects a collision between the cat and the hedgehog, it does the following:
Captures the hedgehog's x and y positions in
explosion_Xandexplosion_YvariablesStarts the
_animationTimer, which is set to fire every 200 millisecondsSends the explosion's x and y values to the
playExplosionmethodSets the
_hedgehogModeltonull.
if
  (
    _collisionController.enemyCollision
      (_catModel, _hedgehogModel)
  )
{
  //Capture the hedgehog's position
  _explosion_X = _hedgehogModel.xPos;
  _explosion_Y = _hedgehogModel.yPos;

  //Start the timer
  _animationTimer = new Timer(200);
  _animationTimer.start();

  //Send the explosion's x and y values to the
  //playExplosion method
  playExplosion(_explosion_X, _explosion_Y);

  //Null the hedgehog
  _hedgehogModel = null;
}
The playExplosion method blits each frame of the animation from the tile sheet. It does so while the timer's currentCount property is less than the number of animation frames. currentCount is a built-in property of the Timer class that tells you how many times the timer has fired. It counts each tick of the clock. When the currentCount property is greater than the number of animation frames, it stops the timer and sets the _explosion flag to false.
private function playExplosion(x:Number, y:Number):void
{
  //The number of frames in the animation
  var animationFrames:uint = 2;
//Animate while the _animationTimer's currentCount//is less than the number of frames in the animation. The first//frame will be "0", the second will be "1"if(_animationTimer.currentCount < animationFrames) {//Find the tiles on the third row of the tile sheetvar sourceRectangle:Rectangle = new Rectangle ( _animationTimer.currentCount * MAX_TILE_SIZE, 3 * MAX_TILE_SIZE, MAX_TILE_SIZE, MAX_TILE_SIZE );//The point on the stage where the animation should//be displayed. This will be the same as the//hedgehog's original positionvar destinationPoint:Point = new Point(x, y); _foregroundBitmapData.copyPixels ( _tileSheetBitmapData, sourceRectangle, destinationPoint, null, null, true ); }//If the maximum number of animation frames//has been reached, stop the _animationTimer//and set the _explosion variable to falseelse {//Stop and reset the timer_animationTimer.stop(); } }
This is a pretty straightforward blit display system, but how does it know which tiles to use for the animation?
Figure 8-28 shows the two tiles in the tile sheet that are used as frames in the animation. They're both on row 3, and the first one is at column 0. This is important, so keep it in mind as I explain how these tiles are found.
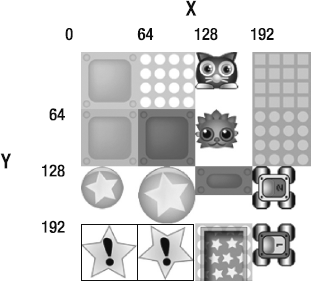
Here's the section of code that finds the correct position on the tile sheet:
var sourceRectangle:Rectangle
  = new Rectangle
  (
    _animationTimer.currentCount * MAX_TILE_SIZE,
    3 * MAX_TILE_SIZE,
    MAX_TILE_SIZE,
    MAX_TILE_SIZE
  );
Remember that a Rectangle object's constructor arguments are as follows:
(
  x position,
  y position,
  width,
  height
);
The x position in this case refers to the position of the tile on the tile sheet:
_animationTimer.currentCount * MAX_TILE_SIZE
The value of currentCount will be zero when the timer first starts. That means you can read the preceding line of code like this:
0 * 64
Of course, that just equals zero.
0
Why is that important? Because that's the x value of the first tile in the animation. Look back at Figure 8-28. The top-left corner of the first tile in the animation has an x position value of 0.
So we now know the x position, but we still need to find the y position:
3 * MAX_TILE_SIZE
You can read that as follows:
3 * 64
Or more simply, like this:
192
That's the y position of the tile on the tile sheet.
All this means is that on the first tick of the animation timer, the x position will be 0, and the y position will be 192. Those are exactly the coordinates of the first tile in the animation.
What happens when the second tick of the animation timer fires? This section of code is run again:
_animationTimer.currentCount * MAX_TILE_SIZE
But now currentCount equals 1. That means you can read this as follows:
1 * 64
(The y value is unchanged.) You can see from Figure 8-28 that the second tile has an x position of 64 and a y value of 192. In this way, the second tile is accurately selected. The animationFrames variable sets a limit of 2, so the timer is stopped after the second tile has been displayed.
The playExplosion method must be called on every frame so that the animation tiles persist on the stage between ticks of the timer. In other words, you need to play the explosion animation while the timer is running.
Timer objects have a property called running that returns true if the timer is currently running. The application class uses that property to call the playExplosion method while the timer is busy counting.
if(_animationTimer
&& _animationTimer.running)
{
  playExplosion(_explosion_X, _explosion_Y);
}
It first checks to make sure that _animationTimer isn't null, and checks to see if it's running. This will make the animation run until the timer is stopped.
The PlayAnimation example is a very simple blit animation system, but you can build a more sophisticated and flexible animation engine to suit your own game. You can think of this system as film projector, and the tile sheet as a strip of film. For longer or more complex animations, just increase the number of tiles in the animation. You may want to dedicate a single tile sheet to a very lengthy animation.
It's easier to manage animations if all the frames of the animation are on one row of the tile sheet. But if you have an animation that spans multiple rows, you'll need some way of figuring out when you need to jump to the next row down. You can do this with the help of the modulus operator (%).
Let's say that your tile sheet is five columns wide. If you can divide currentCount by 5 and there's no remainder, then you know that you've exceeded the last column and need to start a new row. Here's what your code might look like:
if(currentCount % 5 == 0)
{
  //Start a new row...
  row += 1;
}
Why does this work?
First, because the column numbering starts at 0, the fifth column is actually numbered as 4 (These are the five column numbers: 0, 1, 2, 3, 4.) Column 4 is the last column of any row. Keep that in mind!
That means when currentCount becomes 5, it's actually referring to the sixth column, But of course, our imaginary tile sheet is only five columns wide, so there is no sixth column! This can mean only one thing: you need to start a new row.
This formula currentCount % 5 will always return a remainder of 0 if currentCount is evenly divisible by 5. That means it will work just as well when currentCount becomes 10, 15, or 20. Each of those numbers can tell the code that you need to jump to a new row.
If coding our cartoon explosion seems like an awful lot of work for two simple frames of animation, you're right—it is! Because we're using a blit display system, we don't have the luxury of the MovieClip object's play and stop methods.
If you're doing a lot of animation, you will probably want to use movie clips for them. It's the natural choice and much more manageable. MovieClip objects are designed for exactly such a job, so there's no need to reinvent the wheel. You can use MovieClip and Sprite objects in a blit environment for the best of both worlds. In the racing car examples at the end of the chapter, I'll show you how to blit tiles into sprites so that you can use all the sprite properties like scaling and rotation.
However, blitting your animation does have one big advantage: it's always going to be less CPU-intensive than playing movie clip animations.
Is there some way to combine the speed of blitting and the convenience of movie clip animation? There is! Even though you may not prefer it for writing code, Flash Professional is great for doing animation. It's possible for you to create all your animations as movie clips in Flash Professional, embed those clips into your code, and then cache each frame of the animation as a bitmap in an array when your game initializes. You can then use a custom method to loop through each bitmap in the array to re-create the movie clip animation as a blit animation. Adobe has published an excellent article by Michael James Williams that explains how to do just that. You can find it at the Adobe Developer Connection web site: http://www.adobe.com/devnet/flash/articles/blitting_mc.html.
Note
We've been importing all sorts of assets into our code, like sounds and images. But did you know that you can just as easily import Sprite and MovieClip objects directly from SWF files and access all their content and properties? Here's how:
In Flash Professional, select
Export for ActionScriptfor any objects you need to access with code.Embed the SWF file into your code.
[Embed(source="FlashMovie.swf",
symbol="AnyMovieClipSymbol")]
var MovieClipObject:Class;
Create an instance of
AnyMovieClipSymboland access its methods and properties like this:theEmbeddedSymbol = new MovieClipObject(); addChild(theEmbeddedSymbol); theEmbeddedSymbol.x = 100; theEmbeddedSymbol.y = 200;
By embedding objects from SWF files in this way, you have the freedom to work in any IDE you choose, but still take advantage of Flash Professional's strength as an excellent animation tool.
A big advantage of tile-based games is how easy it is to create new game levels. You'll find an example of a game prototype with three levels in the SwitchingLevels folder. Each level has a door. When the cat reaches the door, a new game level is displayed, as shown in Figure 8-29. When the cat goes through the last door, the first level is displayed again. An infinite loop of levels!

It takes only a few minutes to create these new game levels, and adding them does not require any changes to the tile game engine that we've been using since the beginning of the chapter. What's new is a method that initializes all these levels and adds them to level arrays when the game first starts.
For the levels, we need a few more variables to store the current platform map, the current game object map, and the current level number.
private var _currentPlatformMap:Array = [];
private var _currentObjectMap:Array = [];
private var _currentLevel:uint = 0;
We also need two more arrays that will store all the game maps.
private var _platformMaps:Array = [];
private var _gameObjectMaps:Array = [];
These arrays will hold the game map arrays that we'll make in the next step.
When the game is initialized, a method is called that creates all the game maps.
createMaps();
This method creates the maps for the three levels, and pushes them into the _platformMaps and gameObjectMaps arrays.
public function createMaps():void
{
  //Level 1
  var platformMap_1:Array
    = [
        [10,10,10,10,10,10,10,10,10,10],
        [00,00,10,10,10,23,10,10,10,10],
        [10,10,10,10,01,01,01,10,10,10],
        [10,10,10,10,10,10,10,10,01,10],
        [10,10,10,10,10,10,01,01,01,10],
        [10,10,10,10,01,01,01,01,01,10],
        [10,10,00,10,10,10,10,10,10,10],
        [00,00,00,00,00,00,00,00,00,00]
      ];

  var gameObjectMap_1:Array
    = [
        [−1,−1,−1,−1,−1,−1,−1,−1,−1,−1],
        [−1,−1,−1,−1,−1,−1,−1,−1,−1,−1],
        [−1,−1,−1,−1,−1,−1,−1,−1,−1,−1],
        [−1,−1,−1,−1,−1,−1,−1,−1,−1,−1],
        [−1,−1,−1,−1,−1,−1,−1,−1,−1,−1],
        [−1,−1,−1,−1,−1,−1,−1,−1,−1,−1],
[−1,20,−1,−1,−1,−1,−1,−1,−1,−1],
[−1,−1,−1,−1,−1,−1,−1,−1,−1,-1]
];
_platformMaps.push(platformMap_1);
_gameObjectMaps.push(gameObjectMap_1);
//Level 2
var platformMap_2:Array
= [
[10,10,10,10,10,10,10,10,10,10],
[10,10,01,01,10,10,01,10,01,10],
[10,10,10,10,10,10,10,10,10,10],
[23,10,10,00,10,10,01,01,01,10],
[00,00,10,00,00,10,10,10,10,10],
[10,10,10,00,00,00,00,10,10,10],
[10,10,10,10,10,10,10,10,10,10],
[00,00,00,00,00,00,00,00,00,00]
];
var gameObjectMap_2:Array
= [
[−1,−1,−1,−1,−1,−1,−1,−1,−1,−1],
[−1,−1,−1,−1,−1,−1,−1,−1,−1,−1],
[−1,−1,−1,−1,−1,−1,−1,−1,−1,−1],
[−1,−1,−1,−1,−1,−1,−1,−1,−1,−1],
[−1,−1,−1,−1,−1,−1,−1,−1,−1,−1],
[−1,−1,−1,−1,−1,−1,−1,−1,−1,−1],
[−1,−1,−1,−1,−1,−1,−1,−1,−1,20],
[−1,−1,−1,−1,−1,−1,−1,−1,−1,-1]
];
_platformMaps.push(platformMap_2);
_gameObjectMaps.push(gameObjectMap_2);
//Level 3
var platformMap_3:Array
= [
[10,10,10,10,10,10,10,10,10,10],
[10,10,00,00,10,10,10,10,10,10],
[10,01,10,00,00,00,00,10,10,10],
[10,10,10,00,23,10,10,00,10,10],
[00,10,10,00,00,00,10,10,00,10],
[10,01,10,10,00,00,01,10,10,10],
[10,10,10,10,00,10,10,10,10,10],
[00,00,00,00,00,00,00,00,00,00]
];var gameObjectMap_3:Array
= [
[−1,−1,−1,−1,−1,−1,−1,−1,−1,−1],
[−1,−1,−1,−1,−1,−1,−1,−1,−1,−1],
[−1,−1,−1,−1,−1,−1,−1,−1,−1,−1],
[−1,−1,−1,−1,−1,−1,−1,−1,−1,−1],
[−1,−1,−1,−1,−1,−1,−1,−1,−1,−1],
[−1,−1,−1,−1,−1,−1,−1,−1,−1,−1],
[−1,−1,20,−1,−1,−1,−1,−1,−1,−1],
[−1,−1,−1,−1,−1,−1,−1,−1,−1,-1]
];
_platformMaps.push(platformMap_3);
_gameObjectMaps.push(gameObjectMap_3);
_currentPlatformMap = _platformMaps[_currentLevel];
_currentObjectMap = _gameObjectMaps[_currentLevel];
}The last two lines are quite important. They set the first level of the game. They set the current maps to the value of _currentLevel. _currentLevel is initialized to 0 when the game starts. That means you can read those two lines like this:
_currentPlatformMap = _platformMaps[0];
_currentObjectMap = _gameObjectMaps[0];
This sets the current maps to the first maps that were pushed in to the _platformMaps and _gameObjectMaps arrays. This will be the first map you'll see when the game starts.
When that's done, we can run the usual buildMap method. But this time, we're sending it the values of _currentPlatformMap and _currentObjectMap.
buildMap(_currentPlatformMap);
buildMap(_currentObjectMap);
The buildMap method is basically unchanged since the first example in this chapter. The only difference is that it has been modified to understand what DOOR tiles are (tile ID 23).
case DOOR:
   var door:TileModel
     = new TileModel
     (
       MAX_TILE_SIZE,
       tileSheetColumn, tileSheetRow,
       mapRow, mapColumn,
       MAX_TILE_SIZE, MAX_TILE_SIZE
     );
  drawGameObject(door, _backgroundBitmapData);
  break;
Now that the game has been initialized, we can use all the same tile-based game techniques that we've covered in this chapter. The game engine is completely agnostic to what level is currently loaded. It doesn't care. Because the game rules are general, they apply to all levels.
One new thing we need to do is to check for a collision with a DOOR tile, as shown in Figure 8-30.
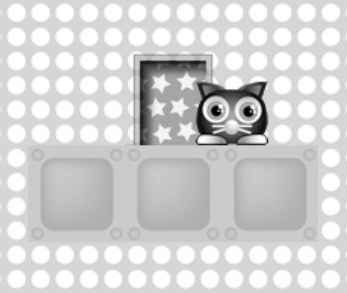
That will switch the level. The door collision uses a very basic spatial grid collision check.
if(_currentPlatformMap[_catModel.mapRow][_catModel.mapColumn]
    == DOOR)
{...
It checks whether the cat's center point is on a DOOR tile. If it is, it adds 1 to the value of _currentLevel, loads the new maps, and builds them.
//Check for a collision with the doorif(_currentPlatformMap[_catModel.mapRow][_catModel.mapColumn] == DOOR) {//Add "1" to the current level_currentLevel++;//Optionally, loop the game levels by setting _currentLevel//back to "0" when the last level of the game is reachedif(_currentLevel >= _platformMaps.length) { _currentLevel = 0; }
//Use the new value of _currentLevel to load the new level maps_currentPlatformMap = _platformMaps[_currentLevel]; _currentObjectMap = _gameObjectMaps[_currentLevel];//Build the maps using the usual buildMap methodbuildMap(_currentPlatformMap); buildMap(_currentObjectMap); }
This code also sets the value of _currentLevel back to 0 if the number of game maps is exceeded. This is what loops the levels infinitely.
These few lines of code are all you need to extend a 1-level game to a 100-level or even 1000-level game. Can you see now how much easier it is to create new levels in a tile-based game engine than it is in a game like Escape!, where most of the level specifics were hardwired into the game engine?
I've kept this example simple so that you can clearly see the mechanics of switching and building new game levels. When you build your own game using this technique, you'll need to carefully consider the rules of the game, and make sure that they will apply no matter which level is loaded. Depending on your game, these rules could become quite complex. You may also find that it's useful to store specific level rules in an array of objects, and load those into the game when you load the new levels. In the race car examples later in this chapter, I'll show you one way you can store and load level rules in arrays along with your maps. In Chapter 10, you'll learn how to load levels and other game data from external XML files.
Scrolling a big environment is greatly simplified if you're using a blit display system in a tile-based game world. Because all the game objects are being projected onto single bitmaps, we can use the Bitmap class's ultra-fast scrollRect property. It's an optimized property designed exclusively for scrolling bitmaps, and it's perfect for scrolling game environments.
You'll find an example of a big, scrolling tile-based game environment using scrollRect in the Scrolling folder. The cat now has a huge playground to jump around in, and the game world camera follows it all the way. Figure 8-31 shows this version.
The tile-based game engine is essentially unchanged. We can drop the scrolling system directly onto the existing engine. The only small modifications we need to make are to account for the larger game world.
The map arrays are twice the size: 20 columns by 16 rows.
private var _platformMap:Array
    = [
        [10,10,10,10,10,10,10,10,10,10,10,10,10,10,10,10,10,10,10,10],
        [10,10,10,10,10,10,10,10,10,10,10,10,10,10,10,10,10,10,10,10],
        [10,10,10,10,10,10,10,10,10,10,10,10,10,00,10,10,10,10,10,00],
        [10,10,10,10,10,01,01,10,00,00,10,00,00,00,10,10,10,10,00,00],
        [10,10,10,10,10,10,10,10,00,10,10,10,10,00,10,10,10,00,00,00],
        [10,10,10,10,10,01,01,10,00,00,00,10,10,00,10,10,10,10,10,10],
        [10,10,10,10,10,10,10,10,00,00,00,10,10,00,00,00,10,10,10,10],
        [10,00,10,10,00,00,00,10,00,00,00,10,10,00,10,10,10,00,00,10],
        [10,10,10,10,10,10,10,10,00,10,10,10,00,00,10,10,10,10,10,10],
        [10,10,10,00,00,10,10,00,00,10,10,00,00,00,00,00,00,10,10,10],
        [10,10,10,10,10,10,10,00,10,10,00,00,00,00,10,10,10,10,10,10],
        [10,10,10,10,10,00,00,00,10,10,00,00,00,00,10,10,10,00,00,10],
        [10,10,10,10,10,10,00,00,10,10,10,10,00,10,10,10,10,10,10,10],
        [10,10,10,10,00,00,00,10,10,10,10,10,00,10,10,00,00,00,10,10],
        [10,00,00,10,10,10,00,10,10,10,10,10,10,10,10,10,10,10,10,10],
        [00,00,00,00,00,00,00,00,00,00,00,00,00,00,00,00,00,00,00,00]
      ];
The _gameObjectMap is equally large.
However, it doesn't matter how large these maps are; they can be any size. The BitmapData that contains them will automatically expand to fit the size of the array. This is because it finds the correct size by multiplying the number of rows and columns by the tile size.
private var _backgroundBitmapData:BitmapData
  = new BitmapData
    (
       MAP_COLUMNS * MAX_TILE_SIZE,
       MAP_ROWS * MAX_TILE_SIZE,
       true, 0
    );

private var _backgroundBitmap:Bitmap
  = new Bitmap(_backgroundBitmapData);

private var _foregroundBitmapData:BitmapData
  = new BitmapData
    (
       MAP_COLUMNS * MAX_TILE_SIZE,
       MAP_ROWS * MAX_TILE_SIZE,
       true, 0
    );
private var _foregroundBitmap:Bitmap
  = new Bitmap(_foregroundBitmapData);
You can design the game maps in the same ways as you design smaller maps. The same rules apply. However, if you use maps of different sizes, you'll need to make sure that the bitmaps are sized correctly. In Chapter 10, you'll learn how you can store this information in XML as metadata that you can load with the map.
The maps are built using the same buildMap method, and there's nothing else that needs to be altered about the game engine. There's just one addition: a camera.
You can think of the camera as a rectangle that follows the cat around the world and selects which parts of the foreground and background bitmaps to display. It's your view onto the game world.
The camera is a Rectangle object. It's the same size as the stage.
private var _camera:Rectangle = new Rectangle
 (0, 0, stage.stageWidth, stage.stageHeight);
It's positioned so that it's always centered over the cat. These two lines of code in the enterFrameHandler will make the camera follow the cat all over the game world:
_camera.x = _catModel.xPos - stage.stageWidth * 0.5;
_camera.y = _catModel.yPos - stage.stageHeight * 0.5;
The camera should also be contained within the limits of the game world. It shouldn't expose what lies beyond the edges of the world. This section of code in the enterFrameHandler makes sure that it doesn't move outside the game world boundaries:
//Check the camera's game world boundaries//Leftif(_camera.x < 0) { _camera.x = 0; }//Rightif(_camera.x > (MAP_COLUMNS * MAX_TILE_SIZE) - stage.stageWidth) { _camera.x = (MAP_COLUMNS * MAX_TILE_SIZE) - stage.stageWidth; }//Bottomif(_camera.y > (MAP_ROWS * MAX_TILE_SIZE) - stage.stageHeight) { _camera.y = (MAP_ROWS * MAX_TILE_SIZE) - stage.stageHeight; }//Topif(_camera.y < 0) { _camera.y = 0; }
After the objects have been blitted to the foreground and background bitmaps, the game can be scrolled. This is done by assigning the bitmaps' scrollRect property to the value of camera. These two lines are also in the enterFrameHandler:
_foregroundBitmap.scrollRect = _camera;
_backgroundBitmap.scrollRect = _camera;
The bitmaps are cropped to the size of the camera rectangle. When the camera's x and y values change, the bitmaps scroll within the camera's rectangle.
And that's all there is to it! The scrolling is handled for you automatically. As you can see when you run the SWF, it's a very natural, classic video game scrolling effect.
There is one small change to the way in which the cat responds to the movements of the mouse in this scrolling environment. In previous examples, the cat's easing was based on the difference between the cat's position and the position of the mouse on the stage. Now that our game world is much bigger than the stage, this won't work. We can't use the coordinate space of the stage. We need to use the coordinate space of the entire _foregroundBitmap.
The TileModel class has a property called coordinateSpace that we can use to take account of just such a situation. It can accept any DisplayObject, like a Bitmap.
The cat's coordinateSpace property is set when the _catModel is created by the buildMap method. I've highlighted it in the following code. (The rest of the code is identical to previous examples.)
case CAT:
  _catModel
    = new TileModel
    (
      MAX_TILE_SIZE,
      tileSheetColumn, tileSheetRow,
      mapRow, mapColumn,
      48, 42
    );

  _catModel.gravity_Vy = 0.98;
  _catModel.coordinateSpace = _foregroundBitmap;

  _UIPlatformController
    = new UIPlatformController(_catModel);
  _UIPlatformView
    = new UIPlatformView
    (_catModel, _UIPlatformController, stage);

  drawGameObject(_catModel, _foregroundBitmapData);
  break;
Setting that coordinateSpace property isn't much help unless you use it in some way. In this case, the cat's UIPlatformController uses it to find whether or not it should use the stage or some other DisplayObject to calculate the mouse's x and y coordinates.
var vx:Number

if(_model.coordinateSpace == null)
{
  vx
    = stage.mouseX
    - (_model.xPos + _model.width * 0.5);
}
else
{
  vx
    = _model.coordinateSpace.mouseX
    - (_model.xPos + _model.width * 0.5);
}
In this case, it chooses the second option. The code will calculate easing based on the position of the mouse on the _foregroundBitmap. This results in the accurate mouse-follow effect you can see in the SWF.
If you're making a game in a scrolling environment where you need to calculate the "bottom of the game world," you must also use the world's bitmap dimensions to help you find out where this is.
For example, let's say we want to set the cat's jumping property to false if the cats lands at the very bottom of the stage, at the bottom of the world. We can do this by checking whether the bottom of the cat is at a position that is at or greater than the height of the foreground bitmap:
if(_catModel.yPos + _catModel.height
  >= _foregroundBitmapData.height)
{
  _catModel.jumping = false;
}
This is the same as checking for the bottom of the stage in a nonscrolling environment.
As you can see, scrolling in a tile-based, blit display environment is quite painless. You'll probably find this the preferred way to do scrolling from now on.
The drawback to using blit objects in games is that it's difficult to scale or rotate them. If you have an object that you want to rotate, you need to create individual tiles that represent every single stage in the rotation. That means for a full 360-degree rotation, you'll need 360 tile images, each of which will be one degree of rotation different than the rest. Not only will you end up with a huge tile sheet, but you'll need to create your own custom methods to handle and display the rotation. This will be a lot of work to create, manage, and maintain, and except for the most performance-intensive games, it's just not worth it.
Sprites and movie clips do scaling and rotation beautifully. It's also quite possible to use them in combination with a tile-based game environment. In fact, you can mix and match sprites, movie clips, and blit objects as much as you like, and still keep the same game engine intact. In this next example, I'll show you how.
Run the DrivingGame SWF in the chapter's source files. This is simple prototype for a tile-based car driving game. Use the arrow keys to drive the car around the track, as shown in Figure 8-32. If you run into the grass, you'll slow down until you're back on the road.
This may seem like a radically different type of game than the platform game examples we've been looking at, but the tile-based engine is identical. What's different here is that the car is a sprite. The car tile is being projected from the tile sheet into a containing sprite. Figure 8-33 is a simplified illustration of how this works.
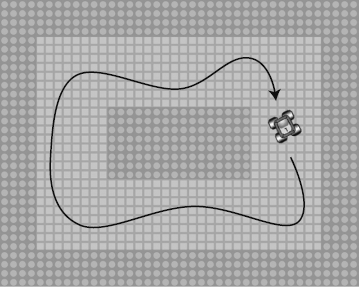
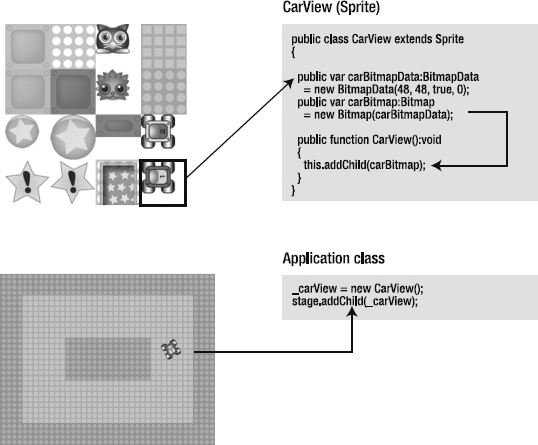
Here's an overview of the process:
The car tile is read from the tile sheet.
It's assigned to the
CarViewsprite'scarBitmapData. carBitmapDatais the same size as the car tile.The
CarViewadds thecarBitmapto its own display list.The application class adds the
carViewsprite to the stage.
Now we'll look at the details of how this works.
The buildMap method creates all the tiles in the game. When it creates the CAR tile, it also creates the car's model, view, and controller. The view is a sprite, and the buildMap method adds it to the stage.
case CAR:
  _carTileModel
    = new CarTileModel
    (
      MAX_TILE_SIZE,
      tileSheetColumn, tileSheetRow,
      mapRow, mapColumn,
      48, 48
    );

  //Add the view and controller
  _carController
    = new CarController(_carTileModel);
  _carView
    = new CarView
    (_carTileModel, _carController, stage);

  //Load the tile from the tile sheet into the
  //car's containing Sprite
  loadTileIntoView
    (_carTileModel, _carView.carBitmapData);

  //Add the car's view to the stage
  stage.addChild(_carView);
  break;
Before the view is added to the stage, the car tile is loaded into it with this line of code:
loadTileIntoView
  (_carTileModel, _carView.carBitmapData);
Notice that it sends the car's carBitmapData property as an argument. The loadTileIntoView method is going to blit the car tile from the tile sheet directly into the carBitmapData.
The loadTileIntoView method in the application class is responsible for reading the tile sheet and copying the car tile into the carView's carBitmapData property.
private function loadTileIntoView
  (tileModel:TileModel, bitmapData:BitmapData):void
{
  var sourceRectangle:Rectangle
    = new Rectangle
    (
      tileModel.tileSheetColumn * MAX_TILE_SIZE,
      tileModel.tileSheetRow * MAX_TILE_SIZE,
      tileModel.width,
      tileModel.height
    );

  var destinationPoint:Point = new Point(0, 0);

  bitmapData.copyPixels
    (
      _tileSheetBitmapData,
      sourceRectangle,
      destinationPoint,
      null, null, true
    );
}
This is a standard blit method. But instead of blitting the tile onto one of the stage bitmaps, it blits it into the carView sprite's carBitmapData property. This needs to happen only once, when the carView is initialized.
The CarView class contains the car tile bitmap and centers it in its own display. It needs to be centered so that the rotation happens around the car's center axis. Here's the complete CarView class.
package com.friendsofed.gameElements.car
{
  import flash.display.*;
  import flash.events.Event;
  import flash.events.KeyboardEvent;
  import flash.ui.Keyboard;
  import com.friendsofed.gameElements.primitives.*;
public class CarView extends Sprite
{
private var _model:Object;
private var _controller:Object;
private var _stage:Object;
public var carBitmapData:BitmapData
= new BitmapData(48, 48, true, 0);
public var carBitmap:Bitmap
= new Bitmap(carBitmapData);
public function CarView
(
model:AVerletModel,
controller:CarController,
stage:Object
):void
{
this._model = model;
this._controller = controller;
this._stage = stage;
//Center this sprite
this.x = _model.xPos + 24;
this.y = _model.yPos + 24;
this.addChild(carBitmap);
//Center the carBitmap in this Sprite
carBitmap.x = −24;
carBitmap.y = −24;
_model.addEventListener(Event.CHANGE, changeHandler);
_stage.addEventListener
(KeyboardEvent.KEY_DOWN, keyDownHandler);
_stage.addEventListener
(KeyboardEvent.KEY_UP, keyUpHandler);
}
private function keyDownHandler(event:KeyboardEvent):void
{
_controller.processKeyDown(event);
}
private function keyUpHandler(event:KeyboardEvent):void
{
_controller.processKeyUp(event);
}private function changeHandler(event:Event):void
{
this.x = _model.xPos + 24;
this.y = _model.yPos + 24;
this.rotation = _model.rotationValue;
}
}
}You'll find all this code in the com.friendsofed.gameElements.car package.
The car's control system is very similar to the spaceship's control system that we looked at in Chapter 1, but has a few new twists. Unlike the spaceship, the car is able to nimbly change direction whenever the direction keys are pressed, even while it's not accelerating.
The car's control system is divided between two classes: CarTileModel and CarController. (You'll find both of these classes in the com.friendsofed.gameElements.car package.)
CarTileModel has two new public properties to help the car move:
public var accelerate:Boolean = false;
public var speed:Number = 0;
Here's the role they play in this system:
accelerateis a Boolean variable that's set totruewhen the up arrow key is pressed, andfalsewhen it's not being pressed. It's the car's accelerator (gas pedal).speedis how fast the car is going.
These are two common-sense properties that you ordinarily associate with cars. Let's look at how they work together to make the car move.
The CarController handles key presses that the CarView sends it. Its two important methods are processKeyDown and processKeyUp. They set the car's rotation and tell it whether or not it should accelerate.
public function processKeyDown(event:KeyboardEvent):void
{
  switch (event.keyCode)
  {
    case Keyboard.LEFT:
      _model.rotationSpeed = −3;
      break;

    case Keyboard.RIGHT:
      _model.rotationSpeed = 3;
      break;
case Keyboard.UP:
_model.accelerate = true;
break;
}
}
public function processKeyUp(event:KeyboardEvent):void
{
switch (event.keyCode)
{
case Keyboard.LEFT:
_model.rotationSpeed = 0;
break;
case Keyboard.RIGHT:
_model.rotationSpeed = 0;
break;
case Keyboard.UP:
_model.accelerate = false;
break;
}
}When the player presses the up arrow key, the car model's accelerate property is set to true.
case Keyboard.UP:
  _model.accelerate = true;
  break;
This is important because the car model uses accelerate to figure out whether it should move the car.
The CarTileModel's update method moves the car using the standard Verlet integration system.
override public function update():void
{
  temporaryX = xPos;
  temporaryY = yPos;

  //Calculate the rotationValue
  rotationValue += rotationSpeed;

  //Calculate the angle and acceleration
  angle = rotationValue * (Math.PI / 180);
//Increase the car's speed if the controller//tells it to accelerateif(accelerate) { speed += 0.1;//Add some optional dragspeed *= friction; }//Add friction to the speed if the car is//not acceleratingelse { speed *= friction; }//Calculate the acceleration based on the angle of rotationacceleration_X = speed * Math.cos(angle); acceleration_Y = speed * Math.sin(angle);//Update the positionxPos += acceleration_X; yPos += acceleration_Y; previousX = temporaryX; previousY = temporaryY; }
If accelerate is true, then the value of speed is increased. If accelerate is false, speed is multiplied by the friction value to slow down the car.
if(accelerate)
{
  speed += 0.1;
  speed *= friction; //This line is optional
}
else
{
  speed *= friction;
}
speed is then multiplied by the angle of rotation to obtain the car's final acceleration values.
acceleration_X = speed * Math.cos(angle);
acceleration_Y = speed * Math.sin(angle);
These are then added to the car's position to move the car in the correct direction and at the correct speed.
xPos += acceleration_X;
yPos += acceleration_Y;
Notice that the update method in the CarTileModel begins with the keyword override.
override public function update():void
{...
Why is this?
CarTileModel extends TileModel. TileModel in turn extends AVerletModel. That means that CarTileModel also inherits all of AVerletModel's properties. This is very convenient because it means that the CarTileModel class has much less code than it would if it also had to contain all of AVerletModel's and TileModel's code. It can just extend TileModel and inherit all of AVerletModel's properties and methods as well—all for free. This is great, except that AVerletModel already contains a method called update. And its update method happens to be radically different from CarTileModel's update method. Using the keyword override tells AS3.0's compiler that it should ignore AVerletModel's update method and use this new one instead.
As you've seen, using the basic control system introduced in Chapter 1, you can achieve markedly different control styles by juggling the numbers in slightly different ways.
The DrivingGame example also illustrates how a tile-based game engine can elegantly solve some otherwise tricky game design problems. A feature of the DrivingGame is that the car slows down when it runs into the grass, as shown in Figure 8-34. This is the single most annoying feature of driving games in general, so I had to include it!
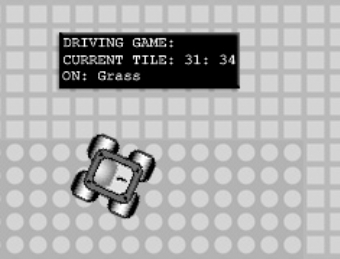
The game does this by checking if the car is on a GRASS tile. If it is, it sets the car's friction to 0.85 to slow it down. The game sets it back to the usual 0.98 if it's not on the grass. This is the section of code in the DrivingGame application class that does this:
if(_raceTrackMap[_carTileModel.mapRow][_carTileModel.mapColumn]
  == GRASS)
{
  //Lots of friction if the car is on the grass
  _carTileModel.friction = 0.85;
}
else
{
  //Otherwise, normal friction
  _carTileModel.friction = 0.98;
}
Game design doesn't get much simpler than this. No creating of a lot of grass objects, no looping through arrays, no complex collision detection. Yay, tile-based games!
You've seen how map arrays are not just used for plotting tiles, but also to help interpret the game world. The enemy in the platform game could use that information to figure out that it was close to a ledge and needed to turn back. The elevator could use it to figure out how high or low it needed to travel. In the DrivingGame example, the GRASS data in the array not only helped plot the grass tile on the stage, but also played a crucial role in the game logic. The power of tile-based games is that map array data holds meaningful information, which can be used in the game for everything from the display to the AI system.
You can take this one step further. What if you stored data in the arrays that contained more information about the game world other than just what you can see on the stage?
Imagine that you're creating a fantasy role-playing game where players can cast spells that affect part of the game world. The Bard character casts a spell of Discordant Cacophony that makes all the enemies run away from the area of the game map where the spell is cast. How will you describe this information to the game?
You could create a "spell map" that matches the size of the game world. You could mark all the parts of the world that are affected by Discordant Cacophony with some kind of code, like 99.
private var _spellMap:Array
  = [
      [−1,−1,−1,−1,−1,−1,−1,−1,−1,−1],
      [−1,−1,−1,−1,−1,−1,−1,−1,−1,−1],
      [−1,−1,−1,−1,99,−1,−1,−1,−1,−1],
      [−1,−1,−1,99,99,99,−1,−1,−1,−1],
      [−1,−1,−1,99,99,99,−1,−1,−1,−1],
      [−1,−1,−1,−1,99,−1,−1,−1,−1,−1],
      [−1,−1,−1,−1,−1,−1,−1,−1,−1,−1],
      [−1,−1,−1,−1,−1,−1,−1,−1,−1,-1]
    ];
Enemies could then take this information into account and decide whether or not they want to risk ruptured eardrums by entering any of those tiles.
This information isn't visual; it's just used by the logic of the game. When you start becoming comfortable thinking in a tile-based way about your games, you'll find that many otherwise complex problems can be solved easily with arrays of game data like this.
As an example, take a look at the AIDrivingGame in the chapter's source files. Now you have an opponent to play against: an AI-controlled robot car that does its best to race you around the track, as shown in Figure 8-35. It will give you a good run for your money until you get the knack of driving.
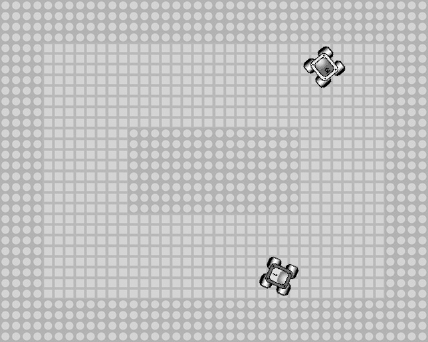
But here's the interesting part: the AI car isn't following a prescripted animation, and it doesn't have a dedicated AI controller. Instead, it's reading an array of numbers that tells it how it should try to angle itself depending on which cell it's in. It's following an invisible "angle map."
To give you a clearer sense of what's going on, here are the three maps used in the game:
private const ROAD:uint = 30;
private const GRASS:uint = 31;
private const CAR:uint = 33;
private const AI_CAR:uint = 32;
private var _raceTrackMap:Array
  = [
      [31,31,31,31,31,31,31,31,31,31],
      [31,30,30,30,30,30,30,30,30,31],
      [31,30,30,30,30,30,30,30,30,31],
      [31,30,30,31,31,31,31,30,30,31],
      [31,30,30,31,31,31,31,30,30,31],
      [31,30,30,30,30,30,30,30,30,31],
      [31,30,30,30,30,30,30,30,30,31],
      [31,31,31,31,31,31,31,31,31,31]
    ];

private var _gameObjectMap:Array
  = [
      [−1,−1,−1,−1,−1,−1,−1,−1,−1,−1],
      [−1,−1,32,−1,−1,−1,−1,−1,−1,−1],
      [−1,−1,33,−1,−1,−1,−1,−1,−1,−1],
      [−1,−1,−1,−1,−1,−1,−1,−1,−1,−1],
      [−1,−1,−1,−1,−1,−1,−1,−1,−1,−1],
      [−1,−1,−1,−1,−1,−1,−1,−1,−1,−1],
      [−1,−1,−1,−1,−1,−1,−1,−1,−1,−1],
      [−1,−1,−1,−1,−1,−1,−1,−1,−1,-1]
    ];

private var _angles:Array
  = [
      [045,045,045,045,045,045,045,045,045,045],
      [315,000,000,000,000,000,000,090,135,135],
      [315,000,000,000,000,000,000,090,135,135],
      [315,315,270,315,315,315,315,090,090,135],
      [315,315,270,135,135,135,135,090,090,135],
      [315,315,270,180,180,180,180,180,225,135],
      [315,315,315,180,180,180,180,180,225,135],
      [225,225,225,225,225,225,225,225,225,225]
    ];
The _angles array is the important one. It tells the opponent car what its target angle should be depending on where it is on the track.
Figure 8-36 illustrates how the angle map works. When the game first starts, the AI car will cruise along at an angle of 0—straight ahead. The first new angle number it hits is 90 (illustrated). The game thinks to itself, "Hmm... the AI car needs to be at a target angle of 90 at this spot. Its current angle is less than 90 at the moment, so I'll turn the car to the right." This logic is mirrored in the code that does the actual work. You'll find it in the enterFrameHandler.
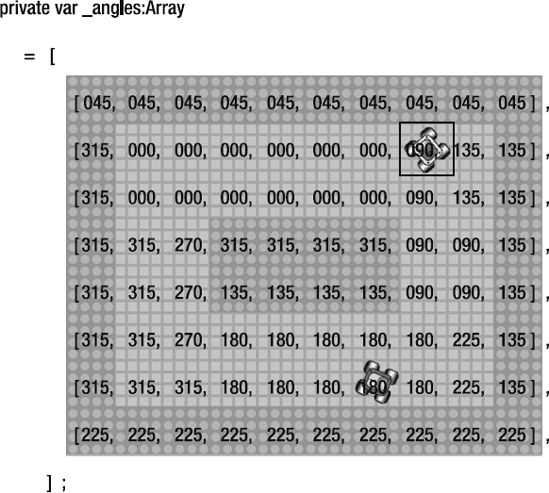
//Find the AI car's current anglevar currentAngle:Number = _aiCarTileModel.rotationValue;//Get the target angle from the _angles array based on the//cell the AI car is currently occupyingvar targetAngle:Number = _angles[_aiCarTileModel.mapRow][_aiCarTileModel.mapColumn]//Calculate the difference between the current//angle and the target anglevar difference:Number = currentAngle - targetAngle;//Figure out whether to turn the car left or rightif(difference > 0 && difference < 180)
{
  //Turn left
   _aiCarTileModel.rotationSpeed = −2;
}
else
{
  //Turn right
  _aiCarTileModel.rotationSpeed = 2;
}
The code is trivial, but the results are almost spooky in their realism. No complex AI is required. It's done with just simple data in an array and the intuitive logic of the tile-based game engine. Be sure to check out the full code in the AIDrivingGame folder.
The AI car shares exactly the same model, CarTileModel, as the player's car. The code is identical, including the update method that we looked at earlier. It doesn't have a controller class; all its logic is entirely in the code from the application class. The only new class is the AI car's view, AICarView, which you'll find in the com.friendsofed.gameElements.car package. It's merely a simpler version of the player's car's view class that doesn't check for key presses.
Our good old friend the buildMap method in the application class does the job of creating the AI car and adding it to the stage.
case AI_CAR:
  _aiCarTileModel
    = new CarTileModel
    (
      MAX_TILE_SIZE,
      tileSheetColumn, tileSheetRow,
      mapRow, mapColumn,
      48, 48
    );
  _aiCarView
    = new AICarView
    (_aiCarTileModel, stage);

  loadTileIntoView
    (_aiCarTileModel, _aiCarView.carBitmapData);
  stage.addChild(_aiCarView);

  //Start the car moving by setting its
  //accelerate property to true
  CarTileModel(_aiCarTileModel).accelerate = true;

  break;
When the car is added to the stage, its accelerate property is set to true. This is what starts the car moving.
CarTileModel(_aiCarTileModel).accelerate = true;
But take a close look at the syntax in the preceding line. _aiCarTileModel needs to be cast as a CarTileModel type. Why is this? accelerate is not a property of the TileModel class, which is the class that CarTileModel extends. accelerate is a property of TileModel's subclass. The subclass is CarTileModel.
The short story of all this is that we need to force the compiler to look in the CarTileModel class if it wants to find the accelerate property. This is an odd quirk in AS3.0 and extremely important to keep in mind. You'll experience this a lot if you frequently extend classes to make new ones. So, you might see this error message:
Error: Access of possibly undefined property _____ through a reference with static type ______
The problem could be that you need to cast an object as the correct type to keep the compiler happy.
When you run the example SWF, you'll notice that the AI car also gets stuck in the grass quite often when it doesn't quite make the track corners. This is nice feature that makes the AI car seem like it's being driven by a human player. The code that slows it down in the grass is identical to the code that slows down the player's car.
if(_raceTrackMap
  [_aiCarTileModel.mapRow][_aiCarTileModel.mapColumn]
  == GRASS)
{
  _aiCarTileModel.friction = 0.85;
}
else
{
  _aiCarTileModel.friction = 0.98;
}
The single biggest thing that affects the behavior of the AI car is the value that you assign for its rotationSpeed. In the code we looked at earlier, this value was −2 to make the car turn left and 2 to make it turn right. Here's the section of code that does this:
if(difference > 0
&& difference < 180)
{
   //Turn left
   _aiCarTileModel.rotationSpeed = −2;
}
else
{
//Turn right
_aiCarTileModel.rotationSpeed = 2;
}You can give the AI car a radically different driving style by changing these values. If you set rotationSpeed to −5 and 5, the AI car will drive with extreme precision. If you set it to −1 and 1, it will run into the grass with alarming frequency.
Here are some ways you could expand this example to a more fully developed racing game:
Make a variety of AI cars at different skill levels just by varying the
rotationSpeednumber.Randomize the
rotationSpeedvalue within a certain range to produce very organic and unpredictable driving styles.Have different AI cars using different angle maps to vary the difficulty.
Make some cars fast and give them precise angle maps.
Make other cars slower and give them maps that are less accurate.
Analyze how well human players did after each race, and make the game more or less difficult to keep it challenging and unpredictable.
You'll surely find countless more solutions to tricky problems once you start thinking about storing and using game data in this way.
All the tile-based collisions in the examples so far have involved collisions with stationary objects. Although the enemy and elevator in the platform examples were moving, the collision detection between them and the cat didn't depend on knowing where they were on the maps. The examples used ordinarily distance-based collision detection, which was covered in the first few chapters of this book.
Yes, I sort of cheated! Why did I used distance-based collision on those moving objects, while at the same time I used spatial grid collision on the stationary platforms, like the doors and stars?
To use spatial grid collision detection on a moving game object requires updating the _gameObject map array each time the object moves. If the object enters a new map cell, the array must be updated to match it. I'm going to show you how to do that next, using a collision map. A collision map is a two-dimensional array that matches the game world maps, but tracks the locations of moving objects.
Plain-vanilla, distance-based collision is often the best method to use for moving objects, even for tile-based games. If you're checking for collisions with a relatively small number of objects, it's fast and simple. For small-scale games with a static game environment, it's the method of choice. But sometimes distance-based collision just won't cut it. Here are the two big scenarios where a different collision strategy makes sense:
A changing game environment: All the platforms in the earlier examples were stationary. But what if you want to create a game where the platforms change interactively over the course of the game? The platform map array would need to be changed dynamically to match these new platform positions. This would also be the case if, instead of an action game, you were making a board game, like checkers. The map (game board) would need to be updated with new piece locations each time a player made a move. As you've seen in previous examples, if you know where different kinds of tiles are in relation to others in your game world, you can make intelligent decisions about what to do with them. In the next chapter, you'll see a practical example of this when we look at pathfinding.
Many moving objects: With a lot of objects, distance-based collision starts to become inefficient because you're checking for collisions between objects that have no hope of ever colliding. You can cut down on a lot of unnecessary work by just checking for collisions between objects that are close to one another. This is an extra broad-phase check. How many moving objects is enough to justify implementing this extra step? The unscientific rule of thumb is more than 100, which is about the point where Flash Player 10 starts to slow down. You wouldn't want to use an additional broad-phase check with fewer objects because there can be quite a bit of overhead associated with updating and maintaining a dynamic array.
Let's look at how to implement a dynamic spatial grid to do tile-based collision checks on moving objects.
These are the essential concepts to creating collision maps:
When game objects move, update their position in a two-dimensional array that describes their position in the game world.
Use that new, updated array to check for collisions with objects.
There are many different ways that you can code a dynamic grid, and no one definitively right way. However, there are two main approaches that you can take: use a persistent array or rebuild the array for each frame.
When you use an array that persists across multiple frames, you have a single game object array that's initialized with your game and lasts until the end of the game. When game objects change their positions, they're removed from their old position in the array and added to the new position. To create this kind of dynamic grid, you need the following:
To inform the game that an object's position has changed
A system for adding new positions and removing old positions
For collision detection, a system to make sure that objects don't do any redundant checking against one another or against themselves
The alternative is to create a new, blank array each frame and add objects to it. Instead on maintaining a persistent array, rebuild the array from scratch each frame. When you add objects to the array, their positions in the grid will match their positions on the current frame. The examples in this book use this method, for the following reasons:
The code is simple to understand and implement.
You can check for collisions while adding objects to the array, which avoids the problem of needing to account for double or redundant checking of objects.
It uses less memory, and depending on the context, can have a lower CPU overhead. This is especially true if you have a lot of moving objects.
You don't need to build additional systems to register and deregister objects with the array. This results in much simpler code and low overhead.
This isn't to say that this is always the best method, but it's a good place to start getting your feet wet with collision maps.
Let's start by looking at how to add a single object to a dynamic grid and update its position each frame. You'll find an example in the DynamicSpatialGrid folder. Run the SWF, and you'll find a circle on the stage that you can control with the mouse or keyboard. The status box displays the position of the circle in the grid (which is the two-dimensional dynamic array). As you move the circle across the stage, watch how its array position changes in lockstep with its stage position. The 2 is its tile ID number. The array is being updated each frame with the circle's new position. You can see this illustrated in Figure 8-37.
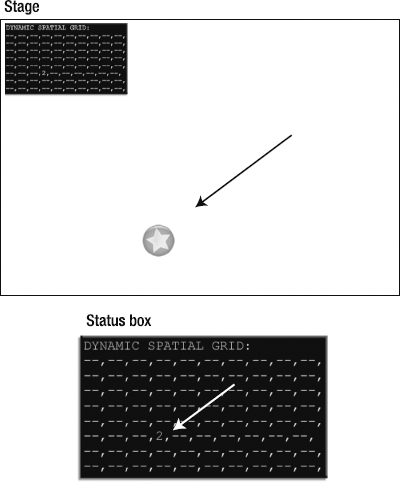
Figure 8.37. When the circle's position changes, a two-dimensional array is updated to mark its cell position in the game world.
The com.friendsofed.utils package includes a class called GridDisplay that visually displays the grid on the stage. It can help you debug or better understand what's going on. To use GridDisplay, instantiate it with the following parameters:
private var _grid:GridDisplay
   = new GridDisplay
    (
       MAX_TILE_SIZE, stage.stageWidth, stage.stageHeight
    );
Then add it to the stage.
addChild(_grid);
Figure 8-38 shows what this example looks like using a GridDisplay object.
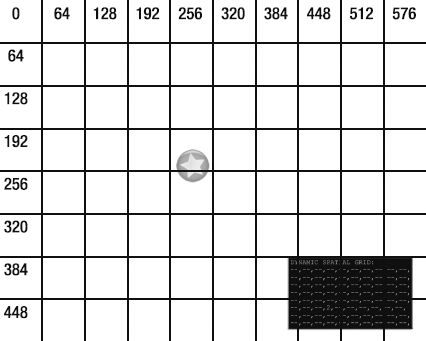
There haven't been any changes made to the tile-based engine. What's new is a two-dimensional array called collisionMap. Each element in the array is itself an array. If you like, you can think of this as a three-dimensional array, but it works like any other two-dimensional array. Instead of each array element containing some data, it contains another array (represented by the empty square brackets).
var collisionMap:Array
  = [
      [[],[],[],[],[],[],[],[],[],[]],
      [[],[],[],[],[],[],[],[],[],[]],
      [[],[],[],[],[],[],[],[],[],[]],
      [[],[],[],[],[],[],[],[],[],[]],
      [[],[],[],[],[],[],[],[],[],[]],
      [[],[],[],[],[],[],[],[],[],[]],
      [[],[],[],[],[],[],[],[],[],[]],
      [[],[],[],[],[],[],[],[],[],[]]
    ];
This array has exactly the same number of cells as the _gameObjectMap. You can think of it as another map layer. But unlike the other maps, it's initialized with null values. All the arrays are empty. It contains no information when it's created; it's just an empty skeleton.
If you prefer, you can also initialize this array like this:
var collisionMap:Array = new Array();
for(var row:int = 0; row < MAP_ROWS; row++)
{
  collisionMap[row] = new Array();

  for(var column:int = 0; column < MAP_COLUMNS; column++)
  {
    collisionMap[row][column] = new Array();
  }
}
It's up to you which style you prefer.
Unlike the other game maps, the collisionMap is initialized inside the enterFrameHandler as a local property.
private function enterFrameHandler(event:Event):void
{
  //...

  var collisionMap:Array
    = [
        [[],[],[],[],[],[],[],[],[],[]],
        [[],[],[],[],[],[],[],[],[],[]],
        [[],[],[],[],[],[],[],[],[],[]],
        [[],[],[],[],[],[],[],[],[],[]],
        [[],[],[],[],[],[],[],[],[],[]],
        [[],[],[],[],[],[],[],[],[],[]],
        [[],[],[],[],[],[],[],[],[],[]],
        [[],[],[],[],[],[],[],[],[],[]],
      ];

   //...
}
Because it's created in the enterFrameHandler, it means that it's built completely new each frame.
The next step is to copy the moving object's cell position on the stage into this grid.
The circle on the stage is a TileModel object called _playerModel. As you've seen, TileModel objects have properties called mapColumn and mapRow that tell you in which cell on the game world map the object currently is located. Just push the _playerModel into the dynamic grid at these same locations on every frame.
collisionMap
  [_playerModel.mapRow]
  [_playerModel.mapColumn]
  .push(_playerModel);
And that's it! The _playerModel has now been assigned to the correct cell in the dynamic grid. The result is exactly as you see it in the status box in Figure 8-37. Because the dynamic grid is created fresh each frame, it will always contain the _playerModel's correct position. That's not bad for what's essentially just two lines of code!
For your reference, here's the code that plots the collisionMap array and displays it in the status box:
_statusBox.text = "DYNAMIC SPATIAL GRID:" + "
";
for(var mapRow:int = 0; mapRow < MAP_ROWS; mapRow++)
{
  for(var mapColumn:int = 0; mapColumn < MAP_COLUMNS; mapColumn++)
  {
    if(collisionMap[mapRow][mapColumn][0] is TileModel)
    {
      _statusBox.text
        += collisionMap[mapRow][mapColumn][0].id + ",";
    }
    else
    {
      _statusBox.text += "--,"
    }
    if(mapColumn == collisionMap[mapRow].length −1)
    {
      _statusBox.text += "
";
    }
  }
}
This is purely optional and may just help you in testing and debugging.
That's how to dynamically map one object. Of course, the usefulness of this system is in tracking many objects simultaneously and using it for something useful—like collision detection. Let's take a look at how to do that next.
With a lot of objects in the grid, you can implement the same kind of spatial grid collision detection that we used to check the cat against the platforms. If they pass that first broad-phase test, you can perform a narrow-phase, distance-based check.
You can see such a system at work in the CollisionMap example, as shown in Figure 8-39. It's a simple billiard-ball physics simulation like the one we looked at in Chapter 3. The difference here is that each circle is first performing a spatial grid collision check before it does a distance check. The status box displays the changing values of the dynamic grid in real time, and you can see that they match the stage positions of the circles.
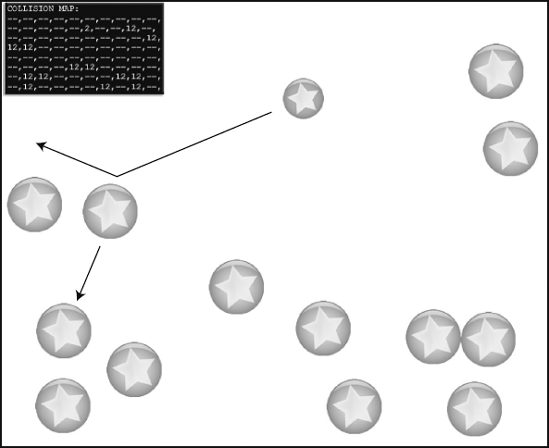
Here are the general steps for making this collision detection work:
1. Push all the circle
TileModelobjects into an array called_circleswhen they're first created by thebuildMapmethod.5. Create a new, blank
collisionMaparray each frame in theenterFrameHandler.6. The
enterFrameHandlerloops through all the circles in the_circlesarray and does the following:Updates the models and checks stage boundaries.
Checks all eight cells surrounding the circle, as well as the cell it currently occupies, for any neighboring circles.
If it finds a neighboring circle, it does a distance-based collision check. This is the same moving circle-versus-moving circle code we looked at in Chapter 3.
Finally, the code adds the current circle being checked to the
collisionMaparray so that the next circle in line can check it for a collision.
Let's take a detailed look at the code that does this.
An array called _circles holds a reference to all the circles in the game.
private var _circles:Array = new Array();
There are two tiles in this game:
PLAYER(the small circle), which has tile ID02BIG_CIRCLE(the big circle, of course), which has tile ID12
When the TileModel objects are created by the buildMap method, they're added to the _circles array.
switch(currentTile)
{
   case PLAYER:
      _playerModel
         = new TileModel
         (
            MAX_TILE_SIZE,
            tileSheetColumn, tileSheetRow,
            mapRow, mapColumn,
            48, 48
         );

      _UIController
         = new UIController(_playerModel);
      _UIView
         = new UIView(_playerModel, _UIController, stage);

      //Push the tile into the _circles array
      _circles.push(_playerModel);

      drawGameObject(_playerModel, _stageBitmapData);
      break;
case BIG_CIRCLE:
var bigCircle:TileModel
= new TileModel
(
MAX_TILE_SIZE,
tileSheetColumn, tileSheetRow,
mapRow, mapColumn,
MAX_TILE_SIZE, MAX_TILE_SIZE
);
//Push the tile into the _circles array
_circles.push(bigCircle);
drawGameObject(bigCircle, _stageBitmapData);
break;
}This is pretty straightforward stuff. All the important code is in the enterFrameHandler.
private function enterFrameHandler(event:Event):void
{
   //Clear the stage bitmap from the previous frame
   _stageBitmapData.fillRect(_stageBitmapData.rect, 0);

   //Initialize a blank collision map
   var collisionMap:Array
     = [
          [[],[],[],[],[],[],[],[],[],[]],
          [[],[],[],[],[],[],[],[],[],[]],
          [[],[],[],[],[],[],[],[],[],[]],
          [[],[],[],[],[],[],[],[],[],[]],
          [[],[],[],[],[],[],[],[],[],[]],
          [[],[],[],[],[],[],[],[],[],[]],
          [[],[],[],[],[],[],[],[],[],[]],
          [[],[],[],[],[],[],[],[],[],[]]
];

   //Loop through all the circles.
   //Add them to the collision map
   //and check neighboring cells for other circles
   for(var i:int = 0; i < _circles.length; i++)
   {
      //Get a reference to the current circle in the loop
      var circle:TileModel = _circles[i];

      //Update the circle and check stage bounds
      circle.update();
      StageBoundaries.bounceBitmap(circle, stage);
//If this is the *first* circle, add it to the//collision map, but don't bother checking//for collisions because there won't yet be any other//objects in the collision map to check forif(i == 0) { collisionMap[circle.mapRow][circle.mapColumn].push(circle); }//If this is the not the first circle...else {//Check the 8 cells surrounding this circle//as well as the cell it currently occupies//(9 cells in total)for(var column:int = −1; column < 2; column++) { for(var row:int = −1; row < 2; row++) {//Make sure that the code doesn't//check for rows that//are greater than the number of rows//and columns on the mapif(circle.mapRow + row < collisionMap.length && circle.mapRow + row >= 0 && circle.mapColumn + column < collisionMap[0].length && circle.mapColumn + column >= 0) {//Get a reference to the current cell being checked//and cast it as an Array using the "as" keyword//(the compiler needs that reassurance)var cell:Array = collisionMap [circle.mapRow + row] [circle.mapColumn + column] as Array;//If this cell isn't null, it must contain objectsif(cell != null) {//Loop through all the elements in the cell//(It will usually just contain one object,//but you never know...)for ( var element:int = 0; element < cell.length; element++ )
{
                       //Check whether the current element is
                       //a tile that we're interested in.
                       //(You don't need to check for the existence
                       //of the object that's performing the check
                       //because it hasn't been added to the array yet)
                       if(cell[element].id == BIG_CIRCLE
                       || cell[element].id == PLAYER)
                       {
                           //A possible collision!
                           //Get a reference to the object that
                           //might be involved in a collision
                           var circle2:TileModel = cell[element];

                           //Do a narrow-phase, distance-based
                           //collision check against the two circles.
                           //The _collisionController object does this
                           _collisionController.movingCircleCollision
                              (circle, circle2);
         }
      }
   }
              }
           }
        }
     }
     //Add the circle to the collision map
     //in the same position as its current
     //game map position. This has to happen last
     collisionMap[circle.mapRow][circle.mapColumn].push(circle);
  }

  //The last step is to update the display.
  //Blit all the circles to the stage bitmap
  //using the familiar drawGameObject method
  for(var j:int = 0; j < _circles.length; j++)
  {
      drawGameObject(_circles[j], _stageBitmapData);
  }
}
Let's look at how this code works.
After the loop updates the model and checks the stage boundaries, the code checks whether this is the first loop. If so, it adds the object to the collisionMap, but doesn't run any other code.
if(i == 0)
{
   collisionMap[circle.mapRow][circle.mapColumn].push(circle);
}
else
{... check for collisions...
Why doesn't the first object check any for collisions? Because if it's the first object, the map will be blank. There can't possibly be any other objects on the map. Obviously, it makes sense to check for collisions only if the map contains more than one object.
The code then runs a nested for loop that scans all adjacent cells around the object. It includes the eight surrounding cells as well as the cell that the object occupies.
for(var column:int = −1; column < 2; column++)
{
   for(var row:int = −1; row < 2; row++)
   {
      //Make sure that the code doesn't check for rows that
      //are greater than the number of rows and columns on the map

      //...

      //Get a reference to the current cell being checked
      var cell:Array
         = collisionMap
         [circle.mapRow + row]
         [circle.mapColumn + column]
         as Array;
The loop produces the numbers −1, 0, and 1 in three sets. If you add those numbers to the circle's current column and row position, the numbers will match all the circle's adjacent cells. Figure 8-40 illustrates how this works.
In previous examples, it was enough to just check the cells containing the object's four corner points. Why didn't we just do that in this case?
If all the objects are moving, you could miss certain types of collisions. Figure 8-41 illustrates one of these situations. The first circle is added by the loop, but can't find the second circle because the second circle hasn't been added to the collision map yet. When the loop eventually adds the second circle to the map, none of its corner points overlap the first circle's center cell. Therefore, it can't find the small circle, and the obvious collision is missed. To avoid this problem, check every cell surrounding the object.
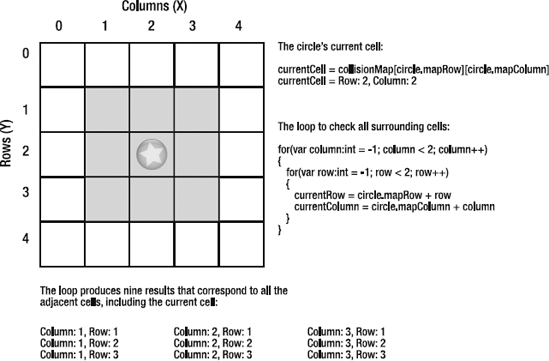
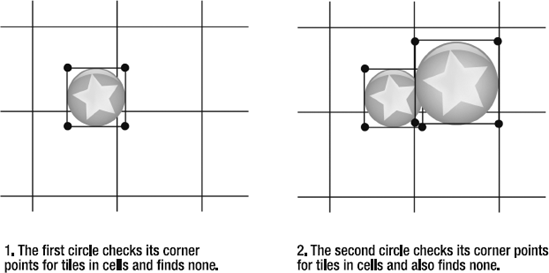
The code also must make sure that it's checking for cells that actually exist in the array.
if(circle.mapRow + row < collisionMap.length
&& circle.mapRow + row >= 0
&& circle.mapColumn + column < collisionMap[0].length
&& circle.mapColumn + column >= 0)
{...
This needs to be done because if the circles are at the edges of the map, they could check for cells that don't correspond to elements in the collisionMap array. If that happens, you'll get a nasty runtime error. The additional check prevents this problem.
After all that, the code produces an Array object called cell:
var cell:Array
   = collisionMap
   [circle.mapRow + row]
   [circle.mapColumn + column]
   as Array;
This refers to any of the nine cells being checked, at any given point in the loop. (It must be cast as Array to keep the compiler happy.)
Because it's an array, it might be empty. We need to check for that as well.
if(cell != null)
{...
If the cell isn't empty ... bingo! It means that it contains at least one tile. But how many of them? It doesn't really matter. We can run a for loop that will catch 1 or 100 objects in the cell.
for(var element:int = 0; element < cell.length; element++)
{...
In this example, there will almost certainly be only one object per cell, so this loop is a bit of overkill. However, in most of your games, many objects could occupy the same cell, especially if any of your tiles are smaller than the map cell. In this specific example, that will be very unlikely because the circles are large enough to push each other out of the map cells. But it could happen if your game has many small objects moving around.
The loop next checks the cell for the kinds of tiles that it's interested in. In this example, there are two kinds of tiles that could be colliding, and both can be handled in the same way.
if(cell[element].id == BIG_CIRCLE
|| cell[element].id == PLAYER)
{
If the loop finds any of these tiles, it switches to the narrow-phase of the collision-detection system. It does a moving circle-versus-moving circle collision check.
if(cell[element].id == BIG_CIRCLE
|| cell[element].id == PLAYER)
{
//A possible collision!//Get a reference to the object that//might be involved in a collisionvar circle2:TileModel = cell[element];//Do a narrow-phase, distance-based//collision check against the two circles_collisionController.movingCircleCollision(circle, circle2); }
You'll find the movingCircleCollision method in the TileCollisionController class in the com.friendsofed.utils package. It's identical to the code we looked at in detail in Chapter 3.
Finally, the code adds the current circle to the collision map.
collisionMap[circle.mapRow][circle.mapColumn].push(circle);
This allows the next circle in line for the collision check to be able to find it in the collisionMap.
This may seem a bit overwhelming at first, but don't let it intimidate you. Much of the code is just error prevention that, as grown-ups, is unfortunately something we just have to do. At its core, it doesn't contain anything new. You're looping through a 9-by-9 grid, and then looping through the objects in the arrays that each grid cell contains.
This is one way to create a collision map of moving objects. There are many other ways, and I'm sure you'll come up with some clever ideas for your own games.
A spatial grid is an excellent all-purpose broad-phase collision-detection system that is a game designer's staple. It's hard to be beat for simplicity, speed, and low overhead. However, there are many other broad-phase collision strategies that each has its unique take on the problem. Here are the four most popular:
Hierarchical grid: In a fixed-sized spatial grid such as the one we've been using in this chapter, the cell size must be as large as the largest object. But what if you have a game with a few very big objects and a lot of very small objects? The cell size will need to be big enough to accommodate those large objects, even if there aren't very many of them. You'll end up with a situation where each cell is full of many small objects, each doing expensive distance checks against one another.
A hierarchical grid solves this problem by creating two or more grids of different-sized cells. It creates a grid with big cells for the big objects, and another one for the small objects, and any range of differing cell size grids in between. Collision checks between small objects are handled in the small-cell grid, and collisions between big objects are handled in the big-cell grid. If a small object needs to check for a collision with a big object, the system checks the cells that correspond to both grids.
Quadtree: A specific type of hierarchical grid. The game world is divided into 4 rectangles, which are in turn divided into 4 more rectangles, resulting in 16. Each of those 16 rectangles are again split into 4 smaller rectangles, and this continues depending on how much detail you need. Each of the smaller rectangles is a child of the larger parents. The quadtree system figures out which objects to test for collisions depending on their level in their hierarchy. The 3D version of the quadtree is called an octree.
Sort and sweep: Sort the objects in arrays based on their x and y positions. Check for overlaps on the x and y axes and, if found, do a more precise distance check. Because the objects are spatially sorted first, likely collision candidates come to the forefront first.
BSP tree: Space is partitioned in a way that closely matches the geometry of the game objects. It's useful because it means that the partitions can be used both for collisions and to define environmental boundaries. Binary space partitioning (BSP) trees are closely related to quadtrees, but they're more versatile. BSP trees are widely used in collision detection for 3D games.
I suggest that you spend some time researching these other broad-phase collision strategies. You may find one of them holds a particularly good solution to a complex collision problem you might be facing.
Tile-based games solve many complex game-design problems in a very compact and efficient way. It should therefore be no surprise that most professionally designed games use an underlying tile-based engine. This is as true for 2D games as it is for 3D. You'll probably consider using a tile-based game engine for all your games from now on.
Although the focus of this book is on action video games, tile-based game engines are at the heart of puzzle, strategy, role-playing, and board games. Games like Tetris, Bejeweled, Age of Empires, and Chess are essentially tile-based games that use many of the techniques covered in this chapter.
This chapter has been an introduction to tile-based game design, but there's a lot more that you can learn. AdvancED ActionScript 3.0 Animation by Keith Peters (friends of ED, 2008) covers isometric and hexagonal tile engines, as well as some advanced pathfinding strategies.
If you're designing large or complex maps for your games, consider using specialized software to help you create your map arrays. Mappy (Windows) and Tiled (Mac OS X and Windows) allow you to visually create game maps from your tile sheets. They output XML or array data that you can use with your games.
In the next chapter, we're going to look at one of the most useful features of tile-based games: pathfinding.