
17. Using Location and Map APIs
Whether for safety or for convenience, incorporating location information, navigation, and mapping features into your project can make your application much more robust. In this chapter, you will learn how to leverage two different location services available for Android: the Android location services APIs and the Google location services APIs. You will learn how to determine the location of the device using both APIs. You will also learn how to translate raw location coordinates into descriptive location names—and how to do the reverse. Finally, we explore a couple of different methods for mapping and utilities that work with maps.
![]() Tip
Tip
Many of the code examples provided in this chapter are taken from the SimpleLocation application. The source code for this application is provided for download on the book’s website.
Incorporating Android Location APIs
The Android location APIs are built directly into the Android SDK. Until Google Play services introduced the new Google location services APIs, the android.location package provided the sole means for working with the location features of a device. Even though the new Google location APIs are much more robust, here are some reasons why you should care about the Android location APIs:
![]() Not all devices are capable of having Google Play services installed; therefore, it is impossible to access the Google location APIs on these devices.
Not all devices are capable of having Google Play services installed; therefore, it is impossible to access the Google location APIs on these devices.
![]() There are many classes available in the Android location APIs that are not available in the Google location APIs. This means that you are able to make use of the best of both APIs (provided they are both available), rather than relying on one over the other.
There are many classes available in the Android location APIs that are not available in the Google location APIs. This means that you are able to make use of the best of both APIs (provided they are both available), rather than relying on one over the other.
Let’s now take a look at some of the features available in the Android location APIs.
Using the Global Positioning System (GPS)
The Android location APIs provide the means for accessing location via built-in GPS hardware, when it’s available. Generally speaking, just about every Android phone has some location capabilities. For example, in the United States, emergency services use mobile phone location information. That said, not all Android devices are phones, nor do all phones enable consumer usage of location services. If GPS features are disabled, or an Android device does not have location hardware, the Android SDK provides additional APIs for determining alternative location providers. These other providers might have advantages and disadvantages in terms of power use, speed, and accuracy of reporting.
Using GPS Features in Your Applications
Location services and hardware such as built-in precision GPS are optional features for Android devices. In addition to requiring the appropriate permissions, you can specify which optional features your application requires in the Android manifest file. You can declare that your application uses or requires specific location services using the <uses-feature> tag of the Android manifest file. Although this tag is not enforced by the Android operating system, it enables popular publication mechanisms such as the Google Play store to filter your app and provide it only to users with appropriate devices. If your application functions well only on devices with some sort of method for determining the current location, you can use the following <uses-feature> tag in your application’s manifest file:
<uses-feature android:name="android.hardware.location" />
If your application requires a precise location fix (that is, the device has functional GPS hardware, not just cell tower triangulation or other such mechanisms), use the following <uses-feature> tag instead:
<uses-feature android:name="android.hardware.location.gps" />
Determining the Location of the Device
To determine device location with the Android location APIs, you need to perform a few steps and make some choices. The following list summarizes this process:
1. Retrieve an instance of the LocationManager using a call to the getSystemService() method using the LOCATION_SERVICE.
2. Add an appropriate permission to the AndroidManifest.xml file, depending on what type of location information the application needs.
3. Choose a provider using either the getAllProviders() method or the getBestProvider() method.
4. Implement a LocationListener class.
5. Call the requestLocationUpdates() method with the chosen provider and the LocationListener object to start receiving location information.
Specific permissions are not needed to retrieve an instance of the LocationManager object. Instead, the permissions determine the available providers. The following code retrieves an instance of the LocationManager object:
import android.location.*;
...
LocationManager locationManager =
(LocationManager)getSystemService(Context.LOCATION_SERVICE);
The following block of XML provides the application with both coarse and fine location permissions when added within the AndroidManifest.xml permissions file:
<uses-permission
android:name="android.permission.ACCESS_FINE_LOCATION" />
<uses-permission
android:name="android.permission.ACCESS_COARSE_LOCATION" />
Requesting fine permission implies coarse support as well, but it’s helpful to be explicit.
Now that the application has permissions to use location information and the LocationManager object is valid, we must determine what provider to use for location information. The following code configures a Criteria object and requests the provider based on this information:
Criteria criteria = new Criteria();
criteria.setAccuracy(Criteria.NO_REQUIREMENT);
criteria.setPowerRequirement(Criteria.NO_REQUIREMENT);
String bestProvider = locationManager.getBestProvider(criteria, true);
The setAccuracy() method can take values for ACCURACY_COARSE and ACCURACY_FINE that can be used (along with the appropriate permissions) to request a provider that the application has permissions to use. You can use the setPowerRequirement() method to find a provider that fits certain power use requirements, such as POWER_HIGH or POWER_LOW. The Criteria object also enables you to specify whether the provider can incur a monetary cost to the user, whether altitude is needed, and some other details. If the application has specific requirements, this is where you set them. However, setting these criteria doesn’t imply that the provider is available to the user. Some flexibility might be required to allow use on a broad range of devices. A boolean parameter of the getBestProvider() method enables the application to ask for only enabled providers.
Using the provider returned by the getBestProvider() method, the application can request the location. Before doing so, however, the application needs to provide an implementation of LocationListener. The LocationListener implementation consists of several methods: to tell the application whether the provider has been disabled or enabled, to give the status about the provider (such as the number of satellites the GPS receiver can see), and to tell the application location information. The following is a sample implementation for the last method, the onLocationChanged() method:
public void onLocationChanged(Location location) {
String locInfo = String.
format("Current loc = (%f, %f) @ (%f meters up)",
location.getLatitude(), location.getLongitude(),
location.getAltitude() );
if (lastLocation != null) {
float distance = location.distanceTo(lastLocation);
locInfo += String.
format("
Distance from last = %f meters", distance);
}
lastLocation = location;
status.setText(locInfo);
}
The onLocationChanged() method receives a Location object with the most recent location information from the chosen provider. In this example, the application merely prints out the location, including the altitude, which might be returned by the provider. Then, it uses a utility method of the Location object, distanceTo(), to calculate how far the device has moved since the last time onLocationChanged() was called.
It is up to the application to determine how to use this location information. The application might want to turn the location information into an address, display the location on an embedded map, or launch the built-in Maps application (if the Google applications are installed) centered at the location.
![]() Tip
Tip
To use many Android location services APIs, you should use AVD configurations that target the Android SDK with the Google APIs. Using the Google APIs target puts applications like Maps on the emulator. Other times, location services design and testing are best done on a real Android device.
Locating Your Emulator
The Android emulator can simulate location services, but as you would expect, it does not have any “underlying hardware” to get a real satellite fix. The Android SDK provides a means to simulate location data with the use of a single location point, GPX file, or KML file. This works only with the emulator, not the physical device, but it can be useful for testing your location-based application.
Geocoding Locations
Determining latitude and longitude is useful for precise location, tracking, and measurements; however, this data is not usually descriptive to users. The Android SDK provides some helper methods to turn raw location data into addresses and descriptive place names. These methods can also work in reverse, turning place names or addresses into raw location coordinates, which is referred to as reverse geocoding.
![]() Warning
Warning
According to the Android documentation, AVDs that target the Google APIs enable developers to test on emulator instances with Google Play services. The Google APIs provide the capability to use Google Maps as well as a back-end geocoder service. Although it is not documented, not all AVD API levels support these geocoder services. For example, AVDs for API Level 6 with the Google APIs provide geocoder services, whereas AVDs with API Levels 7 and 8 with the Google APIs do not (as of this writing). When you use an AVD without back-end geocoder services, you simply get an exception stating there is no back-end service. The code in this chapter is best run in an emulator running an AVD with API Level 6 plus the Google APIs, or on a real device with true geocoder back-end services.
The Geocoder object can be used without any special permission. The following block of code demonstrates using the Geocoder object to get the location names of a Location object passed in to the onLocationChanged() method of a LocationListener:
if (Geocoder.isPresent()) {
Geocoder coder = new Geocoder(this);
try {
List<Address> addresses = coder.getFromLocation(
location.getLatitude(), location.getLongitude(), 3);
if (addresses != null) {
for (Address namedLoc : addresses) {
String placeName = namedLoc.getLocality();
String featureName = namedLoc.getFeatureName();
String country = namedLoc.getCountryName();
String road = namedLoc.getThoroughfare();
locInfo.append(String.format("[%s][%s][%s][%s]
",
placeName, featureName, road, country));
int addIdx = namedLoc.getMaxAddressLineIndex();
for (int idx = 0; idx <= addIdx; idx++) {
String addLine = namedLoc.getAddressLine(idx);
locInfo.append(String.format("Line %d: %s
", idx,
addLine));
}
}
}
} catch (IOException e) {
Log.e("GPS", "Failed to get address", e);
}
} else {
Toast.makeText(GPSActivity.this, "No geocoding available",
Toast.LENGTH_LONG).show();
}
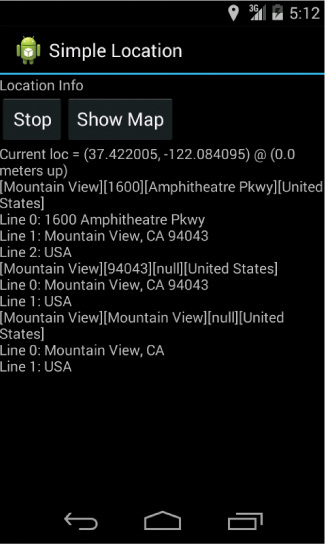
You can extract information from the results of the call to the getFromLocation() method in two ways, both of which are demonstrated. Note that a particular location might have multiple Address results in the form of a List<Address> object. Typically, the first Address is the most detailed, and the subsequent Address objects have less detail and describe a broader region.
The first method is to query for specific information, such as by using the getFeatureName() method or the getLocality() method. These methods are not guaranteed to return useful information for all locations. They are useful, though, when you know you need only a specific piece of general information, such as the country.
The second method for querying information is by address lines. This is generally used for displaying the address of a location to the user. It might also be useful to use the location in directions and in other cases where a street address is desired. That said, the addresses returned might not be complete. Simply use the getMaxAddressLineIndex() and getAddressLine() methods to iterate through the addresses. Figure 17.1 shows a sample location with three resulting addresses.
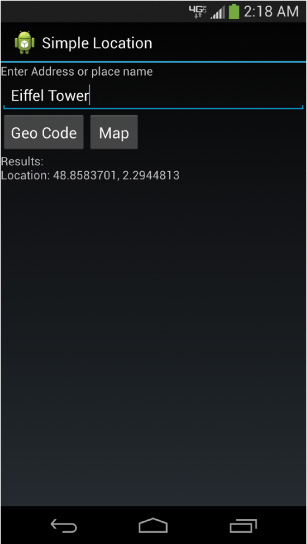
The Geocoder object also supports using named locations or address lines to generate latitude and longitude information. The input is forgiving and returns reasonable results in most cases. For instance, all of the following return valid and correct results: “Eiffel Tower,” “London, UK,” “Iceland,” “BOS,” “Yellowstone,” and “1600 Pennsylvania Ave, DC.”
The following code demonstrates a button onClick() handler that computes location data based on user input:
public void onClick(View v) {
if (Geocoder.isPresent()) {
String placeName = name.getText().toString();
try {
// coder initialized elsewhere
List<Address> geocodeResults = coder
.getFromLocationName(placeName, 3);
StringBuilder locInfo = new StringBuilder("Results:
");
double lat = 0f;
double lon = 0f;
for (Address loc : geocodeResults) {
lat = loc.getLatitude();
lon = loc.getLongitude();
locInfo.append("Location: ").append(lat)
.append(", ").append(lon).append("
");
}
results.setText(locInfo);
} catch (IOException e) {
Log.e("GeoAddress", "Failed to get location info", e);
}
} else {
Toast.makeText(GeoAddressActivity.this,
"No geocoding available", Toast.LENGTH_LONG).show();
}
}
The result of the call to the getFromLocationName() method is a List of Address objects, much like the previous example. Figure 17.2 shows the results for entering Eiffel Tower.
Always assume that you will get more than one result. It is good form to provide a picker so that the user can select the most appropriate location from the results. Another good way to confirm that the user entered the correct location is to map it. We will discuss later a couple of different methods for mapping locations using Google Maps.
![]() Warning
Warning
Geocoding operations typically require a network connection and therefore should not be run on the main UI thread. Instead, perform geocoding tasks in a separate thread so as not to cause your application’s responsiveness to degrade.
Doing More with Android Location-Based Services
You have been introduced to a number of different location tools provided by the Android location APIs; however, you should be aware of several more.
The LocationManager supports proximity alerts, which are alerts that trigger a PendingIntent when the device comes within some distance of a location. This can be useful for warning the user of an upcoming turn in directions, for scavenger hunts, or for help in geocaching.
The GpsStatus, GpsStatus.Listener, and GpsSatellite classes provide more detailed information about the GPS satellites used by the GPS engine. The GpsStatus class and its Listener subclass monitor the GPS engine and get a list of the satellites used. The GpsSatellite class represents the current state of an individual satellite used by the GPS engine with state information such as satellite elevation and whether the particular satellite was used in the most recent GPS fix.
![]() Tip
Tip
Location services applications are a popular category of Android applications. Location services are like networking services: sometimes unreliable or unresponsive. Make sure to consider application responsiveness when designing location services applications. This means completing location-related tasks asynchronously using threads or AsyncTask as well as considering Android services.
Incorporating Google Location Services APIs
The Google location services APIs were added into the Google Play services SDK and are compatible with devices that have Google Play installed and running Android version 2.2 (API Level 8) or newer. If you are looking for an easier way to add location features to your application with increased accuracy and low power consumption, use the Google location services APIs.
Locating with the Fused Location Provider
Now that the location features have been integrated into Google Play services, rather than each application having to implement its own code for managing location features, Google Play services handles all of this tedious work for you and makes this information available to you via the fused location provider, in a convenient set of APIs. Developers no longer need to be concerned with managing power consumption on their own and are able to locate with fine-grained accuracy with very little coding effort.
To make use of the fused location provider, there are a few simple steps you need to follow:
1. Add the appropriate permissions to the Android manifest file, declaring the accuracy that your application requires, such as ACCESS_COARSE_LOCATION or ACCESS_FINE_LOCATION.
2. Make sure to check that Google Play services have been installed on the device; otherwise, your application will crash. Failure to implement the appropriate checks and handling cases where Google Play services are not installed could result in a bad user experience and bad user reviews if your application crashes unexpectedly.
3. Implement the appropriate callback methods for the OnConnectionFailedListener and ConnectionCallbacks. For the OnConnectionFailedListener, implement the onConnectionFailed() method, and for the ConnectionCallbacks class, implement the onConnected() and onDisconnected() methods.
4. Create a location client using the LocationClient class in the onCreate() method of your application, and handle the appropriate lifecycle events to connect() and disconnect() the location client where appropriate.
5. Use the getLastLocation() method of the location client to retrieve the location of the device. The permissions you have requested and the location features users have enabled on their device will determine the type of location information available to your application.
Doing More with Google Location Services
The fused location provider is just the first improvement of the Google location services API. In addition, there are two other APIs that you should be aware of, the activity recognition APIs and the geofencing APIs.
Understanding Activity Recognition APIs
The activity recognition APIs are used for detecting the user’s current physical activity. Here is a list of the activities, by their constant value and description, that your application is able to detect:
![]()
IN_VEHICLE: Determine if a user is driving a vehicle.
![]()
ON_BICYCLE: Determine if a user is riding on a bike.
![]()
ON_FOOT: Determine if a user is walking or running.
![]()
STILL: Determine if a user is not moving at all.
![]()
TILTING: Determine if a user is tilting the device.
![]()
UNKNOWN: If the user’s current activity does not fit into one of these classifications, the activity is unknown.
![]() Tip
Tip
To learn more about how to implement activity recognition API features, download the sample application found on the Android documentation website: http://d.android.com/shareables/training/ActivityRecognition.zip.
Understanding Geofencing APIs
A Geofence is an area that you define for detecting whether a user has entered or exited a particular latitude, longitude, and specified radius. To set up a Geofence for your application, there are a few things you need to do:
1. Add the appropriate location permissions to the Android manifest file.
2. Verify that your app is able to access Google Play services, as geofencing APIs are available only if the Google Play application is installed.
3. Define a Geofence storage mechanism using SharedPreferences.
4. Create a Geofence using a latitude, longitude, and radius.
5. Monitor for when a user enters or exits a Geofence and handle the intents appropriately.
6. Stop monitoring and remove the geofences.
![]() Tip
Tip
To learn more about how to implement geofencing API features, download the sample application found on the Android documentation website: http://d.android.com/shareables/training/GeofenceDetection.zip.
Incorporating Google Maps Android API v2
Determining the location of a device or specific geographic coordinates does not necessarily provide meaningful information to users; therefore, it is best to display that information on a map with which users are familiar. Luckily, Google provides a set of Map APIs for Android. The current version is 2, and this version provides a number of features and enhancements that were not available in the first version.
![]() Note
Note
The first version of Google Maps for Android is no longer available for new developer signups. This means that you will no longer be able to request an API key to access the first version, but the service is still supported for users who already have an existing API key.
Mapping Locations
The Android SDK provides two different methods to show a location with Google Maps. The first method is to use a location URI to launch the built-in Google Maps application with the specified location. The second method is to use a MapFragment embedded within your application to display the map location.
Mapping Intents
Earlier in this chapter, we demonstrated how to determine the latitude and longitude for a place name. Now we map the location using the built-in Maps application. The following block of code demonstrates how to perform this:
String geoURI = String.format("geo:%f,%f", lat, lon);
Uri geo = Uri.parse(geoURI);
Intent geoMap = new Intent(Intent.ACTION_VIEW, geo);
startActivity(geoMap);
The first task is to create a String that conforms to the URI handled by the mapping application. In this case, it’s geo: followed by the latitude and longitude. This URI is then used to create a new Uri object for creating a new ACTION_VIEW intent. Finally, we call the startActivity() method. If the latitude and longitude are valid, such as the location for the Hoover Dam, the screen would look like Figure 17.3.
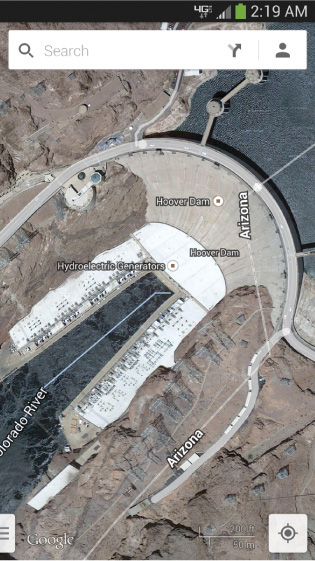
Using this method of mapping launches the user into a built-in mapping application—in this case, Google Maps. If you do not want to bother with the details of a full mapping application or do not need to provide any further control over the map, this is a fast and easy method to use. Users are typically accustomed to the controls of the mapping application on their device, too.
Getting Your Map API Key
Before you are able to work with Maps in your application, you first need to obtain a Google Maps for Android API key from Google. The key is generated from a SHA-1 fingerprint of a certificate that you use to sign your applications.
For testing purposes, you can use the debug certificate that is created by the Android SDK, as mentioned in step 1 below. For production distribution, substitute the debug certificate with your release distribution signing certificate.
You need to do the following to generate the appropriate API key:
1. Generate a SHA-1 fingerprint for your debug certificate.
2. Sign in to the Google Developer Console, and choose the project for which you would like to generate an API key.
3. Under the Services link, make sure that Google Maps Android API v2 is turned on.
4. Navigate to the API Access link, and under Simple API Access, click Create new Android key.
5. Paste in the fingerprint from step 1 and follow the additional instructions for configuring an Android key for your project, then press Create.
The first step is performed on your development machine. Locate the debug certificate used by the Android SDK. On all platforms, the filename is debug.keystore by default. If you use the Android IDE, the location of the file is listed under the Android Build preferences. Using this file, you then need to execute the following command (make sure the Java tools are in your path):
keytool -list -keystore /path/to/debug.keystore -storepass android
The result is the fingerprint that you must paste into the form in step 5.
![]() Tip
Tip
The default debug keystore on the Android SDK lasts for only one year and is unique to a developer’s computer. We highly recommend making a debug key that lasts longer and can be shared among team members. This enables your Google Maps Android API key to last much longer. In addition, you won’t have to uninstall apps from a shared device before you can install one with someone else’s debug key. Luckily, it’s easy to do this using the keytool command-line tool with the following command:
keytool -genkey -keypass android -keystore debug.keystore
alias androiddebugkey -storepass android
-validity 10000
-dname "CN=Android Debug,O=Android,C=US"
This command generates a valid debug keystore that can be shared among team members and lasts for 10,000 days. After creating it, make sure you reference it from the Android IDE if it’s not in the default location.
When you have successfully completed the steps to get your key, you can reference your map key in the Android manifest file of your application by including the following <meta-data> tag:
<meta-data
android:value="API_KEY"
android:name="com.google.android.maps.v2.API_KEY" />
![]() Tip
Tip
If you work on multiple development machines or work as part of a team, you need to have an API key for everyone’s debug certificate. Alternatively, you can copy the debug certificate from one machine to other machines so that the signing and check against the Android Maps API key is successful. This can save you time because you don’t have to modify the code or layout files for each developer on the team.
Map Fragments
A MapFragment is a user interface component that allows you to add a map to your application in the form of a Fragment. Simply create a layout that includes a MapFragment (or a SupportMapFragment when working with the Support Library), like so:
<fragment
android:id="@+id/map"
android:layout_width="match_parent"
android:layout_height="match_parent"
class="com.google.android.gms.maps.SupportMapFragment" />
Then extend a FragmentActivity, and within your Activity, access the map in your code using the getFragmentManager() or getSupportFragmentManager() method using the getMap() method of the Fragment like so:
map = ((SupportMapFragment) getSupportFragmentManager()
.findFragmentById(R.id.map))
.getMap();
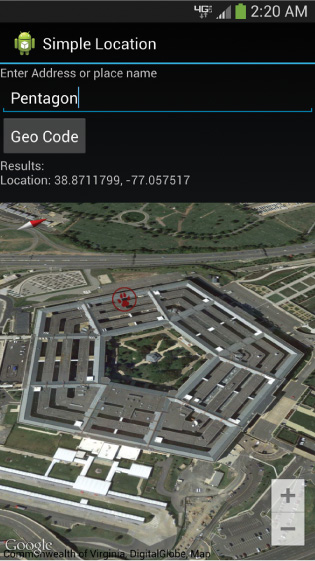
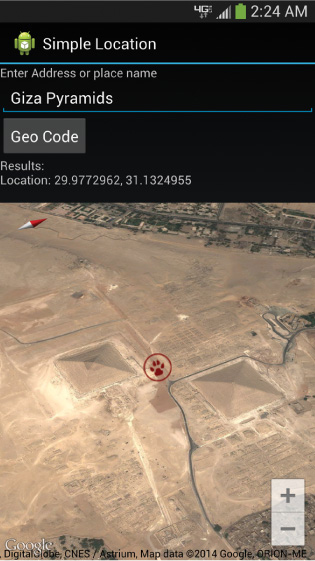
Once you have the map, you are ready to manipulate the presentation to provide meaningful information to your users. When you execute the SimpleLocation code, you should be presented with a screen that looks like Figure 17.4.
Marking the Spot
There are times when you want to mark a particular geographic location on the screen to clearly distinguish a point of reference on the map. Google Maps provides a convenience method for adding a marker to a map at a specific position:
map.addMarker(new MarkerOptions()
.position(new LatLng(0, 0))
.title("Marker"));
First you call the addMarker() method on the map and pass in a new MarkerOptions() object with a new coordinate position and a title for the marker. When the user clicks the marker, the marker displays the information you passed to the title() method of the MarkerOptions() class as shown in Figure 17.5.

Positioning and Animating the Map Camera
There are times when you may like to navigate to a different location on the map as the user interacts with your application. The map is viewable through what is known as the camera, whose position can be zoomed, rotated, tilted, or moved. The following code will move and animate the map to a different location, zoom, rotation, and tilt:
destBuilder = new CameraPosition.Builder();
CameraPosition dest = destBuilder.target(new LatLng(lat, lon))
.zoom(15.5f)
.bearing(300)
.tilt(50)
.build();
map.animateCamera(CameraUpdateFactory.newCameraPosition(dest));
First you create a new CameraPosition.Builder() object. Then you define the target where you would like the camera to move; provide any zoom, orientation, and tilt options; and then call build() to create a new CameraPosition object. Then you call the animateCamera() method of the map object and pass in a CameraUpdateFactory object with the new camera position to navigate to. Figure 17.6 shows what the SimpleLocation application looks like after having animated the camera to a new location on the map.
Summary
Google Maps for Android v2 support is available to developers who register for a key, and it can be used to enhance Android applications with location-rich information. Some applications want to build in seamless map support, whereas others might just launch the built-in map application for the user to leverage. There are tremendous opportunities for using the built-in Android location services APIs, the Google location services APIs, and the Google Maps Android v2 services APIs to improve your Android applications.
Quiz Questions
1. True or false: The Android manifest <uses-feature> attribute for adding a precise hardware GPS location fix is android.hardware.location.
2. What permission should you add to your Android manifest file to access fine location?
3. When working with a LocationClient object, what method should you call to retrieve the location of the device?
4. True or false: A MapView is used to display a map with the Google Maps Android v2 services APIs.
5. What method should you call on a Fragment to access the MapFragment?
Exercises
1. Write an application that makes use of the geofencing APIs.
2. Write an application that makes use of the activity recognition APIs.
3. Use the Google Developer Console to create an API key for Google Maps Android API v2 and install and run the SimpleLocation application provided with this chapter.
References and More Information
Android Google Services: “Location APIs”:
Android Training: “Making Your App Location-Aware”:
http://d.android.com/training/location/index.html
Android API Guides: “Location and Maps”:
http://d.android.com/guide/topics/location/index.html
Android API Guides: “Location Strategies”:
http://d.android.com/guide/topics/location/strategies.html
Android Reference documentation on the android.location package:
http://d.android.com/reference/android/location/package-summary.html
Android Google Services Reference documentation on the com.google.android.gms.location package:
http://d.android.com/reference/com/google/android/gms/location/package-summary.html
Android Google Services: “Google Maps Android API v2”:
http://d.android.com/google/play-services/maps.html
Google Developers: “Google Maps Android API v2”:
https://developers.google.com/maps/documentation/android/
Android Google Services Reference documentation on the com.google.android.gms.maps package:
http://d.android.com/reference/com/google/android/gms/maps/package-summary.html
Android Google Services Reference documentation on the com.google.android.gms.maps.model package:
http://d.android.com/reference/com/google/android/gms/maps/model/package-summary.html