
29. Internationalizing Your Applications
There are now hundreds of Android devices on the market worldwide. In this chapter, you will learn how to design and develop Android applications for foreign users and markets. This involves following design principles that make for easy internationalization, such as using alternative string resources for different languages and leveraging locale-aware classes for format-sensitive data such as date and time formats. Finally, we talk a bit about publishing applications in foreign countries.
Localizing Your Application’s Language
Android users hail from many different parts of the world. They speak different languages, use different currencies, and format their dates in different ways—just to name a few examples. Android application internationalization generally falls into three categories:
![]() Providing alternative resources such as strings or graphics for use when the application runs in different languages
Providing alternative resources such as strings or graphics for use when the application runs in different languages
![]() Implementing locale-independent or locale-specific code and other programmatic concerns
Implementing locale-independent or locale-specific code and other programmatic concerns
![]() Configuring your application for sale in foreign markets
Configuring your application for sale in foreign markets
We already discussed how to use alternative resources in Introduction to Android Application Development: Android Essentials, Fourth Edition, but perhaps another example is in order. Let’s look at an application that loads resources based upon the device language settings. Specifically, let’s consider a simple application that loads different string and graphic resources based on the language and region settings of the device.
Internationalization Using Alternative Resources
Let’s look at two examples of how to use alternative resources—this time, to localize an application for a variety of different languages and locales. By language, we mean the linguistic variety such as English, French, Spanish, German, Japanese, and so on. By locale, we are getting more specific, such as English (United States) versus English (United Kingdom) or English (Australia). There are times when you can get away with just providing language resources (English is English is English, right?) and times when this just won’t work.
Our first example is theoretical. If you want your application to support both English and French strings (in addition to the default strings), you can simply create two additional resource directories called /res/values-en (for the English strings.xml) and /res/values-fr (for the French strings.xml). Within the strings.xml files, the resource names are the same. For example, the /res/values-en/strings.xml file can look like this:
<?xml version="1.0" encoding="utf-8"?>
<resources>
<string name="hello">Hello in English!</string>
</resources>
Whereas the /res/values-fr/strings.xml file would look like this:
<?xml version="1.0" encoding="utf-8"?>
<resources>
<string name="hello">Bonjour en Français!</string>
</resources>
A default layout file in the /res/layout directory that displays the string refers to the string by the variable name @string/hello, without regard to which language or directory the string resource is in. The Android operating system determines which version of the string (French, English, or default) to load at runtime. A layout with a TextView control to display the string might look like this:
<?xml version="1.0" encoding="utf-8"?>
<LinearLayout
xmlns:android="http://schemas.android.com/apk/res/android"
android:orientation="vertical"
android:layout_width="match_parent"
android:layout_height="match_parent">
<TextView
android:layout_width="match_parent"
android:layout_height="match_parent"
android:text="@string/hello" >
</LinearLayout>
The string is accessed programmatically in the normal way:
String str = getString(R.string.hello);
It’s as easy as that. So, we move on to a more complex example, which illustrates how you can organize alternative application resources to provide functionality based on the device language and locale.
![]() Tip
Tip
The code examples provided in this section are taken from the SimpleInternationalization application. The source code for this application is provided for download on the book’s website.
Again, this application has no real code to speak of. Instead, all interesting functionality depends upon the judicious and clever use of resource folder qualifiers to specify resources to load. These resources are:
![]() The default resources for this application include the application icon stored in the
The default resources for this application include the application icon stored in the /res/drawable directory, the layout file stored in the /res/layout directory, and the strings.xml string resources stored in the /res/values directory. These resources are loaded whenever there isn’t a more specific resource available to load. They are the fallbacks.
![]() There are English string resources stored in the
There are English string resources stored in the /res/values-en directory. If the device language is English, these strings load for use in the default layout.
![]() There are French Canadian string resources stored in the
There are French Canadian string resources stored in the /res/values-fr-rCA directory. If the device language and locale are set to French (Canada), these strings load for use within the layout. But wait! There’s also an alternative layout stored in the /res/layout-fr-rCA directory, and this alternative layout uses a special drawable graphic (the Quebec flag) stored in the /res/drawable-fr-rCA directory.
![]() Finally, there are French string resources stored in the
Finally, there are French string resources stored in the /res/values-fr directory. If the device language is French (any locale except Canada), these strings load for use in the default layout.
In this way, the application loads different resources based on the language and locale information, as shown in Figure 29.1. This figure shows the project layout, in terms of resources, and what the screen might look like when the device settings are set to different languages and locales.

Figure 29.1 Using alternative resources for different language string resources. Locales set to (clockwise from top left) English (any), French (any but Canadian), anything but French or English, and French Canadian.
Changing the Language Settings
Generally, a device ships in a default language. In the United States, this language is English (United States). Users who purchase devices in France, however, are likely to have a default language setting of French (France), while those in Britain and many British territories would likely have the language set to English (United Kingdom)—that said, Australia and New Zealand have their own English settings and Canada has both an English (Canada) language option and a French (Canada) option.
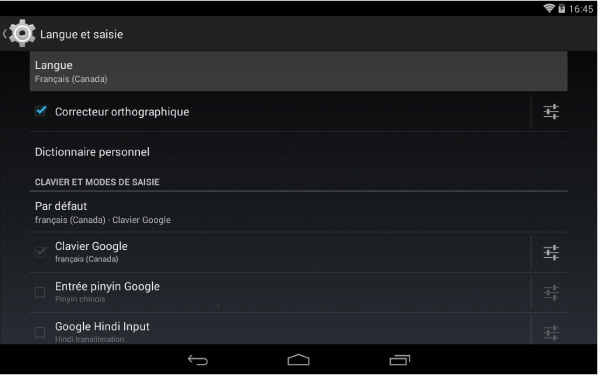
To change the locale setting on the emulator or the device, you need to perform the following steps:
1. Navigate to the Home screen.
2. Press the All Apps button.
3. Choose the Settings option.
4. Scroll down and choose the Language & input settings.
5. Choose the Language option (see Figure 29.2, top).
6. Select the locale you want to change the system to, for example, French (France), English (United States), or English (United Kingdom) (see Figure 29.2, bottom).

Make sure you memorize the steps (and related icons) required to change the language settings, as you need to navigate back to this screen in that foreign language in order to change the settings back. Figure 29.3 shows the Language Settings menu in French (Canada). If you do not remember the steps you took to change the language, you may have a hard time understanding how to change the language back to your own.
![]() Tip
Tip
You can also create custom locales for testing using the Custom Locale application, available on the Android emulator. For example, you might want to create a Spanish locale for Mexico. When you use a custom locale, the emulator displays in its default language, but the current locale is detected as your custom locale, allowing you to localize your application.
Internationalization forces design choices on the development team. For example, will you build one big project for all languages, or will you break the applications up by region? For some projects with light internationalization, you might be able to get away with one project with all internationalized resources. For deep internationalization, you might need to reorganize projects so that no application becomes too large or cumbersome for the user.
Because much of the work for application localization revolves around alternative resources, this means that this work might fall not to a developer who knows how to use the Android IDE and the Android tools well, but to a designer who needs some training on how Android internationalization works, how resources can be layered, and the drawbacks of over-internationalizing (resulting in large package files with many graphics and such). On the plus side, this leaves developers free to do what they do best: developing code.
Finally, you’ve likely noticed that the Android alternative resource structure isn’t perfect—especially for countries with multiple official (and unofficial) languages. It is possible to work around these issues, when necessary, by loading graphics programmatically based on the current locale setting on the device, but this should be attempted only when absolutely necessary.
![]() Tip
Tip
While testing on real hardware is the only way to be sure that your internationalization works the way you expect, the Graphical Layout designer in the Android IDE allows you to preview alternative resources.
Implementing Locale Support Programmatically
There are times when you should ensure that your application code is “locale aware.” Often, this means writing code that is flexible enough to run smoothly regardless of the locale. However, when your application needs to be locale aware—for example, to download appropriate content from a remote application server—you should rely on locale-friendly methods.
![]() Tip
Tip
To determine the device locale, developers can use the getDefault() method of the java.util.Locale class. Similarly, you can use the getAvailableLocales() method to retrieve a list of locales available on the device. Not all locales are supported on all devices; device manufacturers and operators might include only a subset of all locales supported by the Android operating system. For example, you might see devices sold in the United States that support only English and Spanish. You might also want to check out the android.content.res.Configuration class for more information on device configuration, including locale settings.
Here are some pointers for developing applications that work in a variety of locales:
![]() Begin by accepting that different parts of the world have different ways of expressing common information. Respect these differences and support them when feasible.
Begin by accepting that different parts of the world have different ways of expressing common information. Respect these differences and support them when feasible.
![]() Apply standard methods for internationalizing Java applications.
Apply standard methods for internationalizing Java applications.
![]() Most localization issues with application code revolve around the use and formatting of strings, numbers, currencies, dates, and times. Audio and video containing speech are also routinely localized.
Most localization issues with application code revolve around the use and formatting of strings, numbers, currencies, dates, and times. Audio and video containing speech are also routinely localized.
![]() Don’t make assumptions about character encodings or what locale your application runs in.
Don’t make assumptions about character encodings or what locale your application runs in.
![]() Always use locale-friendly methods when they are available. Often, a class has two versions of a method: one that uses the current locale and another that includes a
Always use locale-friendly methods when they are available. Often, a class has two versions of a method: one that uses the current locale and another that includes a Locale parameter that you can use when necessary to override behavior.
![]() Tip
Tip
There are a number of utility classes and methods provided in the Android SDK for a locale- and region-specific string (start with the String.format() method), date manipulation (start with the java.text.DateFormat utility class), and phone number formatting (start with the android.telephony.PhoneNumberUtils class). Note also that many classes have methods that take a Locale parameter, enabling the developer to override behavior for other than the current locale.
Right-to-Left Language Localization
Android 4.2 (API Level 17) introduced a new set of APIs for supporting layouts and languages that are read from right to left (RTL), such as Hebrew and Arabic. RTL layouts are easy to add by setting the android:supportsRtl attribute to true for the <application> tag in your manifest file. When this attribute is set to true, various UI components that were previously displayed on the left side will now appear on the right, such as the application icon and title displayed within the action bar, in addition to reversing any View classes within your layout.
Further enhancements were added in Android 4.3 (API Level 18) for cases where mixed-direction text needs to be displayed, to ensure proper formatting. Information such as street addresses was difficult to display properly in an RTL layout, so the BidiFormatter utility class was added to help with the directionality of text displayed partially in a left-to-right manner mixed with right-to-left text.
Translation Services through Google Play
The more language translations your application supports, the more users your application will be able to reach. Unless you are able to speak many languages, chances are that you require help translating your application into languages other than what you know. Fortunately, Google added some great features to the Developer Console to make the process of translating applications much smoother, as part of a new pilot program Google is testing.
Using the Developer Console
To make use of the translation services, you must be using the ADT Bundle which includes the ADT Translation Manager Plugin. Once your development environment is configured, you will then be able to purchase professional translation services through the Google Play Developer Console. Google provides links to many third-party service providers who are able to assist with translation services for a fee, and the good thing is that these vendors have been prequalified.
From within the Android IDE, all you have to do is click the upload strings for translation (![]() ) toolbar button to start the localization process, or click the download translated strings (
) toolbar button to start the localization process, or click the download translated strings (![]() ) toolbar button to complete the process once the files have been translated.
) toolbar button to complete the process once the files have been translated.
Publishing Applications for Foreign Users
After you’ve designed and developed an application that targets different locales, you need to make sure you can distribute the application to them easily. Google Play has fairly sophisticated settings available for publishing and selling applications in a variety of countries around the world. This is due to the fact that Google Wallet has worked out the tax and export situations with these countries. Developers can create application listings in a variety of languages and easily target the users they desire. Other markets, such as the Amazon Appstore, are available to a much more limited set of users. See the specific publication channels you wish to use for details about where they distribute applications.
Summary
By internationalizing your Android applications, you enable them to reach the maximum number of users. Internationalization requires a multifaceted approach and is best done as part of the application design process. Application assets like strings should be organized by language or region in the appropriate alternative resource directories. You also want to ensure that locale-dependent information such as dates, times, and currencies is displayed appropriately. Finally, be aware that once you internationalize your applications, you must still manage their internationalized application profiles on various publication channels, such as Google Play.
Quiz Questions
1. True or false: The /res/values-fr/strings.xml file should be used to store French string translations.
2. What directory would you use for French layout files?
3. What directory would you use to store French Canadian graphic files?
4. True or false: The Custom Locale emulator application is used for creating custom locales for Android applications.
5. How would you add support for RTL layouts to your Android application?
Exercises
1. Use the Android documentation to determine how you would programmatically perform a manual locale lookup in your application.
2. Use the Android documentation to determine how you would change the locale of an emulator using adb from the command line.
References and More Information
Android API Guides: “Providing Alternative Resources”:
http://d.android.com/guide/topics/resources/providing-resources.html#AlternativeResources
Android API Guides: “Localizing with Resources”:
http://d.android.com/guide/topics/resources/localization.html
Android API Guides: “How Android Finds the Best-Matching Resource”:
http://d.android.com/guide/topics/resources/providing-resources.html#BestMatch
Android SDK Reference documentation for the BidiFormatter class:
http://d.android.com/reference/android/text/BidiFormatter.html
Android Tools: “Installing the Eclipse Plugin”:
http://d.android.com/sdk/installing/installing-adt.html
Android Distribute: “Publishing: Localization Checklist”:
http://d.android.com/distribute/googleplay/publish/localizing.html
ISO 639.2:
http://www.loc.gov/standards/iso639-2/php/code_list.php
Country Codes—ISO 3166:
http://www.iso.org/iso/country_codes/iso_3166_code_lists/country_codes