
27. Enabling Application Search
Android devices boast powerful search features, thanks to the search framework that was built into the Android SDK from the beginning. Application developers can enable search features in their applications in a variety of ways, including exposing app data on device-wide searches, providing relevant search suggestions, enabling voice search, and more. In this chapter, you will become familiar with some of the most common ways apps can leverage the Android search framework.
Making Application Content Searchable
If your application is content rich, either with content created by users or with content provided by you, the developer, integrating with the search capabilities of Android can provide many benefits and add value to the user. The application data becomes part of the overall device experience and is more accessible, and your application can be presented to users in more cases than just when they launch it.
Developers can implement powerful search features in their applications using the Android framework. There are two ways that search capabilities are generally added to Android applications:
![]() Applications implement a search framework that enables their activities to react to the user pressing the Search button, requesting a search, and performing searches on data within that application.
Applications implement a search framework that enables their activities to react to the user pressing the Search button, requesting a search, and performing searches on data within that application.
![]() Applications can expose their content for use in global, system-wide searches that include application and web content.
Applications can expose their content for use in global, system-wide searches that include application and web content.
Search framework features include the capability to search for and access application data as search results, as well as the ability to provide suggestions as the user types search criteria. Applications can also provide an Intent to launch when a user selects specific search suggestions.
![]() Tip
Tip
The code examples provided in this section are taken from the SimpleSearchIntegration application. The source code for this application is provided for download on the book’s website.
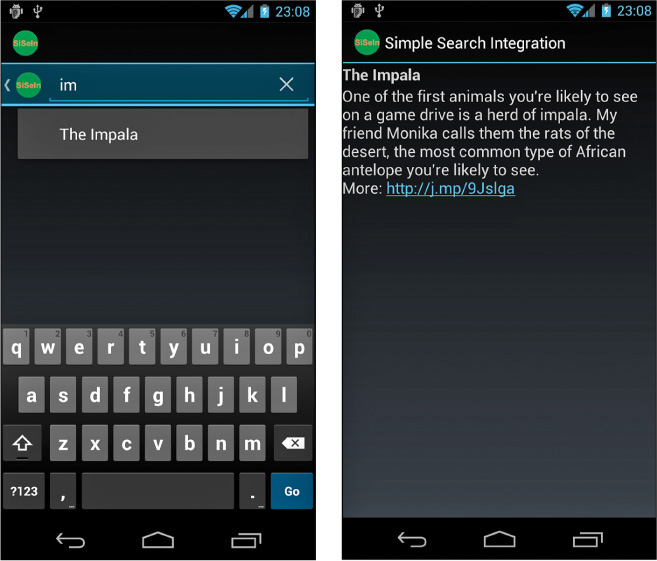
Let’s revisit the African field notes application we discussed in the previous chapter. This application uses a simple content provider to supply information about game animals. Enabling search support in this application seems rational; it enables the user to quickly find information about a specific animal simply by pressing the Search button or using a search widget. When a result is found, the application needs to be able to apply an Intent for launching the appropriate screen to view that specific field note—the perfect time to implement a simple content type handler that enables the application to handle “view field note” actions, as shown in Figure 27.1.
Enabling Searches in Your Application
You need to make a number of changes in your application to enable searches. Although these changes might seem complex, the good news is that if you do them right, enabling global searches later is simple. Searching content generally necessitates that your application expose a content provider or, at the very least, that it has some sort of underlying database that can be searched in a systematic fashion.
![]() Note
Note
The search framework provided by the SearchManager class (android.app.SearchManager) does not actually perform the search queries—that is up to you, the developer. The SearchManager class simply manages search services and the search dialog controls. How and what data is searched and which results are returned are implementation details.
To enable in-application searches, you need to:
![]() Develop an application with data, ideally exposed as a content provider
Develop an application with data, ideally exposed as a content provider
![]() Create an XML search configuration file
Create an XML search configuration file
![]() Implement an
Implement an Activity class to handle searches
![]() Configure the application’s Android manifest file for searches
Configure the application’s Android manifest file for searches
Now let’s look at each of these requirements in more detail.
Creating a Search Configuration
Creating a search configuration for your application simply means that you need to create an XML file with special search tags. This search configuration file is normally stored in the XML resource directory (for example, /res/xml/searchable.xml) and referenced in the searchable application’s Android manifest file.
Enabling Basic Searches
The following is a sample search configuration that the field notes application might use, stored as an application resource file:
<?xml version="1.0" encoding="utf-8"?>
<searchable
xmlns:android="http://schemas.android.com/apk/res/android"
android:label="@string/app_name"
android:hint="@string/search_hint"
android:searchSettingsDescription="@string/search_settings_help">
</searchable>
The basic attributes of the search configuration are fairly straightforward. The label attribute is generally set to the name of your application (the application providing the search result). The hint attribute is the text that shows in the EditText control of the search box when no text has been entered—a prompt. You can further customize the search dialog by customizing the search button text and input method options, if desired.
Enabling Search Suggestions
If your application acts as a content provider and you want to enable search suggestions—those results provided in a list below the search box as the user types in search criteria—you must include several additional attributes in your search configuration. You need to specify information about the content provider used to supply the search suggestions, including its authority, path information, and the query to use to return search suggestions. You also need to provide information for the Intent to trigger when a user clicks on a specific suggestion.
Again, let’s go back to the field notes example. Here are the search configuration attributes required to support search suggestions that query field note titles:
android:searchSuggestAuthority =
"com.advancedandroidbook.simplesearchintegration.
SimpleFieldnotesContentProvider"
android:searchSuggestPath="fieldnotes"
android:searchSuggestSelection="fieldnotes_title LIKE ?"
android:searchSuggestIntentAction="android.intent.action.VIEW"
android:searchSuggestIntentData=
"content://com.advancedandroidbook.simplesearchintegration.
SimpleFieldnotesContentProvider/fieldnotes"
The first attribute, searchSuggestAuthority, sets the content provider to use for the search suggestion query. The second attribute defines the path appended to the Authority and right before SearchManager.SUGGEST_URI_PATH_QUERY is appended to the Authority. The third attribute supplies the SQL WHERE clause of the search query (here, only the field note titles, not their bodies, are queried to keep search suggestion performance reasonably fast). Next, an Intent action is provided for when a user clicks a search suggestion, and then finally the Uri used to launch the Intent is defined.
You can also set a threshold (android:searchSuggestThreshold) on the number of characters the user needs to type before a search suggestion query is performed. Consider setting this value to a reasonable number like three or four characters to keep queries to a minimum (the default is 0). At a value of zero, even an empty search field shows suggestions—but these are not filtered at all.
Each time the user begins to type in search criteria, the system performs a content provider query to retrieve suggestions. Therefore, the application’s content provider interface needs to be updated to handle these queries. In order to make this all work properly, you need to define a projection in order to map the content provider data columns to those that the search framework expects to use to fill the search suggestion list with content. For example, the following code defines a project to map the field note unique identifiers and titles to the _ID, SUGGEST_COLUMN_TEXT_1, and SUGGEST_COLUMN_INTENT_DATA_ID fields for the search suggestions:
private static final HashMap<String, String>
FIELDNOTES_SEARCH_SUGGEST_PROJECTION_MAP;
static {
FIELDNOTES_SEARCH_SUGGEST_PROJECTION_MAP =
new HashMap<String, String>();
FIELDNOTES_SEARCH_SUGGEST_PROJECTION_MAP.put(_ID, _ID);
FIELDNOTES_SEARCH_SUGGEST_PROJECTION_MAP.put(
SearchManager.SUGGEST_COLUMN_TEXT_1, FIELDNOTES_TITLE + " AS "
+ SearchManager.SUGGEST_COLUMN_TEXT_1);
FIELDNOTES_SEARCH_SUGGEST_PROJECTION_MAP.put(
SearchManager.SUGGEST_COLUMN_INTENT_DATA_ID, _ID + " AS "
+ SearchManager.SUGGEST_COLUMN_INTENT_DATA_ID);
}
Each time search suggestions need to be displayed, the system executes a query using the Uri provided as part of the search configuration. Don’t forget to define this Uri and register it in the content provider’s UriMatcher object (using the addURI() method). For example, the field notes application used the following URI for search suggestion queries:
content://com.advancedandroidbook.simplesearchintegration.
SimpleFieldnotesContentProvider/fieldnotes/search_suggestion_query
By providing a special search suggestion Uri for the content provider queries, you can simply update the content provider’s query() method to handle the specialized query, including building the projection, performing the appropriate query, and returning the results. Let’s take a closer look at the field notes content provider query() method:
@Override
public Cursor query(Uri uri, String[] projection, String selection,
String[] selectionArgs, String sortOrder) {
SQLiteQueryBuilder queryBuilder = new SQLiteQueryBuilder();
queryBuilder.setTables(SimpleFieldnotesDatabase.FIELDNOTES_TABLE);
int match = sURIMatcher.match(uri);
switch (match) {
case FIELDNOTES_SEARCH_SUGGEST:
selectionArgs = new String[] { "%" + selectionArgs[0] + "%" };
queryBuilder.setProjectionMap(
FIELDNOTES_SEARCH_SUGGEST_PROJECTION_MAP);
break;
case FIELDNOTES:
break;
case FIELDNOTE_ITEM:
String id = uri.getLastPathSegment();
queryBuilder.appendWhere(_ID + "=" + id);
break;
default:
throw new IllegalArgumentException("Invalid URI: " + uri);
}
SQLiteDatabase sql = database.getReadableDatabase();
Cursor cursor = queryBuilder.query(sql, projection, selection,
selectionArgs, null, null, sortOrder);
cursor.setNotificationUri(getContext().getContentResolver(), uri);
return cursor;
}
This query() method implementation handles both regular content queries and special search suggestion queries (those that come in with the search suggestion Uri). When the search suggestion query occurs, we wrap the search criteria in wildcards and use the handy setProjectionMap() method of the QueryBuilder object to set and execute the query as normal. Because we want to return results quickly, we search only for titles matching the search criteria for suggestions, not the full text of the field notes.
Instead of using wildcards and a slow LIKE expression in SQLite, we could have used the SQLite FTS3 extension, which enables fast full-text queries. With a limited number of rows of data, this is not strictly necessary in our case, and it requires creating tables in a different and much less relational way. Indices are not supported, so query performance might suffer. See the SQLite FTS3 documentation at http://www.sqlite.org/fts3.html.
Enabling Voice Search
You can also add voice search capabilities to your application. This enables the user to speak the search criteria instead of type them. There are several attributes you can add to your search configuration to enable voice searches. The most important attribute is voiceSearchMode, which enables voice searches and sets the appropriate mode. The showVoiceSearchButton value enables the little voice recording button to display as part of the search dialog, the launchRecognizer value tells the Android system to use voice recording activity, and the launchWebSearch value initiates the special voice web search activity.
To add voice support to the field notes sample application, add the following line to the search configuration:
android:voiceSearchMode="showVoiceSearchButton|launchRecognizer"
Other voice search attributes you can set include the voice language model (free-form or web search), the voice language, the maximum voice results, and a text prompt for the voice recognition dialog.
Requesting a Search
Up until Android API Level 11, most Android devices had a physical Search button. From within your application, this button can be pressed and the search dialog comes up (Figure 27.1, left). The search dialog can also be triggered by calling the onSearchRequested() method of the Activity class.
With API Level 11 and later, the Search button is gone. Instead, developers must add a Search button to their applications. The best way to do this is with the SearchView class. With this class, an expandable search area can easily be added to the action bar. Take, for example, the following implementation of onCreateOptionsMenu(), found in the sample app:
@Override
public boolean onCreateOptionsMenu(Menu menu) {
MenuInflater inflater = getMenuInflater();
inflater.inflate(R.menu.menu, menu);
SearchManager searchManager =
(SearchManager) getSystemService(Context.SEARCH_SERVICE);
SearchView searchView = (SearchView) menu.findItem(R.id.menu_search)
.getActionView();
searchView.setSearchableInfo(searchManager
.getSearchableInfo(new ComponentName(this,
SimpleSearchableActivity.class)));
searchView.setIconifiedByDefault(true);
return true;
}
Here’s the corresponding menu resource file:
<?xml version="1.0" encoding="utf-8"?>
<menu xmlns:android="http://schemas.android.com/apk/res/android" >
<item
android:id="@+id/menu_search"
android:actionViewClass="android.widget.SearchView"
android:icon="@drawable/ic_menu_search"
android:showAsAction="ifRoom|collapseActionView"
android:title="@string/menu_search"/>
</menu>
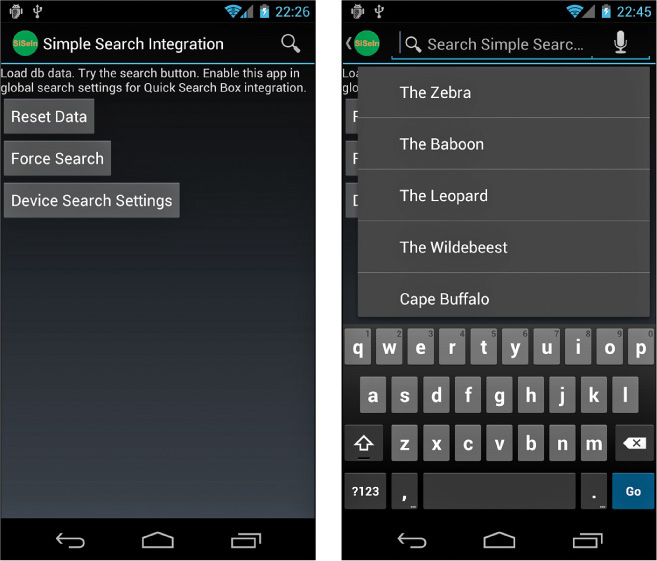
The result of this SearchView configuration is shown in Figure 27.2. The action bar receives the menu item with the search icon (Figure 27.2, left). When the search item is clicked, the search field appears right in the action bar, and the suggestions appear below it (Figure 27.2, right).
Creating a Search Activity
Next, you need to implement an Activity class that actually performs the requested searches. This Activity is launched whenever your application receives an Intent with the action value of ACTION_SEARCH.
The search request contains the search string in the extra field called SearchManager.QUERY. The Activity takes this value, performs the search, and then responds with the results.
Let’s look at the search Activity from our field notes example. You can implement its search Activity, SimpleSearchableActivity, as follows:
public class SimpleSearchableActivity extends ListActivity {
@Override
protected void onCreate(Bundle savedInstanceState) {
super.onCreate(savedInstanceState);
Intent intent = getIntent();
checkIntent(intent);
}
@Override
protected void onNewIntent(Intent newIntent) {
// update the activity launch intent
setIntent(newIntent);
// handle it
checkIntent(newIntent);
}
private void checkIntent(Intent intent) {
String query = "";
String intentAction = intent.getAction();
if (Intent.ACTION_SEARCH.equals(intentAction)) {
query = intent.getStringExtra(SearchManager.QUERY);
Toast.makeText(this,
"Search received: " + query, Toast.LENGTH_LONG)
.show();
} else if (Intent.ACTION_VIEW.equals(intentAction)) {
// pass this off to the details view activity
Uri details = intent.getData();
Intent detailsIntent =
new Intent(Intent.ACTION_VIEW, details);
startActivity(detailsIntent);
finish();
return;
}
fillList(query);
}
private void fillList(String query) {
String wildcardQuery = "%" + query + "%";
CursorLoader loader = new CursorLoader(getApplicationContext(),
SimpleFieldnotesContentProvider.CONTENT_URI, null,
SimpleFieldnotesContentProvider.FIELDNOTES_TITLE +
" LIKE ? OR " +
SimpleFieldnotesContentProvider.FIELDNOTES_BODY + " LIKE ?",
new String[] { wildcardQuery, wildcardQuery }, null);
Cursor cursor = loader.loadInBackground();
ListAdapter adapter = new SimpleCursorAdapter(this,
android.R.layout.simple_list_item_1, cursor,
new String[] { SimpleFieldnotesContentProvider.
FIELDNOTES_TITLE },
new int[] { android.R.id.text1 });
setListAdapter(adapter);
}
@Override
protected void onListItemClick(
ListView l, View v, int position, long id) {
Uri details = Uri.withAppendedPath(
SimpleFieldnotesContentProvider.CONTENT_URI, "" + id);
Intent intent =
new Intent(Intent.ACTION_VIEW, details);
startActivity(intent);
}
}
Both the onCreate() and onNewIntent() methods are implemented because the Activity is flagged with a launchMode set to singleTop. This Activity is capable of bringing up the search dialog when the user presses the Search button, like the rest of the activities in this example. When the user performs a search, the system launches the SimpleSearchableActivity—the same Activity the user was already viewing. We don’t want to create a huge stack of search result activities, so we don’t let it have more than one instance on top of the stack—thus the singleTop setting.
Handling the search is fairly straightforward. We use the search term provided for us to create a CursorLoader. Using the loader.loadInBackground() call, the results are obtained as a Cursor object that is then used with the SimpleCursorAdapter object to fill the ListView control of the Activity class.
For list item click handling, the implementation here simply creates a new VIEW intent and, effectively, lets the system handle the item clicking. In this case, the details Activity handles the displaying of the proper field note. Why do this instead of launching the class Activity directly? No reason other than it’s simple and it’s well tested from other uses of this launch style.
When a user clicks on a suggestion in the list, instead of an ACTION_SEARCH, this Activity receives the usual ACTION_VIEW. Instead of handling it here, though, it’s passed on to the details view Activity as that Activity is already designed to handle the drawing of the details for each item—there’s no reason to implement it twice.
Configuring the Android Manifest File for Search
Now it’s time to register your searchable Activity class in the application manifest file, including configuring the intent filter associated with the ACTION_SEARCH action. You also need to mark your application as searchable using a <meta-data> manifest file tag.
Here is the Android manifest file excerpt for the searchable Activity registration:
<activity
android:name="SimpleSearchableActivity"
android:launchMode="singleTop">
<intent-filter>
<action android:name="android.intent.action.SEARCH" />
</intent-filter>
<intent-filter>
<action android:name="android.intent.action.VIEW" />
</intent-filter>
<meta-data
android:name="android.app.searchable"
android:resource="@xml/searchable" />
</activity>
The main difference between this <activity> tag configuration and a typical Activity is the addition of the intent filter for intents with an action type of SEARCH. In addition, some metadata is provided so that the system knows where to find the search configuration details.
Next, let’s look at an example of how to enable the Search button for all activities in the application. This <meta-data> block needs to be added to the <application> tag, outside any <activity> tags:
<meta-data
android:name="android.app.default_searchable"
android:value =
"com.advancedandroidbook.simplesearchintegration.
SimpleSearchableActivity" />
This <meta-data> tag configures the default Activity that handles the search results for the entire application. This way, pressing the Search button brings up the search dialog from any Activity in the application. If you don’t want this functionality in every Activity, you need to add this definition to each Activity for which you do want the Search button enabled.
![]() Note
Note
Not all Android devices have a Search button. If you want to guarantee search abilities within the application, consider adding other ways to initiate a search, such as adding a Search button to the application screen or providing the search option on the options menu.
Enabling Global Search
After you have enabled your application for searches, you can make it part of the global device search feature with a few extra steps. Global searches are often invoked using the Quick Search Box. In order to enable your application for global search, you need to:
![]() Begin with an application that already has in-application search capabilities as described earlier
Begin with an application that already has in-application search capabilities as described earlier
![]() Update the search configuration file to enable global searches
Update the search configuration file to enable global searches
![]() Include your application in global searches by updating the Search settings of the device
Include your application in global searches by updating the Search settings of the device
Now let’s look at these requirements in a bit more detail. Let’s assume we’re working with the same sample application—the field notes.
Updating a Search Configuration for Global Searches
Updating an existing search configuration is simple. All you need to do is add the include InGlobalSearch attribute in your configuration and set it to true as follows:
android:includeInGlobalSearch="true"
At this point, you should also ensure that your application is acting as a content type handler for the results you provide as part of global searches (if you haven’t already). That way, users can select search suggestions provided by your application. Again, you probably want to leverage the content type handler functionality again, in order to launch the application when a search suggestion is chosen.
![]() Tip
Tip
You can initiate a global search using the SearchManager.INTENT_ACTION_GLOBAL_SEARCH intent.
Updating Search Settings for Global Searches
However, the user has ultimate control over what information is included as part of the global search. Your applications are not included in global searches by default. The user must include applications explicitly. For your application to show up as part of global searches, the user must adjust the device Search settings. The user makes this configuration from the device Search settings page.
If your application is appropriate for global searches, you might want to include a shortcut to these settings so that users can easily navigate to them without feeling like they’ve left your application. The SearchManager class has an Intent called INTENT_ACTION_SEARCH_SETTINGS for this purpose:
Intent intent = new Intent(SearchManager.INTENT_ACTION_SEARCH_SETTINGS);
startActivity(intent);
This Intent launches the Settings application on the Search settings screen. As you can see, searches—whether they are in-application searches or global searches—allow applications and content to be exposed in new and interesting ways so that the user’s data is always just a few keystrokes (or spoken words) away.
![]() Tip
Tip
Each device may have a different way of navigating to the Search settings screen, so you may need to browse through your device manual to learn how to reach these settings. One possible way to reach these settings is to navigate to the Google account settings you configured for your device and look for Search settings there.
Summary
The Android search framework enables applications to expose their data so that the user can find information easily and efficiently through a consistent interface. Applications can enable in-application searches, search suggestions, voice searching, and more. Often, applications with content providers and application databases are the simplest to enable for search, so using these common design practices will work to your advantage.
Quiz Questions
1. True or false: The <searchable> attribute searchSuggestAuthority sets the content provider to use for a search suggestion query.
2. What <searchable> attribute would you set to require a certain number of characters to be typed by the user before a search suggestion query is performed?
3. How would you add voice support to the field notes sample application with web search?
4. True or false: The SearchButton class is used to add a Search button to an application.
5. What <searchable> attribute and value must you declare to include your application in global search?
Exercises
1. Use the Android documentation to determine what type of Cursor you would use if your search suggestions are not stored in a SQLite table or table format.
2. Use the Android documentation to determine what <path-permission> you would need to set if your content provider requires a read permission.
References and More Information
Android Training: “Adding Search Functionality”:
Android API Guides: “Search Overview”:
http://d.android.com/guide/topics/search/index.html
Android SDK Reference documentation on the SearchManager class:
http://d.android.com/reference/android/app/SearchManager.html
Android SDK Reference documentation on the SearchView class:
http://d.android.com/reference/android/widget/SearchView.html
Android SDK Reference documentation on the SearchRecentSuggestions class:
http://d.android.com/reference/android/provider/SearchRecentSuggestions.html