26. Extending Android Application Reach
Android applications can be extended far beyond traditional functional boundaries to integrate tightly with the rest of the operating system. Developers can use a number of other platform features to improve the usefulness of an application. In this chapter, you will learn about the various ways to enhance your applications and extend their reach, making them even more powerful and compelling to your users.
Enhancing Your Applications
One of Android’s most compelling features as a platform is its approach to application interoperability. Unlike the mobile development platforms of the past, which allowed each simple application to run in its own little bubble, Android allows applications to share data and functionality with other applications and the rest of the operating system in a secure and reasonable fashion. After you’ve developed your core application, it’s time to give some thought to how to extend the application’s reach beyond the traditional use case, which is:
1. User launches the app.
2. User runs the app.
3. User closes the app.
Although it’s certainly necessary to support that particular scenario, it’s not the only way that users can interact with an app or its features. The Android framework includes a number of ways to move beyond this paradigm. You can extend and enhance Android applications in a variety of ways, including:
![]() Exposing small segments of application functionality in the form of App Widgets, which can reside on the user’s Home screen or on the Lock screen.
Exposing small segments of application functionality in the form of App Widgets, which can reside on the user’s Home screen or on the Lock screen.
![]() Providing users with an interactive background associated with your application in the form of a live wallpaper.
Providing users with an interactive background associated with your application in the form of a live wallpaper.
![]() Displaying an interactive screen saver while the device is plugged into a charger or residing in a dock in the form of a Daydream.
Displaying an interactive screen saver while the device is plugged into a charger or residing in a dock in the form of a Daydream.
![]() Making application content searchable across the device, as discussed in Chapter 27, “Enabling Application Search.”
Making application content searchable across the device, as discussed in Chapter 27, “Enabling Application Search.”
![]() Enabling your application to act as a content type handler, exposing the capability to process common types of data such as pictures or videos.
Enabling your application to act as a content type handler, exposing the capability to process common types of data such as pictures or videos.
![]() Enabling different application entry points using intent filters above and beyond the default
Enabling different application entry points using intent filters above and beyond the default Activity to launch.
![]() Having your application act as a content provider, exposing internal data for use by other applications, and taking advantage of other content providers to enhance your application. See Chapter 4, “Building Android Content Providers,” for more details.
Having your application act as a content provider, exposing internal data for use by other applications, and taking advantage of other content providers to enhance your application. See Chapter 4, “Building Android Content Providers,” for more details.
![]() Enabling your application to act as a broadcast receiver to react to important events that occur and to broadcast application events of interest to other applications. See Chapter 5, “Broadcasting and Receiving Intents,” for more details.
Enabling your application to act as a broadcast receiver to react to important events that occur and to broadcast application events of interest to other applications. See Chapter 5, “Broadcasting and Receiving Intents,” for more details.
![]() Having your application act as a
Having your application act as a Service, providing data services and special functionality to other applications, as discussed in Chapter 2, “Working with Services.”
This is where we encourage you to think outside the box and consider how to extend the reach of your applications. By doing so, you keep your application fresh in your users’ minds so they continually rely on your application and don’t forget about it. Now let’s look at some of the options listed in more detail.
Working with App Widgets
Introduced in API Level 3, the App Widget provides a level of application integration with the Android operating system that was previously not available to mobile developers. Applications that publish App Widgets are called App Widget providers. A component that can contain an App Widget is called an App Widget host. An App Widget is a lightweight, simply featured application (such as a desktop plug-in) that can be installed on a host such as the Home screen.
An App Widget is normally tied back to some underlying application. For example, a calendar application might have an App Widget that shows the current date and enables the user to view the scheduled events of the day. Clicking on a specific event might launch the full calendar application to that date, enabling the user to access the full range of application features. Similarly, a music application might provide a simple set of controls within an App Widget, enabling the user to easily start and stop music playback from the Home screen. We provide a simple App Widget implementation as part of the code that accompanies this book; this App Widget displays information about the United States Homeland Security Advisory System’s threat level (imminent and elevated); this type of App Widget might be appropriate for a travel application.
An App Widget can be updated at regular intervals with fresh content. This makes App Widgets ideal for secondary application features, whereas notifications that launch into the full application functionality might be more appropriate for events that require a speedy user response.
![]() Tip
Tip
As of Android 4.2 (API Level 17), App Widgets may now be added to a user’s Lock screen. This makes an App Widget available for view while the user is locked out of the phone, similar to the Clock application found on many Android devices.
Creating an App Widget
Consider whether or not your application should include App Widget functionality. Although App Widgets are small in size and light on functionality, they allow the user to access application functionality straight from the Home screen. App Widgets also serve to keep users using the application by reminding them that they installed it. Some applications allow only one instance of an App Widget to run (such as the music player), whereas others might allow multiple instances of the same App Widget to be placed simultaneously, though generally showing different content (such as a picture frame).
You need to make the following changes to your application to support App Widgets:
![]() Provide an XML App Widget configuration.
Provide an XML App Widget configuration.
![]() Determine whether the App Widget requires a configuration
Determine whether the App Widget requires a configuration Activity.
![]() Provide an
Provide an AppWidgetProvider class implementation.
![]() Provide a
Provide a Service class implementation to handle App Widget content updates, as needed.
![]() Update the application Android manifest file to register the App Widget provider information and any information about the update
Update the application Android manifest file to register the App Widget provider information and any information about the update Service.
Now let’s look at some of these requirements in greater detail.
![]() Tip
Tip
The code examples provided in this section are taken from the SimpleAppWidget application. The source code for this application is provided for download on the book’s website.
Creating an App Widget Configuration
First, your application must provide an XML App Widget definition. You can store this definition in the project’s resources in the /res/xml directory. Let’s take a closer look at an example of an App Widget definition, as defined in res/xml/simple_widget_info.xml:
<?xml version="1.0" encoding="utf-8"?>
<appwidget-provider
xmlns:android="http://schemas.android.com/apk/res/android"
android:minWidth="146dp"
android:minHeight="72dp"
android:updatePeriodMillis="28800000"
android:initialLayout="@layout/widget"
android:previewImage="@drawable/widgetPreview" >
</appwidget-provider>
This simple App Widget definition is encapsulated in the <appwidget-provider> XML tag. The minWidth and minHeight attributes dictate the size of the App Widget (a dimension, here in dp), and the updatePeriodMillis attribute is used to define how often the App Widget content is refreshed (using the App Widget update Service)—in this case, once every eight hours. The App Widget layout definition is referenced using the initialLayout attribute—we talk more about this layout file in a few moments. Finally, a preview of the App Widget is provided with the previewImage field. This is useful in Android 3.0 and later where selecting images is done from the preview image rather than a list.
![]() Note
Note
An App Widget cannot be updated more frequently than every 30 minutes (1,800,000 milliseconds). Ensure that the updatePeriodMillis attribute of your App Widget provider reflects this limitation. This limit has testing implications. You might consider a tool to force an update or some sort of Refresh button that users might benefit from, as well.
If your widget must break this limit, which you should do only for a very good reason, you must implement the timer yourself. Keep in mind the effect on battery life and performance this decision might have.
To draw nicely on the Home screen, the App Widget dimensions must follow certain guidelines. The Home screen is divided into cells of a particular size. When the user attempts to install an App Widget, the system checks to make sure there is enough space (as dictated by the minimum width and height values of the App Widget).
![]() Tip
Tip
The basic formula for determining the size of an App Widget is to multiply the number of cells you want by 70, and then subtract 30. In our case, we want an App Widget two cells high and two cells wide. Therefore, we use a size of ((70*2) – 30) or 110. This formula has changed a few times in the past, so make sure to check the documentation for the current formula to calculate the appropriate size for your App Widget. For a nice write-up on App Widget design guidelines, see the Android website at http://d.android.com/guide/practices/ui_guidelines/widget_design.html.
There are a number of other attributes available in the <appwidget-provider> tag. For example, you can specify the Activity class used to configure the App Widget using the configure attribute, which is especially useful when you support multiple simultaneous App Widget instances. For a complete list of available App Widget provider configuration details, see the class documentation for the android.appwidget.AppWidgetProviderInfo class.
Determining Whether the App Widget Requires a Configuration Activity
Generally speaking, if there is more than one instance of an App Widget, each instance should look or behave differently. This isn’t a strict requirement; if each instance of the App Widget looks and acts the same, users quickly catch on and install only one instance at a time.
However, if you want to differentiate between App Widget instances, you need to provide each with settings, and thus you must create a configuration Activity. This configuration Activity is a normal Activity, but it will read in certain Intent extras upon launch. The configuration Activity must be defined in the App Widget XML configuration.
Each time a new App Widget instance is created, the configuration Activity is launched. The Activity is launched with the unique App Widget identifier, passed in via the launch Intent’s EXTRA_APPWIDGET_ID extra. The Activity, on completion, must set this value back in the result Intent along with result status, such as RESULT_OK.
The configuration Activity should not only let the user configure options on this particular App Widget instance, but it should also update the RemoteViews object, as the App Widget will not receive an update event when it’s first created with a configuration Activity set in the XML configuration. Subsequent updates receive the update event, though.
Creating an App Widget Provider
An App Widget is basically a BroadcastReceiver that handles particular actions. As with a broadcast receiver, the primary interaction with an App Widget happens through the onReceive() method. However, the default AppWidgetProvider class handles onReceive() and, in turn, delegates operations to its other methods, which you then implement.
Implementing the AppWidgetProvider Class
The AppWidgetProvider class simplifies the handling of these actions by providing a framework for developers to implement App Widgets. An AppWidgetProvider implementation requires the following methods:
![]() The
The onEnabled() method is called when the App Widget is created. This is a good place to perform any configuration shared for the entire widget provider. This method is called once for the first App Widget instance added to the widget host (usually the Home screen).
![]() The
The onDisabled() method is called when the App Widget is disabled. This method is called only after all App Widget instances for this provider are removed from the App Widget host. For example, if there were five App Widgets for this provider on the Home screen, this method would be called only after the user removed the fifth and final App Widget.
![]() The
The onUpdate() method is called at regular intervals, depending on the update frequency specified in the App Widget configuration file. This frequency uses an in-exact timer, so do not rely on this frequency being precise. If you need precision updates, consider scheduling updates using the AlarmManager class. This method is called with a list of widget identifiers. Each identifier references a unique App Widget instance in the App Widget host. The App Widget provider implementation must differentiate between each instance and, typically, store different configuration values for each as well.
![]() The
The onDeleted() method is called when a particular instance of this App Widget is deleted.
Using Remote Views
Android App Widgets do not run in the application process, but in the host’s process. Therefore, the App Widget uses the RemoteViews class to define its user interface. The RemoteViews class supports a subset of the overall View hierarchy, for display in another process. Generally speaking, you want to configure the RemoteViews object and send it to the App Widget Manager during the onUpdate() method. However, you also need to update it when an instance is created and a configuration Activity exists.
View hierarchies defined using RemoteViews can contain only a limited set of controls, including Button, ImageButton, ImageView, TextView, AnalogClock, Chronometer, ProgressBar, ListView, GridView, StackView, ViewFlipper, and AdapterViewFlipper controls and only in FrameLayout, LinearLayout, RelativeLayout, or GridLayout layouts. Objects derived from these controls cannot be used, either. The RemoteViews configuration should be kept as simple as possible because access to its View hierarchy is controlled through helper methods, such as setImageViewResource(), setTextViewText(), setProgressBar(), setShort(), setString(), setChronometer(), and setRemoteAdapter(). In short, you can generate an XML layout definition for an App Widget, but you must be careful to use only controls that are supported by the RemoteViews class.
Let’s look at the incredibly simple layout definition used by the threat level App Widget, as defined in the resource file /res/layout/widget.xml:
<?xml version="1.0" encoding="utf-8"?>
<RelativeLayout
xmlns:android="http://schemas.android.com/apk/res/android"
android:layout_height="match_parent"
android:layout_width="match_parent"
android:id="@+id/widget_view">
<TextView
android:layout_width="wrap_content"
android:layout_height="wrap_content"
android:id="@+id/widget_text_threat"
android:layout_centerInParent="true">
</TextView>
</RelativeLayout>
Nothing too complex in this layout, eh? A single TextView control, which displays the threat level information, is encapsulated in a RelativeLayout control. Now your layout can be loaded programmatically into a RemoteViews object for use in the App Widget provider. Don’t worry; things get more complex when we cram that layout into a RemoteViews object and act upon it across processes.
To load a layout resource (such as widget.xml, defined earlier) into a RemoteViews object, you can use the following code:
RemoteViews remoteView =
new RemoteViews(context.getPackageName(), R.layout.widget);
When you want to update the text in that layout’s TextView control, you need to use the setTextViewText() method of the RemoteViews class, like this:
remoteView.setTextViewText(R.id.widget_text_threat, "Red alert!");
If you want the user to be able to click in the RelativeLayout control of the App Widget display and to launch the underlying application, use the setOnClickPendingIntent() method of the RemoteViews class. For example, the following code creates a pending Intent that can launch the SimpleAppWidgetActivity activity:
Intent launchAppIntent =
new Intent(context, SimpleAppWidgetActivity.class);
PendingIntent launchAppPendingIntent = PendingIntent.getActivity(
context, 0, launchAppIntent,
PendingIntent.FLAG_UPDATE_CURRENT);
remoteView.setOnClickPendingIntent
(R.id.widget_view, launchAppPendingIntent);
Finally, when the RemoteViews object is all set up, the App Widget provider needs to tell the App Widget Manager about the updated RemoteViews object:
ComponentName simpleWidget = new ComponentName(context,
SimpleAppWidgetProvider.class);
AppWidgetManager appWidgetManager =
AppWidgetManager.getInstance(context);
appWidgetManager.updateAppWidget(simpleWidget, remoteView);
To update the appropriate App Widget, the AppWidgetManager object requires its component name. The App Widget Manager then updates the content of the specific named App Widget using the contents of the RemoteViews object you provide in the updateAppWidget() method. Each time the RemoteViews object is updated, it is rebuilt. Although this usually happens infrequently, keep the RemoteViews simple for good performance.
![]() Note
Note
Unfortunately, the complete implementation of the AppWidgetProvider class provided in SimpleAppWidget is too lengthy for print. See the SimpleAppWidgetProvider class in the sample project for the full details of how the threat level App Widget works.
Updating an App Widget
When the onUpdate() method of the App Widget provider is called, a list of identifiers is passed in. Each identifier references a particular App Widget instance for this provider. That is, a user can add any number of App Widgets of a particular kind to a host. It’s up to you, though, how they differ. During the update event, each identifier must be iterated over and each of the RemoteViews objects updated individually (that is, if you support different instances simultaneously).
An App Widget must be responsive during the update event because it is being executed from the UI thread of the host process. When the updates are done, there is no guarantee that the App Widget provider object stays around. Therefore, if an App Widget refresh requires any lengthy blocking operations, it must use a Service so that it can create a thread to perform these operations in the background.
In our threat level App Widget example, we already have a Service that performs some network operations to download updated threat level data. This Service is perfect for the needs of an App Widget and the application, so they can share it. Convenient, huh?
Creating an App Widget Update Service
Most App Widgets do not contain static content but are updated from time to time. Normally, an Android Service is used to enable App Widget content updates. The Service performs any necessary update-related tasks, including spawning threads, connecting to the Internet, and so on. The App Widget provider’s onUpdate() method, which is called at the App Widget update interval, is a great place to start this update Service. After the Service has done its job, it should shut itself down until the next time fresh content is needed. Let’s revisit the threat level App Widget, which uses two services:
![]() The
The SimpleDataUpdateService class runs at the App Widget update interval (started in the onUpdate() method of the App Widget provider). The Service connects to the Internet, checks the current threat level, and stores the result in the application’s shared preferences. Finally, the Service shuts itself down. It might be helpful to consider the application as the “owner” of this Service—it provides information for both the application and the App Widget by saving data to the shared preferences.
![]() The
The PrefListenerService class listens for changes in the application’s shared preferences. In addition to using the onUpdate() method, this Service is started when the App Widget is enabled, thus allowing it to be updated whenever the data changes (for example, when the underlying application modifies the shared preferences by checking the threat level itself). When the threat level preference changes, this Service triggers a call to the updateAppWidget() method of the App Widget provider, which updates the RemoteViews object for the App Widget—bypassing the frequency limitations of the App Widget Manager. It might be helpful to consider the App Widget as the “owner” of this Service—it runs in the App Widget lifecycle and exists only to update the content of the App Widget.
Certainly, there are simpler ways to update your App Widget. For example, the App Widget can use its one Service to do the work of downloading the threat level data and updating the App Widget content, but then the application is left to do its own thing. The method described here illustrates how you can bypass some of the update frequency limitations of App Widgets and still share content between App Widgets and their underlying applications.
![]() Tip
Tip
Updating the RemoteViews object need not happen from within the App Widget provider. It can be called directly from the application, too. In this example, the Service created for downloading the threat level data is used by the application and App Widget alike. Using a Service for downloading online data is a good practice for a number of reasons. However, if there was no download Service to leverage, we could have gotten away with just one Service. In this Service, fully controlled by the App Widget, we would have not only done the download but also then updated the RemoteViews object directly. Doing this would have eliminated the need for listening to changes of the shared preferences from the App Widget Service, too.
Configuring the Android Manifest File for App Widgets
For the Android system to know about your application’s App Widget, you must include a <receiver> tag in the application’s Android manifest file to register it as an App Widget provider. App Widgets often use services, and these services must be registered in the Android manifest file with a <service> tag like any other Service. Here is an excerpt of the Android manifest file from the SimpleAppWidget project:
<receiver android:name="SimpleAppWidgetProvider"
android:label="@string/widget_desc"
android:icon="@drawable/threat_levels_descriptions">
<intent-filter>
<action android:name=
"android.appwidget.action.APPWIDGET_UPDATE" />
</intent-filter>
<meta-data
android:name="android.appwidget.provider"
android:resource="@xml/simple_widget_info" />
</receiver>
<service android:name="SimpleDataUpdateService" />
<service android:name="SimpleAppWidgetProvider$PrefListenerService" />
Notice that, unlike a typical <receiver> definition, a <meta-data> section references an XML file resource. The <receiver> tag includes several bits of information about the App Widget configuration, including a label and icon for the App Widget, which is displayed on the App Widget picker (where the user chooses from available App Widgets on the system). The <receiver> tag also includes an intent filter to handle the android.appwidget.action.APPWIDGET_UPDATE action, as well as a <meta-data> tag that references the App Widget configuration file stored in the XML resource directory. Finally, the services used to update the App Widget are registered.
Installing an App Widget to the Home Screen
After your application has implemented App Widget functionality, a user (who has installed your application) can install it to the Home screen using the following steps:
1. From the Home screen, click to the button to show all applications.
2. Choose the Widgets tab, as shown in Figure 26.1.
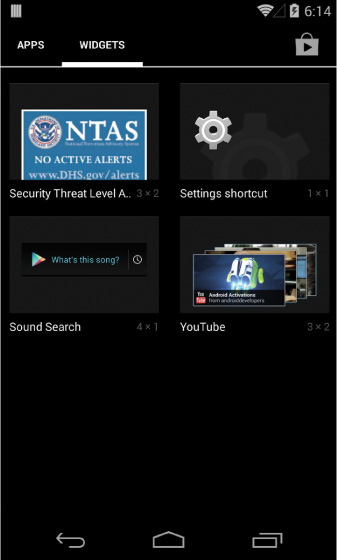
3. From the Widget menu, choose the App Widget you want to include by pressing and holding. Users can see the preview image here. Set the preview to something useful—generally what the widget will look like in a typical situation.
4. Drag the App Widget to the place you want it and release, as shown in Figure 26.2.

Becoming an App Widget Host
Although somewhat less common, applications might also become App Widget hosts. App Widget hosts (android.appWidget.AppWidgetHost) are simply containers that can embed and display App Widgets. The most commonly used App Widget host is the Home screen. Creating an App Widget host is not a trivial process and usually requires trial and error. For more information on developing an App Widget host, see the Android SDK documentation.
Introducing Lock Screen App Widgets
Android API Level 17 introduced a new type of App Widget configuration for the Lock screen. Lock screen App Widgets function the same as Home screen App Widgets; they just appear on a user’s Lock screen. To add Lock screen support to an App Widget, simply add the android:widgetCategory attribute to the <appwidget-provider> tag, and assign a value of keyguard. By default, the <appwidget-provider> is set to the value of home_screen. You should also set the attribute android:initialKeyGuardLayout with a layout value for the Lock screen. To add Lock screen support to our App Widget, update the <appwidget-provider> XML file with the following:
<appwidget-provider xmlns:android="http://schemas.android.com/apk/res/android"
android:initialLayout="@layout/widget"
android:initialKeyguardLayout="@layout/widget"
android:minHeight="72dp"
android:minWidth="146dp"
android:previewImage="@drawable/widget_preview"
android:updatePeriodMillis="28800000"
android:widgetCategory="keyguard|home_screen" >
</appwidget-provider>
Installing an App Widget to the Lock Screen
Installing to the Lock screen is similar to installing on the Home screen with some small differences. A user can install an App Widget to the Lock screen with the following steps:
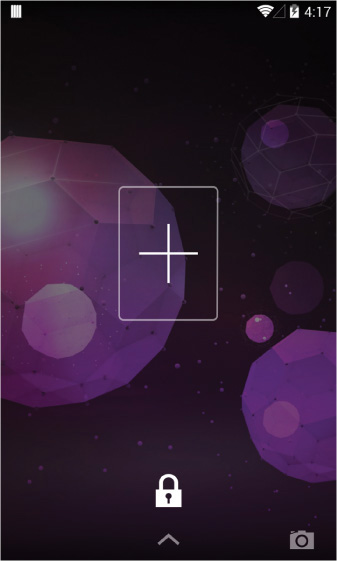
1. From the Lock screen, swipe left (or right) until you reveal an empty Lock screen page.
2. Press the big plus button in the middle of the screen, as shown in Figure 26.3. After pressing the plus button, you will be asked to enter your screen lock passphrase (if one has been set on the device).
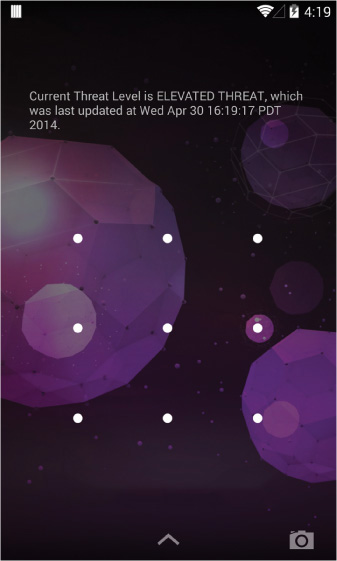
3. After successfully entering your screen lock passphrase, from the Widget menu, choose the App Widget you want to include by pressing and holding.
4. Drag the App Widget to the place you want it and release, as shown in Figure 26.4.
Working with Live Wallpapers
In addition to still image wallpapers, Android supports the notion of a live wallpaper. Instead of displaying a static background image on the Home screen, the user can set an interactive, or live, wallpaper that can display anything that can be drawn on a surface, such as graphics and animations. Live wallpapers were introduced in Android 2.1 (API Level 7).
Your applications can provide live wallpapers that use 3D graphics and animations as well as display interesting application content. Some examples of live wallpapers include:
![]() A 3D display showing an animated scene portraying abstract shapes
A 3D display showing an animated scene portraying abstract shapes
![]() A
A Service that animates between images found on an online image-sharing service
![]() An interactive pond with water that ripples with touch
An interactive pond with water that ripples with touch
![]() Wallpapers that change based on the actual season, weather, and time of day
Wallpapers that change based on the actual season, weather, and time of day
Creating a Live Wallpaper
A live wallpaper is similar to an Android Service, but its result is a surface that the host can display. You need to make the following changes to your application in order to support live wallpapers:
![]() Provide an XML wallpaper configuration.
Provide an XML wallpaper configuration.
![]() Provide a
Provide a WallpaperService implementation.
![]() Update the application Android manifest file to register the wallpaper
Update the application Android manifest file to register the wallpaper Service with the appropriate permissions.
Now let’s look at some of these requirements in greater detail.
![]() Tip
Tip
The code examples provided in this section are taken from the SimpleLiveWallpaper application. The source code for this application is provided for download on the book’s website.
Creating a Live Wallpaper Service
The guts of the live wallpaper functionality are provided as part of a WallpaperService implementation, and most of the live wallpaper functionality is driven by its WallpaperService.Engine implementation.
Implementing a Wallpaper Service
Your application needs to extend the WallpaperService class. The most important method the class needs to override is the onCreateEngine() method. Here is a sample implementation of a wallpaper Service called SimpleDroidWallpaper:
public class SimpleDroidWallpaper extends WallpaperService {
private final Handler handler = new Handler();
@Override
public Engine onCreateEngine() {
return new SimpleWallpaperEngine();
}
class SimpleWallpaperEngine extends WallpaperService.Engine {
// Your implementation of a wallpaper service engine here...
}
}
There’s not much to this wallpaper Service. The onCreateEngine() method simply returns your application’s custom wallpaper engine, which provides all the functionality for a specific live wallpaper. You can also override the other wallpaper Service methods, as necessary. A Handler object is initialized for posting wallpaper draw operations.
Implementing a Wallpaper Service Engine
Now let’s take a closer look at the wallpaper Service engine implementation. The wallpaper Service engine handles all the details regarding the lifecycle of a specific instance of a live wallpaper. Much like the graphics examples used in Chapter 24, “Developing Android 3D Graphics Applications,” live wallpaper implementations use a Surface object to draw to the screen.
There are a number of callback methods of interest in the wallpaper Service engine:
![]() You can override the
You can override the onCreate() and onDestroy() methods to set up and tear down the live wallpaper. The Surface object is not valid during these parts of the lifecycle.
![]() You can override the
You can override the onSurfaceCreated() and onSurfaceDestroyed() methods (convenience methods for the Surface setup and teardown) to set up and tear down the Surface used for live wallpaper drawing.
![]() You should override the
You should override the onVisibilityChanged() method to handle live wallpaper visibility. When invisible, a live wallpaper must not remain running. This method should be treated much like an Activity pause or resume event.
![]() The
The onSurfaceChanged() method is another convenience method for Surface management.
![]() You can override the
You can override the onOffsetsChanged() method to enable the live wallpaper to react when the user swipes between Home screens.
![]() You can override the
You can override the onTouchEvent() method to handle touch events. The incoming parameter is a MotionEvent object—we talk about the MotionEvent class in detail in the “Working with Gestures” section of Chapter 8, “Handling Advanced User Input.” You also need to enable touch events (off by default) for the live wallpaper using the setTouchEventsEnabled() method.
The implementation details of the live wallpaper are up to the developer. Often, a live wallpaper implementation uses OpenGL ES calls to draw to the screen. For example, the sample live wallpaper project included with this book includes a live wallpaper Service that creates a Bitmap graphic of a bug droid that floats around the screen, bouncing off the edges of the wallpaper boundaries. It also responds to touch events by changing its drift direction. Its wallpaper engine uses a thread to manage drawing operations, posting them back to the system using the Handler object defined in the wallpaper Service.
![]() Tip
Tip
Your live wallpaper can respond to user events, such as touch events. It can also listen for events when the user drops items on the screen. For more information, see the documentation for the WallpaperService.Engine class.
![]() Note
Note
Unfortunately, the wallpaper engine implementation of the sample application, SimpleLiveWallpaper, is far too lengthy for print due to all the OpenGL ES drawing code. However, you can see its implementation as part of the sample code provided for download on the book’s website. Specifically, check the SimpleDroidWallpaper class.
![]() Warning
Warning
You should take into account device responsiveness and battery life when designing live wallpapers. Unlike your application where you can simply perform lengthy operations off the main thread, live wallpapers take away performance from the Home screen and use battery life regardless of what thread the operation takes place in.
Creating a Live Wallpaper Configuration
Next, your application must provide an XML wallpaper definition. You can store this definition in the project’s resources in the /res/xml directory. For example, here is a simple wallpaper definition called /res/xml/droid_wallpaper.xml:
<?xml version="1.0" encoding="utf-8"?>
<wallpaper xmlns:android="http://schemas.android.com/apk/res/android"
android:thumbnail="@drawable/live_wallpaper_android"
android:description="@string/wallpaper_desc" />
This simple wallpaper definition is encapsulated in the <wallpaper> XML tag. The description and thumbnail attributes are displayed on the wallpaper picker, where the user is prompted to select a specific wallpaper to use.
Configuring the Android Manifest File for Live Wallpapers
Finally, you need to update the application’s Android manifest file to expose the live wallpaper Service. Specifically, the WallpaperService needs to be registered using the <service> tag. The <service> tag must include several important bits of information:
![]() The
The WallpaperService class
![]() The
The BIND_WALLPAPER permission
![]() An intent filter for the
An intent filter for the WallpaperService action
![]() Wallpaper metadata to reference the live wallpaper configuration
Wallpaper metadata to reference the live wallpaper configuration
Let’s look at an example. Here is the <service> tag implementation for a simple live wallpaper:
<service
android:label="@string/wallpaper_name"
android:name="SimpleDroidWallpaper"
android:permission="android.permission.BIND_WALLPAPER">
<intent-filter>
<action
android:name="android.service.wallpaper.WallpaperService" />
</intent-filter>
<meta-data
android:name="android.service.wallpaper"
android:resource="@xml/droid_wallpaper" />
</service>
In addition to the Service definition, you also need to limit installation of your application to API Level 7 and higher (where support for live wallpapers exists) using the <uses-sdk> manifest tag:
<uses-sdk android:minSdkVersion="7" android:targetSdkVersion="19" />
Keep in mind that your live wallpaper might use APIs (such as OpenGL ES 2.0 APIs) that require a higher minSdkVersion than API Level 7. You might also want to use the <uses-feature> tag to specify that your application includes live wallpaper support for use in Google Play filters:
<uses-feature android:name="android.software.live_wallpaper" />
Installing a Live Wallpaper
After you’ve implemented live wallpaper support in your application, you can set a live wallpaper on your Home screen using the following steps:
1. Long-press on the Home screen.
2. From the menu, choose the Live Wallpapers option, as shown in Figure 26.5 (left).

3. From the Live Wallpaper menu, choose the live wallpaper you want to include, as shown in Figure 26.5 (right). Here you can see the values you configured in droid_wallpaper.xml. Make these indicative of what the wallpaper is and does.
4. After you’ve chosen a wallpaper, it is shown in preview mode. Simply choose the Set Wallpaper button to confirm you want to use that live wallpaper. The live wallpaper is now visible on your Home screen, as shown in Figure 26.6.
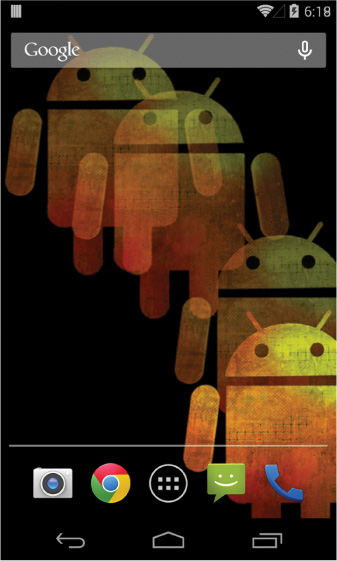
Figure 26.6 A simple live wallpaper on the Home screen background that bounces a colorful bug droid around.
Introducing Daydream
New in Android 4.2 (API Level 17) is an interactive screen saver feature called Daydream. A Daydream occurs when a device is charging. This allows you to package up particular features of your application for presenting to users when their device is charging, acting as another point of interactivity. Here are two very important points to think about when planning your Daydream:
![]() Privacy: A Daydream is presented on top of the keyguard or Lock screen, so make sure you take care not to reveal any information a user would not want visible to others.
Privacy: A Daydream is presented on top of the keyguard or Lock screen, so make sure you take care not to reveal any information a user would not want visible to others.
![]() Power: A Daydream works only when a device is charging or docked, so if your Daydream consumes considerable power while running, a user’s device might take a long time to charge, or maybe won’t even charge at all.
Power: A Daydream works only when a device is charging or docked, so if your Daydream consumes considerable power while running, a user’s device might take a long time to charge, or maybe won’t even charge at all.
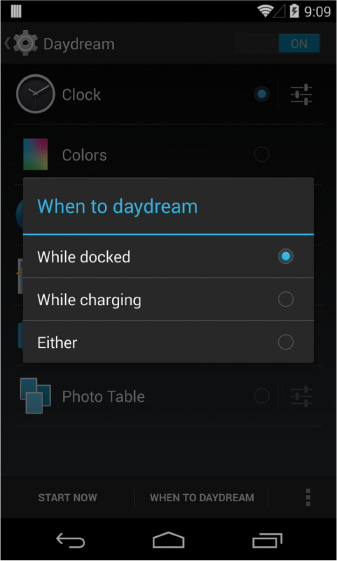
To select a default Daydream to run, the user navigates to the Settings app, chooses Display, then Daydream (the feature should be turned on if it is off), then selects the Daydream he or she wishes to have as the default. Users may even customize the settings of a particular Daydream provided the developer allows for configuration changes to be made. Finally, users are able to select when they would like a Daydream to occur by choosing the When to daydream button. They are presented with three options: While docked, While charging, and Either (see Figure 26.7).
Implementing a Daydream is like implementing a Service and is done by extending the DreamService class of the android.service.dreams package. You also need to include a <service> tag in your Android manifest file while including an <intent-filter> for the <service> tag that defines an <action> tag with the name attribute value set to android.service.dreams.DreamService. Optionally, you may include a <meta-data> tag specifying a resource file for linking to a settings Activity for managing the settings of the Daydream.
Acting as a Content Type Handler
Your application can act as a content type filter—that is, handle common Intent actions such as VIEW, EDIT, or SEND for specific MIME types.
![]() Tip
Tip
See the android.content.Intent class for a list of standard Activity actions.
A photo application might act as a content type handler for VIEW actions for any graphic formats, such as JPG, PNG, or RAW image file MIME types. Similarly, a social networking application might want to handle Intent SEND actions when the underlying data has a MIME type associated with typical social content (for example, text, graphics, or video). This means that any time the user tries to send data (with the MIME types that the social networking application was interested in) from an Android application using an Intent with action SEND, the social networking application is listed as a choice for completing the SEND action request. If the user chooses to send the content using the social networking application, that application has to launch an Activity to handle the request (for example, an Activity that uploads the content to the social networking website to share).
Finally, content type handlers make it easier to extend the application to act as a content provider, provide search capabilities, or include App Widget features. Define data records using custom MIME types, so that no matter how an Intent fires (inside or outside the application), the action is handled by the application in a graceful fashion.
To enable your application to act as a content type handler, you need to make several changes to your application:
![]() Determine which
Determine which Intent actions and MIME types your application needs to be able to handle.
![]() Implement an
Implement an Activity that can process the Intent action or actions that you want to handle.
![]() Register that
Register that Activity in your application’s Android manifest file using the <activity> tag as you normally would. You then need to configure an <intent-filter> tag for that Activity in your application’s Android manifest file, providing the appropriate Intent action and MIME types your application can process.
Determining Intent Actions and MIME Types
Let’s look at a simple example. For the remainder of this chapter, we make various modifications to a simple field notes application that uses a content provider to expose African game animal field notes; each note has a title and text body (the content itself comes from field notes on African game animals that we wrote up years ago on our nature blog, which is very popular with grade-schoolers). Throughout these examples, the application acts as a content type handler for VIEW requests for data with a custom MIME type:
vnd.android.cursor.item/vnd.advancedandroidbook.live.fieldnotes
![]() Tip
Tip
MIME types come in two forms. Most developers are familiar with MIME types, such as text/plain or image/jpeg (as defined in RFC 2045 and RFC 2046, which are standards used globally). The Internet Assigned Numbers Authority (IANA, at http://www.iana.org) manages these global MIME types.
Developers frequently need to create their own MIME types, without the need for them to become global standards. These types must still be sufficiently unique that MIME type namespace collisions do not occur. When you’re dealing with Android content providers, there are two well-defined prefixes that you can use for creating MIME types. The ContentResolver.CURSOR_DIR_BASE_TYPE prefix ("vnd.android.cursor.dir") is for use with directories or folders of items. The ContentResolver.CURSOR_ITEM_BASE_TYPE prefix ("vnd.android.cursor.item") is for use with a single type. The part after the slash must then be unique. It’s not uncommon to pattern MIME types after package names or other such unique qualifiers.
Implementing the Activity to Process the Intents
Next, the application needs an Activity class to handle the Intent objects it receives. For the sample, we simply need to load a page capable of viewing a field note. Here is a sample implementation of an Activity that can parse the Intent data and show a screen to display the field note for a specific animal:
public class SimpleViewDetailsActivity extends Activity {
@Override
protected void onCreate(Bundle savedInstanceState) {
super.onCreate(savedInstanceState);
setContentView(R.layout.details);
try {
Intent launchIntent = getIntent();
Uri launchData = launchIntent.getData();
String id = launchData.getLastPathSegment();
Uri dataDetails = Uri.withAppendedPath
(SimpleFieldnotesContentProvider.CONTENT_URI, id);
CursorLoader loader = new CursorLoader(this, dataDetails,
null, null, null, null);
Cursor cursor = loader.loadInBackground();
cursor.moveToFirst();
String fieldnoteTitle = cursor.getString(cursor
.getColumnIndex(SimpleFieldnotesContentProvider
.FIELDNOTES_TITLE));
String fieldnoteBody = cursor.getString(cursor
.getColumnIndex(SimpleFieldnotesContentProvider
.FIELDNOTES_BODY));
TextView fieldnoteView = (TextView)
findViewById(R.id.text_title);
fieldnoteView.setText(fieldnoteTitle);
TextView bodyView = (TextView) findViewById(R.id.text_body);
bodyView.setLinksClickable(true);
bodyView.setAutoLinkMask(Linkify.ALL);
bodyView.setText(fieldnoteBody);
} catch (Exception e) {
Toast.makeText(this, "Failed.", Toast.LENGTH_LONG).show();
}
}
}
The SimpleViewDetailsActivity class retrieves the Intent that was used to launch the Activity using the getIntent() method. It then inspects the details of that Intent, extracting the specific field note identifier using the getLastPathSegment() method. The rest of the code simply involves querying the underlying content provider for the appropriate field note record and displaying it using a layout.
Registering the Intent Filter
Finally, the Activity class must be registered in the application’s Android manifest file, and the intent filter must be configured so that the application accepts only intents for specific actions and specific MIME types. For example, the SimpleViewDetailsActivity would be registered as follows:
<activity
android:name="SimpleViewDetailsActivity">
<intent-filter>
<action
android:name="android.intent.action.VIEW" />
<category
android:name="android.intent.category.DEFAULT" />
<data android:mimeType=
"vnd.android.cursor.item/
vnd.advancedandroidbook.live.fieldnotes" />
</intent-filter>
</activity>
The <activity> tag remains the same as any other. The <intent-filter> tag is what’s interesting here. First, the <action> tag defines the matching criteria an Intent object will need to specify in order to be handled by this application. The name property of the <action> tag specifies the type of action, in this case the VIEW action. The <category> tag is set to DEFAULT, which is most appropriate, and finally, the <data> tag is used to filter VIEW intents further to only those of the custom MIME type associated with field notes.
Summary
The Android platform provides a number of ways to integrate your applications tightly into the operating system, enabling you to extend your reach beyond traditional application boundaries. In this chapter, you learned how to extend your application by creating App Widgets, live wallpapers, Daydreams, and more. The Android APIs provide many ways that applications can integrate into the system and take part in the user experience at many levels.
Quiz Questions
1. What changes do you need to make to your application to support App Widgets?
2. What attributes of the <appwidget-provider> tag are used to define the size of an App Widget?
3. True or false: An App Widget cannot be updated more frequently than every 15 minutes.
4. What is the formula for determining the size of an App Widget?
5. True or false: To make an App Widget available to the Lock screen, you must set the <appwidget-provider> tag attribute android:widgetCategory to the value of lock_screen.
6. What changes do you need to make to your application to support a live wallpaper?
7. What Service permission must you include in the Android manifest file to support a live wallpaper?
8. What Google Play filter would you include to notify users that your application supports live wallpaper?
Exercises
1. Use the Android documentation to determine what the <appwidget-provider> tag configure attribute is defined for.
2. Use the Android documentation to determine the intents your application may monitor for receiving App Widget broadcasts.
3. Create a new Daydream application that presents a new text-based affirmation every minute. Include five different affirmations for the application to rotate through.
References and More Information
Android API Guides: “App Widgets”:
Android API Guides: “App Widget Host”:
http://d.android.com/guide/topics/appwidgets/host.html
Android API Guides: “App Widget Design Guidelines”:
http://d.android.com/guide/practices/ui_guidelines/widget_design.html
Android Design: “Widgets”:
http://d.android.com/design/patterns/widgets.html
Android Developers Blog: “Daydream: Interactive Screen Savers”:
http://android-developers.blogspot.com/2012/12/daydream-interactive-screen-savers.html
Android SDK Reference documentation on the DreamService class:
http://d.android.com/reference/android/service/dreams/DreamService.html