Chapter 5
3D Shooters for Doom
This chapter looks at another great game for the PC: Doom. It came along shortly after Wolfenstein 3D and put id Software at the lead of the pack in 3D graphics gaming for the PC. In this chapter, you'll learn how to bring the open source Doom engine (PrBoom) to the Android platform.
The chapter starts with fun facts about Doom itself, which will help you understand the breadth of this project. Bringing a PC game to a mobile device with little change to the original code is a difficult task. As you can probably tell from reading the previous chapters, I embrace the Java/C powercombo for maximum performance.
Next, we dig into the game itself, which is divided into two big layers: Java and native. This makes sense, as the game is a mix of original C wrapped in Java code. In the Java layer are classes for the main activity, audio, and JNI interface (what I call the native interface class). The native layer has the native method implementations (using JNI), plus changes to the original C code. The latter is required to glue both layers together and requires less than 50 lines of new code (I consider this to be the most difficult to follow, as there are close to 80,000 lines of original C code, but I will explain the new C code as clearly as possible.)
Finally, we get to compilation, deployment, and playing Doom in the emulator! You will learn awesome tips for native library compilation—a subject that is obscure to the average Java developer.
This is a long and complex chapter, and I have tried my best to make it as simple and clean as possible. For the sake of simplicity, I have omitted some of the lengthier code. Even so, there are some big listings throughout this chapter and a lot of things to cover. To make the most of this chapter, you should grab the chapter source distributed with this book. The project has been built with Eclipse Galileo and can be imported into your workspace. The source will help you to understand the layout of the resources as you read through the chapter.
The Sky Is the Limit with the Java/C Power Combo
The goal here is not to try to explain how the game itself works (that would take a complete book), but to show the kinds of things that can be accomplished by combining the elegant object-oriented features of Java with the raw power of C. Most Java developers dismiss procedural languages like C, failing to see what can be accomplished when this duo coexists harmoniously. The trick is to find the right balance that combines the best of both worlds to solve a complex task with minimal time and effort. Here, you will learn how a task that would take a team of Java developers possibly months to complete can be done in a matter of days by someone who understands that object-oriented and procedural languages are not enemies, but simply pieces of the same puzzle.
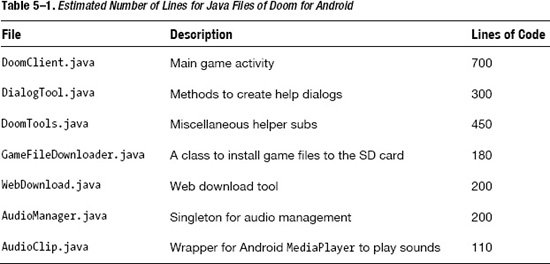
Consider Tables 5–1 and 5–2. They show the total number of lines of new Java code, plus the number of lines inserted in the existing C code in Doom for Android.

The following is the rundown of the estimated totals:
- Total number of lines of new Java code = 2,140
- Total number of lines of original C code = 80,000
- Total number of lines of new C code = 469
The bottom line? One developer has managed to reuse about 80,000 lines of C code, thus bringing a PC game to Android with a few thousand lines of new code in a couple of days. Imagine the potential savings in development costs and time. Now compare this to a team of three developers trying to port the 80,000 lines of raw C to pure Java. It would probably take them months of head-pounding work with no financial gain (as the code is open sourced). This simply makes no sense. I hope that at this point you understand why this chapter is my personal favorite and a must-read for the aspiring Android game developer. So get the source code for the chapter—and let's get started.
Bringing Doom to a Mobile Device
After working on Wolfenstein 3D for Android, I was so excited that I decided my next challenge would be to bring the great game Doom to the platform. But I had my doubts that this could even be achieved once I looked at the complexity and the amount of original C code. Listing 5–1 shows a portion of the total number of lines of C code of the popular Doom engine, PrBoom (available from http://prboom.sourceforge.net/).
I knew I had two choices for this project:
- Port the C code line by line to Java. I even started porting a few files to Java. Believe me when I say that this is not a good idea. The amount of time that it would take to do this makes the project unfeasible, especially considering that the hard work must be done pro bono.
- Find a way to pack the game as a dynamic shared object (DSO) and call it from Javausing JNI. This option seems to be simpler and quicker, but requires expert knowledgeof C and JNI, as well as changes to the original game to glue both languages together.
Given these two options, the latter is the best approach to the problem, so I decided to build a DSO and glue it to Java with JNI.
Listing 5–1. Portion of Code for the PrBoom Doom Engine (Approximately 80,000 Lines in Total)
$ wc –l *.c

   1585 am_map.c

    554 d_client.c

   3093 d_deh.c

    140 d_items.c

   1744 d_main.c

    759 d_server.c

     48 doomdef.c

    108 doomstat.c

     85 dstrings.c
    668 f_finale.c

    202 f_wipe.c

   2979 g_game.c

   2717 gl_main.c

    957 gl_texture.c

    767 hu_lib.c

   1593 hu_stuff.c

    866 mmus2mid.c

    467 p_ceilng.c

// …

    450 r_fps.c

    649 r_main.c

    788 r_patch.c

    468 r_plane.c

    854 r_segs.c

     56 r_sky.c

   1077 r_things.c

    714 s_sound.c

    245 sounds.c

    374 st_lib.c

   1160 st_stuff.c

    128 tables.c

   1037 v_video.c

     38 version.c

    166 w_memcache.c

    335 w_mmap.c

    476 w_wad.c

   1968 wi_stuff.c

    123 z_bmalloc.c

    705 z_zone.c

   73176 total


$ wc –l *.h

    111 am_map.h

    209 config.h

   1118 d_deh.h

    707 d_englsh.h

    125 d_event.h

     59 d_items.h

     82 d_main.h

    214 d_net.h

    234 d_player.h

     94 d_think.h

     59 d_ticcmd.h

    204 doomdata.h

// …

     64 r_bsp.h

    109 r_data.h

    428 r_defs.h

     45 r_demo.h

    163 r_draw.h

    174 r_filter.h

    100 s_sound.h

    305 sounds.h

    209 st_lib.h

    102 st_stuff.h

     93 tables.h
    207 v_video.h

     40 version.h

    146 w_wad.h

     64 wi_stuff.h

     52 z_bmalloc.h

    131 z_zone.h

  13460 total
As I've noted, I chose to use the PrBoom Doom engine. Even though the game was created by id Software and released under the GNU license in 1993 (see http://en.wikipedia.org/wiki/Doom_(video_game)), there are many Doom engines out there. I did try a few engines before settling on PrBoom.
The first engine I tried was the original code from id Software—after all, it is the original creator. But I had a lot of trouble with id Software's Linux implementation of the game, due to two main issues:
- Color palette: The Linux flavor supports an 8-bit color palette, which looks pretty bad on 32-bit machines. This code was written for old machines (it has not been updated for a long time). There should be a more modern implementation out there.
- Sine and cosine tables: These are used for ray casting. I had many compiler idiosyncrasies (using the CodeSourcery GCC 4.3.x compiler) where these tables, which have hard-coded values, were not filled in correctly, making sprites go through walls or move in the wrong way and creating many other display problems.
PrBoom is a modern Doom engine. It is highly portable, although it is much bigger than the original game. I found it to be the best choice due to the plethora of platforms it has been ported to and the powerful support available for it from the developer community.
Game Architecture for Doom
When the user starts the game, the main activity, org.doom.DoomClient, will start (see Figure 5–1). This activity is bound to the other pieces in the following manner:
- The main activity is bound to the device UI through an XML layout (
doom.xml). This layout defines an image buffer used to display the graphics and a set of controller buttons for navigation (see the “Game Layout” section for details). - The Doom engine is written in C and compiled as a DSO (
libdoom_jni.so). All communication with the DSO goes through the JNI layer (or native interface classNatives.java). Events are cascaded back to the main activity, which dispatches them to their respective handler. Game files are read from the SD card by the DSO, which handles all game aspects except sound. - Sound requests are delegated by the native library to the native interface class to the main activity, and finally to the sound classes, which play them using the Android
MediaPlayer. - Video buffers (pixels) are cascaded by the native library to the native interface class to the main activity, which renders them into the
ImageViewof the layout XML.
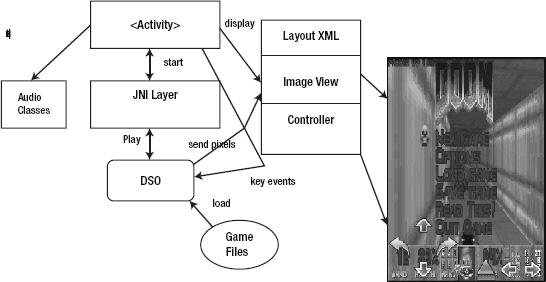
Figure 5–1. Doom for Android architecture
This process continues in an endless loop, where key and touch events are dispatched back to the DSO, which updates the game accordingly.
The game is composed of the following Java packages:
org.doom: This is the main game package and contains the main activityDoomClient.java. This class controls the application life cycle and the key and touch events, dispatches sound and music requests to the audio classes, and dispatches user events to the DSO through the native interface class.doom.audio: This package contains the audio classesAudioManagerandAudioClip.AudioManager: This class is in charge of playing sounds and background music usingAudioClip. It also caches sounds for better performance.AudioClip.java: This class is capable of playing, stopping, and looping a sound using the AndroidMediaPlayer. Sound files use the WAVE format.
doom.jni: This JNI package contains the native interface classNatives.java. This class is a two-way pipe for all access with the DSO. This includes native Java methods and C to Java callbacks.doom.util: This package contains the following utility classes:DialogTool.java: This class contains miscellaneous dialogs to start the game and install shareware game files, message boxes, and other items.DoomTools.java: This class contains basic game constants and commonly used subroutines.GameFileDownloader.java: This class is capable of downloading shareware game files from the Internet into the SD card.LibraryLoader.java: This class loads the DSO, which is required before the native methods can be invoked.WebDownload.java: This is a web download tool used by theGameFileDownloaderclass.
Again, before we look at these components in more detail, make sure you have the chapter code at hand; most of the listings have been stripped down for simplicity.
Java Main Activity
The main activity class is invoked when the user starts the game and controls the life cycle of the application. In Doom, this life cycle is handled by the following:
- Creation handler: This handler is implemented by
onCreateand it is called when the activity is first created. It sets the UI layout XML (doom.xml) and initializes the game. - Menu handlers: Here, we have
onCreateOptionsMenuandonOptionsItemSelected. The first method creates the game menu, and the latter processes the menu when the user selects an option. - Key and touch handlers: These methods receive key and touch events and dispatch them to the right JNI component.
- Native callback handlers: These methods receive video and sound updates from the native interface and dispatch them.
- Controller toolbar: The controller toolbar is a set of image buttons displayed at the bottom of the screen for navigation. It is helpful for devices that do not have a keyboard.
Creation Handler
The creation handler is defined by onCreate (see Listing 5–2). For Doom, this method performs the following steps:
- Sets the display to full screen and hides the title
- Sets the content view layout to
R.layout.doom, which maps todoom.xml - Gets a reference to the video buffer (
R.id.doom_iv), which will be used to display the pixels sent by the DSO - Sets the navigation controls
Listing 5–2. Main Activity Life Cycle
public void onCreate(Bundle savedInstanceState) {

    super.onCreate(savedInstanceState);


    // Full screen

    getWindow().setFlags(WindowManager.LayoutParams.FLAG_FULLSCREEN,

            WindowManager.LayoutParams.FLAG_FULLSCREEN);


    // No title

    requestWindowFeature(Window.FEATURE_NO_TITLE);


    setContentView(R.layout.doom);


    mView = (ImageView)findViewById(R.id.doom_iv);


    if (mGameStarted) {

        setGameUI();

        setupPanControls();

        return;

    }


    // Pan controls

    setupPanControls();


}
onCreate() is the very first function called when the game starts, and it is called only once while the application is in memory. Next, let's look at the game layout loaded by this function.
Game Layout
GUIs in Android are defined by XML layouts, where visual components are placed in a variety of layout schemes. Doom's layout (doom.xml) is a relative layout, which has widgets placed relative to each other (meaning they can overlap depending on the widget size). The master layout contains an image view and two table layouts.
In Android, an image view encapsulates an array of pixels representing an image. The great thing about image views is that they have efficient automatic resize capabilities. This will allow the game to be resized on the fly!
The two table layouts are for the navigation controls (see Figure 5–2). The first table layout defines a three-row table that contains image buttons for up, down, left, and right navigation. The second table layout is a one-row table that contains buttons for the level map, object pick up, and strafing left and right.

Figure 5–2. Doom displaying the game layout
Listing 5–3 shows Doom's relative layout XML. The most important attributes are explained in Table 5-3.

Listing 5–3. Doom Game UI layout doom.xml
<?xml version="1.0" encoding="utf-8"?>

<RelativeLayout

    xmlns:android="http://schemas.android.com/apk/res/android"

    android:layout_width="fill_parent"

    android:layout_height="fill_parent"

    >


    <!-- GAME IMAGE -->

    <ImageView android:id="@+id/doom_iv"

        android:layout_width="fill_parent"

        android:layout_height="fill_parent"

        android:adjustViewBounds="true"

        android:visibility="visible"

        android:background="@drawable/doom"

        android:focusableInTouchMode="true"
android:focusable="true"/>
<!-- Nav Controls -->
<TableLayout android:id="@+id/pan_ctls"
android:layout_width="wrap_content"
android:layout_height="wrap_content"
android:layout_alignParentBottom="true"
android:layout_alignParentLeft="true"
android:visibility="gone"
android:focusable="false"
android:focusableInTouchMode="false">
<TableRow>
<ImageButton android:id="@+id/btn_upleft"
android:layout_width="wrap_content"
android:layout_height="wrap_content"
android:background="#00000000"
android:layout_margin="0px"
android:src="@drawable/blank"
/>
<ImageButton android:id="@+id/btn_up"
android:layout_width="wrap_content"
android:layout_height="wrap_content"
android:src="@drawable/up"
android:background="#00000000"
android:layout_margin="0px"
/>
<ImageButton android:id="@+id/btn_upright"
android:layout_width="wrap_content"
android:layout_height="wrap_content"
android:src="@drawable/blank"
android:background="#00000000"
android:layout_margin="0px"
/>
</TableRow>
</TableLayout>
<!-- Other controls: Map, Open, strafe -->
<!-- This XML has been removed for simplicity
<!-- See the file doom.xml for details -->
</RelativeLayout>
Once the GUI is all set, the next step is to provide a menu and handlers for the application.
Menu and Selection Handlers
The application menu can be easily defined by overriding the following methods:
onCreateOptionsMenu(Menu menu): Override this method to add items to the menu. To do this, usemenu.add(groupId, itemId, order, Menu Label), wheregroupIdis the ID of the group for this item. This can be used to define groups of items for batch state changes.itemIdis the unique item ID.orderis the order for the item.onOptionsItemSelected(MenuItem item): Override this method to process menu selections. The item selected can be obtained withitem.getItemId().
The following menus are defined for Doom (see Listing 5–4):
- Start: to run the native game loop
- Install Game: to download and install game files
- Navigation: to switch the navigation controls between the keyboard and touch screen
- Exit: to quit the application
Listing 5–4. Game Menu and Selection
public boolean onCreateOptionsMenu(Menu menu) {

    super.onCreateOptionsMenu(menu);

    menu.add(0, 0, 0, "Start").setIcon(R.drawable.icon);

    menu.add(0, 2, 2, "Install Game").setIcon(R.drawable.install);

    menu.add(0, 3, 3, "Navigation").setIcon(R.drawable.nav);

    menu.add(0, 6, 6, "Exit").setIcon(R.drawable.exit);

    return true;

}


/**

 * Menu selection

 */

public boolean onOptionsItemSelected(MenuItem item) {

    super.onOptionsItemSelected(item);

    switch (item.getItemId()) {

    case 0:

        if ( mGameStarted) {

            MessageBox("Game already in progress.");

            return true;

        }

        mMultiPlayer = false;

        showLauncherDialog(this, mMultiPlayer);


        return true;

    case 2:

        if ( mGameStarted) {

            MessageBox("Can't install while game in progress.");

            return true;

        }


        // SD card required

        if ( ! DoomTools.checkSDCard(this) ) return true;


        // Download Game file

        DialogTool.showDownloadDialog(this);

        return true;


    case 3:

        DialogTool.showNavMethodDialog(this);

        return true;
    case 6:

        // Exit

        DoomTools.hardExit(0);

        return true;


    }

    return false;

}
Key and Touch Event Handlers
Key and touch handlers can be overridden to process key and touch events. Doom handles key and touch events as follows (see Listing 5–5):
- The Android
keyCodeis first translated to an ASCII key symbol by callingintsym =DoomTools.keyCodeToKeySym(keyCode). - The ASCII symbol is the sent to the DSO through the native interface class
Natives.keyEvent(EVENT_TYPE, SYMBOL), where the event type must be eitherNatives.EV_KEYUPorNatives.EV_KEYDOWN. Note that any errors in the native side (such as a missing symbol or invalid signature) will throw anUnsatisfiedLinkError.
Listing 5–5. Key and Touch Handlers
public boolean onKeyUp(int keyCode, KeyEvent event) {

    //

    if (keyCode == KeyEvent.KEYCODE_MENU) {

        return false;

    }


    int sym = DoomTools.keyCodeToKeySym(keyCode);


    try {

        Natives.keyEvent(Natives.EV_KEYUP, sym);


    } catch (UnsatisfiedLinkError e) {

        // Should not happen

        Log.e(TAG, e.toString());

    }

    return false;

}


public boolean onKeyDown(int keyCode, KeyEvent event) {

    // Ignore menu key

    if (keyCode == KeyEvent.KEYCODE_MENU) {

        return false;

    }


    int sym = DoomTools.keyCodeToKeySym(keyCode);


    try {

        Natives.keyEvent(Natives.EV_KEYDOWN, sym);
    }

    catch (UnsatisfiedLinkError e) {

        // Should not happen

        Log.e(TAG, e.toString());

    }

    return false;

}

public boolean onTouchEvent(MotionEvent event)

{


    try {

        if ( event.getAction() == MotionEvent.ACTION_DOWN) {

            // Fire on tap R-CTL

            Natives.keyEvent(Natives.EV_KEYDOWN, DoomTools.KEY_RCTL);

        }

        else if ( event.getAction() == MotionEvent.ACTION_UP) {

            Natives.keyEvent(Natives.EV_KEYUP, DoomTools.KEY_RCTL);

        }

        else if ( event.getAction() == MotionEvent.ACTION_MOVE) {

            // Motion event

        }

        return true;

    }

    catch (UnsatisfiedLinkError e) {

        // Should not happen!

        Log.e(TAG, e.toString());

        return false;

    }

}
For touch events, Android provides three actions: ACTION_DOWN, ACTION_UP, and ACTION_MOVE, when the user is pressing, releasing, and dragging fingers in the device screen, respectively. When a finger press or release occurs, Doom will send a right control (KEY_RCTL) to the native layer, which will result in the weapon being fired.
Native Callback Handlers
The native callback handlers are implemented by the main activity (DoomClient.java) via the Natives.EventListener interface. This allows the activity to listen for native callbacks. The handlers are divided in the following categories:
- Graphics initialization: This handler receives information when the native graphics have been initialized. It receives the width and height of the video buffer.
- Image update: This handler receives video buffer updates and fires multiple times per second.
- Message update: This handler receives string messages from the native rendering engine.
- Fatal errors: This handler will fire whenever an unrecoverable error occurs.
- Sound and music requests: A series of handlers handle audio.
Graphics Initialization Handler
The graphics initialization handler is critical and must be the first to fire before the game can start. It receives the width and height of the video buffer, which are used to create the Android bitmap that renders the video on the device (see Listing 5–6). To create a 32-bit ARGB bitmap in Android, you use the following call:
Bitmap.createBitmap(width, height, Config.ARGB_8888)
Config.ARGB_8888 tells the system you wish to use a 4-byte (32-bit) ARGB bitmap. You will use this bitmap to set pixels for the video in later sections. Note that this callback fires only once during the lifetime of the game. To set the width and height of the video buffer ImageView, use a call to ImageView.getLayoutParams().
Listing 5–6. Graphics Initialization
public void OnInitGraphics(int w, int h) {

    Log.d(TAG, "OnInitGraphics creating Bitmap of " + w + " by " + h);

    mBitmap = Bitmap.createBitmap(w, h, Config.ARGB_8888);

    LayoutParams lp =  mView.getLayoutParams();

    mWidth = w;

    mHeight = h;

    lp.width = w;

    lp.height = h;

}
Image Update Handler
The image update handler receives an array of ARGB packed pixels representing a color (see Listing 5–7). It fires multiple times per second, and its job is to replace pixels in the bitmap with the colors in the array by calling the following method:
mBitmap.setPixels(pixels, offset, stride, x, y, width, height)
The arguments are as follows:
pixelsis the colors to write to the bitmap.offsetis the index of the first color to read frompixels[].strideis the number of colors inpixels[]to skip between rows (normally, this value will be the same as the width of the bitmap.xis the x coordinate of the first pixel to write to in the bitmap.yis the y coordinate of the first pixel to write to in the bitmap.widthis the number of colors to copy frompixels[]per row.heightis the number of rows to write to the bitmap.
Listing 5–7. Image Update Handler
public void OnImageUpdate(int[] pixels) {

    mBitmap.setPixels(pixels, 0, mWidth, 0, 0, mWidth, mHeight);

    mHandler.post(new Runnable() {

        public void run() {

            mView.setImageBitmap( mBitmap);

        }

    });

}
Note that because this handler fires from a non-UI thread, you cannot set the pixels directly into the ImageView, but must use an android.os.Handler to post a Runnable to the message queue:
    Handler.post(new Runnable() {

        public void run() {

            // Code that updates the UI goes here

        }

    });
NOTE: A handler allows you to send and process message and runnable objects associated with a thread's message queue. Each handler instance is associated with a single thread and that thread's message queue. When you create a new handler, it is bound to the thread and message queue of the thread that is creating it. Always use a handler when updating UI widgets from a non-UI thread!
Message Updates
The message updates handler receives native messages, which are very helpful for debugging. Listing 5–8 shows this handler, which logs the text to the Android console.
Listing 5–8. Message Update Handler
/**

 * Fires on DSO message

 */

public void OnMessage(String text, int level) {

Log.d(TAG, "**Doom Message: " + text);

}
Fatal Error Handler
The fatal error handler deals with unrecoverable errors. This means displaying a message to the user and exiting gracefully. There are many things that can cause unrecoverable errors, such as code bugs, corrupted game files, I/O errors, and network failures.
Listing 5–9 shows the way Doom deals with this situation. It uses a message handler to display a message box to the user (remember that this method fires from a non-UI thread, where all UI widget access must go through an OS handler). It then waits for a while so the user can read the message, and finally exits gracefully.
Listing 5–9. Fatal Error Handler
public void OnFatalError(final String text) {

    mHandler.post(new Runnable() {

        public void run() {

            MessageBox("Fatal Error",

                    text + " - Please report this error.");

        }

    });


    // Wait for the user to read the box

    try {

        Thread.sleep(8000);

    } catch (InterruptedException e) {


    }

    // Must quit here or the LIB will crash

    DoomTools.hardExit(-1);

}
Audio Request Handlers
The native Doom engine cannot access the sound device directly. This is due to the nonstandard audio library used by Android (Enhanced Audio System, EAS, by SoniVOX, and in Ice Cream Sandwich, Vorbis). To overcome this very serious limitation, audio requests are cascaded back to these handlers, which start sound events at a given volume, start and stop background music events, and set the background music.
Listing 5–10 shows the audio handlers for Doom. Note that all requests are delegated to the doom.audio.AudioManager class, which deals with the Android audio system.
Listing 5–10. Sound and Music Handlers
public void OnStartSound(String name, int vol)

{

    if ( mSound && mAudioMgr == null)

        Log.e(TAG, "Bug: Audio Mgr is NULL but sound is enabled!");


    try {

        if ( mSound && mAudioMgr != null)

            mAudioMgr.startSound( name, vol);


    } catch (Exception e) {

        Log.e(TAG, "OnStartSound: " +  e.toString());

    }

}


/**

 * Fires on background music

 */

public void OnStartMusic(String name, int loop) {

    if ( mSound && mAudioMgr != null)

        mAudioMgr.startMusic(DoomClient.this, name, loop);

}
/**

 * Stop bg music

 */

public void OnStopMusic(String name) {

    if ( mSound &&  mAudioMgr != null)

        mAudioMgr.stopMusic( name);

}


public void OnSetMusicVolume(int volume) {

    if ( mSound &&  mAudioMgr != null)

        mAudioMgr.setMusicVolume(volume);

}
NOTE: Even though cascading audio in this way will make the game slower, it will provide high-quality sound to the game. It also provides a format-independent way of handling audio. Whatever the format of your sound file, Android will detect it behind the scenes and call the appropriate audio driver—as long as your sound file uses any format supported by the platform.
Navigation Controls
Older Android devices feature a trackball, which is cumbersome for mobile games. In fact, most gaming devices, such as PlayStation Portable (PSP) and Game Boy, feature multiple keypad arrows, which are great for navigation. On the plus side, the QWERTY keyboard is helpful for PC games. But the latest Android devices have neither a keyboard nor a trackball. This is where the navigation controls can help. Figure 5–3 shows the navigation controls in action during a game.
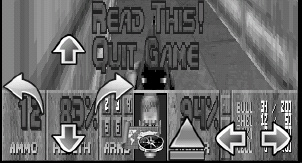
Figure 5–3. Navigation controls for Doom
The controls themselves are implemented as image buttons within the game layout (see the “Game Layout” section). The RelativeLayout of the game allows the controls to overlap the video ImageView, as shown in Figure 5–3. To set up events for the buttons, simply load the button widget using its ID and set a touch listener:
findViewById(R.id.BUTTON_ID).setOnTouchListener(new View.OnTouchListener(){

  public boolean onTouch(View v, MotionEvent evt) {

      // ACTION_DOWN or ACTION_UP

      int action = evt.getAction();
      // …

  }

});
Depending on the touch event action, ACTION_DOWN or ACTION_UP, you simply send a key event to the native layer with the following code:
public static void sendNativeKeyEvent (int type, int sym) {

    try {

        Natives.keyEvent(type, sym);

    } catch (UnsatisfiedLinkError e) {

        Log.e(TAG, e.toString());

    }

}
Listing 5–11 shows the setupPanControls() function for the up, down, left, and right buttons of the Doom controller.
Listing 5–11. Controller Event Setup
private void setupPanControls() {

    // Up

    findViewById(R.id.btn_up).setOnTouchListener(

            new View.OnTouchListener(){

        public boolean onTouch(View v, MotionEvent evt) {

            int action = evt.getAction();

            if ( action == MotionEvent.ACTION_DOWN) {

                Natives.sendNativeKeyEvent(Natives.EV_KEYDOWN

                        , DoomTools.KEY_UPARROW);

             }

            else if ( action == MotionEvent.ACTION_UP) {

                Natives.sendNativeKeyEvent(Natives.EV_KEYUP

                        , DoomTools.KEY_UPARROW);

            }

            return true;

        }

    });


    // Down

    findViewById(R.id.btn_down).setOnTouchListener(

            new View.OnTouchListener(){

        public boolean onTouch(View v, MotionEvent evt) {

            int action = evt.getAction();

            if ( action == MotionEvent.ACTION_DOWN) {

                Natives.sendNativeKeyEvent(Natives.EV_KEYDOWN

                        , DoomTools.KEY_DOWNARROW);

            }

            else if ( action == MotionEvent.ACTION_UP) {

                Natives.sendNativeKeyEvent(Natives.EV_KEYUP

                        , DoomTools.KEY_DOWNARROW);

            }

            return true;

        }

    });


    // Right

    findViewById(R.id.btn_right).setOnTouchListener(

            new View.OnTouchListener(){
        public boolean onTouch(View v, MotionEvent evt) {

            int action = evt.getAction();

            if ( action == MotionEvent.ACTION_DOWN) {

                Natives.sendNativeKeyEvent(Natives.EV_KEYDOWN

                        , DoomTools.KEY_RIGHTARROW);

            }

            else if ( action == MotionEvent.ACTION_UP) {

                Natives.sendNativeKeyEvent(Natives.EV_KEYUP

                        , DoomTools.KEY_RIGHTARROW);

            }

            return true;

        }

    });


    // More ...

}
Handling Audio Independently of the Format
The audio classes are implemented in the package doom.audio and consist of two files: AudioManager and AudioClip.
AudioManager is a singleton class very similar to the AudioManager class presented in the previous chapter. Some of the method signatures are different to accommodate the Doom engine:
preloadSounds(): This method preloads the most common Doom sounds to improve performance. Sounds are encoded in WAVE format.startSound(String name, intvol): This method starts the sound given by a name key at volumevol. The key does not include the file extension, and the volume ranges from 0 to 100.startMusic (Context ctx, String key, int loop): This method starts a background music file given bykeyand loops ifloopis set to anything other than 0. An Android context is required by the backgroundAudioClip.stopMusic (String key): This method stops the background music given bykey.setMusicVolume (intvol): This method sets the background music volume.volranges from 0 to 100.
The AudioClip class is the same as Wolfenstein 3D's AudioClip (shown in the previous chapter). The only difference is that the package has been renamed. A great thing about AudioClip is that provides a format independent way of playing sound (behind the scenes Android will take care of the dirty work of dealing with the format drivers), plus it will work in all versions of Android thus giving you the widest range of device support.
Because the audio files (including background music) can occupy more than 5MB, files have been packed in a zip archive and installed at runtime into the SD card. This will save precious disk space in the main file system. The zip archive lives in the assets folder of the Doom project.
TIP: Android features an automated media scanner service that searches for audio files within the file system. This can be really annoying, as your media player will suddenly display a few hundred unwanted Doom sounds and music. You can fix the problem by adding an empty file called .nomedia to the sound folder. This will tell the media scanner to bypass this directory.
Native Interface Class
The native interface class is the two-way pipe that sends messages from Java to the Doom engine through native methods, and from the engine to Java using C to Java callbacks (see Listing 5–12). This class consists of three parts: callback listener, native methods, and C to Java callbacks.
Callback Listener
The callback listener is implemented by the interface EventListener. It must be implemented by clients that wish to receive C to Java callbacks (in this case, by the main activity DoomClient.java). The C to Java callbacks are as follows:
OnMessage(String text, int level): This is mostly a debug callback that sends messages to let Java know what is happening on the native side.OnInitGraphics(int w, int h): This is the very first callback and fires only once after graphics initialization. It tells Java the width and height of the video buffer.OnImageUpdate(int[] pixels): This fires many times per second and sends an Android packed video buffer to Java, which will use it to render the game bitmap.OnFatalError(String text): This callback fires when there is an unrecoverable error in the engine. The receiver should display the message and terminate.OnQuit(int code): This callback fires when the user exits the game. It sends a return code back to the receiver.OnStartSound(String name, intvol): This fires when the native engine starts a sound. It delegates to the receiver.OnStartMusic(String name, int loop): This fires on background music. It delegates to the receiver.OnStopMusic(String name): This fires on stop music background. It delegates to the receiver.OnSetMusicVolume(int volume): This fires when the user sets the music volume. It delegates to the receiver.
Native Methods
The native methods invoke the native Doom engine. There are three basic native methods:
static native intDoomMain(String[] argv): This method invokes the main game loop of the Doom engine.static native intkeyEvent(int type, int key): This method sends a key event to the engine. The event type is eitherEV_KEYDOWNorEV_KEYUP. The argumentkeymust be an ASCII symbol, not an Android key code. This means the key code must be translated before being sent to the engine.static native intmotionEvent(int b, int x, int y): This method sends a motion event to the engine (such as when the user drags a finger on the display). The first argument is a mouse button (always zero in this case), plus the x and y coordinates of the event itself.
static native intDoomMain(String[] argv) requires a list or arguments and blocks execution, so it must be run within a thread. The following are the most important arguments:
widthdefines the width of the video buffer.heightdefines the height of the video buffer.iwaddefines the game to be played. The following game files are supported by the engine:doom1.wad: This is the shareware episode of Doom.doom.wad: This is the retail episode.doom2.wad: This is the second episode in the Doom series.plutonia.wad: This is the Plutonia Experiment episode, part of the Ultimate Doom series.tnt.wad: This is an episode dubbed Evilution, also part of the ultimate Doom series.
filedefines extra game files to be used by the engine.
For example, to play Doom shareware in landscape mode, the list arguments that must be sent to DoomMain (as a String array) would be doom -width 480 -height 320 -iwad doom1.wad.
C to Java Callbacks
C to Java callbacks are used to delegate engine messages to the listener activity. To do so, the native interface class uses a private listener and a static setter method:
private static EventListener listener;

public static void setListener(EventListener l) {

        listener = l;

}
Note that there can be only one listener. When the Doom engine sends a message (such as “have some text”), the native interface class simply delegates to the listener, which deals with the event:
private static void OnMessage(String text, int level) {

        if (listener != null)

            listener.OnMessage(text, level);

}
In the preceding example, the engine is saying “have some text,” along with an integer log level. The rest of callbacks are shown in Listing 5–12.
Listing 5–12. Native Interface Class (Natives.java)
package doom.jni;


import android.util.Log;


public class Natives {

    public static final String TAG = "Natives";


    private static EventListener listener;


    public static final int EV_KEYDOWN = 0;

    public static final int EV_KEYUP = 1;

    public static final int EV_MOUSE = 2;


    public static interface EventListener {

        void OnMessage(String text, int level);

        void OnInitGraphics(int w, int h);

        void OnImageUpdate(int[] pixels);

        void OnFatalError(String text);

        void OnQuit(int code);

        void OnStartSound(String name, int vol);

        void OnStartMusic(String name, int loop);

        void OnStopMusic(String name);

        void OnSetMusicVolume(int volume);

    }


    public static void setListener(EventListener l) {

        listener = l;

    }

    /**

     * Send a key event to the native layer

     *

     * @param type : key up down or mouse

     * @param sym: ASCII symbol
     */

    public static void sendNativeKeyEvent(int type, int sym) {

        try {

            Natives.keyEvent(type, sym);

        } catch (UnsatisfiedLinkError e) {

            Log.e(TAG, e.toString());

}

    }


     // Native Main Doom Loop: @param argv: program arguments

    public static native int DoomMain(String[] argv);


    /**

     * Send a Key Event

     * @param type: event type: UP/DOWN

     * @param key: ASCII symbol

     */

    public static native int keyEvent(int type, int key);


    /***********************************************************

     * C to Java - Callbacks

     ***********************************************************/


    /**

     * This fires on messages from the C layer

     */

    private static void OnMessage(String text, int level) {

        if (listener != null)

            listener.OnMessage(text, level);

    }


    private static void OnInitGraphics(int w, int h) {

        if (listener != null)

            listener.OnInitGraphics(w, h);

    }


    private static void OnImageUpdate(int[] pixels) {

        if (listener != null)

            listener.OnImageUpdate(pixels);


    }


    private static void OnFatalError(String message) {

        if (listener != null)

            listener.OnFatalError(message);

    }

    private static void OnQuit(int code) {

        if (listener != null)

            listener.OnQuit(code);

    }

    /**

     * Fires when a sound is played in the C layer.

     */

    private static void OnStartSound(byte[] name, int vol) {

        if (listener != null)

            listener.OnStartSound(new String(name), vol);

    }
    /**

     * Start background music callback

     */

    private static void OnStartMusic(String name, int loop) {

        if (listener != null)

            listener.OnStartMusic(name, loop);

    }


    /**

     * Stop background music

     * @param name

     */

    private static void OnStopMusic(String name) {

        if (listener != null)

            listener.OnStopMusic(name);

    }


    /**

     * Set background music volume

     * @param volume Range: (0-255)

     */

    private static void OnSetMusicVolume(int volume) {

        if (listener != null)

            listener.OnSetMusicVolume((int) (volume * 100.0 / 15.0));

    }

}
Native Layer
The native layer glues the Java and C code together by defining three types of tasks to be performed:
- Native method implementations: These are the C implementations of the native Java methods defined by the native interface class. This code lives in the file
jni_doom.c. - Original game changes: The original Doom engine needs to be modified slightly to accommodate the JNI glue. This consists of inserting calls to the C to Java callbacks in the correct files.
- Removal of invalid dependencies: Invalid dependencies in the original code must be removed. For example, the original Simple DirectMedia Layer (SDL) dependency used by the PC code must be deleted.
Let's look a these tasks in more detail.
Native Method Implementations
Table5–4 shows the Java native signatures and their C counterparts in jni_doom.c.

Before you can proceed with the implementation, the javah command must be used to generate the required header files and signatures:
javah -jni -classpath PATH_TO_PROJECT_FOLDER/bin -d include doom.jni.Natives
Note that a class path to the bin folder is required for javah to find the doom.jni.Natives class. The output file doom_jni_Natives.h will be dumped in the include folder by using -d. The header file is then used by jni_doom.c, as shown in this fragment:
#include <stdio.h>

#include "include/doom_jni_Natives.h"

#include "include/jni_doom.h"

#include "doomdef.h"

#include "d_event.h"
The code will use Doom code, thus the inclusion of doomdef.h and d_event.h. The header jni_doom.h defines prototypes for the C to Java callbacks and miscellaneous constants.
You also need a static reference to the JVM used by the C to Java callbacks, as in the following fragment:
// Global  Java VM  reference

static JavaVM *g_VM;
For improved performance, static references to the Java native interface class (doom.jni.Natives) are kept in jNativesCls. References to the Java methods to send the video image (jSendImageMethod) and sound file (jStartSoundMethod) are also kept. This is because these methods will be invoked multiple times, and looking up these names every time can slow things.
static jclass jNativesCls;

static jmethodID jSendImageMethod;

static jmethodID jStartSoundMethod;
Also, since you may send a pixel buffer (image) multiple times per second, you should keep a reference to the Java array and its size, as in the following fragment:
static jintArray jImage;

static int iSize;

extern int doom_main(int argc, char **argv);
The line extern intdoom_main defines the main engine function and tells the compiler it is defined somewhere else in the library. The header jni_doom.h included up front defines the constants and method signatures required to invoke the C to Java callbacks. For example, the following fragment of the header defines constants for the Java native interface class (doom/jni/Natives), and the method names and signatures for the callbacks OnImageUpdate and OnStartSound (see the “C to Java Callbacks” section for more details).
#define CB_CLASS "doom/jni/Natives"

#define CB_CLASS_IU_CB  "OnImageUpdate"

#define CB_CLASS_IU_SIG  "([I)V"


#define CB_CLASS_SS_CB  "OnStartSound"

#define CB_CLASS_SS_SIG  "([BI)V"
Let's take a look at the actual implementations. They are divided into the following three groups:
- Native game loop: This invokes the engine loop
doom_main. - Key and motion events: These post key and motion events to the engine.
- C to Java callbacks: These callbacks are critical for the Java code to receive information from the Doom engine.
Native Game Loop
The native game loop's job is to extract the arguments sent as a jobjectArray into a C char ** array and invoke the main Doom engine function (doom_main). This function performs the following additional steps:
- Obtain a reference to the JVM using
(*env)->GetJavaVM(env, &g_VM). This reference will be used by the C to Java callbacks. - Load the
doom.jni.Nativesclass, also used by the C to Java callbacks:jNativesCls = (*env)->FindClass(env, “doom/jni/Natives”). - Load the
doom.jni.Natives.OnImageUpdateanddoom.jni.natives.OnStartSoundJava methods. This is done for performance reasons, as these methods are called many times.
Listing 5–13 shows the native game loop.
Listing 5–13. JNI Call to the Main Game Loop
/*

 * Class:     doom_jni_Natives

 * Method:    DoomMain

 * Signature: ([Ljava/lang/String;)V

 */

JNIEXPORT jint JNICALL Java_doom_jni_Natives_DoomMain

  (JNIEnv * env, jclass class, jobjectArray jargv)

{

    // Obtain a global ref to the Java VM

    (*env)->GetJavaVM(env, &g_VM);


    // Extract char ** args from Java array

    jsize clen =  getArrayLen(env, jargv);


    char * args[(int)clen];


    int i;

    jstring jrow;

    for (i = 0; i < clen; i++)

    {

        jrow = (jstring)(*env)->GetObjectArrayElement(env, jargv, i);

        const char *row  = (*env)->GetStringUTFChars(env, jrow, 0);


        args[i] = malloc( strlen(row) + 1);

        strcpy (args[i], row);


        jni_printf("Main argv[%d]=%s", i, args[i]);


        // Free Java string jrow

        (*env)->ReleaseStringUTFChars(env, jrow, row);

    }


    /*

     * Load the Image update class (called many times)

     */

    jNativesCls = (*env)->FindClass(env, CB_CLASS);


    if ( jNativesCls == 0 ) {

        jni_printf("Unable to find class: %s", CB_CLASS);

        return -1;

    }


// Load doom.util.Natives.OnImageUpdate(char[])

    jSendImageMethod = (*env)->GetStaticMethodID(env, jNativesCls

            , CB_CLASS_IU_CB

            , CB_CLASS_IU_SIG);


    if ( jSendImageMethod == 0 ) {

        jni_printf("Unable to find method OnImageUpdate(): %s"

                , CB_CLASS);

        return -1;

    }


    // Load OnStartSound(String name, int vol)

    jStartSoundMethod = (*env)->GetStaticMethodID(env, jNativesCls

            , CB_CLASS_SS_CB
            , CB_CLASS_SS_SIG);


    if ( jStartSoundMethod == 0 ) {

        jni_printf("Unable to find method OnStartSound signature: %s "

                , CB_CLASS_SS_SIG);

        return -1;

    }


    // Invoke Doom's main sub. This will loop forever

    doom_main (clen, args);


    return 0;

}
Key and Motion Events
Key and motion events are posted via the extern symbol D_PostEvent, as shown in Listing 5–14. The event type (event_t) is defined by the engine and consists of the following:
- A type (0 for key down, 1 for key up, and 2 for mouse events)
- An ASCII key stored in
event.data1for key events - A mouse button and x and y coordinates for mouse events, stored as
event.data1 = MOUSE BUTTON,event.data2 = x, andevent.data3 = y. Mouse buttons can be 1 for left, 2 for middle, or 3 for right.
Listing 5–14. Posting Key and Motion Events with JNI
/*

 * Class:     doom_util_Natives

 * Method:    keyEvent

 * Signature: (II)V

 */

extern void D_PostEvent (event_t* ev);


JNIEXPORT jint JNICALL Java_doom_jni_Natives_keyEvent

  (JNIEnv * env, jclass cls, jint type, jint key)

{

    event_t event;

    event.type = (int)type;

    event.data1 = (int)key;

    D_PostEvent(&event);


    return type + key;

}


/*

 * Class:     doom_util_Natives

 * Method:    motionEvent

 * Signature: (II)I

 */

JNIEXPORT jint JNICALL Java_doom_jni_Natives_motionEvent

  (JNIEnv * env, jclass cls, jint x, jint y, jint z)
{

    event_t event;

    event.type = ev_mouse;

    event.data1 = x;

    event.data2 = y;

    event.data3 = z;

    D_PostEvent(&event);

    return 0;

}
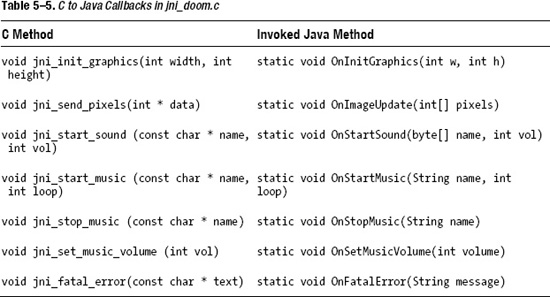
C to Java Callbacks
Table 5–5 shows the callbacks on the left side and the Java methods they invoke on the right. The callbacks can be divided into the following types:
- Graphics initialization (
jni_init_graphics) - Video buffer (
jni_send_pixels) - Sound and music (
jni_start_sound, jni_start_music, jni_stop_musicandjni_set_music_volume) - Fatal errors (
jni_fatal_error)
The callbacks must be inserted in the C code, as explained in the following sections.
Graphics Initialization
Constants for the graphics initialization callback are defined in jni_doom.h, as shown in Listing 5–15. CB_CLASS_IG_CB indicates the Java method name OnInitGraphics. CB_CLASS_IG_SIG "(II)V" defines the signature: two integer parameters and a void return type, as shown in the following fragment:
#define CB_CLASS_IG_CB  "OnInitGraphics"

#define CB_CLASS_IG_SIG  "(II)V"
This callback also performs some critical steps:
- It attaches to the current thread with
(*g_VM)->AttachCurrentThread (g_VM, &env, NULL). This is where the global JVM reference comes into play. Furthermore, the JNI environment (env) will be used to invoke the callback. - It allocates space for the Java pixel array (video buffer) used by
jni_send_pixelsusing the width and height of the display:jImage = (*env)->NewIntArray(env, width * height). - It invokes the static void method
doom.util.Natives.OnInitGraphics(width, height)using its method ID:(*env)->CallStaticVoidMethod(env, jNativesCls, METHOD_ID, ARGUMENTS), whereARGUMENTSare the width and height of the display. Note that the arguments must match the arguments in the Java method!
Listing 5–15. Graphics Initialization
/**

 * Fires when Doom graphics are initialized.

 * params: img width, height

 */

void jni_init_graphics(int width, int height)

{

    JNIEnv *env;


    if ( !g_VM) {

        printf("No JNI VM available.
");

        return;

    }


    (*g_VM)->AttachCurrentThread (g_VM, (void **) &env, NULL);


    iSize = width * height;


    // Create a new int[] used by jni_send_pixels

    jImage = (*env)-> NewIntArray(env, iSize);


    // Call doom.util.Natives.OnInitGraphics(w, h);

    jmethodID mid = (*env)->GetStaticMethodID(env, jNativesCls

            , CB_CLASS_IG_CB

            , CB_CLASS_IG_SIG);


    if (mid) {

        (*env)->CallStaticVoidMethod(env, jNativesCls

                , mid

                , width, height);

    }

}
Video Buffer Callback
The video buffer callback is critical, and it must be lean and mean. It gets called continuously and must not create any objects (see Listing 5–16). Like the previous callback, it attaches to the current thread. It also calls the static void method doom.jni.Natives.OnImageUpdate(int[] pixels). But before calling this method, it must set the pixels into the Java array (jImage):
(*env)->SetIntArrayRegion(env, jImage, 0, iSize, (jint *) data)
data is an array of integers already formatted as 32-bit ARGB pixels, as required by Android, and iSize is the size of the display calculated in the previous callback.
Listing 5–16. Sending Video Pixels
/**

 * Image update Java callback. Gets called many times per sec.

 * It must not look up JNI classes/methods or create any objects; otherwise

 * the local JNI ref table will overflow & the app will crash

*/

void jni_send_pixels(int * data)

{

    JNIEnv *env;

    if ( !g_VM) {

        return;

    }


    (*g_VM)->AttachCurrentThread (g_VM, (void **) &env, NULL);


    // Send img back to Java.

    if (jSendImageMethod) {

        (*env)->SetIntArrayRegion(env, jImage, 0, iSize, (jint *) data);


        // Call Java method

        (*env)->CallStaticVoidMethod(env, jNativesCls

                , jSendImageMethod

                , jImage);

    }


}
Sound and Music Callbacks
The sound and music callbacks fire from the engine when a sound or background music must be played. In a perfect world, sound would be handled in the native layer; however, due to the lack of documentation and support for open audio standards in Android, requests are cascaded back to Java for processing.
There are four sound and music callbacks in Doom, with their names and signatures defined in the header jni_doom.h:
// doom.jni.Natives.OnStartSound(byte[] name, int volume)

#define CB_CLASS_SS_CB  "OnStartSound"

#define CB_CLASS_SS_SIG  "([BI)V"
// doom.jni.Natives.OnStartMusic (String name , int loop)

#define CB_CLASS_SM_CB  "OnStartMusic"

#define CB_CLASS_SM_SIG  "(Ljava/lang/String;I)V"


// doom.jni.Natives.OnStopMusic (String name )

#define CB_CLASS_STOPM_CB  "OnStopMusic"

#define CB_CLASS_STOPM_SIG  "(Ljava/lang/String;)V"


//   doom.jni.Natives.OnSetMusicVolume (int volume)

#define CB_CLASS_SETMV_CB  "OnSetMusicVolume"

#define CB_CLASS_SETMV_SIG  "(I)V"
Note the method signature for OnStartSound with ([BI)V, where [B represents an array of bytes (the name of the sound), I represents an integer (volume), and V is the return type of the method (void). Another interesting signature is OnStartMusic with (Ljava/lang/String;I)V, where Ljava/lang/String; means the class java.lang.String (enclosed in L;).
Listing 5–17 shows the implementation of these callbacks. They are pretty similar in nature, in that they all must attach to the current thread using the global JVM (g_VM). The following are some of the key aspects of the code:
- To create a Java byte array, you can use
jbyteArray ARRAY = (*env)->NewByteArray(env, SIZE), where the wordsbyte/Bytecan be replaced withboolean/Boolean,int/Int,object/Object, and other primitive types, depending on your needs. - To insert data into the array, use
(*env)->SetByteArrayRegion(env, ARRAY, START, SIZE, (jbyte *) C_ARRAY), whereBytecan be replaced with any Java primitive type. - To call a static void method, use
(*env)->CallStaticVoidMethod(env, CLASS, METHOD_ID, ARG1, ARG2,…). - To release resources for an array, use
(*env)->DeleteLocalRef(env, ARRAY).
Listing 5–17. Cascading Sound and Music Requests Back to Java
/**

 * Fires multiple times when a sound is played

 * @param name Sound name

 * @param volume

 */

void jni_start_sound (const char * name, int vol)

{

    /*

     * Attach to the curr thread; otherwise we get JNI WARNING:

     * threadid=3 using env from threadid=15 which aborts the VM

     */

    JNIEnv *env;


    if ( !g_VM) {

        return;

    }
    (*g_VM)->AttachCurrentThread (g_VM, (void **) &env, NULL);


    if ( jStartSoundMethod == 0 ) {

        jni_printf("BUG: Invalid Doom JNI method OnStartSound %s"

          , CB_CLASS_SS_SIG);

        return ;

    }


    // Create a new char[] used by jni_send_pixels

    // Used to prevent JNI ref table overflows

    int iSize = strlen(name);

    jbyteArray jSound = (*env)-> NewByteArray(env, iSize);


    (*env)->SetByteArrayRegion(env, jSound, 0, iSize, (jbyte *) name);


    // Call Java method

    (*env)->CallStaticVoidMethod(env, jNativesCls

            , jStartSoundMethod

            , jSound //(*env)->NewStringUTF(env, name)

            , (jint) vol);


    (*env)->DeleteLocalRef(env,jSound);

}


/**

 * Fires when a background song is requested

 */

void jni_start_music (const char * name, int loop)

{

    /*

     * Attach to the curr thread; otherwise we get JNI WARNING:

     * threadid=3 using env from threadid=15 which aborts the VM

     */

    JNIEnv *env;


    if ( !g_VM) {

        return;

    }


    (*g_VM)->AttachCurrentThread (g_VM, (void **) &env, NULL);


    jmethodID mid = (*env)->GetStaticMethodID(env, jNativesCls

        , CB_CLASS_SM_CB

        , CB_CLASS_SM_SIG);


    if (mid) {

        (*env)->CallStaticVoidMethod(env, jNativesCls

                , mid

                , (*env)->NewStringUTF(env, name)

                , (jint) loop );


    }

}


/**

 * Fires when a background song is stopped

 */
void jni_stop_music (const char * name)

{

    /*

     * Attach to the curr thread; otherwise we get JNI WARNING:

     * threadid=3 using env from threadid=15 which aborts the VM

     */

    JNIEnv *env;


    if ( !g_VM) {

        return;

    }


    (*g_VM)->AttachCurrentThread (g_VM, (void **) &env, NULL);

    jmethodID mid = (*env)->GetStaticMethodID(env, jNativesCls

        , CB_CLASS_STOPM_CB

        , CB_CLASS_STOPM_SIG);


    if (mid) {

        (*env)->CallStaticVoidMethod(env, jNativesCls

                , mid

                , (*env)->NewStringUTF(env, name)

                );


    }

}


/**

 * Set bg msic vol callback

 */

void jni_set_music_volume (int vol) {

    JNIEnv *env;


    if ( !g_VM) {

        return;

    }


    (*g_VM)->AttachCurrentThread (g_VM, (void **) &env, NULL);


    jmethodID mid = (*env)->GetStaticMethodID(env, jNativesCls

        , CB_CLASS_SETMV_CB

        , CB_CLASS_SETMV_SIG);


    if (mid) {

        (*env)->CallStaticVoidMethod(env, jNativesCls

                , mid

                , (jint) vol

                );


    }


}
Fatal Errors
Fatal or unrecoverable errors occur in any type of software. In Doom, these errors are cascaded back to Java, where a message is presented to the user, and then the application aborts. The following fragment from jni_doom.h shows the callback name and signature for this task:
#define CB_CLASS_FATAL_CB  "OnFatalError"

#define CB_CLASS_FATAL_SIG  "(Ljava/lang/String;)V"
This callback is simple (see Listing 5–18). It works as follows:
- It attaches to the current thread, aborting if no JNI environment is available.
- It looks up the
doom.jni.NativesJava class, aborting if not found. - It looks up the
doom.jni.Natives.OnFatalError(String)using the method name and signature. - It calls the static void method.
Listing 5–18. Cascading Fatal Errors
/**

 * Called when a fatal error has occurred.

s * The receiver should terminate

 */

void jni_fatal_error(const char * text) {

    JNIEnv *env;


    if ( !g_VM) {

        printf("JNI FATAL: No JNI Environment available. %s
", text);

        exit(-1);

    }


    (*g_VM)->AttachCurrentThread (g_VM, (void **) &env, NULL);


    if ( !env) {

        printf("JNI FATAL: Unable to attach to thread: %s.
", text);

        exit(-1);

    }


    if ( !jNativesCls ) {

        jNativesCls = (*env)->FindClass(env, CB_CLASS);


        if ( jNativesCls == 0 ) {

                printf("JNI FATAL: Unable to find class: %s", CB_CLASS);

                exit(-1);

        }

    }

    jmethodID mid = (*env)->GetStaticMethodID(env, jNativesCls

        , CB_CLASS_FATAL_CB

        , CB_CLASS_FATAL_SIG);


    if (mid) {

        (*env)->CallStaticVoidMethod(env, jNativesCls
                , mid

                , (*env)->NewStringUTF(env, text) );

    }

    else {

        printf("JNI FATAL: Unable to find method: %s, signature: %s
"

                , CB_CLASS_MSG_CB, CB_CLASS_MSG_SIG );

        exit (-1);

    }


}
Original Game Changes
In order for the JNI glue to work, changes are required to the original game engine. Some are simple, such as inserting calls to the C to Java callbacks; some are not so simple, such as removing invalid dependencies. Table 5-6 shows the original files and the changes required. Considering that the engine has a total of 90,000 lines of code, these changes are not that bad.
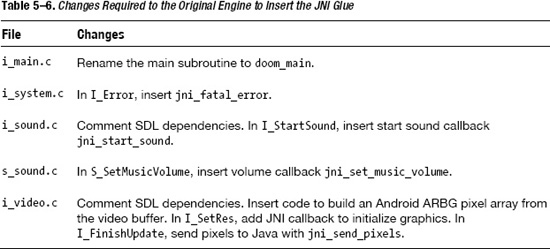
These changes are explained in more detail in the following sections.
Renaming main
Let's start with the simplest change: renaming the main() subroutine in i_main.c so it can be invoked from the Java native Java_doom_jni_Natives_DoomMain, which will start the game from Java, as shown in the following fragment:
// In i_main.c

int main(int argc, char **argv)

int doom_main(int argc, char **argv)


// In jni_doom.c

extern int doom_main(int argc, char **argv);
JNIEXPORT jint JNICALL Java_doom_jni_Natives_DoomMain


  (JNIEnv * env, jclass class, jobjectArray jargv)


{

  ...

  doom_main (clen, args);

  ...

}
Once main is renamed to doom_main, simply add the extern symbol extern intdoom_main(intargc, char **argv) to jni_doom.c and invoke it from the game starter function.
Inserting the Fatal Error Callback
Another simple change is to insert the C to Java callback jni_fatal_error whenever an unrecoverable error occurs. The changes occur in the I_Error function in the i_system.c file, as shown in Listing5–19.
Listing 5–19. Changes Required to i_system.c
void I_Error (char *error, ...)

{

    va_list     argptr;

    static char  string[1024];


    // Message first.

    va_start (argptr,error);

    vsprintf (string, error ,argptr);

    va_end (argptr);


    // Shutdown. Here might be other errors.

    if (demorecording)

      G_CheckDemoStatus();


    D_QuitNetGame ();

    I_ShutdownGraphics();


    // Send the error back to JNI layer

    jni_fatal_error(string);


    // Something wrong has happened

    // OLD CODE -> exit(-1);

}
Commenting SDL Occurrences
The Doom engine is built on top of SDL, which is an open framework to access system resources such as sound and video hardware. Doom uses SDL to display video and play music. This is a relatively hard problem, as Android has no support for SDL. Thus, any SDL occurrence must be commented or removed and replaced by a JNI equivalent. This happens in two files: i_sound.c and i_video.c.
Changes to i_sound.c are simple and consist of commenting the sdl.h header file and inserting jni_doom.h instead, as shown in the following fragment:
#include <sdl.h>

#include "include/jni_doom.h"
Furthermore, any function that starts with SDL_ must be commented. Luckily, these functions do not affect the game flow itself, and thus they can be safely commented.
Sound System Changes
Other changes are required to i_sound.c to insert a call to jni_start_sound, as shown in Listing 5–20. The global variable S_sfx[id].name provides the sound name, which will be sent back to Java and loaded from the file system, along with its volume.
Listing 5–20. Changes Required to i_sound.c to Insert the jni_start_sound Callback
int I_StartSound(int id, int channel, int vol, int sep, int pitch, int priority)

{

  const unsigned char* data;

  int lump;

  size_t len;


  // ...


 // The entries DSBSPWLK, DSBSPACT, DSSWTCHN

 // and DSSWTCHX are all zero-length sounds

  if (len<=8) return -1;


  /* Find padded length */

  len -= 8;

  // Do the lump caching outside the SDL_LockAudio/SDL_UnlockAudio pair

  // Use locking which makes sure the sound data is in a malloced area and

  // not in a memory mapped one

  data = W_LockLumpNum(lump);


  // JNI changes: Send a sound request to Java

  // id is the sound index, S_sfx[id].name (soundname)

  // vol = volume

  jni_start_sound(S_sfx[id].name , vol);


  // ...


  return channel;

}
Changes are also required to s_sound.c to insert a call to jni_set_music_volume (volume) to send the background music volume back to Java (see Listing 5–21). Note that this function is called within the game when the user changes the music volume from the options menu.
Listing 5–21. Changes Required to s_sound.c to Insert the Music JNI Callback
void S_SetMusicVolume(int volume)

{

  // Return if music is not enabled
  if (!mus_card || nomusicparm)

    return;


  if (volume < 0 || volume > 15)

    I_Error("S_SetMusicVolume: Attempt to set music volume at %d", volume);


  // JNI Changes: Send a volume request to Java

  // volume = [0..100]

  jni_set_music_volume (volume);


  I_SetMusicVolume(volume);

  snd_MusicVolume = volume;

}
Video Buffer Changes
This is where the toughest changes must be done. The file i_video.c is the one that renders the video buffer and uses SDL heavily. All SDL references must be removed and replaced with structures compatible with Android.
Down to the pipe, a video buffer is simply an array of packed colors, represented as either bytes indicating the index of a color in a color palette or integers specifying an RGB color. SDL uses a structure called SDL_Surface to encapsulate the video buffer as an array of bytes plus a palette used to map colors to the buffer. Consider the following fragment, which replaces the SDL screen with a similar structure called XImage (actually taken from the X11 structure of the same name).
static SDL_Surface *screen;    // OLD CODE

static XImage * image;         // NEW CODE
In Doom, SDL_Surface will be replaced with the equivalent XImage that holds the array of bytes for the video buffer. Note that the video buffer cannot be rendered directly to a display. Instead, it must be cascaded back to Java using the C to Java callbacks, where Android will take care of the actual rendering.
Because XImage doesn't exist, it must be written. This isn't difficult, as XImage is simply a C struct holding the width, height, and array of bytes for the video buffer, as shown in Listing 5–22.
Listing 5–22. Video Buffer Image Object from i_video.c
/**********************************************************

 * Class XImage

 **********************************************************/

typedef struct Image XImage;


struct Image

{

  int width;

  int height;

  byte * data;

};


/**

 * Class Color
 */

typedef struct Color XColor;


struct Color

{

  int red;

  int green;

  int blue;

};


// The Image

XImage *            image;


/**

 * XImage Constructor

 */

XImage * XCreateImage(int width, int height)

{

    XImage * this = (XImage*) malloc(sizeof(XImage));


    // set width, height

    this->width = width;

    this->height = height;


    // allocate image buffer

    this->data = (byte *)malloc (width * height);


    return this;

}

/**********************************************************

 * Class XImage

 **********************************************************/
In addition to XImage, you need a color palette used to map the bytes on XImage to ARGB colors used by Android. For this purpose, you use the structXColor, which holds the red, green, and blue values of a color. You also need a function to allocate memory for the XImage given its width and height (XCreateImage). This function will allocate space for the image byte buffer. You must modify the palette upload function (I_UploadNewPalette) in i_video.c to use the new XColor structure, as shown in Listing 5–23.
Listing 5–23. Setting the Color Palette in i_video.c
// Color palette

static XColor * colours;


static void I_UploadNewPalette(int pal)

{

  // This is used to replace the current 256 colour cmap with a new one

  // Used by 256 colour PseudoColor modes


  static int cachedgamma;

  static size_t num_pals;


  if (V_GetMode() == VID_MODEGL)

    return;

  if ((colours == NULL) || (cachedgamma != usegamma)) {
    int pplump = W_GetNumForName("PLAYPAL");

    int gtlump = (W_CheckNumForName)("GAMMATBL",ns_prboom);


    register const byte * palette = W_CacheLumpNum(pplump);

    register const byte * const gtable = (const byte *)W_CacheLumpNum(gtlump)

     + 256*(cachedgamma = usegamma);


    register int i;


    num_pals = W_LumpLength(pplump) / (3*256);

    num_pals *= 256;


    if (!colours) {

      // First call - allocate and prepare colour array

      colours = malloc(sizeof(*colours)*num_pals);

    }


    // set the colormap entries

    for (i=0 ; (size_t)i<num_pals ; i++) {

      colours[i].red     = gtable[palette[0]];

      colours[i].green = gtable[palette[1]];

      colours[i].blue   = gtable[palette[2]];

      palette += 3;

    }


    W_UnlockLumpNum(pplump);

    W_UnlockLumpNum(gtlump);

    num_pals/=256;

  }

}
In Listing 5–23, the original SDL palette has been replaced by XColor * colours. Note that the Doom engine uses a 768-color palette (256 colors each for red, green, and blue). The palette is read from the game file, along with a gamma table (used to apply a brightness factor to each color). With this information, the palette is filled and kept in memory for later use.
The final change to i_video.c is the function that does the actual rendering, I_FinishUpdate (see Listing 5–24). This function uses the width and height of the screen to create an array of pixels (each one representing an Android-packed ARGB color). It then loops through the array and uses the byte value from the screen buffer to look up the color from the palette:
byte b = screens[0].data[i];  // Video buffer byte

XColor color = colours[b];  // Palette color for that byte
It then constructs a 32-bit pixel using the RGB values of color:
pixels[i] = (0xFF << 24) | (color.red << 16) | (color.green << 8) | color.blue
NOTE: 0xFF << 24 represents the alpha (opacity) value of the pixel—fully visible in this case.
Finally, the array is sent back using the callback jni_send_pixels(pixels), where Android will do the rendering.
Listing 5–24. Video Buffer Renderer Function from i_video.c
void I_FinishUpdate (void)

{

  if (I_SkipFrame()) return;


  // Screen size

  int size = SCREENWIDTH * SCREENHEIGHT;


  // ARGB pixels

  int pixels[size], i;


  for ( i = 0 ; i < size ; i ++) {

      byte b = screens[0].data[i];


      XColor color = colours[b];


      pixels[i] = (0xFF << 24)

          | (color.red << 16)

          | (color.green << 8)

          | color.blue;

  }


  // Send pixels to Java

  jni_send_pixels(pixels);


}
At this point, the Doom engine is all set and ready for compilation.
Compiling Doom with the NDK
With the release of the NDK 1.6 and later, Google has made a lot of nice improvements to support native development. The following are the highlights of this new version:
- The
sourcesfolder from the NDK folder structure is gone (see the section on Wolf 3D and NDK 1.5). Now, all code (Java and native) lives in theappsfolder. Within theappsfolder, theprojectfolder contains the Android Java project, and withinproject, thejnifolder contains the native code and the MakefileAndroid.mk. - NDK 1.6 adds support for OpenGL ES 2.0. This welcome addition will help many 3D games out there.
I would recommend the NDK over the CodeSourcery G++ compiler (or any other ARM compiler) if you have a slow system such as a laptop or VMware combination or if your library crashes mysteriously, perhaps because of GNU compiler version issues, which can happen in programs that are not highly portable. Discrepancies in the GNU compiler version (for example, CodeSourcery uses GCC 4.3.x instead of Android's 4.2.x) can cause optimization errors and other types of runtime errors that ultimately crash the game.
All in all, the NDK is a good improvement but still has far to go to catch up with other powerful tools, such as Apple's iPhone Xcode platform. For example, the NDK will recompile the entire library if you change the Makefile, Android.mk (too add a new source file for example). This is really annoying when you have a big library with lots of source files. Other tools such as GNU make will detect the changes and recompile only the right files in the library. Anyway, for Doom, the folder structure for NDK should look as follows:
NDK_ROOT/apps/Doom/Application.mk: This file defines the module name to be built.NDK_ROOT /apps/Doom/project: This folder contains the actual Android project for the game.NDK_ROOT /apps/Doom/project/jni: This folder contains the native code and the Makefile,Android.mk.
The following steps show you how to get Doom to compile with NDK 1.6:
- Create
android-ndk-1.6_r1/apps/Doom/Application.mk. This file contains the module (doom) that we are building:APP_PROJECT_PATH := $(call my-dir)/project
APP_MODULES := doom - Create the folder
NDK_ROOT/apps/Doom/project. Copy the Android project fromAndroid.Doomto this folder. You don't need to copy thenativefolder (this is the native code). - Create the folder
android-ndk-1.6_r1/apps/Doom/project/jni, and copy the native code fromch07.Android.Doom/native/prboom. - Create a Makefile called
Android.mkinNDK_ROOT/apps/Doom/project/jni. This make file should look as follows:LOCAL_PATH := $(call my-dir)
# clear vars
include $(CLEAR_VARS)
# module name
LOCAL_MODULE := doom
LP := $(LOCAL_PATH)
# doom folder
DOOM := apps/Doom/project/jni
# includes
INC := -I$(DOOM) -I$(DOOM)/include
DOOM_FLAGS := -DNORMALUNIX -DLINUX -DHAVE_CONFIG_H
OPTS := -O3 -ffast-math -fexpensive-optimizationsLOCAL_CFLAGS := $(DOOM_FLAGS) $(OPTS) $(INC)
# sources
LOCAL_SRC_FILES :=
am_map.c m_cheat.c p_lights.c p_user.c sounds.c
hu_lib.c md5.c p_map.c r_bsp.c s_sound.c
d_deh.c hu_stuff.c m_menu.c p_maputl.c r_data.c st_lib.c
d_items.c m_misc.c p_mobj.c r_demo.c st_stuff.c
d_main.c info.c p_plats.c r_draw.c tables.c
doomdef.c m_random.c p_pspr.c r_filter.c version.c
doomstat.c p_ceilng.c p_saveg.c r_fps.c v_video.c
p_checksum.c p_setup.c r_main.c wi_stuff.c
dstrings.c p_doors.c p_sight.c r_patch.c w_memcache.c
f_finale.c p_enemy.c p_spec.c r_plane.c w_mmap.c
f_wipe.c lprintf.c p_floor.c p_switch.c r_segs.c w_wad.c
g_game.c m_argv.c p_genlin.c p_telept.c r_sky.c z_bmalloc.c
m_bbox.c p_inter.c p_tick.c r_things.c z_zone.c
d_client.c d_server.c
droid/i_video.c droid/i_network.c droid/i_joy.c
droid/i_system.c droid/i_main.c droid/i_sound.c
droid/jni_doom.c
# Build libdoom.so
include $(BUILD_SHARED_LIBRARY) - Finally, run
make APP=Doomfrom the NDK root folder. The output librarylibdoom.sowill be stored inDoom/project//libs/armeabiand ready to use. ImportDoom/projectinto your Eclipse workspace, and start the game.
Testing Doom in the Emulator
To test the game in the emulator, create a launch configuration within your Eclipse IDE, as follows:
- From the main menu, select
Run
Run Configurations. - Enter a name for the configuration (
Doom) and select the projectch05.Android.Doom. - Set the Launch Action as Launch Default Activity. Figure 5–4 shows the completed Run Configurations dialog box for this example.
- Click Run.

Figure 5–4. Android run configuration for Doom
Now let's play some Doom. From the emulator, click Menu ![]() Start and monitor the log view to make sure everything works. Consider the log fragment in Listing 5–25.
Start and monitor the log view to make sure everything works. Consider the log fragment in Listing 5–25.
Listing 5–25. Log Fragment from a Doom Run
DEBUG/DoomClient(23981): Loading JNI librray from doom_jni

DEBUG/LibLoader(23981): Trying to load library doom_jni from LD_PATH: /system/lib

DEBUG/dalvikvm(23981): Trying to load lib /data/data/org.doom/lib/libdoom_jni.so 0x43733de8

DEBUG/dalvikvm(23981): Added shared lib /data/data/org.doom/lib/libdoom_jni.so 0x43733de8

DEBUG/dalvikvm(23981): No JNI_OnLoad found in /data/data/org.doom/lib/libdoom_jni.so

 0x43733de8

DEBUG/DoomTools(23981): Sound folder: /sdcard/doom/sound

DEBUG/DoomClient(23981): Starting doom thread with wad doom1.wad sound enabled? true

 Orientation:1

DEBUG/DoomClient(23981): **Doom Message: Main argv[0]=doom

DEBUG/DoomClient(23981): **Doom Message: Main argv[1]=-width

DEBUG/DoomClient(23981): **Doom Message: Main argv[2]=480

DEBUG/DoomClient(23981): **Doom Message: Main argv[3]=-height
DEBUG/DoomClient(23981): **Doom Message: Main argv[4]=320

DEBUG/DoomClient(23981): **Doom Message: Main argv[5]=-iwad

DEBUG/DoomClient(23981): **Doom Message: Main argv[6]=doom1.wad

DEBUG/DoomClient(23981): **Doom Message: I_UpdateVideoMode: 480x320 (fullscreen)

 default VM=8

DEBUG/DoomClient(23981): **Doom Message: I_SetRes: Creating 480x320 image.
The following two lines show the native library is loaded successfully by the JVM:
Trying to load lib /data/data/org.doom/lib/libdoom_jni.so

Added shared lib /data/data/org.doom/lib/libdoom_jni.so
So far, so good. Next, the game arguments are displayed:
**Doom Message: Main argv[0]=doom

**Doom Message: Main argv[1]=-width

**Doom Message: Main argv[2]=480

**Doom Message: Main argv[3]=-height

**Doom Message: Main argv[4]=320

**Doom Message: Main argv[5]=-iwad

**Doom Message: Main argv[6]=doom1.wad
This tells us the size of the display, 48020 (landscape mode), plus the name of the game file, doom1.wad. At this point, the game has successfully loaded and is ready for action (see Figure5–5).
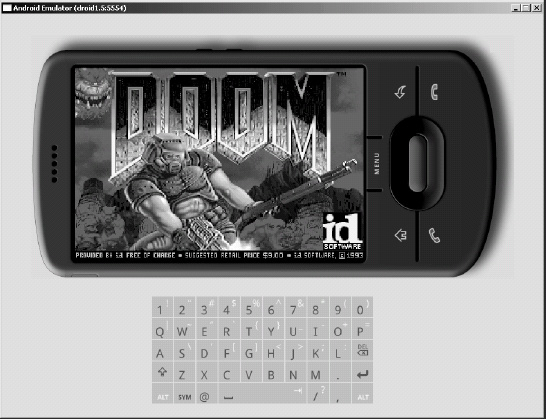
Figure 5–5. Doom running in the Android emulator
Summary
Congratulations! You have seen how easy it is to bring one of the first PC shooters to Android using a mix of Java and the original C engine. We have looked at the complexity of the game and the best way to implement it. We covered the following topics:
- The game architecture, where Java activities and UI XML layouts are glued with C subroutines using JNI native methods and C to Java callbacks
- The main activity, which is the Java class that controls the life cycle of the application, along with a UI layout
- User interface handlers, such as menus and key and touch event handlers, and native callback handlers for graphics initialization, video buffer updates, fatal errors, and audio requests
We have also looked at custom touch screen controls for phones that do not have a keyboard. You saw that the native interface class has callback listeners for clients that wish to receive C to Java callbacks, native methods invoked through JNI to start the game loop and send key and motion event information to the Native library, and C to Java callbacks used to delegate engine messages to the listener activity.
We have looked at the native layer that glues the Java and C code together and provides the native method implementations. Changes to the original code are also required to remove invalid dependencies and insert the C to Java callbacks. Finally, you saw the Makefile required to compile the Native library and the IDE launch configuration to test the game in the emulator.
Using the Java/C power combo, we have brought one of the great PC games, Doom, to the platform. Even though Google is pushing for Java-only development and provides little or no support for native development, Java alone is not the best choice when it comes to advanced mobile gaming. Java-only code works fine for the regular mobile app, but it is not enough for high-performance graphics.
I hope that the material in this book has opened a new frontier for you to explore, and you're excited about the possibility of bringing thousands of PC games to Android—with minimal time and effort.