
Chapter 7
3D Shooters for Quake II
This chapter builds upon the previous one to deliver the next great PC engine: Quake II. What makes this chapter unique is that, thanks to the wonderful reusability of Java and the power of the C language, we will be able to do the following:
- Reuse the thin Java wrappers to the Quake engine from Chapter 6 with no changes whatsoever.
- Keep 99 percent of the native engine intact with the help of NanoGL.
- Make tiny changes to the C code in the remaining 1 percent of the native engine in order to make it Android-friendly.
We'll start by learning how to add set nimble Java wrappers to get the engine running quickly in Android, including game startup, video rendering, and key and audio events. Next, we'll look at an efficient way of dealing with system errors (the ones that can crash you app). Then, the video handler changes required to the native engine. And finally, building the native code and running it in the emulator; as well as a performance test of the engine running on multiple devices at different resolutions.
Reviewing the Code
To get an idea of the amount of work we should save, let's take a look at the number of lines of C code for the engine.
$ find –name “*.[ch]” | xargs wc –l

   1058 ./client/adivtab.h

    181 ./client/anorms.h

     81 ./client/asm_i386.h

    123 ./client/block16.h

    124 ./client/block8.h

26 ./client/cdaudio.h

    584 ./client/client.h

    650 ./client/cl_cin.c
   1543 ./client/cl_ents.c

2298 ./client/cl_fx.c

…

173666 total


$ ref_gl> wc –l *.[ch]

   181 anorms.h

    37 anormtab.h

   416 gl_draw.c

  1590 gl_image.c

   729 gl_light.c

   458 gl_local.h

…

  1756 gl_rmain.c

   248 gl_rmisc.c

  1662 gl_rsurf.c

   662 gl_warp.c

   557 qgl.h

    51 warpsin.h

 10692 total
In the first part, we have about 180,000 total lines of code (including header files); this includes almost 11,000 lines of code for the OpenGL renderer. I've estimated less than 2,000 lines of new code to make the engine Android-friendly. Thus, you will find that we will squeeze a tremendous amount of work—that would have taken a small team of developers several months to complete—into a project that a single guy can complete over a weekend.
Escaping the Shackles of the Java Heap
The Quake II engine is the perfect proof of concept for graphics rendering on a mobile device. Written around 1998, it has the same hardware requirements as a modern smartphone:
- 600 Mhz processor with a powerful GPU
- 80 MB RAM
- 40 MB of disk (for the shareware version), or 100 MB for retail
Believe or not, Quake II is so portable that some guys took the time to bring the game to pure Java 3D: the name of the project is Jake 2 (www.bytonic.de/html/jake2.html). There is even a port of Quake II by Google that runs on a web browser using WebGL. As a matter of fact, when Android was in its infancy, and the NDK didn't even exist, I took a couple of weeks to get Jake 2 to compile on Android's Jalvik VM. It was a lot of hard work just to find out that Java is simply not capable of handling any kind of powerful 3D game engine due to the constraints it imposes on the developer.
When thinking of a project like Jake 2, the key is the amount of RAM required to play the game: 80 MB. This is why there will never be a powerful 3D engine written in Java on Android. The Android Java VM only lets programs allocate a maximum of 16 MB of RAM—and it cannot be changed. As any Java developer knows, on the PC, the size of the heap (or RAM) can be changed at runtime with a simple command line argument. This is not possible in Android. I found this out the hard way when playing with Jake 2. All powerful 3D engines must be written in C/C++; there is simply no way around this.
NOTE: Writing game engines in C/C++ allows the developer to use disk space and RAM in any way he or she chooses, limited only by what the hardware can provide. Java, on the other hand, will shackle you to 16 MB of RAM, from which you cannot escape.
Taming the Mighty Quake II Engine
To make the Quake II engine work seamlessly in Android, we will reuse most of the Java wrappers from Chapter 6. Plus, we'll have to implement custom video and audio handlers for this particular engine. All in all, most of the work will basically consist of the following:
- About 2,000 lines of new C code (for the video an audio handling).
- The Java code from Chapter 6, with tiny changes to make them fit Quake II.
If we dig around the source of both the Quake I and II engines, we realize there is a whole lot of common code between them. Nevertheless, Quake II has been greatly modularized (in comparison to Quake I), consisting of basically the following three separate components:
- The client: In Linux, this is the game executable, dubbed
quake2. - The game library: Quake II was designed to work with a plethora of mission packs, extensible mods, and so forth. By decoupling the game library into a separate component, mod developers can simply create new games by writing a new game library, leaving the other components intact.
- The renderer: Quake II supports two renderer types: software and hardware (using Open GL). In Linux, the renderers are called
ref_soft.sofor software, andref_glx.so(for OpenGL under UNIX/Window). Note that there are multiple OpenGL renderer implementations, each with different names.
This great modularization works wonders on the desktop, where developers simply have to code a new game library and leave the other components intact. In Android (or any mobile platform for that matter), this can be a pain to develop, as the compiler tools are cumbersome (compared to the desktop), plus the way Android loads shared libraries is not the same as in the standard Linux OS. Lucky for us, Quake II can compile all three components as a standalone (hard linked) library. Thus in Android, to make things even easier, we will compile Quake II as a single, hard-linked library dubbed libquake2.so. More details on doing so will be explained in the “Building Quake II with the NDK” section.
Code Reusability
Thanks to the great object-oriented and reusability features of Java, most of the classes from Chapter 6 can be reused without change. There are some tiny changes to the startup class, but besides that, the code is identical. Best of all, this code could be used in any type of native engine, not just Quake I and Quake II. To recap, Table 7-1 lists the Java classes and their tasks.
Most of the native access methods residein the class Natives.java; they are as follows:
- native void QuakeMain(String[] argv): This method calls the Quake II main method. Its job is to convert the Java String arguments (argv) into a C array that can be fed into the engine. It also loads the Natives.java class to fire up callbacks when the native engine needs to send a message back to Java (for example, when a system/fatal error occurs and the application needs to terminate). This method requires no change to work with Quake II.
- native void
RenderFrame(): This native method renders a single frame of the game. We must do so to play nice with the Android OpenGL surface renderer, which uses a separate thread to render one frame at a time. This method requires no change to work with Quake II. - native int
keyPress(int key)andkeyRelease(int key): These two are used to push ASCII keys into the key processor. Note that the Android key codes will be translated into ASCII by the Java wrappers. These methods need to be updated to work with Quake II. - native void
mouseLook(int mouseX, int mouseY): This method is used to look around 3D space when the player sweeps a finger across the screen. It receives delta coordinates for yaw (mouseX), and pitch (mouseY). This method requires no change. - native void
mouseMove(int mouseX, int mouseY): This method is used to move the characters forward or sideways in 3D space. It receives delta coordinates in the XY axis. This method requires no change. - native void
PaintAudio( ByteBuffer buf ): This method reads a byte buffer of audio from the C engine into a Java buffer and writes it into the device audio hardware using Android's MediaTrack API. This method requires no change.
Game Startup
QuakeMain is the function that kicks things off. It starts the Quake II engine with a given array of arguments. The next fragment shows its declaration and Natives.java and C implementation in jni_quake.c.
NOTE: The C implementations for all the native Java methods in Natives.java are located in the project source under ch07.QuakeII/jni/quake2-3.21/android/jni_quake.c.
// Java

package quake.jni;


public class Natives {

  …

  public static native int QuakeMain(String[] argv);

  …

}
// in jni_quake.c

JNIEXPORT jint JNICALL Java_quake_jni_Natives_QuakeMain

(JNIEnv * env, jclass cls, jobjectArray jargv)
Note that the Java string arguments map into a jobjectArray in C, and they must be converted to the standard char *[] format. Fortunately, JNI provides utility functions to do this easily.
- First, get the size of the array.
jsize clen = (*env)->GetArrayLength(env, jargv); - Next, allocate a C array of the same size.
char * args[(int)clen]; - Then, loop through the size value, extracting a Java string from the array, and converting that Java string into a C string with the following.
  int i;

  jstring jrow;

  for (i = 0; i < clen; i++)

  {

      jrow = (jstring)(*env)->GetObjectArrayElement(env, jargv, i);

const char *row = (*env)->GetStringUTFChars(env, jrow, 0); - Then, simply allocate space for the corresponding C string using the
mallocsystem call.args[i] = malloc( strlen(row) + 1);
strcpy (args[i], row);Make sure to release the Java string when done. Failing to do so will create a memory leak.
      // free java string jrow

      (*env)->ReleaseStringUTFChars(env, jrow, row);

} - Finally, invoke Quake II
mainsub with the arguments that we just created.// Invoke Quake's main sub.
main (clen, args);
Rendering a Single Frame
Both the Java and C implementations for RenderFrame are the same as Chapter 6. In Natives.java we declared the native method RenderFrame(), which is implemented as shown in the following fragment:
extern void RenderFrame();


JNIEXPORT jint JNICALL Java_quake_jni_Natives_RenderFrame

  (JNIEnv * env, jclass cls)

{
    RenderFrame();

}
The C keyword extern void RenderFrame() tells the compiler that elsewhere exists a function called RenderFrame, which will be invoked within the JNI implementation. RenderFrame is a new function and needs to be created.
Listing 7–1 shows the Quake II main function from the project source at ch07.QuakeII/jni/quake2-3.21/android/sys_linux.c. We notice that it loops forever (by using a while (1) loop).
Listing 7–1. Quake II Main Function
int main (int argc, char **argv)

{

  int   time, oldtime, newtime;


  // go back to real user for config loads

saved_euid = geteuid();

  seteuid(getuid());


Qcommon_Init(argc, argv);


  nostdout = Cvar_Get("nostdout", "0", 0);

  if (!nostdout->value) {

printf ("Linux Quake -- Version %0.3f
", LINUX_VERSION);

}

  oldtime = Sys_Milliseconds ();


// main render loop

  while (1) {

// find time spent rendering last frame

    do {

      newtime = Sys_Milliseconds ();

      time = newtime - oldtime;

    } while (time < 1);

    Qcommon_Frame (time);

    oldtime = newtime;

   }

}
This infinite loop does not work well with Android because Android's rendering thread already has a loop of its own. Calling an infinite loop within another loop will deadlock the rendering thread and make your application crash. Therefore, we must comment the infinite loop. We can also see that within the loop, one frame is rendered at a time using Qcommon_Frame(time). This is what we need; we can just extract what is inside this loop and put it in RenderFrame(). Thus, the code in Listing 7–1 becomes the code in Listing 7–2.
Listing 7–2. Modified Quake II Main Function to Render a Single Frame
void RenderFrame()

{

  int   time, newtime;

  static int oldtime;


  // Init this var
  if (oldtime == 0 )

    oldtime = Sys_Milliseconds ();


  do {

    newtime = Sys_Milliseconds ();

    time = newtime - oldtime;

  } while (time < 1);

  Qcommon_Frame (time);

  oldtime = newtime;

}


int main (int argc, char **argv)

{

// …

// main render loop?

#ifndef ANDROID

  while (1) {

// find time spent rendering last frame

    do {

      newtime = Sys_Milliseconds ();

      time = newtime - oldtime;

    } while (time < 1);

    Qcommon_Frame (time);

    oldtime = newtime;

   }

#endif

}
What we have done is simply extract whatever is inside the while loop and put it in RenderFrame() to render a single frame. Also notice that we use conditional compilation:
#ifndef ANDROID

  while (1) {

  …

  }

#endif
#ifndef ANDROID tells the compiler to include the enclosed code only if the flag ANDROID has not been defined at compilation time. This creates portability and allows the same code to work in multiple Linux flavors. Therefore, this tiny change allows the following sequence of events to occur seamlessly:
- When the application starts, the main activity will start (Java).
- The activity will create an OpenGL surface and start a separate rendering thread (Java).
- When the surface is first created, the
QuakeMainnative method will be invoked only once, which will in turn call the Quake II main function (Java/C) passing game startup arguments. - The rendering thread will loop continuously, firing the render frame event—which will invoke the native function
RenderFrameto draw a single frame of the game. - After the single frame rendering completes, Android will invoke the OpenGL swap buffers operation to display the graphics on the device and the process will resume back from step 4 until the user decides to terminate the program.
Now that we have the rendering smoothed, let's tackle key events.
Pumping Key Events
Keys are sent from the Java wrappers to the C engine via the native functions: keyPress and keyRelease declared in quake.jni.Natives.java. Both functions have as an argument the ASCII code of the key, which must be translated from the Android key format. The translation is identical to Chapter 6 under the “Handling Key Events” section, where we used an array of key mappings between Android codes and ASCII codes. The tricky part is dealing with all the different keyboard layouts of the dozens of keyboard-equipped phones out there. Nevertheless, the C implementations of keyPress and keyRelease need a tiny change to feed the key to the Quake II engine handler, as shown in Listing 7–3.
Listing 7–3. Key Handlers for Quake II Java Wrappers
// in jni_quake.c

JNIEXPORT jint JNICALL Java_quake_jni_Natives_keyPress

  (JNIEnv * env, jclass cls, jint key)

{

  Key_Event((int)key, 1);

  return key;

}


JNIEXPORT jint JNICALL Java_quake_jni_Natives_keyRelease

  (JNIEnv * env, jclass cls, jint key)

{

  Key_Event((int)key, 0);

  return key;

}
Listing 7–3 shows the parameter key, which must be an ASCII code—and I wish to stress this because failing to translate the key properly will make all kinds of weird things happen and cause you a lot of headaches—being fed to the Quake II key handler:
Key_Event((int)key, 1);
The first argument of Key_Event is the ASCII code, and the second is a Boolean variable where 1 means key pressed and 0 means key released.
Moving in 3D Space
When moving a Quake II character in 3D space, we have four choices: moving forwards, moving sideways, and the ability to look around by controlling the yaw (or angular movement in the X coordinate) or pitch (angular movement in the Y coordinate). To do so, there are two native methods in Natives.java:
mouseMove controls forward or sideways movement by feeding XY increments (or deltas) to the Quake II engine. mouseLook does the same thing with yaw and pitch increments. The C companions for mouseMove and mouseLook are identical to Quake I in Chapter 6; however, Quake II requires a movement handler that must be implemented. This handler is called IN_Move and it is shown in Listing 7–4.
Listing 7–4. Moving in 3D Space
// jni_quake.c

// forwards/sideways deltas

extern int   mouse_side, mouse_fwd;


// Yaw/pitch deltas

extern int   mx, my;


JNIEXPORT jint JNICALL Java_quake_jni_Natives_mouseLook

  (JNIEnv * env, jclass cls, jint mousex, jint mousey)

{

  mx = (int)mousex;

  my = (int)mousey;

}


extern int   mouse_side, mouse_fwd;


JNIEXPORT jint JNICALL Java_quake_jni_Natives_mouseMove

  (JNIEnv * env, jclass cls, jint jx, jint jy)

{

  mouse_side = (int)jx;

  mouse_fwd = (int)jy;

}


// vid_so.c

int mouse_side = 0;

int mouse_fwd = 0;

int mx, my; // mouse look


void IN_Move (usercmd_t *cmd)

{

  old_mouse_x = mx;

  old_mouse_y = my;


  mx *= 3; //sensitivity

  my *= 3; //sensitivity


  // Look: yaw/pitch

  in_state.viewangles[YAW] -= m_yaw->value * mx;

  in_state.viewangles[PITCH] += m_pitch->value * my;

  mx = my = 0;


  // Move

  cmd->sidemove += m_side->value * mouse_side;

  cmd->forwardmove -= m_forward->value * mouse_fwd;


}
IN_Move is the Quake II input handler for movement. For forward or side movement, IN_Move provides the command structure usercmd_t *cmd, which can be used to control the character by consuming two delta values in the XY coordinates:
cmd->sidemove += m_side->value * DELTA_X;

cmd->forwardmove -= m_forward->value * DELTA_Y;
DELTA_X and DELTA_Y are the increments in the XY direction provided by Java when the user drags a finger on screen. m_side and m_forward are two internal constants used to control the sensitivity of the movement, and cmd->sidemove and cmd->forwardmove are the internal variables that contain the actual character position on 3D space. Note that to move forward in the Quake I/II 3D space coordinate system, the increments in the Y axis must be negative. This is the inverse of dragging a finger up the screen, which provides a positive increment.
To control yaw and pitch, on the other hand, we provide another set of increments in XY, but in this case we use the Quake II view angles data structure (in_state.viewangles):
in_state.viewangles[YAW] -= m_yaw->value * DELTA_X;

in_state.viewangles[PITCH] += m_pitch->value * DEALTA_Y;
By providing an increment in the X coordinate, we can control the yaw or side angular movement, thus making our character look sideways. An increment in the Y coordinate will result in pitch change or up/down angular movement. As before, m_yaw and m_pitch are two internal constants used to control sensitivity, and viewangles[YAW] and viewangles[PITCH] contain the actual angular values.
TIP: It is up to you as a developer to decide how to control the forward/sideways or yaw/pitch Java and C handlers. For example, dragging a finger on the left half of the screen could trigger the side movement handlers, and dragging on the right half could trigger the look handlers.
Audio Handling
Audio handling in Quake II works the same way as in Chapter 6. In the Java class NativeAudio, declare a native method PaintAudio that receives a ByteBuffer as argument:
static native PaintAudio( ByteBuffer buf )
The Java ByteBuffer represents an array of audio bytes to be played using Android's MediaTrack API. Listing 7–5 shows the C implementation of this function; it simply gets the memory address of the Java buffer using GetDirectBufferAddress plus its size (with GetDirectBufferCapacity ), then it calls the external function paint_audio to fill it up. paint_audio is the same as in Quake I and it is defined in snd_android.c; however, the audio initialization is slightly different.
NOTE:jni_quake.c and snd_android.c can be found on the book source under ch07.QuakeII/jni/quake2-3.21/android.
Listing 7–5. Java/C Audio Handlers
// jni_quake.c

extern int paint_audio (void *unused, void * stream, int len);


JNIEXPORT jint JNICALL Java_quake_jni_Natives_PaintAudio

 ( JNIEnv* env, jobject thiz, jobject buf )

{

  void *stream;

  int len;


  stream = (*env)->GetDirectBufferAddress(env,  buf);

  len = (*env)->GetDirectBufferCapacity (env, buf);


  paint_audio (NULL, stream, len );

  return 0;

}


// snd_android.c

qboolean SNDDMA_Init(void)

{

  // most of the wav files are 16 bits, 22050 Hz, stereo

  dma.samplebits = 16;

  dma.speed = 22050;

  dma.channels = 2;


  LOGD("SNDDMA_Init Speed %d channels %d", dma.speed, dma.channels);


  dmapos = 0;


  // Sample size

  dma.samples = 32768;

  dma.samplepos = 0;

  dma.submission_chunk = 1;


  dmasize = (dma.samples * (dma.samplebits/8));

  dma.buffer = calloc(1, dmasize);


  snd_inited = 1;

  return 1;

}
Audio initialization in Listing 7–5 consists of telling Quake II information about its format, such as:
- Resolution: 16 bit
- Frequency: 22 kHz
- Number of channels: 2 for stereo
- Buffer size
For this purpose, Quake II defines the audio data structure dma as:
// snd_loc.h

typedef struct

{

  int     channels;

  int     samples;        // mono samples in buffer

  int     submission_chunk;   // don't mix less than this #

  int     samplepos;        // in mono samples

  int     samplebits;

  int     speed;

  byte    *buffer;

} dma_t;


extern  dma_t dma;
When Quake II starts, it will call SNDDMA_Init to initialize the audio, and the following sequence of events will take place to quick off the audio playback:
- When the user starts the game, the Java native method
QuakeMainwill be invoked, which will translate the array of Java string arguments into a C array and pass them to the Quake II engine. - Quake II will startup, process the arguments, and at some point call
SNDDMA_Init. - Once the audio and video are initialized, the C to Java callback
jni_init_videowill be called to send a message to the Java wrappers that video is ready. At this point, the Java code will start the audio thread declared inNativeAudio.javaby invokingNativeAudio.start(). - Audio playback will start.
The jni_init_video callback is explained in detail in the section on video handling.
What to Do When Fatal Errors Occur
The user needs to be notified when a fatal error such as a crash or missing resource occurs. For this purpose, we can use JNI to invoke a Java method such as:
OnSysError(final String message)
This method could pop up a dialog box to notify the user of the error, and then terminate the program. Listing 7–6 presents such an implementation.
Listing 7–6. Handling Fatal Errors
// sys_linux.c

void Sys_Error (char *error, ...)

{

  va_list     argptr;

  char        string[1024];


  CL_Shutdown ();

  Qcommon_Shutdown ();
  va_start (argptr,error);

  vsprintf (string,error,argptr);

  va_end (argptr);


  jni_sys_error(string);

}


// jni_quake.c

void jni_sys_error(const char * text) {

  JNIEnv *env;


  if ( !g_VM) {

    LOGE("jni_fatal No Java VM available. Aborting
");

    exit (0);

  }


  (*g_VM)->AttachCurrentThread (g_VM, &env, NULL);


  // need a valid environment and class

  if ( !env || !jNativesCls) {

    return;

  }


  jmethodID mid = (*env)->GetStaticMethodID(env, jNativesCls

    , "OnSysError"

    , "(Ljava/lang/String;)V");


  // invoke Natives.OnSysError(text)

  if (mid) {

      (*env)->CallStaticVoidMethod(env, jNativesCls

          , mid

          , (*env)->NewStringUTF(env, text) );

  }

}
Whenever a fatal error occurs, Quake II will call Sys_Error with a description of the error. The client will be shut down and the arguments will be packed into a string and sent to the C to Java callback jni_sys_error:
  va_start (argptr,error);

  vsprintf (string,error,argptr);

  va_end (argptr);


  jni_sys_error(string);
jni_sys_error will then:
- Attach to the current thread by calling
AttachCurrentThread.NOTE: C functions that are not invoked from a JNI implementation performing JNI API calls must attach to the current thread by calling
: (*g_VM)->AttachCurrentThread (g_VM, &env, NULL). - Load the static method OnSysError from the
quake.jni.NativesJava class with the signature:(Ljava/lang/String;)VLjava/lang/String;simply says there is one argument of type java.lang.String. The V tells the return type is of type void. It is critical to get the signature right otherwise GetStaticMethodID won't be able to find the - Invoke the method with the string argument. Note that C strings must be converted into Java string using
NewStringUTF(env, C_CHAR_ARRAY).
Listing 7–7 shows the error handler in action. The JNI function QuakeMain starts printing the boot-up arguments and calling the engine main function. Quake II then initializes the audio and video, but fails to find a valid game file, so it bails out.
Listing 7–7. Error Log Showing Missing Game Files
DEBUG/QuakeActivity(841): Display Size:800,480

DEBUG/QuakeView(841): Setting startup args & renderer

INFO/ActivityManager(72): Displayed com.opengl.q2/com.opengl.QuakeActivity: +2s542ms

DEBUG/QuakeView(841): onSurfaceCreated

DEBUG/Q2JNI(841): Q2Main[0]=quake2

DEBUG/Q2JNI(841): Q2Main[1]=+set

DEBUG/Q2JNI(841): Q2Main[2]=basedir

DEBUG/Q2JNI(841): Q2Main[3]=/sdcard/quake2

DEBUG/Q2JNI(841): Q2Main[4]=+set

DEBUG/Q2JNI(841): Q2Main[5]=skill

DEBUG/Q2JNI(841): Q2Main[6]=0

DEBUG/Q2JNI(841): Q2Main[7]=+set

DEBUG/Q2JNI(841): Q2Main[8]=nocdaudio

DEBUG/Q2JNI(841): Q2Main[9]=1

DEBUG/Q2JNI(841): Q2Main[10]=+set

DEBUG/Q2JNI(841): Q2Main[11]=cd_nocd

DEBUG/Q2JNI(841): Q2Main[12]=1

DEBUG/Q2JNI(841): Q2Main[13]=+set

DEBUG/Q2JNI(841): Q2Main[14]=s_initsound

DEBUG/Q2JNI(841): Q2Main[15]=1

DEBUG/Q2JNI(841): Q2Main[16]=+set

DEBUG/Q2JNI(841): Q2Main[17]=vid_ref

DEBUG/Q2JNI(841): Q2Main[18]=glx

DEBUG/Q2JNI(841): Q2Main[19]=+set

DEBUG/Q2JNI(841): Q2Main[20]=gl_mode

DEBUG/Q2JNI(841): Q2Main[21]=4

DEBUG/Q2JNI(841): couldn't exec default.cfg

DEBUG/Q2JNI(841): couldn't exec config.cfg

DEBUG/Q2JNI(841): basedir is write protected.

DEBUG/Q2JNI(841): Console initialized.

DEBUG/Q2JNI(841): ------- sound initialization -------

DEBUG/QSound(841): SNDDMA_Init Speed 22050 channels 2

DEBUG/Q2JNI(841): sound sampling rate: 22050

DEBUG/Q2JNI(841): ------------------------------------

DEBUG/Q2JNI(841): ref_gl version: GL 0.01

DEBUG/Q2JNI(841): SDL audio device shut down.

ERROR/Natives(841): Natives::OnSysError Couldn't load pics/colormap.pcx

ERROR/QuakeView(841): Couldn't load pics/colormap.pcx
Sys_Error gets invoked, which in turn calls jni_sys_error, which sends the message back to the Java QuakeView class that terminates the program. Of course, you should pop up a message box to the user telling him about the error before terminating the program.
ERROR/Natives(841): Natives::OnSysError Couldn't load pics/colormap.pcx

ERROR/QuakeView(841): Couldn't load pics/colormap.pcx
OpenGL Immediate Mode Issues
Before we start digging into the video handlers, I'd like to stress the tremendous amount of work saved in this project by reusing NanoGL to deal with the immediate mode headaches of OpenGL. As shown at the beginning of this chapter, Quake II's OpenGL renderer is about 11,000 lines of very difficult C code. All this code would have been translated into OpenGL ES and taken months of pro bono work by a team of many developers. Now all that work is reduced to a few weekend hours by one dude. Keep this wonderful software tool in mind when you decide to bring other projects to your mobile device, as NanoGL can be reused without change by any mobile program.
Video Handlers
Video handlers are probably the most laborious part of this project. Any Quake II video handler must implement six handler functions. Of the lot, only the following three will require actual implementations, the rest will be just empty declarations:
GLimp_Init( void *hinstance, void *hWnd ): This function is used to initialize the OpenGL renderer. The arguments hinstance and hWnd are Windows-only variables and do not apply in the Android/Linux world.GLimp_SetMode( int *pwidth, int *pheight, int mode, qboolean fullscreen ): This function is used to set the video mode of the game, including the width and, height of the screen. The argumentfullscreendoes not apply in our case.GLimp_EndFrame (): This function gets called after the rendering of each frame completes. It is meant to tell the OpenGL ES pipeline it is time to draw.
The following video functions are called from various points of the drawing cycle and must be declared, but don't apply to our project, thus will be empty:
GLimp_Shutdown( ): Called when the OpenGL renderer is shut down. It can fire many times during the life cycle of the game.GLimp_BeginFrame( float camera_separation ): Called before each frame of the game is drawn.GLimp_AppActivate( qboolean active ): Called once when the application is activated.
Video Initialization
During video initialization, we load the NanoGL handlers and tell the engine the renderer is ready to perform OpenGL calls, as shown in Listing 7–8.
Listing 7–8. Video Initialization
// gl_glx.c

static qboolean gl_initialized = false;


int GLimp_Init( void *hinstance, void *wndproc )

{

  if ( ! gl_initialized ) {

    //  init NanoGL

    if ( ! nanoGL_Init() ) {

      return false;

    }

    gl_initialized = true;

  }

  return true;

}
Because Quake II allows switching screen resolutions and renderers on the fly, GLimp_Init may fire more than once during the game life cycle; thus we must make sure initialization occurs only once.
Setting the Video Mode and Size
The Quake II OpenGL renderer video resolution is calculated from the command line by sending the arguments:
+ set gl_mode MODE_NUMBER
Where MODE-NUMBER maps to an array of screen resolutions (see Listing 7–9). For example, gl_mode 3 tells the engine to use a 569 × 320 video resolution. If the video mode is not specified at startup, the default value is 3.
Listing 7–9. Setting the Video Mode
// vid_so.c

typedef struct vidmode_s

{

  const char *description;

  int         width, height;

int         mode;

} vidmode_t;


vidmode_t vid_modes[] =

{

#ifdef ANDROID

  { "Mode 0: 256x256",   256, 256,   0 },

  { "Mode 1: 320x320",   320, 320,   1 },

  { "Mode 2: 480x320",   480, 320,   2 },

  { "Mode 3: 569x320",   569, 320,   3 },
  { "Mode 4: 800x480",   800, 480,   4 },

#else

  ...

#endif

};


// gl_glx.c

int GLimp_SetMode( int *pwidth, int *pheight, int mode, qboolean fullscreen )

{


  if ( !ri.Vid_GetModeInfo( &width, &height, mode ) )

  {

    ri.Con_Printf( PRINT_ALL, " invalid mode
" );

    return rserr_invalid_mode;

  }


  ri.Con_Printf( PRINT_ALL, " %d %d
", width, height );


  *pwidth = width;

  *pheight = height;


  // let the sound and input subsystems know about the new window

  ri.Vid_NewWindow (width, height);


  return rserr_ok;

}


// vid_so.c

qboolean VID_GetModeInfo( int *width, int *height, int mode )

{

  if ( mode < 0 || mode >= VID_NUM_MODES )

return false;


  *width  = vid_modes[mode].width;

  *height = vid_modes[mode].height;


  return true;

}


/**

* VID_NewWindow

*/

void VID_NewWindow ( int width, int height)

{

  viddef.width  = width;

  viddef.height = height;


  //tell java  about it

  jni_init_video (width, height);

}
For Android, we have defined a set of resolutions that include all possible sizes for the different types of Android devices out there:
#ifdef ANDROID

  { "Mode 0: 256x256",   256, 256,   0 },

  { "Mode 1: 320x320",   320, 320,   1 },

  { "Mode 2: 480x320",   480, 320,   2 },
  { "Mode 3: 569x320",   569, 320,   3 },

  { "Mode 4: 800x480",   800, 480,   4 },

…

#endif
When the Quake II engine starts up, GLimp_SetMode will be invoked. Here, we must get the screen resolution by calling
ri.Vid_GetModeInfo( &width, &height, mode )
where width and height are references that will store the size of the screen, and mode is the gl_mode argument sent in the command line. Note that ri.Vid_GetModeInfo is nothing more than a function pointer that references the real Vid_GetModeInfo function declared in vid_so.c:
ri.Vid_GetModeInfo = Vid_GetModeInfo
This is done because, as we mentioned at the beginning of the chapter, Quake II has been greatly modularized, and in the default configuration—where the client, game, and renderer are compiled in separate libraries—functions can be called across libraries. This makes the code very complex, but the benefits are well worth it: very easy to maintain and enhance. Vid_GetModeInfo simply uses the value of mode to look up the video modes table (vid_modes) and obtain the size of the screen:
  *width  = vid_modes[mode].width;

  *height = vid_modes[mode].height;
Once the screen size is received, GLimp_SetMode sends the information back to the parent and tells the other subsystems that a new window has been created:
  *pwidth = width;

  *pheight = height;

  // let the sound and input subsystems know about the new window

  ri.Vid_NewWindow (width, height);
In Android, VID_NewWindow, will update the video definition with the screen values and call the C to Java callback jni_init_video:
  viddef.width  = width;

  viddef.height = height;


  //tell java  about it

  jni_init_video (width, height);
jni_init_video will, in turn, invoke the Java static method OnInitVideo declared in quake.jni.Natives.java with the width and height of the screen:
// jni_quake.c

  jmethodID mid = (*env)->GetStaticMethodID(env, jNativesCls

      , "OnInitVideo"

      , "(II)V");


  if (mid) {

      (*env)->CallStaticVoidMethod(env, jNativesCls, mid, width, height);

  }
Note that the jni_init_video implementation is the same as Quake I in Chapter 6. Finally, OnInitVideo will call the listener OnInitVideo (QuakeView in this case), which will start the Java audio thread and start audio playback. Thus, the video initialization call stack can be summarized as follows:
GLimp_SetMode(width, height, mode) – CVid_GetModeInfo(width, height, mode) – CVid_NewWindow(width, height) -Cjni_init_video(width, height) – C/JNIOnInitVideo(width, height) – JavaQuakeView(width, height) – JavaNativeAudio.start()– Java
What to Do When the Rendering Completes
This is the last step in the rendering cycle. GLimp_EndFrame will fire after each frame of the game is rendered. Here we issue a qglFlush call, which causes all issued OpenGL commands to be executed as quickly as they are accepted by the actual rendering pipeline:
// gl_glx.c

void GLimp_EndFrame (void)

{

  qglFlush();

}
Now we are ready to build the engine and start laying Quake II in our mobile device.
Building Quake II with the NDK
The final step is to get the native code compiled into libquake2.so before we can start testing in our device. In the project source (under ch07.QuakeII/jni), we have three files that drive the compilation process: Application.mk, Android.mk, and hardlinkedq2gl.mk. Application.mk defines what modules are to be compiled. In our case, quake2 (as libquake2.so), and NanoGL (from Chapter 6), which will be compiled as a static library and embedded within libquake2.so:
# Application.mk

APP_BUILD_SCRIPT := $(call my-dir)/Android.mk

APP_MODULES      := quake2 NanoGL
Android.mk simply includes the real compilation script hardlinkedq2gl.mk. This is done because of a really annoying Android peculiarity: if you need to update the compilation script Android.mk (if you missed a compiler option, for example), then the compilation process will start from the beginning all over again. This can drive you crazy when you try to compile libraries with dozens and dozens of source files—especially in slow systems.
TIP: By including another script within Android.mk, the compilation process will resume from the last file whenever updates are performed to the included script.
In hardlinkedq2gl.mk, we build NanoGL as a static library first. Note that the source code lives in Chapter 6.
# hardlinkedq2gl.mk

LOCAL_PATH := $(call my-dir)


include $(CLEAR_VARS)


DIR:= ../../ch06.Quake/jni/Quake/NanoGL


LOCAL_MODULE    := NanoGL

LOCAL_C_INCLUDES := ../ch06.Quake/jni/Quake/NanoGL/GL

LOCAL_SRC_FILES := $(DIR)/eglwrap.cpp $(DIR)/nanogl.cpp

        $(DIR)/nanoWrap.cpp


include $(BUILD_STATIC_LIBRARY)
Next, we build Quake II as a shared library (libquake2.so, see Listing 7–10). Note the following compiler options:
-DANDROID: It tells the compiler to use the custom Android code declared throughout the engine.-DGLQUAKE: It tells the compiler to build the OpenGL renderer-DLIBQUAKE2: It tells the compiler to use custom Quake II code.-Dstricmp=strcasecmp: It replaces all occurrences ofstricmpwithstrcasecmpfor string comparison. Some Linux C-library implementations don't includestricmp.-DREF_HARD_LINKED: This is a critical option. It tells the compiler to pack the renderer and client modules as a single monolithic file. This makes the build/debug/run process much simpler in mobile platforms.-DGAME_HARD_LINKED: Another critical option. It tells the compiler to include the game module in the pack.
Listing 7–10. Quake II Android Compilation Script
# hardlinkedq2gl.mk

BUILDDIR:=quake2-3.21


include $(CLEAR_VARS)


LOCAL_MODULE := quake2


COMMON_CFLAGS :=-DANDROID -DGLQUAKE -DLIBQUAKE2 -Dstricmp=strcasecmp
LOCAL_CFLAGS := $(COMMON_CFLAGS) -DREF_HARD_LINKED -DGAME_HARD_LINKED

LOCAL_C_INCLUDES := $(COMMON_C_INCLUDES) ../ch06.Quake/jni/Quake/NanoGL

LOCAL_LDLIBS := -llog -ldl

LOCAL_STATIC_LIBRARIES := libNanoGL


# Q2 client

QUAKE2_OBJS :=

  $(BUILDDIR)/client/cl_cin.c

  $(BUILDDIR)/client/cl_ents.c

  $(BUILDDIR)/client/cl_fx.c

  $(BUILDDIR)/client/cl_input.c

  $(BUILDDIR)/android/vid_so.c

  ....

  $(BUILDDIR)/android/sys_linux.c


# Game

CGAME_SRC :=

  $(BUILDDIR)/game/q_shared.c

  $(BUILDDIR)/game/g_ai.c

  $(BUILDDIR)/game/p_client.c

  ...

  $(BUILDDIR)/game/p_trail.c

  $(BUILDDIR)/game/p_view.c

  $(BUILDDIR)/game/p_weapon.c


# OpenGL renderer

REF_FILES :=

  $(BUILDDIR)/ref_gl/gl_draw.c

  $(BUILDDIR)/ref_gl/gl_image.c

  $(BUILDDIR)/ref_gl/gl_light.c

  $(BUILDDIR)/ref_gl/gl_mesh.c

  $(BUILDDIR)/ref_gl/gl_model.c

  $(BUILDDIR)/ref_gl/gl_rmain.c

  $(BUILDDIR)/ref_gl/gl_rmisc.c

  $(BUILDDIR)/ref_gl/gl_rsurf.c

  $(BUILDDIR)/ref_gl/gl_warp.c

  $(BUILDDIR)/linux/qgl_linux.c

  $(BUILDDIR)/android/gl_glx.c


LOCAL_SRC_FILES := $(QUAKE2_OBJS) $(CGAME_SRC) $(REF_FILES)


include $(BUILD_SHARED_LIBRARY)
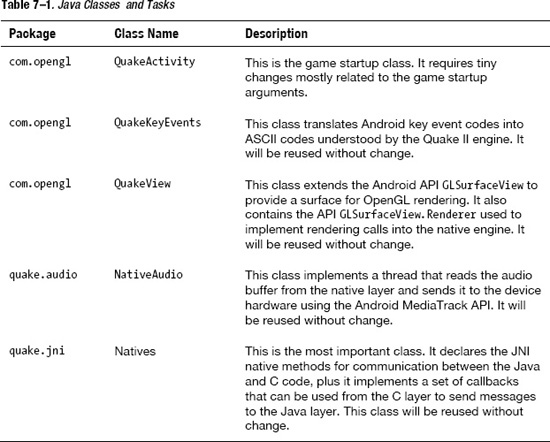
To run the compilation process in Windows using Cygwin, start the Cygwin console, change to the folder containing the chapter source (see Figure 7–1), and invoke the Android build script ndk-build:
$ cd ch07.QuakeII

$ ndk-build
Figure 7–1. Compiling Quake II with the NDK
The native library libquake2.so will be created under the Java project ch07.QuakeII/libs/armeabi/libquake2.so. Thus when the Java app starts, the QuakeView class will invoke
System.load("quake2")
This will load the native library and provide access to the JNI methods and the C to Java callbacks used by the Java code. Now let's play some Quake II.
Running on the Device or Emulator
With the native library compiled and ready for use, we can now run the game in the emulator; but first, connect your device/tablet or run an emulator, then create a run configuration in Eclipse, as shown in Figure 7–2.
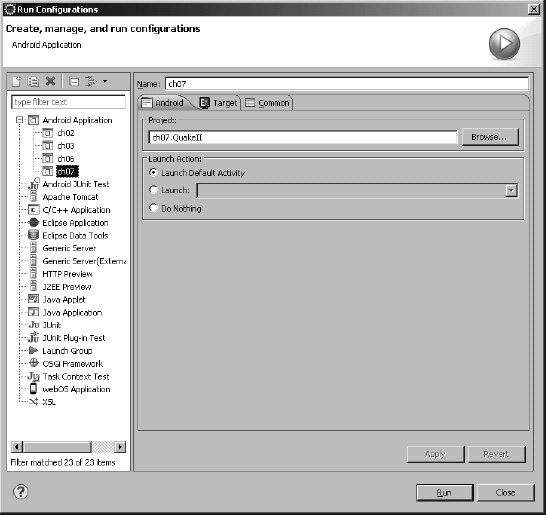
Figure 7–2. Run configuration for Quake II
Before running the game, make sure you put the Quake II game files in your device SDCard under
/sdcard/quake2/baseq2
Run the game and look at the Android log carefully. It should look something like Listing 7–11.
Listing 7–11. Quake II Run Log File
DEBUG/QuakeActivity(569): Display Size:800,480

DEBUG/QuakeView(569): Setting startup args & renderer

INFO/ActivityManager(72): Displayed com.opengl.q2/com.opengl.QuakeActivity: +3s469ms

DEBUG/QuakeView(569): onSurfaceCreated

DEBUG/Q2JNI(569): Q2Main[0]=quake2

DEBUG/Q2JNI(569): Q2Main[1]=+set

DEBUG/Q2JNI(569): Q2Main[2]=basedir

DEBUG/Q2JNI(569): Q2Main[3]=/sdcard/quake2

DEBUG/Q2JNI(569): Q2Main[4]=+set

DEBUG/Q2JNI(569): Q2Main[5]=skill

DEBUG/Q2JNI(569): Q2Main[6]=0
DEBUG/Q2JNI(569): Q2Main[7]=+set

DEBUG/Q2JNI(569): Q2Main[8]=nocdaudio

DEBUG/Q2JNI(569): Q2Main[9]=1

DEBUG/Q2JNI(569): Q2Main[10]=+set

DEBUG/Q2JNI(569): Q2Main[11]=cd_nocd

DEBUG/Q2JNI(569): Q2Main[12]=1

DEBUG/Q2JNI(569): Q2Main[13]=+set

DEBUG/Q2JNI(569): Q2Main[14]=s_initsound

DEBUG/Q2JNI(569): Q2Main[15]=1

DEBUG/Q2JNI(569): Q2Main[16]=+set

DEBUG/Q2JNI(569): Q2Main[17]=vid_ref

DEBUG/Q2JNI(569): Q2Main[18]=glx

DEBUG/Q2JNI(569): Q2Main[19]=+set

DEBUG/Q2JNI(569): Q2Main[20]=gl_mode

DEBUG/Q2JNI(569): Q2Main[21]=4

DEBUG/Q2JNI(569): Added packfile /sdcard/quake2/baseq2/pak0.pak (1106 files)

DEBUG/Q2JNI(569): execing default.cfg

DEBUG/Q2JNI(569): couldn't exec config.cfg

DEBUG/Q2JNI(569): basedir is write protected.

DEBUG/Q2JNI(569): Console initialized.

DEBUG/Q2JNI(569): ------- sound initialization -------

DEBUG/QSound(569): SNDDMA_Init Speed 22050 channels 2

DEBUG/Q2JNI(569): sound sampling rate: 22050

DEBUG/Q2JNI(569): ------------------------------------

DEBUG/Q2JNI(569): ref_gl version: GL 0.01

DEBUG/Q2JNI(569): QGL_Init:

INFO/nanoGL(569): nanoGL: Init loading driver libGLESv1_CM.so

WARN/nanoGL(569): <eglChooseConfig> not found in libGLESv1_CM.so. Trying libEGL.so.

WARN/nanoGL(569): <eglCopyBuffers> not found in libGLESv1_CM.so. Trying libEGL.so.

WARN/nanoGL(569): <eglCreateContext> not found in libGLESv1_CM.so. Trying libEGL.so.

WARN/nanoGL(569): <eglCreatePbufferSurface> not found in libGLESv1_CM.so. Trying libEGL.so.

…

WARN/nanoGL(569): <eglBindTexImage> not found in libGLESv1_CM.so. Trying libEGL.so.

WARN/nanoGL(569): <eglReleaseTexImage> not found in libGLESv1_CM.so. Trying libEGL.so.

WARN/nanoGL(569): <eglSurfaceAttrib> not found in libGLESv1_CM.so. Trying libEGL.so.

DEBUG/Q2JNI(569): Initializing OpenGL display

DEBUG/Q2JNI(569): ...setting fullscreen mode 4:

DEBUG/Q2JNI(569):  800 480

DEBUG/QuakeView(569): OnInitVideo. 800x480 Starting native audio.

DEBUG/Q2JNI(569): GL_VENDOR: Google Inc

DEBUG/Q2JNI(569): GL_RENDERER: Android Pixel Flinger 1.0

DEBUG/Q2JNI(569): GL_VERSION: OpenGL ES-CM 1.0

DEBUG/Q2JNI(569): ...disabling CDS

DEBUG/Q2JNI(569): ...GL_EXT_compiled_vertex_array not found

DEBUG/Q2JNI(569): ...GL_EXT_point_parameters not found

DEBUG/Q2JNI(569): ...GL_EXT_shared_texture_palette not found

DEBUG/Q2JNI(569): ...GL_ARB_multitexture not found

DEBUG/Q2JNI(569): ...GL_SGIS_multitexture not found

DEBUG/Audio(569): Audio start.

DEBUG/Q2JNI(569): ------------------------------------

DEBUG/Q2JNI(569): ------- Server Initialization -------

DEBUG/Q2JNI(569): 0 entities inhibited

DEBUG/Q2JNI(569): 0 teams with 0 entities

DEBUG/Q2JNI(569): -------------------------------------

DEBUG/Q2JNI(569): ====== Quake2 Initialized ======

DEBUG/QuakeView(569): onSurfaceChanged w=800 h=404
DEBUG/Q2JNI(569): 0.0.0.0:0: client_connect

DEBUG/Q2JNI(569):

DEBUG/Q2JNI(569): Installation

DEBUG/Q2JNI(569): Map: demo2

DEBUG/Q2JNI(569): pics

DEBUG/Q2JNI(569): maps/demo2.bsp

DEBUG/Q2JNI(569): models/weapons/v_blast/tris.md2

DEBUG/Q2JNI(569): models/objects/gibs/sm_meat/tris.md2

DEBUG/Q2JNI(569): models/objects/gibs/arm/tris.md2

DEBUG/Q2JNI(569): models/objects/debris3/tris.md2

DEBUG/Q2JNI(569): models/objects/barrels/tris.md2

DEBUG/Q2JNI(569): models/monsters/tank/tris.md2

DEBUG/Q2JNI(569): models/weapons/v_shotg/tris.md2

DEBUG/Q2JNI(569): images
As soon as the game starts up, you should be able to the game in action (see Figure 7–3).
Figure 7–3. Quake II running at a 800 480 pixel resolution
If any errors occur, they will be displayed in the Eclipse Android log view. Take a look at the “What to Do When Fatal Errors Occur” section for details.
Quake II Performance on Multiple Devices
To bring the proceedings to a close, I have created a little performance test of the Quake II engine in multiple generation devices (see Figure 7–4).
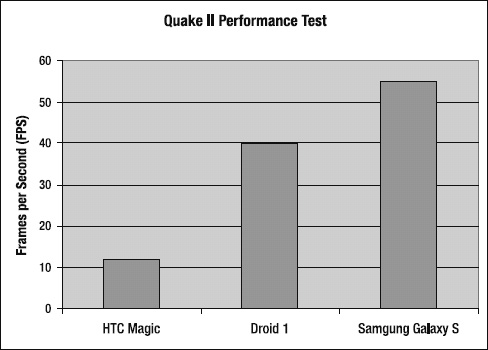
Figure 7–4. Quake II performance test
I have used three different devices for this test:
- HTC Magic: This is a first-generation device with a 480 MHz processor, 150 MB of RAM, and 8 GB SDCard, and a Qualcomm GPU.
- Motorola Droid 1: The quintessential Android device from Motorola, with a 600 MHz processor, 250 MB of RAM, 16 GB of SDCard, and the superb PowerVR GPU.
- Samsung Galaxy S: A powerful, third-generation device from Samsung. It has a powerful 1 GHz processor, 250 MB of RAM, plenty of SDCard space, and a very powerful GPU.
The graph in Figure 7–4 shows the number of frames per second (FPS) of the game using the OpenGL renderer running on each device. As we can see, first-generation devices such as the HTC Magic (at 12 FPS) are simply not capable of running a powerful sucker like Quake II. The Motorola Droid 1, on the other hand, is more than capable of running the game at around 40 FPS. I am pretty sure this is possible thanks to the amazing PowerVR GPU that's inside—same as the iPhone. Finally, the Samsung Galaxy S, a really powerful device, blasts at around 55 FPS. This test clearly shows that Quake II performs astonishingly in second-generation or later Androids.
Summary
This is it. You have learned how engines such as Quake I, II, and Doom can be brought to your smartphone in record time by making use of the best that Android can offer:
- Code reusability: By combing the raw power of C/C++ with the elegant object-oriented features of Java, you can have your games up and running in no time. This is particularly useful if you are building for other platforms, such as iOS, RIM, or Palm.
- JNI: The Java Native Interface is what makes all of this possible. It let's you break free of the memory and performance constraints of the Java language, thus reducing development time and costs.
- Powerful APIS for game development: This includes hardware-accelerated graphics with OpenGL, audio handling independent of the format, keyboard handling, and single/multi-touch capabilities; plus Bluetooth for external controller support.
My goal in this book has been to show you that even though Java is the primary development language for Android, hybrid Java/C development is the only way to develop powerful games. I have done this by featuring three powerful engines that can be run in a mobile device: Doom and Quake I and II.
The Green Robot has taken off with a vengeance, and I hope my book is just what you need to quickly get up and running to build cutting-edge games. To all Android developers out there, the future of the platform is in your hands.