Chapter 3
More Gaming Tricks with OpenGL and JNI
Chapter 2 provided a great introduction to some basic gaming techniques for Android, including handling Audio/Video, I/O Events, and Bluetooth controllers. Now it's time to ramp things up a notch.
In this chapter, you will learn a neat trick to mix OpenGL code in Java and C. This is a key step in reusing large portions of OpenGL C code along with Java code, thus using the best features of each language for maximum savings in time and costs.
Any game developer knows that OpenGL is the holy grail of advanced game development. You won't find any powerful games that are not written with this API, because it takes advantage of hardware acceleration, which is infinitely superior to any kind of software renderer.
OpenGL can be a scary subject to the newcomer due to its complexity. But you don't have to be an OpenGL guru to understand what it does and how to draw elements with this API. All you need is the desire to learn a powerful and exciting tool for gaming.
The goal of this chapter is not to teach you OpenGL (a whole book wouldn't be enough for that), but to show you how you can take the Android OpenGL sample provided by Google and modify it in a completely different way by mixing OpenGL API calls in both Java and native C for maximum reusability.
Some may say this is simply another OpenGL chapter for a mobile device (dime a dozen, right?). Well, it is not. This chapter presents a technique for OpenGL in Android that is unique, and at the time of this writing, not available anywhere in the Android sphere (on the Web). This is a technique I stumbled on by accident when thinking about porting the game Quake to Android. In a nutshell, the technique consists of creating the OpenGL context, display, and surface objects in Java, and performing all drawing operations natively in C. At the end of the rendering cycle, a JNI callback is used by the C engine to tell the Java side to swap the buffers (render the image). The cycle then repeats itself. This technique is extremely useful when you have a 200,000-line code game like Quake, and rewriting this code in Java is simply not feasible (an introduction to this method is given in the section OpenGL the Native Way and explained thoroughly in the later chapter Doom for Android).
The chapter starts by examining the OpenGL tumbling cubes sample to expose how OpenGL works in Java. Next, we will look at how sections of the rendering process can be implemented in the native layer, and how everything is bound by JNI. The final section discusses some of the limitations of the OpenGL Embedded System when it comes to advanced 3D games. And, as is the previous chapter, all material discussed within this one is Android 4 compatible.
Let's get started.
Need An OpenGL Refresher?
The Power of Mobile Devices
Mobile Android devices have become pretty powerful for graphics development. Check out the following hardware stats for the Samsung Galaxy S:
- ARM processor running at 1 GHz
- Graphics processing unit (GPU) with 256KB of RAM
- 320×480 pixel display
To make good use of the GPU, Google has included the OpenGL Embedded System (ES) within Android. OpenGL ES provides the software API to make high-performance, hardware-accelerated games possible. This is a Java API, which is good news for Java developers who wish to create 3D games from scratch, but bad news for C developers who wish to reuse 3D engines written in C. 3D game engines are very complex and large, and are mostly written in C. Rewriting these engines in Java would be a very difficult task, consuming significant development and time resources.
Consider how easy it is to reuse OpenGL code in C. Let's look at another powerful smartphone: Apple's iPhone. If you search the iPhone App Store (or the Web), you will find that dozens of OpenGL-based 3D games have already been ported to the platform, including some of the greatest 3D shooters for the PC: Wolfenstein 3D, Doom, and Quake I. Even Quake III Arena—a game that has extremely advanced 3D graphics for a mobile device—has been ported! What do all these games have in common? They are written in C. Furthermore, Apple provides a C toolchain that makes it easy to have the games running in the platform. Clearly, Android is at a big disadvantage in this field. Nevertheless, porting these games to Android is still possible.
Even though Android supports only Java development, the Android OS is built in a stripped version of GNU Linux featuring a C runtime. Using an ARM C toolchain, you can write and compile C code and bind it to Java using JNI.
A Head Start: The Source Code for this Chapter
OpenGL the Java Way
Let's look at how OpenGL graphics are done in Java. We'll start by creating a project for our sample application. Then we'll look at the classes that make up the project: The main activity used to launch the app, the surface view used to render graphics, the GL thread used to perform drawing operations in the background, the cube renderer used to draw the actual cube, and the cube class which has information such as dimensions, color, and others.
Creating a Project
For this exploration, let's create a project to hold the GL tumbling cubes application from the Android samples.
Here is how:
- Click the New Android Project button.
- In the New Android Project dialog box, enter a project name, such as
ch03.OpenGL. Click Next. - Specify the build target (Android 4 in this case). Click next.
- Enter an application name, such as Ch03.OpenGL.
- Enter a package name, such as
opengl.test. - Select Create Activity and enter
JavaGLActivity. - Specify the minimum SDK version as 14 for Android 4. Figure 3–1 shows all the wizard dialogs for this example.
- Click Finish.
NOTE: The original sample code will be modified to fit the changes described throughout this chapter.
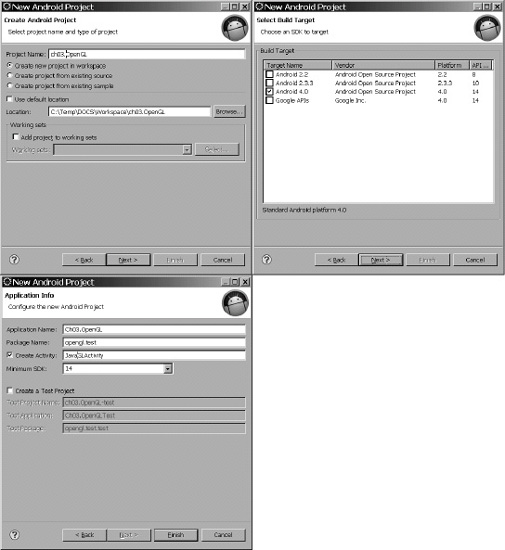
Figure 3–1. New Android project for the OpenGL sample
The Android cubes sample consists of the following Java classes (see Figure 3–2):
GLSurfaceView: This is an implementation ofSurfaceViewthat uses a dedicated surface for displaying an OpenGL animation. The animation will run in a separate thread (GLThread).GLThread: This is a generic thread with a loop for GL operations. Its job is to perform resource initialization. It also delegates rendering to an instance of theRendererinterface.Renderer: This is a generic interface for rendering objects. In this case, we will be rendering two tumbling cubes.EglHelper: This is a GL helper class used to do the following:- Initialize the EGL context.
- Create the GL surface.
- Swap buffers (perform the actual drawing).
CubeRenderer: This is an implementation of theRendererinterface to draw the cubes.Cube: This class encapsulates a GL cube, including vertices, colors, and indices for each face.
Because the sample needs to be slightly modified to illustrate the concepts of the chapter, the following classes have been added for this purpose:
JavaGLActivity: This is the Android activity that will start the Java-only version of the application.NativeGLActivity: This activity will start the hybrid version of the sample (with Java/C/JNI code).Natives: This class defines the native methods used by this sample.
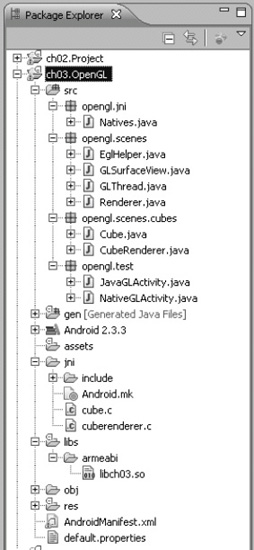
Figure 3–2. Resource list for the OpenGL sample
The Android manifest needs to be updated to include the new activities defined in the previous paragraph, as shown in bold in Listing 3–1.
Listing 3–1. Manifest File for This Chapter's Example
<?xml version="1.0" encoding="utf-8"?>

<manifest xmlns:android="http://schemas.android.com/apk/res/android"

      package="opengl.test"

      android:versionCode="1"

      android:versionName="1.0">

   <application android:icon="@drawable/icon"

        android:label="@string/app_name">

        <activity android:name=".JavaGLActivity"
                  android:label="OpenGL Java">

            <intent-filter>

                <action android:name="android.intent.action.MAIN" />

                <category android:name="android.intent.category.LAUNCHER" />

            </intent-filter>

        </activity>

        <activity android:name=".NativeGLActivity"

                  android:label="OpenGL Native">

            <intent-filter>

                <action android:name="android.intent.action.MAIN" />

                <category android:name="android.intent.category.LAUNCHER" />

            </intent-filter>

        </activity>

    </application>

    uses-sdk android:minSdkVersion="3" />

</manifest>
The following lines tell Android to create two application launchers in the device launchpad, one for each of the activities OpenGL Java and OpenGL Native:
<action android:name="android.intent.action.MAIN" />

<category android:name="android.intent.category.LAUNCHER" />
Let's start with the Java-only implementation. Figure 3–3 defines the basic workflow of the OpenGL application. The figure shows the main activity (JavaGLActivity), which creates the rendering surface (GLSurfaceView). The surface creates a renderer (CubeRenderer) which contains a thread (GLThread). GLThread in turn contains the loop that invokes the renderer draw() method that draws the tumbling cubes seen on the device display.
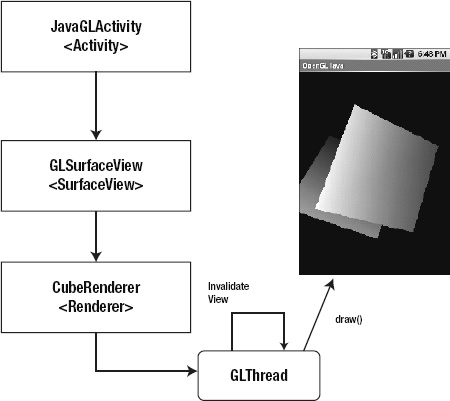
Figure 3–3. Workflow of the Java-only cubes sample
Java Main Activity
When the user starts the application, the JavaGLActivity.onCreate() method will be called (see Listing 3–2). Here is where the surface view (mGLSurfaceView) is initialized and set as the application content:
mGLSurfaceView = new GLSurfaceView(this);

mGLSurfaceView.setRenderer(new CubeRenderer(true));

setContentView(mGLSurfaceView);
Note that the GL surface view must use a renderer (CubeRenderer in this case), which implements the Renderer interface and takes a Boolean argument indicating if a translucent background should be used.
Listing 3–2. Main Activity for the Java-Only Version of the GL Cubes Sample
package opengl.test;


import opengl.scenes.GLSurfaceView;

import opengl.scenes.cubes.CubeRenderer;

import android.app.Activity;

import android.os.Bundle;


public class JavaGLActivity extends Activity

{

    private GLSurfaceView mGLSurfaceView;

    /** Called when the activity is first created. */

    @Override

    public void onCreate(Bundle savedInstanceState) {

        super.onCreate(savedInstanceState);


        mGLSurfaceView = new GLSurfaceView(this);


        try {

            mGLSurfaceView.setRenderer(new CubeRenderer(true));

            setContentView(mGLSurfaceView);


        } catch (Exception e) {

            e.printStackTrace();

        }

    }


    @Override

    protected void onPause() {

        // Ideally a game should implement onResume() and onPause()

        // to take appropriate action when the activity loses focus

        super.onPause();

        mGLSurfaceView.onPause();

    }


    @Override

    protected void onResume() {

        super.onResume();

        mGLSurfaceView.onResume();

    }

}
When the application loses focus or resumes, the onPause() or onResume() method will be called, respectively. These methods delegate to the surface view (GLSurfaceView) to take the appropriate action, such as saving application state or suspending/resuming the rendering process.
Surface View
The class GLSurfaceView (see Listing 3–3) defines the surface where the tumbling cubes animation will take place. The class constructor starts by initializing a callback to receive notifications when the surface is changed, created, or destroyed:
        mHolder = getHolder();

        mHolder.addCallback(this);

        mHolder.setType(SurfaceHolder.SURFACE_TYPE_GPU);
By implementing SurfaceHolder.Callback and calling SurfaceHolder.addCallback(), the class will receive the events:
surfaceCreated(SurfaceHolder holder): This is called immediately after the surface is first created. In this case, the surface delegates to the inner threadGLThread.surfaceCreated().surfaceDestroyed(SurfaceHolder holder): This method is called immediately before a surface is being destroyed. After returning from this call, the surface should not be accessed. In this case, the method delegates to the rendering threadGLThread.surfaceDestroyed().surfaceChanged(SurfaceHolder holder, int format, int w, int h): This method is called immediately after any structural changes (format or size) have been made to the surface. Here is where you tell the inner thread that the size has changed. This method is always called at least once, aftersurfaceCreated(). The second argument of this method (format) is the pixel format of the graphics defined in thePixelFormatclass.
Listing 3–3. Surface View for the GL Cubes Sample
package opengl.scenes;


import opengl.jni.Natives;

import android.content.Context;

import android.util.AttributeSet;

import android.view.SurfaceHolder;

import android.view.SurfaceView;


/**

 * An implementation of SurfaceView that uses the dedicated surface for

 * displaying an OpenGL animation. This allows the animation to run in a

 * separate thread, without requiring that it be driven by the update

 * mechanism of the view hierarchy.

 *

 * The application-specific rendering code is delegated to a GLView.Renderer

 * instance.

 */

public class GLSurfaceView extends SurfaceView

  implements  SurfaceHolder.Callback

{

    public GLSurfaceView(Context context) {

        super(context);

        init();

    }


    public GLSurfaceView(Context context, AttributeSet attrs) {

        super(context, attrs);

        init();

    }


    private void init() {

        // Install a SurfaceHolder.Callback so we get notified when the

        // underlying surface is created and destroyed

        mHolder = getHolder();

        mHolder.addCallback(this);

        mHolder.setType(SurfaceHolder.SURFACE_TYPE_GPU);

    }


    public SurfaceHolder getSurfaceHolder() {

        return mHolder;
    }


    public void setRenderer(Renderer renderer) {

        mGLThread = new GLThread(renderer, mHolder);

        mGLThread.start();

    }


    public void surfaceCreated(SurfaceHolder holder) {

        mGLThread.surfaceCreated();

    }


    public void surfaceDestroyed(SurfaceHolder holder) {

        // Surface will be destroyed when we return

        mGLThread.surfaceDestroyed();

    }


    public void surfaceChanged(SurfaceHolder holder, int format, int w,

            int h) {

        // Surface size or format has changed. This should not happen in

        // this example.

        mGLThread.onWindowResize(w, h);

    }


    /**

     * Inform the view that the activity is paused.

     */

    public void onPause() {

        mGLThread.onPause();

    }


    /**

     * Inform the view that the activity is resumed.

     */

    public void onResume() {

        mGLThread.onResume();

    }


    /**

     * Inform the view that the window focus has changed.

     */

    @Override

    public void onWindowFocusChanged(boolean hasFocus) {

        super.onWindowFocusChanged(hasFocus);

        mGLThread.onWindowFocusChanged(hasFocus);

    }

    /**

     * Queue an "event" to be run on the GL rendering thread.

     *

     * @param r

     *            the runnable to be run on the GL rendering thread.

     */

    public void queueEvent(Runnable r) {

        mGLThread.queueEvent(r);

    }


    @Override

    protected void onDetachedFromWindow() {

        super.onDetachedFromWindow();
        mGLThread.requestExitAndWait();

    }


    private SurfaceHolder mHolder;

    private GLThread mGLThread;


}
Other important methods in the surface view include the following:
setRenderer(): This method creates the inner thread that does all the work and starts it. The thread keeps a reference to the surface holder available by callinggetHolder().public void setRenderer(Renderer renderer) {
mGLThread = new GLThread(renderer, mHolder);
mGLThread.start();
}queueEvent(Runnable r): This method sends an event to be run by the inner thread.onDetachedFromWindow(): This method is called when the view is detached from a window. At this point, it no longer has a surface for drawing.
The surface view provides the drawing canvas for the next component: the GL thread. A thread is required to perform tasks in the background thus offloading processing time from the main application thread to make the application run seamlessly. Let's see what it does.
GL Thread
The main loop of the animation is performed by GLThread. When started, this thread performs the following steps:
- It creates a semaphore:
sEglSemaphore.acquire();

guardedRun();   // Only 1 thread can access this code

sEglSemaphore.release(); - It runs the critical animation loop. Within the loop, the actual drawing is delegated to the
CubeRenderer. - When asked to quit, the loops terminates, and the OpenGL resources are released.
NOTE: A semaphore is an object often used to restrict the number of threads that can access the OpenGL context. When the Android framework launches a second instance of an activity, the new instance's onCreate() method may be called before the first instance returns from onDestroy(). A semaphore ensures that only one instance at a time accesses the GL API. We must do this because OpenGL is a single-threaded API (which means that only one thread can access the GLContext at a time).
Listing 3–4 shows a fragment of the GLThread class taken from the GL cubes sample. When the thread starts, the run() method will be invoked, and a semaphore used to ensure that guardedRun() can be accessed by one thread only. guardedRun() performs other important steps, such as the following:
- Initialize the Embedded OpenGL (EGL) for a given configuration specification. The configuration specification defines information, such as pixel format and image depth.
- Create the OpenGL surface and tell the renderer about it.
- Check if the size of the surface has changed and tell the renderer about it.
- Queue and get events to be run on the GL rendering thread.
Listing 3–4. Rendering Thread for the GL Cubes Sample
package opengl.scenes;


// …


/**

 * A generic GL Thread. Takes care of initializing EGL and GL.

 * Delegates to a Renderer instance to do the actual drawing.

*/

public class GLThread extends Thread

{

    public GLThread(Renderer renderer, SurfaceHolder holder) {

        super();

        mDone = false;

        mWidth = 0;

        mHeight = 0;

        mRenderer = renderer;

        mHolder = holder;

        setName("GLThread");

    }


@Override

    public void run() {

        try {

            try {

                sEglSemaphore.acquire();

            } catch (InterruptedException e) {

                return;
            }

            guardedRun();

        } catch (Exception ex) {

            ex.printStackTrace();

        } finally {

            sEglSemaphore.release();

        }

    }


    private void guardedRun() throws InterruptedException {

        mEglHelper = new EglHelper();


         // Specify a configuration for our OpenGL session

        int[] configSpec = mRenderer.getConfigSpec();

        mEglHelper.start(configSpec);


        GL10 gl = null;

        boolean tellRendererSurfaceCreated = true;

        boolean tellRendererSurfaceChanged = true;


         // This is our main activity thread's loop,

        while (!mDone) {


             // Update the asynchronous state (window size)

            int w, h;

            boolean changed;

            boolean needStart = false;

            synchronized (this) {

                Runnable r;

                while ((r = getEvent()) != null) {

                    r.run();

                }

                if (mPaused) {

                    mEglHelper.finish();

                    needStart = true;

                }

                if (needToWait()) {

                    while (needToWait()) {

                        wait();

                    }

                }

                if (mDone) {

                    break;

                }

                changed = mSizeChanged;

                w = mWidth;

                h = mHeight;

                mSizeChanged = false;

            }

            if (needStart) {

                mEglHelper.start(configSpec);

                tellRendererSurfaceCreated = true;

                changed = true;

            }

            if (changed) {

                // Create the surface

                gl = (GL10) mEglHelper.createSurface(mHolder);

                tellRendererSurfaceChanged = true;
            }

            if (tellRendererSurfaceCreated) {

                mRenderer.surfaceCreated(gl);

                tellRendererSurfaceCreated = false;

            }

            if (tellRendererSurfaceChanged) {

                mRenderer.sizeChanged(gl, w, h);

                tellRendererSurfaceChanged = false;

            }

            if ((w > 0) && (h > 0)) {

                /* draw a frame here */

                mRenderer.drawFrame(gl);


                 // Call swapBuffers() to instruct the system to display

                mEglHelper.swap();

            }

        }


         // Clean up...

        mEglHelper.finish();

    }


    // …

    private static final Semaphore sEglSemaphore = new Semaphore(1);

    private EglHelper mEglHelper;

}
The GL thread will make use of the next two sections: The cube renderer to perform drawing, rotation, and positioning operations on the cube, and the cube class which has information about the cube itself. Let's look at the renderer in more detail.
Cube Renderer
CubeRenderer is the class that renders the pair of tumbling cubes (see Listing 3–5). It implements the Renderer interface and does some very interesting things.
The void drawFrame(GL10 gl) method does the actual drawing and gets called many times per second. The method starts by setting the matrix mode to GL_MODELVIEW. This essentially says to render things in a 3D perspective (model view). Next, it clears all screen buffers by calling glLoadIdentity().
        gl.glMatrixMode(GL10.GL_MODELVIEW);

        gl.glLoadIdentity();
Next, the perspective is translated in the z axis by three units toward the eye viewpoint (also known as the camera):
gl.glTranslatef(0, 0, -3.0f);
The next two instructions tell the pipeline to rotate the perspective in the y and x axes by an angle given in radians (0-6.28, 0 meaning zero degrees, and 6.28, meaning 360 degrees).
        gl.glRotatef(mAngle, 0, 1, 0);

        gl.glRotatef(mAngle * 0.25f, 1, 0, 0);
Next, it requests that vertices and colors be rendered. These are defined within the Cube class:
        gl.glEnableClientState(GL10.GL_VERTEX_ARRAY);

        gl.glEnableClientState(GL10.GL_COLOR_ARRAY);
Then the cube is drawn:
mCube.draw(gl);
The perspective is rotated again in the y and z axes, and translated half a unit away from the eye:
        gl.glRotatef(mAngle * 2.0f, 0, 1, 1);

        gl.glTranslatef(0.5f, 0.5f, 0.5f);
The second cube is drawn, and the angle of rotation is increased for the next iteration.
        mCube.draw(gl);

        mAngle += 1.2f;
The int[] getConfigSpec() method initializes the pixel format and the depth of the display. The pixel format describes the size of the ARGB values used to describe a pixel. The depth indicates the maximum number of colors used. For example, the following integer array requests 32 bits per pixel (ARGB 32bpp) with a depth of 16 (2^16 colors).
int[] configSpec = {

EGL10.EGL_RED_SIZE,      8,

EGL10.EGL_GREEN_SIZE,    8,

EGL10.EGL_BLUE_SIZE,     8,

EGL10.EGL_ALPHA_SIZE,    8,

EGL10.EGL_DEPTH_SIZE,   16,

EGL10.EGL_NONE

};
The following are two other interesting methods in the cube renderer:
voidsizeChanged(GL10 gl, int width, int height): This method fires when the size of the viewport changes. It scales the cubes by setting the ratio of the projection matrix and resizing the viewport.voidsurfaceCreated(GL10 gl): This method fires when the surface is created. Here, some initialization is performed, such as setting a translucent background (if requested) and miscellaneous OpenGL renderer tweaking.
When the code in drawFrame() is executed many times per second, the result is two tumbling cubes (see Figure 3–4).
Listing 3–5. Cube Renderer for the Pair of Tumbling Cubes
package opengl.scenes.cubes;


import javax.microedition.khronos.egl.EGL10;

import javax.microedition.khronos.opengles.GL10;


import opengl.jni.Natives;

import opengl.scenes.Renderer;
/**

 * Render a pair of tumbling cubes.

 */

public class CubeRenderer implements Renderer {


    public CubeRenderer(boolean useTranslucentBackground) {

        mTranslucentBackground = useTranslucentBackground;

        mNativeDraw = nativeDraw;

        mCube = new Cube();

    }


    public void drawFrame(GL10 gl) {

        /*

         * Usually, the first thing one might want to do is to clear

         * the screen. The most efficient way of doing this is

         * to use glClear().

         */

        gl.glClear(GL10.GL_COLOR_BUFFER_BIT | GL10.GL_DEPTH_BUFFER_BIT);


        /*

         * Now we're ready to draw some 3D objects

         */

        gl.glMatrixMode(GL10.GL_MODELVIEW);

gl.glLoadIdentity();

        gl.glTranslatef(0, 0, -3.0f);

        gl.glRotatef(mAngle, 0, 1, 0);

        gl.glRotatef(mAngle * 0.25f, 1, 0, 0);


        gl.glEnableClientState(GL10.GL_VERTEX_ARRAY);

        gl.glEnableClientState(GL10.GL_COLOR_ARRAY);


        mCube.draw(gl);


        gl.glRotatef(mAngle * 2.0f, 0, 1, 1);

        gl.glTranslatef(0.5f, 0.5f, 0.5f);


        mCube.draw(gl);


        mAngle += 1.2f;

    }


    public int[] getConfigSpec() {

        if (mTranslucentBackground) {

            // We want a depth buffer and an alpha buffer

            int[] configSpec = { EGL10.EGL_RED_SIZE, 8,

                    EGL10.EGL_GREEN_SIZE, 8, EGL10.EGL_BLUE_SIZE, 8,

                    EGL10.EGL_ALPHA_SIZE, 8, EGL10.EGL_DEPTH_SIZE, 16,

                    EGL10.EGL_NONE };

            return configSpec;

        } else {

            // We want a depth buffer, don't care about the

            // details of the color buffer.

            int[] configSpec = { EGL10.EGL_DEPTH_SIZE, 16,

                    EGL10.EGL_NONE };

            return configSpec;

        }

    }
    public void sizeChanged(GL10 gl, int width, int height) {

        gl.glViewport(0, 0, width, height);


        /*

         * Set our projection matrix. This doesn't have to be done each time we

         * draw, but usually a new projection needs to be set when the viewport

         * is resized.

         */

        float ratio = (float) width / height;

        gl.glMatrixMode(GL10.GL_PROJECTION);

        gl.glLoadIdentity();

        gl.glFrustumf(-ratio, ratio, -1, 1, 1, 10);

    }


    public void surfaceCreated(GL10 gl) {

        /*

         * By default, OpenGL enables features that improve quality but reduce

         * performance. One might want to tweak that especially on software

         * renderer.

         */

        gl.glDisable(GL10.GL_DITHER);


        /*

         * Some one-time OpenGL initialization can be made here probably based

         * on features of this particular context

         */

        gl.glHint(GL10.GL_PERSPECTIVE_CORRECTION_HINT

           , GL10.GL_FASTEST);

        if (mTranslucentBackground) {

            gl.glClearColor(0, 0, 0, 0.5f);

        } else {

            gl.glClearColor(1, 1, 1, 0.5f);

        }


        gl.glEnable(GL10.GL_CULL_FACE);

        gl.glShadeModel(GL10.GL_SMOOTH);

        gl.glEnable(GL10.GL_DEPTH_TEST);

    }


    private boolean mTranslucentBackground;

    private Cube mCube;

    private float mAngle;

}
The final piece of this puzzle is the cube itself which has information such as dimensions, colors, and others. It works in tandem with the previous two components. Let's see what the cube does.
Cube Class
CubeRenderer delegates drawing to the Cube class (see Listing 3–6). This class defines a 12-sided cube with 8 vertices (8 * x,y,z coordinates ), 32 colors (8 vertices * 4 ARGB values), and 36 indices for the x,y,z coordinates of each side. The class consists of two methods:
Cube(): This is the class constructor. It initializes arrays for the vertices, colors, and indices required to draw. It then uses direct Java buffers to place the data on the native heap, where the garbage collector cannot move them. This is required by thegl*Pointer()API functions that do the actual drawing.draw(): To draw the cube, we simply set the vertices and colors, and issue a call toglDrawElementsusing triangles (GL_TRIANGLES). Note that a cube has 6 faces, 8 vertices, and 12 sides:gl.glVertexPointer(3, GL10.GL_FIXED, 0, mVertexBuffer);
gl.glColorPointer(4, GL10.GL_FIXED, 0, mColorBuffer);
gl.glDrawElements(GL10.GL_TRIANGLES, 36
, GL10.GL_UNSIGNED_BYTE, mIndexBuffer);
Listing 3–6. Cube Class for the GL Cubes Sample
package opengl.scenes.cubes;


import java.nio.ByteBuffer;

import java.nio.ByteOrder;

import java.nio.IntBuffer;

import javax.microedition.khronos.opengles.GL10;


/**

 * A vertex shaded cube.

 */

public class Cube {

    public Cube() {

        int one = 0x10000;

        // 8 vertices each with 3 xyz coordinates

        int vertices[] = { -one, -one, -one

                , one, -one, -one

                , one, one,  -one

                , -one, one, -one

                , -one, -one, one

                , one, -one, one

                , one, one, one

                , -one, one, one };


        // 8 colors each with  4 RGBA values

        int colors[] = { 0, 0, 0, one

                , one, 0, 0, one

                , one, one, 0, one

                , 0, one, 0, one

                , 0, 0, one, one

                , one, 0, one, one

                , one, one, one, one

                , 0, one, one, one};

        // 12 indices each with 3 xyz coordinates

        byte indices[] = { 0, 4, 5, 0, 5, 1, 1, 5, 6, 1, 6, 2, 2, 6, 7,

                2, 7, 3, 3, 7, 4, 3, 4, 0, 4, 7, 6, 4, 6, 5, 3, 0, 1,

                3, 1, 2 };


        ByteBuffer vbb = ByteBuffer.allocateDirect(vertices.length * 4);

        vbb.order(ByteOrder.nativeOrder());
        mVertexBuffer = vbb.asIntBuffer();

        mVertexBuffer.put(vertices);

        mVertexBuffer.position(0);


        ByteBuffer cbb = ByteBuffer.allocateDirect(colors.length * 4);

        cbb.order(ByteOrder.nativeOrder());

        mColorBuffer = cbb.asIntBuffer();

        mColorBuffer.put(colors);

        mColorBuffer.position(0);


        mIndexBuffer = ByteBuffer.allocateDirect(indices.length);

        mIndexBuffer.put(indices);

        mIndexBuffer.position(0);

    }


    public void draw(GL10 gl) {

        gl.glFrontFace(GL10.GL_CW);

        gl.glVertexPointer(3, GL10.GL_FIXED, 0, mVertexBuffer);

        gl.glColorPointer(4, GL10.GL_FIXED, 0, mColorBuffer);

        gl.glDrawElements(GL10.GL_TRIANGLES, 36, GL10.GL_UNSIGNED_BYTE,

                mIndexBuffer);

    }


    private IntBuffer mVertexBuffer;

    private IntBuffer mColorBuffer;

    private ByteBuffer mIndexBuffer;

}
Figure 3–4 shows the sample in action. In the next section, you'll see how portions of this code can be implemented natively.
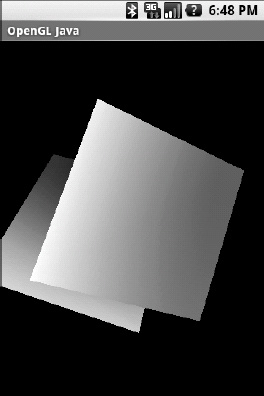
Figure 3–4. Tumbling cubes from the Java sample
OpenGL the Native Way
In the previous section, you saw how a pure Java OpenGL application works from the ground up. This applies if you write an application from scratch in Java. However, if you already have a C OpenGL renderer and wish to interface with Android, you probably don't want to rewrite your application (especially if it has thousands of lines of code). This would consume significant time and resources, and more than likely, give you terrible headache. To understand how you can maximize the return on your investment, let's look at the general steps used to create an OpenGL application:
- Initialization: OpenGL is a single-threaded system that requires a
GLContextto be initialized. Only one thread can access this context at a time. In EGL, this step is subdivided as follows:- Get an EGL instance. In Android, this can be done using the
EGLContextclass:mEgl = EGLContext.getEGL(); - Get a default display. The display is required for the rendering process. In Android, use this call:
mEglDisplay = mEgl.eglGetDisplay(EGL10.EGL_DEFAULT_DISPLAY); - Initialize the display, as follows:
- You must also specify the pixel format and image depth you wish to use. The following requests a 32bpp pixel format with an image depth of 16:
EGLConfig[] configs = new EGLConfig[1];

int[] num_config = new int[1];


int[] configSpec = {

  EGL10.EGL_RED_SIZE,      8,

  EGL10.EGL_GREEN_SIZE,    8,

  EGL10.EGL_BLUE_SIZE,     8,

  EGL10.EGL_ALPHA_SIZE,    8,

  EGL10.EGL_DEPTH_SIZE,   16,

  EGL10.EGL_NONE

};

mEgl.eglChooseConfig(mEglDisplay, configSpec, configs, 1, num_config);
- Get an EGL instance. In Android, this can be done using the
- Main loop: This is usually a user-defined thread that performs or delegates drawing operations.
- Drawing: In the drawing process, a set of GL operations is performed for each iteration of the loop. At the end of each iteration, buffers must be swapped to display the rendered surface on the screen.
- Cleanup: In this step, the
GLContextis destroyed and resources released back to the system.
All these steps can be performed in Java. So it happened that one day I wanted to port an OpenGL-based game to Android written in C, and wondered if some steps could be done in Java and some in C. I was very happy to discover that this is indeed possible. For example, the following steps can be performed in Java within an Android activity:
- Initialization: Get the EGL instance, initialize the default display, and set the pixel format and image depth.
- Main loop: The main loop can be a combination of a Java thread that calls a native game loop. Here is where things get interesting.
NOTE: OpenGL operations can be performed natively after the
GLContextis initialized by an Android activity if, and only if, the native code is loaded by the activity as a shared library through JNI. - Swap buffers: This step can be performed in Java, provided that the native library issues a callback after all GL operations have been completed. This is simply using JNI callbacks and will result in a rendered surface on the screen.
This is great news. You don't need to rewrite large portions of an OpenGL game. You simply need to initialize the GLContext within your Java activity, load the shared library, do all the rendering operations natively, and issue a swap buffers callback to Java on each iteration of the game loop.
Let's apply this concept by rewriting portions of the GL cubes Java sample in C. The portion that will be rewritten is the rendering of the cubes. The rest—initialization, main loop, and swap buffers—will remain in Java. To accomplish this, you must make some simple changes to the sample classes and add a new native activity.
Main Activity
Let's create a new activity (with its own launcher) to load the native code (see Listing 3–7). This activity is almost identical to its Java counterpart, except for the following:
- A native library is loaded using
System.loadLibrary("ch03"). - The
Rendererconstructor has been modified to accept a second Boolean argument (use native rendering):mGLSurfaceView.setRenderer(new CubeRenderer(true, true)). This tells the cube renderer to use a translucent background and native rendering.
Listing 3–7. Native Cubes Activity
package opengl.test;


import opengl.scenes.GLSurfaceView;

import opengl.scenes.cubes.CubeRenderer;

import android.app.Activity;

import android.os.Bundle;


public class NativeGLActivity extends Activity {

    private GLSurfaceView mGLSurfaceView;


    {

        System.loadLibrary(“ch03”);

    }


    /** Called when the activity is first created. */

    @Override

    public void onCreate(Bundle savedInstanceState) {

        super.onCreate(savedInstanceState);


        mGLSurfaceView = new GLSurfaceView(this);


        try {

            mGLSurfaceView.setRenderer(new CubeRenderer(true, true));

            setContentView(mGLSurfaceView);


        } catch (Exception e) {

            e.printStackTrace();

        }

    }
    @Override

    protected void onResume() {

        // Ideally a game should implement onResume() and onPause()

        // to take appropriate action when the activity loses focus

        super.onResume();

        mGLSurfaceView.onResume();

    }


    @Override

    protected void onPause() {

        // Ideally a game should implement onResume() and onPause()

        // to take appropriate action when the activity loses focus

        super.onPause();

        mGLSurfaceView.onPause();

    }

}
These new files will be added to the project and discussed in the following sections (see Figure 3–5):
- Native activity: This is the main entry point to the application. It can be run from its own launcher on the device.
- Native interface class: This is a new Java class that contains the native methods to be invoked within the renderer thread.
- Native cube renderer (
cuberenderer.c): This is the C equivalent ofCubeRenderer.java. It initializes the scene and draws a frame. It also contains all the JNI callbacks. - Native cube (
cube.c): This file is equivalent toCube.java; it draws the cube.
TIP: The native files cube.c and cuberenerer.c are available in the project source under ch03.OpenGL/jni.
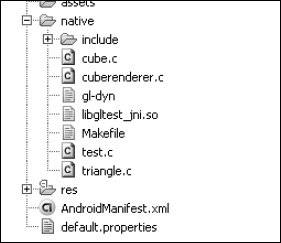
Figure 3–5. GL native cubes sample file layout.
The main activity is the first component of the native version of the tumbling cubes, but we also need a native interface class to provide a two-way communication pipeline with the native library loaded by the main activity. This new interface is described in the following section.
Native Interface Class
The native interface class defines native methods to be invoked within the application thread (see Listing 3–8). It includes one native method and one callback:
static native intNativeRender(): This is the actual native method that will render the cube. It is implemented natively in C and executed through JNI.static void GLSwapBuffers(): This is a callback invoked within the native layer to request a buffer swap (render it). For this sample, this method will not be actually invoked (as the loop is defined in Java), but it could be useful in other situations (when the main loop is implemented natively).
TIP: As you may know, using JNI, you can invoke C functions from Java. You may not know that you can also load classes and invoke Java methods within C.
Listing 3–8. Native Interface for the GL Cubes Sample
package opengl.jni;


public class Natives {


    private static EventListener listener;


    public static interface EventListener {

        void OnMessage(String text);

        void GLSwapBuffers();

    }


    public static void setListener(EventListener l) {

        listener = l;

    }


    /**

     * Native Render test

     *

     * @return

     */

    public static native int NativeRender();


    @SuppressWarnings("unused")

    private static void GLSwapBuffers() {

        if (listener != null)

            listener.GLSwapBuffers();

    }

}
This class needs a way to notify components (the activity, for example) that some message has been received from the native layer. You do this by creating the interface EventListener. In this way, a class that wants to receive messages must implement EventListener and issue a call to Natives.setListener(this).
Before we jump to the C code, let's take a look at the Java changes required to the classes CubeRenderer, GLSurfaceView, and GLThread for the sample.
Changes to the Original Sample
The class CubeRenderer has been modified to accept a Boolean argument in its constructor to request a native draw (see Listing 3–9).
Listing 3–9. Changes for CubeRenderer Class (highlighted in bold)
public class CubeRenderer implements Renderer

{

    private boolean mNativeDraw = false;


    public CubeRenderer(boolean useTranslucentBackground,

            boolean nativeDraw
)

    {

        mTranslucentBackground = useTranslucentBackground;

        mNativeDraw = nativeDraw;
        mCube = new Cube();

    }


    public void drawFrame(GL10 gl) {

        if (mNativeDraw) {

            doNativeDraw();

                 }

        else {

                 doJavaDraw(gl);

                }

    }


    private void doJavaDraw(GL10 gl) {

        // Same as before

        // ...

    }


    public void doNativeDraw() {

        Natives.NativeRender();

    }


    // ...

}
When drawFrame() is invoked and mNativeDraw is true, the cube will be rendered from C (by calling Natives.NativeRender()). Otherwise, the Java implementation will be used.
When the surface is created, and a renderer is set for that surface using GLSurfaceView.setRenderer(Renderer renderer), you must tell the native interface class (Natives.java) that you wish to listen for messages by sending a reference to the loop thread:
public void setRenderer(Renderer renderer) {

    mGLThread = new GLThread(renderer, mHolder);

    mGLThread.start();

    Natives.setListener(mGLThread);

}
Note that GLThread must implement Natives.EventListener for this to work.
Finally, the last class to be updated is GLThread (see Listing 3–10), which contains the main loop.
Listing 3–10. Changes for GLThread.java
public class GLThread extends Thread implements EventListener

{

    // ...

    @Override

    public void GLSwapBuffers() {

        if ( mEglHelper != null ) {

            mEglHelper.swap();

        }

    }

}
GLThread implements EventListener. This allows the C code to send text messages if something is wrong. The method GLSwapBuffers() will be invoked when the C code requests a buffer swap.
This takes care of the Java portion of the sample. Now let's look at the C files: cuberenderer.c and cube.c.
Native Cube Renderer
The native cube renderer (cuberenderer.c) is similar to the Java class CubeRenderer. This file performs the following tasks (see Listings 3–11 through 3–14):
- It initializes the scene. This function is almost identical to
CubeRenderer.surfaceCreated(). - It draws a frame using the
drawFrame()function. This function is similar in nature toCubeRenderer.drawFrame(). - It contains the Java callback
jni_gl_swap_buffers () whichwill invoke a Java methodto request a buffer swap within Java. - It contains the native implementation of the native interface class
opengl.jni.Natives.NativeRender(mapped in C asJava_opengl_jni_Natives_NativeRender). This function will be invoked every time a frame is rendered from theGLThreadJava class.
These tasks are discussed in the following four sections.
Scene Initialization
Scene initialization is performed by the init_scene() function (see Listing 3–11). Its job is to perform trivial GL initialization calls, such as setting a perspective correction hint, background color, and shade model, and in this case, enabling face culling and depth tests.
init_scene() is meant to mirror the Java method CubeRenderer.surfaceCreated, which initializes the scene after the surface is created. Note that Java lines such as gl.glDisable(GL10.GL_DITHER) become glDisable(GL_DITHER). Because the context is already initialized in Java, you can simply make the GL commands you need in the equivalent C function.
Listing 3–11. Scene Initialization from cuberenderer.c
#include <stdlib.h>

#include <stdio.h>

#include <stdarg.h>

#include <string.h>

#include <math.h>


#include <EGL/egl.h>

#include <GLES/gl.h>

#include <GLES/glext.h>


#include "include/opengl_jni_Natives.h"


#define ONE  1.0f

#define FIXED_ONE 0x10000


// Prototypes

void jni_printf(char *format, ...);

void jni_gl_swap_buffers ();


// Rotation Angle

static float mAngle = 0.0;


extern void Cube_draw();


static void init_scene(void)

{

        glDisable(GL_DITHER);


        /*

         * Some one-time OpenGL initialization can be made here

         * probably based on features of this particular context

        */

        glHint(GL_PERSPECTIVE_CORRECTION_HINT,GL_FASTEST);


        glClearColor(.5f, .5f, .5f, 1);


        glEnable(GL_CULL_FACE);

        glShadeModel(GL_SMOOTH);

        glEnable(GL_DEPTH_TEST);

}
Drawing Frames
Drawing the actual frames is performed by the drawFrame() function. This function performs the following steps:
- It clears the screen via
glClear(). - It sets the framework to draw 3D objects via the
glMatrixMode(GL_MODELVIEW)system call. - It performs an initial translation—a rotation to be applied to the first cube.
- It draws the first cube by calling
Cube_draw(). Note that vertices and colors must be enabled viaglEnableClientState(). - It performs a second rotation/translation and draws a second cube by calling
Cube_draw()again. - It increases the angle for the next interaction.
drawFrame() is meant to mirror the Java method CubeRenderer.drawFrame(), which includes the code in the next fragment:
        gl.glClear(GL10.GL_COLOR_BUFFER_BIT | GL10.GL_DEPTH_BUFFER_BIT);

        gl.glMatrixMode(GL10.GL_MODELVIEW);

        gl.glLoadIdentity();

        gl.glTranslatef(0, 0, -3.0f);

        gl.glRotatef(mAngle,        0, 1, 0);

        gl.glRotatef(mAngle*0.25f,  1, 0, 0);


        gl.glEnableClientState(GL10.GL_VERTEX_ARRAY);

        gl.glEnableClientState(GL10.GL_COLOR_ARRAY);


        mCube.draw(gl);


        gl.glRotatef(mAngle*2.0f, 0, 1, 1);

        gl.glTranslatef(0.5f, 0.5f, 0.5f);


        mCube.draw(gl);


        mAngle += 1.2f;
In C, the preceding code simply becomes the following:
        glDisable(GL_DITHER);


        glTexEnvx(GL_TEXTURE_ENV,

              GL_TEXTURE_ENV_MODE,GL_MODULATE);

        glClear(GL_COLOR_BUFFER_BIT | GL_DEPTH_BUFFER_BIT);


        glMatrixMode(GL_MODELVIEW);

        glLoadIdentity();
        glTranslatef(0, 0, -3.0f);

        glRotatef(mAngle,        0, 0, 1.0f);

        glRotatef(mAngle*0.25f,  1, 0, 0);


        glEnableClientState(GL_VERTEX_ARRAY);

        glEnableClientState(GL_COLOR_ARRAY);


        Cube_draw();


        glRotatef(mAngle*2.0f, 0, 1, 1);

        glTranslatef(0.5f, 0.5f, 0.5f);


        Cube_draw();


        mAngle += 1.2f;
Note that drawFrame() is defined as static, which tells the compiler that this function will be visible only by functions within cuberenderer.c (a bit similar to the private keyword in Java). Furthermore, the function Cube_draw() is implemented in cube.c.
Listing 3–12. Drawing Frames from cuberenderer.c
static void drawFrame()

{

        /*

         * By default, OpenGL enables features that improve quality

         * but reduce performance. One might want to tweak that

         * especially on software renderer.

         */

        glDisable(GL_DITHER);

        glTexEnvx(GL_TEXTURE_ENV,

              GL_TEXTURE_ENV_MODE,GL_MODULATE);


        /*

         * Usually, the first thing one might want to do is to clear

         * the screen. The most efficient way of doing this is to use

         * glClear().

         */

        glClear(GL_COLOR_BUFFER_BIT | GL_DEPTH_BUFFER_BIT);


        /*

         * Now we're ready to draw some 3D objects

         */

        glMatrixMode(GL_MODELVIEW);

        glLoadIdentity();


        glTranslatef(0, 0, -3.0f);

        glRotatef(mAngle,        0, 0, 1.0f);

        glRotatef(mAngle*0.25f,  1, 0, 0);


        glEnableClientState(GL_VERTEX_ARRAY);

        glEnableClientState(GL_COLOR_ARRAY);


        Cube_draw();


        glRotatef(mAngle*2.0f, 0, 1, 1);

        glTranslatef(0.5f, 0.5f, 0.5f);
        Cube_draw();


        mAngle += 1.2f;

}
Java Callback
A Java callback is used to send messages from the native layer to the Java layer (see Listing 3–13). The cube renderer implements the callback:jni_gl_swap_buffers (). This callback tells Java that it is time to swap the OpenGL buffers. In OpenGL lingo, that means render the graphics. This step must be performed at the end of each frame of the rendering loop. The callback implementation is similar to the previous one. The main difference is that it invokes the Java method opengl.jni.Natives.GLSwapBuffers ().
Listing 3–13. Java Callbacks from cuberenderer.c
// Java Natives class reference

static jclass jNativesCls;

static JavaVM *g_VM;


void jni_gl_swap_buffers () {

    JNIEnv *env;


    if ( !g_VM) {

        return;

    }


    (*g_VM)->AttachCurrentThread (g_VM, (void **) &env, NULL);


    if ( !jNativesCls ) {

        jNativesCls = (*env)->FindClass(env, "opengl/jni/Natives");


    }

    if ( jNativesCls == 0 ) {

            return;

    }


    // Call opengl.jni.Natives.GLSwapBuffers ()

    jmethodID mid = (*env)->GetStaticMethodID(env, jNativesCls

            , "GLSwapBuffers"

            , "()V");


    if (mid) {

        (*env)->CallStaticVoidMethod(env, jNativesCls

                , mid

                );

    }

}


/**

 * Printf into the java layer

 * does a varargs printf into a temp buffer

 * and calls jni_sebd_str

 */
void jni_printf(char *format, ...)

{

    va_list         argptr;

    static char             string[1024];


    va_start (argptr, format);

    vsprintf (string, format,argptr);

    va_end (argptr);


    LOGD(“%s”, string);

}
Let's take a closer look at the anatomy of a JNI Java callback. To start using JNI, a C program must include the system header:
#include <jni.h>
Now, if your function is called from a different place than the one that started Java_opengl_jni_Natives_NativeRender, you must attach to the current thread with the following:
(*g_VM)->AttachCurrentThread (g_VM, (void **) &env, NULL);
This is required if, for example, your program implements its own game loop, and then sends messages back to Java through JNI. This isn't the case in our example, but I've included it so the function can be invoked either way. g_VM is a global reference to the JVM, which must be saved within the very first call to Java_opengl_jni_Natives_NativeRender. Next, to load a Java class opengl.jni.Natives within C, you use the following:
jclass jNativesCls = (*env)->FindClass(env, "opengl/jni/Natives");
Here, env is a reference to the JNI environment obtained from the previous call. Note that the class name must be separated using /, not ..
Now, with a reference to the native class, you can call the static void method OnMessage:
jmethod mid = (*env)->GetStaticMethodID(env, jNativesCls, "GLSwapBuffers", "()V");

(*env)->CallStaticVoidMethod(env, jNativesCls, mid);
Note that to call this method, you need to obtain its JNI method ID using its name (GLSwapBuffers) and its signature “()V”. The signature describes the method's arguments (void in this case) and the return type (void). With this information, you call the static void method sending the corresponding arguments.
Native Interface Function
The native interface function (see Listing 3–14) is the C implementation of the Java native method opengl.jni.Natives.NativeRender(). This function performs the following tasks:
- It saves a reference to the Java VM, required by the Java callbacks of the previous section.
- It initializes the scene.
- It renders one frame. This function is meant to be called multiple times within the rendering thread (implemented by
GLThread.java).
Listing 3–14. Native Interface Function from cuberenderer.c
/*

 * Class:     opengl_jni_Natives

 * Method:    RenderTest

 * Signature: ()V

 */

JNIEXPORT jint JNICALL Java_opengl_jni_Natives_NativeRender

  (JNIEnv * env, jclass cls)

{


    (*env)->GetJavaVM(env, &g_VM);

    static int initialized = 0;


    if ( ! initialized ) {

        jni_printf("Native:RenderTest initscene");

        init_scene();


        initialized = 1;


    }

    drawFrame();

    return 1;

}
Native Cube
Native cube (cube.c) is the last file in the lot (see Listing 3–15). This file is a carbon copy of Cube.java. It defines the vertices, colors, and indices of the cube, and draws it in the same way as its Java counterpart.
TIP:cube.c is located in the book source under ch03.OpenGL/jni.
Listing 3–15. Native Implementation of Cube.java
#include <stdio.h>

#include <unistd.h>

#include <stdlib.h>

#include <GLES/gl.h>


#define FIXED_ONE 0x10000

#define one 1.0f


typedef unsigned char byte;


extern void jni_printf(char *format, ...);


// Cube vertices

static GLfloat vertices[24] = {
        -one, -one, -one,

        one, -one, -one,

        one,  one, -one,

        -one,  one, -one,

        -one, -one,  one,

        one, -one,  one,

        one,  one,  one,

        -one,  one,  one,

};


// Colors

static GLfloat colors[] = {

        0,    0,    0,  one,

        one,    0,    0,  one,

        one,  one,    0,  one,

        0,  one,    0,  one,

        0,    0,  one,  one,

        one,    0,  one,  one,

        one,  one,  one,  one,

        0,  one,  one,  one,

};


static byte indices[] = {

        0, 4, 5,    0, 5, 1,

        1, 5, 6,    1, 6, 2,

        2, 6, 7,    2, 7, 3,

        3, 7, 4,    3, 4, 0,

        4, 7, 6,    4, 6, 5,

        3, 0, 1,    3, 1, 2

};


void Cube_draw()

{

    glFrontFace(GL_CW);


    glVertexPointer(3, GL_FLOAT, 0, vertices);

    glColorPointer(4, GL_FLOAT, 0 , colors);


    glDrawElements(GL_TRIANGLES, 36, GL_UNSIGNED_BYTE, indices);

}
Compiling and Running the Sample
Now let's run the sample in the emulator. But before that, we need to compile the native library using the NDK:
- Start your cygwin console and change to the project work directory ch03.OpenGL (see Figure 3–6)
- Type ndk-build to compile the library. An Android make file (Android.mk) is required to do so (see Listing 3–16).
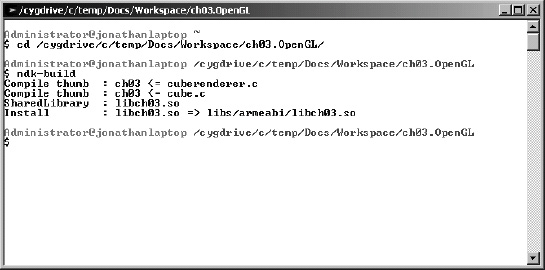
Figure 3–6. Compiling the native library using the Cygwin console
Listing 3–16. Make file (Android.mk) for the native library
LOCAL_PATH := $(call my-dir)


include $(CLEAR_VARS)


LOCAL_MODULE    := ch03


INCLUDES :=


LOCAL_CFLAGS := -O2 $(INCLUDES)


LOCAL_SRC_FILES := cuberenderer.c cube.c


LOCAL_LDLIBS := -llog -lGLESv1_CM


include $(BUILD_SHARED_LIBRARY)
Let's take a look at Android.mk to see what some of the lines mean. The most important are:
- LOCAL_MODULE: This is a required variable that defines the name of the library (ch03 in this case). After compilation the output file will be named libch03.so
- LOCAL_SRC_FILES: This is a required variable that defines the names of the source files.
- LOCAL_LDLIBS: This is an optional but critical variable. It defines the required C runtime libraries at link time. In our case we use the Android logging and OpenGL thus: -llog –lGLESv1_CM
Finally, to run the project, create a Run configuration.
- From the main menu in Eclipse click
Run
Run Configurations. - Give it a name and select the ch03.OpenGL Project. Optionally select an activity you wish to run.
- Click Run (see Figure 3–7).
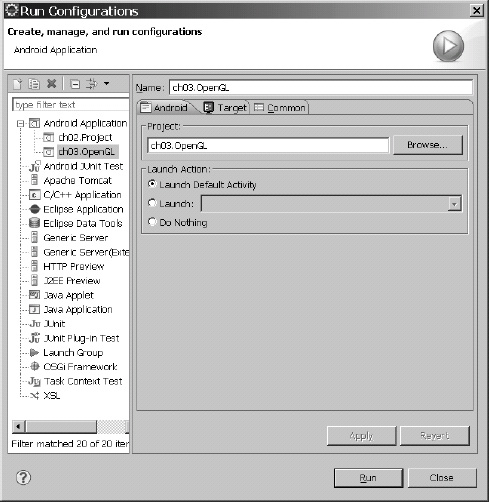
Figure 3–7. Run configuration for the project.
As shown in Figure 3–8, when the project is started in the device, two launchers will be placed in the device desktop: OpenGL Java and OpenGL Native.
Figure 3–8. Device launchers for the GL cubes sample
Run both launchers and look at the device log (see Listing 3–17). On the native side, you should see the following messages:
Listing 3–17. Device Logs for the Java and Native Implementations of GL Cubes
// Java Device Log

07-28 19:46:04.568: INFO/ActivityManager(52): Start proc opengl.test for activity opengl.test/.JavaGLActivity: pid=505 uid=10021 gids={}

07-28 19:46:04.857: INFO/jdwp(505): received file descriptor 10 from ADB

07-28 19:46:05.677: INFO/System.out(505): GLSurfaceView::setRenderer setting

07-28 19:46:06.347: INFO/System.out(505): Vendor:Google Inc.

07-28 19:46:06.376: INFO/System.out(505): Renderer:Android PixelFlinger 1.0

07-28 19:46:06.376: INFO/System.out(505): Version:OpenGL ES-CM 1.0

07-28 19:46:06.416: INFO/System.out(505): Vendor:Google Inc.

07-28 19:46:06.436: INFO/System.out(505): Renderer:Android PixelFlinger 1.0

07-28 19:46:06.476: INFO/System.out(505): Version:OpenGL ES-CM 1.0

07-28 19:46:06.546: INFO/ARMAssembler(505): generated 07-28 19:46:06.638: INFO/ActivityManager(52): Displayed activity opengl.test/.JavaGLActivity: 2202 ms


// Native Log

07-28 19:56:57.167: INFO/ActivityManager(52): Start proc opengl.test for activity opengl.test/.NativeGLActivity: pid=512 uid=10021 gids={}

07-28 19:56:57.357: INFO/jdwp(512): received file descriptor 10 from ADB

07-28 19:56:58.247: INFO/System.out(512): Loading JNI lib using abs path:/data/libgltest_jni.so

07-28 19:56:58.267: DEBUG/dalvikvm(512): Trying to load lib /data/libgltest_jni.so 0x433a7258

07-28 19:56:58.376: DEBUG/dalvikvm(512): Added shared lib /data/libgltest_jni.so 0x433a7258

07-28 19:56:58.387: DEBUG/dalvikvm(512): No JNI_OnLoad found in /data/libgltest_jni.so 0x433a7258
07-28 19:56:58.548: INFO/System.out(512): GLSurfaceView::setRenderer setting natives listener

07-28 19:56:59.777: INFO/System.out(512): Vendor:Google Inc.

07-28 19:56:59.816: INFO/System.out(512): Renderer:Android PixelFlinger 1.0

07-28 19:56:59.916: INFO/System.out(512): Version:OpenGL ES-CM 1.0

07-28 19:57:00.056: INFO/System.out(512): Vendor:Google Inc.

07-28 19:57:00.158: INFO/System.out(512): Renderer:Android PixelFlinger 1.0

07-28 19:57:00.187: INFO/System.out(512): Version:OpenGL ES-CM 1.0

07-28 19:57:00.187: INFO/System.out(512): GLThread::OnMessage Native:RenderTest initscene

07-28 19:57:00.796: INFO/ActivityManager(52): Displayed activity opengl.test/.NativeGLActivity: 3971 ms
Figure 3–9 shows the native renderer running in the emulator.
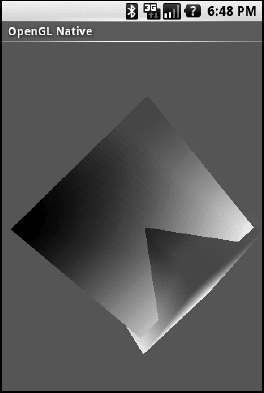
Figure 3–9. GL cubes native renderer
So far we have seen two ways of tackling OpenGL rendering: purely using Java versus a mix of a thin Java wrapper and a native renderer. Both are equally valid and can achieve the same results. However the later works better if you already have large portions of OpenGL code written in C and you wish to reuse them. The former will be the way to go if you plan to write your code entirely in Java. Choosing the right rendering technique is difficult but not the only challenge you will face when creating your game. Video scaling is another difficult subject that we'll tackle in the next section. Let's continue.
Scaling Video Buffers with Hybrid OpenGL ES
One of the trickiest parts of working with software-based games is scaling the video buffer to fit the display size. It is even more troublesome when you have a multitude of resolutions, such as in an open environment like Android. As a developer we must try to achieve the right balance of performance versus display quality. As we've seen in Chapter 2, video scaling can be of three kinds from slowest to the fastest:
- Software: Slowest of them all but the easiest to implement. Best for old devices with no GPUs. However most of today's phones are hardware accelerated.
- Hybrid: It uses a mix of software drawing (to create an image buffer), and hardware rendering (to draw into the display). It is fast and can render images at any resolution greater than 256x256.
- Hardware Only: The fastest of the bunch but the hardest to implement. Depending on the complexity of your game it may require a powerful GPU. If you have good hardware it can create games with amazing quality and effects. It is a tough choice in hardware fragmented platforms such as Android.
In this section we tackle the middle one. It is the best choice for a fragmented platform where you have a software renderer and wish to scale your game to any display resolution. It is perfect for games such as emulators, arcade, simple shooters, and others. It also works very well in low, middle, and high power devices.
We'll start with a general overview of hybrid scaling and why it is the preferable method to scale video. Next, we'll dig into the implementation, including how to initialize a surface, and drawing into the texture to perform the actual scaling.
Why Use Hybrid Scaling?
The principle behind this scaling technique is simple:
- Your game creates an image buffer (usually in pixel format RGB565 – the most common for mobile) at a given size. Let's say 320×240, the typical size of an emulator.
- The image 320×240 needs to be scaled to a tablet size (1024×768) or any device for that matter. Here we could use a software scaler but it would be painfully slow. Instead we create an OpenGL ES texture and render the image (320×240) into the texture using a GL Quad.
- By magic the texture will be scaled to the display size (1024×768) using hardware; thus gaining a significant performance boost to your game.
From the implementation point of view, the process can be described as follows:
- Initialize the OpenGL ES texture: at the stage of the game where the video gets initialized, a hardware surface must be created. This surface consists of a simple texture where the video image will be rendered (see Listing 3–18 and 3–19).
- Draw the image buffer into the texture: at the end of your game loop, render the video image into the texture which will be automatically scaled to fit any display size (see Listing 3–20).
Listing 3–18. Create an empty texture as RGB656
// Texture ID

static unsigned int mTextureID;


// These are used to compute an XY offset of the image drawn into the texture

static int xoffset;

static int yoffset;


/**

 * Create an empty texture as RGB565

 * params: (w,h) width, height of the texture

 * (x_offsety_offset): XY offset of the image drawn into the texture

 */

static void CreateEmptyTextureRGB565 (int w, int h, int x_offset, int y_offset)

{

  int size = w * h * 2;


  xoffset = x_offset;

  yoffset = y_offset;


  // buffer

  unsigned short * pixels = (unsigned short *)malloc(size);


  memset(pixels, 0, size);


  // Init GL sate

  glDisable(GL_DITHER);

  glHint(GL_PERSPECTIVE_CORRECTION_HINT, GL_FASTEST);


  glClearColor(.5f, .5f, .5f, 1);

  glShadeModel(GL_SMOOTH);

  glEnable(GL_DEPTH_TEST);

  glEnable(GL_TEXTURE_2D);


  // Create texture

  glGenTextures(1, &mTextureID);

  glBindTexture(GL_TEXTURE_2D, mTextureID);


  // texture params

  glTexParameterf(GL_TEXTURE_2D, GL_TEXTURE_MIN_FILTER,GL_NEAREST);

  glTexParameterf(GL_TEXTURE_2D, GL_TEXTURE_MAG_FILTER,GL_LINEAR);


  glTexParameterf(GL_TEXTURE_2D, GL_TEXTURE_WRAP_S, GL_CLAMP_TO_EDGE);

  glTexParameterf(GL_TEXTURE_2D, GL_TEXTURE_WRAP_T, GL_CLAMP_TO_EDGE);
  // Texture is RGB565

  glTexImage2D(GL_TEXTURE_2D, 0, GL_RGB, w, h, 0, GL_RGB, GL_UNSIGNED_SHORT_5_6_5 , pixels);


  free (pixels);

}
Listing 3–18 shows CreateEmptyTextureRGB565 which creates an empty texture for drawing and has the following arguments:
- w,h: This is the size of the video image.
- x_offset, y_offset: This are XY offset coordinates at which the image will be rendered into the texture. Read on to see why we may need this.
To create a texture in OpenGL we simply call:
glGenTextures(1, &mTextureID);

glBindTexture(GL_TEXTURE_2D, mTextureID);
Where mTextureID is an integer that has stored the ID of our texture. Next it sets the following texture parameters:
- GL_TEXTURE_MIN_FILTER: This is the texture minifying function is used whenever the pixel being textured maps to an area greater than one texture element. The minifying function we use is: GL_NEAREST, which returns the value of the texture element that is nearest (in Manhattan distance) to the center of the pixel being textured.
- GL_TEXTURE_MAG_FILTER: This is the texture magnification function is used when the pixel being textured maps to an area less than or equal to one texture element. The magnification function we use is: GL_LINEAR which returns the weighted average of the four texture elements that are closest to the center of the pixel being textured.
- GL_TEXTURE_WRAP_S: It sets the wrap parameter for each texture coordinate S to GL_CLAMP which causes the coordinates to be clamped to the range [0,1] and is useful for preventing wrapping artifacts when mapping a single image onto an object.
- GL_TEXTURE_WRAP_T: It sets the wrap parameter for each texture coordinate T to GL_CLAMP.
Finally we specify a two-dimensional texture imagewith glTexImage2D with the following parameters:
- GL_TEXTURE_2D: It specifies the target texture.
- Level: Specifies the level-of-detail number. Level 0 is the base image level.
- Internal format: Specifies the color components in the texture. In this case RGB.
- Width and height: Size of the texture. It must be a power of two.
- Format: It specifies the format of the pixel data and must be the same as the internal format.
- Type: It specifies the data type of the pixel data. In this case RGB565 (16 bit).
- Pixels: It specifies a pointer to the image data in memory. It must be encoded as RGR656.
NOTE: The size of the texture must be a power of two 256, 512, 1024, etc. However the size of the video image can be arbitrary. This means the size of the texture must be a power of two equal or greater to the size of the video. This is a caveat that will be explained later on.
Now, let's take a look at the actual implementation of the hybrid video scaler. The next two sections will show you how to initialize a surface for scaling and how to perform the actual drawing.
Initializing the Surface
It is critical for this scaler to work, that the size of the texture must be a power of two equal or greater than the size of the video. If we don't make sure this rule applies you will see a white or black screen whenever the image is rendered. In Listing 3–19 we have a function JNI_RGB565_SurfaceInit which makes sure this rule is obeyed. It takes the width and height of the image as arguments. It then calls getBestTexSize to obtain the closest texture size, and finally creates the empty texture by calling CreateEmptyTextureRGB565. Note that if the image is smaller than the texture, it will be centered on screen by calculating XY offset coordinates.
Listing 3–19. Surface initialization
// Get the next POT texture size greater or equal to image size (wh)

static void getBestTexSize(int w, int h, int *tw, int *th)

{

  int width = 256, height = 256;


  #define MAX_WIDTH 1024

  #define MAX_HEIGHT 1024


  while ( width < w && width < MAX_WIDTH) { width *= 2; }

  while ( height < h && height < MAX_HEIGHT) { height *= 2; }


  *tw = width;

  *th = height;

}


/**
 * Ini an RGB565 surface

 * params: (w,h) width, height of the image

 */

void JNI_RGB565_SurfaceInit(int w, int h)

{

  // min texture w&h

  int texw = 256;

  int texh  = 256;


  // Get texture size (must be POT) >= WxH

  getBestTexSize(w, h, &texw, &texh);


 // Center image on screen?

  int offx = texw > w ? (texw - w)/2 : 0;

  int offy = texh > h ? (texh - h)/2 : 0;


  if ( w > texw || h > texh)

    printf ("Error: Invalid surface size %sx%d", w, h);


  // Create the OpenGL texture used to render

  CreateEmptyTextureRGB565 (texw, texh, offx, offy);

}
Drawing into the Texture
Finally, to render into the display (also known as surface flipping), we call JNI_RGB565_Flip with an array of pixel data (encoded as RGB565) plus the size of the image. JNI_RGB565_Flip draws into the texture by calling DrawIntoTextureRGB565 and swaps the buffers. Note that the buffer swapping is done in Java not C, therefore we need a way to tell Java it is time to swap. We can do this using JNI to call some Java method to do the actual swapping (see Listing 3–20).
Listing 3–20. Drawing an image buffer into a texture using a Quad
// Quad vertices X, Y, Z

static const float vertices[] = {

    -1.0f, -1.0f, 0,

    1.0f, -1.0f, 0,

    1.0f,  1.0f, 0,

    -1.0f, 1.0f, 0

};

// Quad coords (0-1)

static const float coords[] = {

    0.0f, 1.0f,

    1.0f, 1.0f,

    1.0f, 0.0f,

    0.0f, 0.0f,

 };


// Quad vertex indices

static const unsigned short indices[] = { 0, 1, 2, 3};


/**

 * Draw an array of pixels in the entire screen using a Quad

 *  pixels: unsigned short for RGB565
 */

static void DrawIntoTextureRGB565 (unsigned short * pixels, int w, int h)

{

  // clear screen

  glClear(GL_COLOR_BUFFER_BIT | GL_DEPTH_BUFFER_BIT);


  // enable vetices & and texture coordinates

  glEnableClientState(GL_VERTEX_ARRAY);

  glEnableClientState(GL_TEXTURE_COORD_ARRAY);


  glActiveTexture(GL_TEXTURE0);

  glBindTexture(GL_TEXTURE_2D, mTextureID);


  glTexSubImage2D(GL_TEXTURE_2D, 0, xoffset, yoffset, w, h, GL_RGB, GL_UNSIGNED_SHORT_5_6_5 , pixels);


  // Draw quad

  glFrontFace(GL_CCW);

  glVertexPointer(3, GL_FLOAT, 0, vertices);

  glEnable(GL_TEXTURE_2D);

  glTexCoordPointer(2, GL_FLOAT, 0, coords);

  glDrawElements(GL_TRIANGLE_FAN, 4, GL_UNSIGNED_SHORT, indices);

}


// Flip surface (Draw into texture)

void JNI_RGB565_Flip(unsigned short *pixels , int width, int height)

{

  if ( ! pixels) {

    return;

  }

  DrawIntoTextureRGB565 (pixels, width, height);


  // Must swap GLES buffers here

  jni_swap_buffers ();

}
To render into the texture using OpenGL:
- Clear the color and depth buffers using
glClear(GL_COLOR_BUFFER_BIT | GL_DEPTH_BUFFER_BIT). - Enable the client state: vertex array and texture coordinates array for writing when glDrawElements is called.
- Select active texture unit with glActiveTexture where the initial value is
GL_TEXTURE0. - Bind a named texture to a texturing target.
GL_TEXTURE_2D(a 2-D surface) is the default target to which the texture is bound.mTextureIDis the ID of a texture. - Specify a two-dimensional texture subimage using glTexSubImage2D with the parameters:
- GL_TEXTURE_2D: It specifies the target texture.
- level: It specifies the level of detail number. Level 0 is the base image level.
- xoffset: It specifies a texel (texture pixel) offset in the x direction within the texture array.
- yoffset: It specifies a texel offset in the y direction within the texture array.
- width: It specifies the width of the texture subimage.
- height: It specifies the height of the texture subimage.
- format: It specifies the format of the pixel data.
- type: It specifies the data type of the pixel data.
- data: It specifies a pointer to the image data in memory.
- Draw the Quad vertices, coordinates and indices by calling:
glFrontFace: It enables the front face of the Quad.glVertexPointer: It defines the array of the Quad's vertex data with a size of 3, of type GL_FLOAT, and a stride of 0.glTexCoordPointer: It defines the Quad's array of texture coordinates with a size of 2, of type GL_FLOAT, and a stride of 0glDrawElements: It renders primitives from the data array using triangles (GL_TRIANGLES), with 4 elements (hence a Quad) of type short (GL_UNSIGNED_SHORT) plus a pointer to the indices.
Note that from Listing 3–20 we see that the coordinates of the Quad range from [-1, 1] in both axes. This is because the OpenGL coordinate system ranges from (-1, 1) where the origin (0,0) is the center (see Figure 3–10).
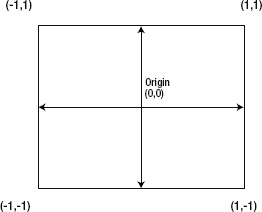
Figure 3–10. OpenGL coordinate system.
In a perfect world we shouldn't have to worry much about the size of the video buffer (especially if using software only scalers/renderers). This is now true however when scaling video using OpenGL in Android. In this case the size of the buffer is crucial. In the next section you will learn how to deal with arbitrary video sizes that don't work very well with OpenGL.
What Happens when the Image is not a Power of Two
As mentioned before, hybrid scaling works flawlessly when the size if the image is a power of two. But, odds are that your image buffer won't be a power of two. For example, the chapter dealing with the Doom engine has a video size of 320x240. In that case, the image will still be scaled, but to a percentage of the size of the texture. To see this effect in action take a look at Figures 3–11 and 3–12.
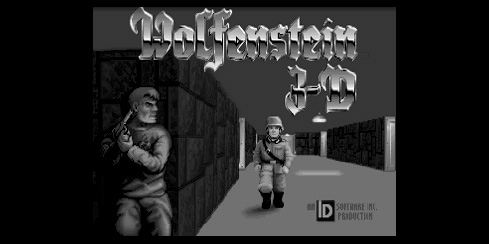
Figure 3–11. Scaling non power of two image.
In Figure 3–11 we have the following sizes:
Device display: 859x480

Texture: 512x256

Image: 320x240
As we can see the image is scaled but to a 62% (320/512*100) of the texture width, and 93% (240/256*100) of the height. Therefore, the image will be scaled to 62%x93% of any device resolution provided the resolution is greater than 256. Now let's take a look at Figure 3–12.
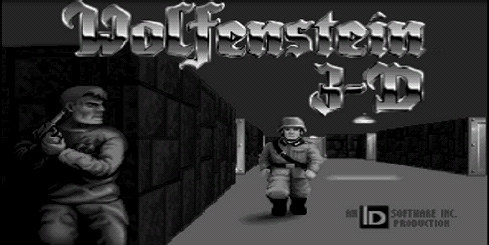
Figure 3–12. Scaling a power of two image
In Figure 3–12 we have the following sizes:
Device display: 859x480

Texture: 512x256

Image: 512x256
Zoom and Draw
In Figure 3–12 we see that the image will be scaled at 100% of any device resolution which is what we want. But what do we do when the image is not a power of two? To get passed this caveat, we could:
- Zoom the 320x240 image to the closest power of two (512x256 in this case) using a software scaler.
- Convert the scaled surface into a RGB656 image, compatible with
DrawIntoTextureRGB565from the previous section. - Draw into the texture thus performing hardware scaling to the display resolution.
This solution is a little slower than the previous section but still much faster than using a pure software scaler, especially if you run in high resolution devices such as tablets. Listing 3–21 shows how we can zoom an SDL surface using the popular SDL_gfx library
Listing 3–21. Zooming an image with SDL_gfx roto-zoom
void JNI_Flip(SDL_Surface *surface )

{

  if ( zoom ) {

    // if surface is 8bit scaled will be 8bit else surface is 32 bit RGBA!

    SDL_Surface * sized = zoomSurface( surface, zoomx, zoomy, SMOOTHING_OFF);


    JNI_FlipByBPP (sized);


    // Must clean up!
    SDL_FreeSurface(sized);

  }

  else {

    JNI_FlipByBPP (surface);

  }

}
Zoom and Draw Implementation
To zoom/scale an SDL surface we simply call SDL_gfxzoomSurface with:
- An SDL surface
- Horizontal zoom factor:(0-1)
- Vertical zoom factor, and
- SMOOTHING_OFF: This disables anti-aliasing for faster drawing
Next we flip the SDL surface based on its resolution (bits per pixel). Listing 3–22 shows how this is done for an 8-bit RGB surface.
Listing 3–22. Flipping an SDL surface by resolution
/**

 * Flip SDL Surface by bits per pixel

 */

static void JNI_FlipByBPP (SDL_Surface *surface)

{

  int bpp = surface->format->BitsPerPixel;


  switch ( bpp ) {

    case 8:

      JNI_Flip8Bit (surface);

      break;

    case 16:

      // Flip 16bit RGB (surface);

      break;

    case 32:

      // flip 32 bit RGB (surface);

      break;

    default:

      printf("Invalid depth %d for surface of size %dx%d", bpp, surface->w, surface->h);

  }

}


/**

 * Flip 8bit SDL surface

 */

static void JNI_Flip8Bit(SDL_Surface *surface )

{

  int i;

  int size = surface->w * surface->h;

  int bpp = surface->format->BitsPerPixel;


  unsigned short pixels [size]; // RGB565
  SDL_Color * colors = surface->format->palette->colors;


  for ( i = 0 ; i < size ; i++ ) {

    unsigned char pixel =   ((unsigned char *)surface->pixels)[i];


    pixels[i] =  ( (colors[pixel].r >> 3) << 11)

      | ( (colors[pixel].g >> 2) << 5)

      | (colors[pixel].b >> 3);   // RGB565


  }


  DrawIntoTextureRGB565 (pixels, surface->w,  surface->h);


  jni_swap_buffers ();

}
Given an SDL surface, we simply check the format's bits per pixel: surface->format->BitsPerPixel and based on that value we create an RGB565 array of pixels that can be used by DrawIntoTextureRGB565:
for ( i = 0 ; i < size ; i++ ) {

    unsigned char pixel =   ((unsigned char *)surface->pixels)[i];


    // RGB565

    pixels[i] =  ( (colors[pixel].r >> 3) << 11)

      | ( (colors[pixel].g >> 2) << 5)

      | (colors[pixel].b >> 3);

  }
Each pixel consists of a Red, Green, and Blue value extracted from the surface color palette with:
SDL_Color * colors = surface->format->palette->colors;

RED: colors[pixel].r

GREEN: colors[pixel].g

BLUE: colors[pixel].b
To build an RGB565 pixel, discard the least significant bits from each color component:
colors[pixel].r >> 3 (8 -3 = 5)

colors[pixel].g >> 2 (8 – 2 = 6)

colors[pixel].b >> 3 (8 – 3 = 5)
Then shift each component into the proper position of a 16-bit value (5+6+5 = 16 - hence RGB656).
pixels[i] = (RED << 11) | (GREEN << 5) | BLUE
Finally we send the new array to DrawIntoTextureRGB565 along with the image width and height. For the final piece of the puzzle, we need a way to tell if the surface requires zooming. This can be done at video initialization when the surface is created in the first place. Listing 3–23 shows how we can create a software surface using SDL.
Listing 3–23. Zoom surface initialization
// Should be zoom?

static char zoom = 0;


// Zoom scales [0,1]

static double zoomx = 1.0;

static double zoomy = 1.0;


/**********************************************************

 * Image Constructor

 * The image must be a power of 2 (256x256, 512x256,...)

 * to render full screen on the OpenGL texture. If the image

 * is not POT (320x240) it will be scaled

 **********************************************************/

SDL_Surface * JNI_SurfaceNew(int width, int height, int bpp, int flags)

{

  Uint32 rmask = 0, gmask = 0, bmask =0 , amask = 0;


  // texture size & offset

  int realw = 256, realh = 256, offx = 0, offy = 0;


  // Image must be a power of 2 for OpenGL to scale it.

  if ( width > 512 ) {

    Sys_Error("ERROR: INVALID IMAGE WIDTH %d (max POT 512x512)", width);

  }


  // REAL W/H must be the closest POT value to wxh

  // Will scale to 512x256

  // could be 256 but 512 gives better res (slower)

  if ( width > 256 ) realw = 512;


  // size not POT , zoom to closest POT. Choices are:

  // 256x256 (fastest/low res) 512x256 (better res/slower)

  // 512x512 slowest.

  if ( ( width != 512 && width != 256) || ( height != 256 ) ) {

    zoom = 1;

    zoomx = realw / (float)width;

    zoomy = realh / (float)height;


    offx = offy = 0;


    printf("WARNING Texture of size %dx%d will be scaled to %dx%d zoomx=%.3f zoomy=%.3f"

      , width, height, realw, realh, zoomx, zoomy);

  }


  // Create the OpenGL texture used to render

  CreateEmptyTextureRGB565 (realw, realh, offx, offy);


  // This is the real surface used by the client to render the video

  return SDL_CreateRGBSurface (SDL_SWSURFACE, width, height, bpp, rmask, gmask, bmask, amask);

}
If the size of the image is not a power of two, then the zoom flag will be set to 1 and the horizontal and vertical zoom factors will be computed. Then, the empty texture will be created by calling CreateEmptyTextureRGB565 with the width, height, and XY offset values of the texture. Finally, the SDL surface is created by calling SDL_CreateRGBSurface with:
- SDL_SWSURFACE: it tells SDL to create a software surface
- width, height: It defines the size of the surface
- bpp: It defines the bits per pixel (resolution) of the surface (8, 16, 24, or 32)
- rmask, gmask, bmask, amask: These are mask values for the red, green, blue, and alpha (transparency) components of the pixel format. Set them to 0 to let SDL take care of it.
Hybrid Scaler Rules of Thumb
To conclude things, always keep in mind the following rules of thumb when using a hybrid scaler like this in your games:
- Always set the video size, if you can, to a power of two: 256x256 or 512x56. Values above 512 are simply too big for this technique.
- If you cannot set the video size but still want a full screen display, use the SDL software scaler from the previous section to scale to the closest power of two resolution, then use the hardware scaler.
- This scaling technique may not be useful (performance wise) if your video size if greater than 512x512.
Summary
The veil has been lifted to reveal a new frontier of 3D development for Android. The techniques demonstrated in this chapter can help you to bring a large number of 3D PC games to the platform, at an enormous savings in development costs.
In this chapter, you have learned a trick to mix OpenGL code in Java and C to enable the reuse of large portions of C code along with Java code. We started by looking at the OpenGL tumbling cubes sample provided by Google, and how sections of the rendering process can be implemented in C. You saw that the sample's rendering process included EGL initialization, the main loop, drawing, buffer swap, and cleanup. Then you saw how to reimplement the cube rendering invoked within the main loop. You created the new components:
- The native activity used to launch the application from the device
- The native interface class used to define the native methods and C callbacks
- The cube renderer and cube class used to render the cubes
Finally, we looked at the limitations of OpenGL ES when it comes to advanced 3D games.
I hope this chapter will help you get your own 3D games for Android with minimal effort and maximum code reuse. This is a prelude to the next chapters, where we will look at three of the greatest 3D shooters for the PC, Doom, Quake I, Quake II, and the minimal changes required to get them running on your phone.