© Warren Gay 2018
Warren GayAdvanced Raspberry Pihttps://doi.org/10.1007/978-1-4842-3948-3_20

20. Cross-Compiling

Warren Gay1 
(1)
St. Catharine’s, Ontario, Canada
 

Embedded computers frequently lack the necessary resources for developing and compiling software. The Raspberry Pi is rather special in this regard since it already includes the gcc compiler and the needed linking tools (under Raspbian Linux). But while the code can be developed and built on the Raspberry Pi, it may not always be the most suitable place for software development. One reason is the lower performance of the SD card, while the Pi Zero or Zero W may be underperforming in this regard.

To compile native code for the Raspberry Pi, you need a compiler and linker that knows how to generate ARM binary executables. Yet it must run on a host with a different architecture (for example, Mac OS X). Hence the reason it is called a cross-compiler. The cross-compiler will take your source code on the local (build) platform and generate ARM binary executables, to be installed on your target Pi.

In this chapter, you’ll walk through how to build your own cross-compiler. This will permit you to get the job done using your existing Linux platform.

Terminology

Let’s first cover some terminology used in this chapter:
  • build: Also called the local platform, this is the platform that you perform the compiling on (for example, Mac OS X).

  • target: The destination platform, which is the Raspberry Pi (ARM) for this chapter.

Let’s now consider some of the cross-compiling issues before you take the plunge. There are two main problem areas in cross-compiling:
  • All C/C++ include files and libraries for the Raspberry Pi (ARM) must be available on your build platform (when building the kernel, for example).

  • The cross-compiler and related tools must generate code suitable for the target platform.

Before you decide that you want to build a cross-compiler environment, are you prepared to
  • Provide all matching C/C++ header files from the ARM platform?

  • Provide all ARM libraries needed, including libraries for third-party products like sqlite3 that you intend to link with?

  • Provide sufficient disk space for the cross-compiler and tools?

The crosstool-NG software will mitigate some of these issues. For example, the correct Linux headers are chosen by the configuration steps shown later in this chapter.

Disk space solves many issues by holding a copy of your Raspberry Pi’s root file system on your build platform. Simple programs won’t require this (for example, a Hello World program). But software linking to libraries may require this. Even if you’re strapped for disk space, you may be able to mount the Raspbian SD card on the build platform, thus gaining access to the Raspberry Pi’s root file system.

Operating System

The procedure used for building a cross-compiler environment is somewhat complex and fragile. Using the crosstool-NG software simplifies things considerably. Despite this advantage, it is best to stick with proven cross-compiler platforms and configurations.

You might be tempted to say, “The source code is open, and so it should work on just about any operating system.” (You might even say, “I’ll fix the problems myself.”) The reality is not quite so simple. Unless you are willing to spend time on Internet forums and wait for answers, I suggest you take a more pragmatic approach—build your cross-compiling environment on a recent and stable Ubuntu or Debian/Devuan environment.

This chapter uses a recent install of Devuan, which is Debian based on an older 32-bit computer donated to the lab here. You can use VirtualBox 4.3.12 ( www.virtualbox.org ) on a Mac OS X MacBook Pro, running an Intel i7 processor instead if you like. Current versions of Debian or Devuan Linux are recommended.

Host, Guest, Build, and Target

At this point, a short note is in order because these terms can get confusing, especially for the first time. Let’s list the environment terms, which will be referred to throughout the remainder of this chapter:
  • Host environment

  • Guest environment

  • Build/local environment

  • Target environment

So many environments! The terms host and guest environments enter the picture when you are using a virtual machine like VirtualBox. VirtualBox is used to host another operating system on top of the one you are using. For example, you might be running Mac OS X on your laptop. In this example, the OS X environment hosts Linux instance within VirtualBox. That Linux operating system is thus referred to as the guest operating system.

The term build (or local) environment refers to the Linux environment that is executing the cross-compiler and tools. These Linux tools produce or manipulate code for the target environment (the Raspberry Pi’s ARM CPU).

Platform Limitations

Many people today are using 64-bit platforms like the MacBook Pro, with an Intel i7 processor or similar. This may present a problem if you want to build a cross-compiler for the Raspberry Pi, which is a 32-bit platform. The 32-bit cross-compiler must be built on a 32-bit processor.

Another item that may be confusing to some is the Raspberry Pi 3 model B+, which runs a 64-bit processor. While it is a 64-bit processor, the current versions of Raspbian Linux run it in a 32-bit mode. Until a 64-bit Linux is available, you need 32-bit tools. Other Linux distributions like SUSE SLES will support a native 64-bit Linux, but then you may have other challenges with firmware blobs, etc. This question was asked in the forum and the following response was added:

Re: Can we get an 64bit OS?

Sat Dec 23, 2017 3:30 pm

AFAIK no there isn't. They don't want to split the OS so they have to support two different OS's, one for PI3 only and another one for all older PI's, and get lots of confused users that complain the 64-bit OS won't work on their older PI.

Also switching to 64-bit CPU's brings almost nothing, not much more speed for example.

If you are using a 64-bit platform, then you’ll probably want to choose a VirtualBox solution or use an older Linux 32-bit server. This gives you a 32-bit operating system to host the cross-compiler on. On the other hand, if you are already running a 32-bit operating system, creating a native cross-compiler should be a slam dunk.

Note

You will need to host the cross-compiler on a 32-bit platform. The cross-compiler does not build on 64-bit platforms.

Without VirtualBox (Native)

If you are already using a Linux development environment like Debian , Devuan or Ubuntu, the term host is equivalent to the build (or local) environment. The host and guest environments are likewise equivalent, though it is probably more correct to say there is no guest operating system in this scenario. This simpler scenario leaves us with just two environments:
  • Host/guest/build: Native environment running the cross-compiler tools

  • Target: The destination execution environment (Raspberry Pi)

Using VirtualBox (Debian/Linux)

If you do not have a suitable Linux environment, one can be hosted on the platform you have. You can host Linux from Windows, Mac OS X, Solaris, or another distribution of Linux using VirtualBox downloaded from the following:

www.virtualbox.org

When VirtualBox is used, the host environment is the environment that is running VirtualBox (for example, Mac OS X). The guest operating system will be some flavor of Linux like Debian. This leaves us with three environments in total:
  • Host: Or native, running VirtualBox (for example, Windows)

  • Guest/build: Debian/Ubuntu development environment within VirtualBox

  • Target: The destination execution environment (your Raspberry Pi)

Planning Your Cross-Development Environment

The main consideration at this point is normally disk space. If you are using VirtualBox, limited memory can be another factor. If you are using Linux or Mac OS X, check your mounted disks for available space (or Windows tools as appropriate):
$ df -k
Filesystem     1K-blocks      Used  Available Use% Mounted on
/dev/sda1      151903380  15768740  128395300  11% /
udev               10240         0      10240   0% /dev
tmpfs             181080       388     180692   1% /run
tmpfs               5120         4       5116   1% /run/lock
tmpfs             727920         0     727920   0% /run/shm

In the preceding example output, we see that the root file system has plenty of space. But your file system is likely to be different. Symlinks can be used when necessary to graft a larger disk area onto your home directory.

If you’re using VirtualBox, create virtual disks with enough space for the Linux operating system and your cross-compiler environment. You may want to put your Linux software on one virtual disk with a minimum size of about 10 GB (allow it to grow larger).

Allow a minimum of 10 GB for your cross-compiler environment (and allow it to grow). You must also factor in additional space for the Raspberry Linux kernel, its include files, and all other third-party libraries that you might need to build with (better still, a copy of the Raspberry Pi’s root file system).

Within your development Linux build environment, make sure your cross-compiler and build area are using the disk area that has available space. It is easy to glibly create a directory someplace convenient and find out later that the space that you thought you were going to use wasn’t available.

Building the Cross-Compiler

At this point, I’ll assume that you’ve set up and installed Linux in VirtualBox, if necessary or using an instance of 32-bit Linux. I'll be using a Devuan Linux, which is based upon Debian.

Download crosstool-NG

The released crosstool-NG downloads are found at:

http://crosstool-ng.org

From the site, find a link to the latest download. As this is written, the following was current:
$ wget http://crosstool-ng.org/download/crosstool-ng/crosstool-ng-1.23.0.tar.bz2

Staging Directory

I’ll assume that you’ve symlinked to your disk area with sufficient available disk space. This chapter will use ~/xrpi as the cross-compiler playground.
$ mkdir ~/xrpi
$ cd ~/xrpi
Next I'll assume that you've created a symlink to your area of disk space, or simply created a subdirectory if the current directory has the space already:
$ symlink /some/big/area/of/disk ~/xrpi/devel
But if ~/xrpi already has sufficient space, then simply do the following instead:
$ mkdir ~/xrpi/devel
For convenience, let's now change to that directory:
$ cd ~/xrpi/devel
In directory ~/xrpi/devel, create a subdirectory named staging (~/devel/staging) and change to it:
$ mkdir ./staging
$ cd ./staging          # Dir is ~/xrpi/devel/staging
$ pwd
/home/myuserid/xrpi/devel/staging
$

Unpack the Tarball

Assuming the tarball crosstool-ng-1.23.0.tar.bz2 was downloaded to your home directory, you would perform the following (change the option j if the suffix is not .bz2):
$ tar xjvf ~/crosstool-ng-1.23.0.tar.bz2
. . .
$

After the unpacking completes, you should have a subdirectory named crosstoolng-1.23.0 in your staging directory.

Create /opt/x-tools

You can choose a different location if you like, but for ease of reference, I’m going to assume that the crosstool-NG software is going to install into /opt/x-tools . We’ll also assume your user ID is fred (substitute your own).
$ sudo mkdir -p /opt/x−tools
$ sudo chown fred /opt/x−tools

Optionally, once the installation is complete later, you can change the ownership back to root for protection.

Install Package Dependencies

The crosstool-NG build depends on several packages provided by your Linux distribution as optionally installed software. At a minimum, install the following now:
# apt-get install bison
# apt-get install flex
# apt-get install libtool
# apt-get install texinfo
# apt-get install gawk
# apt-get install gperf
# apt-get install automake
# apt-get install subversion
# apt-get install help2man

If during the configuration of crosstools-ng you find that you need other packages, they can be installed then and the configuration retried.

Configure crosstools-NG

With the package dependencies installed, you are now in a position to make the crosstool-NG software (substitute the crosstool-ng version as required throughout the remainder of this chapter):
$ cd ~/xrpi/devel/staging/crosstool-ng-1.23.0
$ ./configure --prefix=/opt/x-tools

If this completes without errors, you are ready to build and install the software. If it reports that you are missing package dependencies, install them now and repeat.

Patch inputbox.c

One extremely vexing irritation I have with some modern Linux and tools, is that they don't properly support the backspace character (Control-H). This is a standard ASCII character intended precisely for this purpose. Why has it been banished? I'll try to refrain from further ranting about this.

The menu program used by the crosstool-ng suffers from the same problem that the linux kernel menuconfig suffers from: no backspace character (Control-H) support. This can leave you in the curse-worthy situation of not being able to backspace or delete input.

To correct that problem, perform the following:
  1. 1.

    cd ~/xrpi/devel/staging/crosstool-ng-1.23.0/kconfig/lxdialog

     
  2. 2.
    Edit file inputbox.c and go to about line 128, where you should see a line that says:
    case KEY_BACKSPACE:
     
  3. 3.
    Add a line below it that simply reads:
    case 8:
     
  4. 4.

    Save the file (inputbox.c).


If you already know that your backspace key sends an escape sequence instead of Control-H, then you can safely skip this change. Otherwise, this kind of thing can drive you absolutely batty. With that file saved, some semblance of sanity will follow.

make crosstool-ng

At this point, you should have no trouble building crosstool-NG (including the above fix). Perform the following make command :
$ cd ~/devel/staging/crosstool-ng-1.23.0
$ make
  SED    'ct-ng'
  SED    'scripts/scripts.mk'
  SED    'scripts/crosstool-NG.sh'
  SED    'scripts/saveSample.sh'
  SED    'scripts/showConfig.sh'
  GEN    'config/configure.in'
  GEN    'paths.mk'
  GEN    'paths.sh'
  DEP    'nconf.gui.dep'
  DEP    'nconf.dep'
  DEP    'lxdialog/yesno.dep'
  DEP    'lxdialog/util.dep'
  DEP    'lxdialog/textbox.dep'
  DEP    'lxdialog/menubox.dep'
  DEP    'lxdialog/inputbox.dep'
  DEP    'lxdialog/checklist.dep'
  DEP    'mconf.dep'
  DEP    'conf.dep'
  BISON  'zconf.tab.c'
  GPERF  'zconf.hash.c'
  LEX    'zconf.lex.c'
  DEP    'zconf.tab.dep'
  CC     'zconf.tab.o'
  CC     'conf.o'
  LD     'conf'
  CC     'lxdialog/checklist.o'
  CC     'lxdialog/inputbox.o'
  CC     'lxdialog/menubox.o'
  CC     'lxdialog/textbox.o'
  CC     'lxdialog/util.o'
  CC     'lxdialog/yesno.o'
  CC     'mconf.o'
  LD     'mconf'
  CC     'nconf.o'
  CC     'nconf.gui.o'
  LD     'nconf'
  SED    'docs/ct-ng.1'
  GZIP   'docs/ct-ng.1.gz'
$

This takes very little time and seems trouble free.

make install

Once the crosstool-NG package has been compiled, it is ready to be installed into /opt/x-tools. From the same directory:
$ sudo make install
  GEN    'config/configure.in'
  GEN    'paths.mk'
  GEN    'paths.sh'
  MKDIR   '/opt/x-tools/bin/'
  INST    'ct-ng'
  MKDIR   '/opt/x-tools/lib/crosstool-ng-1.23.0/'
  INSTDIR 'config/'
  INSTDIR 'contrib/'
  INSTDIR 'patches/'
  INSTDIR 'scripts/'
  INST    'steps.mk'
  INST    'paths'
  INSTDIR 'samples/'
  INST    'kconfig/'
  MKDIR   '/opt/x-tools/share/doc/crosstool-ng/crosstool-ng-1.23.0/'
  INST    'docs/manual/*.md'
  MKDIR   '/opt/x-tools/share/man/man1/'
  INST    'ct-ng.1.gz'
For auto-completion, do not forget to install 'ct-ng.comp' into
your bash completion directory (usually /etc/bash_completion.d)

If you still own the directory /opt/x-tools from earlier (recall sudo chown fred /opt/x-tools), you won’t need to use sudo in the preceding step. After make install is performed, you will have the crosstool-NG command ct-ng installed in the directory /opt/x-tools/bin.

PATH

To use the newly installed ct-ng command, you will need to adjust your PATH environment variable (and every time you log in):
$ PATH="/opt/x-tools/bin:$PATH"
The website also indicates that you might have to unset environment variable LD_LIBRARY_PATH, if your platform has it defined. If so, then unset it as follows to avoid any unwanted trouble:
$ unset LD_LIBRARY_PATH
Now you should be able to run ct-ng to get version info (note that there are no hyphens in front of version in the following command). Seeing the version output confirms that your ct-ng command has been installed and is functional:
$ ct-ng version
This is crosstool-NG version crosstool-ng-1.23.0
Copyright (C) 2008  Yann E. MORIN <[email protected]>
This is free software; see the source for copying conditions.
There is NO warranty; not even for MERCHANTABILITY or FITNESS FOR A
  PARTICULAR PURPOSE .

Cross-Compiler Configuration

The command ct-ng simplifies the work necessary to configure and build the cross-compiler tool chain. From here, we are concerned with building the cross-compiler tools themselves. When that process is completed, you will have populated the cross-compiler tools into the directory /opt/x-tools/arm-unknown-linux-gnueabi.

Before ct-ng can build your cross-compiler, it must first be configured:
$ cd ~/xrpi/devel/staging
$ ct-ng menuconfig

If you get a “command not found” error message, check that the PATH variable is set correctly.

Paths and Misc Options

When the ct-ng command starts up, the menu configuration screen is presented as shown in Figure 20-1. Press Enter to open the Paths and Misc Options submenu.
../images/326071_2_En_20_Chapter/326071_2_En_20_Fig1_HTML.jpg
Figure 20-1

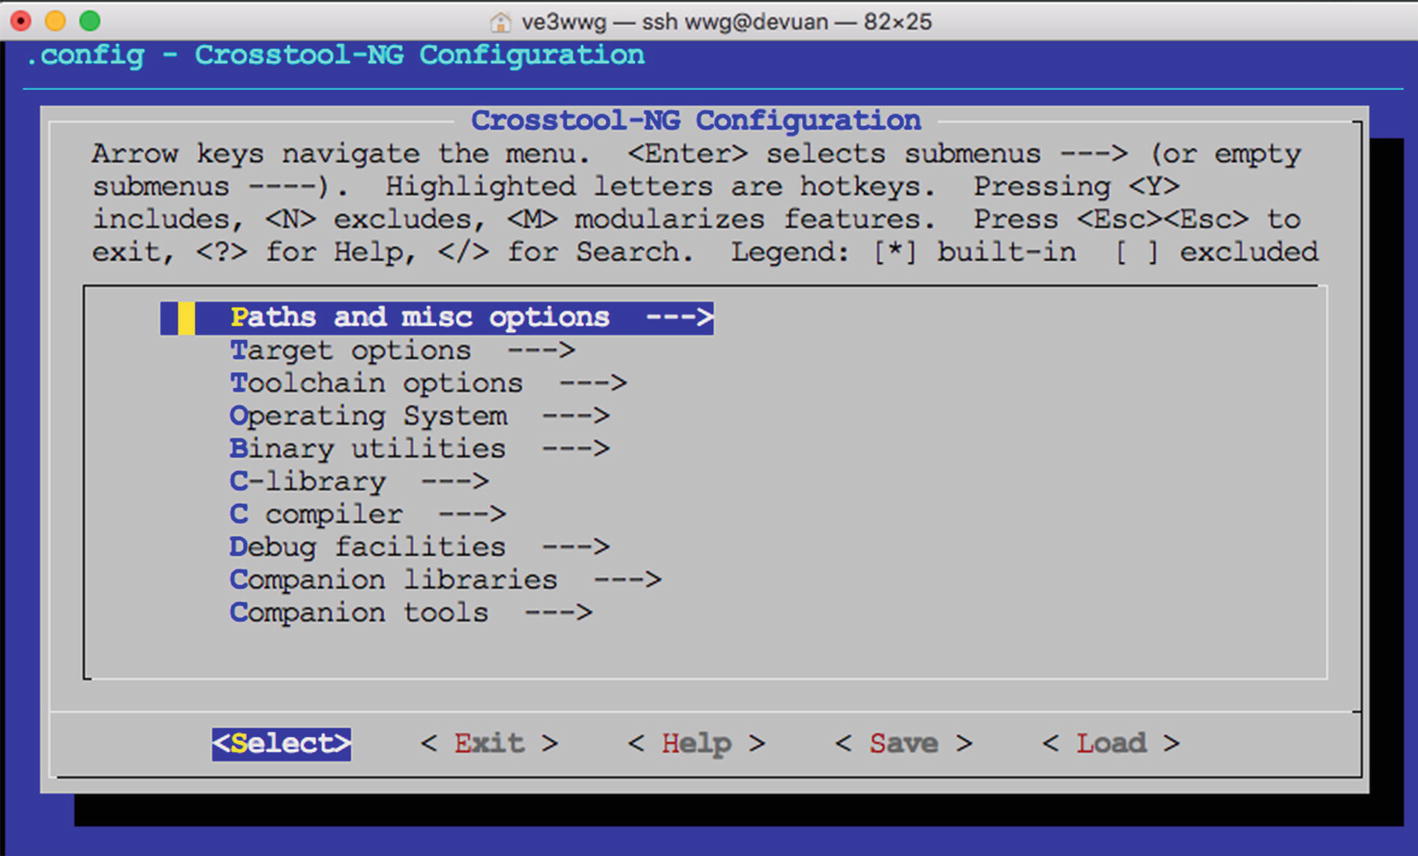
ct-ng menuconfig opening dialog

Once in the Paths and Misc Options menu, as shown in Figure 20-2, use the cursor key to move down to Try Features Marked as Experimental. Once that line is highlighted, press the spacebar to put an asterisk inside the square brackets to select the option (pressing space again toggles the setting).
../images/326071_2_En_20_Chapter/326071_2_En_20_Fig2_HTML.jpg
Figure 20-2

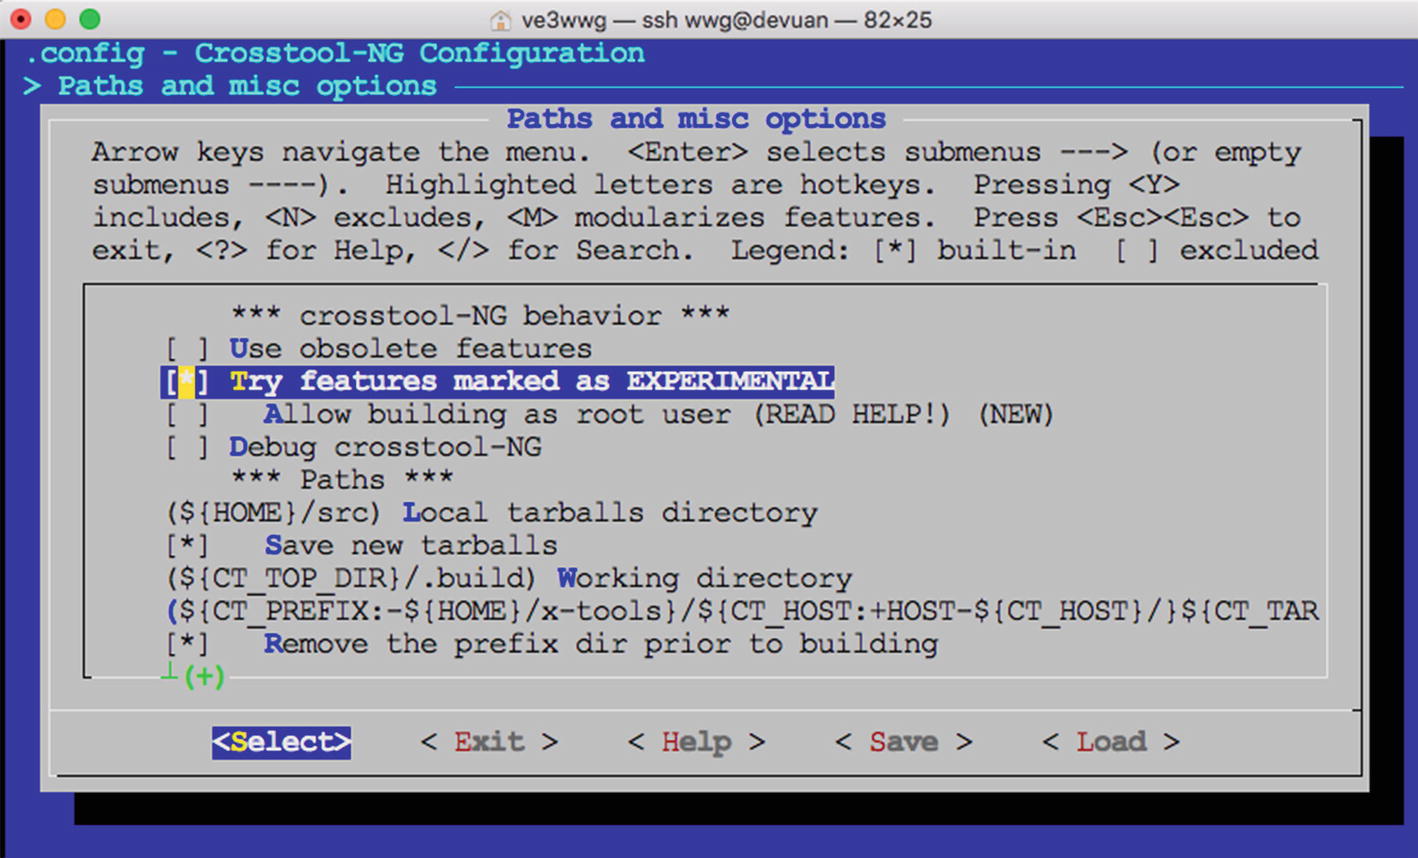
ct-ng enabling "Try features marked as EXPERIMENTAL" (by pressing space)

After doing that, while in the same menu, move the cursor down to the middle entry labeled Prefix Directory and press Enter to select it (Figure 20-3). Unfortunately, recent defaults prevent you from seeing the “Prefix Directory” text at the extreme right of the menu selection.
../images/326071_2_En_20_Chapter/326071_2_En_20_Fig3_HTML.jpg
Figure 20-3

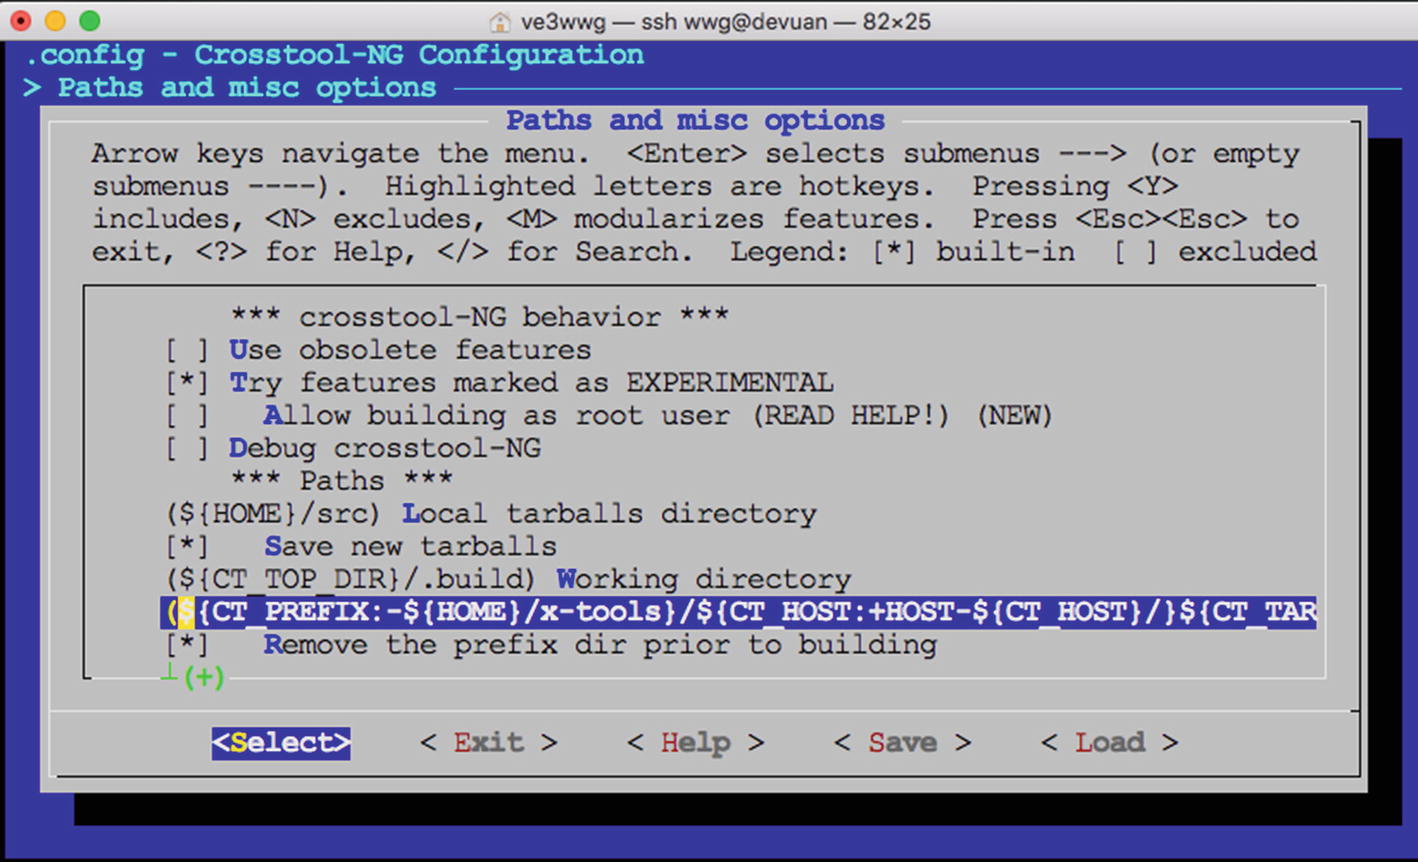
Select the CT_PREFIX line to set the prefix

For the procedure used in this chapter, modify the path to the following:
/opt/x-tools/${CT_TARGET}
Figure 20-4 illustrates the input dialog. If you find that you cannot use backspace, then apply the fix discussed in section “Patch inputbox.c”.
../images/326071_2_En_20_Chapter/326071_2_En_20_Fig4_HTML.jpg
Figure 20-4

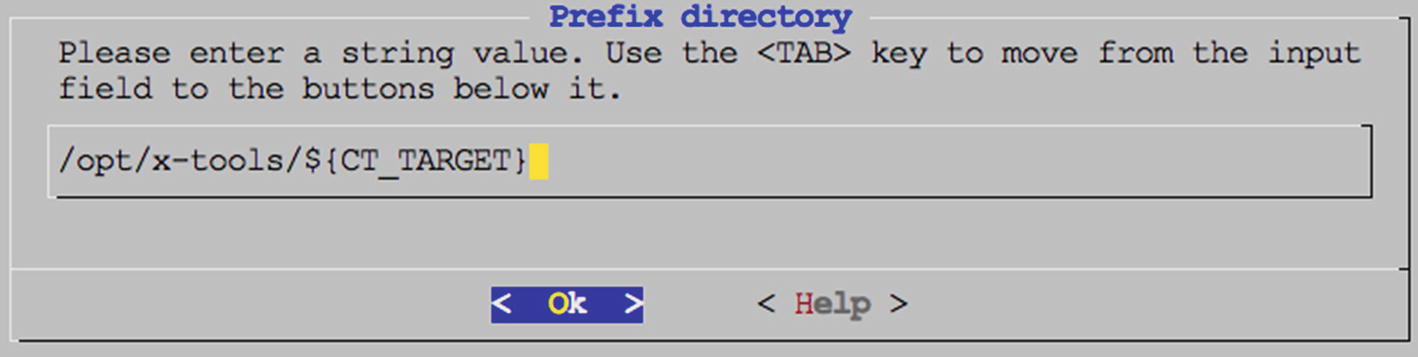
Set the Prefix Directory

Once the pathname is established, press Enter on the OK button shown. This returns you to the Paths and Misc Options menu.

Then select the Exit button shown at the bottom, and press Enter again. If you have changed anything that needs saving then choose “Yes” (Figure 20-5).
../images/326071_2_En_20_Chapter/326071_2_En_20_Fig5_HTML.jpg
Figure 20-5

The save configuration dialog

Target Options

Restart the menu and select Target Options with the cursor and press Enter to open it (Figure 20-6).
../images/326071_2_En_20_Chapter/326071_2_En_20_Fig6_HTML.jpg
Figure 20-6

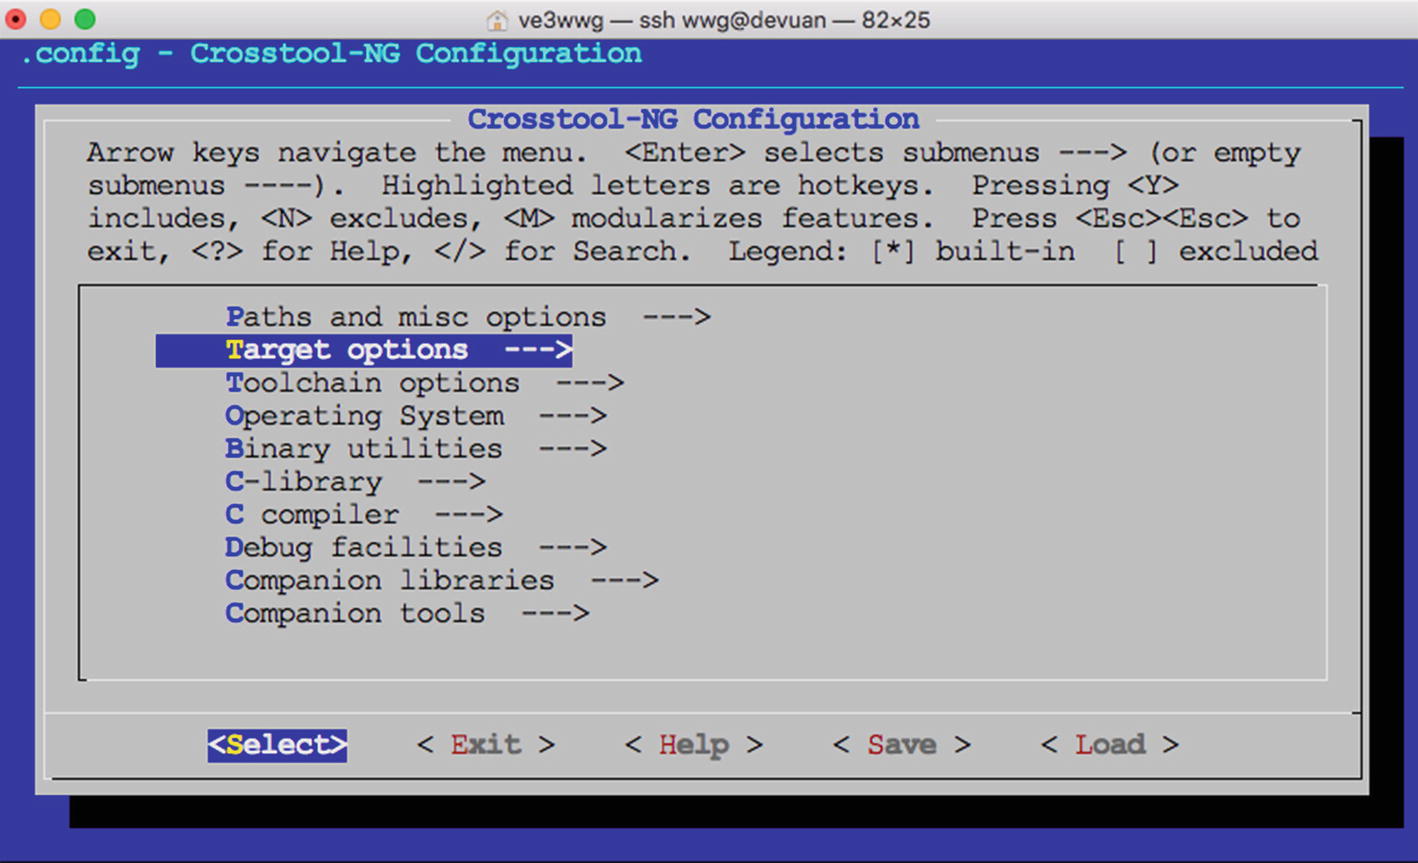
Choose Target options

Then choose Target Architecture and press Enter (Figure 20-7).
../images/326071_2_En_20_Chapter/326071_2_En_20_Fig7_HTML.jpg
Figure 20-7

Choose Target Architecture

In that menu, choose arm and press space (Figure 20-8). Then use the Select button at the bottom. This returns you to the Target Options menu.
../images/326071_2_En_20_Chapter/326071_2_En_20_Fig8_HTML.jpg
Figure 20-8

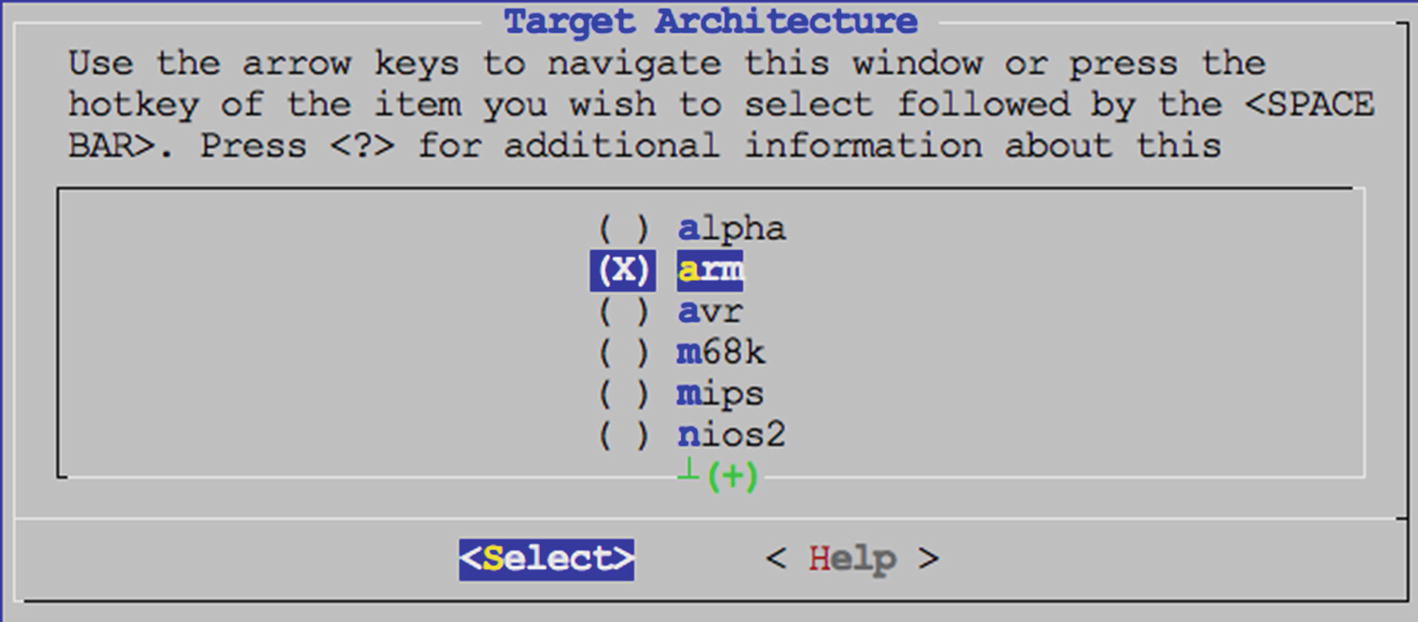
Choosing arm architecture

While in the Target Options menu (shown next), verify the Endianness setting by reviewing the status in round brackets. It should read Little Endian (Figure 20-9). If not, enter that menu and change it to Little endian. Below the Endianness menu item is the Bitness option. It should already indicate 32-bit. If not, change it.
../images/326071_2_En_20_Chapter/326071_2_En_20_Fig9_HTML.jpg
Figure 20-9

Checking Endianness and Bitness

Finally, exit this submenu with the Exit button.

Operating System

At the main menu again (Figure 20-10), choose Operating System and then choose Target OS (bare-metal) as shown in Figure 20-11.
../images/326071_2_En_20_Chapter/326071_2_En_20_Fig10_HTML.jpg
Figure 20-10

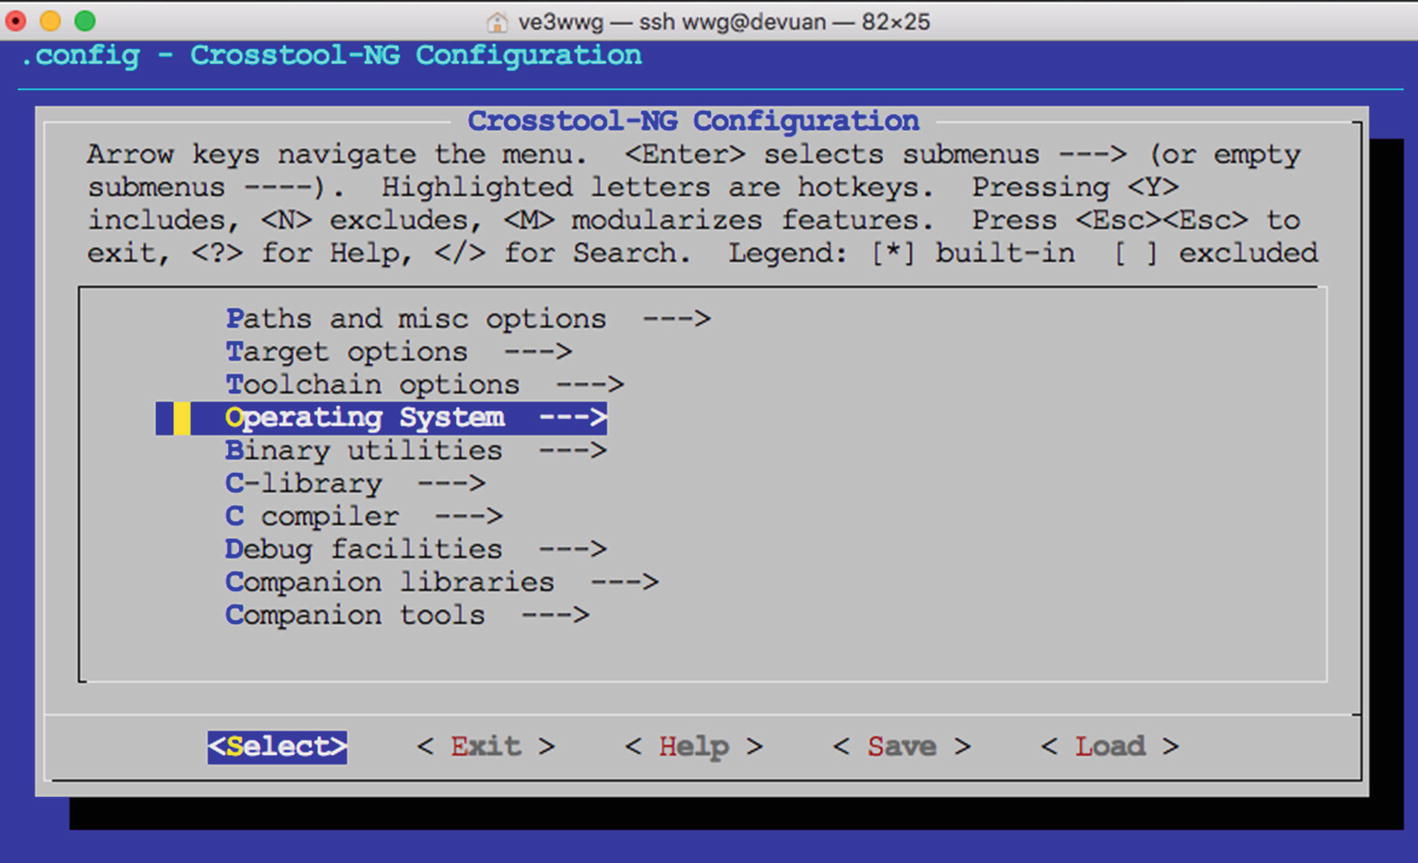
Select Operating System

../images/326071_2_En_20_Chapter/326071_2_En_20_Fig11_HTML.jpg
Figure 20-11

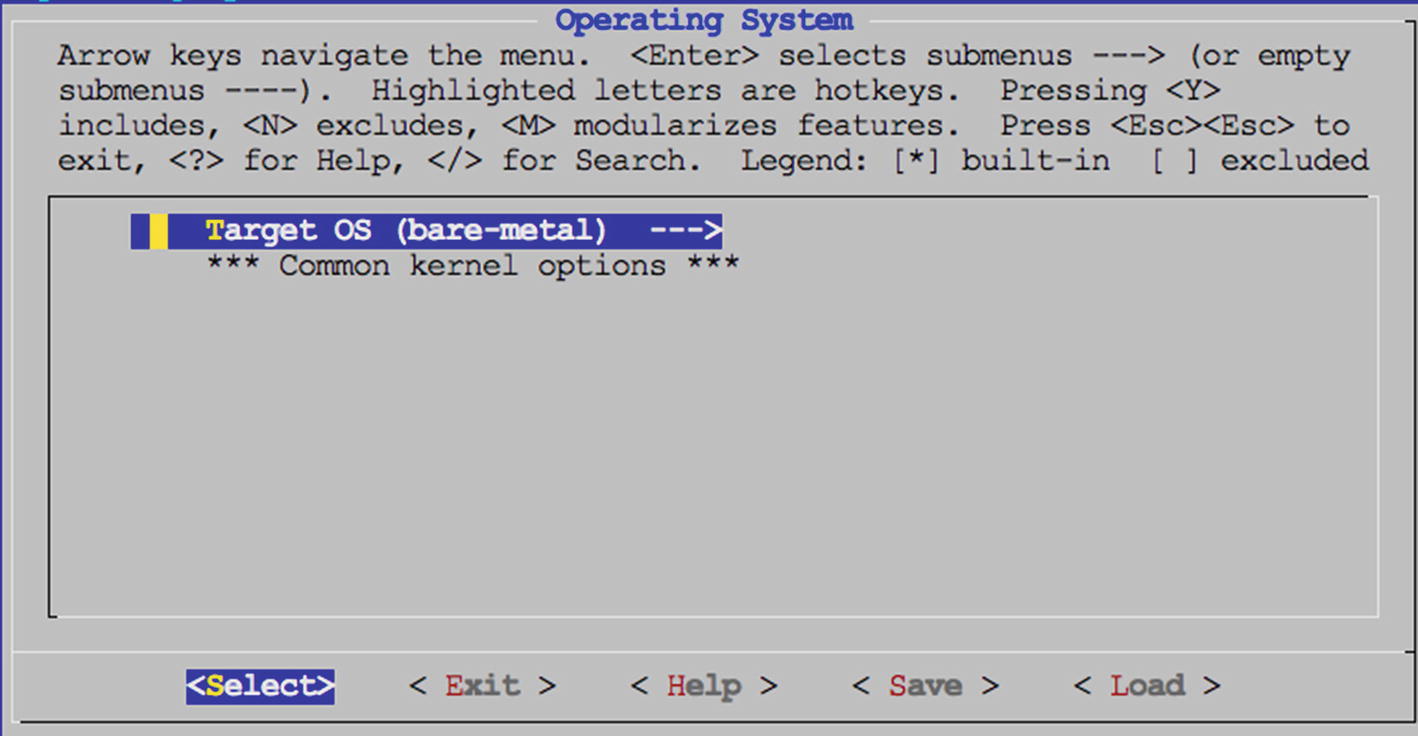
Choose Target OS (bare-metal)

../images/326071_2_En_20_Chapter/326071_2_En_20_Fig12_HTML.jpg
Figure 20-12

Choose Linux (not bare-metal)

Once you have chosen “linux” in Figure 20-12, exit back to the main menu.

Binary Utilities

At the main menu, open the Binary Utilities menu (Figure 20-13).
../images/326071_2_En_20_Chapter/326071_2_En_20_Fig13_HTML.jpg
Figure 20-13

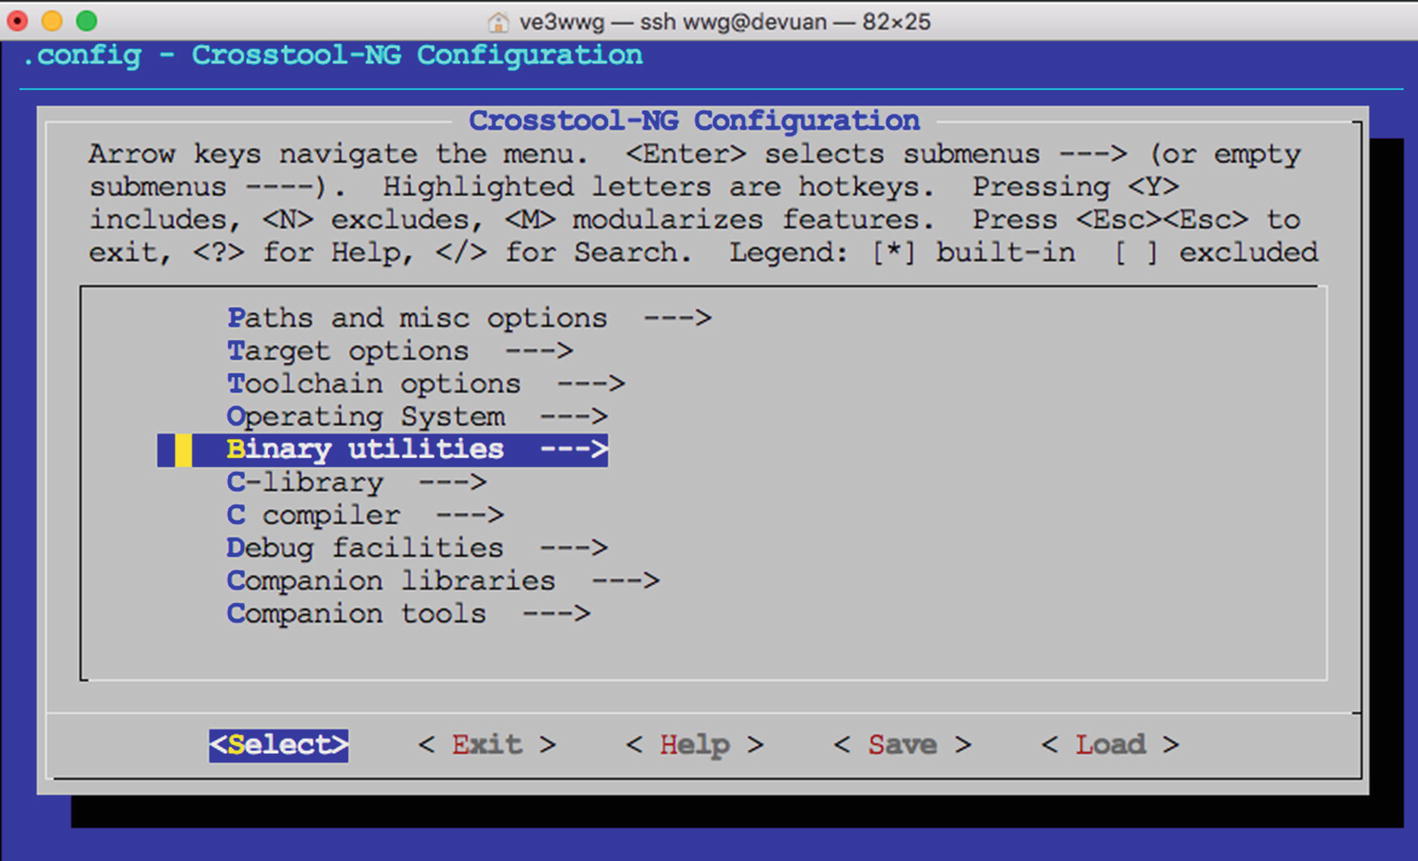
The Binary utilities menu

Cursor down to Binutils Version and open it (Figure 20-14).
../images/326071_2_En_20_Chapter/326071_2_En_20_Fig14_HTML.jpg
Figure 20-14

The binutils version menu

Once into the final binutils version selection menu, pick the most recent version unless you experienced trouble with a prior build attempt (Figure 20-15).
../images/326071_2_En_20_Chapter/326071_2_En_20_Fig15_HTML.jpg
Figure 20-15

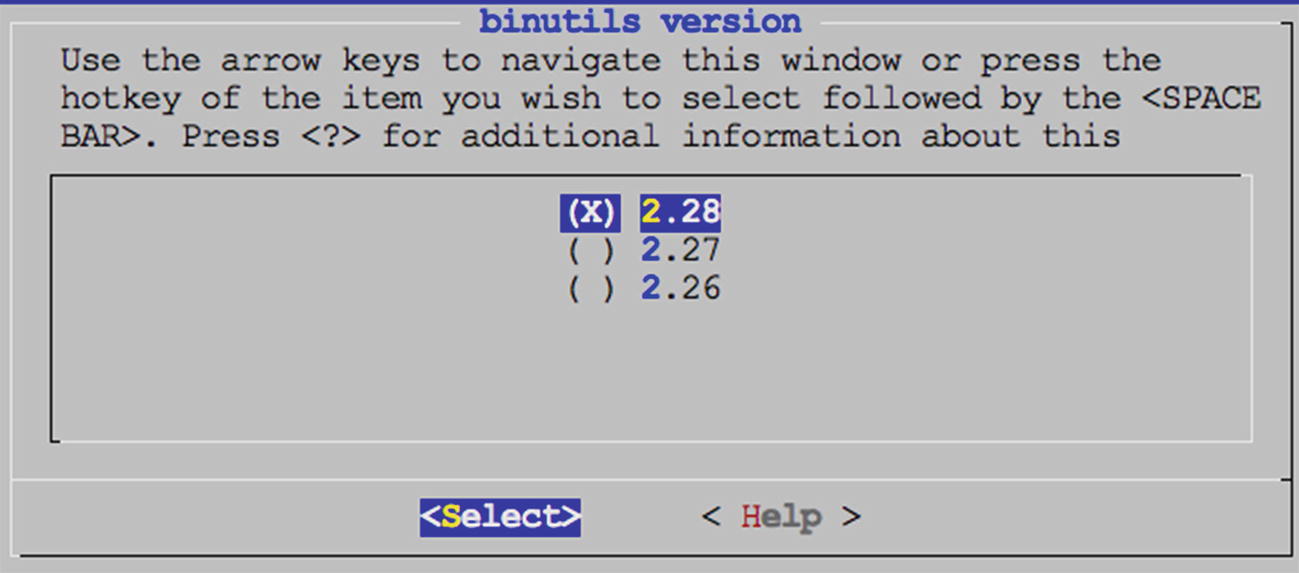
Select the binutils version (normally the most recent)

Exit back to the main menu.

C Compiler

At the main menu, open the C Compiler submenu (Figure 20-16).
../images/326071_2_En_20_Chapter/326071_2_En_20_Fig16_HTML.jpg
Figure 20-16

The C compiler submenu of the main menu

Here it is recommended that you enable the Show Linaro Versions option (Figure 20-17).
../images/326071_2_En_20_Chapter/326071_2_En_20_Fig17_HTML.jpg
Figure 20-17

Enable “Show Linaro versions”

Once that is enabled, you can select the submenu Gcc Version (Figure 20-18).
../images/326071_2_En_20_Chapter/326071_2_En_20_Fig18_HTML.jpg
Figure 20-18

Select menu “gcc version

Figure 20-19 shows a recent version of the Linaro compiler being chosen.
../images/326071_2_En_20_Chapter/326071_2_En_20_Fig19_HTML.jpg
Figure 20-19

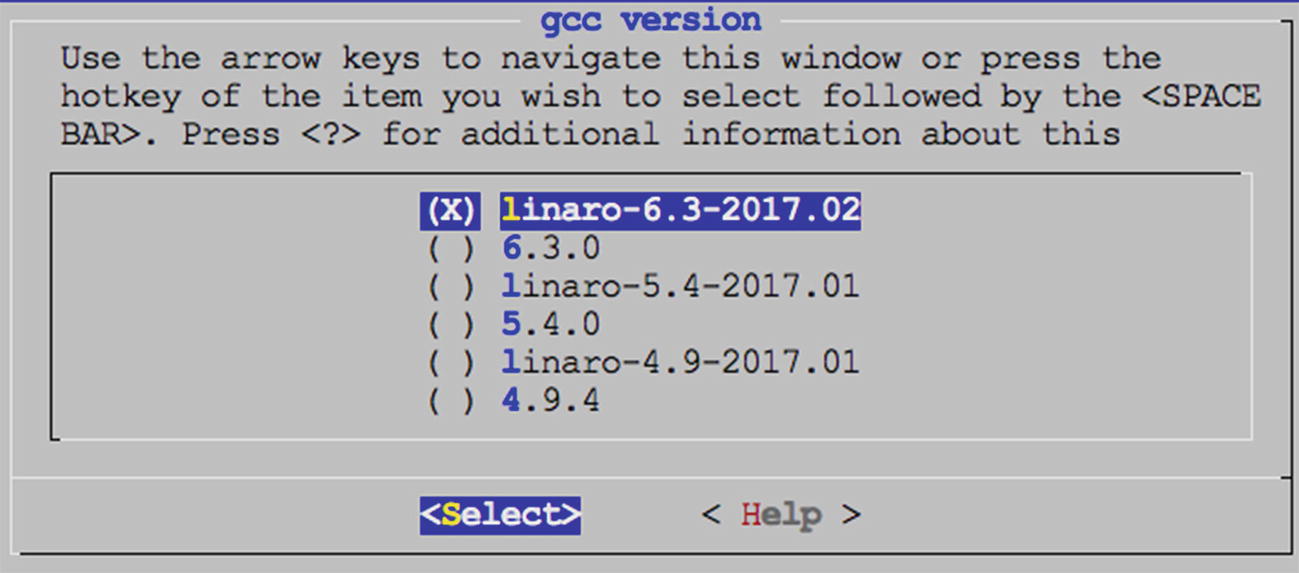
Choosing a recent linaro compiler

Then choose Exit once again to return to the main menu.

Save Configuration

Unless you have a reason to change anything else, exit the menu again to cause the Save prompt to appear:

../images/326071_2_En_20_Chapter/326071_2_En_20_Figa_HTML.jpg
Upon selecting Yes, the command exits after saving your configuration. At this point, it is worth mentioning that you may want to save your configuration somewhere outside the current directory. The configuration is saved in a file named .config and can be copied somewhere else for backup:
$ cp .config ~/ct-ng.config.bak

Saving the file outside the current directory will prevent accidental loss if ct-ng distclean is used.

Build Cross-Compiler

Check the ownership of /opt/x-tools. If you don’t own this directory, change the ownership now (substitute your userid for fred):
$ sudo chown -R fred /opt/x-tools
This will save you from having to execute the build process with root privileges. Now you can initiate the building of the cross-compiler. Note that your system needs to be connected to the Internet for downloading, unless the downloads were done on a prior attempt:
$ cd ~/xrpi/devel/staging
$ ct-ng build
Allow four hours of time for this job, much less if you’re repeating it (the first-time downloads files). Ideally, you can just leave the command to run and check for successful completion in the morning. It is not uncommon for different software problems to arise at this stage but if you do, read the next section for some troubleshooting tips. If all goes well, ct-ng compiles and installs tools into /opt/x-tools without any further interaction.
$ ct-ng build
[INFO ]  Performing some trivial sanity checks
[INFO ]  Build started 20180713.233346
[INFO ]  Building environment variables
[WARN ]  Directory '/home/wwg/src' does not exist.
[WARN ]  Will not save downloaded tarballs to local storage.
[EXTRA]  Preparing working directories
[EXTRA]  Installing user-supplied crosstool-NG configuration
[EXTRA]  ======================================================
[EXTRA]  Dumping internal crosstool-NG configuration
[EXTRA]    Building a toolchain for:
[EXTRA]      build  = i686-pc-linux-gnu
[EXTRA]      host   = i686-pc-linux-gnu
[EXTRA]      target = arm-unknown-linux-gnueabi
[EXTRA]  Dumping internal crosstool-NG configuration : done in 0.20s (at 00:03)
[INFO ]  ======================================================
[INFO ]  Retrieving needed toolchain components' tarballs
[EXTRA]    Retrieving 'automake-1.15'
[EXTRA]    Retrieving 'libtool-2.4.6'
[EXTRA]    Retrieving 'linux-4.10.8'
...
[INFO ]  Installing C library: done in 1950.45s (at 165:01)
[INFO ]  ======================================================
[INFO ]  Installing final gcc compiler
[EXTRA]    Configuring final gcc compiler
[EXTRA]    Building final gcc compiler
[EXTRA]    Installing final gcc compiler
[EXTRA]    Housekeeping for final gcc compiler
[EXTRA]       " --> lib (gcc)   lib (os)
[INFO ]  Installing final gcc compiler: done in 3446.75s (at 222:28)
[INFO ]  ======================================================
[INFO ]  Finalizing the toolchain's directory
[INFO ]    Stripping all toolchain executables
[EXTRA]    Installing the populate helper
[EXTRA]    Installing a cross-ldd helper
[EXTRA]    Creating toolchain aliases
[EXTRA]    Removing installed documentation
[INFO ]  Finalizing the toolchain's directory: done in 4.55s (at 222:33)
[INFO ]  Build completed at 20180714.031618
[INFO ]  (elapsed: 222:32.13)
[INFO ]  Finishing installation (may take a few seconds)...
[222:33] /
$

Based upon the 222:33 figure reported, this download and build took approximately 4 hours and 15 minutes to complete. This build was performed on an older single processor Devuan Linux instance.

Troubleshooting

The session output that you get from this build process is terse. As such, you don’t always get a clear idea of what the real failure was. For this reason, you’ll often need to check the build.log file:
$ less build.log

Using less, you can navigate to the end of the build.log file by typing a capital G.

One failure that frequently occurs in the beginning is a failed download. While the build process does retry downloads and tries different download methods, it can still fail. All that you need to do is to retry the build. It will download only the remaining files needed. Sometimes it will succeed on the second or third retry attempt.

Sometimes a component will fail in its configuration phase. Check the build.log file first to determine precisely which component is involved. Next you will want to examine the config.log file for that particular component. For example, let’s say the isl component failed. Dive down into the .build subdirectory until you find its config.log file:
$ cd .build/arm-unknown-linux-gnueabi/build/build-isl-host-i686-build_pc-linux-gnu
$ less config.log

Navigate to the end of config.log and work backward a few pages. Eventually, you will see text describing the command that was tried and the error message produced. In one instance, I was able to determine that the custom compiler option that I added (-fpermissive) was causing the failure. The solution then was to remove that option and try again.

Some errors will only occur with certain version choices. At one time, I was receiving errors related to PPL and needed a patch to correct it.

In getting through these issues, you can simply make corrections and then rerun the ct-ng build command. It is recommended that you plan for a later rebuild of everything again (after a clean), once the problems are solved. This will ensure that you have a good build without dependency issues.

If, after a correction, you run into the same problem, you may need to do a clean step first and start over. Depending on how deep you think the problem may be, choose one of the following:
  • ct-ng clean

  • ct-ng distclean (Be careful; see the following text.)

The ct-ng clean command will usually be enough, forcing the next build to start fresh. Any downloaded files and configuration will remain and will be reused.

The ct-ng distclean command is much more drastic, since it removes all of the downloaded content and your configuration files. I had copied the .config file to .config.bak and discovered to my horror that .config.bak had also been removed! So if you back up the .config file, copy it outside the current directory for safety.

Above all, keep your head. It’s difficult to troubleshoot these issues if you feel time pressure or get angry over the time invested. When under time pressure, leave it for another day when you can deal with it thoughtfully. Each redo takes considerable time. Wherever possible, eliminate the guesswork.

With each problem, take a deep breath, patiently look for clues, and pay attention to the details in the error messages. Remember that line in the movie Apollo 13: “Work the problem, people!”

Summary

In this chapter you have seen how to install a cross-compiler for your Raspberry Pi, whether on an older 32-bit Linux platform or in an instance of VirtualBox. Doing this will provide you with the compiler tools needed to compile your kernel or applications for the lesser powered Raspberry Pis, like the Zero or Zero W.

..................Content has been hidden....................

You can't read the all page of ebook, please click here login for view all page.
Reset
3.144.33.41