Some applications require a camera, like a birdie-cam, for example. Giving your Pi an eye can be done fairly inexpensively and is fun. This chapter examines the Pi camera, its installation, and its use.
Hookup
You’ll normally get the camera with a flat ribbon cable included. Most instructions will just say “plug in the camera” as part of the setup. But how do you plug in this type of cable? Which way does it go? Mine won’t go in, what gives?
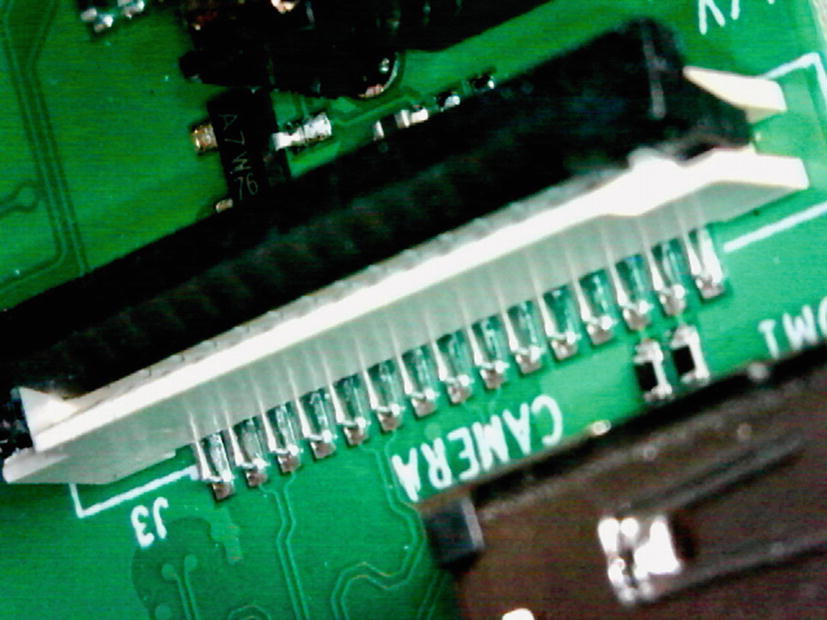
With the power off, locate the connector labeled “CAMERA” on the Pi. Figure 26-1 illustrates what the connector looks like. Your Pi may still have a protective plastic adhesive strip on top of that connector (mine was red). This is presumably to keep the dust out. Peel it off, and then you should see a connector like the figure. Without peeling off the protective strip, you might be left scratching your head as to how a cable is to fit in there.
Figure 26-1
The camera connector on the Pi, with the protective adhesive strip removed (Pi 3 B+)
In the figure you can see a black C-shaped part of the connector that can be lifted up by gently pulling up the sides (Figure 26-2). This exposes a slot for cable insertion.
Figure 26-2
Camera connector with the black locking part lifted to receive the ribbon cable (Pi 3 B+)
With the power off, gently insert the ribbon cable with the contacts facing away from the black part of the connector. In other words, face the contacts toward the label shown in Figure 26-2.
You may or may not still be able to see some contact surface showing after the cable is inserted (Figure 26-3 exposes some contact area above the connector). Don’t use too much force but use enough to fully insert. While holding the cable, push down on the shoulders of the connector to bind that C-shaped black part into the socket.
Figure 26-3
Insertion of the camera cable, with the contacts facing away from the black binding part of the connector
Figure 26-4 illustrates what the backside of the cable should look like in the connector. The blue strip of the cable will be facing that black binding part of the socket. After pushing the binding component down on the inserted cable, gently pull on the cable to see if it is firmly installed. If it comes out, then try again.
Figure 26-4
The backside of the cable (blue) should face the black binding C-shapped part of the socket
Camera
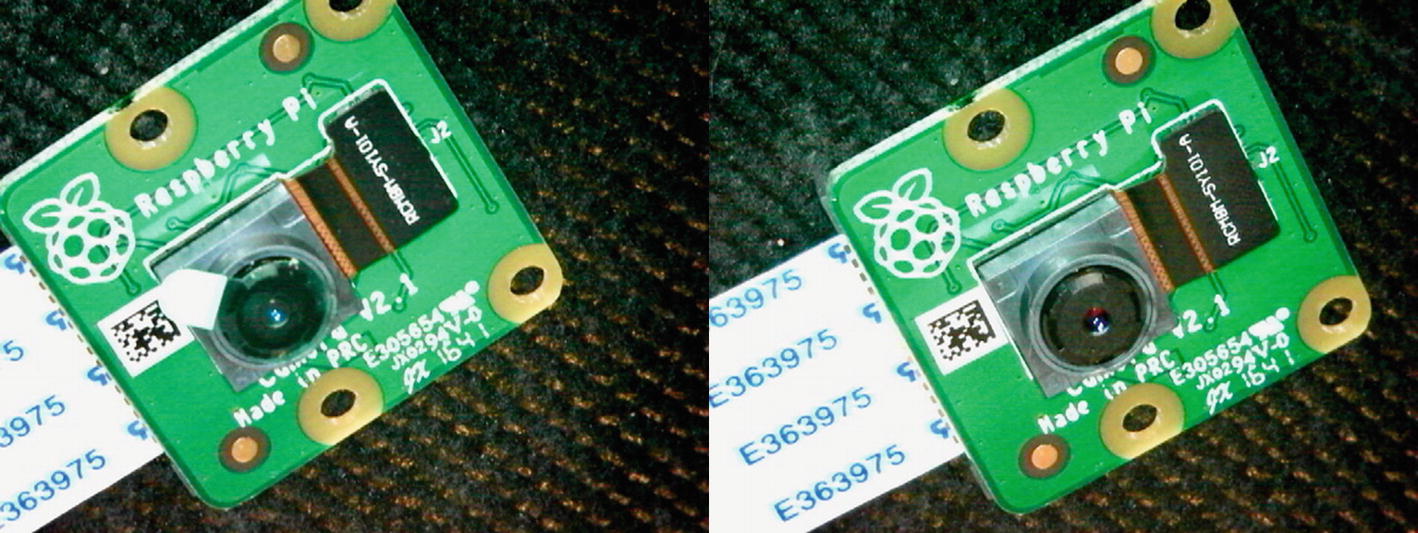
The camera may come with a protective covering, which should be removed. Figure 26-5 illustrates.
Figure 26-5
Camera with protective lens cover (left) and covering removed (right)
With the camera hardware ready to go, the Pi can be powered up and configured for the camera.
Configuration
Boot up into the Pi desktop and open the Raspberry Pi Configuration. Choose the Interfaces tab and then enable the camera (Figure 26-6). After enabling the camera, don’t forget to click OK and then reboot.
Figure 26-6
Enabling the camera in the Raspberry Pi Configuration, Interfaces tab. Click OK and then reboot.
Commands
The Raspbian Linux distribution is convenient because aside from configuration conveniences, it also provides tools for working with the camera among other things. The command raspistill can be used to capture an image after a five-second preview period.
$ raspistill -o itworks.jpg
Figure 26-7 was a capture from the Pi camera using the raspistill command. The camera preview only displays on the graphical desktop, which must be running. The preview will also not display in a VNC session but will appear on your monitor.
Figure 26-7
The author running the raspistill command, exclaiming “it worked!”
There are currently three commands supporting the camera:
raspistill for still captures.
raspivid for recording video.
raspistillyuv for still captures with no encoding (records YUV/RGB information to the file).
If you have an interest in Python, you can try using the supplied Python package picamera. For example, create a Python file with the following statements in it:
from picamera import PiCamera
from time import sleep
camera = PiCamera()
camera.start_preview()
sleep(10)
camera.stop_preview()
Save that as pieye.py (do not name it picamera.py). Then run the program:
$ py pieye.py
The camera preview will be shown on the graphical desktop, which must be running.
Summary
This chapter gets you up and running with your Pi camera. Raspbian Linux supports it well with bult-in drivers and Raspbian Linux commands like raspistill. With the Raspbian supplied tools, you are well equipped for camera-related projects. Advanced developers can pursue the use of projects like OpenCV (opencv.org).
This chapter also brings this book to a close. I hope the content has inspired you to do more with your Pi. Thank you for allowing me to be your guide.