
Lesson 1. Getting Started
Most of the lessons in the first half of Agile Java involve the development of various pieces of a student information system. You will not build a complete system, but you will work on various subsystems that might be part of a complete system.
The student information system involves many different aspects of running a school or university: registration, grades, course scheduling, billing, records, and so on.
In Lesson 1, you will:
• create a simple Java class
• create a test class that exercises the Java class
• use the JUnit framework
• learn about constructors
• refactor the code that you write
This lesson is very detail oriented. I will explicitly describe the steps you should take in doing test-driven development. Future lessons will assume that you are following the cycle of test-driven development in order to produce appropriate tests and code.
Testing
Test-driven development means that you will write tests for virtually every bit of code. It also means that you will write the tests first. The tests are a means of specifying what the code needs to do. After writing the corresponding code, the tests are run to ensure that the code does what the tests specify.
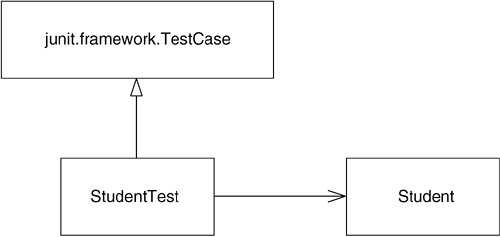
Each class you code will have a corresponding test class. In Figure 1.1, StudentTest is the test class for the production class Student.
Figure 1.1. Test and Production Class

StudentTest will have to create objects of class Student, send messages to these objects, and prove that once all the messages have been sent, things are as expected. StudentTest is thus dependent on Student, as shown by the navigable association in the diagram. Conversely, Student is not dependent on StudentTest: The production classes you build should know nothing about the tests written for them.
Design
You design and construct a system based on customer needs, or requirements. Part of the design process is translating the customer requirements into rough ideas or sketches of how the system will be used. For a web-based system, this means designing the web pages that will provide the application's functionality. If you are building “inbetween” software known as middleware, your system will be used by other client software and will interact with other server software. In this case, you will want start by defining the communication points—the interfaces—between the other systems and the middleware.
You start by building only high-level designs, not highly detailed specifications. You will continually refine the design as you understand more about the customer needs. You will also update the design as you discover what works well and what doesn't work well in the Java code that you build. The power of object-oriented development can allow you this flexibility, the ability to quickly adapt your design to changing conditions.
Designing the system from the outside in as described above would be a daunting task without complete understanding of the language in which you're going to build it—Java. To get started, you will construct some of the internal building blocks of the system. This approach will get you past the language basics.
![]()
The student information system is primarily about students, so as your first task you will abstract that real-world concept into its object-oriented representation. A candidate class might be Student. Student objects should contain basic information about a student such as name, identification number, and grades. You will concentrate on an even smaller concern first: Create a unique student object that stores the name of the student.
The book icon that appears to the left of the preceding paragraph will appear throughout Agile Java. I will use this icon to designate requirements, or stories, that you will build into the student information system. These stories are simple descriptions of what you need to build into the system in order to make the customer happy. You will translate stories into detailed specifications that you realize in the form of tests.
A Simple Test
To represent the initial need to capture student information, start by creating a class that will act as your test case. First, create a new directory or folder on your machine.1 Then create a file named StudentTest.java in this directory. For the time being, you will save, compile, and execute code out of this single directory. Type the following code into your editor:
1 The instructions in this lesson are geared toward command-line use of Java. If you are using an IDE, you will create a class named StudentTest in something called the “default package.” If you are prompted for any package name, do not enter anything.
public class StudentTest extends junit.framework.TestCase {
}
Save the file using the file name StudentTest.java.
The two lines of code in StudentTest.java define a class named StudentTest. Everything that comes between the opening and closing braces ({and }) is part of the definition of StudentTest.
You must designate the class as public in order for the testing framework JUnit to recognize it. I will cover public in more depth later. For now, understand that the public keyword allows other code, including the code in the JUnit framework, to work with the code you write.
The code phrase extends junit.framework.TestCase declares StudentTest to be a subclass of another class named junit.framework.TestCase. This means that StudentTest will acquire, or inherit, all the capabilities (behavior) and data (attributes) from a class named junit.framework.TestCase. Student Test will also be able to add its own behavior and/or attributes. The extends clause also allows the JUnit user interface to recognize the StudentTest class as something that contains testing methods.
The UML class diagram in Figure 1.2 shows the inheritance relationship between StudentTest and junit.framework.TestCase. StudentTest is now dependent upon both junit.framework.TestCase and Student. Remember that the arrowhead distinguishes between the type of dependency—a closed arrowhead indicates an inheritance relationship.
Figure 1.2. StudentTest Inherits from junit.framework.TestCase
Your next step is to compile the StudentTest class. In order to do so, you must tell Java where to find any other classes that StudentTest references. Currently this includes only the class junit.framework.TestCase. This class can be found in a packaged format known as a JAR (Java ARchive) file. The JAR file in which junit.framework.TestCase can be found also contains many other classes that comprise the JUnit framework.
I discuss JAR files in more depth in Additional Lesson III. For now, you only need to understand how to tell Java where to find the JUnit JAR file. You do so using the classpath.
From the command line, you can specify the classpath at the same time that you compile the source file.
javac -classpath c:junit3.8.1junit.jar StudentTest.java
You must specify either the absolute or relative location of the file JUnit. jar;2 you will find it in the directory where you installed JUnit. This example specifies the absolute location of JUnit.jar.
2 An absolute location represents the explicit, complete path to a file, starting from the drive letter or root of your file system. A relative location contains a path to a file that is relative to your current location. Example: If StudentTest is in /usr/src/student and JUnit.jar is in /usr/src/JUnit3.8.1, you can specify the relative location as ../JUnit/3.8.1/JUnit.jar.
You should also ensure that you are in the same directory as StudentTest.java.
If you omit the classpath, the Java compiler will respond with an error message:
StudentTest.java:1: package junit.framework does not exist
public class StudentTest extends junit.framework.TestCase {
^
1 error
Your IDE will allow you to specify the classpath somewhere in the current project's property settings. In Eclipse, for example, you specify the classpath in the Properties dialog for the project, under the section Java Build Path, and in the Libraries tab.
JUnit
Once you have successfully compiled StudentTest, you can execute it in JUnit. JUnit provides two GUI-based interfaces and a text interface. Refer to the JUnit documentation for further information. The following command will execute the AWT interface3 against StudentTest.class, using JUnit's class named junit.awtui.TestRunner.
3 The AWT is Java's more bare-boned user interface toolkit, in contrast with Swing, which provides more controls and features. The AWT version of the JUnit interface is simpler and easier to understand. To use the Swing version, use the class name junit.swingui.TestRunner instead of junit.awtui.TestRunner. To use the text version, use the class name junit.textui.TestRunner.
java -cp .;c:junit3.8.1junit.jar junit.awtui.TestRunner StudentTest
You once again specify the classpath, this time using the abbreviated keyword -cp. Not only does the Java compiler need to know where the JUnit classes are, but the Java VM also needs to be able to find these classes at runtime so it can load them up as needed. In addition, the classpath now contains a ., representing the current directory. This is so Java4 can locate StudentTest.class: If a directory is specified instead of a JAR filename, Java scans the directory for class files as necessary.
4 You'll note I use phrases such as “Java does this” often. This is a colloquial (i.e., lazy) way of saying “The Java virtual machine does this,” or “The Java compiler does that.” You should be able to determine whether I'm talking about the VM or the compiler from the context.
The command also contains a single argument, StudentTest, which you pass to the junit.awtui.TestRunner class as the name of the class to be tested.
When you execute the TestRunner, you should see a window similar to Figure 1.3.
Figure 1.3. JUnit (showing a red bar)
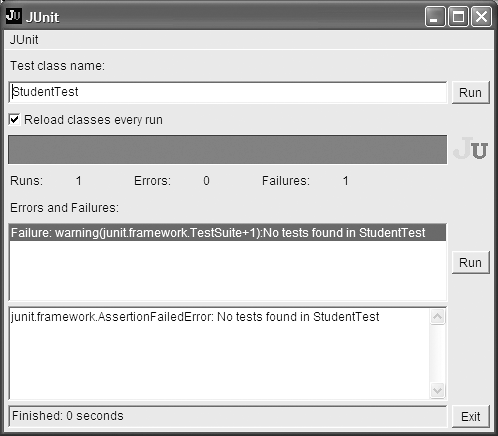
There really isn't very much to the JUnit interface. I will discuss only part of it for now, introducing the remainder bit by bit as appropriate. The name of the class being tested, StudentTest, appears near the top in an entry field. The Run button to its right can be clicked to rerun the tests. The interface shows that you have already executed the tests once. If you click the Run button (go ahead!), you will see a very quick flash of the red bar5 spanning the width of the window.
5 If you are color-blind, the statistics below the bar will provide you with the information you need.
The fact that JUnit shows a red bar indicates that something went wrong. The summary below the red bar shows that there is one (1) failure. The Errors and Failures list explains all the things that went wrong; in this case, JUnit complained because there were “No tests found in StudentTest.” Your job as a test-driven programmer will be to first view errors and failures in JUnit and then quickly correct them.
Adding a Test
Edit the source for your StudentTest class to look like the following code:
public class StudentTest extends junit.framework.TestCase {
public void testCreate() {
}
}
The new second and third lines define a method within the StudentTest class:
public void testCreate() {
}
A method is a block of code that will contain any number of code statements. Like the class declaration, Java uses braces to delineate where the method starts and where it ends. All code that appears between method braces belongs to the method.
The method in this example is named testCreate. It is designated as being public, another requirement of the JUnit testing framework.
Methods have two general purposes. First, when Java executes a method, it steps through the code contained within the braces. Among other things, method code can call other methods; it can also modify object attributes. Second, a method can return information to the code that executed it.
The testCreate method returns nothing to the code that invoked it—JUnit has no need for such information. A method that returns no information provides what is known as a void return type. Later (see Returning a Value from a Method in this lesson) you will learn how to return information from a method.
The empty pair of parentheses () indicates that testCreate takes no arguments (also known as parameters)—it needs no information passed to it in order to do its work.
The name of the method, testCreate, suggests that this is a method to be used for testing. However, to Java, it is just another method name. But for JUnit to recognize a method as a test method, it must meet the following criteria:
• the method must be declared public,
• the method must return void (nothing),
• the name of the method must start with the word test, in lowercase letters, and
• the method cannot take any arguments ().
Compile this code and rerun JUnit's TestRunner. Figure 1.4 shows that things are looking better.
Figure 1.4. JUnit success (showing a green bar)
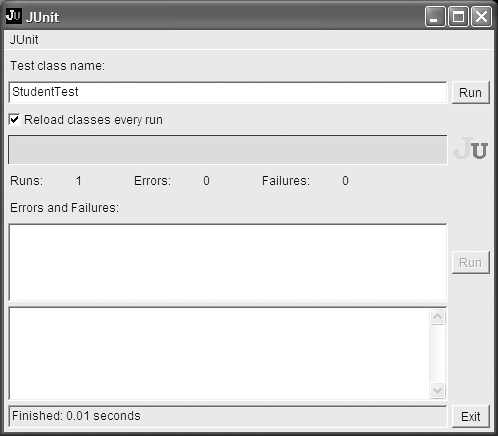
The green bar is what you will always be striving for. For the test class StudentTest, JUnit shows a successful execution of one test method (Runs: 1) and no errors or failures.
Remember that there is no code in testCreate. The successful execution of JUnit demonstrates that an empty test method will always pass.
Creating a Student
Add a single line, or statement, to the testCreate method:
public class StudentTest extends junit.framework.TestCase {
public void testCreate() {
new Student("Jane Doe");
}
}
You terminate each statement with a semicolon (;).
When the testing framework calls the testCreate method, Java executes this single statement. Once Java executes the statement, it returns control to code in the testing framework that called testCreate.
The statement in testCreate tells Java to create an object of the class type Student:
new Student("Jane Doe");
You place the new keyword before the name of the class to instantiate. You then follow the class name with an argument list. The argument list contains information the Student class requires in order to be able to instantiate a Student object. Different classes will need different pieces of information; some classes will not need any information at all. It is up to the designer of the class (you, in this case) to specify what information must be supplied.
The sole argument in this example represents the name of the student, Jane Doe. The value "Jane Doe" is a string literal. String literals represent object instances of the predefined Java class java.lang.String. Simply put, string literals are Java's representation of pieces of text.
Soon you will build code for the Student class. At that time, you will specify what to do with this String argument. There are a few things you can do with arguments: You can use them as input data to another operation, you can store them for later use and/or retrieval, you can ignore them, and you can pass them to other objects.
When the Java VM executes the new operator in this statement, it allocates an area in memory to store a representation of the Student object. The VM uses information in the Student class definition to determine just how much memory to allocate.
Creating the Student Class
Compile the test. You should expect to see problems,6 since you have only built the test class StudentTest. StudentTest refers to a class named Student, which is nowhere to be found—you haven't built it yet!
6 You may see different errors, depending on your Java compiler and/or IDE.
StudentTest.java:3: cannot find symbol
symbol : class Student
location: class StudentTest
new Student("Jane Doe");
^
1 error
Note the position of the caret (^) beneath the statement in error. It indicates that the Java compiler doesn't know what the source text Student represents.
The compile error is expected. Compilation errors are a good thing—they provide you with feedback throughout the development process. One way you can look at a compilation error is as your very first feedback after writing a test. The feedback answers the question: Have you constructed your code using proper Java syntax so that the test can execute?
To eliminate the current error, create a new class named Student.java. Edit it to contain the following code:
class Student {
}
Run javac again, this time using a wildcard to specify that all source files should be compiled:
javac -cp c:junit3.8.1junit.jar *.java
You will receive a new but similar error. Again the compiler cannot find a symbol, but this time it points to the word new in the source text. Also, the compiler indicates that the symbol it's looking for is a constructor that takes a String argument. The compiler found the class Student, but now it needs to know what to do with respect to the "Jane Doe" String.
StudentTest.java:3: cannot find symbol
symbol : constructor Student(java.lang.String)
location: class Student
new Student("Jane Doe");
^
1 error
Constructors
The compiler is complaining that it cannot find an appropriate Student constructor. A constructor looks a lot like a method. It can contain any number of statements and can take any number of arguments like a method. However, you must always name a constructor the same as the class in which it is defined. Also, you never provide a return value for a constructor, not even void. You use a constructor to allow an object to be initialized, often by using other objects that are passed along as arguments to the constructor.
In the example, you want to be able to pass along a student name when you instantiate, or construct, a Student object. The code
new Student("Jane Doe");
implies that there must be a constructor defined in the Student class that takes a single parameter of the String type. You can define such a constructor by editing Student.java so that it looks like this:
class Student {
Student(String name) {
}
}
Compile again and rerun your JUnit tests:
javac -classpath c:junit3.8.1junit.jar *.java
java -cp .;c:junit3.8.1junit.jar junit.awtui.TestRunner StudentTest
You should see a green bar.
The constructor currently doesn't do anything with the name String passed to it. It is lost in the ether! Soon, you'll modify the Student class definition to hold on to the name.
Local Variables
So far, when JUnit executes testCreate, Java executes the single statement that constructs a new Student object. Once this statement executes, control returns to the calling code in the JUnit framework. At this point, the object created in testCreate disappears: It had a lifetime only as long as testCreate was executing. Another way to say this is that the Student object is scoped to the testCreate method.
You will want to be able to refer to this Student object later in your test. You must somehow hold on to the memory address of where the Java VM decided to store the Student object. The new operator returns a reference to the object's location in memory. You can store this reference by using the assignment operator, represented in Java as the equals sign (=). Modify StudentTest:
public class StudentTest extends junit.framework.TestCase {
public void testCreate() {
Student student = new Student("Jane Doe");
}
}
The statement is now an assignment statement: an object or value on the right-hand side of an assignment operator is stored in a reference on the left-hand side of the operator.
When the Java VM executes this statement, it executes the code to the right-hand side of the assignment operator (=) first, creating a Student object in memory. The VM takes note of the actual memory address where it places the new Student object. Subsequently, the VM assigns this address to a reference on the left-hand side, or first half, of the statement.
The first half of the statement creates a local variable reference named student of the type Student. The reference will contain the memory address of the Student object. It is local because it will exist only for the duration of the test method. Local variables are also known as temp variables or temporary variables.
You could have named the variable someStudent, or janeDoe, but in this case, the generic name student will work just fine. See the section Naming Conventions at the end of this lesson for guidelines on how to name your variables.
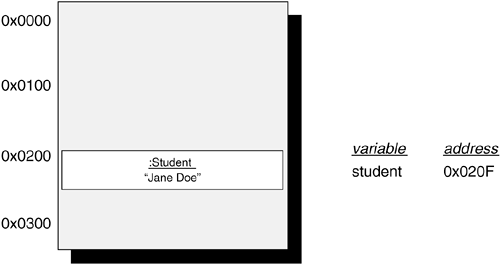
A conceptual pictorial representation of the student reference and Student object might look something like Figure 1.5.7 This picture exists only to give you an understanding of what's happening behind the scenes. You need not learn how to create your own such pictures.
7 The memory addresses are shown in hexadecimal, which is indicated by the “0x” that precedes each number. Lesson 10 includes a discussion of hexadecimal numbers.
Figure 1.5. Reference to an Object
Behind the scenes, Java maintains a list of all the variables you define and the memory location to which each variable refers. One of the beauties of Java is that you do not have to explicitly code the mundane details of creating and releasing this memory space. Developers using an older language such as C or C++ expend a considerable amount of effort managing memory.
In Java, you don't have to worry as much about managing memory. But it is still possible to create an application with memory “leaks,” where the application continues to use more and more memory until there is none left. It is also possible to create applications that behave incorrectly because of a poor understanding of how Java manages memory for you. You must still understand what's going on behind the scenes in order to master the language.
I will use the conceptual memory diagrams only in this chapter to help you understand what Java does when you manipulate objects. They are not a standard diagramming tool. Once you have a fundamental understanding of memory allocation, you can for the most part put the nuts and bolts of it out of mind when coding in Java.
Recompile all source files and rerun your test. So far, you haven't written any code that explicitly tests anything. Your tests should continue to pass.
Returning a Value from a Method
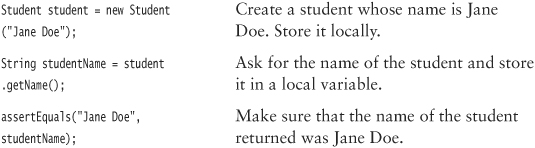
As the next step, you want to ask the Student object created in the test for the student's name.
public class StudentTest extends junit.framework.TestCase {
public void testCreate() {
Student student = new Student("Jane Doe");
String studentName = student.getName();
}
}
You now have two statements in testCreate. Each statement is terminated by a semicolon. When the Java VM executes testCreate, it will execute each statement in turn, top to bottom, before returning control to the calling class.
The second statement is another assignment statement, similar to the first statement. In this statement, however, you are not instantiating a new object. Instead, you are sending a message to the Student object, using the student reference assigned to in the previous statement.
The right-hand side of this statement is a message send that asks the Student object for its name. You, as the programmer and class designer of the Student class, are the one who makes the decision about the message name and its arguments. You have decided that the message to which students should respond is called getName and that the message will not need to carry any additional information (arguments).
student.getName();
You also must specify the message receiver—the object to which you want the message sent. To do so, you first specify the object reference, student, followed by a period (.), followed by the message getName(). The parentheses indicate that no arguments are passed along with the message. For this second statement to work, you will need to define a corresponding method in the Student class called getName().
The left hand of the second statement assigns the memory address of this returned String object to a String local variable called studentName. For this assignment to work, you'll need to define the getName() method in Student so that it returns a String object.
You'll see how to build getName() in just a minute.
Compile all source files. The remaining compilation error indicates that the compiler doesn't know about a getName method in the Student class.
StudentTest.java:4: cannot find symbol
symbol : method getName()
location: class Student
String studentName = student.getName();
^
1 error
You can eliminate this error by adding a getName method to the Student class definition:
class Student {
Student(String name) {
}
String getName() {
}
}
You saw earlier how you can indicate that a method returns nothing by using the void keyword. This getName method specifies instead a return type of String. If you now try to compile Student.java, you receive an error:
Student.java:5: missing return statement
}
^
1 error
Since the method specifies a return type of String, it needs a return statement that provides a String object to be returned to the code that originally sent the getName message:
class Student {
Student(String name) {
}
String getName() {
return "";
}
}
The return statement here returns an empty String object—a String with nothing in it. Compile the code again; you should receive no compilation errors. You are ready to run the test in JUnit again.
Assertions
You now have a complete context for testCreate: The first test statement creates a student with a given name, and the second statement asks for the name from the student object. All that you need do now is add a statement that will demonstrate that the student name is as expected—that it is the same as the name passed to the constructor of the student.
public class StudentTest extends junit.framework.TestCase {
public void testCreate() {
Student student = new Student("Jane Doe");
String studentName = student.getName();
assertEquals("Jane Doe", studentName);
}
}
The third line of code (statement) is used to prove, or assert, that everything went well during the execution of the first two statements. This is the “test” portion of the test method. To paraphrase the intent of the third statement: You want to ensure that the student's name is the string literal "Jane Doe". In more general terms, the third statement is an assertion that requires the first argument to be the same as the second.
This third line is another message send, much like the right-hand side of the second statement. However, there is no receiver—to what object is the assertEquals message sent? If you specify no receiver, Java assumes that the current object—the object in which the current method is executing—is the receiver.
The class junit.framework.TestCase includes the definition for the method assertEquals. Remember that in your class definition for StudentTest, you declared:
public class StudentTest extends junit.framework.TestCase {
This declaration means that the StudentTest class inherits from junit.framework.TestCase. When you send the message assertEquals to the current StudentTest object, the Java VM will attempt to find a definition for assertEquals in StudentTest. It will not find one and subsequently will use the definition it finds in junit.framework.TestCase. Once the VM finds the method, it executes it just like any other method.
The important thing to remember is that even though the method is defined in the superclass of StudentTest, it operates on the current StudentTest object. You will revisit this concept of inheritance in Lesson 6.
The third statement also demonstrates how you can pass more than one argument along with a message by using commas to separate each argument. There are two parameters to assertEquals: the String literal "Jane Doe" and the studentName reference you created in the second statement. Both represent objects that will be compared within the assertEquals method. JUnit will use the result of this comparison to determine if the testCreate method should pass or fail. If the string in the memory address referred to by studentName is also "Jane Doe", then the test passes.
Recompile and run your test. JUnit should look something like Figure 1.6.
Figure 1.6. Not Quite Done
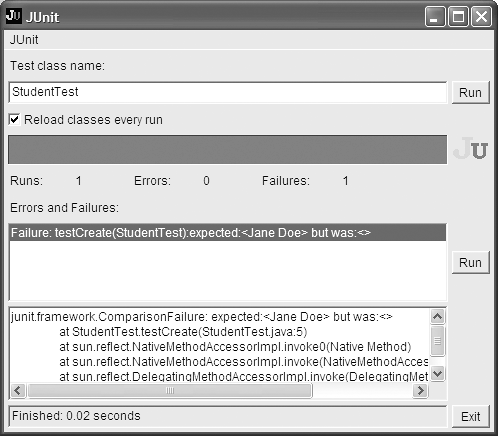
JUnit shows a red bar and indicates one failure. It also tells you what went wrong in the first listbox:
Failure: testCreate(StudentTest): expected:<Jane Doe> but was:<>
The method failing is testCreate, located in the StudentTest class. The problem is that something expected the String literal "Jane Doe" but received instead an empty String. Who is expecting this and where? JUnit divulges this information in the second listbox, showing a walkback (also known as a stack trace) of the code that led up to the failure. The first line of this stack trace indicates that there was a ComparisonFailure, and the second line tells you that the failure occurred at line 5 in StudentTest.java.
Use your editor to navigate to line 5 of the StudentTest source code. This will show that the assertEquals method you coded is the source of the comparison failure:
assertEquals("Jane Doe", studentName);
As mentioned before, the assertEquals method compares two objects8 and fails the test if they are not equal. JUnit refers to the first parameter, "Jane Doe", as the expected value. The second parameter, the studentName variable, references the actual value—what you are expecting to also have the value "Jane Doe". The studentName reference instead points to an empty String value, since that's what you coded to return from the getName method.
8 Specifically, this example compares a String object to a String variable, or reference. Java dereferences the variable to obtain the String object at which it points and uses this for the comparison.
Fixing the code is a simple matter—change the getName method to return "Jane Doe" instead:
class Student {
Student(String name) {
}
String getName() {
return "Jane Doe";
}
}
Recompile and rerun JUnit. Success! (See Figure 1.7.) There's something satisfying about seeing that green bar. Press the Run button again. The bar should stay green. Things are still good—but not that good. Right now, all students will be named Jane Doe. That's not good, unless you're starting and all-woman school that only accepts people with the name Jane Doe. Read on
Figure 1.7. Success!

Instance Variables
You have built your first test and corresponding class. You used StudentTest to help you build the Student class in an incremental manner. The test can also be used to ensure that any future changes you make don't break something you already did.
Unfortunately, the code isn't quite right. If you were to build more students, they would all respond to the getName message by saying they were Jane Doe. You'll mature both StudentTest and Student in this section to deal with the problem.
You can prove the theory that every Student object will answer the name Jane Doe by elaborating on the testCreate method. Add code to create a second student object:
public void testCreate() {
Student student = new Student("Jane Doe");
String studentName = student.getName();
assertEquals("Jane Doe", studentName);
Student secondStudent = new Student("Joe Blow");
String secondStudentName = secondStudent.getName();
assertEquals("Joe Blow", secondStudentName);
}
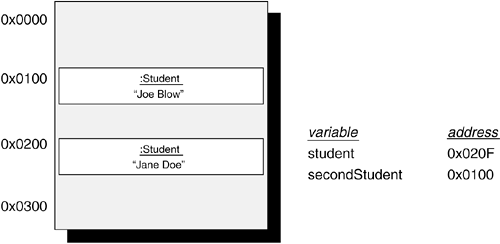
The conceptual picture of the second student in memory is shown in Figure 1.8. Java finds space for the new Student object and stuffs it there. You won't know and shouldn't care where each object ends up. The important thing to get out of the memory diagram is that you now have references to two discrete objects in memory.
Figure 1.8. Objects in Memory
Start JUnit again. If you are running from the command line, start it as a background process (under Unix)9 or use the start command (under Windows).10 This will allow JUnit to run as a separate window, returning control to the command line. Whether you are using an IDE or running from the command line, you can keep the JUnit window open. Since JUnit reloads class files that are changed by compilation, you will not need to restart the JUnit GUI each time you make a change.11
9 Append an & to the command, under most systems
10 Prepend the command with the word start. For example:
11 For this to work, ensure that the checkbox labeled “Reload classes every run” is checked in the JUnit GUI.
junit.framework.ComparisonFailure: expected:<...oe Blow> but was:<...ane Doe>
Sure enough, since getName always returns "Jane Doe", the second assertEquals statement fails.
The problem is that you passed the student name to the constructor of the Student class, but the constructor does nothing with that name. Your code in the Student class is responsible for storing the name if anything is going to be able to refer to the name later.
You want the student's name to be an attribute of the student—a piece of information that is kept by the student as long as the student object is around. The most direct way to represent an attribute in Java is by defining it as a field, also known as an instance variable. You declare a field within the braces that delineate the start and end of a class. A field declaration can appear anywhere within the class as long as it appears outside of the methods defined in that class. But according to convention, you should place field declarations near either the start or the end of the class.
Like a local variable, a field has a type. Define the field myName to be of the type String within the Student class as shown here:
Class student {
String myName;
Student(String name) {
}
String getName() {
return "Jane Doe";
}
}
In the constructor body, assign the constructor's parameter name to myName:
Student(String name) {
myName = name;
}
Finally, return the field from the getName method (instead of the String literal "Jane Doe").
String getName() {
return myName;
}
JUnit should still be open, showing the comparison failure and red bar. Rerun the tests by pressing the Run button. The bar should turn green.
Take a look again at the test method:
public void testCreate() {
Student student = new Student("Jane Doe");
String studentName = student.getName();
assertEquals("Jane Doe", studentName);
Student secondStudent = new Student("Joe Blow");
String secondStudentName = secondStudent.getName();
assertEquals("Joe Blow", secondStudentName);
}
The test demonstrates, and thus documents, how Student instances can be created with discrete names. To further bolster this assertion, add a line to the end of the test to ensure that you can still retrieve the proper student name from the first student object created:
public void testCreate() {
Student student = new Student("Jane Doe");
String studentName = student.getName();
assertEquals("Jane Doe", studentName);
Student secondStudent = new Student("Joe Blow");
String secondStudentName = secondStudent.getName();
assertEquals("Joe Blow", secondStudentName);
assertEquals("Jane Doe", student.getName());
}
Note that instead of assigning the result of the message send—the result of calling student.getName()—to a local variable, you instead substituted it directly as the second parameter of assertEquals.
Rerun the test (after compiling). The success of the test shows that student and secondStudent refer to two distinct objects.
start java -cp .;c:junit3.8.1junit.jar junit.awtui.TestRunner StudentTest
Summarizing the Test
Let's summarize what the test is supposed to be doing, line by line:
That's a lot of things to know in order to understand a few short lines of code. However, you have already seen the foundation for a large part of Java programming. In well-designed object-oriented Java coding, most statements involve either creating new objects, sending messages to other objects, or assigning object addresses (whether the objects are created via new or are returned from a message send) to an object reference.
Refactoring
One of the main problems in software development is the high cost of maintaining code. Part of the reason is that code quickly becomes “crufty” or messy, as the result of rushed efforts or just plain carelessness. Your primary job in building software is to get it to work, a challenge that you will resolve by writing tests before you write the code. Your secondary job is to ensure that the code stays clean. You do this through two mechanisms:
![]()
- ensure that there is no duplicate code in the system, and
- ensure that the code is clean and expressive, clearly stating the intent of the code
Throughout Agile Java, you will pause frequently to reflect on the code just written. Anything that does not demonstrate adherence to these two simple rules must be reworked, or refactored, immediately. Even within a “perfect” design—an unrealistic goal—the poor implementation of code can cause costly headaches for those trying to modify it.
The more you can continually craft the code as you go, the less likely you are to hit a brick wall of code so difficult that you cannot fix it cheaply. Your rule of thumb should be to never leave the code in a worse state than when you started working on it.
Even within your small example so far, there is some less-than-ideal code. Start on the path to cleaning up the code by taking a look at the test:
public void testCreate() {
Student student = new Student("Jane Doe");
String studentName = student.getName();
assertEquals("Jane Doe", studentName);
Student secondStudent = new Student("Joe Blow");
String secondStudentName = secondStudent.getName();
assertEquals("Joe Blow", secondStudentName);
assertEquals("Jane Doe", student.getName());
}
The first step is to eliminate the unnecessary local variables studentName and secondStudentName. They don't add anything to the understanding of the method and can be replaced with simple queries to the student object, as in the very last assertEquals.
When you are done making this change, recompile and rerun your test in JUnit to ensure you haven't broken anything. Your code should look like this:
public void testCreate() {
Student student = new Student("Jane Doe");
assertEquals("Jane Doe", student.getName());
Student secondStudent = new Student("Joe Blow");
assertEquals("Joe Blow", secondStudent.getName());
assertEquals("Jane Doe", student.getName());
}
The second step: It is considered poor programming practice to embed String literals throughout your code. One reason is that the code can be difficult to follow if it is not clear what each String literal represents.
In this example, you also are breaking the rule against code duplication. Each of the two String literals appears twice within the test method. If you change one String, you have to change the other. This is more work, and it also means there is a possibility that you will introduce a defect in your code by changing one and not the other.
One way to eliminate this redundancy (and add a bit of expressiveness to the code) is to replace the String literals with String constants.
final String firstStudentName = "Jane Doe";
This statement creates a reference named firstStudentName of the type String and assigns it an initial value of the String literal "Jane Doe".
The keyword final at the beginning of the statement indicates that the String reference cannot be changed—no other object can be assigned to the reference. You are never required to specify final, but it is considered good form and helps document the intent that firstStudentName is acting as a constant. You will learn other uses for final later.
Now that you have declared the constant, you can replace the String literals with it.
final String firstStudentName = "Jane Doe";
Student student = new Student(firstStudentName);
assertEquals(firstStudentName, student.getName());
...
assertEquals(firstStudentName, student.getName());
Compile and rerun your test to ensure that you haven't inadvertently broken anything.
Apply a similar refactoring to the other String literal. In addition, change the local variable name student to firstStudent in order to be consistent with the variable name secondStudent. Between each small change, compile and use JUnit to ensure that you haven't broken anything. When finished, your code should look like this:
public void testCreate() {
final String firstStudentName = "Jane Doe";
Student firstStudent = new Student(firstStudentName);
assertEquals(firstStudentName, firstStudent.getName());
final String secondStudentName = "Joe Blow";
Student secondStudent = new Student(secondStudentName);
assertEquals(secondStudentName, secondStudent.getName());
assertEquals(firstStudentName, firstStudent.getName());
}
The final assertEquals proves your understanding of the way Java works rather than the functionality that you are trying to build. You would not likely keep this assertion around in a production system. You may choose to keep it or delete it. If you delete it, make sure you recompile and rerun your test!
Your development cycle is now:
• Write a small test to assert some piece of functionality.
• Demonstrate that the test fails.
• Write a small bit of code to make this test pass.
• Refactor both the test and code, eliminating duplicate concepts and ensuring that the code is expressive.
This cycle will quickly become an ingrained, natural flow of development.
this
Look at the Student class code to see if it can be improved.
class Student {
String myName;
Student(String name) {
myName = name;
}
String getName() {
return myName;
}
}
The code appears clean, but naming the field myName is oh so academic. Show your professionalism by using a better name. A first thought might be to call the field studentName. However, that introduces duplication in the form of name redundancy—it's clear that the field represents a student's name, since it is defined in the class Student.
Also, you generally name your get methods after the fields, so the redundancy would become very apparent when you coded a statement like:
student.getStudentName();
How about simply name?
The problem with using name as the field name is that it clashes with the formal parameter name of the Student constructor—both would be called name. Try it, though, and see what happens.
class Student {
String name;
Student(String name) {
name = name;
}
String getName() {
return name;
}
}
This should pass compilation (you might see a warning). Run your test, however, and it will fail:
junit.framework.ComparisonFailure: expected:<Jane Doe> but was:<null>
Why? Well, part of the problem is that the Java compiler allows you to name fields the same as formal parameters, or even the same as local variables. When the code is compiled, Java tries to figure out which name you meant. The resolution the compiler makes is to use the most locally defined name, which happens to be the name of the formal parameter. The statement
name = name;
thus just results in the object stored in the parameter being assigned to itself. This means that nothing is getting assigned to the instance variable (field) called name. Field references that are not assigned an object have a special value of null, hence the JUnit message:
expected:<Jane Doe> but was:<null>
There are two ways to ensure that the value of the formal parameter is assigned to the field: Either ensure both variables have different names or use the Java keyword this to differentiate them. Using this is the most common approach.
The first approach means you must rename either the parameter or the field. Java programmers use many differing conventions to solve this naming issue. One is to rename the formal parameter so that it uses a single letter or is prefixed with an article. For example, name could be renamed to n or aName. Another common choice is to rename the field by prefixing it with an underscore: _name. This makes use of the field stand out like a sore thumb, something that can be very valuable when trying to understand code. There are other schemes, such as prefixing the argument name with the article a or an (aName).
The second approach for disambiguating the two is to use the same name for both, but where necessary refer to the field by prefixing it with the Java keyword this.
class Student {
String name;
Student(String name) {
this.name = name;
}
String getName() {
return name;
}
}
The this keyword represents a reference to the current object—the object for which the code is currently executing. The statement in the above example assigns the value of the formal parameter name to the field name.
Make sure your test now passes after making this change. From now on, remember to recompile after you change the code and before running your tests—there will be few reminders in the rest of the book.
private
Java allows you to access fields of an object, just like you can call a method:
public void testCreate() {
final String firstStudentName = "Jane Doe";
Student firstStudent = new Student(firstStudentName);
assertEquals(firstStudentName, firstStudent.getName());
final String secondStudentName = "Joe Blow";
Student secondStudent = new Student(secondStudentName);
assertEquals(secondStudentName, secondStudent.getName());
assertEquals(firstStudentName, firstStudent.name);
}
If you run this test, it will pass. However, it demonstrates particularly poor object-oriented coding style.
![]()
Do not directly expose fields to other objects.
Suppose you want to design the Student class so that a student's name is immutable—it cannot be changed once you've created a Student object. The following test code demonstrates how allowing other objects to access your attributes can be a bad idea:
final String firstStudentName = "Jane Doe";
Student firstStudent = new Student(firstStudentName);
firstStudent.name = "June Crow";
assertEquals(firstStudentName, firstStudent.getName());
The test shows that Student client code—code that is interacting with the Student object—can directly modify the String stored in the name instance variable. While this doesn't seem like a terrible affront, it eliminates any control you have over clients changing your object's data. If you want to allow client code to change the Student's name, you can create a method for the client to use. For example, you could create a method called setName that takes a new name String as parameter. Within the setName method, you could include code for any additional control you needed.
Make the above change to StudentTest and demonstrate for yourself that the test fails.
To protect your fields—to hide them—you should designate them as private. Change the Student class to hide the name field.
class Student {
private String name;
...
After doing so, other code that attempts to access the field will not even compile. Since the code in Student test refers to the name field directly:
assertEquals(firstStudentName, firstStudent.name);
you will receive a compilation error:
name has private access in Student
assertEquals(firstStudentName, firstStudent.name);
^
1 error
Remove the offending line, recompile, and retest.
The other interest in making fields private is to reinforce the notion of object orientation and encapsulation: An object-oriented system is about behavior, not data. You want to accomplish things by sending messages. You also want to encapsulate implementation details. Perhaps later you want to change the Student class to store both first and last names and change the getName method to return the combined name parts. In that case, code that directly accesses the name field would no longer be valid.
As with any rule, there are exceptions. There are at least a couple legitimate reasons to not designate a field as private. (You'll learn about these much later.)
Naming Conventions
You should have noticed a naming pattern in the Java code you have written so far. Most of the elements in Java that you have already learned about—fields, formal parameters, methods, and local variables—are named in a similar way. This convention is sometimes referred to as camel case.12 When following the camel case naming pattern, you comprise a name, or identifier, of words concatenated directly together. You begin each word in the identifier, except for the first word, with a capital letter.
12 Imagine that the letters represent the view of a camel from the side. The upper letters are the humps. For an interesting discussion of the term, see http://c2.com/cgi/wiki?CamelCase. You may hear other names for camel case, such as “mixed case.”
You should name fields using nouns. The name should describe what the field is used for or what it represents, not how it is implemented. Prefixes and suffixes that belie the type of the field are unnecessary and should be avoided. Examples of field names to avoid are firstNameString, trim, and sDescription.
Examples of good field names include firstName, trimmer, description, name, mediaController, and lastOrderPlaced.
Methods are generally either actions or queries: Either you are sending a message to tell an object to do something or you are asking an object for some information. You should use verbs to name action methods. You should also use verbs for query method names. The usual Java convention is to prefix the name of the attribute being retrieved by the word get, as in getNumberOfStudents and getStudent. I will discuss some exceptions to this rule later.
Examples of good method names include sell, cancelOrder, and isDoorClosed.
Name classes using upper camel case—camel case where the first letter of the identifier is uppercased.13 You should almost always use nouns for class names—objects are abstractions of things. Do not use plural words for class names. A class is used to create a single object at a time; for example, a Student class can create a Student object. When creating collections of objects, as you will learn to do later, continue to use a nonplural name: StudentDirectory instead of Students. From a StudentDirectory class, you can create a StudentDirectory object. From a Students class, you could create a Students object, but it sounds awkward and leads to similarly awkward code phrases.
13 Camel case is thus sometimes called lower camel case to distinguish it from upper camel case.
Examples of good class names include Rectangle, CompactDisc, LaundryList, and HourlyPayStrategy.
In terms of good object-oriented design, you will find that design impacts the ability to name things. A welldesigned class does one thing of importance and only that one thing.14 Classes generally should not do a multitude of things. For example, if you have a class that cuts paychecks, prints a report of all the checks, and calculates chargebacks to various departments, it would be hard to come up with a name that succinctly describes the class. Instead, break the class up into three separate classes: CheckWriter, PayrollSummaryReport, and ChargebackCalculator.
14 A guideline known as the Single-Responsibility Principle [Martin2003].
You can use numbers in an identifier, but you cannot use a number as its first character. Avoid special characters—the Java compiler disallows many of them. Avoid underscores (_), particularly as separators between words. There are exceptions: As mentioned earlier, some developers prefer to prefix their fields with underscores. Also, class constants (to be introduced later) usually include underscores.
Avoid abbreviations. Clarity in software is highly valued. Take the time to type the few extra characters. Doing so is far cheaper than increasing the time it takes for a future reader to comprehend your code. Replace names such as cust and num with the more expressive custard and numerology.15 Modern IDEs provide support for quickly renaming things in your code and for auto-completing things you are typing, so you have no excuse to use cryptic names. Abbreviations are acceptable if you use the abbreviation in common speech, such as id or tvAdapter.
15 I'll bet you thought they stood for customer and number. See how easy it is to be led astray?
Remember that Java is case sensitive. This means that stuDent represents a different name than student. It is bad form to introduce this sort of confusion in naming, however.
These naming conventions indicate that there are commonly accepted coding standards for things that aren't necessarily controlled by the compiler. The compiler will allow you to use hideous names that will irritate your fellow developers. Most shops wisely adopt a common standard to be followed by all developers. The Java community has also come to a higher level of agreement on such standards than, say, the C++ community. Sun's coding conventions for Java, located at http://java.sun.com/docs/codeconv, is a good, albeit incomplete and outdated, starting point for creating your own coding standards. Other style/standards books exist, including Essential Java Style16 and Elements of Java Style.17
17 [Vermeulen2000].
Whitespace
The layout of code is another area where you and your team should adhere to standards. Whitespace includes spaces, tab characters, form feeds, and new lines (produced by pressing the enter key). Whitespace is required between certain elements and is optional between others. For example, there must be at least one space between the keyword class and the name of the class in a class declaration:
class Student
And the following spacing is allowable (but avoided):
String studentName = student . getName();
The Java compiler ignores extra whitespace. You should use spaces, tabs, and blank lines to judiciously organize your code. This goes a long way toward allowing easy future understanding of the code.
The examples in this book provide a consistent, solid and generally accepted way of formatting Java code. If your code looks like the examples, it will compile. It will also meet the standards of most Java development shops. You will want to decide on things such as whether to use tabs or spaces for indenting and how many characters to indent by (usually three or four).
Exercises
Exercises appear at the end of lesson. Many of the exercises have you build pieces of an application that plays the game of chess. If you are unfamiliar with the rules of chess, you can read them at http://www.chessvariants.com/d.chess/chess.html.
- As with Student, you will start simply by creating a class to represent a pawn. First, create an empty test class named PawnTest. Run JUnit against PawnTest and observe that it fails, since you haven't written any test methods yet.
- Create a test method named
testCreate. Ensure that you follow the correct syntax for declaring test methods. - Add code to
testCreatethat instantiates a Pawn object. Ensure that you receive a compile failure due to the nonexistent class. Create the Pawn class and demonstrate a clean compile. - Assign the instantiated Pawn object to a local variable. Ask the pawn for its color. Code a JUnit assertion to show that the default color of a pawn is represented by the string
"white". Demonstrate test failure, then add code to Pawn to make the test pass. - In
testCreate, create a second pawn, passing the color"black"to its constructor. Assert that the color of this second pawn is"black". Show the test failure, then make the test pass. Note: Eliminate the default constructor—require that clients creating Pawn objects pass in the color. The change will impact the code you wrote for Exercise #4. - In
testCreate, create constants for the Strings"white"and"black". Make sure you rerun your tests.