
Lesson 11. IO
In this lesson you will learn about the input-output (IO) facilities of Java. IO refers to anything that transfers data to or from your application. IO in Java is wonderfully complete, wonderfully complex, and reasonably consistent. You might use Java's IO capabilities to write reports to files or to read user input from the console.
In this lesson, you will learn about:
• organization of the stream classes
• character streams versus byte streams
• the File class
• data streams
• redirecting System.in and System.out
• object streams
• random access files
• nested classes
Organization
The java.io package contains dozens of classes to manage input and output using data streams, serialization, and the file system. Understanding the organization and naming strategy of the classes in the package will help you minimize the otherwise overwhelming nature of doing IO in Java.
Java IO is based upon the use of streams. A stream is a sequence of data that you can write to or read from. A stream may have a source, such as the console, or a destination, such as the file system. A stream with a source is an input stream; a stream with a destination is an output stream.
Java further distinguishes its streams by the format of the data they carry. Java contains character streams and byte streams. You use character streams to work with 2-byte (16-bit) Unicode character data. Java classes with Reader (input) and Writer (output) in their names are character streams. You use character streams to work with human-readable text.
Byte streams work with 8-bit binary data. Byte stream classes have the word Input or Ouput in their name. You normally use byte streams for working with nontext data such as image files or compiled byte codes.
Low-level Java streams support basic concepts such as reading or writing single bytes at a time. Were you able to work only with low-level streams, you would be forced to write tedious, repetitive code. Java supplies a number of higher-level streams that simplify your work by providing aggregate and additional functionality. These higher level streams are known as wrapper streams.
A wrapper stream object contains a reference to, or wraps, a low-level stream object. You interact with the wrapper stream. It in turn interacts with the wrapped low-level stream that does the dirty work.
Take a look at the java.io package, which contains a set of interfaces and classes to define the basic building blocks for IO. You will note that it is crowded—Java's IO facilities are complete but complex. The package includes specific stream implementations, including filtered, buffered, piped, and object streams.
In addition to the stream classes, the java.io package provides a set of classes to manipulate the underlying file system.
Character Streams
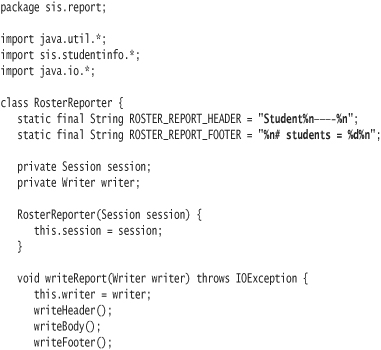
In Lesson 3, you created the RosterReporter class to write a report of students enrolled in a course session. You wrote the report to a string, then printed the report using System.out. Here is the existing RosterReporter class:
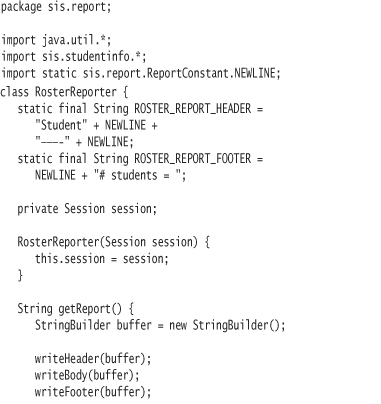
Currently the RosterReporter class builds a string representing the entire report. Another class using RosterReporter would take this string and send it to a desired destination—the console, a file, or perhaps the Internet. Thus, you write every character in the report twice—first to the String, then to a final destination. With a larger report, the receiver of the report may experience an unacceptable delay while waiting for the entire report to be produced.
A preferable solution would involve writing each character directly to a stream that represents the ultimate destination. This also means that you wouldn't need to store the entire report in a large string buffer, something that has the potential to cause memory problems.
![]()
You have been told to make the student information system flexible. Initially the system must be able to write reports to either the console or to local files. To meet this requirement, you will first update the RosterReporter class to write directly to a character stream. First, you will need to update the test.
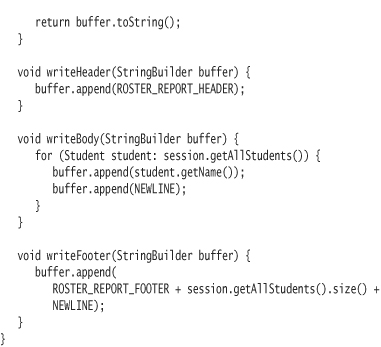
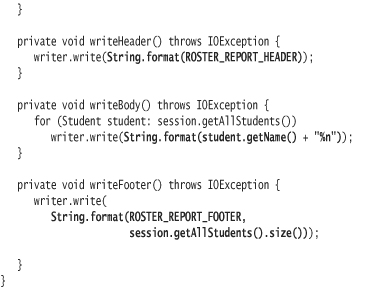
To use Java's IO classes, you must import the package java.io. Many IO operations can generate an exception. You'll need to declare that the test method throws an IOException.
You want the RosterReporter to write its report to a Writer object provided by the client. The class java.io.Writer is the base abstraction for character streams. For purposes of testing, you can create an object of the Writer subclass StringWriter. When you send the message toString to a StringWriter, it returns a String of all characters written to it.
Note the improvement to the design. Instead of asking the RosterReporter object for a report (getReport), you are telling it to write a report (writeReport).
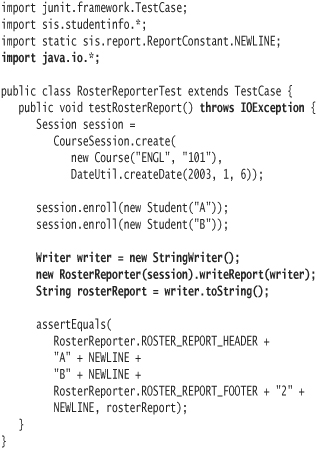
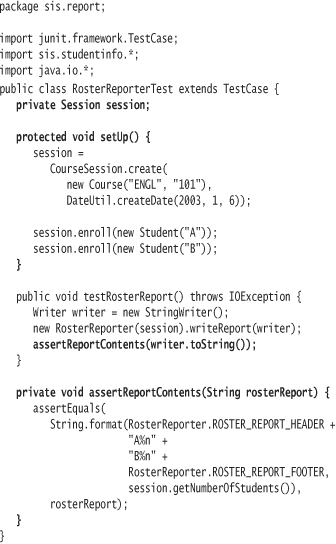
In RosterReporter, like RosterReporter test, you will need to add an import statement and throws clauses to methods that perform IO operations. (Instead of believing me, the better approach is to code this without the throws clauses and let the compiler tell you what to do.)

In writeHeader, writeBody, and writeFooter, you have replaced calls to the StringBuilder method append with calls to the Writer method write. Also, previously the code passed a StringBuilder from method to method. Now you have a Writer instance variable. By not passing the same pervasive variable to every method, you can eliminate some duplication.
Watch your tests pass, then make the following refactorings to take advantage of Java String formatting.
The requisite changes to the test:
Writing to a File
You will now need to update RosterReporter to be able to take a filename as a parameter. The test will need to make sure that the report is properly written to an operating system file.
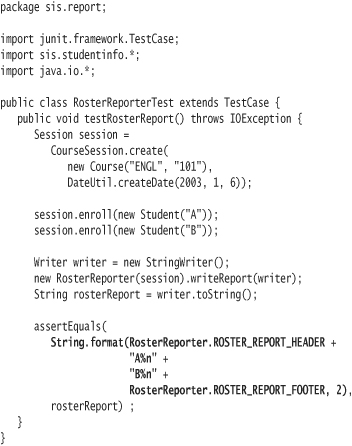
First, you will refactor RosterReporterTest to create a setUp method and an assertion method assertReportContents. By doing so, you will set the stage to quickly add a new test, testFiledReport, that uses these common methods and thus introduces no duplication.
Within assertReportContents, you can modify the assertion to obtain the number of expected students from the session object. You will need to change getNumberOfStudents in Session from package to public.
The refactored RosterReporterTest:
The new test, testFiledReport, calls an overloaded version of writeReport. This second version of writeReport takes a filename instead of a Writer as a parameter.

After calling writeReport, the test uses a BufferedReader to read the contents of the report file into a buffer. The test then passes the buffer's contents to the assertReportContents method.
A BufferedReader is a Reader subclass that can wrap another reader. Remember that you use Reader objects to read from character streams. The test constructs a BufferedReader with a FileReader as a parameter. A FileReader is a character-based input stream that can read data from a file. You construct a FileReader using a filename.
You could read the file's contents by directly using a FileReader instead of a BufferedReader. However, a BufferedReader is more efficient since it buffers characters as it reads. In addition, BufferedReader supplies the method readLine to help you simplify your code. The readLine method returns a logical line of input from the wrapped stream, using the system property "line.separator" to delineate lines.
The new method in RosterReporter:
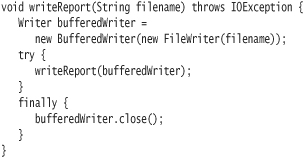
The writeReport method creates a FileWriter using the filename passed to it. It wraps the FileWriter in a BufferedWriter. The method then passes the writer to the existing writeReport method (which takes a PrintWriter as a parameter).
A finally block ensures that the PrintWriter is always closed, regardless of whether writeReport threw an exception or not. You must remember to close file resources, otherwise you may encounter locked file problems. Also, buffered information will not appear in the file until you close the Writer. You can also use the Writer method flush to force the Writer to write its contents to the destination.
Notice that you were able to add functionality to the existing Roster-Reporter class without modifying a single line of its code. You simply added a new method. Achieving this ideal happens more often if you strive to ensure that your code maintains an optimal design at all times. Prefer the use of abstractions in your code.
java.io.File
The File class is not a stream-based class. Instead of working with streams, the File class provides you with an interface into the file and directory structure of your underlying file system. It contains a number of file-based utilities, such as the ability to delete files and to create temporary files.
When writing tests that work with files, you want to ensure that you have a clean environment for testing. You also want to ensure that you leave things the way they were when the test completes. With respect to testFiled-Report, this means that you need to delete any existing report file as the first step in the test and delete the created report file as the last step in the test.
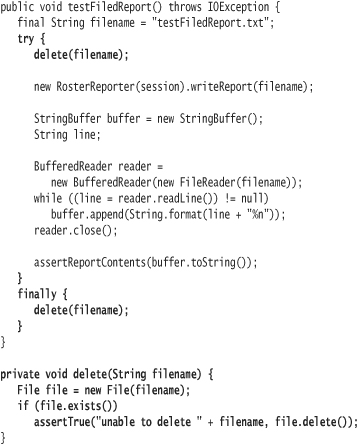
The delete method uses the File class to accomplish its goals. It creates a File object by passing a filename to its constructor. It calls the exists method to determine whether the file can be found in the file system. Finally, it calls the delete method, which returns true if the file system successfully removed the file, false otherwise. A file system might not be able to delete a file if it is locked or has its read-only attribute set, among other reasons.
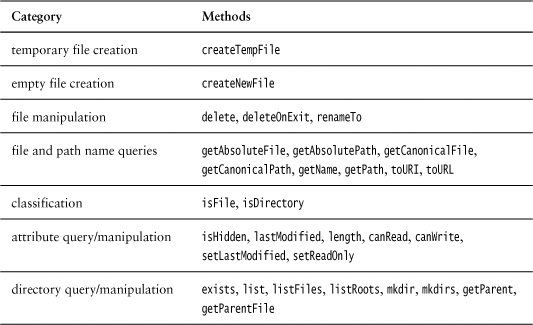
I have categorized most of the functionality of the class java.io.File in Table 11.1.
Table 11.1. java.io.File methods by category
Byte Streams and Conversion
Java represents standard input (stdin) and standard output (stdout) with stream objects stored in System.in and System.out, respectively. System.in refers to an InputStream, while System.out refers to a PrintStream. A PrintStream is a specialized OutputStream that simplifies writing objects of various types.
Both System.in and System.out are byte streams, not character streams. Remember that Java uses the multibyte character set Unicode, while most operating systems use a single-byte character set.
The java.io package provides a means of converting between byte streams and character streams. The class InputStreamReader wraps an InputStream and converts each byte read into an appropriate character. The conversion uses your platform system's default encoding scheme (as understood by Java) by default; you may also supply a decoding class that defines the mapping. In a similar fashion, the class OutputStreamWriter wraps an output stream, converting each character to a single byte.
The predominant use for InputStreamReader and OutputStreamWriter is to map between Java's character streams and stdin/stdout. Reader and Writer subclasses allow you to work with input and output on a line-by-line basis.
![]()
Do not send messages directly to System.in and System.out.
Referring to Reader and Writer abstract classes instead allows for quick redirecting to a different medium (e.g., files), and also makes for easier testing.
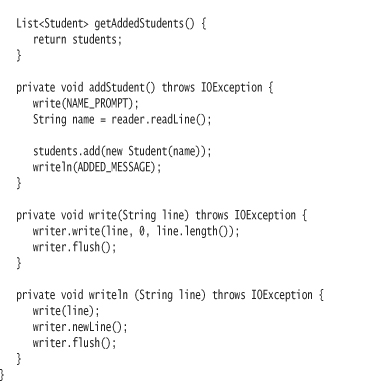
A Student User Interface
![]()
In this section, you will write a very simple console-based user interface (UI). The UI will allow an end user of the student information system to create student objects. You will prompt the user with a simple menu that either drives the addition of a new student or allows the user to terminate (exit) the application.
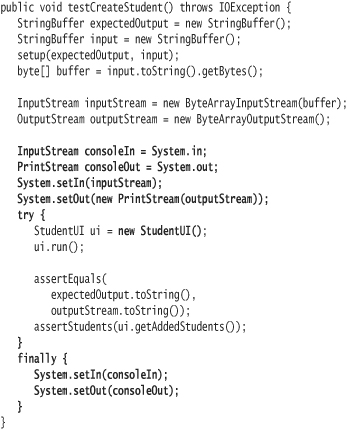
There are many ways to approach development of a user interface through TDD. The following test, implemented in the class StudentUITest, presents one solution. I have broken the listing into three parts for clarity. The first part shows the core test method, testCreateStudent.

The test creates two StringBuffers. One will hold expected output—what the console application displays—and the other will hold the input that a user (the test, in this case) types in. The setup method explicitly populates each of these:
private void setup(StringBuffer expectedOutput, StringBuffer input) {
expectedOutput.append(StudentUI.MENU);
input.append(line(StudentUI.ADD_OPTION));
expectedOutput.append(StudentUI.NAME_PROMPT);
input.append(line(name));
expectedOutput.append(line(StudentUI.ADDED_MESSAGE));
expectedOutput.append(StudentUI.MENU);
input.append(line(StudentUI.QUIT_OPTION));
}
The setup method can be viewed as presenting a script to which the system must adhere. The buffer appends are intertwined to emulate the interaction between system output and user input. This natural flow should aid you in understanding the script. First, the user interface presents the user with a menu:
expectedOutput.append(StudentUI.MENU);
The user responds to the menu by first typing the option to add a student, then pressing enter.
input.append(line(StudentUI.ADD_OPTION));
The line method is a utility method that appends an end-of-line string to an input string. The remainder of the setUp method represents the expected sequence of events between the system presenting some text (expectedOutput.append) and the user entering a response (input.append).
The code in testCreateStudent creates an InputStream by wrapping a Byte-ArrayInputStream around the bytes from the input StringBuffer. It then creates an InputStreamReader, wrapped with a BufferedReader, to convert incoming bytes to characters.
Similarly, the test creates and wraps a ByteArrayOutputStream with an OutputStreamWriter that will convert characters to bytes. A BufferedWriter wraps the OutputStreamWriter.
You pass these two streams, reader and writer, to the constructor of Student-UI after setup executes. The UI is told to run and should continually present a menu of options until the user chooses to quit.
After the UI completes processing, an assertion verifies that the application produced correct output. The assertion compares the contents of the ByteArrayOutputStream to the contents of the expectedOutput StringBuffer.
Finally, the test calls assertStudents to ensure that the list of students created and stored in the UI instance is as expected.
private void assertStudents(List<Student> students) {
assertEquals(1, students.size());
Student student = students.get(0);
assertEquals(name, student.getName());
}
To verify the example user “script” coded in the setup method, assertStudents must ensure that the StudentUI object added only one student and that this student's data (its name) is as expected.
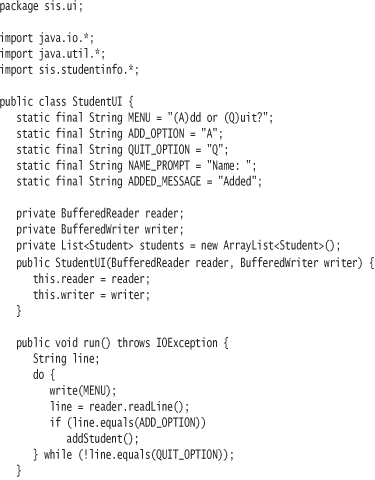
The entire StudentUI implementation appears below. To build this class test-first and very incrementally, you should start with an even simpler set of unit tests. First, ensure that the menu is presented and that the user can immediately quit the application. Then add functionality to support adding students. Start with assertions against the user interface flow, then add the assertion to ensure that a student object was created. A more complete test than this would ensure that multiple students could be created.
Testing the Application
The student user interface represents an actual application that someone might want to execute and interact with. You will need to provide a main method so that they can start the application. Currently, in order to execute the application, you would need to construct a student UI with System.in and System.out appropriately wrapped, then call the run method.
You can simplify the main method by encapsulating this work in the Student-UI class itself. This may or may not be an appropriate tactic—if you only have one user interface class, it's fine. But if you have a dozen related UI classes, each controlling a portion of the user interface, you'd be better off constructing the console wrappers in a single class.
For this example, let's make the main method as simple as possible. You can do this by redirecting console input and output using the System methods setIn and setOut instead of wrapping the input and output streams in buffered streams. You must wrap the ByteArrayOutputStream in a PrintStream in order to call setOut.
You want to make sure you reset System.in and System.out by using a try-finally statement.
The new constructor for StudentUI must use an InputStreamReader to wrap stdin in a BufferedReader and an OutputStreamWriter to wrap stdout in a BufferedWriter.
public StudentUI() {
this.reader =
new BufferedReader(new InputStreamReader(System.in));
this.writer =
new BufferedWriter(new OutputStreamWriter(System.out));
}
After demonstrating that the test passes, you can now write a main method that kicks off the application.
public static final void main(String[] args) throws IOException {
new StudentUI().run();
}
There are two trains of thought on this. First, it is possible to write a test against the main method, since you can call it like any other method (but you must supply an array of String objects that represent command-line arguments):
StudentUI.main(new String[] {});
The other testing philosophy is that the main method is virtually unbreakable. It is one line of code. You will certainly run the application from the command line at least once to ensure it works. As long as the main method does not change, it can't break, in which case you do not necessarily need a test against the main method.
The choice is yours as to whether to test main or not. Regardless, you should strive to minimize the main method to a single line. Refactor code from the main method into either static or instance-side methods. Create utility classes to help you manage command-line arguments. Test the code you move out of main.
I hope you've noticed that testing this simple console-based user interface required a good amount of code. Were you to write more of the console application, the work would simplify as you built utility methods and classes to help both testing and production coding.
Data Streams
You can write Java primitive data directly to a DataOutputStream. DataOutputStream is an example of a filtered stream. A filtered stream wraps another stream to either provide additional functionality or to alter the data along the way. The base filtered stream classes are FilteredOutputStream, FilteredInputStream, FilteredWriter, and FilteredReader.
The filter in DataOutputStream provides methods to output each Java primitive type: writeBoolean, writeDouble, and so on. It also provides the writeUTF method to output a String.
CourseCatalog
![]()
The student information system requires a CourseCatalog class to store a list of all available course sessions. CourseCatalog will be responsible for persisting basic course information (department, course number, start date, and number of credits) to a file so that the application can be restarted without any data loss.
The CourseCatalog provides a load method that reads all Session objects from a DataOutputStream into a collection. It also provides a store method to write the collection to a DataOutputStream.
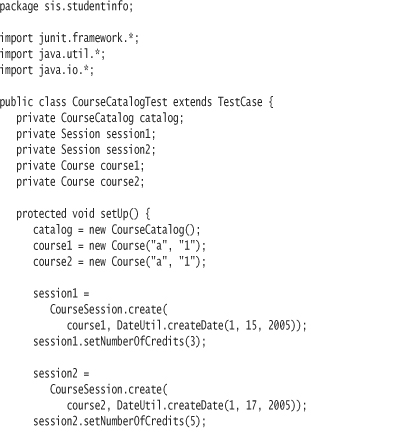
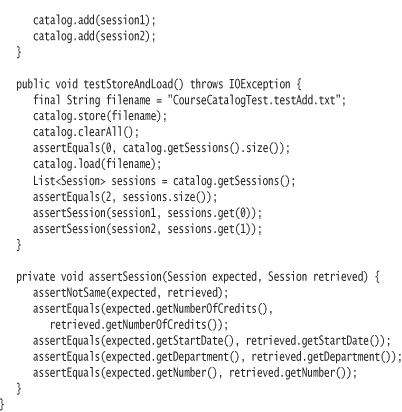
The test loads a couple courses into the catalog, calls the store method, clears the catalog, and then calls the load method. It asserts that the catalog contains the two courses initially inserted.
The code other than load and store in CourseCatalog is trivial:
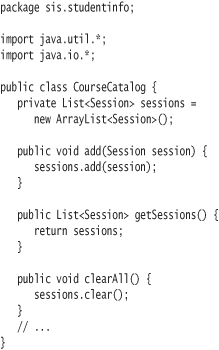
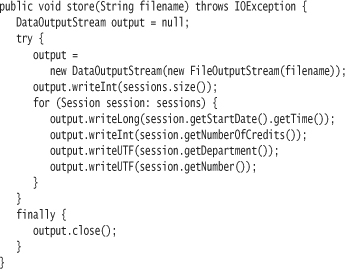
The store method creates a DataOutputStream by wrapping a FileOutputStream. It first writes an int that represents the number of course sessions to be stored. The method then loops through all sessions, writing the start date, number of credits, department, and course number for each.
You'll need to create a getter method in Session to return the number of credits:
public int getNumberOfCredits() {
return numberOfCredits;
}
The load method creates a DataInputStream by wrapping a FileInputStream. It reads the count of sessions to determine how many sessions are stored in the file. Using counts in this manner is preferred to the alternative, which is to anticipate an end-of-file exception with each read operation against the file.
The load method assumes that the session being read is a CourseSession, not a SummerCourseSession or other Session subclass. If the CourseCatalog needed to support more than one type, you would need to store the type of Session. The type information would allow code in the load method to know what class to instantiate when reading each object.
Both load and store methods ensure that the associated data streams are closed by use of a finally block.
Advanced Streams
Piped Streams
You use piped streams for a safe I/O-based data communication channel between different threads. Piped streams work in pairs: Data written to a piped output stream is read from a piped input stream to which it is attached. The piped stream implementations are PipedInputStream, PipedOutputStream, PipedReader, and PipedWriter. Refer to Lesson 13 for more information on multithreading.
SequenceInputStream
You can use a SequenceInputStream to allow a collection of input sources to act as a single input stream. The collection of sources is ordered; when one source is fully read, it is closed and the next stream in the collection is opened for reading.
Pushback Streams
The primary use of pushback streams (PushbackInputStream and PushbackReader) is for lexical analysis programs such as a tokenizer for a compiler. They allow data to be put back onto a stream as if it had not yet been read by the stream.
StreamTokenizer
The primary use of StreamTokenizer is also in parsing applications. It acts similarly to StringTokenizer. Instead of returning only strings from the underlying stream, however, a StreamTokenizer returns the type of the token in addition to the value. A token type may be a word, a number, an end-of-line marker, or an end-of-file marker.
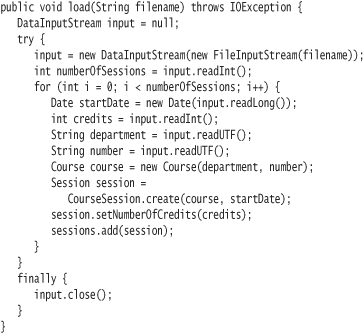
Object Streams
Java provides the capability to directly read and write objects from and to streams. Java can write an object to an object output stream by virtue of serializing it. Java serializes an object by converting it into a sequence of bytes. The ability to serialize objects is the basis for Java's RMI (Remote Method Invocation) technology. RMI allows objects to communicate with other objects on remote systems as if they were local. RMI in turn provides the basis for Java's EJB (Enterprise Java Bean) technology for component-based computing.
You write and read objects using the classes ObjectOutputStream and ObjectInputStream. As a quick demonstration, the following code is a rewrite of the the methods store and load in the CourseCatalog class. The modified code uses object streams instead of data streams.
The test remains largely unchanged.
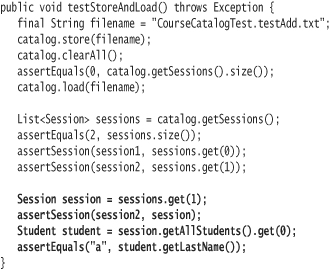
public void testStoreAndLoad() throws Exception {
final String filename = "CourseCatalogTest.testAdd.txt";
catalog.store(filename);
catalog.clearAll();
assertEquals(0, catalog.getSessions().size());
catalog.load(filename);
List<Session> sessions = catalog.getSessions();
assertEquals(2, sessions.size());
assertSession(session1, sessions.get(0));
assertSession(session2, sessions.get(1));
}
The throws clause on the test method signature must change, since the load method now throws a ClassNotFoundException. Within the context of this example, it doesn't seem possible for a ClassNotFoundException to be generated. You store a List of Session objects and immediately read it back, and both java.util.List and Session are known to your code. An exception could be thrown, however, if another application with no access to your Session class were to read the objects from the file.
When you run the test, you should receive an exception:
java.io.NotSerializableException: studentinfo.CourseSession
In order to write an object to an object stream, its class must be serializable. You mark a class as serializable by having it implement the interface java.io.Serializable. Most of the classes in the Java system class library that you would expect to be serializable are already marked as such. This includes the String and Date classes as well as all collection classes (HashMap, ArrayList, and so on). But you will need to mark your own application classes:

Don't forget the Course class, since Session encapsulates it:
public class Course implements java.io.Serializable {...
When you mark the abstract superclass as serializable, all its subclasses will also be serializable. The Serializable interface contains no method definitions, so you need not do anything else to the Session class.
An interface that declares no methods is known as a marker interface. You create marker interfaces to allow a developer to explicitly mark a class for a specific use. You must positively designate a class as capable of being serialized. The Serializable marker is intended as a safety mechanism—you may want to prevent certain objects from being serialized for security reasons.
Transient
Course sessions allow for enrollment of students. However, you don't want the course catalog to be cluttered with student objects. Suppose, though, that a student has enrolled early, before the catalog was created. The setUp method in CourseCatalogTest enrolls a student as an example:
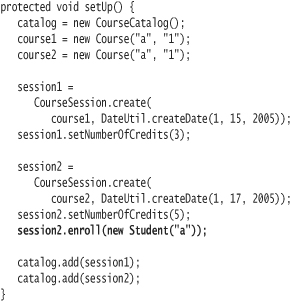
If you run your tests, you again receive a NotSerializableException. The course session now refers to a Student object that must be serialized. But the Student class does not implement java.io.Serializable.
Instead of changing Student, you can indicate that the list of students in Session is to be skipped during serialization by marking them with the transient modifier.
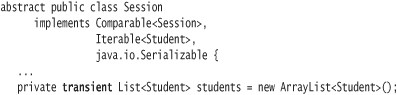
The list of students will not be serialized in this example. Your tests will now pass.
Serialization and Change
Serialization makes it easy to persist objects. Too easy, perhaps. There are many implications to declaring a class as Serializable. The most significant issue is that when you persist a serialized object, you export with it a definition of the class as it currently exists. If you subsequently change the class definition, then attempt to read the serialized object, you will get an exception.
To demonstrate, add a name field to Session.java. This creates a new version of the Session class. Don't worry about a test; this is a temporary “spike,” or experiment. You will delete this line of code in short time. Also, do not run any tests—doing so will ruin the experiment.

Your last execution of tests persisted an object stream to the file named CourseCatalogTest.testAdd.txt. The object stream stored in this file contains Session objects created using the older definition of Session without the name field.
Then create an entirely new test class, studentinfo.SerializationTest:
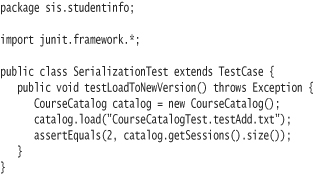
The test tries to load the persisted object stream. Execute only this test. Do not execute your AllTests suite. You should receive an exception that looks something like:

Java determines compatibility between the objects stored in the output stream and the existing (local) class definition. It considers the class name, the interfaces implemented by the class, its fields, and its methods. Changing any of these will result in incompatibility.
Transient fields are ignored, however. If you change the declaration of the name field in Session to transient:
private transient String name;
SerializationTest will then pass.
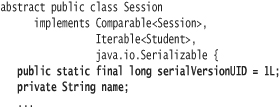
Serial Version UID
The InvalidClassException you received referred to a serialVersionUID for both the stream's class definition and the local (current Java) class definition. In order to determine whether the definition of a class has changed, Java generates the serialVersionUID based on the class name, interfaces implemented, fields, and methods. The serialVersionUID, a 64-bit long value, is known as a stream unique identifier.
You can choose to define your own serialVersionUID instead of using the one Java generates. This may give you some ability to better control version management. You can obtain an initial serialVersionUID by using the command-line utility serialver or you can assign an arbitrary value to it. An example execution of serialver:
serialver -classpath classes studentinfo.Session
You optionally specify the classpath, followed by the list of classes for which you wish to generate a serialVersionUID.
Remove the name field from Session. Rebuild and rerun your entire test suite. Add a serialVersionUID definition to Session. At the same time, add back the name field.
Then run only SerializationTest. Even though you've added a new field, the version ID is the same. Java will initialize the name field to its default value of null. If you change the serialVersionUID to 2L and rerun the test, you will cause the stream version (1) to be out of synch with the local class version (2).
Creating a Custom Serialized Form
Your class may contain information that can be reconstructed based on other data in the class. When you model a class, you define its attributes to represent the logical state of every object of that class. In addition to those attributes, you may have data structures or other fields that cache dynamically computed information. Persisting this dynamically calculated data may be slow and/or a grossly inefficient use of space.
![]()
Suppose you need to persist not only the course sessions but also the students enrolled in each session. Students carry a large amount of additional data, and they are already being persisted elsewhere. You can traverse the collection of course sessions and persist only the unique identifier for each student to the object stream.1 When you load this compacted collection, you can execute a lookup to retrieve the complete student object and store it in the course session.
1 We have a small school. We don't admit anyone with the same last name as another student, so you can use that as your unique identifier.
To accomplish this, you will define two methods in Session, writeObject and readObject. These methods are hooks that the serialization mechanism calls when reading and writing each object to the object stream. If you don't supply anything for these hooks, default serialization and deserialization takes place.
First, change the test in CourseCatalogTest to ensure that the enrolled student was properly persisted and restored.
Make sure that the students field in Session is marked as transient. Then code the writeObject definition for Session:
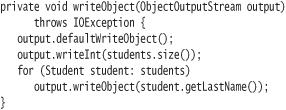
The first line of writeObject calls the method defaultWriteObject on the stream. This will write every nontransient field to the stream normally. Subsequently, the code in writeObject first writes the number of students to the stream, then loops through the list of students, writing each student's last name to the stream.
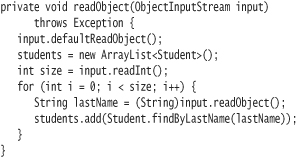
On the opposite end, readObject first calls defaultReadObject to load all nontransient fields from the stream. It initializes the transient field students to a new ArrayList of students. It reads the number of students into size and iterates size times. Each iteration extracts a student's last name from the stream. The code looks up and retrieves a Student object using this last name and stores the Student in the students collection.
In real life, the findByLastName method might involve sending a message to a student directory object, which in turn retrieves the appropriate student from a database or another serialization file. For demonstration purposes, you can provide a simple implementation that will pass the test:
public static Student findByLastName(String lastName) {
return new Student(lastName);
}
Serialization Approaches
For classes whose definitions are likely to change, dealing with serialization version incompatibility issues can be a major headache. While it is possible to load serialized objects from an older version, it is difficult. Your best tactics include:
• minimizing use of serialization
• maximizing the number of transient fields
• identifying versions with serialVersionUID
• defining a custom serialization version
When you serialize an object, you are exporting its interface. Just as you should keep interfaces as abstract and unlikely to change as possible, you should do the same with serializable classes.
Random Access Files
Instead of loading and storing the complete course catalog each time you execute the application, you can dynamically interact with the catalog by implementing it as a random access file. A random access file allows you to quickly seek to specific positions in the file and either read from or write to that position.
It would be possible to create a fully featured object database in Java using random access files. The forthcoming example code is a starting point.
In Lesson 9, you created a StudentDirectory class. You implemented the class to to store student objects in a HashMap, using the student's ID as a key.
![]()
Now you need to ensure that your student directory supports the tens of thousands of students enrolling at the university. Further, you must persist the directory to the file system in order to secure the data. It is imperative that retrieving students from the directory executes rapidly. A retrieval must execute in constant time—the amount of time to access a student should not vary depending on where the student appears in the file.
You will implement the student directory using a simple indexed file system. You will store student records in a data file and unique ids (identifiers) for each student in an index file. As you insert a serialized student into the data file, you will record its id, position, and length in the index file. The index file will be small compared to the data file size. It can be quickly loaded into memory and written out when the data file is closed.2
2 There is a bit of risk in not persisting the indexes as you add Students. You could mitigate this risk by writing the data length within the data file itself as well. Doing so would allow you to recreate the index file by traversing through the data file.
The example code is the most involved in this book so far. If you take it a test and method at a time, you shouldn't have much trouble understanding it. Building the tests and code from scratch is a bit more of a challenge. The UML is shown in Figure 11.1.
Figure 11.1. The Student Directory
And here is the code. I'll explain the interesting parts of it after the code listing for each class.
The Student Directory
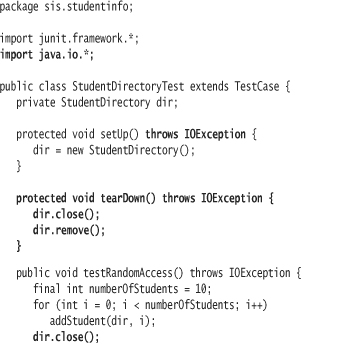
The most significant new addition to StudentDirectoryTest appears in testRandomAccess. When it adds the students to the directory, the test closes it. It then creates a new directory instance to be used for the student lookups. By doing this, the test demonstrates at least some notion of persistence.
An additional performance test might be worthwhile to demonstrate that a lookup into the directory takes the same amount of time regardless of where it appears in the file. Additions of students to the directory should also execute in constant time.
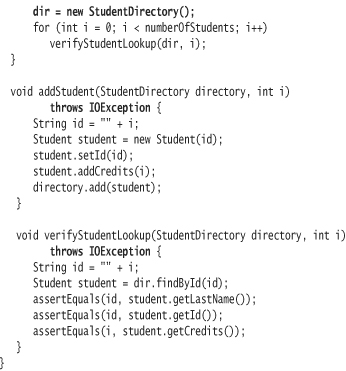
In contrast, most of the StudentDirectory class has changed. The StudentDirectory class now encapsulates a DataFile instance to supply directory functionality. It provides a few additional specifics, including the key field to use (the student id) and the base filename for the data and key files. Beyond that, the class merely delegates messages to the DataFile object.
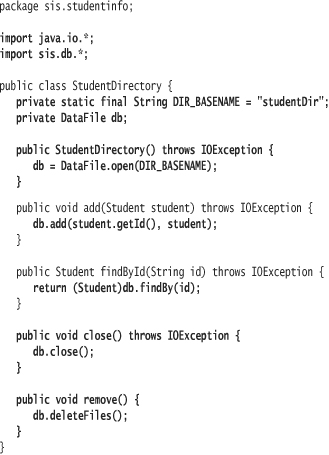
sis.db.DataFileTest

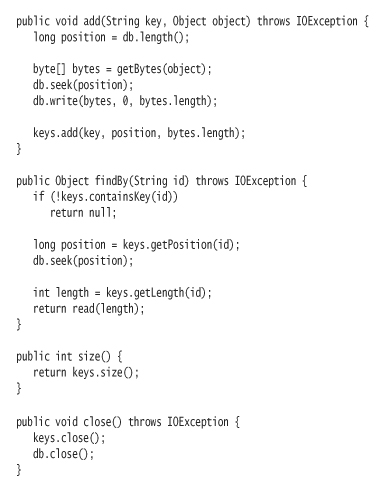
DataFileTest shows that you create a new DataFile using the static factory method create. The create method takes the name of the DataFile as its parameter.
The test also shows that you insert objects into a DataFile by using the add method, which takes a unique key and associated object as parameters. To retrieve objects, you send the message findBy, passing with it the unique id of the object to be retrieved. If the object is not available, DataFile returns null.
Persistence is tested by closing a DataFile and creating a new instance using the static factory method open.3 The distinction between open and create is that create will delete the data file if it already exists, while open will reuse an existing data file or create a new one if necessary.
3 Technically the test does not prove disk persistence. You could have implemented a solution that stored objects in a static-side collection. However, the point of the test is not to protect you from being dishonest and coding a foolish solution. The test instead demonstrates the expected behavior. If you're not convinced, however, there's nothing that prohibits you from writing a test to ensure that the object is actually stored in a disk file. It's just a lot more complex, and probably unnecessary.
Note that the object returned by the findBy method requires a cast! This suggests that DataFile is a candidate for implementing as a parameterized type. (See Lesson 14 for more information on parameterized types.)
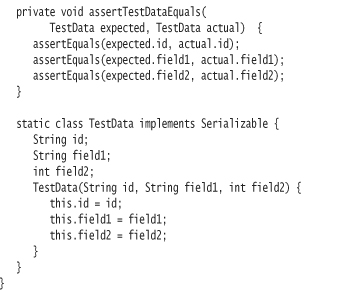
Static Nested Classes and Inner Classes
DataFileTest needs to show that DataFile can persist an object and retrieve that object at a later time. In order to write such a test, it's best to use a class that you can guarantee no one else will change. You could use a Java system library class such as String, but they change with new releases of Java. Instead, the better solution is to create a test class solely for use by DataFileTest.
The class TestData is defined as a nested class of DataFileTest; that is, it is completely contained within DataFileTest. There are two kinds of nested classes: inner classes and static nested classes. The chief distinction is that inner classes have access to the instance variables defined within the enclosing class. Static nested classes do not.
Another distinction is that inner classes are completely encapsulated by the enclosing class. Since inner classes can refer to instance variables of the enclosing class, it makes no sense for other code to be able to create instances of an instance inner class. While Java technically allows you to refer to aninner class from external code, it's a bit of trickery that I'm not going to show you here—don't do it!
Static nested classes, on the other hand, can be used by external code as long as the access specifier is not private. You have already used the static nested class Entry in order to iterate key-value pairs in a Map object. You referred to this class as Map.Entry, since you used it in a code context other than Map.
So the first reason to declare a nested class as static is to allow other classes to use it. You could declare the class as a top-level (i.e., non-nested) class, but you may want to tightly couple it to the containing class. For example, Map.Entry is tightly bound to Map, since it makes no sense for the Entry class to exist in the absence of Map.
The second reason to declare a nested class as static is to allow it to be serialized. You cannot serialize inner class objects, since they must have access to the instance variables of the enclosing class. In order to make it work, the serialization mechanism would have to capture the fields of the enclosing class. Yuck.
Since you need to persist TestData objects, you must make the class serializable. If TestData is to be a nested class, you must declare it as static.
sis.db.DataFile
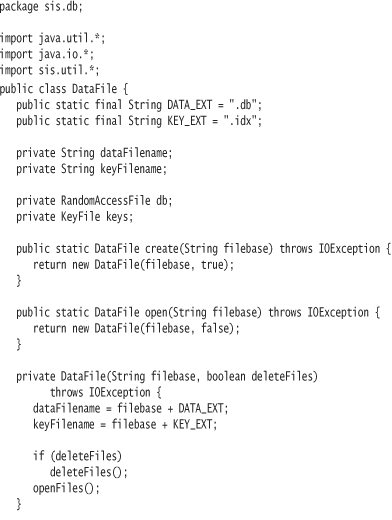
The DataFile class is the core part of the solution. It demonstrates use of a RandomAccessFile object, which you store in the instance variable db (short for database, one of the small number of abbreviations I use). You create a RandomAccessFile object by passing in a File object and a String declaring the mode in which you wish to access the RandomAccessFile.
RandomAccessFile provides four modes: "r" (read-only), "rw" (read and write access), "rws" (read-write with synchronous data/metadata updates), and "rwd" (read-write with synchronous data updates). The synchronous updates ensure that updates to the file are safely written to the underlying storage device. Without using them, you could conceivably lose data in a system crash. The "rws" option ensures persistence of both content and metadata (information such as the last modified timestamp for the file), while the "rwd" option only ensures updates of the content.
Here we chose the "rw" option, since you want to be able to both read data from and write data to the data file. The other read-write options incur additional overhead but may be necessary to maintain data integrity.
You use the seek method to rapidly move an internal file pointer to any location within the underlying file. The getFilePointer method (not used here) returns the current position of the file pointer. The length method returns the total number of bytes in the file. Like other IO classes, RandomAccessFile supplies many read and write methods to extract and store data.
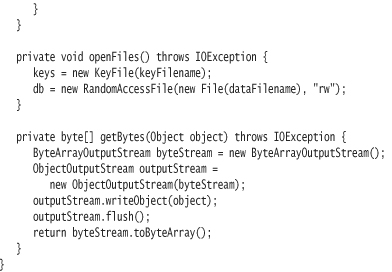
RandomAccessFile does not directly support storing objects. In order to persist an object to the RandomAccessFile, you must first convert it to a byte array. To convert an object to bytes, the getBytes method wraps a ByteArrayOutputStream in an ObjectOutputStream. This means that any objects written to the ObjectOutputStream are piped to the underlying ByteArrayOutputStream. You can extract the bytes from an ByteArrayOutputStream by sending it the toByteArray message.
To read an object from the RandomAccessFile, you must do the opposite. Create a byte array of the appropriate length and use the method readFully to populate the bytes from the RandomAccessFile. Wrap the populated byte array in a ByteArrayInputStream, which you then wrap in an ObjectInputStream. Reading from the ObjectInputStream will reconstitute the persisted object using the underlying bytes.
sis.db.KeyFileTest
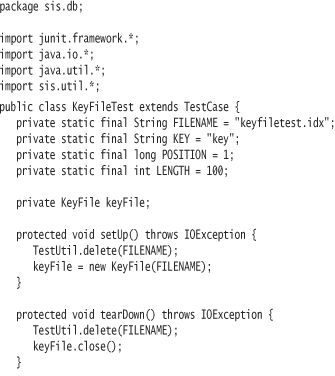

KeyFileTest demonstrates the ability to add keys (unique ids) to a KeyFile. A key is stored with the position of the associated data in the DataFile object as well as with the length of that data. The data position and length can be retrieved from the KeyFile using the unique key.
The third test, testReopen, ensures that you can create a new KeyFile object using the name of an existing key file. The KeyFile object must load the already-persisted key data.
sis.db.KeyFile
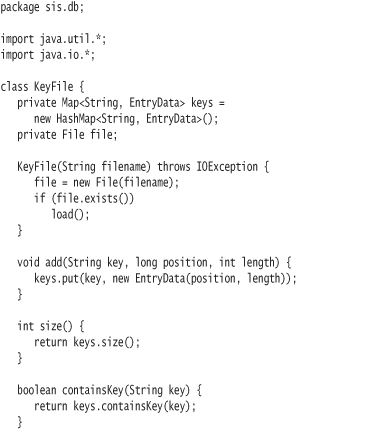
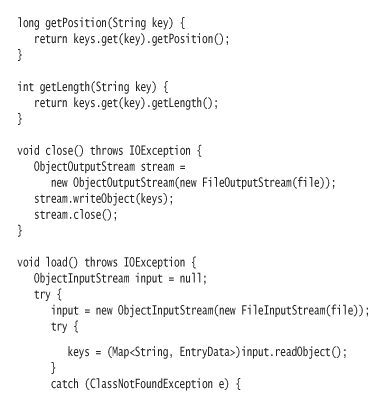
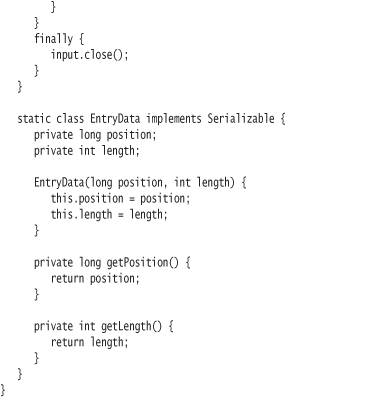
KeyFile stores the key information using a Map named keys. This Map object maps the key to a serializable static nested class, EntryData, which contains the data position and length. When closed, the KeyFile writes the entire Map to the file by using an ObjectOutputStream. It loads the entire Map when opened.
sis.util.IOUtilTest
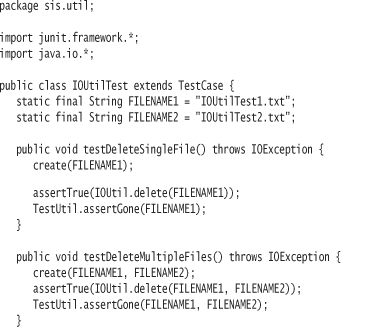
The most interesting aspect of IOUtilTest is that it contains four test methods, each testing the same IOUtil method delete. Each test proves a typical scenario. There are probably many more tests possible. It's up to you to decide whether you have enough tests to give you the confidence you need in your code.
![]()
Err in the direction of too many tests instead of too few.
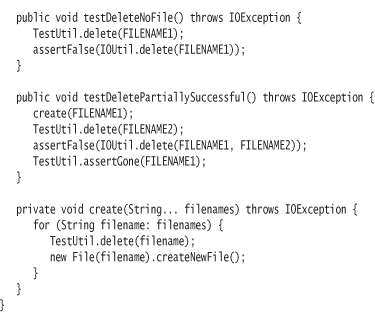
sis.util.IOUtil
The delete method uses varargs to allow you to delete multiple files in a single method call. It returns true only if all files were successfully deleted.
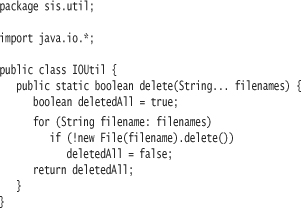
sis.util.TestUtil
Only tests use code in the TestUtil class. Since TestUtil does not extend from junit.framework.TestCase, it does not have instance access to any assert methods. However, the class junit.framework.Assert defines the assert methods as class methods, allowing you to access them anywhere.
Other things you will need to do:
• Make the GradingStrategy implementation types and Student serializable.
• Add an id field and associated getter/setter methods to the Student class.
• Update the AllTests suite classes.4
4 Having to remember to add the classes is asking for trouble. In Lesson 12, you'll learn how to use Java's reflections capabilities to dynamically build test suites.
Developing the Solution
In this example, I started by trying to implement StudentDirectory through the single test you see in StudentDirectoryTest, testRandomAccess. As often happens, the task of building functionality for StudentDirectory represented a large step. As I stubbed out the methods in StudentDirectory, it led me to the task of building the DataFile class. This meant my work on Student-Directory-Test was temporarily put on hold. Similarly, after I started to work on DataFile, I found it easier to encapsulate the key functionality to a class named KeyFile.
As I progressed in developing the solution, I was constantly reevaluating the design at hand. My general strategy is to sketch an initial design going from the “outside” and moving in. In other words, I determine how client code wants to be able to use a class and base its design on that interface. If necessary, I sketch out the high-level structure and work on some of the “inner” details. No matter how I work, I find that the design is usually in a state of flux. Implementing inner details sometimes impacts the surrounding classes, and vice versa.
Changes to the design are normal. The outermost interface remains fairly stable, but the details change frequently. Few of the design changes are major—it's more like pushing small bits of code from here to there, constantly honing and improving the design.
Doing an initial design can still be very valuable. Just don't invest much time in the details. The important parts of the design to get right are the interface points—where does your code have to interact with other code in the system? Beyond that, the pieces in the middle are under your control. You'll craft a better system by letting the implementation guide your design.
Exercises
- Create a test to write the text of this exercise to the file system. The test should read the file back in and make assertions about the content. Ensure that you can run the test multiple times and have it pass. Finally, make sure that there are no leftover files when the test finishes, even if an exception is thrown.
- (hard) Create a timing test to prove that using a Buffered class is important for performance. The test can loop through various sizes of file, creating character data in sizes growing by a factor of 10, calling a method coded to write using the basic character-at-a-time methods, then wrapping the writer in a buffered output stream and writing it again until a 5x performance gain is reached. What is the threshold at which a buffered writer is a significant performance gain?
- Create and test a utility class called MyFile. This class should wrap a File object, taking a string filename as its constructor argument. It should have methods for retrieving the content of the file as a String or as a List of lines. It should also have a method for writing either a String or a List of Strings. Read and write operations should encapsulate opening and closing the file—clients should not have to close the file themselves.
Ensure that the read methods fail with a specific unchecked exception type if the file doesn't exist. Similarly, the write methods should fail if the file does exist. Provide
deleteandoverwritemethods, and you will have built a well-tested utility class that you can place in your toolbox. - Further adventures in utility classes: Create a Dir class that encapsulates a File object that in turn represents an actual file system directory. Design the class so that it is functional only when mapped to an existing directory. Provide a method named
ensureExiststo create the directory if it does not exist. The constructor should throw an exception if the directory name is the same as an existing file. Finally, provide a method that returns a list of MyFile objects in the directory and throws an exception if the directory has not been created yet. - Code a test that shows the use of a ByteArrayOutputStream to capture an exception and dump the stack trace into a string. Code it with and without an OutputStreamWriter. In both the character version and the byte version, use buffered readers and writers.
- Modify the chess application to allow you to save the board positions to a text file and read them back in. Provide two choices—a serialized object of type Board or a textual representation as shown in the earlier exercises.
- In Additional Lesson III, you will learn the preferred Java technique for cloning, or creating a copy of, an object. Until you learn this technique, you can implement cloning using object serialization and deserialization to duplicate objects. Your implementation will be a “poor man's” clone that you should not use in production systems.
- Create an instance inner class for Dir, named Attributes, that encapsulates two directory attributes: Is the directory read-only and is it hidden? The Dir class should return an instance of this object if requested. Demonstrate (through failure to compile) that the test cannot instantiate this object.
- Change the Dir.Attributes inner class to a static nested class and change the code and test so they still work. What are the implications? Show that the test can instantiate a Dir.Attributes class. Does this design make sense?
- In the exercises for Lesson 10, you wrote code to programmatically determine the size of each primitive integral type. Now, write code to determine the base size of all primitive types by using a data stream.