
In the previous chapters you must have got the idea of what is Alfresco Share and the high level architecture of Alfresco Share. Now it's time to jump into the Alfresco Share application. In this chapter, and the following chapters, you will learn how you can use Alfresco Share to build collaborative sites and see what you can do with the Alfresco Share user interface.
In this chapter, we will discuss about managing the users and groups of the Alfresco Share application. You will also understand the concepts and the underlying framework behind the Alfresco security model. The Alfresco security model is flexible and allows you to choose either its built-in security or an external security model defined by your organization, by using systems such as LDAP and Active Directory. You will understand various security models and learn to choose the one that is most suited to your enterprise's requirements. The Alfresco membership system is highly scalable and can cater to a number of users and content managers. We will also discuss various administrative features in the later sections of this chapter.
In this chapter, you will learn:
Managing system users
Searching users using people finder
Updating a user profile
Managing groups
The user dashboard and customizing a personal dashboard
Configuring authentication subsystems
Administrative functions
A content management system requires a membership system that allows its users to access content, set their preferences, and receive notifications and alerts. Members of the system can collaborate with other members by selectively sharing documents and sharing ideas by using discussion forums. Through the workflow mechanism, members can control and follow the business process.
Traditional membership models address basic authentication (who can access) and authorization (what they can do). Alfresco extends this model by providing capabilities to manage groups and subgroups of members, member attributes, and member workspaces. It also provides a set of administrative tools to configure and control the membership.
A content management system requires a membership system that allows its users to access content, set their preferences, and receive notifications and alerts. Members of the system can collaborate with other members by selectively sharing documents and sharing ideas by using discussion forums. Through workflow, members can control and follow the business process.
Traditional membership models address basic authentication (who can access) and authorization (what they can do). Alfresco extends this model by providing capabilities to manage groups and subgroups of members, member attributes, and member workspaces. It also provides a set of administrative tools to configure and control the membership.
Users are individual members, whereas groups are the logical categorization of users.
Users and groups are stored in the Alfresco Repository and these users can login via Alfresco Share also. In Alfresco, a user is identified by a unique user ID, also known as the log in ID. The administrator is like a super user of the system. There can be more than one administrator user.
Alfresco groups, logically a group is a set of users in the system for security and collaboration purposes. A group can have any number of sub-groups. There is a default group called EVERYONE, which represents all the users of the system.
A user can belong to more than one group and sub-group. A group can have more than one user. A user belonging to a sub-group will automatically belong to the parent group. This is how a typical organization's hierarchy works. An employee belongs to a particular department, or some times more than one department. Hence, you can consider different departments as different groups.
Alfresco imposes authentication using the username and password pair. Authentication is performed at the following entry points to the Alfresco Repository:
Web client
CIFS
FTP
WebDAV
Web services
Spring beans exposed as public services in Java
When a call is made to the Repository through the public service API, the caller must first be authenticated. This can be done by logging in using a username and password to validate a user. Some applications and authentication mechanisms may support single sign-on. For example, a user can access the Alfresco Repository through Alfresco Share or another application through the web services protocol. No matter how a user or an external system connects to Alfresco, they all should go through the same authentication process to access data from the Alfresco Repository.
You have to log in to Alfresco Share as an administrator (admin) to create accounts for each Alfresco user. Only an administrator user can manage user accounts.
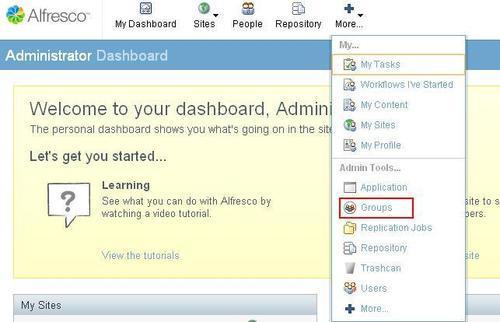
In Share, for user management, expand the More menu on the toolbar and click on Users option in the Tools list:
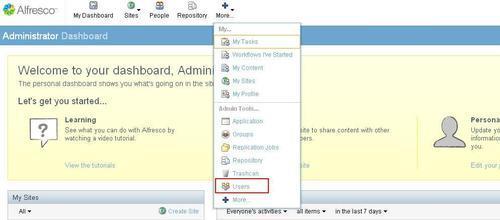
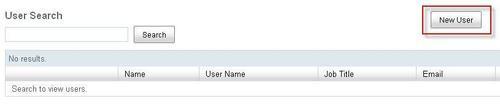
Only administrator users will have this link. Once you click on this link, you can see the screen for managing users. From this screen you can create new users, as well as searching for existing users, accessing the profile of users, and deleting users.
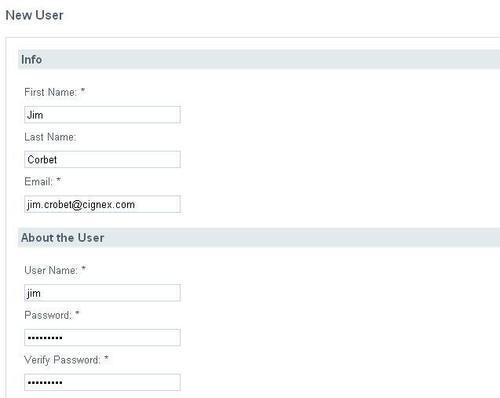
To add users, you need to know the user ID, password, and other primary details as listed as follows, which are mandatory to create any new user:
First Name
Last Name
E-mail ID (valid corporate e-mail)
User name (login ID)
Password
The steps to create a new user are as follows:
Other user details like Contact Information, Company Details, and so on are also captured in a user profile in Alfresco Share. In the following section for Updating the User Profile we will see how the user can provide these details.
The People Finder page component enables you to search for a particular user. To search the any user, follow these steps:
Click People on the toolbar.
The People Finder page component appears.
In the search box, you can type the full, or partial name, of the user you want to search.
Refer to the search tips provided on the People Finder page to perform more complex searches by both name and property.
Click Search. The results list appears beneath the search box and displays all users matching the search criteria provided:
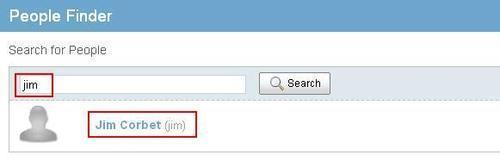
In this list, click a username to display that user's profile. The user details are organized across three pages: Info, Sites, and Content.
Navigate the pages to view the details for the selected user.
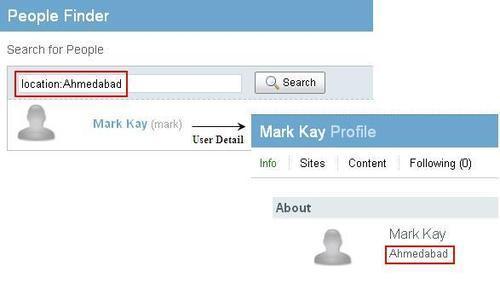
On the People Finder component page, you can refer to the search tips provided to perform more complex searches by both name and property. For example, let's search for a user whose location is Ahmedabad. So in this case we are searching for the user by its property and here property is location.
The syntax is:<property_name>:<value>
Hence, in our example, the search string should be location:Ahmedabad. If you search with this, it will give the resultant users having their location set as Ahmedabad:
This feature allows you to follow other users whose activities might be of interest to you..
To follow any user perform the following steps:
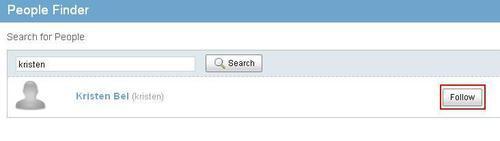
Search for the people you want to follow using people finder as discussed in the previous section.
Click on the Follow button with the resultant user's list:
Another option is to follow any user from the user's Profile page. There is also a Follow button on the info page on the user's profile.
You can see the users you are following from your profile page under the I'm Following section.
To see who is following you, check the Following Me section on Profile page.

The Private checkbox allows you to make your followers list private, which restricts other users from viewing this.
Once the user is created, the user himself can update the profile. The admin user also can update the profile for any other user, but can update only limited details.
The admin user can update the profile for any other user, but can update only the following details:
First Name
Last Name
Email
Quota
Groups
Disable Account
Photo
To update the profile for any user by admin, perform the following steps:
Expand the More menu on the toolbar.
Click Users in the tools list.
Search for the user whose details you want to update:
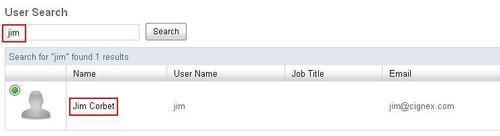
Click on the name of the user, it will open a page with that user's details.
Click on the Edit User icon, as shown in the following figure:
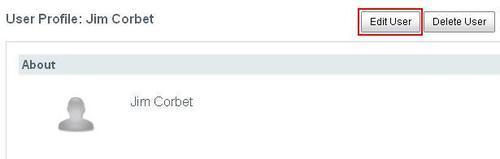
On this page you can update this user's details. For example, let's update the Quota for this user:
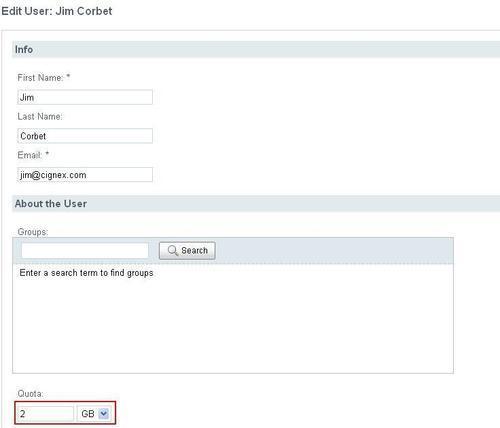
Once done with the changes, click on the Save Changes button to save the changes.
There are two ways to access the user's own profile. You can find the My Profile option in the More menu on the toolbar and also in the drop down menu from the upper-right corner where the username is displayed:

Once you click on My Profile, click on the Edit Profile button.
The following list mentions other information, which can be filled up while editing the user's own profile:
Quota (maximum limit to upload the data by a particular user)
Photo
Location
Job Title
Summary
Groups (groups to which this user belongs)
Contact Information
Telephone
Mobile
Skype
IM
Google Username
Company Details
Name
Address
Post Code
Telephone
Fax
Email
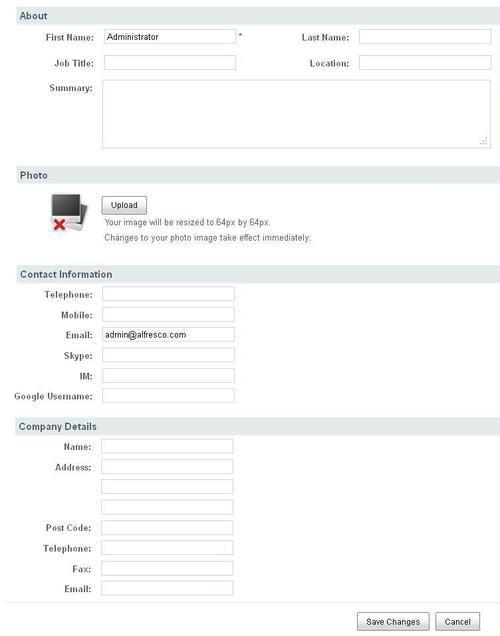
Edit the user's profile details, making changes, and adding new information as desired. Once done with the changes, click on the Save Changes button to update the profile.
To upload a photo to display with your profile, perform the following steps:
Click Upload in the Photo section. Click Browse on the Upload File page.
Browse and upload the image. The selected file appears in the Upload File page. Click Remove to delete the file listed.
Click Upload File(s) to upload the picture.
If a profile picture already exists, uploading a new photo will replace the existing picture.
Click Save Changes to save the profile details. The User Profile page now displays your updated user profile.
On the user's profile page, along with the basic information of the user, there are other tabs available which display the other relevant information for the current user, as shown in the following screenshot:

Sites: This section lists the sites of which the current user is a member
Content: Which displays the recently added and modified content by the current user
I'm Following: This section displays the list of users who are followed by current user along with the option to Unfollow that user
Following Me: This section displays the users who are following the current user
Change Password: This allows the password to be changed
Notifications: Allows to enable/disable e-mail notifications, which sends the e-mails informing the user of certain events like invitations to join the sites, recent site activities, and so on
There is one field called Status in the user menu, which allows you to share your status with your colleagues. You can set your own status to what you are doing or working on. Whatever status you set, your colleagues can see it with your name when it appears in the site dashboard and in the People Finder page.
Follow the given steps to set your status:
On the toolbar, expand the user menu. The status field displays your current update. The length of time since your last status update is displayed beneath this field.
Provide your status in the field, as shown in the following figure:
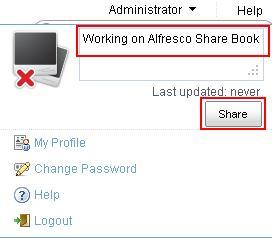
Click on the Share button, which will share your status with other users.
Only the Administrator can delete existing user accounts from Alfresco. To retain the user account while denying the user access to the application, consider simply disabling the user account. Only when you want to delete the user permanently, use the Delete a user feature. To delete a user perform the following steps:
On the toolbar, expand the More menu and click Users in the Tools list. The User Search page appears.
Search for the user you want to delete.
Click on the username in the search results, which will open the User Profile page.
On the User Profile page, there will be a button for deleting the user:
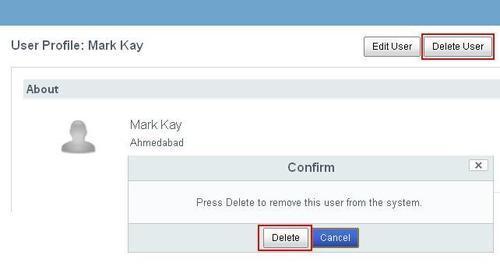
Click on the Delete button. A message prompts you to confirm the deletion.
Click Delete.
This will delete the user from the Alfresco Repository itself.
Only the Administrator can disable any user account in Alfresco. To retain the user account but just denying the user access to the application, you should disable that user's account. It will disable the user's account in the Alfresco Repository itself. The steps to disable a user are as follows:
On the toolbar, expand the More menu and click Users in the Tools list. The User Search page appears.
Search for the user whose account you want to disable.
Click on the username in the search results, which will open the User Profile page.
On the User Profile page, there will be a button to edit the user profile:
Click on the Edit User button.
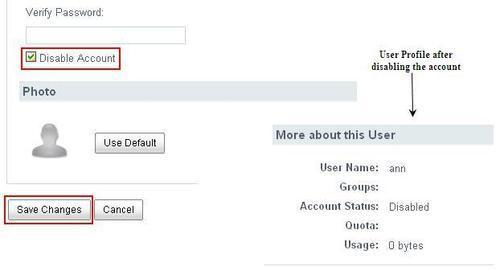
On the Edit user page, click Disable Account. A checkmark indicates the account for the current user will be disabled.
Verify on the User Profile page, the Account Status appears as Disabled.
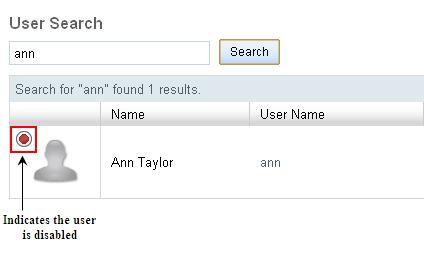
On the User Search page, you can see the red dot for this user, listed in the search results list, which indicates that the user account is disabled, as shown in the following figure:
When initially we are creating users in the system, sometimes we may need to import multiple users. Alfresco allows importing user's details in a CSV (Comma Separated Values) file format. You can prepare CSV file and then on the user's page, there is an option to import the users by uploading this file.
Note
The order of the user's details in the CSV file should be as follows:
User Name, First Name, Last Name, E-mail Address, Password, Company, Job Title, Location, Telephone, Mobile, Skype, IM, Google User Name, Address, Address Line 2, Address Line 3, Post Code, Telephone, Fax, Email.
Create the CSV file according to the above structure with the users' details.
Go to the User page which will open the User Search page.
Click on the button Upload User CSV File.
Upload the CSV file with the user's details.

In Chapter 1, Building a Corporate Collaboration Strategy, we had discussed about the case study of marketing site for a new product. There will be users from within the organization, and external users, who have permission to access the site and its content. Here, internal users will be members from different departments like the marketing department, sales department, product development team, strategists and so on. You can consider these different departments as different groups. Groups will logically form a set of users for better collaboration.
So, now we will see how to create groups in Alfresco Share and also how to associate users to the groups in this section. When you create any group in Share, it will be created in the Alfresco Repository. Hence, you can manage them from the Repository as well.
Alfresco comes with three default user groups called EVERYONE, ALFRESCO_ADMINISTRATORS, and EMAIL_CONTRIBUTORS.
The EVERYONE group logically includes all the system users irrespective of the groups they belong to.
The ALFRESCO_ADMINISTRATORS group contains all the administrator users. In Alfresco, you can have more than one admin user. Any user who is member of this group can act as an administrator in Share.
The EMAIL_CONTRIBUTORS group is required to allow permissions to be handled at a high level by the administrator as an e-mail arriving at the Alfresco e-mail server is unauthenticated. By default, this group contains the admin user.
In Share, for groups management, expand the More menu on the toolbar and click on the Groups option in the Admin Tools list:
In Alfresco, only the administrator can create and manage the groups. The following steps explain how to create a new group in Alfresco Share:
On the toolbar, expand the More menu and click Groups in the Admin Tools list.
On the Groups page, click on Browse. The leftmost pane displays all top-level user groups:
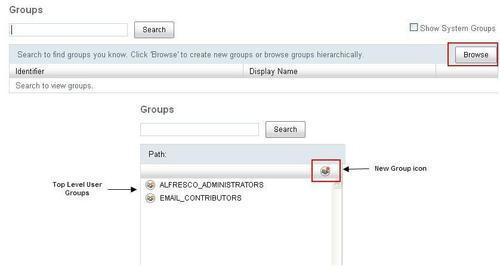
To create a top-level group, click the New Group icon at the top of the initial pane.
The New Group page appears. Fields marked with an asterisk (*) are required.
Complete the required details:
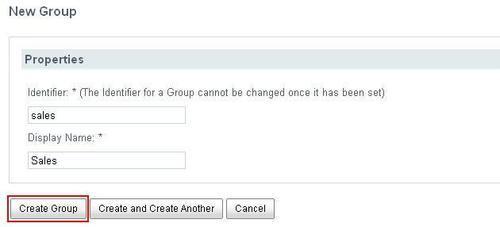
Click Create Group.
If you want to immediately create another group at the same level, click Create and Create Another. This creates the group specified and clears the fields without returning you to the Groups page.
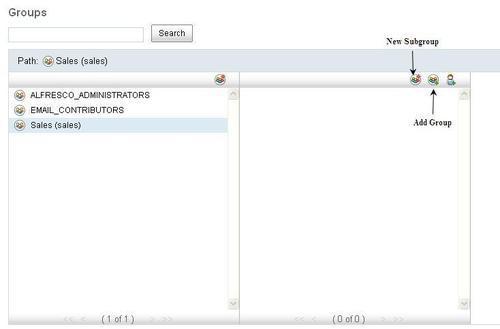
You can also create a sub group within a group. In that way, you can have a structured hierarchy of groups. If any user is a member of a sub group, it will also be a member of all parent groups.
Navigate to the user group where you want to create the new group.
To create a subgroup, browse the group structure to locate the desired parent group. Select this group and then click the New Subgroup icon at the top of the pane immediately to the right, as shown in the following screenshot:
You can assign users to the group. One user can be a member of multiple groups and, at the same time, one group can have multiple users. Let's add the user we had created in previous section (pallika) to the newly created group Product Development.
On the toolbar, expand the More menu and click Groups in the Admin Tools list. On the Groups page, click Browse. The leftmost pane displays all the top-level user groups.
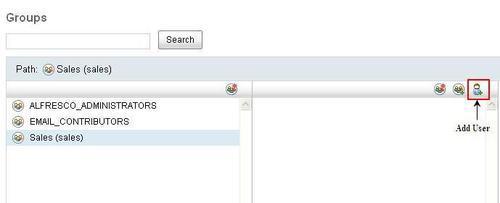
Navigate the group structure to locate the user group in which you want to add users. Click the user group to select it. Here, click on the Product Development group.
Click on the Add User icon in the right pane:
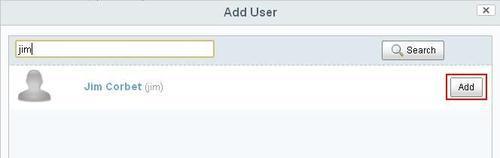
Using the search feature provided, locate the user you want to add to the selected group. Here, search for the user Jim.
Click the Add button to add that user to the group:
To remove the groups from the system, the administrator user can delete the group. To delete the group:
On the toolbar, expand the More menu and click Groups in the Admin Tools list.
On the Groups page, click Browse. The leftmost pane displays all the top-level user groups.
Navigate the group structure to locate the group you want to delete. You can also use the search feature to locate the group.
Mouse hover the group name to see its available actions:
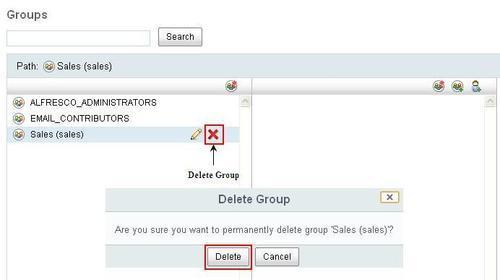
Click the Delete Group icon. A message prompts you to confirm the deletion.
Click the Delete button.
This will also delete all the sub groups of this main group.
We will be using the below users and groups throughout the book for our case study of a marketing site for new product. As it was explained in Chapter 1, Building a Corporate Collaboration Strategy, there are two types of users, Internal and External. In this chapter, we will create internal users and groups. We will discuss about external users and how they can access our site in the next chapter.
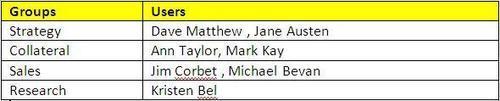
Groups: Strategy, Collateral, Sales, Research
Users: Dave Matthew, Jane Austen, Mark Kay, Ann Taylor, Michael Bevan, Jim Corbet, Kristen Bel
The following table shows the membership of the users to the groups. Create these users and groups in Share and also add users to the respective groups. We will be using these users and groups throughout the book:
Dashboard is the home page for the user. This is the first page you see when you login to the Share application. Your personal dashboard consists of dashlets that allow you to track all information relevant to you. These dashlets appear on your personal dashboard. Each dashlet provides a summarized view of a page. However, the presence of a corresponding page is not mandatory. Wherever a page exists, it generates the contents of the related dashlet. Following is the default share dashboard for any new user created:
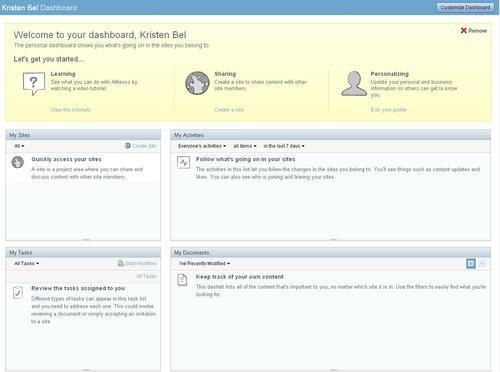
Alfresco Share provides many other dashlets apart from the default dashlets added in the dashboard, as shown in the previous figure. The list of out-of-the-box available dashlets is as follows:
Getting Started: This dashlet displays information for getting started and provides links to perform common tasks.
My Limited Profile: My Profile contains a summary of the personal details provided in your user profile.
My Sites: This dashlet displays all sites that you have either created, or are a member of. You can access a site from this dashlet. Creation or deletion of a site can be done using this dashlet.
My Calendar: This dashlet provides a list of events that you have created, as well as events for each site of which you are a member.
My Tasks: My Tasks displays a list of all your incomplete tasks.
My Site Activities: This dashlet maintains the most recent activities that have been performed in any site that you are a member of.
My Documents: This dashlet allows you to view files from all Document Libraries that may be of particular interest to you, organized into three categories: Favorites, I'm Editing, and I've Modified.
My Workspace: This dashlet displays all Document Workspace sites of which you are a member. You can enter and delete a Document Workspace from this dashlet.
My Meeting Workspaces: My Meeting Workspaces dashlet displays all Meeting Workspace sites of which you are a member. You can enter and delete a Meeting Workspace from this dashlet.
Web View: The Web View dashlet can be configured to display any website. The Configure link enables you to change the website as desired.
Content I'm Editing: Content I'm Editing displays all files you currently have checked out from any Document Library.
Alfresco Network: Alfresco Network is a portal that gives Alfresco Share customers access to the latest Alfresco news.
RSS Feed: The RSS Feed dashlet is configured to display the Alfresco website feed. This is a default setting.
CMIS Feed: This dashlet displays links specific to the Content Management Interoperability Services (CMIS) specification and implementation.
Records Management Config: The Records Management dashlet displays links for creating, accessing, and configuring the Records Management site. This dashlet is available only when the Records Management module is installed.
It's very easy to create your own custom dashlet if you don't find your suitable dashlet or information in these out-of-the-box available dashlets. Creating custom dashlets is out of the scope of this book hence, we will not discuss it here.
You can customize your personal dashboard to suit your purpose. You can modify the dashboard layout, select the personal dashlets to appear in your dashboard, or configure the display order of the selected dashlets.
To customize a dashboard, click on the Customize Dashboard button on the user's dashboard:
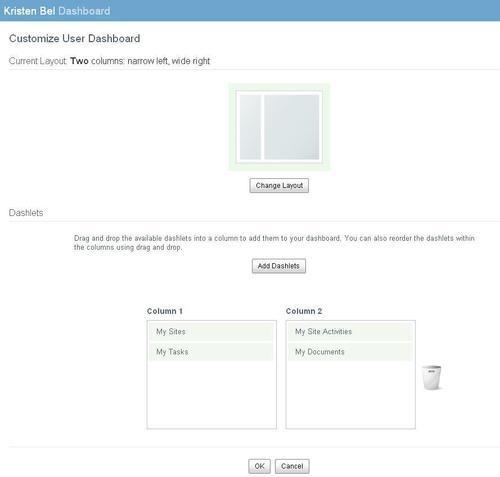
The default layout is three columns. You can change this default layout. Each user can have its own layout for his/her dashboard. To change the default layout perform the following steps:
Click on the Customize Dashboard button on the dashboard.
In the first section, Current Layout shows the currently selected layout, as shown in the previous figure.
Click the Change Layouts button to display all other available dashlet layouts:

You can select a layout by clicking on it, or on the Select button beside it.
To add dashlets perform the following steps:
Click Add Dashlets to display the available dashlets.
Click the desired dashlet in the Add Dashlets section and drag it to the desired column.
To remove a dashlet, click on and drag the dashlet to the Bin.
Click and drag the dashlets up and down within, and across, columns to change the display order. Also, you can select the dashlet and click the Delete key to remove any dashlet:
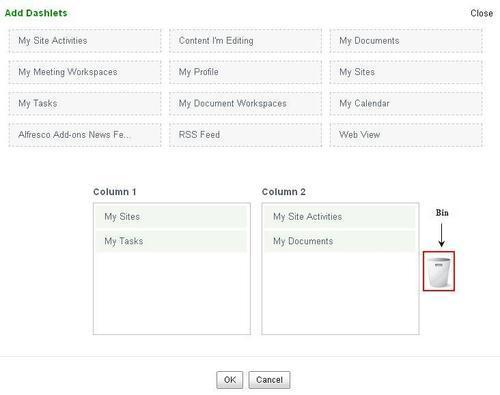
Click OK to save your changes. Now your dashboard is customized as per your selections and will display the selected dashlets, in the order specified.
Alfresco imposes authentication through user login ID and password. This is where you choose a security model such as Alfresco's built-in membership system, NTLM (Windows NT LAN Manager), or LDAP (Lightweight Directory Access Protocol), and so on. It also supports chaining of multiple authentication systems. Hence, you can combine the strength of a variety of authentication protocols with Alfresco.
Alfresco has introduced Authentication as one of the subsystems from version 3.2. A subsystem is a configurable module responsible for a sub-part of Alfresco functionality and one of them is authentication. Through this you can configure any authentication mechanism very easily.
The security model you choose will be based on the requirements of your enterprise. Let us consider the following sample scenarios:
Scenario 1: Let's say your requirement is to build an extranet as a standalone application to share documents with the customers. There are around 500 customers who will be accessing the site and you would like to control and manage the security. You need to have a flexible and highly scalable membership system. In this scenario, an out-of-the-box Alfresco membership system would be able to solve the problem.
Scenario 2: Let's consider a scenario where you are working in an IT department of a large university. Over the years, the various departments have developed their own sites with local authentication and authorization. The university has a directory-based central authentication system. How can you consolidate all the sites and provide a central point of authentication and authorization for all our sub-sites? In this scenario, it would make sense to configure Alfresco with LDAP for centralized identity management.
Scenario 3: In an enterprise you may have various systems such as customer support, ERP, proprietary content management systems, and open source ECM Alfresco. The employees have different accounts on all these different systems and it is becoming unmanageable. In this kind of scenario, you are looking at a single sign-on solution to access all our systems with one login ID and password.
Different authentication subsystems that are available are as follows:
alfrescoNTLM: This is Native Alfresco Authentication. It performs authentication based on user and password information stored in the Repository.
ldap: Authentication and user registry export via the LDAP protocol (OpenLDAP).
ldap-ad: Authentication and user registry export from Active Directory via the LDAP protocol.
passthru: Authentication via a Windows domain server which replaces the standard user database, to authenticate users accessing it. This saves having to create user accounts within Alfresco.
Kerberos: Authentication via a Kerberos Realm. The Java Authentication and Authorization Service (JAAS) is used within the Kerberos subsystem to support Kerberos authentication of usernames and passwords. You may choose to use Kerberos against an Active Directory server, in preference to LDAP or NTLM as it provides strong encryption without using SSL. It would still be possible to export user registry information using a chained LDAP subsystem.
external: Authentication via an external SSO mechanism or any other external system.
The LDAP directory is the central authentication engine for the enterprise, and serves as a Yellow Pages for user access, and profile information. The biggest advantage of LDAP is that your enterprise can access the LDAP directory from almost any computing platform, using any one of the increasing numbers of readily available LDAP-aware applications. In fact, LDAP is finding much wider industrial acceptance because of its status as an Internet standard.
You can use LDAP with any directory server, such as iPlanet, Novell's eDirectory, Microsoft's Active Directory, or OpenLDAP. If you are planning to implement an LDAP directory in your organization, you may consider OpenLDAP, Active Directory, or eDirectory. OpenLDAP is a stable and widely accepted open source directory server.
This is the most widely used authentication mechanism. Microsoft Active Directory supports LDAP based authentication. This example addresses the more advanced goal of delegating authentication responsibility to a centralized directory server. To integrate Alfresco with an active directory server, you simply need to include an instance of the ldap-ad subsystem types in the authentication chain. In this example, we will implement the authentication chain with ldap-ad and the default Alfresco authentication. Perform the following configuration steps:
Copy the
ldap-adconfiguration folder from<install_application> | tomcat | webapps | alfresco | WEB-INF | classes | alfresco | subsystems | Authentication.to<install_application> | shared | classes | alfresco | subsystems | Authentication | ldap-ad. (Create the folder hierarchy if doesn't exist.)
Rename the folder
ldap-adlocated at<install_application> | shared | classes | alfresco | subsystems | Authentication | ldap-ad to ldap-ad1.Edit the
ldap-ad-authentication.propertiesfile located at<install_application> | shared | classes | alfresco | subsystems | Authentication | ldap-ad | ldap-ad1 for standard configuration. Set proper values for the following properties:ldap.authentication.active=true
ldap.authentication.userNameFormat=%[email protected]
ldap.authentication.java.naming.provider.url=ldap://ahm.cignex.com:389
ldap.authentication.java.naming.security.authentication=simple
ldap.authentication.defaultAdministratorUserNames=admin
Edit the file
ldap-ad-authentication-context.xmllocated at<install_application> | shared | classes | alfresco | subsystems | Authentication | ldap-ad | to replace<import resource="../common-ldap-context.xml" /> with <import resource="../../../../../../../../webapps/alfresco/WEB- INF/classes/alfresco/subsystems/Authentication/common-ldap- context.xml" />.
Modify
alfresco-global.propertieslocated at<install_application> | tomcat | shared | classes, add the following line to enable chaining of authentication with ldap-ad:authentication.chain=alfrescoNtlm1:alfrescoNtlm,ldap-ad1:ldap-ad.
Once these configurations are done, you need to restart the server.
Note
You can refer to the wiki link: http://wiki.alfresco.com/wiki/Alfresco_Subsystems for more details on configuring different subsystems.
We already discussed user and group management. Now in this section, we will discuss some more administrative functions available in Share. Share Admin Console is a browser-based console, which allows the Alfresco Administrator to manage administrative operations through the UI itself.
When you start Alfresco Share, whatever default look and feel you are seeing is set by a default theme. In this section, we will talk about out-of-the-box themes available and how a user can apply a different theme than the default one. We will also discuss how one can edit the existing theme and also create new themes for corporate branding and use it in Share.
Share themes consist of a directory containing a CSS and images files, and they can be located in the theme directory,
<install_application> | tomcat | webapps | share |WEB-INF | classes | alfresco | site-data | themes.
The default theme is called default.xml. Other out-of-the-box themes available in Share include:
Blue theme (default)
Yellow theme
Green theme
High contrast black
Google Docs theme
Only an Application Administrator user can change the default Share theme. Any change to the theme will affect all users of the Alfresco instance from the next time that they log in, or from a browser refresh. Also, this will be applicable to all the sites of an Alfresco instance.
To change the global theme perform the following steps:
Expand the More menu on the toolbar, and click Application in the Admin Tools list. This will open the Options page.
It will allow you to choose the new theme from the available options:
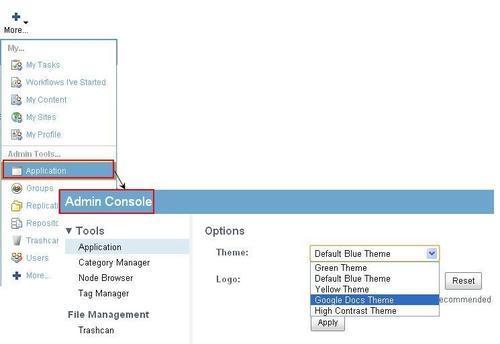
Select Google Docs Theme.
Click Apply.
The new theme displays in Share and this persists across sessions.
Google Docs Theme:

A theme consists of some CSS files, an image directory, and a directory for assets for YUI. To create a new look, change the presentation.css file and, if required, replace or add images to the /images directory.
In this section, we will try to change one of the existing themes. Let's change the Green theme:
Open the presentation.css file located at<install_application> | tomcat | webapps | share |themes | Greentheme.
Locate the properties at the end of the presentation.css file.
Edit the following four properties:
color
background
background-color
border
Any change to these properties will change the theme.
Note
You can refer to the wiki link: http://wiki.alfresco.com/wiki/Alfresco_Share#Themes to get more details on creating your own new theme.
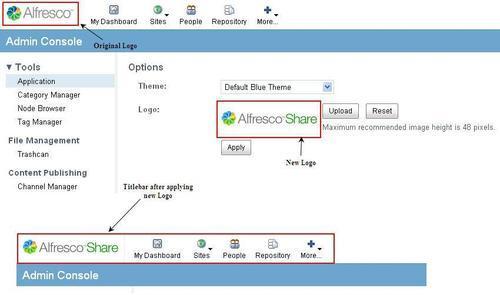
To change the default Alfresco logo which appears on the top left corner of Share, perform the following steps:
Open the Admin Console by expanding the More menu on the toolbar, and click Application in the Tools list. This will open the Options page.
Click on Upload to browse the new logo; once the new logo file is uploaded, click on the Apply button. It will change the logo in the title bar to the new uploaded logo:
An Administrator can manage the categories in the system using this feature. Any content can be categorized to the predefined categories. Some predefined categories are already there in Alfresco. A category can have sub categories. You can also create your own custom category.
To Manage categories perform the following steps:
Open the Admin Console by expanding the More menu on the toolbar, and click Category Manager in the Tools list. This will open the Category Manager page.
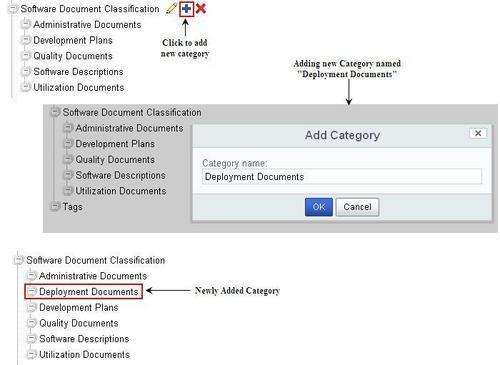
The Category Manager page will display the existing category tree structure, as shown in the following figure:
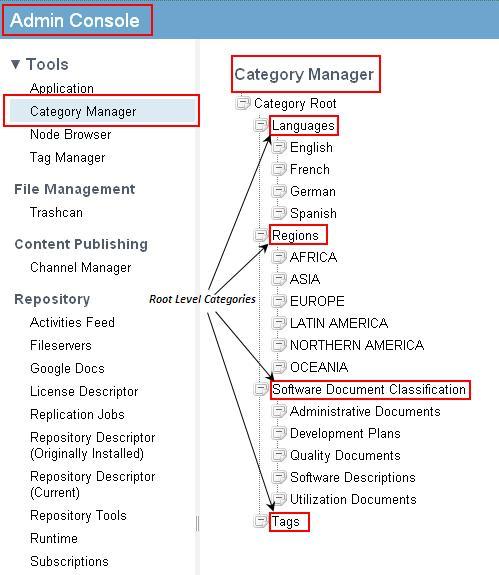
To add a new category or sub category, mouse hover on the parent category within which you want to create a new category. Click on the Add Category icon, provide the name of the new category and then click on OK:
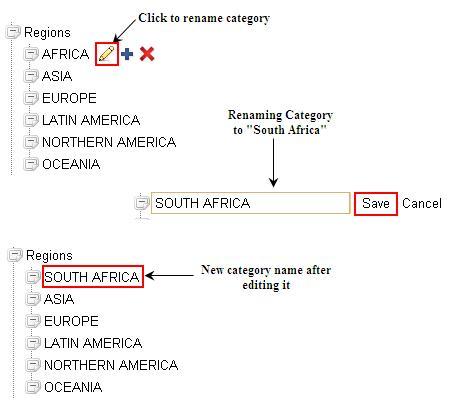
To rename an existing category, mouse hover on the category, which you want to rename, click on Edit Category icon, provide the new name of the category and then click on OK:
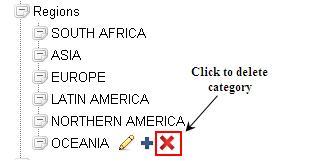
To delete any category, mouse hover on the category which you want to delete, click on the Delete Category icon. When asked for confirmation, click on the Delete button.
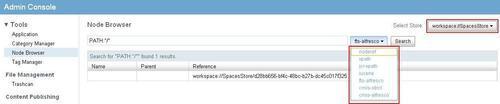
The node browser allows users to browse the Alfresco Repository and also perform different search operations. This feature is more useful to developers, which helps them for debugging while customizing the application.
To browse the node browser perform the following steps:
There is an option Select Store on the Node Browser page to select the store which you want to browse:
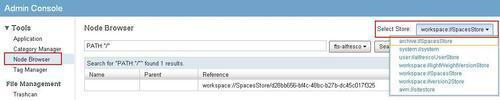
Once you select the store, the node which is displayed there is the root node of the selected store. After clicking on that, you can browse it and see the details like properties, aspects, children, parents, associations, source associations, and permissions of the current node.
The node browser allows users to perform different search queries. There are different search type/protocols available; which you can use to perform the search. The different search types include:
Click on Node Browser on the Admin Console page.
Select the desired Search type and the Store in which you want to perform the search.
Provide the search query (using the search syntax based on the search type you have selected) in the field provided and click on the Search button. It will display the resultant nodes there:
The Tag Manager page on the Admin Console allows you to manage the content tags.
It lists all the tags associated to any content of any site with the details like Tag Name, Creator, or Last modifier of that tag and the last modified date of the tag:
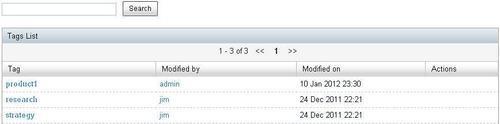
Click on the Tag name to see all the content associated to that tag.
To edit a tag, mouse hover the tag name you want to edit, click on the Edit icon and provide the new name of the tag. This will update the tag name in all the content in which it was tagged earlier.
To Delete a tag, mouse hover the tag you want to delete, click on the Delete icon. It will delete the tag from the system and also remove from the content in which it was tagged earlier.
You can also perform a search for any tag using the search box on the Tag Manager page.
An Administrator can manage the deleted items from the Trashcan page on the Admin Console.
Click on Trashcan under the File Management section on the Admin Console:

Here you can see the list of all deleted items from any site by any user.
There are two options available for all deleted items:
Delete: Click on this button to permanently delete that particular item.
Recover: Click on this button to recover this deleted item, this will move the item back to its original location.
To permanently delete all the items from Trashcan, click on the Empty button.
Content publishing is a very interesting feature in Alfresco Share for social collaboration, which allows you to publish your content that is stored in Alfresco to other social media websites like Facebook, YouTube, and so on.
To publish the content to these websites, two steps are required: Creating the Publishing Channel and Publishing the existing Content using the appropriate channel.
As discussed in the previous section, to publish the content to social websites, the first step is to create the publishing channel. There are different channels supported by Alfresco Share which include:
Facebook
Flickr
LinkedIn
SlideShare
Twitter
YouTube
To Create a new Channel perform the following steps:
Click on the Channel Manager page on the Admin Console.
Click on the New button and select the desired channel from the available channels. Let's select YouTube as a channel.
The next step is to provide the credential details for the chosen channel to authorize it.
You can authorize the channel later also by clicking on the Reauthorize option, as shown in the following screenshot:

To delete an existing Channel perform the following steps:
Click on the Delete icon to delete any existing channel, as shown in the previous screenshot.
It will ask for confirmation and then it deletes the channel.
To provide permissions for a channel perform the following steps:
Click on the Permissions icon to manage the permissions for any channel.
There are two options to set permissions: inherit permissions and set local permissions.
Inherit permissions
By default the inherited permissions are enabled.
To disable it, click on the Inherit Permissions button.
Set local permissions
Click on the Add User/Group button to set the local permissions.
Once you click on this, it will allow you to search for the user or group and add it.
Once you add it, you can provide the desired role for that user/group.
Once the channel is created, you can publish your content to social websites using this channel.
Go to the Document library and navigate to the content you want to publish.
Mouse hover to that content to display the different actions, click on More and then Publish:
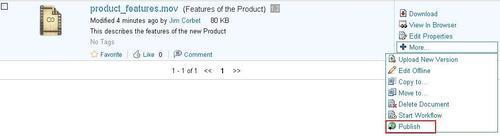
Once you click on Publish, you will see the
publish <<content name>>dialog.Select the channel as New YouTube channel, which we just created to publish this video on YouTube; here you will see only the appropriate authorized channels based on your content type.
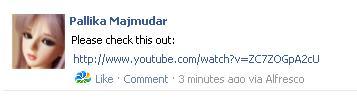
If you want to update the status on any other channels, you can select it in the Update on list. Select Facebook here and provide the appropriate message, which will be displayed on Facebook:

Once done, click on the Publish button, it will start publishing the video. You can track the publishing status and history from the Publishing History section on the Details page.
Once it is published, you can check the status update on Facebook with the link of the video uploaded on YouTube, as shown in the following screenshot:
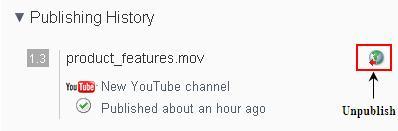
To remove published content
If you want to un-publish this video, go to the Details page of the content and locate the currently published version from the Publishing History section.
Click on Unpublish icon as shown. It will remove the video from the published channel and change the status to Unpublished:
In this section, we will discuss about the configuration of some of the Repository features, which can be controlled from the Admin Console. Alfresco Share allows configuring activity feeds, different file systems like CIFS, Google Docs, Replication jobs, and so on from the Admin Console.
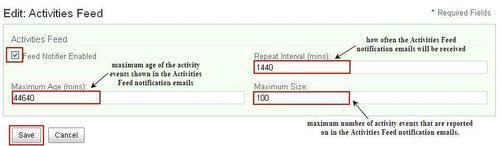
Activity feed is a setting for configuring activity e-mails, which is being sent to the Administrator. To enable this, follow the given steps:
On the Activities Feed page on the Admin Console, check the Feed Notifier Enabled checkbox to activate the e-mails for the activity feed.
You can also configure other properties like frequency of e-mails and number of items shown in the e-mail and so on, as shown in the following screenshot:
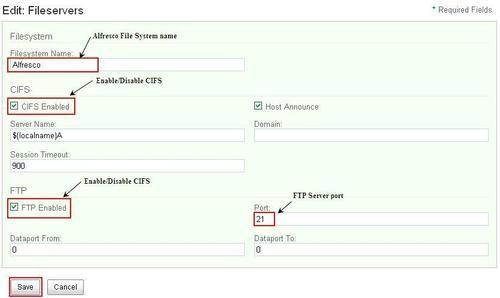
Alfresco supports different protocols like CIFS, FTP, and so on to access the Alfresco Repository. The Fileservers page on Admin Console allows you to configure the properties for CIFS and FTP for Alfresco File System.
Click on the Fileservers page on the Admin Console.
Click on the Edit button to configure the file server properties.
From here, you can enable/disable CIFS and FTP. You can also handle the following properties:
For CIFS, you can configure different properties like Server Name (host name for the Alfresco CIFS server), Session Timeout (in seconds), Domain (Workgroup to which the server belongs), and so on.
For FTP, you can configure Port (on which FTP server to listen to), Dataport From and Dataport To:
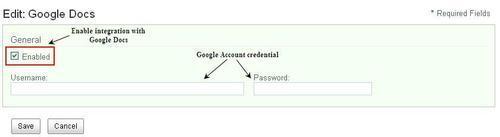
Alfresco provides a way to integrate the documents stored in the Alfresco Repository with Google Docs. By default, Google Docs are not enabled in Alfresco Share.
To enable it, perform the following steps:
Click on Google Docs on the Admin console page.
Click on the Edit button and check the Enabled checkbox to enable Google Docs.
Provide the username and password of your Google account:
Once this is enabled, you need to add the Google Docs Editable aspect on the content and then you will be able to check out the content to Google Docs.
More details on editing the documents with Google Docs and updating it back to Alfresco will be discussed in Chapter 9, Configuring Share.
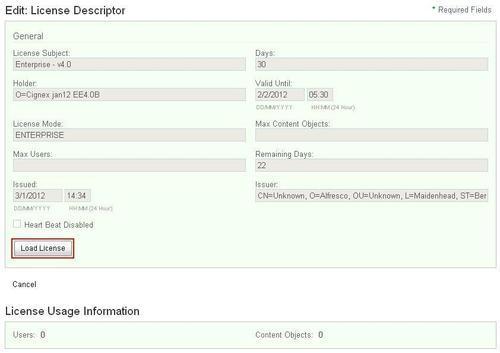
License Descriptor is a page where you can see the details of your already loaded license. It shows the details like Days (number of days of the license subscription), Valid Until (the date and time when your license expires), License Mode (type of license that is issued), and so on. You need to purchase the licenses appropriate to the number of users, content objects, and your support requirements. Once you get the license file, you can load it from this page by clicking on the Load License button. As soon as you upload the license with the .lic extension, it will be automatically renamed to the .lic.installed extension:
The replication job tool in Share allows a user to schedule a job, which specifies the content to be replicated and the target location for the replicated content. In the target repository, replicated content is read only which ensures the integrity of the content.
To create a new replication job perform the following steps:
Click on the Replication Jobs page on the Admin Console.
Click on the Create Job button.
Provide all the details like job Name, Source Items, Transfer Target, and schedule the time and frequency, as shown in the following screenshot:
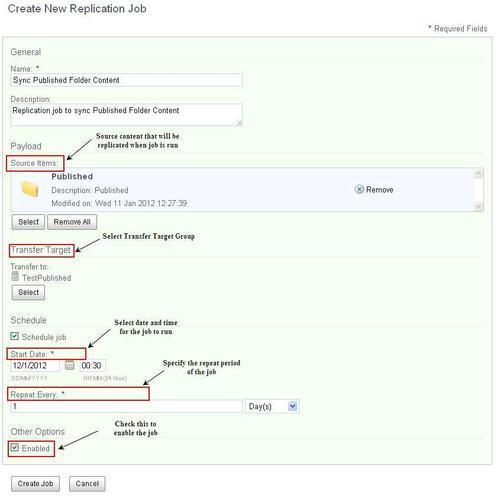
Based on the time and frequency specified, this job will be executed and the content will be replicated. There is one button, Run Job, which allows a user to manually run a replication job at any time.
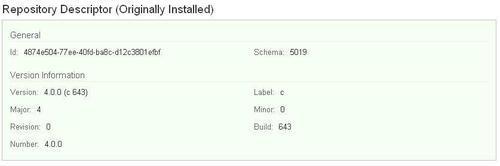
The Repository Descriptor shows the details of the Alfresco Repository in a read-only mode, you cannot edit anything here. This includes the details like, Schema in use, Major/Minor version number, Build number, Version and version Label, and so on.
There are two kinds of Repository Descriptor pages available on the Admin Console:
The Repository Descriptor (Originally Installed) displays the details about the repository when it was installed initially
The Repository Descriptor (Current), as the name suggests displays the details (same properties) with the latest information about the current repository
The configuration changes you do using the Admin Console, that is the current values of the running system are stored in an area on the JMX interface. Sometimes, it is very convenient to have a dump of these settings for some particular point of time, specially when talking to Alfresco Support for troubleshooting any issue.
From the Repository Tools page on the Admin Console, you can download the JMX dump in ZIP format by clicking on Download JMX Zip Dump.
The Runtime page on the Admin Console shows the properties, which show the details of memory in the system:

The Subscriptions page in the Admin Console allows you to enable or disable the subscriptions, which is responsible for the Follow feature for users to follow each other in Share.
By default, this is enabled which allows users to follow other users. If you disable this, users will not be able to follow other users and on the user's profile page, I'm Following and Following Me options will not be visible. To disable this, click on the Edit button, which will open the Edit: Subscription page. On this page, deselect the Enabled checkbox and click on the Save button.
The Sysadmin page under the Admin Console displays the properties for the server administration in read-only format. This page displays the port, host, and protocol, and other details for Repository and Share:

The Workflow page under the Admin Console shows the workflow properties in read-only form. Alfresco workflows run on an embedded Activiti workflow engine. JBPM workflow engine, which was used in older versions of Alfresco, is still shipped with the new version of Alfresco, but Alfresco recommends using the Activiti workflow engine for new workflows. In case you have upgraded to the new version, JBPM can be enabled to migrate existing workflows:
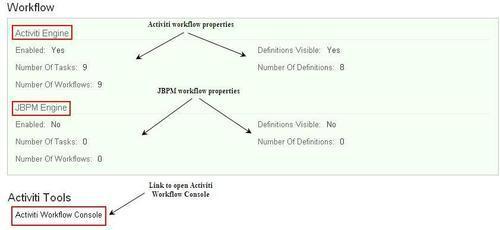
There is also a link to the Activiti Workflow Console. From this console, a user can perform the following activities:
View deployed process definitions
View task variables
Manage deployments
Examine the process database
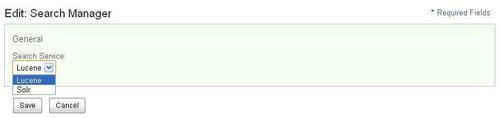
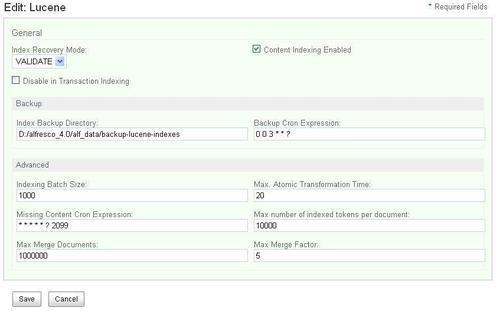
The Search page on the Admin Console allows users to manage search related properties and configure settings from the screen. These settings are configured in Alfresco files by default, which can also be edited from here.
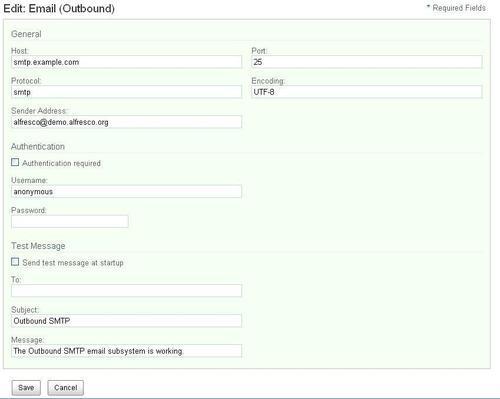
E-mail related configurations for IMAP, inbound, and outbound can be configured from the Admin Console. These settings are done in the configuration files in Alfresco, which can also be edited from this section from the browser itself.
The Email (IMAP) page under the section Email on the Admin Console allows you to configure IMAP e-mails. It has different properties like Home Folder Path (the folder name for IMAP mount), Home Root Path (the default location for IMAP mount point), Mail From Default, Host, Port, and so on, which can be configured from this page, as shown in the following screenshot:

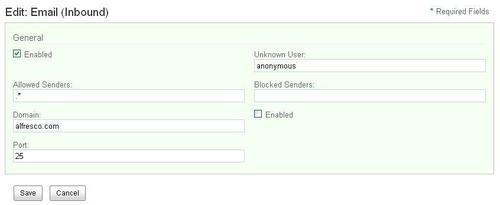
You can configure inbound e-mail related configurations from the Email (Inbound) page under the Email section on the Admin Console. From here, you can enable/disable inbound e-mails and also the related properties like Domain, Port, senders details (allowed and blocked senders), and so on:
Alfresco Share is using Alfresco as a Repository to store user information. The Alfresco security framework is very secure, flexible, scalable, and customizable. You can manage Alfresco Share users and groups with the administrative rights from Share UI. Authentication is possible using the Alfresco built-in membership system, as well as using NTLM and LDAP. Authentication subsystems configuration allows you to configure any of these authentication mechanisms or chaining of multiple systems also. An Administrator can perform various administrative functions using the Admin Console in Alfresco Share. In the next chapter, we will discuss about creating, managing, and configuring a Site in Alfresco Share.