
Now, you are all set to start collaborating in Share. In the previous chapter, we discussed about the users and groups in Alfresco share and also configuring the Authentication system. Hence, your system is ready with the proper authentication system and required users and groups. Now we can talk about how these users can collaborate together as a team for some projects by creating a site. Creating a site in Share is a way to collaborate within the team on specific projects or tasks.
In this chapter, we will create a site for our case study of a Marketing site, which needs to be created for launching a new product. This site will be available to both internal and external members of the company. It will be a private site and membership will be by invitation only. Members collaborate on the design and creation of new product positioning documents. The marketing strategies, the various activities, and events planned around the marketing of the product and the marketing material such as brochures, presentations, and so on. The site centralizes contact and event information, and provides the viewing of the status of the products marketing activities.
The product site should be efficient enough to enable collaboration between its members. They should be able to document the various plans and strategies. The documents, presentations, plans, and other details should be available to other members, as per their roles and access rights.
We will also discuss configuring a site. A site has many pages such as Wiki, Blogs, Document Library, Calendars, and so on. We will discuss in brief about all these pages of a site. We will cover the Site Dashboard and different out-of-the-box available dashlets, along with how to customize a site dashboard.
In this chapter, you will learn:
Managing sites (create, edit, delete site)
Site membership and inviting users to the site for collaboration
Configuring a Site
Overview of site pages such as Wiki, Blogs, Calendar, Document Library and so on
Site dashboard
Different out-of-the-box dashlets and configuring a dashboard
A site is a collaborative area for a project or some task undertaken. Imagine a scenario where any business user is able to set up their project site quickly and able to invite the users with specific roles, hence allowing the project team to collaborate with each other. What was earlier a customized solution is now offered out-of-the-box with Alfresco Share.
You can create a site from anywhere in the application using the Sites option on the toolbar. You can make the site a public, private, or moderate site. We will discuss more about these different types of site in the next section. The person who is creating a site will become the site manager. A site can have multiple managers.
Let's create a site for our case study of marketing project. This is the same site that we will be using through the book for further discussions of site pages and the various activities you can perform in a site with different roles.
The steps to create a new site are as follows:
Expand the Site menu on the toolbar.
Click on Create Site in the tools list:
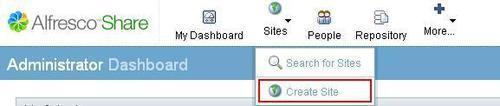
This will open the Create Site dialog, as shown in the following screenshot:
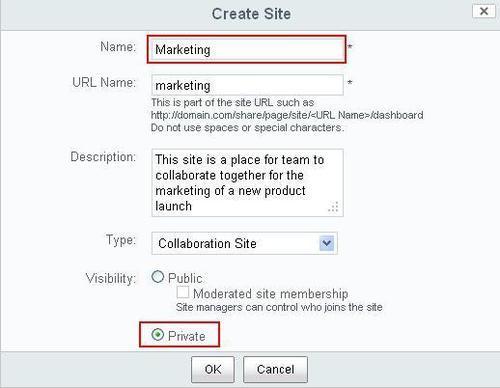
Provide the required details marked with (*) such as Name, URL Name, Description, and so on. The site Name is a descriptive name that is displayed as the title of your site. URL will be part of the site's URL, therefore, do not use space or any special characters such as
*, <, >, , /, ., ?, :, |.Specify the site's Visibility as Private. We will discuss more about different visibilities in the next section.
Once done with filling up all the details, click on the OK button. This will create a site and the site's dashboard will be displayed. We will talk more about the site's dashboard and different dashlets in the next chapter.
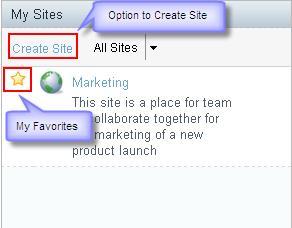
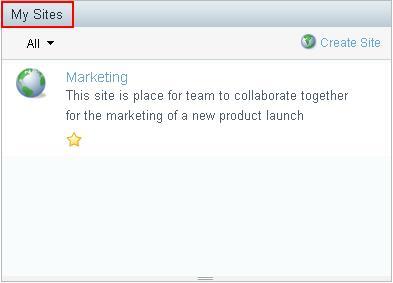
You can see this newly created site in the My Sites dashlet on your dashboard. Furthermore, this site will be automatically added to the My Favorites list:
When you create a site, you need to specify a visibility for the site. The following are the different levels of site visibility supported by Alfresco:
Public: The site will be visible to all. Anyone can search for this site and can join the site.
Private: The site will only be visible to the creator of the site. Any other user cannot even search for this site except for an Alfresco administrator. Only site managers can invite the members to join the site.
Moderate: The site is visible to all, but the site manager controls the membership of a site and who can join the site. Everyone can see the site in a search and send request to join that site. Once the site manager approves this request, the user will be a member of that site.
You can enter a site from the My Sites dashlet on your personal dashboard. This dashlet lists all sites that you created, or of which you are a member. If this dashlet is not available on your dashboard, then you can configure it by clicking on the Customized Dashboard.
If the site you want to enter is not listed on the My Sites dashlet, then you can search for it using the Site Finder page. If the desired site does not exist, then click on Create Site on this dashlet to create it.
To enter a site:
Click on My Dashboard on the toolbar if your personal dashboard is not already displayed.
On the My Sites dashlet, click on the Marketing site you wish to enter. The application displays the Marketing site. We will discuss more about the Site Dashboard and dashlets in detail later in this chapter.
The Site Finder component allows you to search the existing sites in Share.
This feature is used to search for a particular public or moderate site. This displays a list of sites you have the permission to access. From this list you can join or leave the sites; and delete the site if you are a site manager.
To search for the site:
Expand the Sites menu on the toolbar.
Click on Search for Sites in the tools list:

It will display the Site Finder page.
In the search box, type the name (full or partial) of the site you want to search for. Let's search for marketing sites, which we have just created with the partial search term as mark.
Click on the Search button:
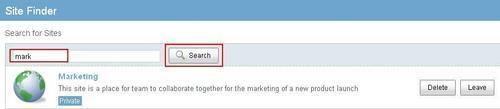
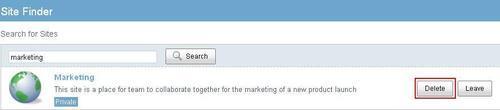
The results list appears beneath the search box and displaying all existing sites matching the criteria entered. This list includes all public and moderate sites, sites created by you, and private sites of which you are a member. To enter a site from this page, click on the site name.
To the right of a site in the site results, you can see two actions Delete and Leave, because the current user is already a member of this site with a content manager role.
The different actions can be as follows:
Delete option will be available to the site manager to delete the site.
Leave action will be available to only those who are already a member of this site. And, at any point in time, the user themselves can decide to leave the membership of that site by clicking on this Leave button.
Join action will be available with the site which is public and you are not already a member of this site. By clicking on this option, you can become a member of that site.
Request to Join action will be available when the site is moderate and if you are not already a member of that site. By clicking on this, you can request the site manager to join this site and once approved, you can be a member of that site.
You can edit the name and description from anywhere in the site. You can also change the access (public or private) for the site. Only site managers can edit site details.
To edit the site details:
Enter the Marketing site from your personal dashboard.
On the dashboard banner, click on the Edit Site Details in the More menu:

The Edit Site Details page displays the current details for this site.
Make the desired changes to the site Name and Description.
You can also change the site access from here, if desired:
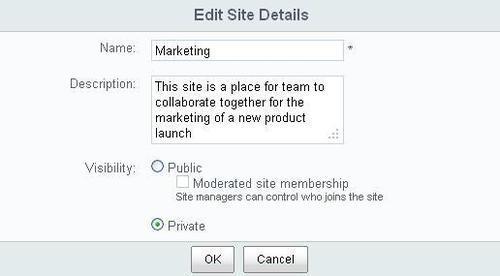
Click on OK. The site dashboard displays the updated details on the banner and the Site Profile dashlet.
Only site managers can delete existing sites from Alfresco Share. Delete a site to permanently remove it from the repository. Deleting a site also removes all site content, including the document library content, Wiki pages, Blog posts, discussion topics, related links, calendar events, and data lists.
To delete a site use the following steps:
Expand the Sites menu on the toolbar.
Click on Search for Sites in the Tools list. It will open the Site Finder page.
Search for the site you want to delete:
The results list will be displayed beneath the search box.
You will be able to see the Delete button if you have permission to delete a particular site.
Click on Delete for the site you want to delete. A confirmation message prompts you to confirm the deletion.
Click on Delete to delete the selected site. A message informs you that the selected action deletes all site content.
Click on Yes. The selected site is deleted in its entirety.
My Favorites sites will be displayed in the Sites menu on the toolbar for easy and quick access from anywhere in the application. The star to the left of the site name, on the My Sites dashlet, indicates whether the site is marked as favorite or not. By default, standard sites display with a star outline. Once tagged as a favorite, the site displays a solid star. Sites created by you are automatically added to your My Favorites list. You can tag any number of sites in this way.
To add a site in the My Favorites list: Click a star outline to mark the site as a favorite.
To remove a site from the My Favorites list: Click a solid star to remove the site from the My Favorites list.
In this section we will discuss how to manage the members of a site. This section also describes how any user can join or leave the site by themselves, along with the options to invite the users to join the site. We will also talk about the different roles of a site member and permissions associated to those roles.
Here we will discuss how users can search for, and find, sites to join on their own. On the Site Finder page you can manage your site membership by joining and leaving sites.
On the toolbar, expand the Sites menu.
Click on Search for Sites and it will open a Site Finder page.
Search for a specific site, if you directly Click on Search, it will display all sites you have permission to access.
The results list appears beneath the search box. In the results list, the following are the three options available:
Join -will allow you to become a member of a public site.
Request to Join -will allow you to request membership in a moderated public site.
Leave -will allow you to remove yourself as a member from a site.
There are two types of users who can be a member of a site, internal users and external users.
There will be an administrator of the site. This will be a person, who is an employee of the organization developing the new product. The administrator will have the right to create the site. This user will then invite the people who he wants to be the members of this site and define their roles in the site.
The invited members will see the invitation when they log in to the Alfresco Share system and if the solution is integrated with the mail server, a notification of the invite can be sent as an e-mail too. In the last section of this chapter, we will see how e-mail can be configured.
The users, who accept the invite, will be listed as Site Members and will have access to the site and the content, as per their permissions and roles.
In this case, the internal users will be members from the marketing department, sales department, product development team, strategists, and so on.
How to invite these internal users to the site will be discussed later in this chapter.
Share also let you invite external users to be a part of your site. The name and the e-mail address of the user needs to be specified and an e-mail notification will go to the user to inform them of the invite and the role.
The people from an external branding agency, market research agency, vendors, and partners if applicable may be invited as members of this site.
How to invite these external users to the site will be discussed later in this chapter.
Alfresco uses roles to determine what a user can and cannot do within a Share site. Each role is associated with the permissions. The following sections describe the Share user permissions. In general, permissions apply as follows:
|
Role |
Permissions |
|---|---|
|
Manager |
Full Control |
|
Collaborator |
Read, Upload, Create, Checkout, Edit |
|
Contributor |
Read, Upload, Create |
|
Consumer |
Read |
|
Administrator |
Read, Upload, Create, Checkout, Edit, Delete |
In the Members component for a site the links for three different pages are available beneath the site banner. These are as follows:
People:
This is the default selection and displays the Search for Site Members page and is visible to all the site members with any role. On this page, you can search for a particular site member and view a list of all site members with their respective roles.
Only the site manager has permission to invite new members to join the site, change a member's role or to remove a site member.
Groups:
This links to the page that allows to Search for Site Groups. On this page, you can search for a site group and view a list of all groups. This page is accessible to all the site members with any role.
Only the site manager has permission to access the additional functionalities, such as to add a new group to the site, change an existing group's role, and to remove a site group.
Pending invites:
Once you are done with the setup of your collaborative site, you can start inviting people to join it. The site manager can send invitations to both internal and external users to join the site and also can assign the roles within the site.
As we discussed in the preceding section, for our case study of the marketing site, the internal users will be the users from the marketing department, sales department, and so on. Let's invite these users to the marketing site with specific roles. The users, which are part of Alfresco, already created in Alfresco, are called Internal users. In Chapter 4, Managing a Site in Share, we have already created these required users, so we will be using the same internal users to invite to the site. Only site managers can invite the users to a site.
To invite internal users to the site:
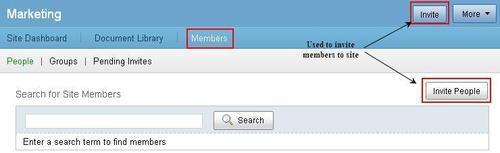
Click on Invite on the site's banner. It will display the Invite member page. One more option is you can click on the Members component for a site and there you can find button called Invite People:
On the Invite page, in the Search for People section, you can provide the full or partial name of the internal user you want to invite and click on Search:
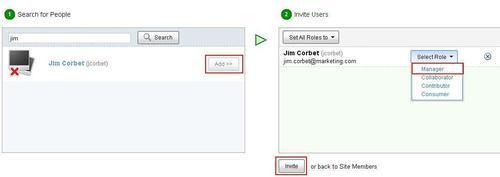
Here we will invite Jim Corbet as site manager. Therefore, in step 1, search for user jim, Click on the Add button and in the second step, assign Manager role to this user as mentioned in the preceding screenshot.
At the end, click on the Invite button which will send an e-mail notification to the invited member, that is, Jim Corbet.
And this user will also get a task to Accept the invitation. The user can see this task in the My Tasks dashlet on his personal dashboard.
Once the user accepts this invitation, this user will now be a member of this site with a specified role.
Note
If you are inviting multiple users at once with the same role, then you can select the desired role from the Set All Roles to drop down and apply this role to all the users added at once.
We will be inviting all required users with the specified role, as mentioned in the following figure and will be using these site members through the book:
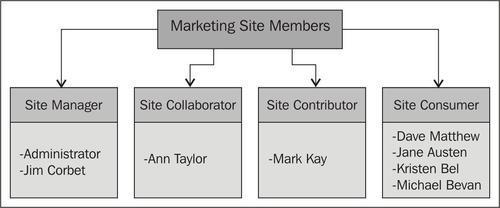
External users are the users who are not part of Alfresco. In our case study, the people from an external branding agency, market research agency or vendors, and so on, are external users. These users are not really users who are part of your system, but they need to be a part of your new site. In this scenario, we will be using concepts of inviting external users to the site.
Only site managers can invite the users to a site.
To invite external users to the site:
Click on Invite on the Site banner. It will display the Invite member page. One more option is you can click on the Members component for a site and there you can find the Invite People button.
On the Invite page, in the Add External Users section, you need to provide the First Name, Last Name, and the Email address of the external user you want to invite to this site and click on Add. Here, we will invite David Thompson as an external user with the role of Consumer, as shown in the following screenshot:

In the second step, assign Consumer role to this user, as follows:
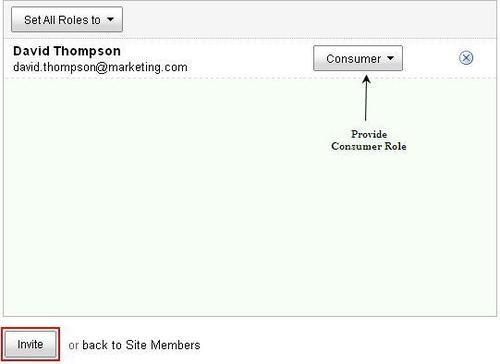
At the end, click on the Invite button, which will send an e-mail notification to the invited member.
And this user will also get a link in the e-mail.
Once the user accepts this invitation, this user will now be a member of this site with a specified role.
As discussed in the preceding section, for share invitations to work correctly, configuration of outbound e-mail is necessary. If you do not set the e-mail configuration, then when you invite a user to a site, the user will not receive the assigned task notification.
The e-mail subsystem allows you to configure outbound e-mail settings. The file<install_application> | tomcat | webapps | alfresco | WEB-INF |classes | alfresco | subsystems | email | OutboundSMTP | OutboundSMTP.properties contains the outbound e-mail configuration.
The following is the list of properties with the default values:
mail.host: Specifies the name of the SMTP host. The default is smtp.alfresco.com
mail.port: Specifies the port number on which the SMTP service runs (the default is 25).
mail.username: Specifies the username of the account from which you want e-mails to be sent.
mail.password: Specifies the password for the username.
mail.encoding: Specifies encoding for e-mail. The default is UTF-8.
mail.from.default: Specifies the e-mail address from which all e-mail notifications are sent. Default is [email protected]
mail.smtp.auth: Specifies whether your authorization is required. The default is false.
mail.protocol: Specifies the default protocol to be used for e-mail. The default is smtp.
You can override these configuration settings and provide your own values as well. For example, if you want to change the host for mail. You need to put your configuration in alfresco-global.properties file located at<install_application | tomcat | shared | classes.
mail.host=<the name of your SMTP host>
Inviting multiple users one by one at a time, with the same role to join your site, can be a time consuming and tedious job. To save time you can add existing user groups to the current site.
For example, Product Development is a group, which is responsible for this new product development. And this group will have many users and each user needs to have the same role as the collaborator on this Marketing site. So, we should add this group to the site instead of inviting each user to the site individually.
The process of adding a group involves searching for the group, assigning a role to the group as a whole, and then adding the group. Unlike adding users, no invitation is extended to the users in the selected group; the group is added immediately. The same roles of user's Manager, Collaborator, Contributor, and Consumer are available for groups too. All the users of the group will be assigned specific roles, as follows:
In the Members component for a site the links for three different pages are available beneath the site banner. Click on the Groups page over there.
Click on Add Groups.
Search for the group you want to add. Here we will search for Product and it will list down Product Development group in the search result. Click on the Add icon, this will add the group in the right pane (Add these Groups section):
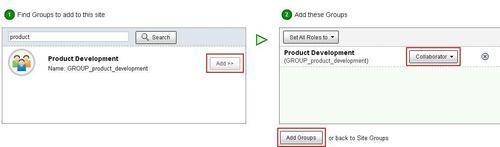
Assign the role as Collaborator and click on the Add Groups button.
To check the list of sites of which a current user is member of, user can use the My Site Dashlet on his personal dashboard:
Only site managers can change the role of a site member or group. To do so,
Go to the Members component of a desired site, select People or Groups to display the respective search page.
Search for the site member or group whose role you want to change for the current site.
The page displays the search results. A button to the right of the member/group name indicates the assigned role.
Click the button displaying the currently assigned role. A list displays the available roles: Manager, Collaborator, Contributor, and Consumer.
Click on the appropriate new role for the site member.
It will display a message on the screen after successful completion of changing of the role.
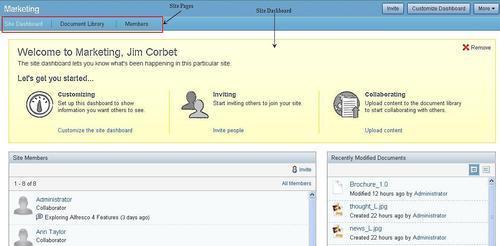
In this chapter, we will discuss about different pages of the sites and configuration of the site with the desired pages. We will also go through the Site Dashboard and how one can customize it. The following is the screenshot of a site with the site dashboard and all the default site pages on top:
By default, sites include Document Library and Members pages. If you have noticed, the Marketing site, which we created in the previous section, was having the above components available by default with that site. Other available pages are Wiki, Blogs, Calendar, Links, Data Lists, and Forum pages. The members of this site can collaborate with each other via these different components.
However, you can customize the site to contain any combination of these components. If you want to add or remove any of these components for a site, then it is possible to configure it.
The following section provides the overview of all these pages. In the next chapter, we will discuss all of these pages in detail with the examples.
The site wiki allows members of the site to create pages for a collaborative purpose within a website. Within the wiki you can create, delete, rename, and edit the wiki pages.
The Wiki page has the default view as Wiki Page List, which displays a summary of all pages created for the current site's wiki. A browsing pane on the left side of the page enables you to populate the wiki list based on some filters, such as Recently Added, Recently Modified, and so on. Selecting a page in the wiki list displays the entire wiki page in the page view.
When you enter the Wiki page, the page view displays the wiki main page. Click on Wiki Page List to display the wiki list.
Site members can create, edit, and add comments to blog postings. The Blog page enables you to add commentary, descriptions of events, and other material related to your site. The postings can be saved as drafts and then, when ready, published to the internal blog. Members can also choose to publish posts to an external blogging site, including WordPress and TypePad.
To work with or perform operations on the Blog, you must be on the desired blog page. A browsing pane on the left side of the blog page enables you to populate the blog posts based on some filters such as Latest, Current user's Drafts, Current user's Published, and so on.
Document Library enables you to gather and store information and collaboratively manage any content related to a site, such as documents, media files, and graphics.
Document Library provides features such as bulk uploading of content, previewing of content, assigning workflow to any content. You can also define your own folder structure in document library to manage your content in a more organized way. A browsing pane on the left side of the document library page enables you to display the content based on some filters such as Recently Modified, Recently Added, Document current user is editing, and so on.
The Calendar page enables you to schedule and track events related to the current site. Site members can create events that display on the calendar for all site users to view.
You can view the calendar by day, week, or month. The Agenda view displays upcoming events. The tasks in this section assume you are in the Calendar page of the desired site.
The links page allows the site members to compile a list of web links that are related to the site or that might be of interest to the site members. These can be internal links pointing to Share pages or external links pointing to any web address.
The topics on a discussion page can take the form of questions or comments with threaded discussions. Site members can use the Discussions page to post user-generated content related to a site.
Members of a site can create new topics and can also reply to a posting to take part in a discussion on a specific topic.
Customizing a site enables you to choose the pages you want to include for the site. By default, all components listed above are included when you create a site. Only the site manager can customize the site.
To customize a site:
Enter the desired site, Marketing.
On the dashboard banner, click on Customize Site in the More menu:

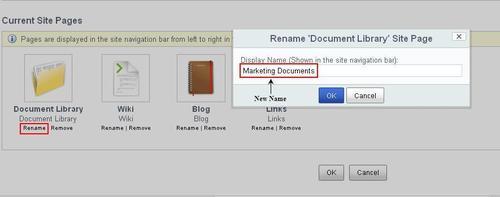
The Customize Site page displays the current pages for this site.
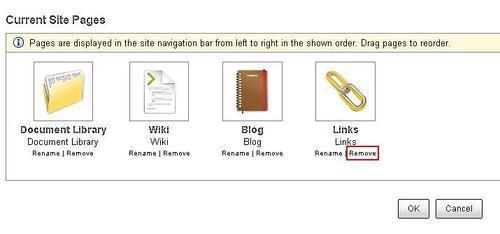
If you are creating any new custom page, or if you have removed any of the existing out-of-the-box pages, then you can add that page in the site.
Drag and drop the desired pages from the Available Site Pages section to Current Site Pages, as shown in the following screenshot:
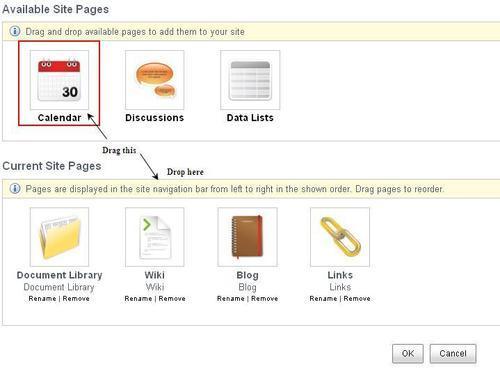
Click on OK to save your changes.
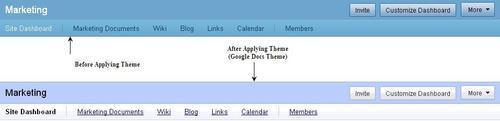
The default theme for any site will be the same theme, which is chosen for the Share Application. Site Manager can change the theme for a particular site as well. Let's select the theme for our Marketing site as "Google Docs Theme". To apply "Google Themes" to Marketing Site, in the Customize Site page,
Go to the Customize Site page.
Select Google Docs Theme from the Site Theme drop down.
Click on OK.
The new theme will be applied to the Marketing site. The following screenshot shows the different layout of a site in different themes:
The Site Dashboard is like a homepage for any site. When you navigate to your site, the first screen, landing page, you are seeing is the Site Dashboard.
The site dashboard is a landing page for any site, which consists of different site dashlets. The siite dashboard displays the related information of a site in an organized manner.
When you customize the Marketing site dashboard, you can specify the desired dashlets; each selected dashlet is displayed as a pane on the dashboard. In the following section, we will describe all of the out-of-the-box available dashlets.
When you create any new site, it includes the following dashlets on the Site Dashboard by default if you don't customize it:
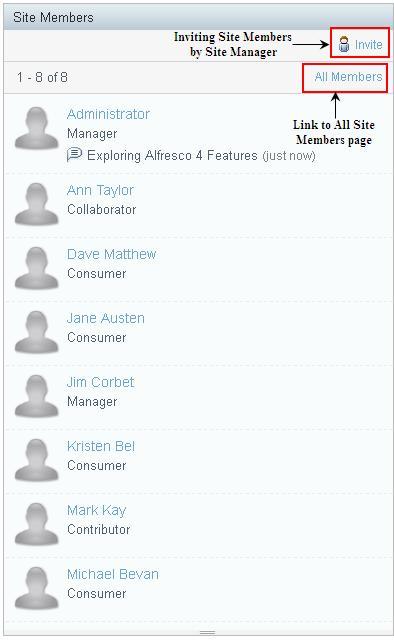
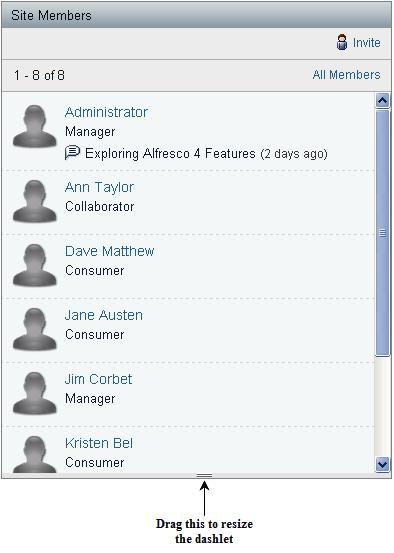
The site member's dashlet lists the members of the current site with the details of their assigned roles.
Site manager can also invite other site members directly from this dashlet using the Invite link. The All Members link links to the site member's page where you can search for any site members. In the following screenshot, it shows all the members of the Marketing site with their assigned roles:
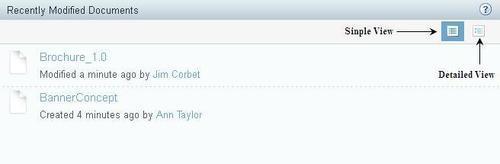
The recently modified documents dashlet lists the content in this site's library that has been added or edited in the past seven days. You can choose a simple or detailed view for this dashlet. In the detailed view, you see extra features that allows you to like an item, or mark it as a favorite. If you click on that document, then you will be directly jumped to the details page of that document where you can read it, add comments, view the document properties, and also perform various actions on that document:
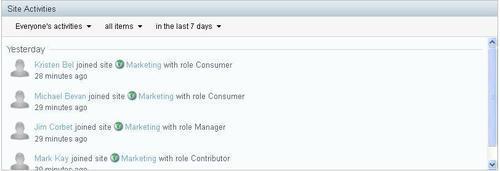
This dashlet tracks the most recent activities that have been performed in this site by the site members. It provides different filters for the following:
Time period - of what time period you want to see the activities like today, last 7 days, last 14 days, last 28 days.
Whose activities you want to see - everyone's, yours, or other users'.
Which items activity log you want to see, such as all items, status updates, comments, content, memberships, and so on.
An RSS feed is also available on this dashlet; a user can subscribe to the feed to automatically receive the activity updates:
Other dashlets are also available that you can configure to display on any site dashboard. How to configure the site dashboard will be discussed in a later section of this chapter. In this section, we will discuss about other out-of-the-box available dashlets for the site.
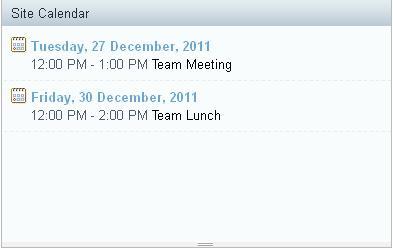
The site calendar dashlet contains a rolled-up view of upcoming events for the Marketing site. By clicking on a particular event, you can see the details of that event:
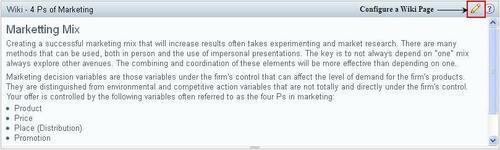
The Wiki dashlet displays the specified wiki page. The Configure link on the dashlet enables you to select the desired page that you want to be displayed on the dashlet. Let's configure one of the wiki pages we have already created for the Marketing site by clicking on the Configure link. Creation of the wiki page will be covered in detail in next chapter:
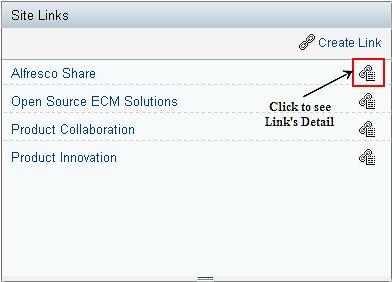
The site links dashlet displays the web links compiled by site users. There is also an icon along with all the links, which allows you to go to the detail of any particular link. You can also create a new link from this dashlet itself:
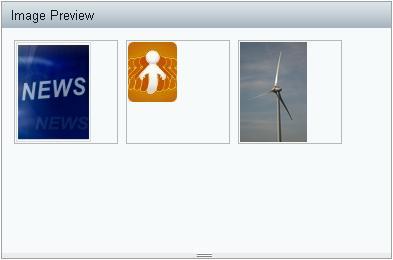
The image preview dashlet displays a thumbnail of all images contained in the site's library. You can also download an image directly from the dashlet, as follows:
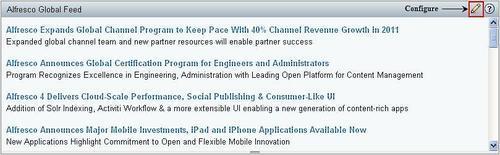
The RSS feed dashlet, by default, is configured to display the Alfresco website feed. You can also configure other RSS feeds by clicking on the Configure link:
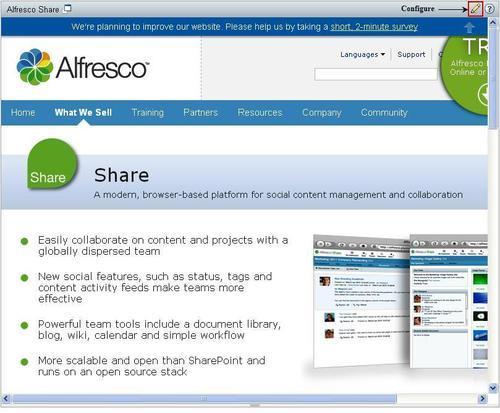
The web view dashlet shows your favorite web site in a dashlet. You can configure any website page to be displayed in this dashlet. When you configure it, you need to provide the title and the web page link. The title will be displayed as a dashlet title and by clicking on it; it will open that site page in a new window:
The dashboard for the Marketing site is an interactive user interface that contains information specific to the site. Similar to your personal dashboard, site information is organized and displayed in dashlets, which represent the configured pages.
For each site, you can modify the dashboard appearance, select the site dashlets to appear on the dashboard or configure the display order of the selected dashlets. Only the site manager of any site can customize the Site Dashboard. Whatever customization the site manager does for the site dashboard it will be available to all the other members of the site.
To customize the site dashboard:
Enter the desired site, Marketing.
On the dashboard banner, click on Customize Dashboard to display the Customize Site Dashboard page. The image in the Current Layout section represents the currently selected layout. The dashlets section displays the currently selected dashlets as they will appear on the site dashboard.
Change the site dashboard appearance (layout):
Click on Change Layout to display the available dashboard layouts. Click on the graphic of the desired layout or click on Select to the right of it. Let's select two columns: wide left, narrow right, as shown in the following screenshot:
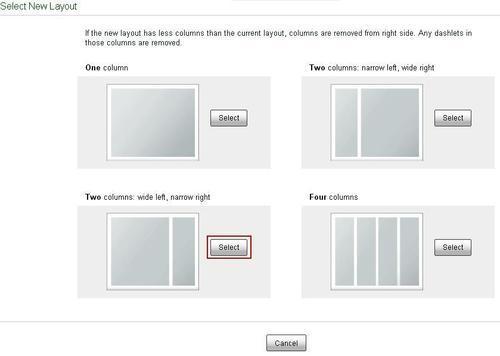
There are four different layouts available, apart from the default three columns layout:
One Column
Two Columns: narrow left, wide right
Two Columns: wide left, narrow right
Four columns
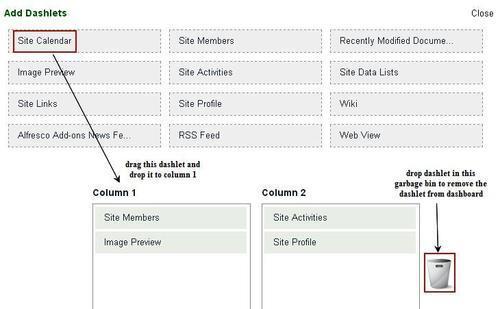
Configure the site dashlets:
To add a dashlet, click the desired dashlet in the Add Dashlets section and drag it to the desired column.
To remove a dashlet, click the unwanted dashlet and drag it to the garbage bin. Furthermore, you can select the dashlet and click the Delete key to remove any dashlet.
Click and drag the dashlets within and across columns to configure the display order:
Click on OK to save your changes. You return to the site dashboard, displaying the selected pages in the order configured.
The following screenshot is of the dashboard after customizing it, changing the layout to two columns and adding/removing some of the dashlets.
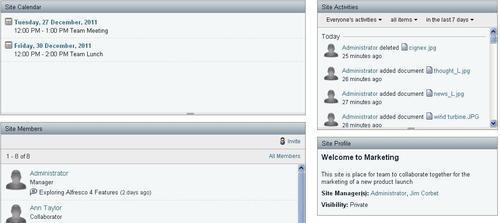
This chapter was focusing on managing and configuring a collaborative site in Alfresco Share. We also introduced the different pages available for any site; we will be discussing these pages in detail in the next chapter. We also talked about Site Dashboard and different out-of-the-box available dashlets along with customizing the dashboard with a desired set of dashlets and layout.