
Workflow is an automation of a business process, during which documents are passed from one participant to another for action, according to a set of procedural rules. Every content management system implementation will have workflow requirements. For some companies, a workflow could be a simple approval process and for some companies it could be a complex business process management. Alfresco simple workflow can be configured to automatically apply actions to documents within folders. Business rules can be applied to documents within the document library to automate the movement of documents through business processes. This chapter explains how advanced workflows can be initiated from within Share and the use of simple workflows built in through Share.
By the end of this chapter, you will learn how to:
Create and apply rules to folders in the document library, to enable a simple workflow
Initiate a new advanced workflow from the list of predefined workflows
Track open workflows
Assign documents and properties to the workflow
Take ownership of a task
Reassign a task
Change the workflow state
List tasks assigned to you and tasks completed by you
Alfresco includes two types of workflows out-of-the-box. One is the simple workflow, which is content-oriented, and the other one is the advanced workflow, which is task-oriented.
The simple workflow process in Alfresco is the movement of documents through various folders. It is simple, in that each workflow definition is restricted to a single state. Multiple states are represented by loosely tying multiple workflow definitions. Loose coupling is achieved by attaching a workflow definition to a folder and a workflow instance to a content item. A content item is moved, or copied, to a new folder, at which point a new workflow instance is attached based on the workflow definition of the folder. A workflow definition is unaware of other related workflow definitions. The good thing about it is that end users can configure the workflow without any technical skills or developer support.
The advanced workflow process is task-oriented, where you create a task, attach documents to be reviewed, and assign it to appropriate reviewers. You can track the list of tasks assigned to you and the tasks initiated by you. You can change the status of the tasks, reassign the tasks to other users, and cancel a task. You can send various notifications to all the parties involved and track the tasks to closure.
You can use out-of-the-box features provided by both the workflows, or you can create your own custom advanced workflow as per the business processes of your organization.
So far, we have learned how to create a site, users, and store documents for a site in Alfresco Share. In addition, we also know that we are going to develop a marketing site for a product with the help of this book. Now, we will see how we can start the workflow on those documents. In this chapter, we will implement the processes that go through a series of approvals and rejections until the final draft is prepared to publish and distribute collaterals such as brochures, presentations, flyers, banners, posters, and so on, to understand the concepts of simple and advanced workflows.
For example, consider a banner needed for a marketing site that moves through various groups of users for designing and approval before publishing. This can be implemented by using a simple workflow in Share.
In this case, you have to create folders for each group and allow the banner to move through various folders with two steps: approve and reject. Each folder is secured, allowing only users of that group to edit the banner and to move it to the next level in the workflow process. The workflow process is so flexible that you could introduce new steps for approval into the operation without changing any code.
The simple workflow is implemented as an aspect, which could be attached to any document in a folder through a business rule. Workflows can also be invoked on individual content items and folders as actions.
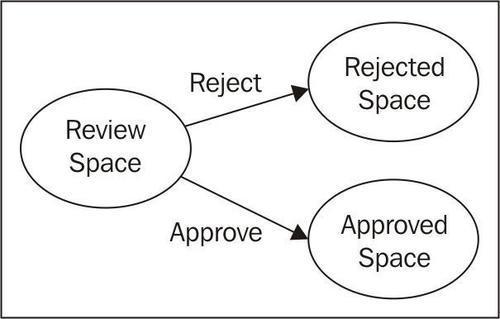
A workflow has two steps: one is the approve step and the other is the reject step. A simple workflow is easy to define. You can refer to the following diagram to understand the concept of defining a workflow. Consider that a workflow is defined for the documents in a folder named Review. It is defined with just two steps: approve and reject. Users belonging to the Review folder can act upon the document. If they reject it, then the document moves to a folder named Rejected and if they approve it then the document moves to a folder called Approved. You can define the names of the folders and the users on the folders, as per your business requirements. You can also rename the steps approve and reject:
The process to define and use simple workflows in Share is as follows:
Identify folders and set security on those folders
Define your workflow process
Add workflow to the content in those folders accordingly
Select the e-mail template and people to send e-mail notifications to
Test the workflow process
Take an example of reviewing and approving a banner for a marketing site. In order to initiate a process, prepare a draft of concepts for a banner. Send the draft for a review. If it is approved, it goes to the designing team to start working on the design and if rejected it goes back to draft it again. Once the designing team is ready with a design, it again goes for a review. If it is approved, it goes for publishing, otherwise it will go back to design.
If you go to the marketing folder of a site, you will notice the following subspaces:
Draft:This folder contains initial drafts of concepts for collaterals including brochures, presentations, flyers, banners, posters, and so on, which are being edited. Now, create two more folders inside theDraftfolder asBannerandBrochure. Set security in such a way that a few selected users such as Ann Taylor, who is a collaborator for a site and acts as a contributor to theDraft|Bannerfolder and can add and edit documents in the space. Being a contributor of this space, Ann can add the content, but cannot edit content on which she has not initially contributed. In addition, Ann can provide comments for any document in this space and Mark Kay, who is a contributor for the site, acts as a consumer to this folder as Mark is not involved in creating concepts of the collateral.Review:This folder contains all the collaterals under review. Now, create two more folders inside theReviewfolder asConceptsandDesign. Set security such that Ann Taylor, who is a collaborator of a site, acts as a contributor of this folder and has the permission to move her own created concepts from theDraft|Bannerfolder to theReview|Conceptsfolder for a review.Design:This folder is to draft a design of collaterals after the concept is reviewed and approved. Set the security on this space such that Ann Taylor, who is a collaborator of a site, can act as a consumer for this folder, as Ann does not design the collaterals. Mark Kay is the one who is going to design collaterals. Mark is already a contributor for a site.Published:This space contains all the collaterals that are approved and visible to others. Nobody should add and edit the documents while they are in thePublishedspace. Set security such that the collaborator and contributor of a site act as a consumer for not allowing editing and adding of any content.
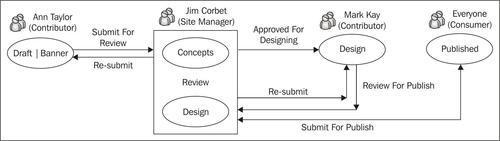
The following diagram illustrates the simple workflow design and users acting on those folders:
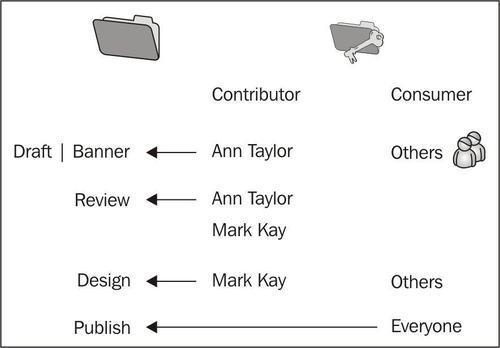
The following diagram illustrates the permissions of users on those folders. Set the security on these subspaces as mentioned:
For more information about securing spaces, refer to Chapter 7, Document Library.
For more information about creating users, refer to Chapter 4, Administering Share and Configuring Authentication Access.
Now that you have identified the spaces, the next step is defining your workflow process.
We will configure the workflow to all the banners in the Draft | Banner space. When a user selects the approve action named Submit for Review on a document, the document moves from the Draft | Banner space to the Review | Concepts space.
Let's configure the workflow to all the banners in the Review | Concepts space. When a user selects the approve action named Approved for Designing on a document, the document moves from the Review | Concepts space to the Design space. Similarly, when a user selects the reject action named Re-submit on a document, it moves back from the Review | Concepts space to the Draft | Banner space.
Let's configure the workflow to all the banners in the Design space. When a user selects the approve action named Review for Published on a document, the document moves from the Design space to the Review | Design space.
Let's configure the workflow to all the banners in the Review | Design space. When a user selects the approve action named Approve for Published on a document, the document moves from the Review | Design space to the Published space. Similarly, when a user selects the reject action named Re-submit on a document, it moves from the Review | Design space to the Design space.
You can have as many review steps (folders) as needed and you can choose the workflow action names as per your business requirements.
Now that you have defined your workflow process, the next step is to add a workflow to the documents in these spaces. As we want to add workflows to all documents, we have to create business rules on that folder. If we don't follow this, then we have to apply a workflow on each document, which can become a tedious task.
In order to add a workflow to the marketing | Draft | Banner space, carry out the following steps:
Login in as Jim Corbet who is the site manager of this site. Ensure that you are in the
Marketing|Draft|Bannerspace of a marketing site.Click on Folder Actions | Manage Rules.
Click on the Create Rules link and you will see the New Rule page.
Add the details, as shown in the following screenshot:
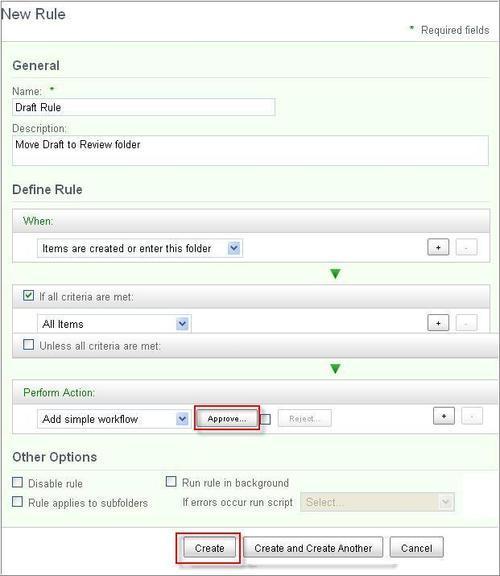
Click on the Approve button and provide the workflow step name as Submit For review.
Select move as the action and click on the Select button to select the
Review|Conceptsfolder.Click on the OK button.
The workflow for the
Draft|Bannerspace does not require the reject step. Hence, don't select a checkbox for Reject, click on the Create button to create a rule for theDraft|Bannerfolder: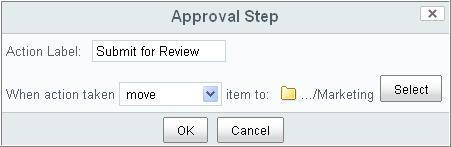
Go to the
marketing|Review|conceptsspace of a marketing site and follow the steps 2-4 steps to create rules. Remember, this space has both Approve and Reject actions. Provide a workflow step name as Approve for Designing that moves the content to theDesignfolder on the Approve action. Provide the Re-submit for Reject action which moves the content to theDraft|Bannerspace.Now go to the
marketing|Designspace of a marketing site and follow the 2-4 steps to create the rules. Remember this space has only Approve actions.Provide the workflow step name as Review for Publish that moves the content to the
Review|Designfolder on Approve action.Go to the
marketing|Review|Designspace of a marketing site and follow the 2-4 steps to create the rules. Remember this space has both Approve and Reject actions. Provide a workflow step name as Approve for Publish that moves the content to thePublishedfolder on the Approve action. Provide the Re-submit for Reject action, which moves the content to theDesignspace.
You can send notifications by an e-mail to reviewers whenever the content needs approval. For our case study, let's consider Jim Corbet as a reviewer. The SMTP e-mail settings shall be configured to run this rule. You can find details about the configuration in Chapter 5, Managing and Configuring a Site. Carry out the following steps to send an e-mail notification, when a document gets into the Review space:
Ensure that you are in the
Marketing|Reviewfolder of a site.Click on the Folder Actions | Manage Rules.
Click on the Create Rule link and you will see the New Rule Page.
Select the Send email action. Select Message.
You will notice an Email Message dialog box opening up, as shown in the following screenshot:
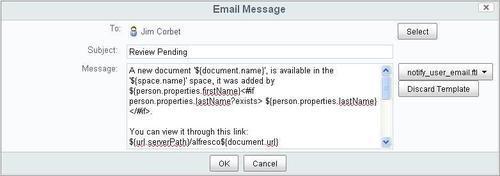
Search and select the reviewer's name as an e-mail recipient and click on the Add button. Provide an appropriate subject for the e-mail. As an e-mail message, you can either provide your own text or use the built-in e-mail template (
notify_user_email.ftl), as shown in the preceding screenshot.Click on OK and select the checkbox to apply the rules to the subfolders, and then click on the Create button.
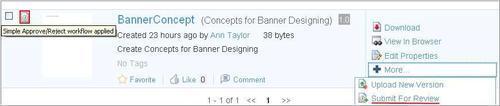
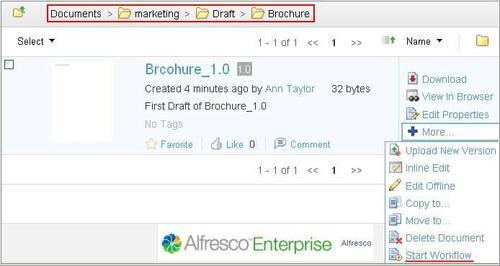
In order to test the workflow process, let's log in with the Ann Taylor user and go to the Draft | Banner space and upload a concept for the banner. You will notice the available workflow actions in the More drop-down menu, as shown in the following screenshot. When you click on the Submit for Review action, the document will be moved automatically to the Review | Concepts space as per the workflow rule:
When the document moves into the Review | Concepts space, two business rules will be applied.
One business rule is to send an e-mail notification to the reviewer indicating to him or her that the document is pending approval. If your e-mail server is configured right, then Jim Corbet will receive e-mail notifications with information about the document.
The second business rule is the workflow on all the incoming documents to this space. When Jim Corbet logs in, he will notice the workflow actions in the More drop-down menu, as shown in the following screenshot:
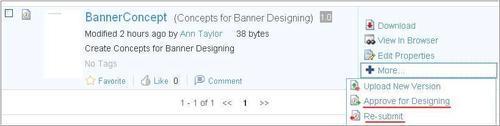
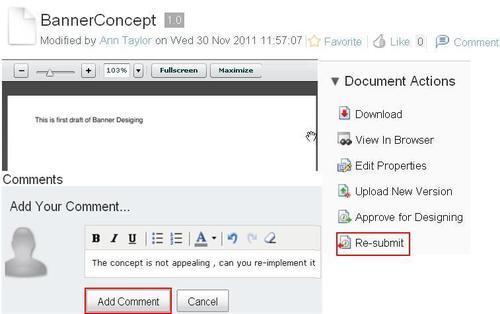
If the reviewer is fine with the concepts, then he can click on the Approve for Designing action and the document will be moved to the Design space automatically. If the reviewer requires more details, or is not satisfied with the concept, then he can click on the Re-submit action to send the document to the original author to edit and re-submit. Add comments to the concept and select the Re-submit action to draft it again. The document moves back to the Draft | Banner space:
Log in as Ann Taylor, create another banner with the name BannerConcept_1.1 in the Draft | Banner space, make the changes, and start the workflow process all over again. The document moves back to the Review | Concept folder. Jim Corbet is going to review it again and he selects the Approve for Designing action this time.
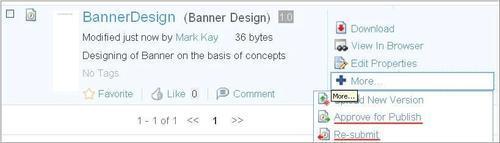
When Mark Kay logs in, he will notice the concept in the Design folder. Create another draft of the design based on the concept and start a workflow to review the design. Select the Review for Publish action in the More drop-down menu, as shown in the following screenshot. This will move the document to the Review | Design space:

When Jim Corbet logs in, he will notice the design in the Review | Design space and will have the workflow actions in the More drop-down menu, as shown in the following screenshot. Select the Approve for Publish action and the design will be moved to the Published folder. If the reviewer requires more details, or is not satisfied with the design, then he can click the Re-submit action to send the document to the original author to edit and re-submit:
When the document is in the
Publishedstate, it is typically visible to all the required employees as it is already reviewed and approved, but no one has the permission to add or edit the final draft.
Simple workflows are good to implement content-oriented workflow processes. However, there are certain limitations of the simple workflow which are as follows:
Unable to create multi-state workflow definitions
Restricted to one or two exit transitions (approve, reject)
Unable to define parallel workflows
Reliance on the folder structure for multi-stage workflow and action triggering
No notion of a task or an assignment
No way to add logic for decisions or other more complex constructs; conditional decision making/conditional transition is not possible in simple workflows
In order to resolve these limitations, Alfresco has embedded the Activiti BPMN (Business Process Model and Notion) 2.0, BPM (Business Process Management) engine in addition to the JBPM (JBoss Business Process Management) engine into its core. By default, Alfresco is configured with Activiti. The JBPM engine can be used with minor configuration changes. Activiti process definitions are written in BPMN 2.0 and are deployed and managed in exactly the same way as the JBPM process definitions. Alfresco provides the same set of pre-defined process templates for Activiti and JBPM.
Activiti is a light-weight workflow and BPM Platform targeted at business users, developers, and system administrators. It provides a fast and reliable BPMN 2 process engine for Java. It is open source and distributed under an Apache license. Activiti is based on open standards and is integrated well with Alfresco.
JBPM is an open source, standalone workflow engine. It can run in any servlet container—it does not require JBoss Application Server. The JBPM engine is responsible for managing deployed processes, instantiating and executing processes, persisting process state and metadata to a relational database (through hibernate), and tracking task assignments, and task lists. JBPM is built on the idea that any process can be described as a graph or a set of connected nodes. JBPM is a flexible, extensible workflow management system with an intuitive process language to express business processes graphically in terms of tasks, wait states for asynchronous communication, timers, and automated actions.
Workflows can be defined with process definitions using an XML-based language named JPDL(Java Process Definition Language) and BPMN 2.0.
BPMN 2.0 is an open standard developed by the Object Management Group (OMG) to provide a notation that is easily understandable by all business users: business analysts designing processes, developers implementing technology to perform those processes, and business people managing and monitoring those processes. BPMN creates a standardized bridge for the gap between the business process design and process. BPMN 2.0 process definition models can be exchanged between graphical editors, and executed on any BPMN 2.0 compliant engine, such as Activiti. BPMN 2.0 includes a graphical designer tool. The Activiti Eclipse Designer, or any other BPMN 2.0-compliant modeler, can be used as a workflow process engine.
JPDL is an intuitive process language to express business processes graphically in terms of tasks, wait states for asynchronous communication, timers, and automated actions. To bind these operations together, JPDL has the most powerful and extensible control flow mechanism. JPDL has minimal dependencies and can be used as easily as using a Java library. JPDL also includes a graphical designer tool. The JBPM process designer can be used as an Eclipse plugin.
Note
To have more information on Activiti refer to, http://www.activiti.org/.
To have more information on JBPM refer to, http://www.jboss.org/jbpm.
As a user, you will be able to perform the following interactions using the Alfresco Share interface (that is, web browser):
Start the workflow:
Select from a list of pre-defined workflows
Attach resources (additional related documents)
Assign users to the workflow
Can start without attachment also
List my tasks (what have I have to do?)
Perform tasks
View associated task resources (if any)
Change task states
Mark tasks done (or other outcome)
Look back (trail of steps up to my task assignment)
Look forward (why hasn't something happened yet?)
Re-assign a task to someone else
Take ownership of the task (if it is assigned to my group)
Cancel the workflow I have started
Filter tasks based on due dates, when started, priorities, and workflow type
New inbox dashlet
Start the workflow, filter tasks by priority, due dates, personal and pooled tasks, and view and edit tasks actions
The advanced workflow process is task-oriented, where you create a task, attach documents to be reviewed, and assign it to appropriate reviewers. It could also be implemented using business rules.
There are five advanced workflows available out-of-the-box:
Adhoc task-based workflow: Assign arbitrary tasks to colleagues on an adhoc basis using the Activiti workflow engine.
Group review and approve: Assign tasks to a group for review and approval.
Parallel review and approve: Assign tasks to colleagues for review and approval.
Pooled review and approval of content: Assign tasks to colleagues for review and approval. In this case, you can select more than one reviewer, but only one of the colleagues will approve or reject and the task will be submitted to the initiator.
Review and approve: Assign tasks to a colleague for review. In this case, you can select only one reviewer.
Let's take an example to implement the advance workflow for a marketing site. We have a requirement to promote new products on the marketing website. The hardest task in marketing is to get the prospect's attention before they switch to another site, trash your e-mail, or throw your brochure in the recycling bin—and this is where a good graphic design gives you the edge. The marketing group decides to design and distribute brochures to everyone. A group of selected people design the brochure.
The brochure is sent simultaneously to a group of reviewers. Reviewers act on this brochure, provide the feedback, and send it back to the initiator. The initiator may make the changes and finalize the design of the brochure. This requirement cannot be achieved with the simple workflow, as all users want to review and provide feedback to the originator. The originator considers everyone's reviews and creates a final draft.
The preceding requirements can be implemented using the following two workflows:
Group Review and Approve
Parallel Review and Approve
We will implement the Group Review and Approve workflow, as we want to send to a group of people for a review. If we have reviewers who belong to a different group, or are just individual users, we can choose Parallel Review and Approve.
For more information about creating groups, refer to Chapter 4, Administering Share and Configuring Authentication Access.
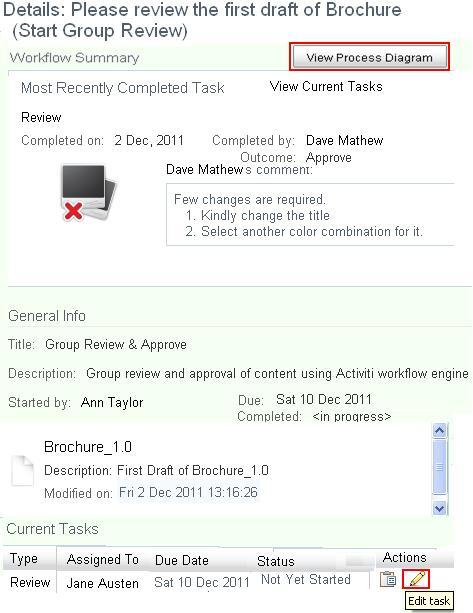
The following screenshot explains the process of initiating a Group Review and Approve workflow. Ann Taylor designs a brochure in the marketing | Draft | Brochure space and starts the workflow by providing the important information such as due date to complete the task, priority of the task, and assign the document to a strategy group to review and approve.
Carry out the following steps to configure the adhoc workflow:
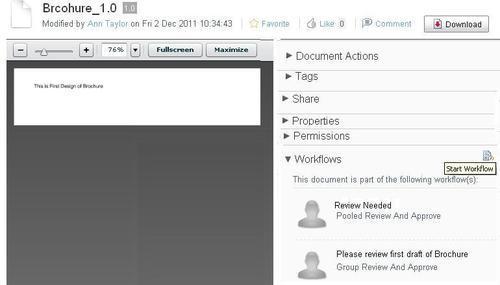
Click on the document's More icon and click on the Start Workflow link, as shown in the following screenshot:
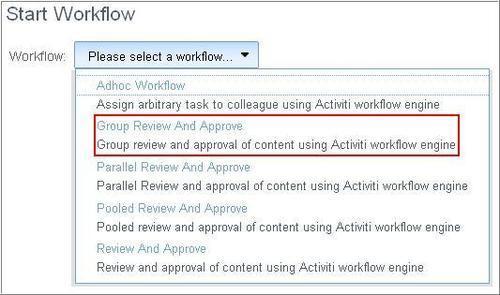
This wizard lists all the available workflows. From the list of available workflows, select the Group Review And Approve option, as shown in the following screenshot:
You will see the Start Workflow page of the Group Review And Approve workflow, as shown in the following screenshot. Provide a meaningful description for the task; choose the Priority and the Due date:
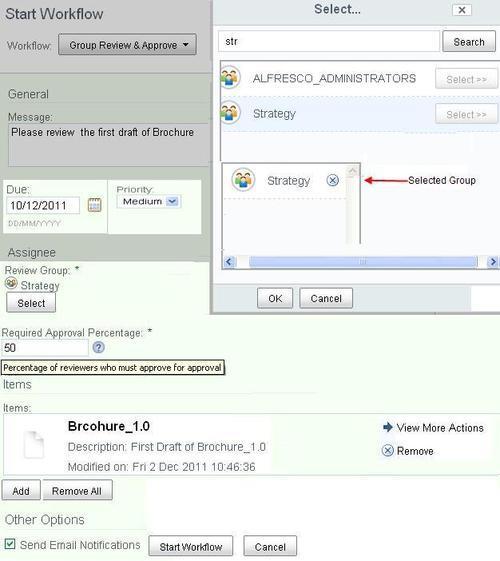
Select the Review Group from the list of groups by searching for the Strategy group. You can also add or remove the resources (documents) to this workflow by clicking on the Add or Remove All button, as shown in the preceding screenshot. This helps if you want to send a set of documents as one bunch for approval. Once you fill up the entire relevant information, click on the Start Workflow button to start the workflow process.
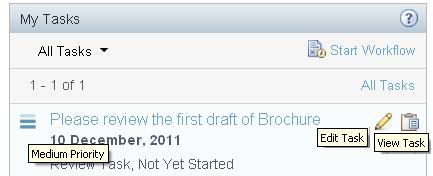
Login as Dave Mathew. Dave and Jane are members of this group. Both users will get the task in their dashlet. The My Tasks dashlet lists all your pending tasks as shown in the following screenshot:
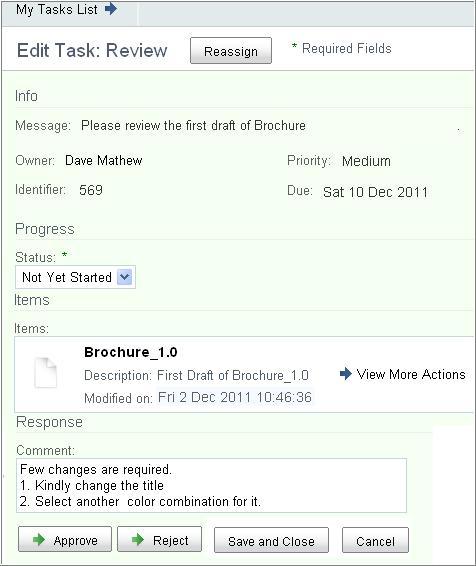
Click on the Edit Task icon as shown in the preceding screenshot. View the document, provide comments if any, and click on the Approve button, as shown in the following screenshot:
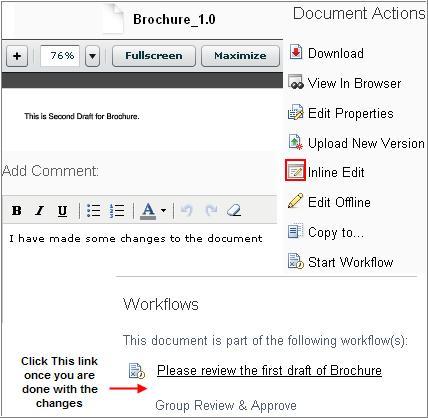
Now login as Jane Austen and view the task list. You have a few minor changes to the attached brochure, or you want to update another version of the document. In that case, you can click on View More Actions. You will see a detail page of the document; make the desired changes to the document by clicking on the Inline Edit tab, and save those changes. Click on the workflow link to navigate to the View Task page, as shown in the following screenshot:
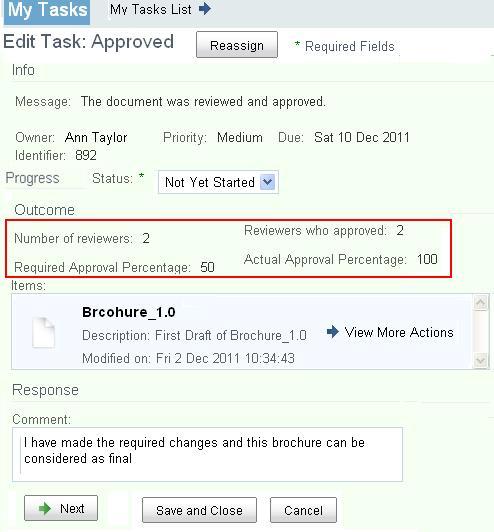
Clicking on the preceding workflow link, the following page comes up. From this page, you can edit tasks:
Fill in the required details, and click on Approve to complete the workflow, as shown in the following screenshot:

Now, log in as Ann Taylor and you will see tasks in your inbox. Open the task details, make the final changes, and click on Next to complete the task, as depicted in the following screenshot:
In this section, we will discuss various workflow capabilities, including start workflow, viewing the task details, viewing the workflow details, reassigning a task, saving and closing, and canceling a task. We will also discuss how filtering of tasks is possible.
When you are logged in, the first thing that is displayed is the user dashboard. The dashboard is user configurable and contains many dashlets. If you don't find the My Tasks dashlet, you can add a dashlet using Customize Dashboard. In the following screenshot, you may notice the new task listed in the My Tasks window. You can filter tasks based on high priority, due tasks, overdue tasks, pooled tasks, and assigned tasks. Additionally, you can start the workflow from this dashlet, view details of tasks, and edit tasks:

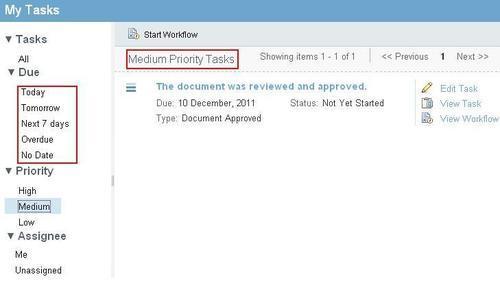
You can also click on All Tasks to look at a more detailed page. In the following screenshot, you may notice additional filters for the Due date such as filter based on Today, Tomorrow, Next 7 days, No Date, and so on. You can also view the workflow detail for a particular task:
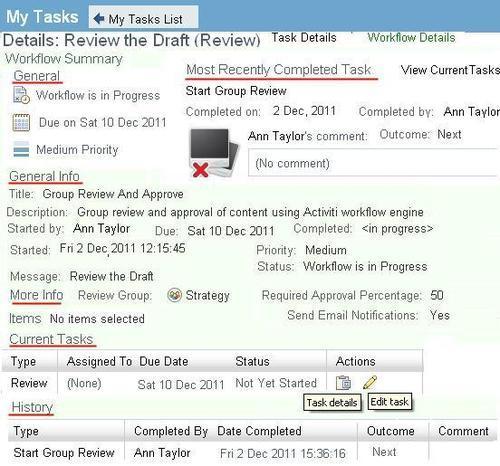
When you click on a workflow details link, you can get information about all tasks associated with that instance, you will know the history of tasks, who all the reviewers for this document, what is the approval percentage, previous review comments, and most recently completed tasks. Additionally, you can edit tasks from here as well:
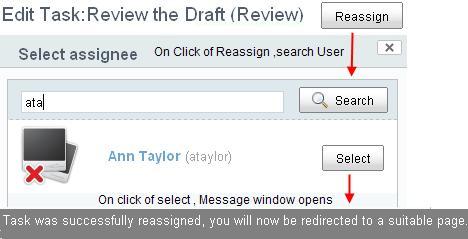
For various business reasons, you can reassign the task by clicking on the Reassign Task button. Once you click on the Reassign Task button, you will see the Reassign Task window, as shown in the following screenshot. You can search for the users and reassign the task to an appropriate user:
At times, it becomes important to save the changes as you may not have time, or with any other reason you are not able to complete information in one go. In such a case, you can save the changes of the workflow by clicking on the Save and Close button. The next time you open the task details page, you will find your changes. Suppose you don't want to work on a task at present, you can cancel the task by clicking on the Cancel button. These two buttons are available in the Task detail page.
For a specific document in your space, you can find out the workflow details by clicking on the document itself. You will be able to view the details page of the document.
The document's details page lists down metadata, actions, version history, permissions, and workflow details as shown in the following screenshot. If you click on those links, you will find workflow details associated with this document for your reference:
Alfresco Share includes two types of workflows out-of-the-box. One is the simple workflow, which is content-oriented and the other one is the advanced workflow, which is task-oriented.
The simple workflow feature of Alfresco enables you to define a simple approve-reject workflow for your documents. The e-mail templates and notification business rules are helpful to notify all the people involved in the workflow process. You can also implement complex workflows by chaining the spaces with multiple approve and reject steps.
The complex task-oriented workflow requirements can be handled by the advanced workflow features. You can create a task, attach multiple documents, and send it to multiple people for a review. Using the dashboard views, you can view all the tasks assigned to you, all the tasks you have assigned to others, and can view workflow details of the task.