
So far, we have learned about Alfresco Share's out-of-the-box features. There may be a need for customization at times. The Alfresco development environment needs to be set in place before we can work with any customization. This chapter explains how to set up the development environment. It also talks about different approaches for deployment and practices to be followed in Share. It is good to know about development before we learn how to customize Share.
In this chapter, you will learn the following topics:
Setting up the development environment
Installing Eclipse
Configuring the Alfresco SDK using Eclipse
Configuring a project for development
Creating a project structure
Deployment approaches
Building an application
In this chapter, we will learn about how to set up the development environment before customizing any functionality or implementing a new feature. The first thing is to finalize a development tool to be used for developing the code. Development tools help in developing the code faster, easier, and with less effort.
There are various tools available in the market. Out of them, Eclipse is the widely used Integrated Development Environment and allows for a convenient and rapid development of web applications. Even the Alfresco SDK distribution includes Eclipse projects that can easily be imported into Eclipse. We shall learn about the Eclipse installation in the next section.
As we will be using Eclipse as a development tool for customization, in this section, we will talk about the installation of Eclipse. Download the Eclipse Europe file eclipse-jee-europa-winter-win32.zip from the following URL:
http://eclipse.org/downloads/moreinfo/jee.php.
You can refer to the following URL for the installation steps:
http://www.cs.umd.edu/class/spring2006/cmsc132/EclipseTutorial/install.html.
The next step after the installation is to configure a project for the development in Eclipse.
Alfresco provides the Alfresco SDK (Software Development Kit) to a developer for customizing or extending the Alfresco platform. It minimizes the efforts and helps in the timely building of the application. The SDK bundle is provided with each release of Alfresco. The following steps explain how to configure the Alfresco SDK:
Download the Alfresco SDK from the following URL:
Alternatively, you can also download it from the following URL:
http://support.alfresco.com/ics/support/default.asp?deptID=15026.
Unpack the Alfresco SDK to any folder.
Import the Alfresco SDK projects into Eclipse.
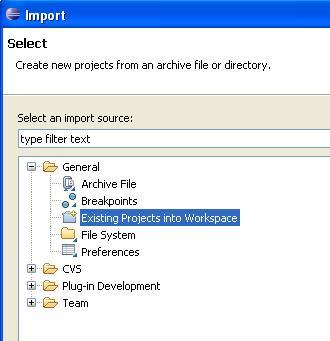
From the Eclipse main menu, go to File | Import. The Import dialog opens, as shown in the following screenshot. Select General | Existing Projects into Workspace and click on the Next button:
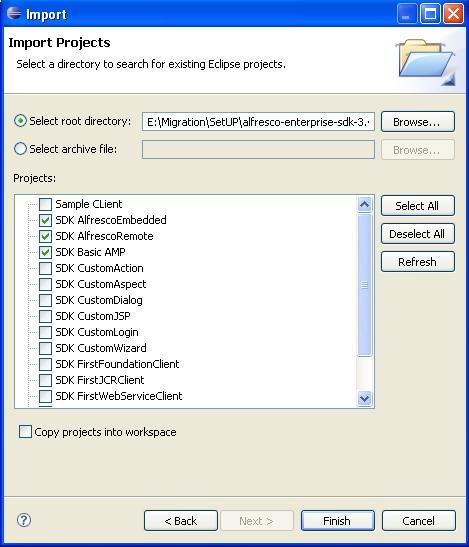
Select the Select root directory option and click on Browse to navigate to the folder where you have unpacked the Alfresco SDK and click on OK. You will find a list of SDK projects, as shown in the following screenshot. These sample projects help in developing the Alfresco extension modules. You can import projects of your choice, but you must import at least the SDK Alfresco Embedded and SDK Alfresco Remote projects to run other sample projects or develop your own extension module:
Once you click on OK, you will find the projects in the Package Explorer.
Developers would also wish to have access to the Alfresco source code and Java documentation to study and customize new requirements. Once the Alfresco SDK Project is imported into Eclipse, carry out the following steps to associate the source code and java documentation:
Expand the SDK Alfresco Embedded project in Eclipse.
Go to Referenced Libraries and right-click on alfresco-repository-4.0 jar and select Properties from the pop-up menu.
The Properties dialog opens up, as shown in the following screenshot, select Java Source Attachment from the tree menu. Click on External File and go to the SRC directory of the unpacked Alfresco SDK folder. Select the
alfresco-repository-src.zipfile and click on Open: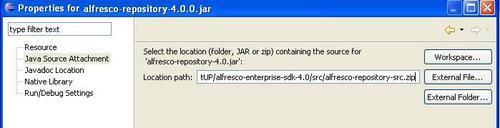
Now associate Java docs. In the same Properties dialog, select Javadoc Location. In the Javadoc Location panel, select the Javadoc in archive option and click on Browse.
Navigate to the doc folder of the Unpacked SDK directory. Select
alfresco-repository-doc.zipand click on Open: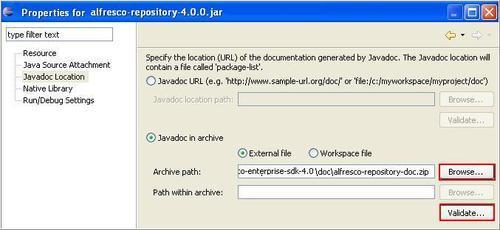
Click on Validate to validate the Javadoc location, and then click on OK to view the Javadoc in a web browser, or Cancel if not.
Finally, click on OK to close the Properties dialog.
Once the source code and Javadoc have been attached, the alfresco-repository.jar icon changes to include a small document.
You will be now able to see the source code attached to this jar and Javadoc for further information. You can repeat the similar steps for other jars for which you wish to get the source code.
In this section, we will learn to set up the development environment for any Alfresco Share project. We can create a project by using the following two approaches:
With the use of Maven, one can manage all Alfresco custom modules. Using Maven archetypes and the embedded Jetty app server, you could have an Alfresco application running with just two command lines standard commands. The usage of Maven Alfresco archetypes can solve the issue of developing an extension/customization in an unstructured manner and will also build the application in less time. This is actually a straightforward way to start a development project on Alfresco Share. The following URL provides all the information needed to build an application through Maven:
http://wiki.alfresco.com/wiki/Managing_Alfresco_Lifecyle_with_Maven.
You can create a project through Eclipse. We will see how we can create a project in Eclipse and build the configure path in Eclipse.
Go to the installed Eclipse folder and open Eclipse by double-clicking on the Eclipse icon. It will ask you to select the workspace. Create a new folder named shareworkspace and browse to that folder while asking for the workspace.
Eclipse will now start. Now we need to set up a new project in eclipse. The following steps explain how to create a Java project in Eclipse:
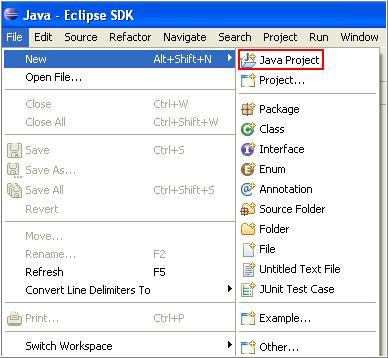
Go to File | New. Select Java Project from the new project wizard, as shown in the following screenshot:
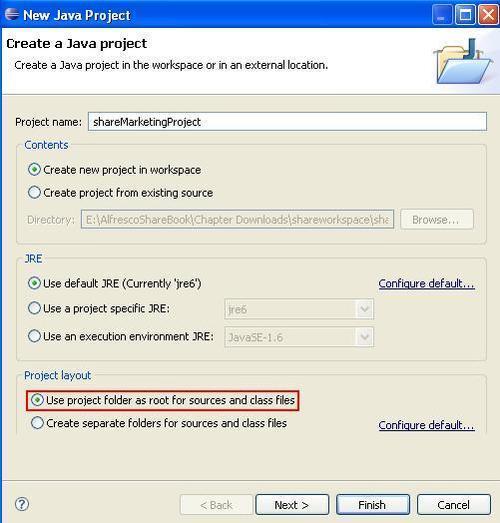
In the next screen, provide the Project name as shareMarketingProject and select the Create new project in workspace option. Remember to select the highlighted option in Project layout and click on the Finish button, as shown in the following screenshot:
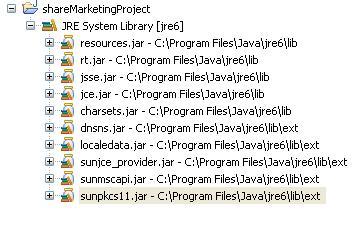
The project named shareMarketingProject will be created and you will find a JRE library with the required JAR files attached for this project (I assume that you have already installed the JDK on your machine, as mentioned in Chapter 2, Installing and Setting up Alfresco Share).
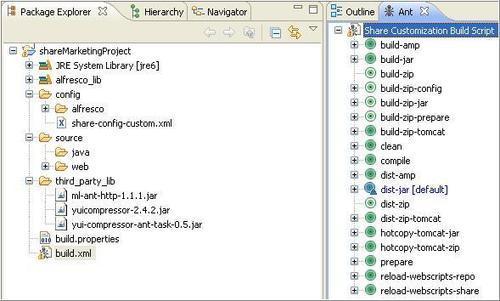
Check the Package Explorer window, as shown in the following screenshot:
This section describes how to create a project structure to use with Alfresco Share. The following screenshot shows the possible folder structure for the Share customization:
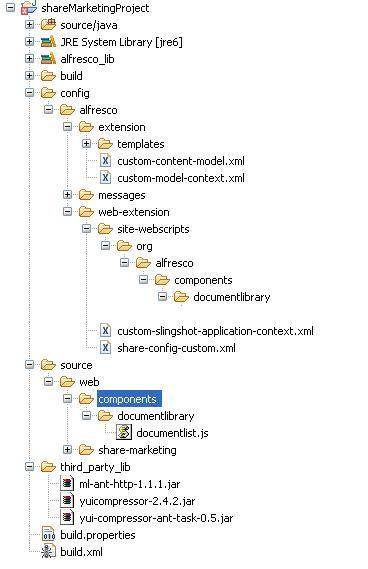
Create the following folder structure for the project as mentioned in the preceding screenshot.
In order to create a folder in an Eclipse project: Select the web project for the root level folder, or select the parent-level folder and right-click, click on New | Folder. Provide the folder name and click on Finish. We will understand the importance of each folder in the coming section.
/config/alfresco/extension:Place all your Alfresco Repository configuration related files in this folder. In the case of Alfresco Share customization, repository-tier web scripts (also known as Data Web Scripts) can be placed in a folder hierarchy as per the standard web script packaging techniques. The web scripts should be added in the following directory:config/alfresco/extension/templates/webscripts./config/alfresco/web-extension:Place all your Share extension configuration files in this folder. Theshare-config-custom.xmlfile is used for advanced configurations and customizations shall be kept insideconfig/alfresco/web-extension. Web-tier web scripts (also known as UI Web Scripts) can be placed insideconfig/alfresco/web-extension/site-webscriptswith the proper package structure. For example, in the previous chapter, we have used the existingdocumentlist.get.config.xmlfile located at<share-app>/WEB-INF/classes/alfresco/site-webscripts/org/alfresco/components/documentlibrary/. You will find in the preceding screenshot that we have used the same package structure within theweb-extensionfolder. You can also keep your new UI Web Scripts inside this folder./source/java:In Share, mainly there are JavaScript backed web scripts, but if you want to create Java backed repository-tier web scripts, you can put all your Java classes in this folder with the respective package structure./source/web:You can add client-side resources such as JavaScript, CSS, and image files within thesource/webdirectory in the project. Please remember to always have a defined package structure to keep your files. You will find in the preceding screenshot that we have used the same package structure within thesource/webfolder./third-party-lib:You can place any external JAR files inside this folder to be used by the project./alfresco-lib:This folder will have all Alfresco jars. The following section will describe how to add JARs into the/alfresco-libfolder and configure the build path to compile java files that are utilizing Alfresco libraries.
Up to this point, our shareMarketingProject had no dependencies other than the Java runtime libraries. Now you need to configure the build path, so when you create any Java files that are utilizing Alfresco libraries, it can automatically be compiled by Eclipse. For that, make sure that the Project | Build Automatically option is checked, and to configure the build path for the project, carry out the following steps:
Right-click on the project name, that is, shareMarketingProject and select Build Path | Add Libraries.
Select User Library, click on Next.
Click on the User Libraries button and in the User Libraries screen, click on the New button.
Provide the name of the library as alfresco_lib and click on OK.
Select that library name and click on Add JARs. Select all the JARs from the Alfresco installed folder, tomcat/lib and add those to this library. Also, select all the JARs from
tomcat/webapps/alfresco/WEB-INF/libfolder and add those to this library. Once this is done, click on OK.Finally, you can click on the Finish button.
There is another option available. As we have imported the SDK Alfresco Embedded project in Eclipse, we can reference that project to our current new project. The SDK Alfresco Embedded project contains all of the Alfresco libraries needed to build a custom module. In order to configure the build path using SDK Alfresco Embedded, carry out the following steps:
Right-click on the project name, that is, shareMarketingProject and select Build Path | Projects.
Click on the Add button.
Under the Required Project Selection screen, select SDK Alfresco Embedded, and click on OK.
Click on OK to complete the build path configurations.
Now the setup is ready. In the next section, we will see how we can build the application and deploy our customizations into Alfresco Share.
There are a couple of deployment approaches, which can be used for installing customizations. Choosing an approach to deploy the code will depend on how complex your extension is and will be based on various factors. For example, deploying the code on the development server is different from deploying it on the production server. For the development server, you are required to test the code repeatedly. No one would be really interested in creating the JAR or the AMP file every time with the changes and restart the server as needed. Developers would like to save time by placing the files directly in the folder and refreshing those files without starting the server. Considering all the possible factors, I have listed down three approaches that can be used for deploying customizations. In the coming sections, my focus would not be to explain what are AMP, JAR, or ZIP files; in fact, it is about what should be used based on requirements.
JAR is mainly designed to facilitate the packaging of applications into a single archive. You can assemble all the configuration and resource files in a JAR file structure. The mechanism was introduced in Alfresco 3.3 onwards that allows Share extension (containing repository and web-tier web scripts, Spring/Surf configuration, and static assets) to be added to the servlet in a single library. Using this, you can keep your customization separate from the Alfresco code.
If your Alfresco and Share are deployed in the same Tomcat instance, you can keep the JAR file in the shared folder. However, in most cases, Share and Alfresco will be running completely on separate nodes, in that case, you can put the JAR into their WEB-INF/lib folder. I find one more advantage with JAR is that, suppose your project has many modules to be deployed one by one, you can deploy those modules with different JARs. If at any point of time you want to remove one module, it is as easy as removing just a JAR file. Another advantage is that your configurations will not be overwritten as they are placed in different JARs.
An AMP file is zip compressed and consists of a collection of code, XML, images, CSS, JavaScripts, and so on that collectively extend the functionality, or data, provided by the standard Alfresco Share application. Installing customizations using AMPs into the Alfresco Repository is pretty straightforward. AMP files can be deployed into an existing Share application file using the Alfresco Module Management Tool (MMT). The only point to be considered is to map the structure of your AMP file to the Alfresco Share WAR when the MMT installs the AMP file.
Using this mechanism, files will be placed directly into the webapp structure, rather than the extension mechanisms used by the JAR and ZIP files that ensure files are placed outside the webapp for safety during upgrades. Another issue I see is the overwriting of configurations: one AMP may overwrite the configurations of another AMP and it would be tedious to detect the issue. AMP is useful when you are working with extensions that are more complex.
We already discussed various approaches that can be used for deploying customization and building the application.
There are many Java built tools available for the Java programmers. These tools help the programmer to build their project efficiently. Build tools automate the repetitive process and allow the programmer to concentrate on the project development. They also reduce the overall build time. Build tools make the build process happen in just a single-click. We will use Apache ANT which is a Java-based build tool for building the application from Eclipse.
There are a number of steps required to transform the source into a deployable software solution. In general, a build tool allows developers and build managers to describe the build process. In a build, a few steps may need to be executed before others, or they may be independent of others. In summary, a build tool provides a mechanism to describe the operations and structure of the build process to deploy the code.
As we are using Eclipse for our development environment, we will learn how we can integrate ANT with Eclipse for the build process. First, we need to create a new build file in Eclipse.
Creating the Build.xml file:
Right click on the project name shareMarketingProject in Package Explorer.
Select New | File.
In the File Name box, provide build.xml, click on the Finish button.
Enter the targets for ANT Build in this file and save it. You can have build targets for compiling the code, packaging the JAR file, and so on. The build file we will use for our examples throughout the book will look like:
<project basedir="." default="dist-jar" name="Share Customization Build Script">
<!-- Property default values. May be overridden using above files or via command-line args -->
<property name="jar.name" value="share-marketing.jar" />
<property name="zip.name" value="share-marketing.zip" />
<property name="amp.name" value="share-marketing.amp" />
<property name="alfresco.extension.jar" value="alfresco- marketing-extension.jar"/>
</project>
Note
Download the complete project, including build.xml, from the Packt website.
Here, in this build file, we have used some of the properties that we need to define in the build.properties file.
The purpose of this file is to provide properties required by build.xml that are likely to be changed. For example, properties such as the home directory of Tomcat, or an application, name of application, and so on, can be mentioned in this file.
alfresco.tomcat.home=E:/Alfresco4/tomcat.
In this file, you can change the values for the properties accordingly. The build.xml file will read the properties from this file.
When you create the build.xml file, you can see all the targets for the build file in Ant view at the right side in Eclipse, as shown in the following screenshot:
There are three different ways to run a particular build target.
The first approach:
Right-click on build.xml in the Package Explorer
Select Run | Ant Build. This will run the default target for the Ant Build and gives you the results in the Eclipse's Console view
The second approach:
Right-click on build.xml in the Package Explorer
Select Run | Ant Build... with ellipsis (three dots)
From the Ant launch configuration dialog screen, choose the target which you want to run from the available list of all targets of the build file, and click on Run
The third approach:
Go to Windows | Show View | Ant
(If Ant is not available there, then click on Other and select Ant from there)
You will see Ant view on the right side in Eclipse
Drag your build.xml file from the Package Explorer to this Ant View
Double-click on the target you want to run from Ant View
The Ant build script build.xml can be used to help you distribute your customizations for testing or deployment. A few targets are defined which can be used for various purposes:
Use the
build-jartarget to build a JAR file in thedistdirectory, suitable for deploying on any Share 3.3+ installation.Use the
hotcopy-tomcat-jartarget to copy the JAR file containing the customizations into a local Tomcat installation on your system. You will need to specify the location of your Tomcat installation by defining the variablealfresco.tomcat.homewhen you call the script.Use the
hotcopy-tomcat-ziptarget to copy all the individual configuration and resource files into a local Tomcat installation on your system for testing. Unlikehotcopy-tomcat-jar, this method allows you to reload changes to your files without having to restart the Tomcat server, and so is better suited for development. Again, you have to specify the location of your Tomcat installation.Use the
reload-webscripts-repotarget to reload the Alfresco Repository Web Scripts. Otherwise, whenever you update any web scripts, you have to hit the Refresh Web Scripts button on the scripts index page.Use the
reload-webscripts-sharetarget to reload the Alfresco Share Web Scripts. This target also has the same purpose as discussed for thereload-webscripts-repotarget.
This chapter explained how to set up the development environment and create a project structure for Share. It also discussed building the application using ANT to help automate some of the mundane tasks. It also explained the different approaches to be used for deploying the code, that is, through JAR or AMP or ZIP files. The JAR will be used for simple customizations and for deploying the code on production. Amp can be used for complex requirements and use the ZIP file during the development, which will not force the server to start repeatedly.