
Alfresco Share offers a number of such features out-of-the-box. These are features that ensure effective task management. These are completely customizable if need be. The numerous technologies and tools that Alfresco supports ensures that no, or minimal, change be made to the enterprise's existing infrastructure.
Enterprises have a number of tasks that require its people to be able to effectively manage their tasks and schedules. For the purpose of managing intra- and inter-team events, a variety of collaboration tools like calendars, forums, and so on are available. More often than not, there are tools independent of each other, or they may not be compatible with existing systems that are in place.
In this chapter, we shall understand the various collaborative features like wiki, blogs, Data Lists, calendar, discussions, and lists features that Share has on offer.
By the end of this chapter, you will have learned about:
Wiki pages and blogs in Share
Creating and Managing Data Lists
Creating events in Alfresco Share
Effective collaboration through discussions
The wiki page list displays a summary of all pages created for the current site's wiki. A browsing pane on the left side of the page enables you to populate the wiki list with a subset of the wiki content. Selecting a page in the wiki list displays the entire wiki page in the page view.
When you enter the wiki page, the page view displays the wiki main page. Click Wiki Page List to display the wiki list.
You can create, delete, view details for, and edit a wiki page in both views. To perform some of the operations on a wiki page like renaming a page, you must be on the wiki page.
Accessing the wiki page gives you access to all wiki content. Within the wiki you can create, delete, rename, and edit the wiki pages. You can perform most actions from both the wiki list and the page view.
To access the wiki page, perform the following steps:
Enter the Marketing Site..
On the banner, click Wiki. The wiki page appears, displaying the main wiki page for this site in the page view. In this view, the actions you can perform on the current wiki page appear as buttons beneath the banner (New Page, Delete, Rename) and as links at the top right of the content area (View Page, Edit Page, Details):

Click Wiki Page List to display the wiki list. The wiki list displays a summary of all pages in the wiki for the current site. In this view, the actions you can perform on a wiki page appear as buttons beneath the banner (only New Page is available in this view) and as links to the right of each page summary.
Assuming that you are on the wiki page of the Marketing Site, the browsing pane to the left of the wiki page list enables you to filter the wiki content to make locating specific wiki pages more manageable.
The wiki page list displays all wiki pages in the current site, organized chronologically. The most recent page appears at the top of the list.
The browsing pane on the left side of the page enables you to display a subset of the wiki content by selecting a specific view or a tag. Whether browsing by view or tag, the wiki list displays a summary of all pages matching the selected option. The summary includes the wiki page name, author, creation and modification dates, a sample of the content, and the tags associated with the page.
The browsing pane provides the following views:
Recently Modified: In this view, the user can see the pages modified recently, for instance pages modified in the past seven days.
All: This displays all pages created in the wiki for the current site.
Recently Added: This displays the pages created recently, like in the past seven days.
My Pages: In this view, the user can see the pages created by himself/herself.
Tags: This displays all tags currently associated with one or more wiki pages. By clicking on an individual tag, the user can see all the wiki pages tagged with that particular tag.
To browse the wiki pages perform the following steps:
Click Wiki Page List on the page view to navigate to the wiki list, if it is not already displayed.
Select the desired option in the browsing pane.
In the Pages list, click the view representing the wiki pages you want to display. The wiki list displays all pages in the current site that correspond to the selection.
In the Tags list, click the tag of interest. The wiki list displays all pages in the current site associated with the selected tag.
In the wiki list, click a wiki page title to display that full page. The selected wiki page appears in the page view.
When any new site is created with a wiki page, it contains a main wiki page, which will be, by default, empty. And this can be considered as an introductory page for the site wiki.
To add content to the wiki main page perform the following steps:
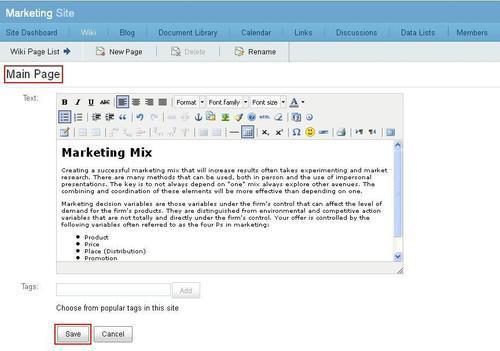
Click Main Page beneath the banner if the main page is not already displayed. Click Edit Page.
Type the content for the main page in the Text box. Use the formatting features provided to markup the content, insert bulleted and numbered lists, and include hyperlinks:
Optionally, add tags for the main page.
Type tags in the box provided and click Add. To add multiple tags, separate each tag with a space.
Click Choose from popular tags in this site to display the existing tags used in this site. Click a tag to associate it with the main page.
The newly associated tags appear beneath the Text box. Click a tag to remove it. Click Save. The page view displays the main page.
You can create a new wiki page from both the wiki list and the page view.
To create a new wiki page perform the following steps:
Click New Page to create the wiki page.
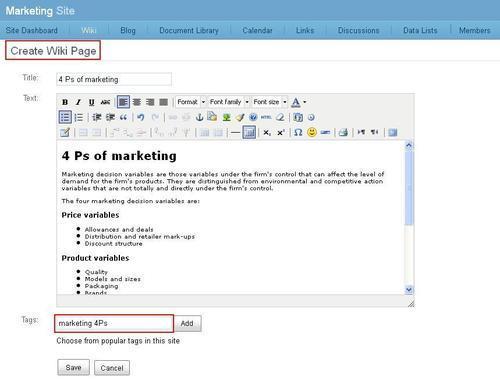
Enter a Title for the page. When your title contains a disallowed character, like some special characters, such as quotation marks, periods, colons, and asterisks (*), the Save button is disabled.
Type the wiki page content in the Text box. Use the formatting features provided to markup the content, insert bulleted and numbered lists, and include hyperlinks. To create a link to another wiki page, type Page Name. If the page indicated does not exist, Share creates it; however, this is an empty wiki page and it will not appear in the wiki list until you select Edit Page and provide content for it.
Optionally, add tags for the wiki page.
Type a tag or multiple tags, separated by a space, in the box provided and click Add. Click Choose from popular tags in this site to display the existing tags used in this site. Click a tag to associate it with the new wiki page.
The newly associated tags appear beneath the Text box. Click a tag to remove it.
Click Save. The new wiki page appears as users will see it. Click Wiki Page List to return to the wiki list:
Adding and editing wiki content happens in a simple browser. You can perform this task from both the wiki list and the page view.
To edit a wiki page perform the following steps:
Click Edit for the page you want to modify. If the wiki page you want to edit is already open in the page view, simply click Edit Page. The content of the selected wiki page displays in an editing box.
Make the required changes to the content. To create a link to another wiki page, type Page Name. If the page indicated does not exist, Share creates it; however, this is an empty wiki page and it will not appear in the wiki list until you select Edit Page and provide content for it.
To edit the tags for this wiki page perform the following steps:
To add a new tag, type a tag in the box provided and click Add. To add multiple tags, separate each tag with a space.
To add an existing tag, click Choose from popular tags in this site to display the tags used in this site. Click a tag to associate it with the wiki page.
To remove an existing tag from the set beneath the Text box, click the tag you want to remove. Click Save. The page view displays the updated wiki page.
You can rename a wiki page in the page view. When you rename a wiki page, the updated page retains the page history. Share creates a new page with the original page name; this page links to the updated page.
To rename a wiki page perform the following steps:
Click the title of the page that you want to rename. Click Rename. The Rename page opens.
Type the new name for the wiki page. Click Save.
The page view reflects the name change and this wiki page retains the page history of the original page. Share creates a new page with the original page name, which links to the updated page.
Delete a wiki page you no longer want to appear in the wiki for the current site. You can perform this task from both the wiki list and the page view.
To delete a wiki page perform the following steps:
In the wiki list, locate the wiki page you want to delete.
Click Delete for that page. If the wiki page you want to delete is already open in the page view, simply click Delete on that page. A message prompts you to confirm the deletion.
Click Yes to delete the current wiki page.
View the details for a wiki page to see the version history, view the tags associated with the page, and list the wiki pages that link to the selected page. You can view the page details from both the wiki list and the page view.
To view the wiki page details perform the following steps:
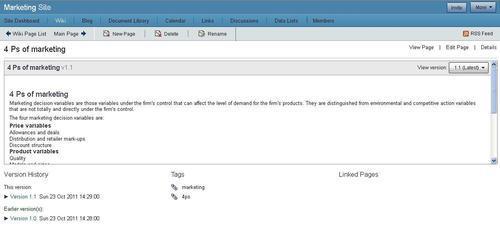
Click Details for the page whose details you want to view. If the wiki page you want to view is already open in the page view, simply click Details on that page. The page view displays the wiki page content in an expanded form to include the Version History, Tags, and Linked Pages. From this page, you can click Edit Page to make any necessary changes.
Click View Page to hide the details. The wiki page displays in the page view:
Note
For more details on the Alfresco Share wiki feature, refer to the link: http://docs.alfresco.com/4.0/index.jsp?topic=%2Fcom.alfresco.enterprise.doc%2Fconcepts%2Fwiki-intro.html.
Site members can create, edit, and add comments to blog postings. The Blog page enables you to add commentary, descriptions of events, and other material related to your site.
The postings can be saved as drafts and then, when ready can be published. The blogs can be published as an internal blog and also to an external blogging site, including WordPress and TypePad. We will discuss more about how you can configure your blog to get published on external blog sites from Alfresco Share in a later section of this chapter.
Accessing the Blog page enables you to view all published blog posts for the Marketing Site. Within the blog, you can create new posts, as well as edit, publish, and delete posts you created. You can also add comments to existing blog posts.
To access the Blog page perform the following steps:
Enter the Marketing Site. On the banner, click Blog. The Blog page appears. The default view, Latest, is selected and the post list displays a summary of the posts created or edited in the past seven days. The summary includes the post title, date and time the post was published (if applicable), the author who created the post, a sample of the content, the number of replies to the post, and the tags associated with the post.
The Previous and Next navigation buttons help move through multiple pages of posts.
Click Simple List to display only the title of the posts. Click Detailed List to display the summary view.
The browsing feature in the Blog page enables you to filter the blog posts. This allows you to more easily navigate the blog content.
A subset of the blog posts by selecting a specific view, a period of time (month), or a tag is displayed on the left hand browsing pane.
The Posts list in the browsing pane provides the following views/filters:
All: In this view, the user can see all posts in the blogs.
Latest: This view displays only the posts created, or modified, recently like in the past seven days.
My Drafts: Here, the user can see the posts created by himself/herself that are saved as drafts (not yet published).
My Published: This view displays the posts created and published, either externally or internally, by the current user.
Published Externally: In this view, all posts that have been published to an external blog are displayed.
Archives: This view organizes posts by month and year. This will have further sub lists of month and year.
Tags: Here, the list displays all tags currently associated with one or more blog posts. By clicking on an individual tag, the user can see all the posts tagged with that particular tag.
To browse the blog posts perform the following steps:
Select the desired option in the browsing pane. In the Posts list, click the view representing the posts you want to view. The post list displays all blog posts in the current site that correspond to the selection.
In the Archives list, click the month of interest. The post list displays all blog posts in the current site published during that month.
In the Tags list, click the tag of interest. The post list displays all posts in the current site associated with the selected tag.
Click Simple List to display only the title of the posts. Click Detailed List to display the summary view.
Create a new blog post to add information or a commentary related to the current site.
When you create a new post, you can save it as a draft without publishing it, or you can immediately publish it to the blog on the Marketing Site. You also have the option of publishing the post to both the internal blog and a configured external blog.
To create a new post perform the following steps:
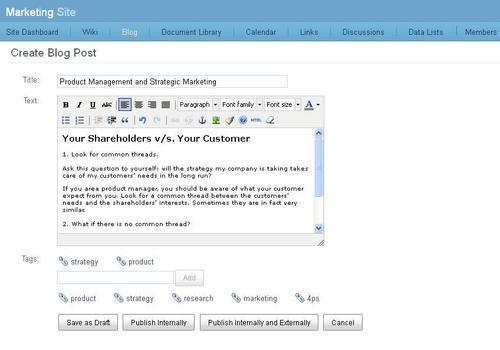
Click New Post. The Create Blog Post page appears. Type a Title for the post.
Type the post content in the Text box. Use the formatting features provided to markup the content, insert bulleted and numbered lists, and include hyperlinks.
Optionally, add tags for the blog post:
Type a tag in the box provided and click Add. To add multiple tags, separate each tag with a space.
Click Choose from popular tags in this site to display the existing tags used in this site. Click a tag to associate it with the new post:
The newly associated tags appear beneath the Text box. Click a tag to remove it.
To save or publish the new blog post perform the following steps:
Click Save as Draft to save the post without publishing it. The post will not appear in the post list.
Click Publish Internally to publish the post to the internal blog, making it available for other users of this site.
Click Publish Internally and Externally to publish the post to both the internal and external blogs.
The new post appears as users will see it. The text (Draft) appears after the title if the post remains unpublished. Click Go to Post List to return to the main view.
Only the Marketing Site Manager, and the user who created the blog post, can edit it to modify or add to its content.
To edit an existing post perform the following steps:
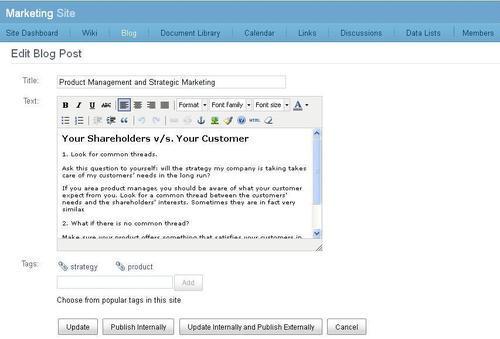
In the post list, locate the blog post you want to edit. Click Edit. The Edit Blog Post page appears displaying the selected post.
Make the desired changes to the post title and content.
To edit the tags for this post perform the following steps:
To add a new tag or multiple tags, each separated with a space, type a tag in the box provided and click Add.
To add an existing tag, click Choose from popular tags in this site to display the tags used in this site. Click a tag to associate it with the new blog post.
To remove an existing tag from the set beneath the Text box, click the tag you want to remove:
To save or publish the updated blog post perform the following steps:
Click Update to save the changes. Click Publish Internally to save the changes and publish the post to the internal blog, making it available for other site members. This option appears only for draft posts.
Click Update Internally and Publish Externally to publish the post to both the internal and external blogs.
The updated post appears as users will see it. The text (updated) appears after the title. Click Go to Post List to return to the main view.
Browsing the blog displays either a summary view or a simple list of the existing posts in the main window of the Blog page. Viewing a post allows you to see the full contents of the post.
You can perform actions on a post from the main page, but viewing a post enables you to confirm that you have selected the correct post before performing irreversible actions, such as deleting and publishing the post.
While the same actions are available in both views (Edit, Publish Externally, and Delete), you must view a post to add a comment to it.
To view a blog post perform the following steps:
Browse the blog posts to locate the post you want to view.
Click the title of the post or click Read beneath the post. If the main page displays posts in a simple list, you must click the title of the post. The post view displays the selected blog post, along with any related comments.
Click Go to Post List to return to the main view.
Delete a blog post to permanently remove it from the blog of the Marketing Site. Deleting a post also deletes all of its comments. Only a Site Manager and the user who created the blog post can delete it.
To delete a post perform the following steps:
In the post list, locate the blog post you want to delete.
Click Delete. A message prompts you to confirm the deletion of the selected post. Click Delete. A message indicates the selected blog post has been deleted.
In addition to creating blog posts and publishing them internally within the site, you can publish the blog posts to an existing WordPress or TypePad blog. To publish the site blogs externally, you must configure the external blog details.
To configure an external blog perform the following steps:
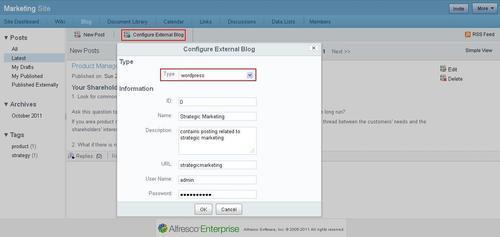
Click Configure External Blog. The Configure External Blog page appears.
In the Type list, select the appropriate option:
Select WordPress to configure the external blog to run on the WordPress blog publishing system.
Select TypePad to configure the external blog to run on a TypePad blogging service.
Complete the remaining fields with the details of the external blog.
The User Name and Password provided must be the user details of the author, or administrator, responsible for posting the external blog. Click OK:
In addition to publishing a blog post to the internal blog of the Marketing Site, you can publish a post to a configured external blog. To publish a draft post externally, you must also publish it internally.
To publish a post externally perform the following steps:
In the post list, locate the blog post you want to publish externally. Click Publish Externally. Optionally, open the post to perform this action.
A message indicates the selected blog post is published.
Adding comments to a blog post can help make a site blog interactive. People can comment on the post and provide their views or comments for any blogs written by other users. While all users with access to the Marketing Site can view the blog conversations, only site members can add comments.
The number of replies added to a post is displayed in the post list beneath the post summary. You must view a post to add, view, and manage the related comments.
In the Blog page, you can add a comment to reply to any published blog post.
To add a comment perform the following steps:
In the post list, locate the blog post to which you want to add a comment.
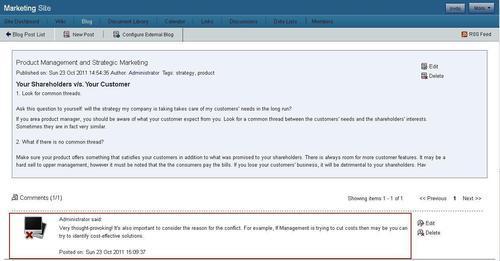
Click the post title to view the post. The post view displays the selected blog post, along with any related comments.
Type the post comment in the Add comment box. Use the formatting features provided to markup the content, insert bulleted and numbered lists, and include hyperlinks.
Click Create comment. The comment displays beneath the post. Click Go to post list to return to the main view:
You can edit a blog comment to modify or add to its content. Only a Site Manager, and the user who created the comment, can edit it.
To edit a comment perform the following steps:
In the post list, locate the blog post containing the comment you want to edit. Click the post title to view the post. The post view displays the selected blog post and the related comments.
Click Edit to the right of the comment you want to change. The Edit Comment box appears, displaying the selected comment.
Make the desired changes to the comment. Click Update. The updated comment displays beneath the post.
Click Go to Post List to return to the main view.
Delete a comment to permanently remove it from a blog post. Only a Site Manager, and the user who created the comment, can delete it.
To delete a comment perform the following steps:
In the post list, locate the blog post containing the comment you want to delete. Click the post title to view the post. The post view displays the selected blog post and the related comments.
Click Delete. A message prompts you to confirm the deletion of the selected comment.
Click Delete. A message indicates the selected comment has been deleted. Click Go to Post List to return to the main view.
The Data Lists component allows site members to create and manage lists of data relevant to the site. Users can work with their own lists and can also contribute to lists created by other site members. Data Lists let you keep track of team information that lends itself to being managed by classic web form interactions and displayed in sortable columns. You can probably think of a lot of examples of things your team needs to track that don't make sense in a blog or a document library or maybe need a little more structure than the wiki. For such scenarios, you can make use of Data Lists. There are some out-of-the-box lists are available, you can also create custom Data Lists, this will be discussed in Chapter 8, Configuring Share.
Note
For more details on the Alfresco Share blogs feature, refer to the link: http://docs.alfresco.com/4.0/index.jsp?topic=%2Fcom.alfresco.enterprise.doc%2Fconcepts%2Fblog-intro.html.
You can access the Data Lists component by clicking on the Data Lists site page for any site, which displays the lists, created for the current site.
The Lists section of the browsing pane displays the data lists for the current site. Once you select a list to view you can choose any of the filters to display specific list items within that list. Following are the different filters available:
All: In this view, the user can see all data lists created for this site
Recently Added: This displays the lists created recently, like in the past seven days
Recently Modified: In this view, user can see the lists modified recently, for instance lists modified in the past seven days
Created by Me: This view displays only the lists created by the current user
You can create a new list for the current site, which will be specific to the site.
To create a new list perform the following steps:
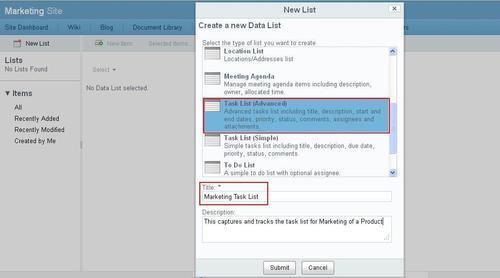
Click on the New List button in the header, which will open the New List dialog box.
On the Create a New Data List screen, a different predefined list will be available. Select the type, of which you want to create a list.
Provide a Title and Description for the list. This title should be unique, hence, it will not allow a duplicate title.
Click the Save button.
Here, let's create a list of To Do Task List, in this task list we can maintain and track the list of tasks the marketing team has to do for a new product launch. It allows you to create a task with basic details, along with advance details like Start Date, End Date, Priority, Assignee, and so on. For this select Task List (Advanced) as the type of list:
The name of this new list, which you created, will appear in the Lists section of the browsing pane. Click the list name to display the list in the main view. A new list contains no list items.
You can modify the task details like Title or Description by Editing List. The user who has created the list, and the users having Site Manager or Site Collaborator roles can edit task list.
To edit a list perform the following steps:
Position your cursor over the list you want to edit in the browsing pane.
It will display the actions, click on the Edit Details action.
The Edit List Details dialog box appears which will display the current list details.
Click on Save once you are done with the desired changes to the title or description.
If you want to remove the list permanently from the site, you can delete a list. The user who has created the list, and the users having a Site Manager role, can edit task list.
To Delete a list perform the following steps:
Position your cursor over the list you want to delete in the browsing pane
It will display the actions, click on the Delete action.
A message prompts you to confirm the deletion of the selected list.
Click Delete.
Once you are done with list creation, you would like to add items (records) to that list. You can add items to both your own lists and also the lists created by other site members. You can also edit or delete list items.
With this items for the Tasks Lists, you can track different tasks with the assignees and due date. The users/assignees also can update this task with the status or any comments they have.
Create list items to populate an existing data list.
To create a new item perform the following steps:
Select the list of which you want to create items.
Click the New Item button.
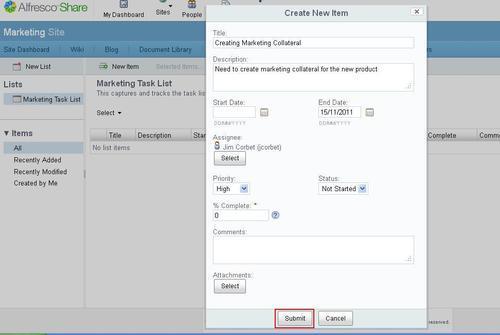
The Create New Item dialog box appears. Based on the type of list selected currently, the fields will be displayed on this page
Here, for the Tasks List, it will have fields like Title, Description, Start Date, End Date, Assignee, Priority, Status, % Complete, Comments, and Attachments.
Fill up the desired information.
Fields marked with an asterisk (*) are mandatory fields.
Click Submit:
You can edit, delete, or duplicate (copy) the list item:

To edit the list item perform the following steps:
To edit a list item, select the list and position your cursor on the list item you want to modify.
It will display different actions in the Actions column, click on the Edit icon.
The Edit Data Item dialog will appear, you can make your desired changes.
Once done, click on Save.
You can see the updated item in the list.
To delete the list item perform the following steps:
To delete a list item, select the list and position your cursor on the list item you want to delete.
It will display different actions in the Actions column, click on the Delete icon.
A message prompts you to confirm the deletion of the list item.
Click on Delete.
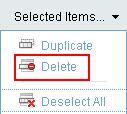
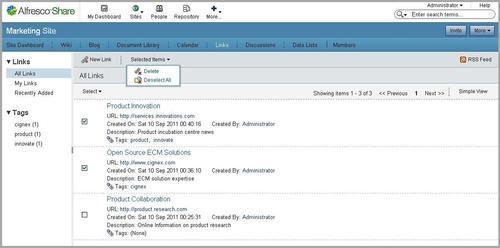
If you want to delete multiple items at once, you can select the desired items by clicking on the checkboxes against each item and then click on Delete action in the Selected Items menu:
To duplicate the list item perform the following steps:
You can also copy the list item with all the details.
To duplicate (copy) a list item, select the List and position your cursor on the list item you want to copy.
It will display different actions in the Actions column, click on Duplicate icon.
The new item will be created identical to the selected list item.
You can edit the newly copied item if required.
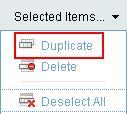
If you want to duplicate multiple items at once, you can select the desired items by clicking on the checkboxes against each item and then click on Duplicate action in the Selected Items menu:
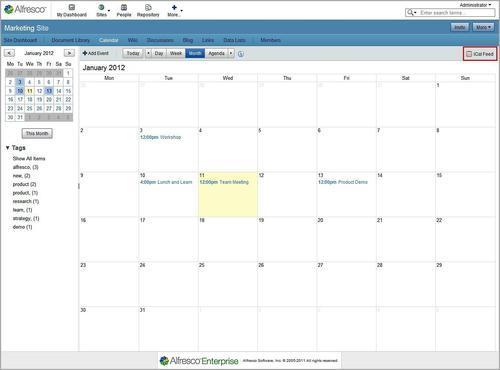
This calendar is specific to the site. It has all the calendar functions. Events can also be created in this calendar. It also has the iCal functions.
On the site navigation bar below the site name is the tab for calendar:

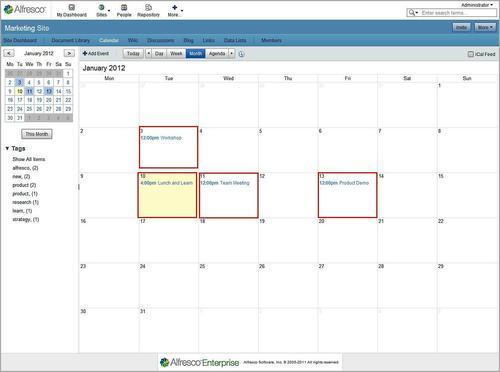
Clicking on the Calendar tab, opens up the calendar page:
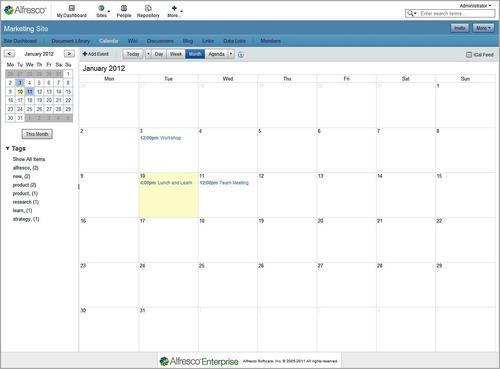
The default view is the Month view. You also have the option of viewing your calendar in the Day and the Week view.
The Previous and Next buttons take the user through the next day/week/month depending on the calendar view selected.
On the left hand side is a mini view of the calendar with the current date highlighted. The tags used through the calendar are listed below the mini view.
On the top bar is a button to create an event. Clicking on the Add Event button will take you through the steps to create an event.
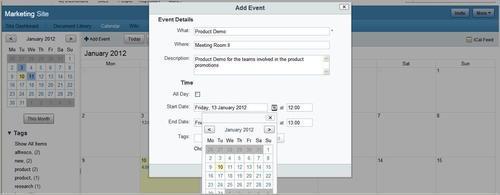
Fill up the details of the event like what the event is, where is it going to be, start and end date, and time. You can also add tags. There can also be selected form tags that may already be in the system.
Click OK to create the event. This event now reflects in the site calendar. Based on their permissions, the members of the site will be able to view the event:
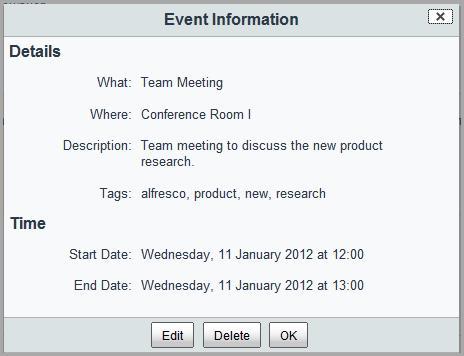
Clicking on the event name in the calendar will open up a window that will display the event related information:
If the user clicks on the Agenda button on the top, they are taken to the agenda starting with the current day:
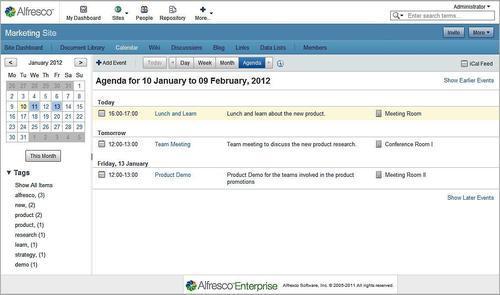
There are links, Show Earlier Events and Show Later Events which can be used to view events earlier and after the ones that are displayed.
The current day event is highlighted in the list.
A new event can also be added by clicking on a specific date. Hovering the mouse over a date will show up a ![]() icon. Clicking on this will pop up the Add Event window where you can add the event details.
icon. Clicking on this will pop up the Add Event window where you can add the event details.
Alfresco Share has an iCal feed function. This is an out-of-the-box feature of Alfresco. This feature helps users to import their Share calendar events to their Microsoft Outlook calendar and vice versa. For the Outlook calendar to be shared on your Alfresco system, you need to have the Outlook and Alfresco systems integrated. You can right-click on the calendar of events in Outlook and select Share. You can select your Alfresco system. This will share the Outlook calendar on your Alfresco site as well. Other mail servers can also be configured to work with this. Taking the MS Exchange Server as the example, iCal is used as follows:
To use the feature click on the iCal Feed button:
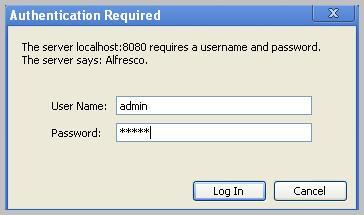
This will take the user to an authentication page where they need to log in using their Share credentials:
Click on Log In. This will open up a window which will ask the user for the location to save the
eventList.icsfile that is created: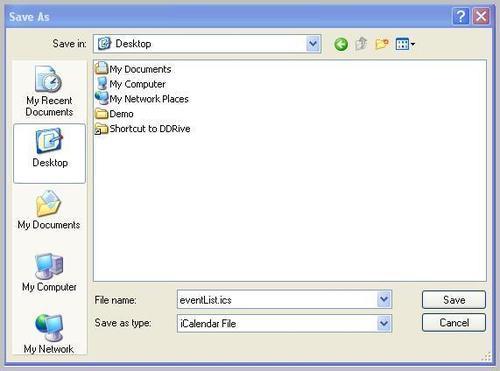
Click Save. Once the file has been saved, double-click the file. It will open up the calendar on your MS Outlook, as shown in the following screenshot:
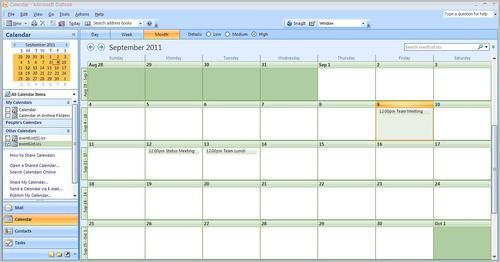
The calendar in Outlook appears as a separate tab, as shown in the following screenshot:
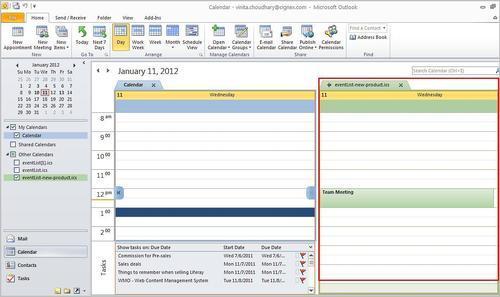
The events for the day/month/week will be listed in the calendar, based on the view that is selected.
This is a nice feature from Share's kitty. It allows the users to list the hyperlinks or URLs of information that they deem useful for collaboration on the site. To create links you need to do the following
Click on Links:

The New Link button lets users create new links.
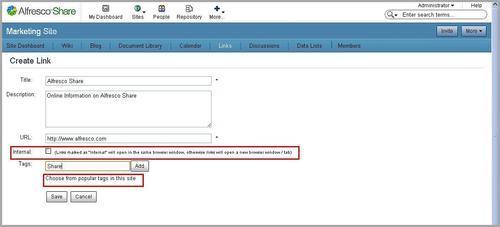
A Create Link window opens up, where the user needs to fill up the details of the link. The user can also specify if the link is internal or external by checking the box. The user can also add tags to the link. They can create new tags or select from the existing ones:
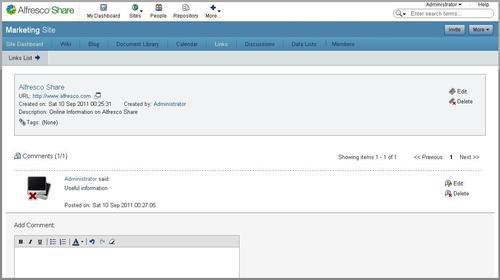
Click on Save. The new link shows up with all the details of its creation. The users that see the link have the option of commenting on it:
Click on the Links List link and it will take you to the page that lists all the lists created with their details. Links can be viewed by the most recently added, the users own links, and all the links that have been created:
The links that have been created by the user can be edited or deleted by them.
The links are displayed in a paginated manner just like the rest of the content like documents, wikis, blogs, and so on.
Discussion with the team members is an important aspect of collaboration. Share provides users a forum to share ideas and work together. To create a new discussion thread perform the following steps:
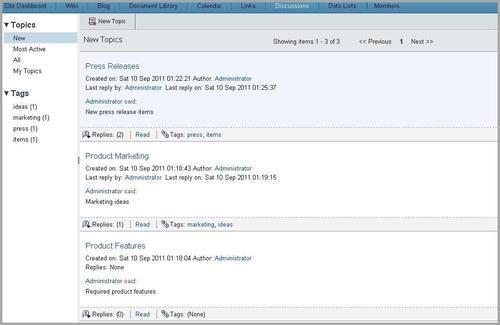
Click on the Discussions tab on the top navigation bar. The following screen opens up:
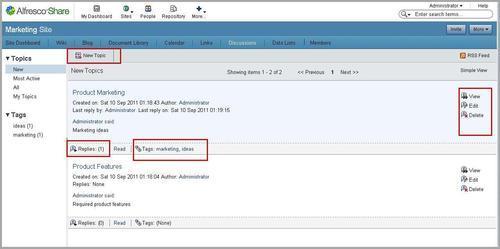
The various discussion topics are listed in a paginated manner. The users can see the replies posted to the topics, as well as the tags associated with the topic.
Also, if a user has created a discussion topic then they will be able to edit, delete, and also view the topic. The remaining users can do the same, based on their roles and permissions.
Click on New Topic to create a new topic of discussion. A window opens where the details of the topic, including the title and the tags and description can be filled in. A WYSIWYG editor is available to the users to describe the topic:
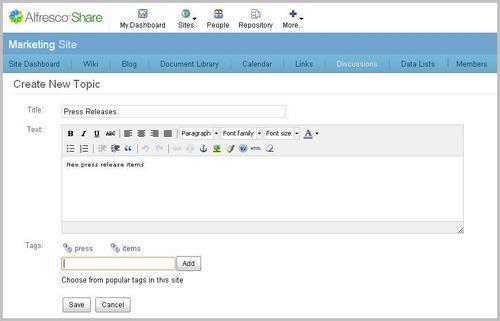
Click Save to create the topic of discussion:
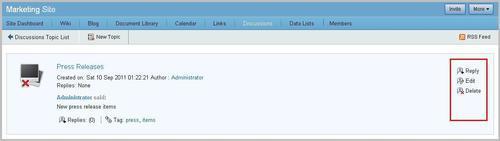
Click on Reply to reply to a discussion. A WYSIWYG editor window is provided for the same. Click on Create to post the reply:
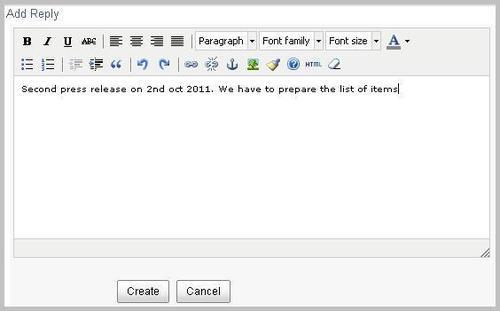
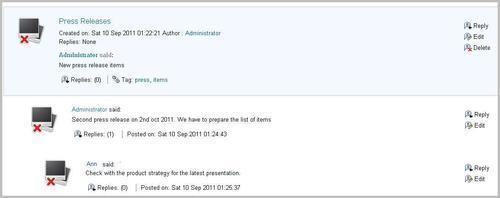
A topic will have a sequence of replies, as shown in the following screenshot during the course of the discussion:
Click on the Discussion Topic List link to go to the window that lists all topics of discussion on the site. These can be viewed as a complete list or sorted on the basis of the latest, most active, or users own topics. The discussions appear as a paginated list of topics with a reply option and a concise view of the number of replies and associated tags, if any:
In this chapter, we discussed about how effectively the team can collaborate with the help of different tools like wiki and blogs. Data List also can be used to capture some of the information, which is more like row based and not in the form of pages or documents.
Teams can benefit from using the task scheduling and discussion features. It can help them provide the right information and inputs at the right moment. Links can be effectively used to maintain a quarry of useful relevant information for the teams' reference.
In the next chapter, we will take a look at the Document Library feature, its benefits and the different ways in which users can benefit from using the document library.