© Sheran Gunasekera 2020
S. GunasekeraAndroid Apps Securityhttps://doi.org/10.1007/978-1-4842-1682-8_10

10. Looking Ahead

Sheran Gunasekera1 
(1)
Singapore, Singapore
 

So far, what we’ve seen is bleak. I intended it that way on purpose. I do celebrate the reverse engineers and people that pick apart apps. I do, however, want you to know that you are in a difficult position and can’t afford to take shortcuts or be lazy about security. My goal of showing you and possibly other reverse engineers how to break Android apps was to get you to take a more serious approach to your security. You have to learn about the principles and work from there rather than rely on someone to build you yet another framework to help simplify your life. Therefore, in this chapter, I want to take you through some alternatives in security. These alternatives are still new and thus have not had enough of an impact on the reversing community as a whole. To this end, you will not find many blog posts or articles written about these topics. I think that you owe it to yourself to figure out some new ways of protecting your own apps, though. It doesn’t hurt and can only help strengthen the ecosystem further.

What I will do in this chapter is talk about some alternate approaches to handling sensitive aspects of app development – SSL Pinning being one of them. We will take a look at how some frameworks are designed and work and then consider alternatives to doing SSL Pinning based on the fact that Android is still, essentially, Linux. These topics are new even to me, and as such I am actively researching them and will publish more details on the companion website for this book [https://aas2book.com]. I would love to work closer with you if you have any thoughts on developing what I present here or even contributing to it. Thus, without much delay, let’s get started.

Flutter

Flutter is an app development framework by Google, very similar to React and React Native. You can find out more on its website: https://flutter.dev. Flutter revolves around Google’s answer to JavaScript called Dart. The Dart programming language has been around since 2011, and if you aren’t aware of it yet, then take a closer look here: https://dart.dev. What’s interesting with Dart is that it can compile to native code or to JavaScript. The native side of things is what should appeal to us as mobile developers. By compiling into native code, Dart and by extension Flutter can be used on multiple supported platforms. An overview of the Flutter system is shown in Figure 10-1.
../images/273312_2_En_10_Chapter/273312_2_En_10_Fig1_HTML.jpg
Figure 10-1

Flutter system overview taken from https://​flutter.​dev/​docs/​resources/​technical-overview

By changing just the Embedder layer, it is possible to transplant Flutter apps to both iOS and Android. There is even a web component that is equivalent to building HTML5 apps through other frameworks like Titanium, Ionic, Apache Cordova, and so on. There, the premise is to use HTML5 and JavaScript to build apps which compile to native packages. This is similar except that Flutter uses Dart, and the Flutter ethos is that you build, use, and reuse Widgets.

I won’t be covering Flutter in depth in this chapter and rely on you to do some of your own research. Flutter has some great installation instructions on how to get setup for the first time, so I encourage you to follow those instructions and get your developer environment setup. Start here [https://flutter.dev/docs/get-started/install] and continue on to the Test Drive section here [https://flutter.dev/docs/get-started/test-drive]. This is the standard demo that we will begin to work off of. My goal in this section is to show you an alternative to using SSL Pinning that is a little trickier to defeat. Fair warning, I have managed to break SSL Pinning described in this section and still intercept traffic going in between, but it was not straightforward and required some considerable time and research.

Flutter is interesting in that it uses its own HTTP communication mechanisms (from Dart) and comes bundled with its own set of trusted root certificates. What does this mean when you want to intercept SSL traffic from a Flutter app? Well, it means that even if you set the phone’s proxy to point to your Burp Proxy location and even if you add the Burp Suite CA certificate, you will not be able to see the Flutter app’s traffic passing through the proxy. I’ve outlined what that looks like in Figure 10-2.
../images/273312_2_En_10_Chapter/273312_2_En_10_Fig2_HTML.jpg
Figure 10-2

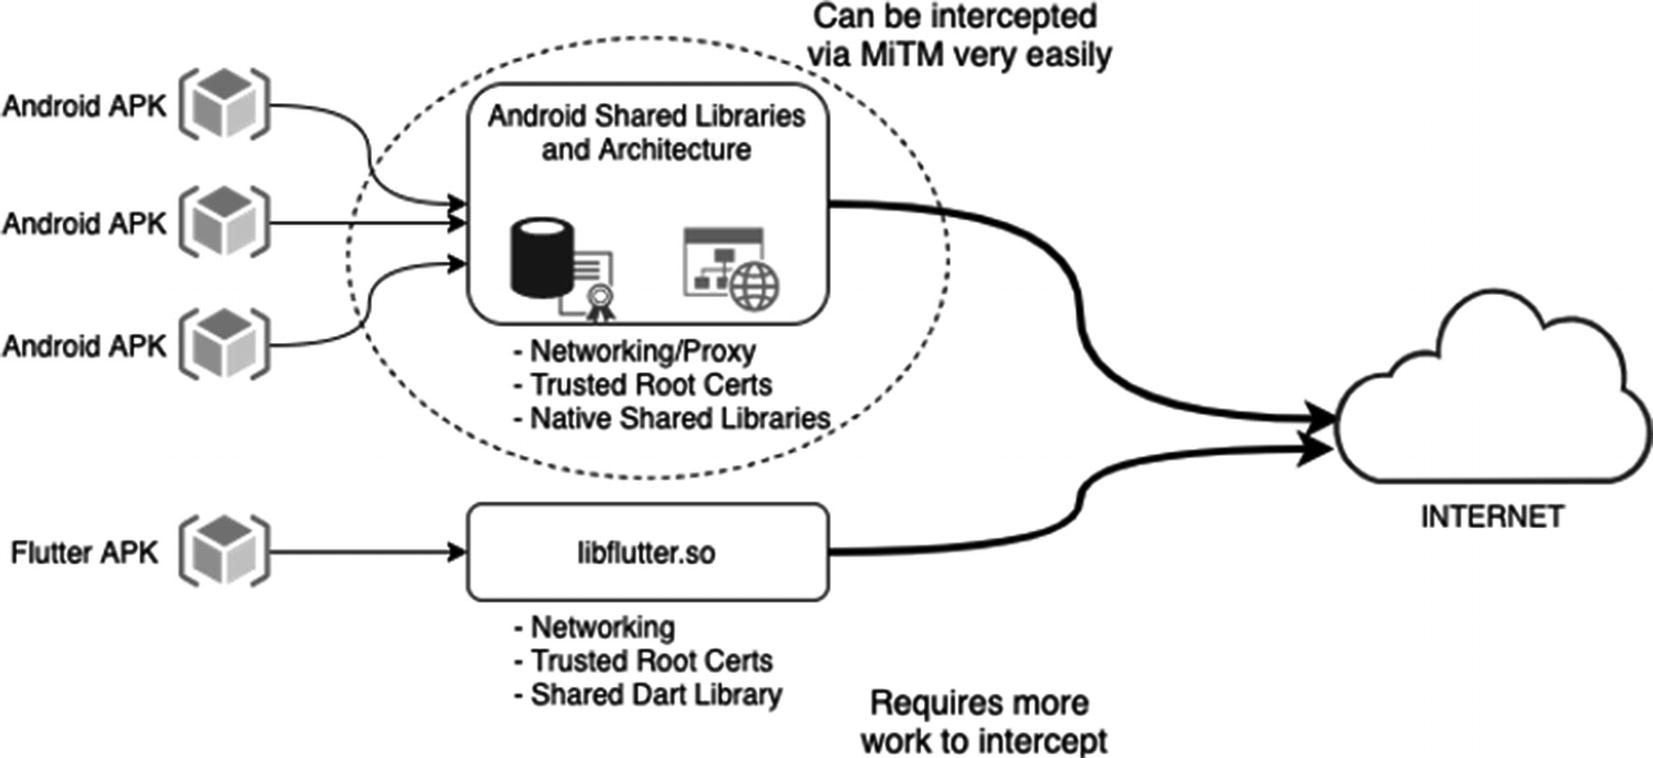
Flutter maintains its own networking and trusted root CAs

Flutter apps will have their own networking and trusted root CAs which is why they are not affected by the overall Android system settings. Therefore, to fully defeat SSL certificate verification, it is a little bit more of an elaborate process where you must look at the libflutter.so native library within the APK to find out where the SSL certificate verification takes place and then render it harmless through our standard techniques of using Frida. To divert all traffic, you will have to use something like iptables to route all network traffic to an IP address (your proxy server). SSL traffic can be looked at, but it isn’t as straightforward as how things are usually done.

The Flutter Certificate Verification

So how would this look in practice? Let’s see. In your project that you created, locate the main.dart file. It will be in the /lib directory. Open the file and look for the _incrementCounter() function. It should be around line 55. You will see that the function looks like this:
void _incrementCounter() {
    setState(() {
      // This call to setState tells the Flutter framework that something has
      // changed in this State, which causes it to rerun the build method below
      // so that the display can reflect the updated values. If we changed
      // _counter without calling setState(), then the build method would not be
      // called again, and so nothing would appear to happen.
      _counter++;
    });
  }
What we’re going to do is add our code to this function. Now normally, you would write all these widgets yourself, but the way we structure it, we’re going to make an HTTPS call whenever the button on this demo app is pressed. First, we have to add the http package. To do this, open your pubspec.yaml file, and under the dependencies, add this line:
dependencies:
  http: 0.12.1
Then add this line to your main.dart imports section up top:
import 'package:http/http.dart' as http;
Next, we will make an HTTPS request to Google. Add this line to your _incrementCounter function (I also removed the comments):
void _incrementCounter() {
    http.get("https://google.com").then((response) => print(response.headers));
    setState(() {
      _counter++;
    });
  }
With this extremely contrived example, what we do is make a request over SSL to google.​com and fetch the response headers and print them out. I am not printing the response body because Flutter is limited by Android in how much data it can write to logcat. When you run your app, you should see a screen that looks like the one in Figure 10-3 either on your emulator or device.
../images/273312_2_En_10_Chapter/273312_2_En_10_Fig3_HTML.jpg
Figure 10-3

Flutter demo app

Now when you click the + button, your request is made to google.​com and the output printed out into logcat. As an exercise, try intercepting traffic of this app the way we did in Chapter 9. You will find that you won’t see any traffic or notice how Burp Proxy doesn’t complain that it can’t establish a secure connection.

SSL Pinning with Flutter

Can we really do SSL Pinning with Flutter? Partially. Flutter does not allow for pinning the way we did in Chapter 9 where we calculated the SHA256 hash of our Subject Public Key of the server certificate. Instead, it has the functionality to do SSL Pinning based on CA certificate. Let’s see how to implement this. You will need to import the dart.​io package by adding this line to your imports:
import 'dart:io';

Dart provides us with a class called SecurityContext. Now in SecurityContext, you can do two things. First, you can tell any HTTPS connection to not trust the stored root certificates. This means that it will not default to trusting its root CA certificates for each connection. The next thing you have to do is give it some form of a mechanism that it can use to base its decision on whether to connect or not to connect. This is the point where you can include your server’s certificate which means it will only trust that. You can find out more about what mechanisms there are to allow your client to trust the server that it speaks with here: https://api.flutter.dev/flutter/dart-io/SecurityContext/SecurityContext.html.

To do this, we have to first get a copy of our server certificate. You can do that with OpenSSL, or, if you’re using your browser, you can visit the site for which you want to download the certificate, then click the padlock on the browser address bar; then if you’re on Chrome or Brave, click the word Certificate (Valid), then drag the icon of the certificate in the resulting dialog window to a directory. See Figure 10-4. This will save the server certificate in DER format. You will need to convert it to PEM format.
../images/273312_2_En_10_Chapter/273312_2_En_10_Fig4_HTML.jpg
Figure 10-4

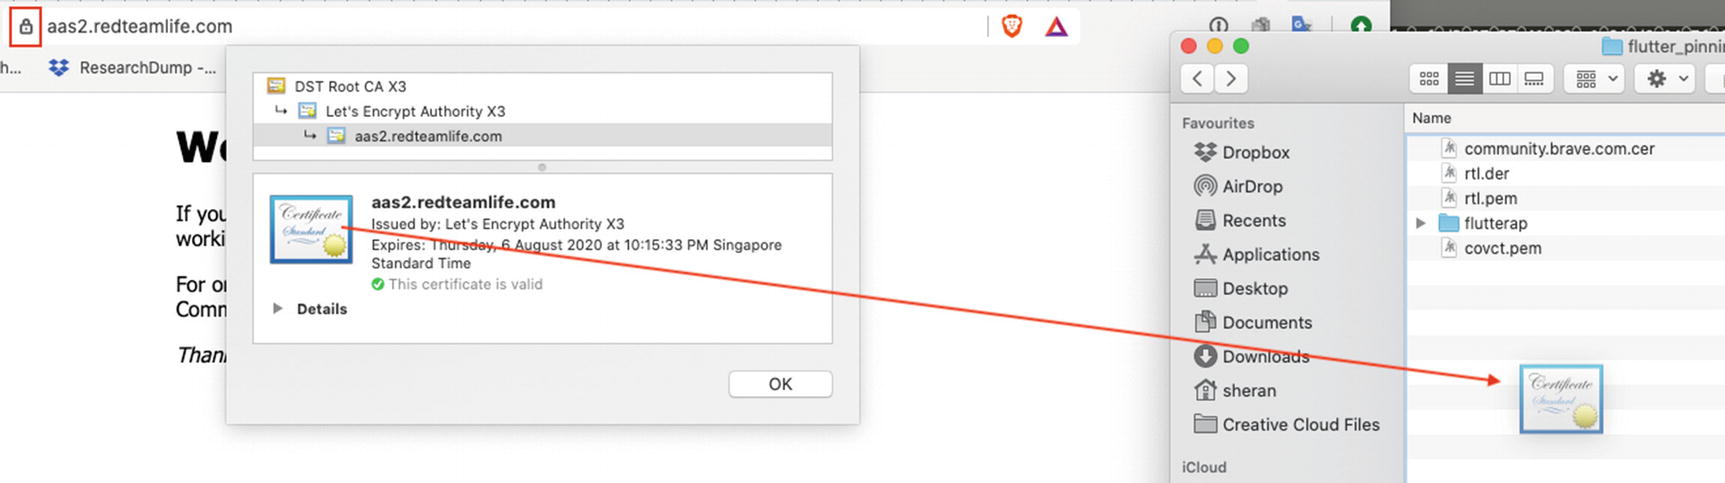
Save the server certificate

I don’t recommend using online tools that you don’t trust to convert your certificate. It is always best to handle it yourself. Here is how to convert the certificate using OpenSSL:
➔  openssl x509 -in aas2.redteamlife.com.cer -inform der -out rtl.pem
➔  head rtl.pem
-----BEGIN CERTIFICATE-----
MIIFYTCCBEmgAwIBAgISA55ixGZHoNROz2Mrr9bnzH5dMA0GCSqGSIb3DQEBCwUA
MEoxCzAJBgNVBAYTAlVTMRYwFAYDVQQKEw1MZXQncyBFbmNyeXB0MSMwIQYDVQQD
ExpMZXQncyBFbmNyeXB0IEF1dGhvcml0eSBYMzAeFw0yMDA1MDgxNDE1MzNaFw0y
MDA4MDYxNDE1MzNaMB8xHTAbBgNVBAMTFGFhczIucmVkdGVhbWxpZmUuY29tMIIB
IjANBgkqhkiG9w0BAQEFAAOCAQ8AMIIBCgKCAQEAw32mdj0toSw1dwj9cMHSgef0
I4bfGZU0mcYYVhbYzNLHT+6VuZhB3p6O/obplWXsffzv0gcnQYbBZNAUf0CA9Fv6
ickF3LjwURzSMF3Cf1FjX+PQcN37qjSVzwJz1DwkzcW/ECjui6/oBfsBHffIzrPh
G7xij57TrfM/cQfcLP110BoWTHNArwpKKmk2NU/EFlVd0z4jsGTY/2ywB3/QoKwY
V4uQ2vJw+lxt4vIZosEzhoXOfn2eMwffIClXBHV9F3JsK+0C9lCGA1LujqnP3rBQ
Once you have converted the certificate to PEM, create a directory in your Flutter project called assets, as shown in Figure 10-5, and copy your new PEM certificate into that directory.
../images/273312_2_En_10_Chapter/273312_2_En_10_Fig5_HTML.jpg
Figure 10-5

The Flutter project structure with our newly created assets directory

Next, we will add this new file into our project’s assets. Open the pubspec.yaml file in your project and add the following lines under the flutter section:
# The following section is specific to Flutter.
flutter:
  assets:
    - rtl.pem
  # The following line ensures that the Material Icons font is
  # included with your application, so that you can use the icons in
  # the material Icons class.
  uses-material-design: true
Then modify the code in your _incrementCounter() section to this:
01: void _incrementCounter() {
02:     SecurityContext secContext = new SecurityContext(withTrustedRoots: false);
03:     var fl = rootBundle.load('assets/rtl.pem').then((value) {
04:       List<int> l = new List();
05:       for(int i = 0; i < value.lengthInBytes; i++){
06:         l.add(value.getInt8(i));
07:       }
08:       secContext.setTrustedCertificatesBytes(l);
09:     });
10:     HttpClient client = new HttpClient(context: secContext);
11:     client.getUrl(Uri.parse("https://aas2.redteamlife.com/")).then((request) => request.close()).then((response) => print(response.headers));
12:
13:     setState(() {
14:       _counter++;
15:     });
16:   }

Here on line 2, what we’re doing is creating a SecurityContext and telling it not to trust or compare against our embedded trusted root CA certificates. Instead, on lines 3 through 7, we load up our file and copy its contents into a new list. Then in line 8, we load that certificate into our SecurityContext.

What we have done so far is to create a SecurityContext that will only allow connections made from our client to talk to a server that presents the certificate we just loaded into memory. Then, we instantiate our HTTPClient and proceed to make a GET request in lines 10–11. By passing our SecurityContext to the client, we tell it that we are only interested in speaking with this one server. Our client will refuse to talk with other servers that do not have this certificate. When you run this code, you should see the HTTP response headers to our site:
I/flutter (12143): connection: keep-alive
I/flutter (12143): last-modified: Fri, 08 May 2020 15:06:20 GMT
I/flutter (12143): date: Wed, 03 Jun 2020 12:10:49 GMT
I/flutter (12143): transfer-encoding: chunked
I/flutter (12143): content-encoding: gzip
I/flutter (12143): etag: W/"5eb5756c-264"
I/flutter (12143): content-type: text/html
I/flutter (12143): server: nginx/1.14.2
If we changed the host in line 11 to a different one, say https://google.com, then we would see an error such as this:
E/flutter (20066): [ERROR:flutter/lib/ui/ui_dart_state.cc(157)] Unhandled Exception: HandshakeException: Handshake error in client (OS Error:
E/flutter (20066): CERTIFICATE_VERIFY_FAILED: unable to get local issuer certificate(handshake.cc:354))
E/flutter (20066):

That’s because our client is only interested in speaking with the certificate issued by aas2.​redteamlife.​com. In this way, you can easily set up SSL Pinning in Flutter. Of course, you can take it a bit further and create a client that only looks at the SHA256 hash of the public key of a certificate, but I leave that up to you to try out.

What we saw here is an attempt to use SSL Pinning on newer and less used software to make it all that much more difficult for a reverse engineer. It is very much akin to security through obscurity because this can be beaten, and I have done exactly that. Yet again, as with obfuscation, very slight advantage counts, and this extra work that a reverse engineer has to put into bypassing SSL Pinning may be just the deterrent to make them pass over your app.

Golang

Golang or the Go language [https://golang.org/] is an open source programming language that was developed by Google and makes it easy to build performant and portable software. It is a breeze to cross-compile to different platforms and is very fast. I recall how I once rewrote a single API in one afternoon using Go in the startup that I worked for. Our code was a monolithic Java-based file, and we would deploy each large WAR file behind HAProxy load balancers but then only route certain APIs to each WAR file. So we would deploy like ten WAR files, and perhaps two handled one set of APIs, three another set, and the rest handled a third set of APIs. The two that handled one set of APIs would receive location data from thousands of mobile devices every 15 seconds. It would then write this to a database. Because of the load on this API, the VMs running this code had about 90–93% usage, and we were already debugging and profiling on the fly in production but didn’t have the time to see it through. That’s when I decided to rewrite that component in Go. After I deployed it, each of the servers hosting the Go binary had 2–3% CPU usage. It was completely unbelievable, if I hadn’t see it with my own eyes. I loved Go before that, but this one really cemented my relationship with Go. If I could hug a programming language while I slept every night, it would be Go.

The reason I bring up Go in this chapter is because I want to try and implement a native library in Go which I can include inside my Android APK. This library would handle the SSL connection and SSL Pinning functions of my app, and by extension, it would make things a little bit harder for a reverse engineer to decipher. Yes, I know that this is security through obscurity once again, like we did in Flutter, but the more barriers you can put up, the better. Plus, I have been familiarizing myself with the assembly code generated by the Go compiler. The Go compiler used to be written in C, but since 1.5 version of the language, the Go compiler was completely ported over to Go. Keep in mind that Go has a runtime that handles all aspects of program execution, including scheduling, garbage collection, memory management, and so on. This runtime is always included whenever you compile and link your program into a native binary. Therefore, when reverse engineering, you have to keep in mind that the code you’re looking at isn’t straightforward Go to assembly code. You will also have to navigate through the runtime. I’d like you to refer back to Figure 10-2 that shows how Flutter apps work with libflutter.so. We are going to replicate this same model, except we will use our own Go library instead of libflutter.so

Gomobile

Go introduced gomobile in version 1.10, and basically what it is is a tool to help you build mobile apps on Android and iOS by writing Go code. Once again, I will not be delving too deeply into Go, except to show you how to get gomobile setup and build a library for Android. To install Go, please follow the installation instructions found on their website [https://golang.org/doc/install].

Once you’ve got Go up and running on your system, it’s time to install gomobile:
➔ go get golang.org/x/mobile/cmd/gomobile
➔ gomobile init
This should install and initialize gomobile into your environment. Next, we will need the Android NDK because we will have to build a native library. To do this, open Android Studio and go to Tools ➤ SDK Manager ➤ SDK Tools and select NDK (Side by side) and CMake as shown in Figure 10-6.
../images/273312_2_En_10_Chapter/273312_2_En_10_Fig6_HTML.jpg
Figure 10-6

Installing the Android NDK

When done, click Finish. Now let’s write our library in Go. I created a separate directory to hold my Go library. For me, it resides in my Go src folder like so: ~/go/src/github.com/sheran/netutils. I also decided to name my library netutils. You can choose whatever name you like depending on the use case of course. Now, let’s create a Go file and write our code in. I create a file called netutils.go as well and put in this code:
01: package netutils
02:
03: import (
04:      "crypto/sha256"
05:      "crypto/tls"
06:      "crypto/x509"
07:      "encoding/hex"
08:      "errors"
09:      "io/ioutil"
10:      "net/http"
11: )
12:
13: func GetVerify(url string) string {
14:      shaPin := "8ccd911bf5ac0ed1bce3d4bb227a2aeed7373b5a7259ec162251fb945c9fad57"
15:      config := &tls.Config{
16:           InsecureSkipVerify: true,
17:      }
18:
19:      config.VerifyPeerCertificate = func(certificates [][]byte, _ [][]*x509.Certificate) error {
20:           certs := make([]*x509.Certificate, len(certificates))
21:           for i, asn1Data := range certificates {
22:                cert, err := x509.ParseCertificate(asn1Data)
23:                if err != nil {
24:                     return errors.New("tls: failed to parse certificate from server: " + err.Error())
25:                }
26:                certs[i] = cert
27:           }
28:           cepk, err := x509.MarshalPKIXPublicKey(certs[0].PublicKey)
29:           if err != nil {
30:                return err
31:           }
32:           pkh := sha256.New()
33:           pkh.Write(cepk)
34:           pubKeyHash := hex.EncodeToString(pkh.Sum(nil))
35:
36:           if pubKeyHash != shaPin {
37:                return errors.New("cannot verify certificate")
38:           }
39:           return nil
40:      }
41:      client := &http.Client{Transport: &http.Transport{TLSClientConfig: config}}
42:      req, err := http.NewRequest("GET", url, nil)
43:      if err != nil {
44:           return err.Error()
45:      }
46:      resp, err := client.Do(req)
47:      if err != nil {
48:           return err.Error()
49:      }
50:      body, err := ioutil.ReadAll(resp.Body)
51:      if err != nil {
52:           return err.Error()
53:      }
54:      return string(body)
55: }
56:
Caution

Be careful that this piece of code does not perform any other certificate verification. You will ideally want to add more verification into this section to ensure that the certificate’s roots are also verified.

Let’s go over this code briefly. Essentially, this library has one function called GetVerify(). When you write libraries with gomobile bindings, you have to mark your functions as exported or public. In Go, you do this by capitalizing the first letter of your function name. Our GetVerify() function takes one string argument and returns a string – line 13. The argument it accepts is a URL. We are creating a new configuration for our TLS connection called config – line 15. In this, we configure the TLS connection to skip its own verification functions and use our function – line 16. We create this new verification function in line 19. The function is called VerifyPeerCertificate. Within this function, what we do is fetch all the certificates presented to us by the server – lines 20–27. Then we extract the public key from the server certificate, and we calculate its SHA256 hash – lines 28–34. Lastly, we compare it with the SHA256 hash value of our server certificate – lines 36–38. We define our known SHA256 hash in line 14.

Then, we create our HTTP client using the configuration we created – line 41. Then we go on to create our request, send the request, receive the response, and read and return the response body – lines 42–54. Here, for demonstration purposes, we’re only working on HTTP GET requests. Also, there’s no use of HTTP headers or request body. These can be added as per Go’s normal HTTP library found here: https://golang.org/pkg/net/http/. What’s important is that you create all your HTTP clients by using the customized configuration and that you initialize the HTTP client using this configuration: client := &http.Client{Transport: &http.Transport{TLSClientConfig: config}}

Next, we have to build this library. Using the command line, navigate to the directory where you saved the preceding code. Then, run this command:
➔  ✗ gomobile bind -trimpath -o netutils.aar -target=android github.com/sheran/netutils
Replace github.com/sheran/netutils with your own path. Essentially, it is the name of your Go package. This should create a netutils.aar package in the current directory. This is your AAR file (Android Archive) to be included in your Android project. Let’s analyze this command for a bit. You will notice the -target parameter is set to android. This means you will build the library for Android devices both 32- and 64-bit ARM and x86. By qualifying the target with a / you can further segment the library. For instance, if you only wanted to build an ARM version, you can set your target to android/arm. Or if you only wanted to build an ARM64 version, you can do android/arm64. By doing this, you can obviously shrink your library size, but then you limit it to what types of devices it can run on. I think the android/arm setting works well for us. Next, it is time for us to build our Android project and use the function we wrote. For this, fire up your Android Studio, and open up the code we last had for the aas2obfuscate app. At the end of it, we add our code that calls our library app like so:
01: package com.redteamlife.aas2.aas2obfuscate
02:
03: import android.bluetooth.BluetoothAdapter
04: import android.os.Bundle
05: import android.util.Log
06: import android.widget.TextView
07: import androidx.appcompat.app.AppCompatActivity
08: import com.scottyab.rootbeer.RootBeer
09:
10: import netutils.Netutils
11:
12: class MainActivity : AppCompatActivity() {
13:
14:     override fun onCreate(savedInstanceState: Bundle?) {
15:         super.onCreate(savedInstanceState)
16:         setContentView(R.layout.activity_main)
17:
18:         val testModule = TestModule()
19:
20:
21:         if (testModule.isOddDay()) {
22:             findViewById<TextView>(R.id.oddDay).text = "It's an odd day today."
23:         }
24:
25:         val nuts = testModule.getNuts()
26:         val loop : TextView = findViewById(R.id.loop)
27:         for (type in nuts){
28:             loop.append(type+" ")
29:         }
30:
31:         val btAdapter = BluetoothAdapter.getDefaultAdapter()
32:         Log.d("aas2obfuscate","BT Adapter address is "+ btAdapter.address)
33:
34:         val rootBeer = RootBeer(applicationContext)
35:         if (rootBeer.isRooted()) {
36:             Log.d("aas2obfuscate","Device has been rooted!")
37:         } else {
38:             Log.d("aas2obfuscate", "No root detected")
39:         }
40:
41:         val out = Netutils.getVerify("https://aas2.redteamlife.com")
42:         Log.d("aas2obfuscate",out)
43:
44:     }
45: }
46:
Notice the bold lines 10, 41, and 42. This is what you need to do to introduce the code from our Go library into your Android app. But you will also need to make a few more adjustments before you can build the app. First, we have to add the module into our project. To do this, in your Android Studio, go to File ➤ Project Structure. Then, navigate to the Modules section on the left pane of the window that just opened, and add a module by clicking the plus button as shown in Figure 10-7.
../images/273312_2_En_10_Chapter/273312_2_En_10_Fig7_HTML.jpg
Figure 10-7

Adding a new module in Project Structure

You will then be presented with a window containing a list of modules you can add. Find the one that says Import .JAR/.AAR Package, select it, and click Next. Then locate your newly built library. In my case, it is netutils.aar. Put in this location on the path folder as shown in Figure 10-8.
../images/273312_2_En_10_Chapter/273312_2_En_10_Fig8_HTML.jpg
Figure 10-8

Adding the netutils.aar archive

When you’re done, click Finish. Then back at the Project Structure window, click OK and the archive will be added.

Now we have to add the netutils package to our settings.gradle file. In your project, under the Gradle Scripts, open the settings.gradle file and add this line to the include section:
include ':app', ':netutils'
Next, we have to edit the build.gradle file belonging to the Module:app. So open that file and add this line under the dependencies section:
implementation project(':netutils')

For context, I am including my settings.gradle and build.gradle (Module:app) files as follows:

settings.gradle
rootProject.name='aas2obfuscate'
include ':app', ':netutils'
build.gradle (Module:app)
apply plugin: 'com.android.application'
apply plugin: 'kotlin-android'
apply plugin: 'kotlin-android-extensions'
android {
    compileSdkVersion 29
    buildToolsVersion "29.0.2"
    defaultConfig {
        applicationId "com.redteamlife.aas2.aas2obfuscate"
        minSdkVersion 26
        targetSdkVersion 29
        versionCode 1
        versionName "1.0"
        testInstrumentationRunner "androidx.test.runner.AndroidJUnitRunner"
    }
    buildTypes {
        release {
            //minifyEnabled true
            //proguardFiles getDefaultProguardFile('proguard-android-optimize.txt'), 'proguard-rules.pro'
        }
    }
}
dependencies {
    implementation fileTree(dir: 'libs', include: ['*.jar'])
    implementation "org.jetbrains.kotlin:kotlin-stdlib-jdk7:$kotlin_version"
    implementation 'androidx.appcompat:appcompat:1.1.0'
    implementation 'androidx.core:core-ktx:1.2.0'
    implementation 'androidx.constraintlayout:constraintlayout:1.1.3'
    implementation 'com.scottyab:rootbeer-lib:0.0.8'
    implementation project(':netutils')
    testImplementation 'junit:junit:4.12'
    androidTestImplementation 'androidx.test.ext:junit:1.1.1'
    androidTestImplementation 'androidx.test.espresso:espresso-core:3.2.0'
}
Now all that’s left to do is build the project and run it on your device and see the results. Here is what happened when I ran the app after redirecting traffic to my proxy (Figure 10-9) vs. when I ran it clean (Figure 10-10).
../images/273312_2_En_10_Chapter/273312_2_En_10_Fig9_HTML.jpg
Figure 10-9

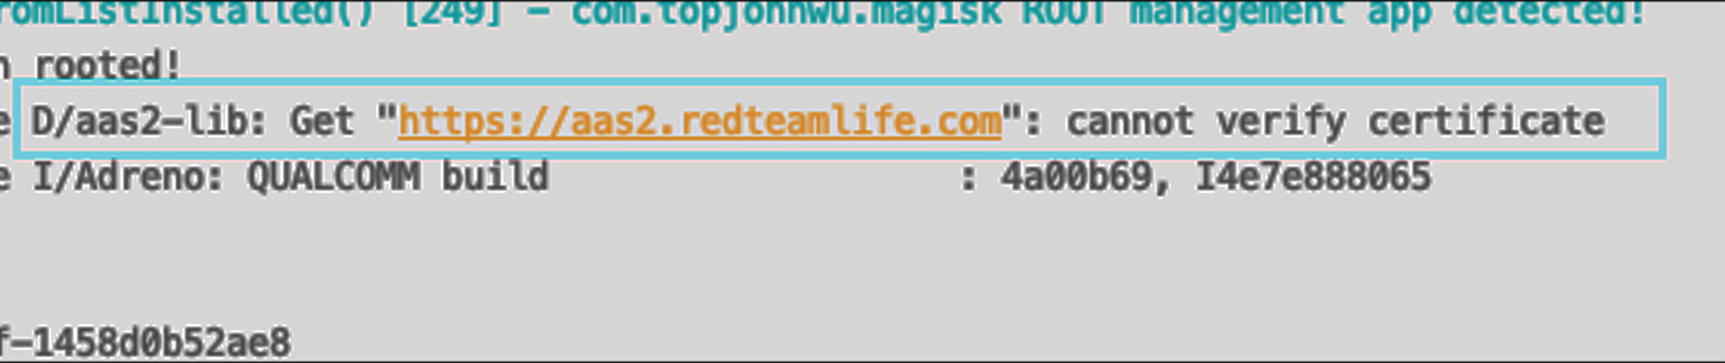
Error in verifying the certificate because we presented the fake SSL cert

../images/273312_2_En_10_Chapter/273312_2_En_10_Fig10_HTML.jpg
Figure 10-10

The successfully retrieved HTTP response body from the server

This demo was a very brief look into how you can consider writing and including your code in your Android apps. Another option, besides C, would be to use Rust [www.rust-lang.org/]. I don’t have sufficient research done on using Rust at this moment, but will update whatever research I have on the book’s companion website in the future [https://aas2book.com].

Trusted Execution Environment

It would be remiss of me to not include a note about the TEE or Trusted Execution Environment . A TEE is a separate, secure area within the processor of a device. Essentially, it is a hardware-enforced level of isolation for code and data for when sensitive transactions are meant to be executed. Generally, trusted environments are built within the main processors of devices and provide a parallel, secure area referred to as the secure world. The code that runs in this secure world is not visible to nor accessible from the nonsecure world (your Android OS). Figure 10-11 shows the separation between what the ARM processor calls the Rich Execution Environment (REE) or Android and the Trusted Execution Environment (TEE).
../images/273312_2_En_10_Chapter/273312_2_En_10_Fig11_HTML.jpg
Figure 10-11

The Arm TrustZone for the ARM Cortex-A processor

Here’s the catch though, in order to leverage the power of this special trusted or secure world, you have to work with a device manufacturer or be one. This sucks because you have a built-in secure area on your device, but you can’t actually use it – well, not completely. The Android Keystore which is hardware backed makes use of the TEE on the device to generate and store secret keys. The trusted application that is running in the secure world in this case is called Keymaster, and it is accessed via a Kernel interface and Abstraction layer. Its architecture is outlined in Figure 10-12. Thus, if you wanted to use the Trusted Execution Environment, one way is by using Google’s hardware-backed keystore. Further info can be found here: https://source.android.com/security/keystore. If you want to see more about the Android-specific ways to use the hardware-backed keystore, you can find it here: https://developer.android.com/reference/android/security/keystore/KeyGenParameterSpec.html. There’s also several examples there.
../images/273312_2_En_10_Chapter/273312_2_En_10_Fig12_HTML.jpg
Figure 10-12

Access to the Keymaster that lives in the secure world

Another way that you can access the TEE is via a Trusted Application Protection (TAP) SDK from a company called Trustonic. Trustonic has been working in the TEE space for some time now and as a result has had its trusted operating system named Kinibi deployed in over 1 billion devices. The Trusted Application Protection SDK is a development kit that app developers can buy and use in their own apps. The TAP SDK can give app developers a more flexible suite of tools to build functionality that leverages the security of the TEE. One quick way to identify if an app uses the Trustonic TAP SDK would be to look in its packaged native libraries. Figure 10-13 shows an app that uses the SDK. You will notice the three native libraries embedded within the app that facilitates your Android app to be able to implement functionality within the TEE.
../images/273312_2_En_10_Chapter/273312_2_En_10_Fig13_HTML.jpg
Figure 10-13

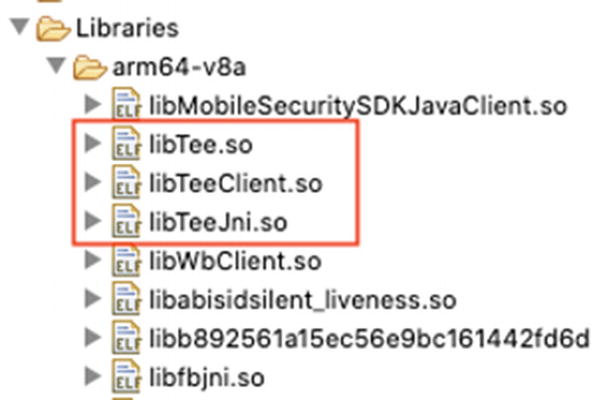
An app that uses Trustonic’s TAP SDK

Admittedly, I have not done further research on the Trustonic TAP SDK, nor have I looked too in depth into the TEE. I do, however, am aware that there have been instances where the secure world has been compromised. Any further research that I do will be up on my blog as an extension to this chapter [https://aas2book.com].

Future Evolution of Android

I am not one to speculate on this, nor do I have sufficient evidence that Android will either continue to live or die. I do know for a fact that Google has been working on a new operating system called Fuchsia. The OS is said to be designed from the ground up for security and updatability. The security part of things, I fully understand and appreciate. Since based on Linux, Android has had a fair share of Linux’s vulnerabilities transplanted over to it. At Fuchsia’s core is the microkernel called Zircon. Zircon contains many of the services, drivers, and libraries that are necessary for it to boot, interface with hardware, load and run user processes, and so on. More information on Fuchsia can be found here: https://fuchsia.dev/.

Fuchsia is an exciting evolution that Android can take. Especially since it is language agnostic, you can write your apps in many languages including Rust and Go. Further, it is built in a manner where you can support new languages so it is possible to support building apps or programs in new languages which is really awesome. I’ll be doing more research on Fuchsia as well, and it would pay to definitely keep an eye on its progress.

Principles I (Try to) Live By

I figure rather than preaching to you, I’ll tell you some of my paranoia that leads my actions. Similar to how the TEE considers the Android world as insecure, so do I. You may think it is a bit of overkill, but I consider that every part of my app will be dissected and its data inspected and tampered with. The best I can choose to do is to design and develop my app on this principle. Therefore, I sit and think around some core concepts of app design and figure out how to give the attackers the lowest chance of success.

Data

Only store the bare minimum. Let the back end store the rest. Even if you don’t have an opportunity for getting accounts brute-forced, build your GET or data retrieving APIs in such a manner as to not leak sensitive personal data.

Encryption on Android, if you are not generating and saving your keys in KeyStore, is most likely going to fail. Whatever you encrypt can be decrypted later if you embed the secret key in your app. You may choose to pull a random string from one of your image assets as a secret key much like how early versions of WhatsApp used to do, but by tracing the encryption functions themselves, it is easy to narrow down where this piece of data is stored. Bottom line is if your app can see it, the attacker can see it.

Network

Even though SSL Pinning can be defeated, use it. Find some new or innovative ways to do pinning, put them in a library, and use them later in your code.

Consider using non-HTTP protocols such as gRPC [https://grpc.io/] as they don’t allow a traditional HTTP sniffer or MiTM tool to work. Again, your days may be numbered as there are already tools that do man-in-the-middle attacks on gRPC. There’s an upcoming version of HTTP/3 or version 3 of HTTP so it may be conceivable that new security testing or reversing tools will have to be used once again to intercept or tamper with that traffic. As with all cat and mouse games, it’s always about trying to stay ahead of the attackers.

Your back ends can be your downfall as well. Get them pen tested regularly or use a bug bounty platform. The usual progression of how an attack takes place is first dissecting the mobile app to determine how it communicates with the back-end server. More often than not, because for some reason developers think their traffic is magically hidden by virtue of its use in a mobile app, there are some abysmal choices made with regard to securing the back end. After the app is generally compromised, the next domino in line is the back-end server. Armed with knowledge of how it talks to the mobile app, it is very trivial to script most of the attacks against the back end. Protect that well.

User Experience

Don’t lose sight of what your application is supposed to do. Securing the crap out of a simple app that requires no sensitive data saving nor financial information can be detrimental to its performance and perhaps user experience. Take a look at the big picture first and decide the level of protection you want to give it. Approaching this and most other security-related issues from a user-centric manner will be better.

Wrapping Up

Well, you made it to the end of this book. Thank you. Thank you for taking the time to read it and support it – if you bought it ;) – and thank you for taking an interest in Android Security. There are many, many other Android books that are absolutely brilliant that you should pick up. They are packed full of really good information to allow you to go much deeper into Android. I list two of them here:
  • Jonathan Levin’s Android Internals – A Confectioner’s Cookbook, Volume I (I’m eagerly awaiting Volume II)

  • Nikolay Elenkov’s Android Security Internals

I will have sections for each of this book’s chapters at https://aas2book.com, and I will continue to add to those sections the further research that I do on those specific topics. At that site and the Apress site, you will be able to also send in any errors, omissions, or inconsistencies. Technical books are no longer written to remain static, and the growth of the Internet has allowed a far greater interaction between the author and the reader to a point where technical books are now more fluid. So feel free to engage and let me know where I can improve or point out something inaccurate.

I wish you the very best in your journey toward securing your Android apps. As long as you hold your user’s best interests at heart, you should have a good base with which to embark on this perilous journey. Bye for now.

..................Content has been hidden....................

You can't read the all page of ebook, please click here login for view all page.
Reset
3.140.198.173