© Sheran Gunasekera 2020
S. GunasekeraAndroid Apps Securityhttps://doi.org/10.1007/978-1-4842-1682-8_2

2. Recap of Secure Development Principles

Sheran Gunasekera1 
(1)
Singapore, Singapore
 
In Android coding with Kotlin or Java, you may have to go out of your way a little to write insecure code. I mean, there are the obvious ones like leaving your private key hardcoded, but in general you should do fine on the code front. Kotlin has made several improvements to Java, which was one of the only ways to write Android code natively in the past. Some notable, among the several, Kotlin improvements have been the addition of null safety and lesser quantity of code written. The null safety check in Kotlin means that if you were to access a variable that points to a null reference, then the system doesn’t throw a NullPointerException or NPE like how Java used to. Kotlin reduces the amount of exception checking because it has no exception checking. This means that in cases where an interface throws a specific exception, you don’t need to keep checking for exceptions each time you use one, for example, Java’s StringBuilder's append method . Kotlin makes both try and throw expressions, so they can return a value which gives rise to code that looks like
val a: Int? = try { parseInt(input) } catch (e: NumberFormatException) { null }
or
val s = person.name ?: throw IllegalArgumentException("Name required")

But I’m not going to dwell at all on the language used to write Android apps in this chapter. Instead, I am going to look at instances where code written can pass on vulnerabilities to other parts of the system, like the back-end servers. I will also talk about some of the things you need to keep in mind with regard to your user’s safety and privacy. So, let’s get started. Let’s look at privacy first.

Privacy

Data privacy has become a big deal lately. I mean, it always should have been, but the past few years have given us such wonderful headlines that privacy is almost always in the news. As a security practitioner, I’m thrilled that more people give a damn. As a security practitioner, I am also appalled at the amount of blatant violations of privacy still going on. Privacy is such a big deal that in May of 2018, the EU implemented GDPR or the General Data Protection Regulation. The law itself is fairly straightforward and logical, but interestingly, it allows for warnings and fines to the tune of up to 4% or 20 million Euros based on certain infringements. To date, 34 fines have been issued to various institutions including a hefty 50 million Euro fine to Google. Whether these have been paid or not are not part of this discussion, although I know Google was appealing their fine. The point is, however, to understand that we’re getting serious about privacy.

If you’re a developer that requests for and stores a user’s private information, then you have a duty to keep that data private and safe. Depending on who you ask, the information one would consider private varies, but for a blanket definition, we typically define private information as information about a user that is generally not shared with the majority of the folks he meets. So, things like home address, gender, marital status, age, bank or credit card information, and phone number are usually considered the major components of information that a person would want to keep private. But let’s analyze why first. I mean, why would you want to keep this information private? One can argue that by having that information about someone, there is precious little that can be done directly to affect him other than sending unsolicited pizza or a mob to his house or prank calling him until he disconnects his phone number. I’d like to pause here and talk about that mob I just mentioned. While I played it off as more or less innocent, there is one specific case where people have even died when mobs have been dispatched to their house. What I’m referring to here is the practice of swatting.

Swatting

Swatting takes place when someone malicious that knows your home address calls up emergency services and then deceives them into believing that there is a life-threatening emergency taking place at your house – typically, an armed person that has already hurt someone or a terrorist suspect. The resulting visit to your home by the SWAT or emergency response team can sometimes have catastrophic results. There was a case in 2017 where a 28-year-old father of two was shot by a police officer. The victim was not even related to the group that initiated the swatting incident. He was an innocent victim that had the misfortune of having his address used for the purposes of winning a bet.

Let’s go a little deeper into what happens when an emergency response team heads to a victim’s house. They head there on full alert prepared to confront an armed and dangerous individual. The victim has no idea why someone has just broken into his home. He doesn’t know if it is a friend or a foe. During heated times like that, sometimes a victim may resist or at least take on a defensive role. To the emergency response team, this may look like a challenge or threat, and if cooler heads don’t prevail, then someone is taking a shot at the perceived aggressor. This is one way to look at why safeguarding your users’ home addresses is important.

Aside from swatting, there is another key reason for keeping your user data private. And no, I’m not talking about the nasty headlines written about how badly you screwed up and allowed 100,000 user accounts to get leaked. I’m talking about social engineering. The more personal, private information that a social engineer has on a victim, the more plausible he can make his story. Humans are wired to trust. They are also wired to default to the truth in most cases. By using subtle cues of private information on a victim, it is a lot easier to push them into believing you and your story. “Oh this guy already knows about my information, so I guess he IS calling from that bank to help me with my bank account” would be a response from a hapless victim on the other end of the phone.

So, then, what’s the secret to keeping a user’s data protected? It’s not really a secret. You have to protect your own infrastructure where the data is stored. One of the first steps I would advise would be to collect as little private information from a user as possible. It may be tempting to say “Let’s just ask for this data now and figure out what to do with it later,” but I think that is a bad idea. If you have a genuine need for the data, then ask for it – especially if it is something you can’t do without, like a shipping address. The concept is that if you have the bare minimum amount of data, then you can rest easy knowing that the fallout from a breach isn’t going to be that catastrophic, especially for the user.

The next piece of advice I would give is to separate the data into a so-called “Cold Storage” database. I’ve outlined how that may look like in Figure 2-1.
../images/273312_2_En_2_Chapter/273312_2_En_2_Fig1_HTML.jpg
Figure 2-1

Conceptual look at how the Cold Storage would work

The concept here is that you split your data into two or more databases similar to how you would shard a database. Let’s work through an example first and imagine an ecommerce platform. Let’s look at registration. During registration, the user will complete his profile. Some data that we may want to collect could be as shown in Figure 2-2.
../images/273312_2_En_2_Chapter/273312_2_En_2_Fig2_HTML.jpg
Figure 2-2

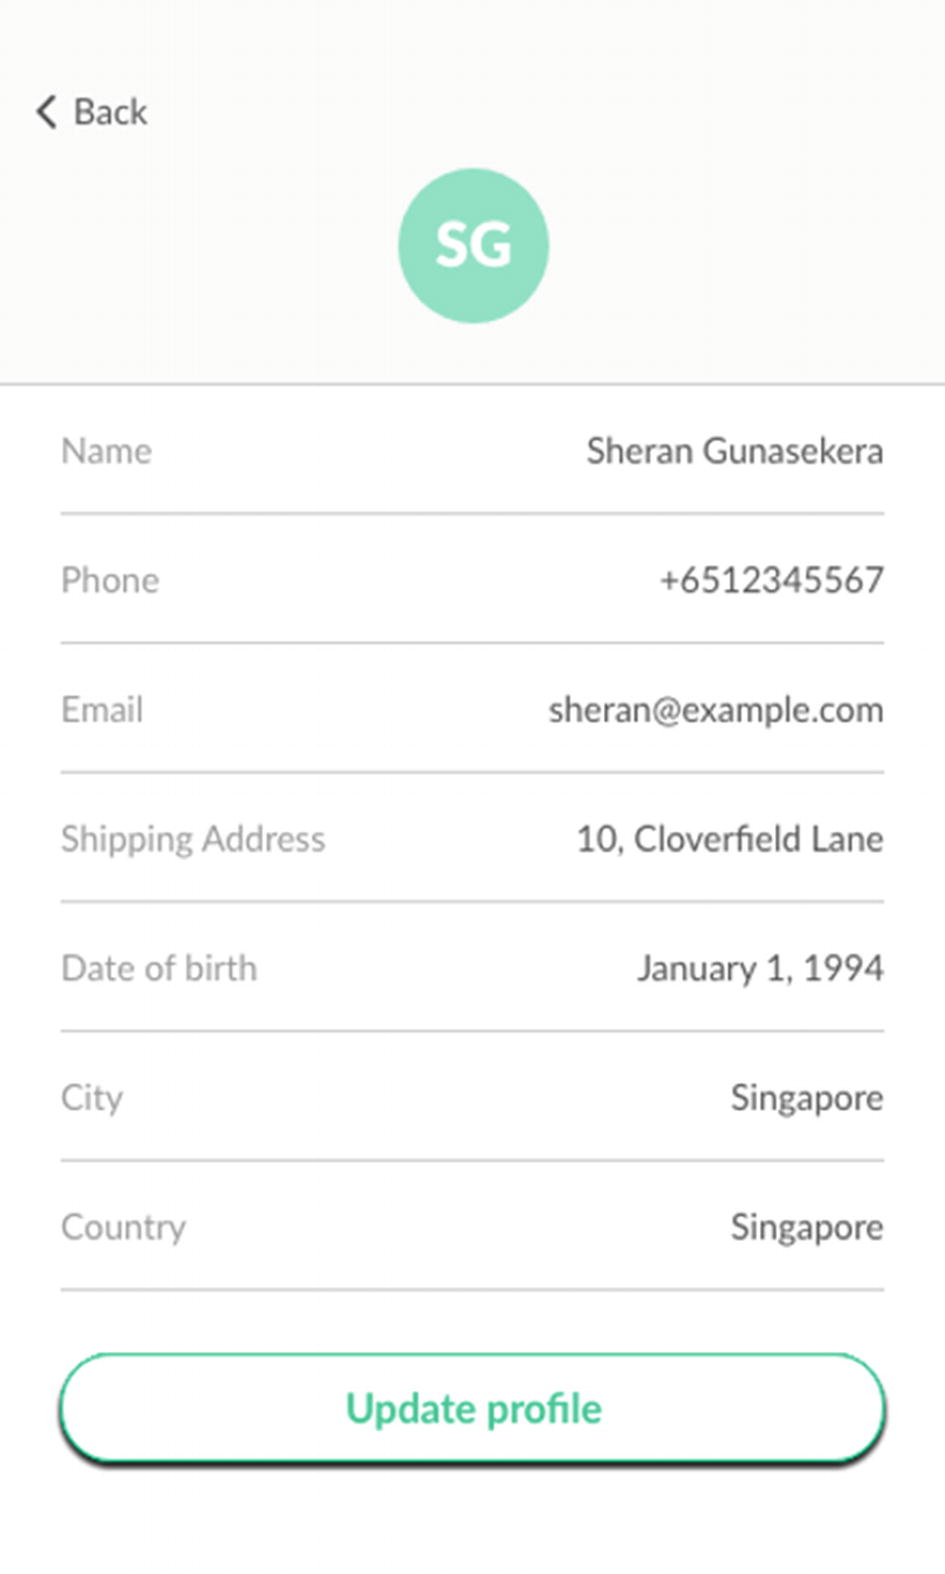
Profile page when user registers

Now when entering this data, the user can see fully what he inputs. What I recommend doing is as soon as he hits the Update Profile button, you take the following steps:
  1. 1.

    Generate a unique user id for him that you save in your main, “hot” database. This database is what gets used all the time.

     
  2. 2.

    Take all the private information and store it in a separate database that does not link to the main ecommerce site. This database is the more secure, “cold” database that holds private information. Typically, for the ecommerce site, it should be a write-only database. Information just goes in and does not come out to the ecommerce site.

     
  3. 3.

    With the information entered, take the private information that you just saved and render it illegible by using a basic algorithm such as blanking out all characters except the first character of each word. You can see an example of that in Figure 2-3. Once this is done, store it in the main database.

     
After this is done, when the user looks back at his profile, he will see it as unreadable. Since the user is familiar with his own data, he will be able to make sense of what it is. If an unauthorized user has access to his account or a data breach of the main database occurs, then the attacker will not see the full text of the private data.
../images/273312_2_En_2_Chapter/273312_2_En_2_Fig3_HTML.jpg
Figure 2-3

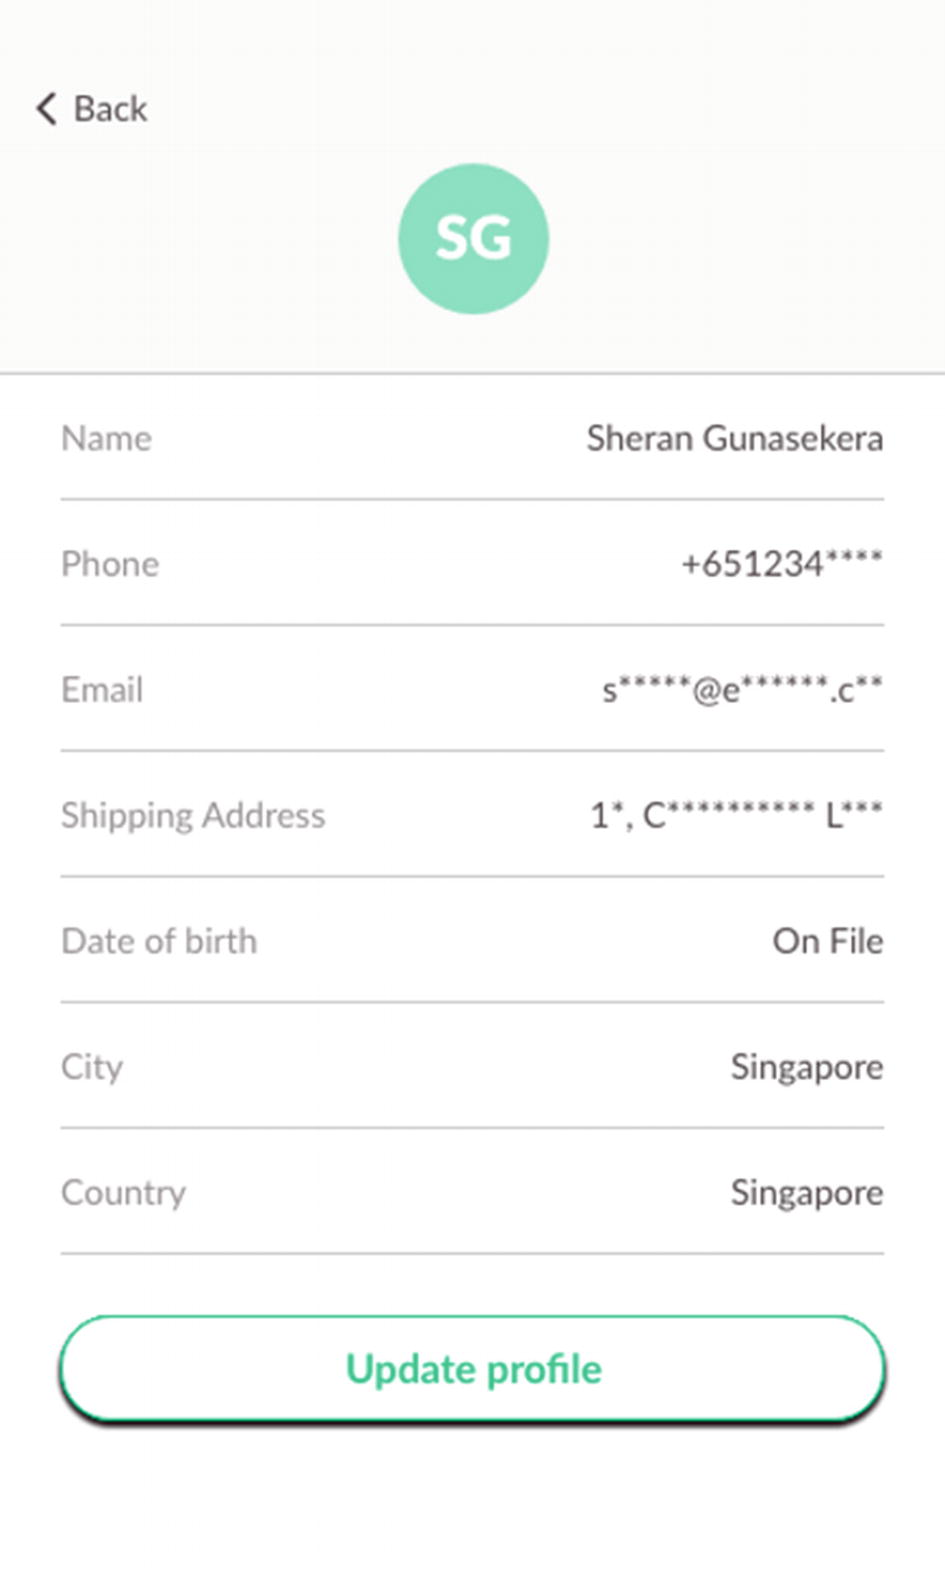
The user profile when it is called up or read back by the user

Another approach is to designate aliases to parts of the information stored. So, for his Shipping Address, you can get him to call it by an alias like “Home” or “Work.” Then when it is read back, the address shows either Home or Work. Since the user knows what the home or work address is, he has all the information that he needs when he checks out. An attacker, however, will not be able to understand what the true address of the person is. All he will see is the word Home or Work.

The concept here is that the user will never need to be told what the information he entered is. He already knows that so there’s no need to show him exactly what he entered. Instead, he will only want to modify or write to the profile data. By using a technique like this, you can greatly limit the exposure of your users in case a data breach takes place.

Data Security

Essentially, any data that an app may need, create, or modify has to be stored somewhere. Android has multiple disk partitions that house various parts of the operating system. We will look at the /data partition which contains the user’s personal data. A few benefits to keeping the user data on a separate partition are that the rest of the operating system can be upgraded or recovered and even rewritten completely without concern for loss of user data. Next, the /data partition can be completely encrypted for security. Now encryption always comes with some overhead and can slow down performance. Since the other partitions don’t contain any sensitive data, they can remain unencrypted, thus not adversely affecting the performance of the device. Within the /data directory is another /data directory. This is where all the installed applications reside. Here’s what the directory looks like:
generic_x86:/data/data # ls -alrt|head
total 860
drwxrwx--x  37 system system 4096 2020-05-04 13:38 ..
drwx------   5 u0_a25 u0_a25 4096 2020-05-04 13:38 com.google.android.setupwizard
drwx------   6 u0_a67 u0_a67 4096 2020-05-04 13:38 com.google.android.deskclock
drwx------   7 u0_a22 u0_a22 4096 2020-05-04 13:38 com.google.android.apps.nexuslauncher
drwx------   4 u0_a32 u0_a32 4096 2020-05-04 13:38 org.chromium.webview_shell
drwx------   4 u0_a75 u0_a75 4096 2020-05-04 13:38 com.ustwo.lwp
drwx------   4 u0_a76 u0_a76 4096 2020-05-04 13:38 com.google.android.webview
drwx------   4 u0_a17 u0_a17 4096 2020-05-04 13:38 com.google.android.sdksetup
drwx------   4 u0_a51 u0_a51 4096 2020-05-04 13:38 com.google.android.printservice.recommendation
generic_x86:/data/data #

You will notice that each directory has its own user and group id. Essentially, Android will allow an app to write into its own space at will. Android apps are unable to write to any other location other than the /data/data directory.

Data Encryption

Android devices since 4.4 had the ability to fully encrypt the user partition. This meant that if your phone got into the wrong hands, then extraction of the data by means other than using your pin, password, or biometrics would not be possible without the decryption key. This should give you some peace of mind if you lose your phone, but of course, you absolutely must have a PIN or password lock enabled on your device. To enable full-disk encryption on your device, you can go to Settings ➤ Security ➤ Advanced ➤ Encryption. This screen for a Google Pixel 3 XL phone is shown in Figure 2-4.
../images/273312_2_En_2_Chapter/273312_2_En_2_Fig4_HTML.png
Figure 2-4

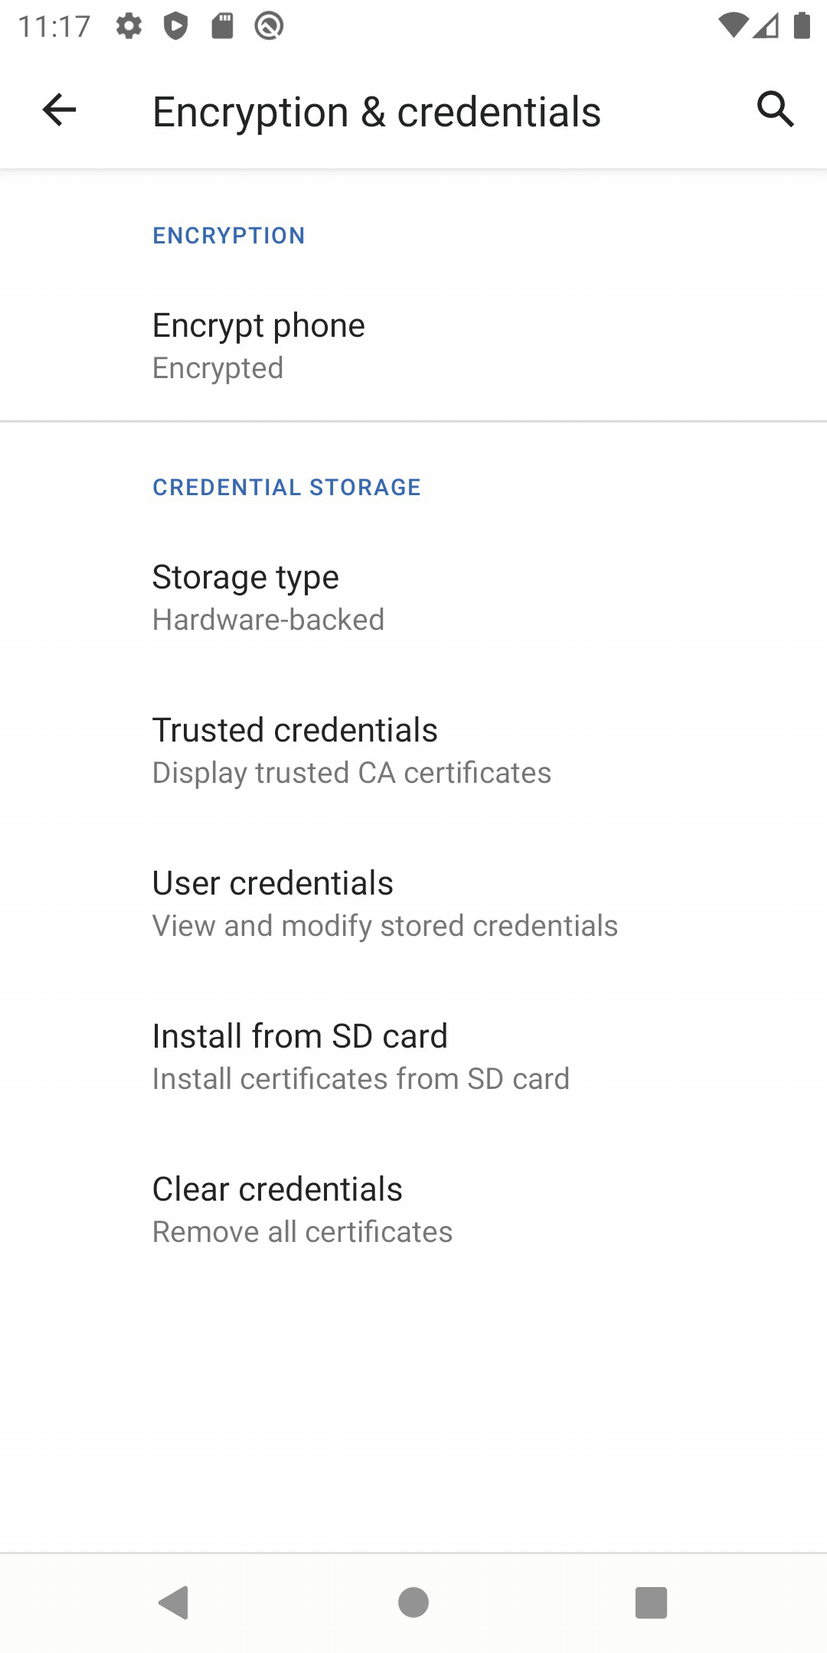
Encryption settings on a Google Pixel 3 XL device

While this security feature is great, you must also consider the data contained in your app. Again, similar to the privacy debate, I think it is important to only store data that you don’t mind someone looking at on your device. Thus, store only nonsensitive, nonprivate data. If your app decides to store data in SQLite databases, then you would do well to consider the SQLCipher from Zetetic [https://github.com/sqlcipher/android-database-sqlcipher]. SQLCipher adds a layer of encryption to your databases that you use in your app and does so in a very transparent manner. Figures 2-5 and 2-6 show you what it looks like when SQLCipher encrypts a database.
../images/273312_2_En_2_Chapter/273312_2_En_2_Fig5_HTML.jpg
Figure 2-5

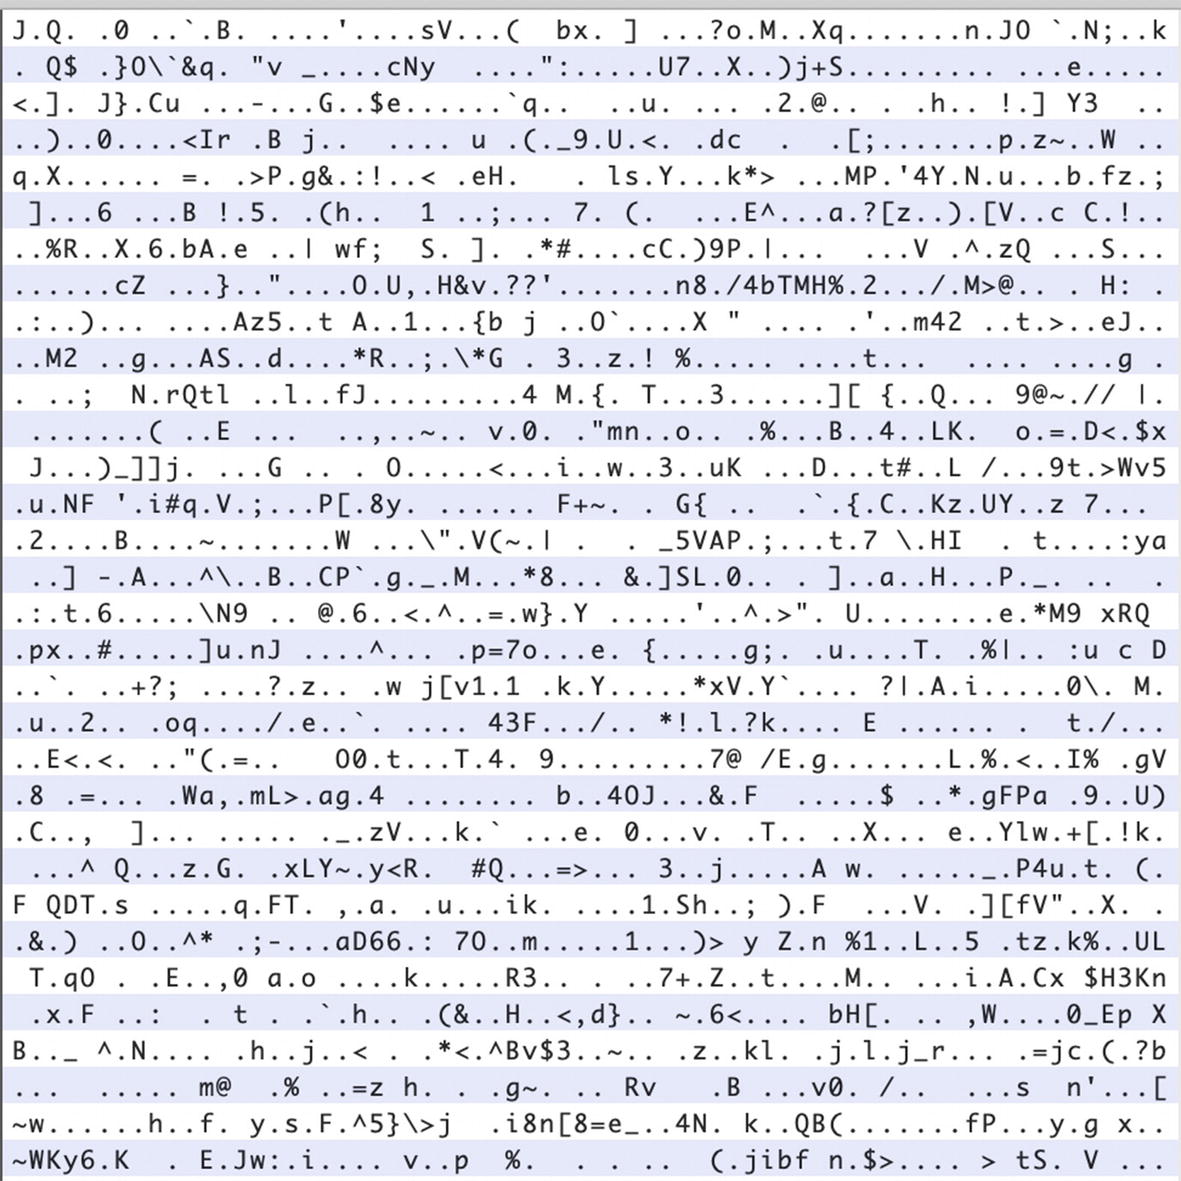
What the BMW Connected App's database looks like in a hex editor

../images/273312_2_En_2_Chapter/273312_2_En_2_Fig6_HTML.jpg
Figure 2-6

All the databases pulled out of the BMW Connected App

The BMW Connected App makes use of SQLCipher to keep its data encrypted on the device. In Figure 2-6, we run the file command on the database files pulled from the BMW Connected App. You can clearly see how the non-encrypted databases were correctly identified as SQLite files, but the ConnectedDB.db file, which uses SQLCipher, shows up as plain data. That is because it is encrypted. Figure 2-5 shows a hex dump of the ConnectedDB.db file.

Zetetic kindly provides the Android version for free via their SQLCipher Community Edition found at the preceding URL. Setting up and using SQLCipher is fairly straightforward. You add the following dependencies into your app/build.gradle file:
implementation 'net.zetetic:android-database-sqlcipher:4.3.0@aar'
implementation "androidx.sqlite:sqlite:2.0.1"

After this, you can write code as you normally would if you wanted to use android.database.sqlite.SQLiteDatabase, except this time you would use net.sqlcipher.database.SQLiteDatabase instead.

Then, using the Kotlin language, you can write some demo code as follows:
package com.demo.sqlcipher
import android.os.Bundle
import androidx.appcompat.app.AppCompatActivity
import net.sqlcipher.database.SQLiteDatabase
class MainActivity : AppCompatActivity() {
    override fun onCreate(savedInstanceState: Bundle?) {
        super.onCreate(savedInstanceState)
        setContentView(R.layout.activity_main)
        SQLiteDatabase.loadLibs(this)
        val databaseFile = getDatabasePath("demo.db")
        if(databaseFile.exists()) databaseFile.delete()
        databaseFile.mkdirs()
        databaseFile.delete()
        val database = SQLiteDatabase.openOrCreateDatabase(databaseFile, "test123", null)
        database.execSQL("create table t1(a, b)")
        database.execSQL("insert into t1(a, b) values(?, ?)",
            arrayOf<Any>("one for the money", "two for the show")
        )
    }
}

Calling Up Sensitive Information

If there is a reason where you are unable to obscure the sensitive information before you present it to the user, then a good practice is to always prompt for user credentials before displaying it to them. Ideally, you want to use the device’s PIN or password or even biometric authentication if available. Here is some Kotlin sample code from https://developer.android.com that shows an example usage of biometric authentication in your app.
private lateinit var executor: Executor
private lateinit var biometricPrompt: BiometricPrompt
private lateinit var promptInfo: BiometricPrompt.PromptInfo
override fun onCreate(savedInstanceState: Bundle?) {
    super.onCreate(savedInstanceState)
    setContentView(R.layout.activity_login)
    executor = ContextCompat.getMainExecutor(this)
    biometricPrompt = BiometricPrompt(this, executor,
            object : BiometricPrompt.AuthenticationCallback() {
        override fun onAuthenticationError(errorCode: Int,
                errString: CharSequence) {
            super.onAuthenticationError(errorCode, errString)
            Toast.makeText(applicationContext,
                "Authentication error: $errString", Toast.LENGTH_SHORT)
                .show()
        }
        override fun onAuthenticationSucceeded(
                result: BiometricPrompt.AuthenticationResult) {
            super.onAuthenticationSucceeded(result)
            Toast.makeText(applicationContext,
                "Authentication succeeded!", Toast.LENGTH_SHORT)
                .show()
        }
        override fun onAuthenticationFailed() {
            super.onAuthenticationFailed()
            Toast.makeText(applicationContext, "Authentication failed",
                Toast.LENGTH_SHORT)
                .show()
        }
    })
    promptInfo = BiometricPrompt.PromptInfo.Builder()
            .setTitle("Biometric login for my app")
            .setSubtitle("Log in using your biometric credential")
            .setNegativeButtonText("Use account password")
            .build()
   val biometricLoginButton =
            findViewById<Button>(R.id.biometric_login)
    biometricLoginButton.setOnClickListener {
        biometricPrompt.authenticate(promptInfo)
    }
}

Network Security

By now I think every developer should know to always send their network traffic over SSL or TLS. Network traffic sent over plain HTTP can be very easily sniffed by using a tool like Burp Proxy. All you would have to do is to fire up Burp Proxy, which listens on port 8080, then add a proxy to your Android’s Wi-Fi connection to route all traffic to Burp Proxy. Of course, both devices have to be on the same network. These days, even plain old HTTPS is not enough either. You can easily circumvent the hassles of sniffing TLS traffic by installing Burp Suite’s TLS Certificate which the app ends up recognizing. After this, it has no reservations about sending Burp Proxy all its TLS traffic as well. What’s the solution then? The main one I wanted to cover here is known as SSL Pinning.

SSL Pinning is a technique you can use to ensure that your app only speaks to a specific server that it trusts. You do this by telling your app to only trust TLS Server Certificates with a specific fingerprint. You can make the trust levels as broad as you want to or as narrow as you want to. You can, in fact, only make your app trust one host name and one TLS Certificate. A flowchart of how SSL Pinning works in concept is shown in Figure 2-7.
../images/273312_2_En_2_Chapter/273312_2_En_2_Fig7_HTML.jpg
Figure 2-7

Flowchart of how SSL Pinning works

We will cover SSL Pinning and its related security in depth in Chapter 9. A snippet of code that shows one of the ways in which SSL Pinning can be implemented in Android is shown as follows:
01: package com.redteamlife.aas2.aas2client
02:
03: import android.os.AsyncTask
04: import android.util.Log
05:
06: import org.json.JSONObject
07: import java.io.*
08: import java.net.URL
09: import java.security.KeyStore
10: import java.security.cert.CertificateFactory
11: import javax.net.ssl.*
12: import java.security.cert.X509Certificate
13:
14: class NetworkAsyncTask(activity: MainActivity): AsyncTask<String, Void, String>(){
15:
16:     private val mActivity = activity
17:
18:     override fun doInBackground(vararg params: String?): String? {
19:         val cf: CertificateFactory = CertificateFactory.getInstance("X.509")
20:
21:         val caInput: InputStream = BufferedInputStream(mActivity.resources.openRawResource(R.raw.cert))
22:         val ca: X509Certificate = caInput.use {
23:             cf.generateCertificate(it) as X509Certificate
24:         }
25:
26:         val keyStoreType = KeyStore.getDefaultType()
27:         val keyStore = KeyStore.getInstance(keyStoreType).apply {
28:             load(null, null)
29:             setCertificateEntry("ca", ca)
30:         }
31:
32:         val tmfAlgorithm: String = TrustManagerFactory.getDefaultAlgorithm()
33:         val tmf: TrustManagerFactory = TrustManagerFactory.getInstance(tmfAlgorithm).apply {
34:             init(keyStore)
35:         }
36:
37:         val context: SSLContext = SSLContext.getInstance("TLS").apply {
38:             init(null, tmf.trustManagers, null)
39:         }
40:
41:         var connection: HttpsURLConnection? = null
42:         return try{
43:             connection = (URL(params[0])?.openConnection() as? HttpsURLConnection)
44:             connection?.requestMethod = "POST"
45:             connection?.doOutput = true
46:             connection?.doInput = true
47:             connection?.setRequestProperty("Content-Type","application/json")
48:             connection?.sslSocketFactory = context.socketFactory
49:             connection?.connect()
50:
51:             val message : JSONObject = JSONObject()
52:             message.put("code",params[1])
53:             val outputWriter = OutputStreamWriter(connection?.outputStream)
54:             outputWriter.write(message.toString())
55:             outputWriter.flush()
56:             if (connection?.responseCode == 200){
57:                 val inputStream = InputStreamReader(connection?.inputStream)
58:                 val body = JSONObject(inputStream.readText())
59:                 return body.getString("message")
60:             } else{
61:                 return "error"
62:             }
63:         } finally {
64:             connection?.disconnect()
65:         }
66:     }
67:
68:     override fun onPostExecute(result: String){
69:         mActivity.setText(result)
70:     }
71:
72:
73: }
..................Content has been hidden....................

You can't read the all page of ebook, please click here login for view all page.
Reset
18.225.255.134