© Sheran Gunasekera 2020
S. GunasekeraAndroid Apps Securityhttps://doi.org/10.1007/978-1-4842-1682-8_9

9. Bypassing SSL Pinning

Sheran Gunasekera1 
(1)
Singapore, Singapore
 

With so much discussion around the topic of securing data in transit, I wanted to take a bit of time to dive into the actual process of SSL/TLS encryption and how Android and apps written for Android handle this. The best way to go about it is to get down and do the work, so in this chapter, we will see how to generate an SSL certificate, write a back-end API in Golang, and write an Android client to talk to that back end, and finally we will see how to intercept SSL traffic.

Let’s first take a very quick look at how an SSL connection is established. Figure 9-1 shows the steps that take place after TCP connectivity has been established. Both the client and server go through a handshake process where they exchange certificates and what encryption ciphers they both use. They agree on a cipher and then proceed.
../images/273312_2_En_9_Chapter/273312_2_En_9_Fig1_HTML.jpg
Figure 9-1

What happens during an SSL handshake

Take note of step 3 in the figure. This is where the client will verify the certificate chain of the server certificate presented. Further, it may also choose to verify the hostname of the server. For example, if the server certificate shows www.example.com, but you access the server using https://192.168.10.10, then because there’s a hostname mismatch, the client can alert the user that something is not right. To see this in action, if you’re keen to, you can always try using OpenSSL on your command line. Pick your favorite SSL website (I am using my own site aas2.redteamlife.com for this example) and then type in the following on your terminal command line:
openssl s_client -connect aas2.redteamlife.com:8443
CONNECTED(00000005)
depth=2 O = Digital Signature Trust Co., CN = DST Root CA X3
verify return:1
depth=1 C = US, O = Let's Encrypt, CN = Let's Encrypt Authority X3
verify return:1
depth=0 CN = aas2.redteamlife.com
verify return:1
---
Certificate chain
 0 s:/CN=aas2.redteamlife.com
   i:/C=US/O=Let's Encrypt/CN=Let's Encrypt Authority X3
 1 s:/C=US/O=Let's Encrypt/CN=Let's Encrypt Authority X3
   i:/O=Digital Signature Trust Co./CN=DST Root CA X3
---
Server certificate
-----BEGIN CERTIFICATE-----
MIIFYTCCBEmgAwIBAgISA55ixGZHoNROz2Mrr9bnzH5dMA0GCSqGSIb3DQEBCwUA
. . .
. . .
. . . Trimmed
. . .
. . .
TBrIULhzOqXGOq67DPityZYgLwtyCusImsiZNqsdRPfwcY/NiC0ZWrf+15I2yfsD
/lKHRZNHY+1GNHRe/Zklf1ZOt3vsY2Md40nvDXkknJDwMfpzzg==
-----END CERTIFICATE-----
subject=/CN=aas2.redteamlife.com
issuer=/C=US/O=Let's Encrypt/CN=Let's Encrypt Authority X3
---
No client certificate CA names sent
Server Temp Key: ECDH, X25519, 253 bits
---
SSL handshake has read 3137 bytes and written 289 bytes
---
New, TLSv1/SSLv3, Cipher is ECDHE-RSA-AES128-GCM-SHA256
Server public key is 2048 bit
Secure Renegotiation IS supported
Compression: NONE
Expansion: NONE
No ALPN negotiated
SSL-Session:
    Protocol  : TLSv1.2
    Cipher    : ECDHE-RSA-AES128-GCM-SHA256
    Session-ID: D938B83987BD43E6C7F62FDBFFBAE0E0C8C5269B543D6F572AFDD689BB2D9A73
    Session-ID-ctx:
    Master-Key: B945C0A53797EE5D2B16106115BC777A0805B9F1EA13EA457110C8E9CFC0F12BAC9052AA30C16D057D8E7064EB3035FD
    TLS session ticket:
    0000 - a3 25 0e a8 18 4a 49 13-92 4c 5f 9b ca 32 fc 6c   .%...JI..L_..2.l
    0010 - 20 49 3f 9f e4 b6 8a 37-0f c9 88 3a 07 2d 21 9d    I?....7...:.-!.
    0020 - fd d8 12 37 4b 11 46 9c-1c 9b e0 dd 82 81 9f 9d   ...7K.F.........
    0030 - 2b e3 40 8c 7a 88 fe a1-ed 7a 67 52 e6 fb 03 e6   [email protected]....
    0040 - ff 27 98 bc 68 02 ac 7c-53 b0 af 29 1e 3e 6e e5   .'..h..|S..).>n.
    0050 - 5b 10 e7 8d 18 da f4 6a-0b b5 b1 fb f6 76 5d 1b   [......j.....v].
    0060 - b8 46 ce 39 6a 05 e5 08-81 0e 39 24 13 96 87 d4   .F.9j.....9$....
    0070 - 01 64 89 cb 48 46 ea 27-                          .d..HF.'
    Start Time: 1589256227
    Timeout   : 7200 (sec)
    Verify return code: 0 (ok)
---
DONE

If you’re used to using telnet or nc to verify HTTP, the way to do that with an SSL-enabled site is to use the OpenSSL command s_client . In the preceding code block, after the DONE prompt, you can type in normal HTTP requests like GET / HTTP/1.1 and so on.

SSL Certificates

Generally, an SSL certificate is issued by a Certificate Authority or CA. A CA’s job, among issuing you a certificate, is to verify your identity. The CA is what vouches for you when other clients ask about how trustworthy you are. Once a certificate is issued by a CA, this is one mechanism in which they say “Yeah this guy’s shown us all his docs and we believe he’s legit so trust us when you see that his certificate is issued by us.” In the early days of public key infrastructure (PKI), obtaining an SSL certificate was quite a process. The process is a lot more straightforward now as you will see. But first, let’s talk about the three types of validation for HTTP certificates.

Domain Validation

Domain Validation (DV) certificates do one thing. They verify that the person applying for the certificate is the person who also controls and has ownership over the name on the certificate that he is applying for. We apply for one later on in this section. A DV certificate can be the quickest to register for and download because it is very easy to validate ownership of a server as you will see. Therefore, no further human interaction is involved on the CA’s side.

Organizational Validation

An Organizational Validation (OV) certificate, on the other hand, will check not just for ownership of the server as a DV certificate but will also request for business entity registration documents to prove that the person that is purchasing the certificate can manage the domain name as well as proving that the company is real. This one would require some human inspection and additional checking on the CA’s side. Of course these procedures depend from CA to CA, but it is safe to assume that the bigger more trusted CAs will do the relevant due diligence as far as checking business registration before issuing the certificate.

Extended Validation

The Extended Validation (EV) certificate, you may have heard the term EVSSL being mentioned by people, is the certificate you want to go to if you’re doing an online business that requires you to verify to your customers that you jumped through the relevant hoops to get this certificate. An EV certificate will typically turn modern browser address bars green and show a heightened level of trust visually. To get an EV certificate, the CA will always want to speak with a human from the company. The checks in place are the ones for an OV certificate, but also include a mandatory human-to-human session where the CA staff can verify further details of your business and its legitimacy prior to issuing you a certificate. Generally, you will find that ecommerce companies or companies that may do online financial transactions will get EV certificates.

Self-Signed Certificates

Another quick way in which you can generate a server certificate is to issue one yourself. These are called self-signed certificates and can be generated by using OpenSSL. The command to do this and accompanying output are as follows:
> openssl req -x509 -newkey rsa:4096 -keyout key.pem -out cert.pem -days 365
Generating a 4096 bit RSA private key
...............................++
...++
writing new private key to 'key.pem'
Enter PEM pass phrase:
Verifying - Enter PEM pass phrase:
-----
You are about to be asked to enter information that will be incorporated
into your certificate request.
What you are about to enter is what is called a Distinguished Name or a DN.
There are quite a few fields but you can leave some blank
For some fields there will be a default value,
If you enter '.', the field will be left blank.
-----
Country Name (2 letter code) []:SG
State or Province Name (full name) []:Singapore
Locality Name (eg, city) []:Jurong
Organization Name (eg, company) []:Madison Technologies
Organizational Unit Name (eg, section) []:
Common Name (eg, fully qualified host name) []:www.redteamlife.com
Email Address []:[email protected]
> ls
cert.pem key.pem
>
The command openssl req -x509 -newkey rsa:4096 -keyout key.pem -out cert.pem -days 365 will generate a new certificate valid for 365 days. Pay close attention to the Common Name. This is the name of your domain which you want the certificate issued for. At the end of this process, you will see a certificate and private key which you can then take and use in your web servers and so on. However, note that if you try to access a web server that has a self-signed certificate, your browser will likely show you an error or warning screen such as the one in Figure 9-2. If you click the “Not Secure” portion, your browser will show you more information about why the certificate was not trusted in Figure 9-3.
../images/273312_2_En_9_Chapter/273312_2_En_9_Fig2_HTML.jpg
Figure 9-2

The error screen when browsing to a site with an untrusted certificate

../images/273312_2_En_9_Chapter/273312_2_En_9_Fig3_HTML.jpg
Figure 9-3

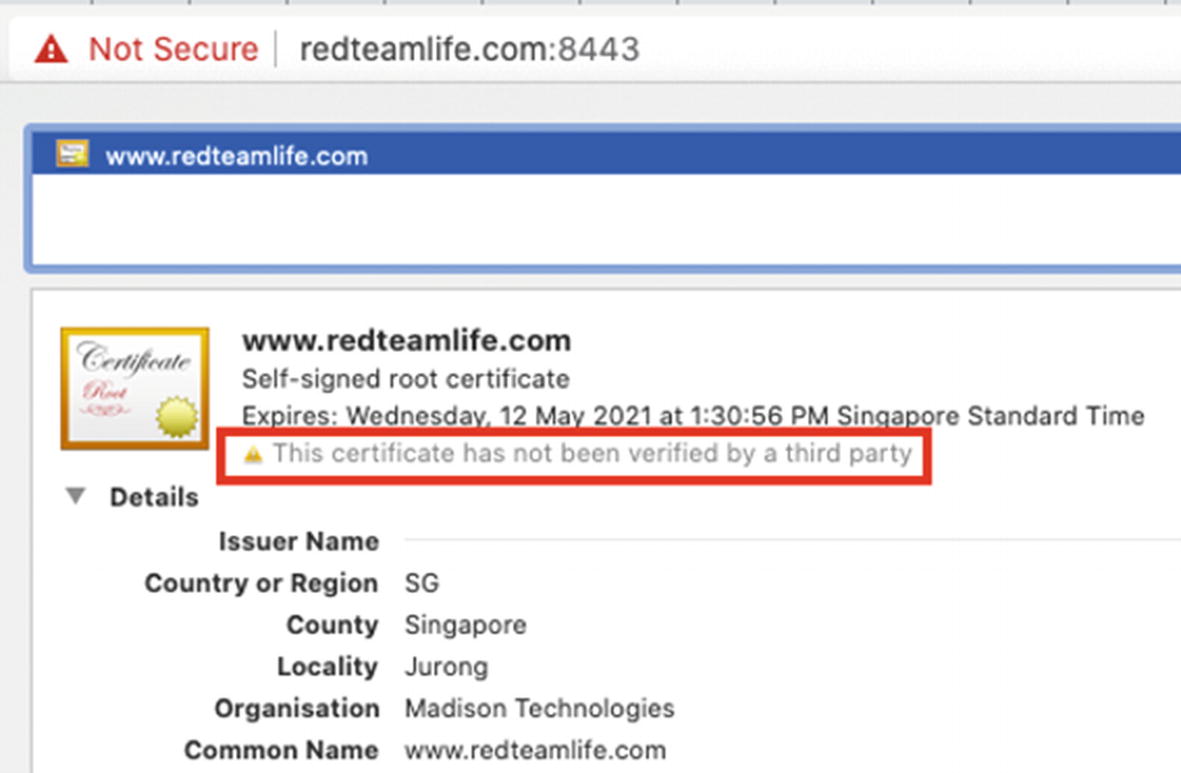
The reason why the certificate was not trusted

A Note About Verification

Why does the preceding example fail? I mean we have a certificate and private key just like we should. Well, the reason this fails or at least the browser doesn’t honor the certificate is because it doesn’t trust the person issuing it. Essentially, it is like you drawing your own ID card and trying to use it when you buy alcohol. The guy selling it to you, in most cases, will laugh in your face because he doesn’t trust the ID card. He would trust the government that issues the ID card, and he already knows what a government-issued ID card looks like. Your ID card looks nothing like the government one, and hence you wouldn’t be able to get that bottle of Single Malt.

You may then wonder how a client can begin to trust a CA’s issued certificate. Well, each of our web clients these days and even operating systems come with a set of root certificates. A root certificate is a self-signed certificate that a CA issues to itself. Based on this certificate, it will sign all other certificates that it issues. But wait, that’s the same process we used right? Well yes, that’s exactly what we used to generate our root certificate. The difference here is that the bigger CAs gain a reputation first and then begin to gain trust. CAs may ask all clients to include their root certificate in the distribution of the latest browser or operating system. Or a client may choose to bundle the root certificate of the CAs that it believes are more trustworthy. Either way, the entity that controls whether a certain root CA is included or not is the publisher of the browser or operating system. We have grown to know and trust the bigger names that make browsers like Firefox, Safari, or Chrome so we use them. This in itself becomes an attack vector. For example, if I wanted to sniff all your SSL web traffic easily, I would embed my own root certificate in a browser that I build (technically, if I am writing the browser, then I don’t even have to implement SSL, but let’s assume for argument’s sake that I base my browser off Chrome). Then whenever I wish to sniff traffic, I can poison or redirect a legitimate SSL host to a server that belongs to me, issue a certificate for that legitimate site, and begin to collect SSL encrypted traffic. The browser won’t report an error because it sees that the certificate for that site was generated and signed by my root certificate. Since the root certificate is in the browser's repository of certificates, it must be legitimate. The topic of SSL and encryption can take up a book by itself, so I am going to quickly move on to our main topic of how to break SSL.

Getting a DV Certificate

To get ourselves a DV certificate, we’re going to use Let’s Encrypt [https://letsencrypt.org/]. Let’s Encrypt is a nonprofit CA that provides DV certificates for free. The service itself is provided by the Internet Security Research Group that had board members and technical advisors from many of the large companies such as Google, Facebook, and Akamai and from other groups such as the ACLU and EFF. The entire process is automated as we will see shortly. For the issuing of a DV certificate, remember that we have to prove that we own the domain name and the server it is running on? This also means that we need to have a domain name and a server to run it on that can be publicly accessible. If you want to follow along, that means you will need a public IP that is configured on a server or workstation of yours that you have access to. I used DigitalOcean [https://www.digitalocean.com/] and quickly spun up a Debian Linux virtual machine or droplet to run this test. You could also choose to use Ubuntu which is based off of Debian. For the demo, I am going to use my domain name called redteamlife.com and will apply for a subdomain name certificate: aas2.redteamlife.com. OK, let’s get started.

You will first need to have a web server running. So let’s first get started with that. We will use nginx for this demo. First, let’s update our version of Debian so we can download the latest packages. On your root shell, run
# apt-get update
Then once you have updated all your packages, install nginx like so:
# apt install nginx
Answer yes to when it asks if you want to continue and wait for nginx to be installed. At this point, I am going to assume your domain name is pointing to the IP address of the server that is running the nginx server. Test your nginx server to see if it is reachable by entering your domain name in your browser. You should see something that resembles Figure 9-4.
../images/273312_2_En_9_Chapter/273312_2_En_9_Fig4_HTML.jpg
Figure 9-4

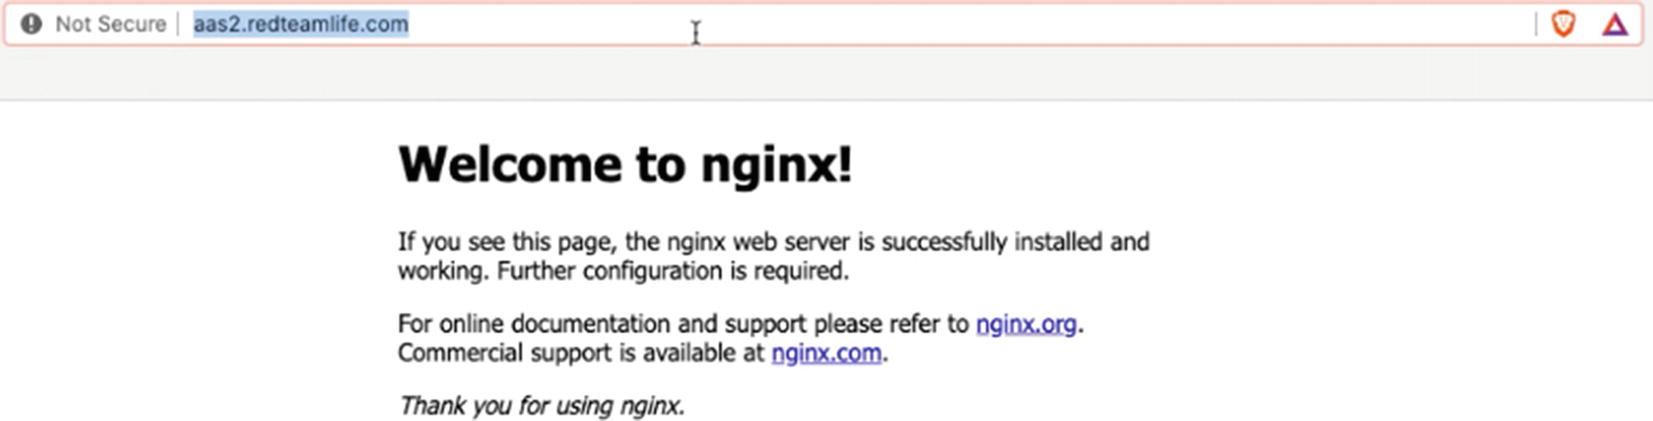
The nginx default page when accessed from a browser

Now we need to use the Certbot to generate our certificate.

Certbot

Certbot [https://certbot.eff.org/] is the EFF’s automated certificate generator. The best way to get a certificate quickly and painlessly, in my opinion, is to use a popular Linux distro with shell access. The reason I say use a popular distro is because the Certbot instructions are a lot easier to follow and generally more precise.

Having stated this, I am aware that getting Certbot up and running well can be a little bit tricky. Here is a list of key points that you need for getting Certbot up and running fast:
  1. 1.

    A server with a public IP address

     
  2. 2.

    A domain name purchased and correctly pointing to the IP address from point 1

     
  3. 3.

    Ports 80 and 443 open on the server from point 1

     
  4. 4.

    Ability to install and configure a web server properly (e.g., nginx) and pick a server operating system where you can install nginx smoothly

     
  5. 5.

    There are specific instructions that can be found in the Certbot website that gives you a very good combination of web servers and operating systems to choose from. For further information, you can visit this URL: https://certbot.eff.org/instructions.

     
On the Certbot page, select which web server and operating system that you use. Figure 9-5 shows you what that looks like. I have selected nginx and Debian 10 to match my setup.
../images/273312_2_En_9_Chapter/273312_2_En_9_Fig5_HTML.jpg
Figure 9-5

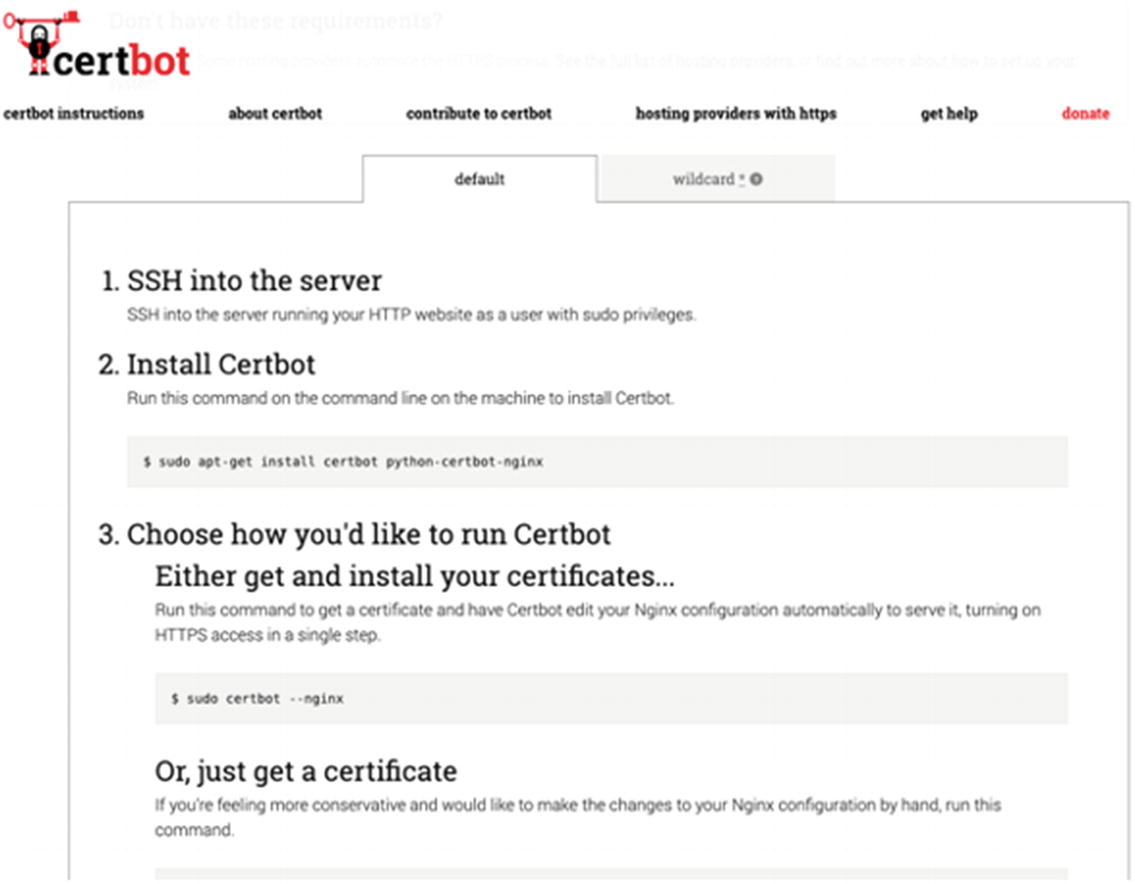
Certbot gives you the instructions you need to get setup with your certificate

I’m going to save you from having to look at any more screenshots for this, but I followed the instructions as stated and ended up with my certificate and private key file like from the preceding openssl example. Let’s Encrypt will usually write your certificates to /etc/letsencrypt/live.<domain name>/.

The Back End

We could technically conduct our demo by using the nginx web server that we just installed and requested a certificate for, but I want to show you a bit more on how API communications will look on the wire, so let’s go ahead and write a back end. I will give you the basic blueprint of the back-end server so you can implement it in the language of your choice. I chose Golang (https://golang.org/) and we will look at the source code later on. You can download the source code here: https://github.com/sheran/aas2-ch09-go_backend.

Note that you will need both the certificate and private key file in the directory that you run this file from.

Back-End Server Specification

  1. 1.

    The server has to listen on port 8443.

     
  2. 2.

    The server has to implement and use SSL from the certificates we generated.

     
  3. 3.

    The server should have one API called /secret that accepts HTTP POST requests only.

     
  4. 4.

    The /secret API should receive JSON data with specification {“code”:<string>} where string is sent from the client.

     
  5. 5.

    The server should return {“message”:<message of your choice if code is incorrect>} if an incorrect code is set.

     
  6. 6.

    The server should return {“message”:<message of your choice if code is correct} if the correct code is sent.

     
  7. 7.

    The code can be a string of your choosing.

     
Here is the Golang code that implements the preceding specification:
01: package main
02:
03: import (
04:      "encoding/json"
05:      "fmt"
06:      "log"
07:      "net/http"
08: )
09:
10: type ReqStruct struct{
11:      Code string `json:"code"`
12: }
13:
14: type ResStruct struct{
15:      Message string `json:"message"`
16: }
17:
18:
19: func greeter(w http.ResponseWriter, req *http.Request){
20:      fmt.Fprintf(w,"Hello!")
21: }
22:
23: func secret(w http.ResponseWriter, req *http.Request){
24:      if req.Method == http.MethodPost{
25:           var jsonData ReqStruct
26:           if err := json.NewDecoder(req.Body).Decode(&jsonData); err != nil{
27:                http.Error(w,err.Error(),http.StatusInternalServerError)
28:                return
29:           }
30:           if jsonData.Code == "gekko"{
31:                response := &ResStruct{Message: "Blue Horseshoe Loves Anacott Steel"}
32:                if err := json.NewEncoder(w).Encode(response); err != nil{
33:                    http.Error(w,err.Error(),http.StatusInternalServerError)
34:                    return
35:                }
36:           } else {
37:                response := &ResStruct{Message: "Wrong code, the SEC is on the way to you now."}
38:                if err := json.NewEncoder(w).Encode(response); err != nil{
39:                    http.Error(w,err.Error(),http.StatusInternalServerError)
40:                    return
41:                }
42:           }
43:     }
44: }
45:
46: func main(){
47:     http.HandleFunc("/greeting",greeter)
48:     http.HandleFunc("/secret",secret)
49: log.Fatal(http.ListenAndServeTLS(":8443","fullchain.pem","privkey.pem",nil))
50: }

Let’s go over the specification.

Line 49 addresses both Spec 1 and Spec 2. My certificate and private key are in my current directory named fullchain.pem and privkey.pem, respectively.

Lines 23–44 and 48 address Spec 3 and Spec 4.

Lines 37–41 address Spec 5.

Lines 30–35 address Spec 6.

And I’ve chosen the code of “gekko”.

After I deploy and run my back end, I can test it by using curl:
➜ curl -X POST -d '{"code":"arglebargle"}' https://aas2.redteamlife.com:8443/secret
{"message":"Wrong code, the SEC is on the way to you now."}
➜ curl -X POST -d '{"code":"gekko"}' https://aas2.redteamlife.com:8443/secret
{"message":"Blue Horseshoe Loves Anacott Steel"}

In this example, I use the hostname aas2.redteamlife.com. You will have to use the domain name that you selected for this exercise.

It seems to be working just fine, which is great. Next, let’s build an Android client to talk to that API.

Android Client

Similar to how we did in Chapter 3, we’re going to build a very basic Android client that has just one purpose – to capture our input and send it to the back-end api, receive a response, and print it out on the screen. In Android Studio, start a new Android Studio Project and then pick the one with an Empty Activity. Name it accordingly as you would want to (refer to Chapter 3) and let's design a UI.

Here’s my design in Figure 9-6.
../images/273312_2_En_9_Chapter/273312_2_En_9_Fig6_HTML.jpg
Figure 9-6

The Activity design of the client app

I am just going to give you my strings.xml, activity_main.xml, MainActivity.kt, and NetUtils.kt source here. These are the files necessary to build the app. You can find the full source code to this client here: https://github.com/sheran/aas2-ch09-android_client_1.

The strings.xml file
<resources>
    <string name="app_name">AAS2Client</string>
    <string name="loader">[Code Appears Here]</string>
    <string name="instructions">In order to view the secret information, you must supply the correct code below.</string>
    <string name="submit">Submit Code</string>
    <string name="codePH">Type in the code</string>
</resources>
The activity_main.xml file
<?xml version="1.0" encoding="utf-8"?>
<androidx.constraintlayout.widget.ConstraintLayout xmlns:android="http://schemas.android.com/apk/res/android"
    xmlns:app="http://schemas.android.com/apk/res-auto"
    xmlns:tools="http://schemas.android.com/tools"
    android:layout_width="match_parent"
    android:layout_height="match_parent"
    tools:context=".MainActivity">
    <TextView
        android:id="@+id/loaderText"
        android:layout_width="330dp"
        android:layout_height="45dp"
        android:textAlignment="center"
        app:layout_constraintBottom_toBottomOf="parent"
        app:layout_constraintEnd_toEndOf="parent"
        app:layout_constraintStart_toStartOf="parent"
        app:layout_constraintTop_toTopOf="parent"
        app:layout_constraintVertical_bias="0.217" />
    <TextView
        android:id="@+id/textView"
        android:layout_width="330dp"
        android:layout_height="85dp"
        android:clickable="false"
        android:text="@string/instructions"
        app:layout_constraintBottom_toBottomOf="parent"
        app:layout_constraintEnd_toEndOf="parent"
        app:layout_constraintStart_toStartOf="parent"
        app:layout_constraintTop_toTopOf="parent"
        app:layout_constraintVertical_bias="0.087" />
    <Button
        android:id="@+id/button"
        android:layout_width="330dp"
        android:layout_height="45dp"
        android:text="@string/submit"
        app:layout_constraintBottom_toBottomOf="parent"
        app:layout_constraintEnd_toEndOf="parent"
        app:layout_constraintHorizontal_bias="0.5"
        app:layout_constraintStart_toStartOf="parent"
        app:layout_constraintTop_toTopOf="parent"
        app:layout_constraintVertical_bias="0.425" />
    <EditText
        android:id="@+id/editText"
        android:layout_width="330dp"
        android:layout_height="45dp"
        android:ems="10"
        android:hint="@string/codePH"
        android:inputType="text"
        android:textAlignment="center"
        app:layout_constraintBottom_toBottomOf="parent"
        app:layout_constraintEnd_toEndOf="parent"
        app:layout_constraintHorizontal_bias="0.506"
        app:layout_constraintStart_toStartOf="parent"
        app:layout_constraintTop_toTopOf="parent"
        app:layout_constraintVertical_bias="0.311" />
</androidx.constraintlayout.widget.ConstraintLayout>
The MainActivity.kt file
01: package com.redteamlife.aas2.aas2client
02:
03:
04: import androidx.appcompat.app.AppCompatActivity
05: import android.os.Bundle
06: import android.widget.Button
07: import android.widget.EditText
08: import android.widget.TextView
09:
10: class MainActivity : AppCompatActivity() {
11:     override fun onCreate(savedInstanceState: Bundle?) {
12:         super.onCreate(savedInstanceState)
13:         setContentView(R.layout.activity_main)
14:         val button : Button = findViewById(R.id.button)
15:         button.setOnClickListener{
16:             val text : EditText = findViewById(R.id.editText)
17:             if(!text.text.isEmpty()){
18:                 val networkTask = NetworkAsyncTask(this)
19:                 networkTask.execute("https://aas2.redteamlife.com:8443/secret",text.text.toString())
20:             }
21:         }
22:     }
23:
24:     fun setText(text: String){
25:         var loader: TextView = findViewById(R.id.loaderText)
26:         loader.text = text
27:     }
28:
29: }
30:
The NetUtils.kt file placed in the same directory as your MainActivity.kt file
01: package com.redteamlife.aas2.aas2client
02:
03: import android.os.AsyncTask
04:
05: import org.json.JSONObject
06: import java.io.*
07: import java.net.URL
08: import javax.net.ssl.HttpsURLConnection
09:
10: public class NetworkAsyncTask(activity: MainActivity): AsyncTask<String, Void, String>(){
11:
12:     private val mActivity = activity
13:
14:     override fun doInBackground(vararg params: String?): String? {
15:         var connection: HttpsURLConnection? = null
16:         return try{
17:             connection = (URL(params[0])?.openConnection() as? HttpsURLConnection)
18:             connection?.requestMethod = "POST"
19:             connection?.doOutput = true
20:             connection?.doInput = true
21:             connection?.setRequestProperty("Content-Type","application/json")
22:             val message : JSONObject = JSONObject()
23:             message.put("code",params[1])
24:             val outputWriter = OutputStreamWriter(connection?.outputStream)
25:             outputWriter.write(message.toString())
26:             outputWriter.flush()
27:             if (connection?.responseCode == 200){
28:                 val inputStream = InputStreamReader(connection?.inputStream)
29:                 val body = JSONObject(inputStream.readText())
30:                 return body.getString("message")
31:             } else{
32:                 return "error"
33:             }
34:         } finally {
35:             connection?.disconnect()
36:         }
37:     }
38:
39:     override fun onPostExecute(result: String){
40:         mActivity.setText(result)
41:     }
42: }
You will also need to add the following permissions (in bold) to your AndroidManifest.xml file in the manifest section:
<?xml version="1.0" encoding="utf-8"?>
<manifest xmlns:android="http://schemas.android.com/apk/res/android"
    package="com.redteamlife.aas2.aas2client">
    <uses-permission android:name="android.permission.INTERNET" />
    <uses-permission android:name="android.permission.ACCESS_NETWORK_STATE" />
After building and running, you should be able to interact with it and see either error or success messages being displayed like in Figure 9-7.
../images/273312_2_En_9_Chapter/273312_2_En_9_Fig7_HTML.jpg
Figure 9-7

A success message after entering the correct code

Testing SSL Traffic Interception with Burp Suite

We are now ready to see if we can intercept traffic from between our client app and our back-end server. First let’s fire up Burp Suite and then install its certificate on our Android device. For this demo, I’m using the emulator. Go into the Proxy upper tab, then Options lower tab. Then select Import/export CA certificate, and in the resulting dialog, select Export ➤ Certificate in DER format as shown in Figure 9-8. Then select a location, name the file, and save it.
../images/273312_2_En_9_Chapter/273312_2_En_9_Fig8_HTML.jpg
Figure 9-8

Exporting the Burp CA certificate

Next, let’s copy that certificate file over to our Android device:
➜  adb push burpcert.cer /data/media/0/Download/
burpcert.cer: 1 file pushed, 0 skipped. 0.2 MB/s (973 bytes in 0.004s)
Now we have to install it on our Android device. So, on the device, go to Settings ➤ Security and Location ➤ Encryption & Credentials ➤ Install From SD Card. In the file browser that pops up, navigate to your Download folder and select the certificate as shown in Figure 9-9 and then proceed to name it and install it as shown in Figure 9-10.
../images/273312_2_En_9_Chapter/273312_2_En_9_Fig9_HTML.jpg
Figure 9-9

Burp Suite CA certificate that we copied to the Downloads directory

../images/273312_2_En_9_Chapter/273312_2_En_9_Fig10_HTML.jpg
Figure 9-10

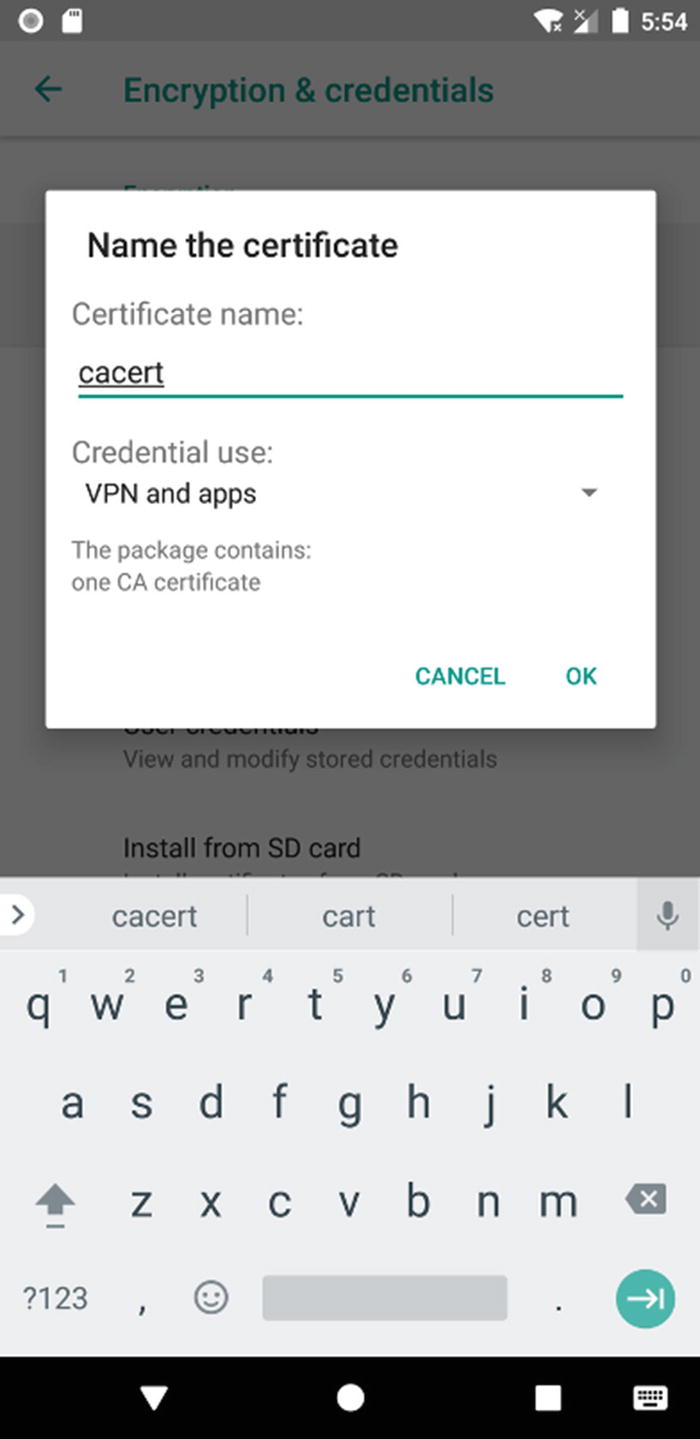
Installing the Burp CA certificate

Doing this will tell the device to trust any server certificates that are signed by the Burp Suite CA certificate. Now, we have to route all our traffic from the device to Burp Suite so it can relay that data to the server and effectively become our man in the middle. To do this, go to Settings ➤ Network & Internet ➤ Wifi and then select AndroidWifi (if you’re using an emulator) or the network that you are currently connected to. Make sure that both your Android device and Burp Suite are connected to the same network so that they can easily send traffic back and forth. Remove any firewalls between the two devices if any, for example, if you have any antivirus software or something like either Little Snitch for MacOS X or iptables on Linux. Modify this network as shown in Figure 9-11, and in Proxy, select Manual and then fill in the IP address and port of your Burp Proxy. In my case that is 192.168.69.42:8888.
../images/273312_2_En_9_Chapter/273312_2_En_9_Fig11_HTML.jpg
Figure 9-11

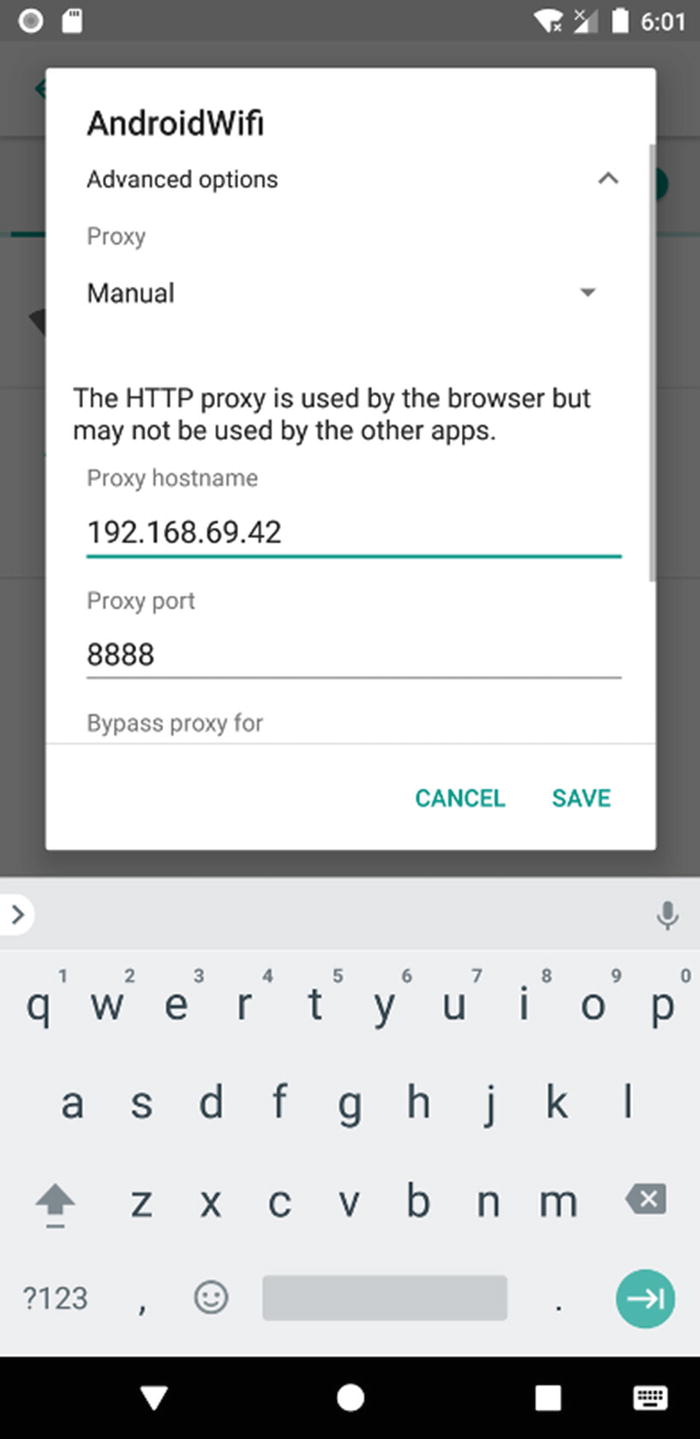
Adding Burp Proxy to the device so that all traffic is routed via the proxy

One more thing, switch off your mobile data on your Android device. This is because Android will use this as a backup in case it detects something unusual with the Wi-Fi connection, for example, it detects a fake certificate. OK, I think we’re ready to test SSL traffic interception! Fire up the client app and enter some codes and click submit.

Two things may happen at this point. First, you will see the SSL traffic in Burp’s Proxy section. Or second, the app will crash. When I first did it, the app crashed on me. So I did a little further digging, and I found that since Android version 7 (API 24), the engineers over at Google have reconfigured how trusted Certificate Authorities handle CA certificates. There is a link to a blog post here: https://android-developers.googleblog.com/2016/07/changes-to-trusted-certificate.html. What does this mean for us? Well, it means that even if we add user CAs (like we did) to our Android device, an app has to specifically opt in to work with that user CA certificate – the premise being that if we were able to add it to the device, we should also be able to add it to the network security config. Turns out, though, that we actually can! But we need to play around with the APK first a little. Let’s do that now.

Pull out the APK like you learned to in Chapter 5. Then using APKTool (also mentioned in that chapter), disassemble the APK. You then have to do two things. First, you have to create a file called network_security_config.xml inside the <app>/res/xml/ directory. Put the following declarations in the file:
<?xml version="1.0" encoding="utf-8"?>
<network-security-config>
      <base-config>
           <trust-anchors>
                <certificates src="user" />
           </trust-anchors>
       </base-config>
 </network-security-config>
Then, you have to edit the AndroidManifest.xml file to include the file you just created. Add the parts in bold to your AndroidManifest.xml file:
<application android:allowBackup="true" android:appComponentFactory="androidx.core.app.CoreComponentFactory" android:debuggable="true" android:extractNativeLibs="false" android:icon="@mipmap/ic_launcher" android:label="@string/app_name" android:roundIcon="@mipmap/ic_launcher_round" android:supportsRtl="true" android:testOnly="true" android:theme="@style/AppTheme" android:networkSecurityConfig="@xml/network_security_config">
Then repack and sign your APK once again. I like to rename the APK that I rebuild just to differentiate it from the original. Here’s what it looks like on my workstation:
➜  apktool b -o aas2_nsc.apk aas2client/
I: Using Apktool 2.4.0
I: Checking whether sources has changed...
I: Checking whether resources has changed...
I: Building apk file...
I: Copying unknown files/dir...
I: Built apk...
➜  apksigner sign --ks /Users/sheran/keystore.ks aas2_nsc.apk
Keystore password for signer #1:
Lastly, install it on the device and test again. This time, it should work just fine, and you will be able to see SSL traffic flowing back and forth as shown in Figures 9-12 and 9-13. Now keep in mind, this is for an app that hasn’t had SSL Pinning implemented. So, let’s build in some SSL Pinning into our app.
../images/273312_2_En_9_Chapter/273312_2_En_9_Fig12_HTML.jpg
Figure 9-12

The intercepted SSL Request

../images/273312_2_En_9_Chapter/273312_2_En_9_Fig13_HTML.jpg
Figure 9-13

The intercepted SSL Response

Adding SSL Pinning

You can use SSL Pinning in two ways; one is through the Network Security Configuration. To pin a certificate using the network security config, you have to create an XML file similar to what we did, but instead containing a hash of the public key you want to pin to. To generate that hash, you can use this string of OpenSSL commands:
➜   openssl x509 -in fullchain.pem -noout -pubkey |openssl pkey -pubin -outform der |openssl dgst -sha256 -binary|openssl enc -base64
     jM2RG/WsDtG849S7Inoq7tc3O1pyWewWIlH7lFyfrVc=
Once you have this hash, you can place it in your network_security_config.xml file like so:
<?xml version="1.0" encoding="utf-8"?>
<network-security-config>
    <domain-config>
        <domain includeSubdomains="true">aas2.redteamlife.com</domain>
            <pin-set>
            <pin digest="SHA-256">jM2RG/WsDtG849S7Inoq7tc3O1pyWewWIlH7lFyfrVc=</pin>
            </pin-set>
    </domain-config>
</network-security-config>

If you put that into your app and repackage it with APKTool and test it, your app should crash.

An alternate way, the older way, to do SSL Pinning was using code and the TrustManager. Let’s take a look at an example. Here, I will be modifying our existing client’s NetUtils.kt file and adding our PEM certificate to the /res/raw directory. Code follows:
01: package com.redteamlife.aas2.aas2client
02:
03: import android.os.AsyncTask
04: import android.util.Log
05:
06: import org.json.JSONObject
07: import java.io.*
08: import java.net.URL
09: import java.security.KeyStore
10: import java.security.cert.CertificateFactory
11: import javax.net.ssl.*
12: import java.security.cert.X509Certificate
13:
14: class NetworkAsyncTask(activity: MainActivity): AsyncTask<String, Void, String>(){
15:
16:     private val mActivity = activity
17:
18:     override fun doInBackground(vararg params: String?): String? {
19:         val cf: CertificateFactory = CertificateFactory.getInstance("X.509")
20:
21:         val caInput: InputStream = BufferedInputStream(mActivity.resources.openRawResource(R.raw.cert))
22:         val ca: X509Certificate = caInput.use {
23:             cf.generateCertificate(it) as X509Certificate
24:         }
25:
26:         val keyStoreType = KeyStore.getDefaultType()
27:         val keyStore = KeyStore.getInstance(keyStoreType).apply {
28:             load(null, null)
29:             setCertificateEntry("ca", ca)
30:         }
31:
32:         val tmfAlgorithm: String = TrustManagerFactory.getDefaultAlgorithm()
33:         val tmf: TrustManagerFactory = TrustManagerFactory.getInstance(tmfAlgorithm).apply {
34:             init(keyStore)
35:         }
36:
37:         val context: SSLContext = SSLContext.getInstance("TLS").apply {
38:             init(null, tmf.trustManagers, null)
39:         }
40:
41:         var connection: HttpsURLConnection? = null
42:         return try{
43:             connection = (URL(params[0])?.openConnection() as? HttpsURLConnection)
44:             connection?.requestMethod = "POST"
45:             connection?.doOutput = true
46:             connection?.doInput = true
47:             connection?.setRequestProperty("Content-Type","application/json")
48:             connection?.sslSocketFactory = context.socketFactory
49:             connection?.connect()
50:
51:             val message : JSONObject = JSONObject()
52:             message.put("code",params[1])
53:             val outputWriter = OutputStreamWriter(connection?.outputStream)
54:             outputWriter.write(message.toString())
55:             outputWriter.flush()
56:             if (connection?.responseCode == 200){
57:                 val inputStream = InputStreamReader(connection?.inputStream)
58:                 val body = JSONObject(inputStream.readText())
59:                 return body.getString("message")
60:             } else{
61:                 return "error"
62:             }
63:         } finally {
64:             connection?.disconnect()
65:         }
66:     }
67:
68:     override fun onPostExecute(result: String){
69:         mActivity.setText(result)
70:     }
71:
72:
73: }

Lines 19–39 and 48 are different as you can see in the code in bold. What we’re doing here is storing the certificate from our server aas2.​redteamlife.​com in the app. Then, we read it and add it to a KeyStore and then use that KeyStore to initialize a TrustManager which we then pass on to an SSLContext. Then, the SSLContext is passed to our HttpsURLConnection. In this way, the TrustManager will ensure that it can verify all certificates against the one we included and pinned. Now when I test the new client, my app crashes right away. There are a few points here to keep in mind. First is on the pinning side. Generally, it is a better idea to pin a public key as opposed to an actual certificate like we have done. This is because when a certificate gets renewed, its public key still remains the same. Thus, each time we renew a certificate, it wouldn’t mean we have to make a code change on our client. So it’s always better to pin a public key. I will show you that later in the chapter. The next point to consider is the continuation. You have a choice with what to do when your certificate pinning validation fails. If the exception is thrown, then you know that something fishy is going on and at that point can take action. Would you continue with lesser features or would you completely stop? In my opinion, it is better to completely stop communications until the certificate issue has been resolved. In our case, we’re failing fairly inelegantly. You could choose to notify the user that there’s an issue with the server certificate or even just fail with a generic error message. With that said, let’s move on to the real reason you’re here, breaking SSL Pinning.

Breaking SSL Pinning

The TrustManager, as its name implies, plays a pivotal role in ensuring that server certificates are trusted. If you look at the TrustManager class or rather the X509TrustManager, which is the subclass most often used, you can see three public methods: checkClientTrusted(), checkServerTrusted(), and getAcceptedIssuers(). We are most interested in the checkServerTrusted() method which we want to render nonfunctional. There are possibly many ways to do this, but hooking this function and rewriting it is probably the cleanest way. We would use a tool like Frida in this case to load a script that has our own implementation of the X509TrustManager.checkServerTrusted() method. But we can take a shorter cut. Essentially, the easiest way is to create our own TrustManager which is empty and then send that into the SSLContext’s init method by hooking it. Since our TrustManager has no actual checks in place, we should be able to get past the SSL Pinning in this case. So, let’s try that out.

First, let’s create a script in our Frida directory. I’m calling mine trustmgr.js. In Frida’s JavaScript format, that would look something a little like this:
const TrustManager = Java.registerClass({
                name : 'com.redteamlife.aas2.X509TrustManager',
                implements : [X509TrustManager],
                methods : {
                    checkClientTrusted: function (chain, authType) {},
           checkServerTrusted: function (chain, authType) {},
           getAcceptedIssuers: function () {return []; },
            }
        })
You can see clearly it has zero functionality other than just serving as empty placeholders for each of the methods. Now, let’s put that into a full-fledged script like so:
01: setTimeout(function() {
02:     Java.perform(function () {
03:          const X509TrustManager = Java.use('javax.net.ssl.X509TrustManager');
04:          const SSLContext = Java.use('javax.net.ssl.SSLContext');
05:
06:          const TrustManager = Java.registerClass({
07:               name : 'com.redteamlife.aas2.X509TrustManager',
08:               implements : [X509TrustManager],
09:               methods : {
10:                 checkClientTrusted: function (chain, authType) {},
11:                 checkServerTrusted: function (chain, authType) {},
12:                 getAcceptedIssuers: function () {return []; },
13:               }
14:          })
15:          var TrustManagers = [TrustManager.$new()];
16:         try {
17:             SSLContext.init.overload(
18:             '[Ljavax.net.ssl.KeyManager;', '[Ljavax.net.ssl.TrustManager;', 'java.security.SecureRandom').implementation = function(keyManager, trustManager, secureRandom) {
19:                 SSLContext.init.call(this, keyManager, TrustManagers, secureRandom);
20:             };
21:         } catch (err) {
22:             console.log(err);
23:         }
24:     });
25: });
Line 17, while a bit of an eyeful, is where the magic happens. Here we are calling SSLContext.init with an empty TrustManager. Now if you recall, in our client, we went to great pains to build our TrustManager with a KeyStore and our pinned certificate. Here, we’re completely negating that piece of code. So instead of the SSLContext init taking place as per our client code, Frida overwrites and calls the init function with our new, empty TrustManager. All that’s left now is to run Frida with our script as follows:
(p3) ➜  frida -U -f com.redteamlife.aas2.aas2client -l trustmgr.js --no-pause
     ____
    / _  |   Frida 12.8.20 - A world-class dynamic instrumentation toolkit
   | (_| |
    > _  |   Commands:
   /_/ |_|       help      -> Displays the help system
   . . . .       object?   -> Display information about 'object'
   . . . .       exit/quit -> Exit
   . . . .
   . . . .   More info at https://www.frida.re/docs/home/
Spawned `com.redteamlife.aas2.aas2client`. Resuming main thread!
[Android Emulator 5554::com.redteamlife.aas2.aas2client]->
We get dropped into the Frida shell, but we will notice that our emulator just started up our app. So let’s go ahead and test it now. Bam! SSL Pinning is broken on my emulator. A quick peek at Burp Suite verifies this as I see the data going in between my client and server (Figure 9-14).
../images/273312_2_En_9_Chapter/273312_2_En_9_Fig14_HTML.jpg
Figure 9-14

The data going in between client and server intercepted by Burp

I would like to quickly revisit the topic of the way Android 7 and above handled Certificate Authorities. If you recall, we used Network Security Configuration to trust all our user certificates. There is another way, however – again, by using Frida. But to do that, we have to dig into the Android source a little bit. Google decided to fork OpenSSL and write their own library called BoringSSL [https://boringssl.googlesource.com/boringssl/]. They use the BoringSSL library in their own projects Google Chrome and notably Android. Android’s implementation of BoringSSL is through Conscrypt [https://source.android.com/devices/architecture/modular-system/conscrypt]. Conscrypt is a Java Security Provider used in Android together with the BoringSSL native library to provide Android’s cryptographic functionality such as ciphers, key generation, and message digests. It also provides Android’s TLS implementation. Since there are many common functions with OpenSSL, let’s take a quick look at how OpenSSL does its certificate verification.

OpenSSL allows you to set a verification callback function from the functions SSL_CTX_set_verify or SSL_set_verify. The difference being the former works for all ssl objects derived from a single context, ctx, and the latter works only on the ssl object that it is called on. What both functions do is call your user-defined verification callback function when it is time to verify a peer certificate. You can find out more about these function calls on the OpenSSL website here: www.openssl.org/docs/manmaster/man3/SSL_CTX_set_verify.html. I am bringing this up because BoringSSL and Conscrypt make use of a similar function. If you look at the embedded Android Conscrypt code, especially in the class com.android.org.conscrypt.NativeCrypto, you will see a similar SSL_set_verify method which calls the underlying native BoringSSL library. Figure 9-15 shows how Android Oreo handles its certificate verification.
../images/273312_2_En_9_Chapter/273312_2_En_9_Fig15_HTML.jpg
Figure 9-15

How Android uses Conscrypt to verify certificates

First (point 1), the OpenSSLSocketImpl class will instantiate the NativeCrypto class which contains the relevant callbacks a little similar to how OpenSSL is. NativeCrypto (point 2) will then load the native library through NativeCryptoJni which interestingly looks in several different places for the library as shown in the code here:
01: package org.conscrypt;
02: /**
03:  * Helper to initialize the JNI libraries. This version runs when compiled as part of an app distribution (or GmsCore).
04:  *
05:  */
06: class NativeCryptoJni {
07:     public static void init() {
08:         if ("com.google.android.gms.org.conscrypt".equals(NativeCrypto.class.getPackage().getName())) {
09:             System.loadLibrary("gmscore");
10:             System.loadLibrary("conscrypt_gmscore_jni");
11:         } else {
12:             System.loadLibrary("conscrypt_jni");
13:         }
14:     }
15:     private NativeCryptoJni() {
16:     }
17: }
Lastly (point 3), OpenSSLSocketImpl will implement the verifyCertificateChain method which is the callback method that is called by Conscrypt during the SSL connection setup. Why am I telling you all this? Well, if we overwrite the verifyCertificateChain method using Frida with this line of code:
1: var OpenSSLEngineSocketImpl = Java.use('com.android.org.conscrypt.OpenSSLEngineSocketImpl');
2: OpenSSLSocketImpl.verifyCertificateChain.overload('[Ljava.lang.Long;', 'java.lang.String').implementation = function(certRefs, authMethod) {};

then we can easily avoid the pesky issue of having to add a new network_security_config.xml file that asked Android to trust all user-added certificates.

Other Pinning Techniques

There are quite a few SSL Pinning techniques that I am not going to cover here. I will list down some of the ones that I am aware of, however:
  • OkHTTPv3 pinner

  • Trustkit pinner

  • Appcelerator PinningTrustManager pinner

  • OpenSSLEngineSocketImpl Conscrypt pinner

  • OpenSSLSocketImpl Apache Harmony pinner

  • PhoneGap sslCertificateChecker pinner

  • IBM MobileFirst pinTrustedCertificatePublicKey pinner

  • IBM WorkLight HostNameVerifierWithCertificatePinning pinner

  • Conscrypt CertPinManager pinner

  • CWAC-Netsecurity CertPinManager pinner

  • Worklight Androidgap WLCertificatePinningPlugin pinner

  • Netty FingerprintTrustManagerFactory pinner

  • Squareup CertificatePinner pinner

  • Squareup OkHostnameVerifier pinner

  • Apache Cordova WebViewClient pinner

  • Boye AbstractVerifier pinner

This list comes from the Frida codeshare script frida-multiple-unpinning.js found here: https://codeshare.frida.re/@akabe1/frida-multiple-unpinning/. Frida’s codeshare section is an open platform where users can submit their own scripts. Then by using Frida’s “—codeshare” switch, you can use these scripts without having to download them. If you look further on codeshare, you can see a whole slew of scripts dedicated to removing SSL Pinning. It is important to take note that these scripts usually show up when a new pinning mechanism has been found. That goes to show you that in general, reverse engineers are always going to come out on top. Tools such as obfuscation, moving code to native libraries, and such can act as a deterrent and possibly slow down a reverse engineer. But if there is determination and time, in the end, your app is bound to succumb to the attacks that are thrown at it. This isn’t meant to discourage you but serve as a warning that it is best to not expose as much code or data as possible and hope that the security tools solve the problem.

Now, I’ll show you the technique of how to pin a certificate’s public key vs. the certificate. We make no other changes to our client app except for in NetUtils.kt as follows:
001: package com.redteamlife.aas2.aas2client
002:
003: import android.net.http.X509TrustManagerExtensions
004: import android.os.AsyncTask
005:
006: import android.util.Base64
007: import android.util.Log
008:
009:
010: import org.json.JSONObject
011: import java.io.*
012: import java.net.URL
013: import java.security.KeyStore
014: import java.security.MessageDigest
015: import java.security.NoSuchAlgorithmException
016: import java.security.cert.Certificate
017: import java.security.cert.X509Certificate
018: import java.util.*
019: import javax.net.ssl.*
020: import javax.security.cert.CertificateException
021:
022: public class NetworkAsyncTask(activity: MainActivity): AsyncTask<String, Void, String>(){
023:
024:     private val mActivity = activity
025:
026:     override fun doInBackground(vararg params: String?): String? {
027:         val trustManagerFactory: TrustManagerFactory = TrustManagerFactory.getInstance(TrustManagerFactory.getDefaultAlgorithm())
028:         val ks: KeyStore? = null
029:         trustManagerFactory.init(ks)
030:         var x509TrustManager: X509TrustManager? = null
031:         for(trustManager: TrustManager in trustManagerFactory.trustManagers) run lit@{
032:             if ( trustManager is  X509TrustManager){
033:                 x509TrustManager = trustManager
034:                 return@lit
035:             }
036:         }
037:         val trustManagerExt = X509TrustManagerExtensions(x509TrustManager)
038:
039:         var connection: HttpsURLConnection? = null
040:         return try{
041:             connection = (URL(params[0])?.openConnection() as? HttpsURLConnection)
042:             connection?.requestMethod = "POST"
043:             connection?.doOutput = true
044:             connection?.doInput = true
045:             connection?.setRequestProperty("Content-Type","application/json")
046:             connection?.connect()
047:             val validPins: Set<String> = Collections.singleton("jM2RG/WsDtG849S7Inoq7tc3O1pyWewWIlH7lFyfrVc=")
048:             validatePinning(trustManagerExt,connection,validPins)
049:
050:             val message : JSONObject = JSONObject()
051:             message.put("code",params[1])
052:             val outputWriter = OutputStreamWriter(connection?.outputStream)
053:             outputWriter.write(message.toString())
054:             outputWriter.flush()
055:             if (connection?.responseCode == 200){
056:                 val inputStream = InputStreamReader(connection?.inputStream)
057:                 val body = JSONObject(inputStream.readText())
058:                 return body.getString("message")
059:             } else{
060:                 return "error"
061:             }
062:         } finally {
063:             connection?.disconnect()
064:         }
065:     }
066:
067:     override fun onPostExecute(result: String){
068:         mActivity.setText(result)
069:     }
070:
071:     @Throws(SSLException::class)
072:     private fun validatePinning(trustManagerExt: X509TrustManagerExtensions, conn: HttpsURLConnection?, validPins: Set<String>)  {
073:         var certChainMsg: String = ""
074:         try{
075:             val md: MessageDigest = MessageDigest.getInstance("SHA-256")
076:             val trustedChain: List<X509Certificate> = trustedChain(trustManagerExt,conn)
077:             for( cert: X509Certificate in trustedChain ) run {
078:                 val publicKey: ByteArray = cert.publicKey.encoded;
079:                 md.update(publicKey,0,publicKey.size)
080:
081:                 var pin: String = Base64.encodeToString(md.digest(),Base64.NO_WRAP)
082:                 certChainMsg += "    sha256/" + pin + " : " + cert.subjectDN.toString() + " "
083:                 if (validPins.contains(pin)){
084:                     return;
085:                 }
086:             }
087:         } catch(e: NoSuchAlgorithmException){
088:             throw SSLException(e)
089:         }
090:         throw SSLPeerUnverifiedException("Pinning Fail! Chain: "+certChainMsg)
091:     }
092:
093:     @Throws(SSLException::class)
094:     private fun trustedChain(trustManagerExt: X509TrustManagerExtensions, conn: HttpsURLConnection?): List<X509Certificate>{
095:         val serverCerts: Array<Certificate> = conn?.serverCertificates!!
096:         val untrustedCerts: Array<X509Certificate> = serverCerts.map { it as X509Certificate }.toTypedArray()
097:         val host: String = conn?.url!!.host
098:         try{
099:             return trustManagerExt.checkServerTrusted(untrustedCerts,"RSA", host)
100:         } catch(e: CertificateException) {
101:             throw SSLException(e)
102:         }
103:     }
104: }

I’ve made the changes bold so you can clearly see what we are doing. We have two new functions called trustedChain and validatePinning. trustedChain will pick up all the certificates from the server and then run it through its own X509TrustManagerExtensions check. The difference between the X509TrustManagerExtensions and plain X509TrustManager is that the checkServerTrusted method will verify and also return the list of certificates to the caller. If it cannot, then the method will throw an SSLException. If it can verify, then it gets verified by the validatePinning method to see if one of the certificates has a matching public key hash that we compare with. If this also fails, then again an SSLException is thrown. If it passes, the connection proceeds as planned.

The preceding piece of code isn’t mine, but I did translate it into Kotlin from Java. The code itself was featured in a blog post by Matthew Dolan here: https://medium.com/@appmattus/android-security-ssl-pinning-1db8acb6621e. In this post, he also provides a few other mechanisms of SSL Pinning. It is highly worth a read. If you notice this code, it doesn’t actually conform to any of the present SSL pin-breaking mechanisms we have with Frida. I am not a fan of security through obscurity, but if you wanted to further hide what this class was doing, you could rename the methods and fields, but a reverser will always be able to find it through the exceptions. You could then possibly roll your own exceptions, but again, it’s a case of following the breadcrumbs. Lastly, you could obfuscate all of that, but then on a rooted phone, a reverser could trace all the native calls and work backward from there. As discouraging as this sounds, only the most determined reversers with something to gain will go after you. Usually, the current mechanisms for protecting apps in the form of obfuscation are sufficient for the drive-by hackers. You can find the TrustManager pinning client source code here: https://github.com/sheran/aas2-ch09-android_client_2.

Summary

In summary, it is important to keep in mind that your app is effectively a showcase for your code and data. It’s just a more structured way of sending out your intellectual property to the world. Your app will be installed on many mobile devices, and a percentage of those will very likely be hostile. Your goal should be to first limit the amount of exposure by reducing what you release in your app, whether it is code or data. Then, if there are parts that you must lock down with obfuscation, do so. SSL is nonnegotiable of course. Always implement SSL Pinning so that even a drive-by hacker can’t see client and server data exchange. But always be prepared that they will be able to see this data and take steps accordingly. Like I said in my first edition, a healthy dose of paranoia when developing your app will serve you well.

..................Content has been hidden....................

You can't read the all page of ebook, please click here login for view all page.
Reset
3.142.12.240