We’re going to take apart some apps in this chapter. This time, we will examine what an app looks like while it is running. Stepping through machine code is not my intention in this chapter. Instead, we are going to look at how we can reveal the inner workings of an app by tracing back from its functionality and user interface. A key skill that will unlock this all for us is called dynamic analysis.
Dynamic Analysis
One can argue that dynamic analysis is the same as debugging. It isn’t. Debugging usually takes place in a friendly environment. By this, I mean the app is debugged by one or more developers, and there is a lot more information that is available to the person debugging. First is the source code. If you use Android Studio to debug, you have such magical things available to you such as pausing or stepping through each line of code, examining variables, and looking at the debug logs. This is fantastic when you want to trace why displaying that pesky custom-written dialog keeps causing the app to crash. You can set a breakpoint at the line of code just before you show that dialog and then execute the source code one line at a time while studying the variables and debug log file to see what causes the crash.
In dynamic analysis, you’re essentially flying blind as far as source code is concerned. Instead, you have access to the bytecode or assembly code. There’s nothing essentially wrong with that, but it does take some doing to learn about what your source code looks like in machine code. One thing that I like to do, obviously when I have time on my hands, is to write and build extremely simple Android apps. Something as simple as printing out “Hello World” and then studying what that looks like after it has been disassembled. I find that it gives me a sense of almost unconscious pattern recognition that makes it quick for me to pick out what an app is trying to do in machine code. To further differentiate the debugging element, you are only able to debug your own source code. Essentially, you will need to have a debug build that supports things like setting breakpoints and tracing. Generally, the Android apps that you find on the Google Play Store are all release builds which means they have all debugging abilities switched off. If you really wanted to, though, you could enable debugging. Let’s see how you can get that done quickly.
Let’s fire up the Google Play Store and look for a likely candidate, shall we? Oh, here’s one: the NYTimes – Crossword app. I love crosswords. Let’s go ahead and download the APK like I’ve described in Chapter 5. Here’s a one-liner that you can use in OS X’s terminal:
will list out the path where the package com.nytimes.crossword is installed. Then it pipes that data to the cut command which delimits whatever output was piped to it with our delimiter “:” and then takes the second column of that output. What this amounts to is basically the path of the base.apk file stored on the Android device. Then all of this is enclosed in backticks (the character below the ~ key on my MacBook Pro keyboard), which means that it gets executed and the result is passed to the outer adb statement. The second half of the command tells adb to rename the pulled file to crossword.apk.
Note that the com.nytimes.crossword and crossword.apk are dynamic variables that you replace given the situation or APK that you’re downloading. Meaning that these two can vary.
Now, we’re going to make the APK debuggable. This allows us to run it in a debugger, set breakpoints, and look at the program flow. So to do that, we have to unpack, edit, and repack the APK.
Disassembling the APK
Remember apktool that we discussed in Chapter 6? We’re going to use that to disassemble the APK we just downloaded.
➔ apktool d crossword.apk
I: Using Apktool 2.4.0 on crossword.apk
I: Loading resource table...
I: Decoding AndroidManifest.xml with resources...
I: Loading resource table from file: /Users/sheran/Library/apktool/framework/1.apk
I: Regular manifest package...
I: Decoding file-resources...
I: Decoding values */* XMLs...
I: Baksmaling classes.dex...
I: Baksmaling classes2.dex...
I: Copying assets and libs...
I: Copying unknown files...
I: Copying original files...
➔
Setting the “android:debuggable” Flag
Then we need to edit the AndroidManifest.xml file. In your favorite text editor, edit the file and look at the application section. It should look like this:
After this, we have to repackage the APK. To do this, we have to build and sign it. If you have already set up your Android Studio with your keystore, then skip this section, but if not, follow along. In Android Studio, start a new Empty Activity project. Then on the Build menu, select Generate Signed Bundle / APK…. You should see a window asking whether you want to build an Android App Bundle or APK. Select APK and then you should see a dialog similar to Figure 7-1.
Figure 7-1
Dialog to create a keystore on Android Studio 3.6
Next, click the Create new… button and fill in the fields in the subsequent dialog as show in Figure 7-2.
Figure 7-2
Creating a new keystore
Make sure to select a path and file name that you remember. Then fill in a password for the keystore and for the private key that we’re calling key0. You can rename it if you wish. By default, Android Studio selects a validity period of 25 years; I have brought that down to 1 year as you can see. I have also added my first and last name to the corresponding field. Now click OK. You should be taken back to the prior dialog with the corresponding fields filled in. Click Next to move along. You will be asked to select a Build Variant. Pick debug, then click the V1 (Jar Signature) checkbox, and click Finish.
Android Studio will do its thing and build and sign your APK. It should also build you a nice keystore file in the directory you selected.
Now you may be wondering why the hell I asked you to build an Empty Activity project just so you get the side effect of building a keystore, and you would not be wrong in thinking I’m trying to waste more page space, but let me explain. The alternative is to build the keystore from the command line. Before you do that, however, you will need to have the latest Java Development Kit (JDK) installed.
You will have to pick the correct installer for your platform. The preceding link contains a link to JDK version 14, which was current as of writing this book.
I’ll wait for you to go install it and come back. Done? Awesome. Here’s how you generate a keystore file from the command line:
Now that we have our keystore, let’s rebuild the APK file. We do this by executing the following command on apktool:
➔ apktool b -o com.nytinmes.crossword crossword
I: Using Apktool 2.4.0
I: Checking whether sources has changed...
I: Smaling smali folder into classes.dex...
I: Checking whether sources has changed...
I: Smaling smali_classes2 folder into classes2.dex...
I: Checking whether resources has changed...
I: Building resources...
I: Copying libs... (/lib)
I: Copying libs... (/kotlin)
I: Building apk file...
I: Copying unknown files/dir...
I: Built apk...
➔
Going back to why I asked you to build the keystore with Android Studio, it’s a lot easier – especially if you’re still struggling with the JDK. After we have repacked our edited app, we have to sign it. If not, we can’t install it on an emulator or device. To sign, we can use either apksigner or jarsigner. Because you accused me earlier of wasting page space, I’m going to show you both. So there.
Signing with apksigner
apksigner should be installed when you installed the SDK Build Tools from Android Studio. You run it from the command line thus:
It asks you for your keystore password and signs the APK.
Signing with jarsigner
Jarsigner comes with the Java SDK, and if you set it up correctly, then it will be in your path. To sign with jarsigner, you have to type in a bit more:
Here, I am using the keys generated from keytool which is why you can see me use the alias alias_name. Then you can install it on your device or emulator by doing a
➔ adb install com.nytimes.crossword.apk
Performing Streamed Install
Success
➔
From this point, you can fire up the app in a debugger like gdb, IDA, or JEB. I say gdb, but you can be certain that I haven’t used it for at least 10 years now. I stick with JEB. Now admittedly, JEB’s debugger isn’t the greatest one out there either, but it does exactly what I want it to. JEB Pro and IDA Pro look pretty similar price-wise, but JEB has an Android-only version which is about $1080 per year which is not too bad. Also, if you’re idly wondering, I am not getting sponsored by JEB, although it would be kinda cool to get a year of JEB Pro for free. Just saying.
Enough of this nonsense. Let’s get back to our app debugging.
Debugging with JEB
Let’s continue with the Crossword app that we just changed to enable debugging. Fire up JEB and open the com.nytimes.crossword.apk file. JEB works like how you would do a lazy load of images on an ecommerce site. Only load the resources as needed when you get to that point. This is good because when decompiling an APK, it can get pretty big on disk, and it is a lot of stuff to keep in memory. JEB will always tell you if your APK has a lot of resources to process and will ask you whether to load it now. I usually say no to this because it just gets loaded later on anyway when necessary. Figure 7-3 shows this message.
Figure 7-3
JEB asking whether to load resources
After JEB processes and loads up the file, you will see the main workspace area. The part that takes the front and center is the bytecode which was just disassembled from the APK. This is Dalvik bytecode which you can find more information about here: https://developer.android.com/reference/dalvik/bytecode/package-summary.
On the left panes, you will see the package explorer as well as the hierarchy of how the package is structured within the app. This is handy with which to navigate from. Each left pane also has a “filter” text entry field that you can type in a search string into, and the pane will only display items that have this text. This is very useful for narrowing down classes when moving back and forth within large apps. On the bottom and bottom right, you will find the logging, terminal, and the callgraph generator. I don’t use the callgraph generator much, but it allows you to visually look at how specific packages or classes are called and how they fit in with the rest of the code. My JEB layout looks like the one in Figure 7-4.
Figure 7-4
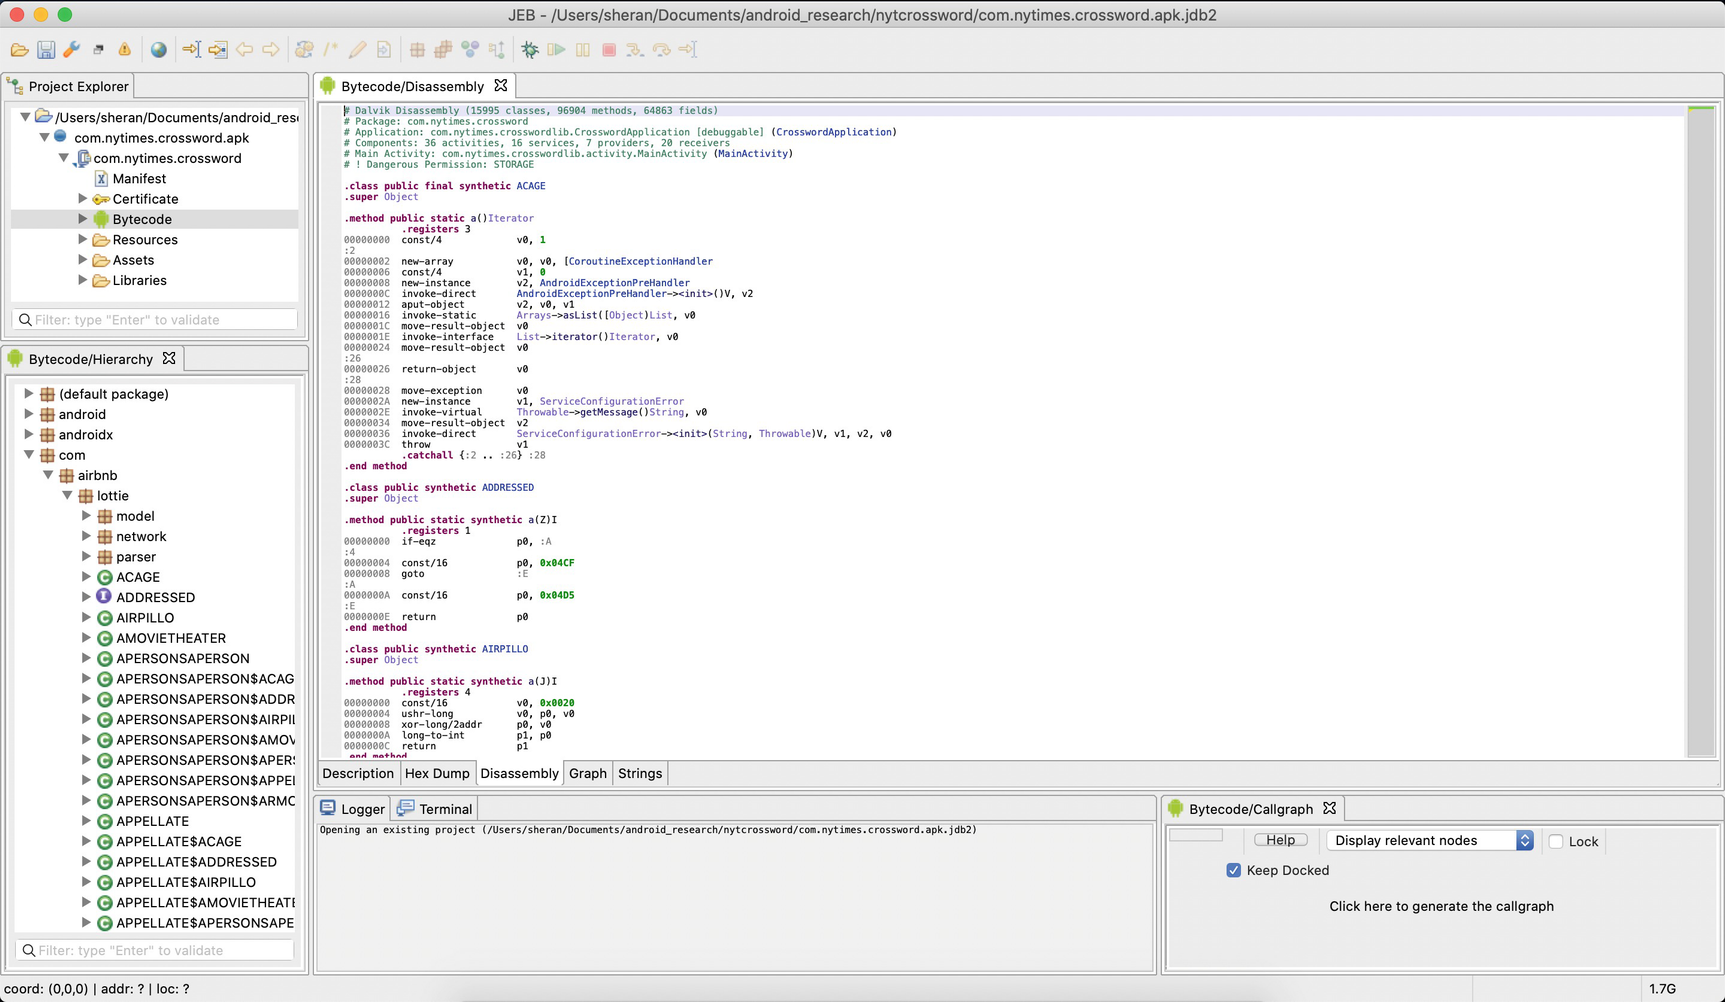
JEB layout with the Crossword app loaded
The first thing you may notice on the main Bytecode window is the first few lines of comments. I reproduce them here:
# Main Activity: com.nytimes.crosswordlib.activity.MainActivity (MainActivity)
# ! Dangerous Permission: STORAGE
Here, JEB tells you how many classes, methods, and fields there are in total including all third-party libraries. It also tells you that the app is debuggable (yes, we made that happen). Then it tells you the starting activity that loads up when a user opens the app – MainActivity. You will notice that the MainActivity word is clickable. Most of the classes and methods in JEB are clickable and will take you to the declaration of that specific method or field. This is extremely convenient when navigating static code. I remember in days gone by, your deadlisting of code was just straight up lines of text that you had to scroll through. Generally, we used to print out pages and pages of disassembled code and make notes on them. While fun, I would never want to go back to those days when disassembling a modern Android app.
When I click the MainActivity, it takes me to the bytecode of the start of the MainActivity. The first few lines look like this:
The ellipses are there to spare you of the field declarations and other code. I included some code as well so you can see what the bytecode looks like. I made one line of code bold to show you the format of Dalvik opcode. The first column is the address of the instruction; the second column is the opcode – in this case, iput-boolean. The third column contains the operands. So how the iput-boolean opcode works is by taking the value in v0 and putting it into an instance field. In this case, the instance field is MainActivity->E:Z. The actual instance that contains this instance field is referenced by p0. Now we can take a closer look at what that means by setting a breakpoint on it and then running the program in the debugger. I’ll show you that in more detail soon, but for now, let’s look at the operands in detail. Figure 7-5 shows the variables being accessed at the time that we stopped on our breakpoint. So, in this case, you can see that p0 is referencing the MainActivity. Essentially, we’re setting a 0 into v0 which resides in the MainActivity.
Figure 7-5
Local variables at the moment our breakpoint was triggered
With JEB, you can pick a line of bytecode while you’re examining it and press the Tab key. This will then invoke the decompiler, and you get back some more readable Java code. Let’s look at our routine:
public MainActivity() {
this.D = false;
this.E = false;
this.G = false;
this.J = new Handler();
this.K = new io.reactivex.disposables.ACAGE();
this.L = false;
}
Would you look at that? We are setting a 0 (false) into MainActivity->E – just as described through the Dalvik opcode.
Now obviously, you may want to browse your code only through the decompiled Java code which is perfectly fine. You can do the same clicking and following around classes, methods, and fields to your heart’s content. JEB is seriously useful for Android reverse engineering.
The next set of steps is quite unique to the researcher or hacker. Often it involves trying to solve a puzzle and hit the correct cluster of code that is triggered at a specific action in the app. What does this mean? Well, think about the app that fetches some profile data from a server and presents it to you in a dialog window. If you want to know exactly when the network call was fired, then one way to find that part of the code, especially if the source is obfuscated, is to find the bit of code that pops open the dialog window and then work backward from there. Usually, that involves looking for Android Activity classes. One thing to note about Activity classes is that if mentioned in the AndroidManifest.xml file, the names are left intact by obfuscators like ProGuard. If, in the manifest file, the additional android:exported="true" is present, then again the obfuscators will not touch them as they are considered public APIs that must remain callable from outside the app. There are commercial and more complex obfuscators like DexGuard and Arxan that we will cover separately and we can take a look at. These obfuscators handle the obfuscation in a different manner that sometimes even includes manifest files.
Needless to say, this part of the analysis can take a while. Let’s turn our attention back to the Crossword app. You will notice that within the app, there is a mechanism to check each square or word that you have entered in the crossword to determine if it is correct. Looking at this, there obviously has to be a way that the answers to the crossword are also delivered or at least fetched. Let’s try to make that a goal for this app. Let’s try to find out what the answers are to a puzzle. If you look further at the app, you will see that there’s a leaderboard and several factors that help you score. One factor is whether you have checked any squares or words. Another is the time. Technically, you could move yourself to the top of the leaderboard by getting all the answers beforehand and then filling them in very fast. So, the goal of this part is to find the routines or the code within the app that gives you all the answers to the crossword. Awesome. Let’s do this!
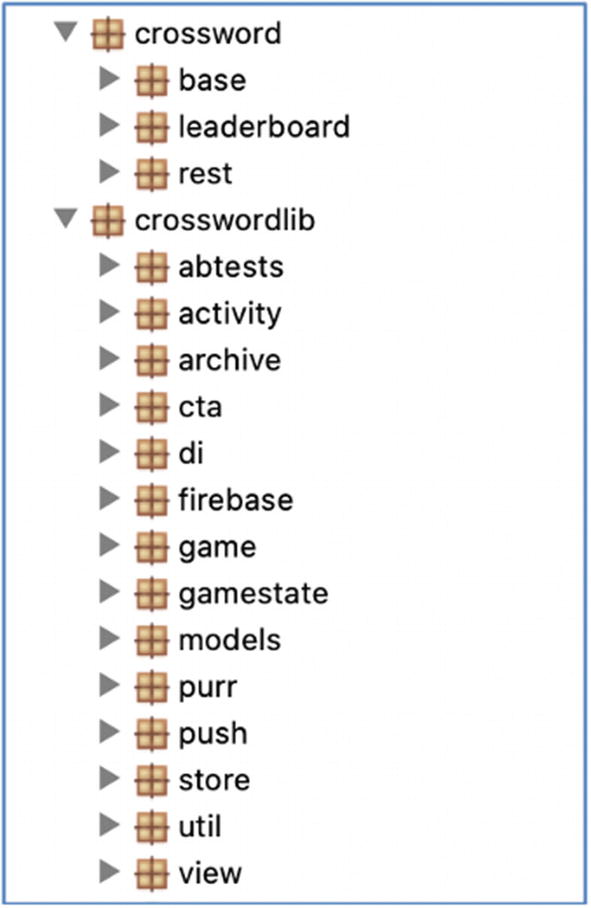
The first thing I want to do is to look through the classes and methods belonging to the app. The first part is to figure out what the app-specific code is. This is among the myriad of third-party libraries that are usually the norm for Android apps these days. Scrolling through the class hierarchy, I notice two packages: com.nytimes.crossword and com.nytimes.crosswordlib. I usually browse through each of the packages to see if there are group names that reveal the purpose of that package. Figure 7-6 has a picture of our app package hierarchy. Some interesting packages to examine are the activity, game, gamestate, and models ones.
The activity package as expected contains all the activities that get launched when you interact with the app. For example, when you click the settings hamburger menu, the SettingsActivity is launched, and the setting screen is displayed. Similarly, when you click About, the AboutActivity is displayed. Let’s make a note to come back to this later and keep looking for more interesting things. The approach that I take is to look through every package first so I can draw up a plan of areas I want to revisit and then prioritize them. So, let’s move on.
Figure 7-6
The app package hierarchy
The game package has just a few class files, but one looks interesting – GameChronometer. Taking a look inside, you see these two methods:
@Override // android.widget.Chronometer
public void start() {
super.start();
this.g = true;
}
@Override // android.widget.Chronometer
public void stop() {
super.stop();
this.g = false;
}
This is most likely where the game timer is started and stopped. That’s extremely interesting. We should verify that later. Let’s move on for now.
The gamestate package looks similar with only a few classes. The most notable one looks like the ArchiveDataSource class. It contains some string references to DAOs or Data Access Objects. That may be something we should follow at some point.
That leaves us with the models package which is usually named so because they contain data objects or models. Think the model from MVC (model-view-controller). In general, if an app has something related to models, you can hope to find some useful nuggets of information within. Our package is no exception. I see the class named ClueList which is, I think, a great place to start our hunt. Wow, didn’t even have to get too far to see the reference to a method called getPuzzleData()! It returns a PuzzleData type object.
List v4 = Arrays.asList(new String[]{"Across", "Down"});
if(v9_1.getClueListOrder() != null) {
v4 = v9_1.getClueListOrder();
}
Let’s trace that. Well, well, well. It seems like PuzzleData belongs to the package com.nytimes.crossword.rest.models. It’s interesting because when you look in there, there’s a lot of other model data types that aren’t even obfuscated. But get this, look at this snippet of code in the very beginning of PuzzleData!
@SerializedName(alternate = {"v6ClueListOrder"}, value = "clueListOrder")
private List clueListOrder;
@SerializedName("clues")
private Map cluesMap;
private Clues cluesWrapper;
private List layout;
private MergeAcrossDown mergeAcrossDown;
private Overlay overlayImage;
public List getAnswers() {
return this.answers;
}
public Map getCellOverrides() {
return this.cellOverrides;
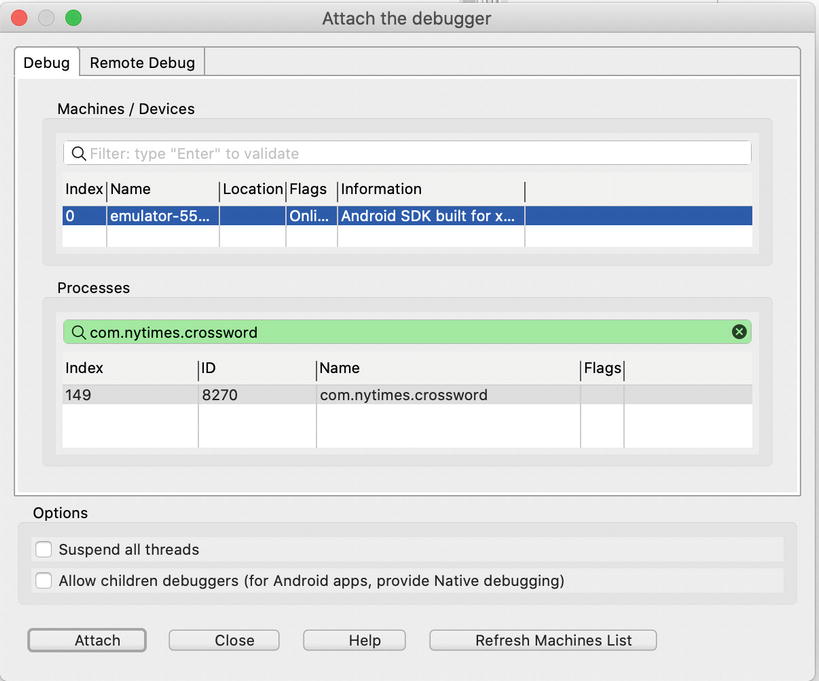
This is getting more interesting by the minute. You know what we should do? We should set a breakpoint on getAnswers() and see what we get! So let’s set a breakpoint at the return this.answers; line and see what we get. In JEB, you set the breakpoints on the bytecode component. On the decompiled Java code, go to the line where you want to set the breakpoint, hit Tab, and JEB takes you back to the bytecode equivalent of that line. Then you can set the breakpoint. After setting the breakpoint, start the debugger. You will see a dialog that looks like Figure 7-7 which shows you the available devices (in my case, I am running it on an emulator) and then the process id for your debuggable APK.
Figure 7-7
The Attach the debugger dialog window showing which process id to attach to
One thing to note with the JEB debugger is that you have to have the app that you’re debugging launched. If not, JEB won’t be able to find it in the running processes. Now that the breakpoint is set, go ahead and click a puzzle to see if our breakpoint gets hit.
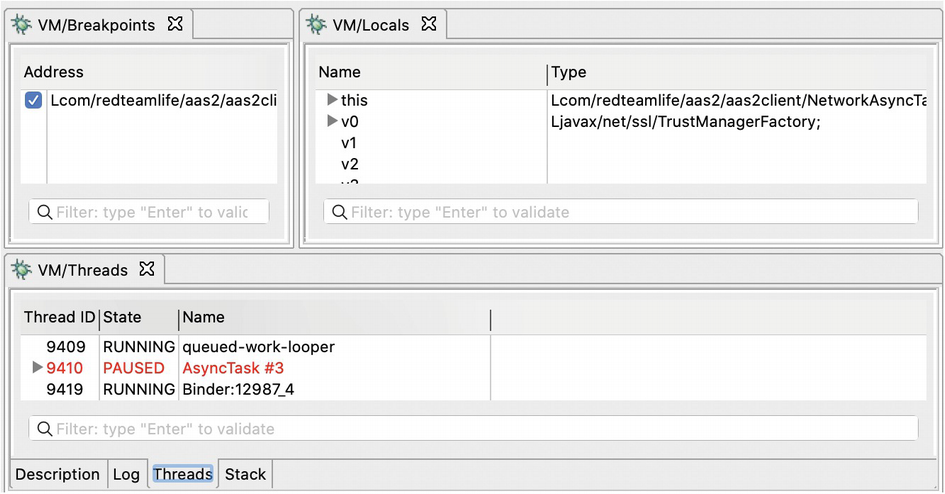
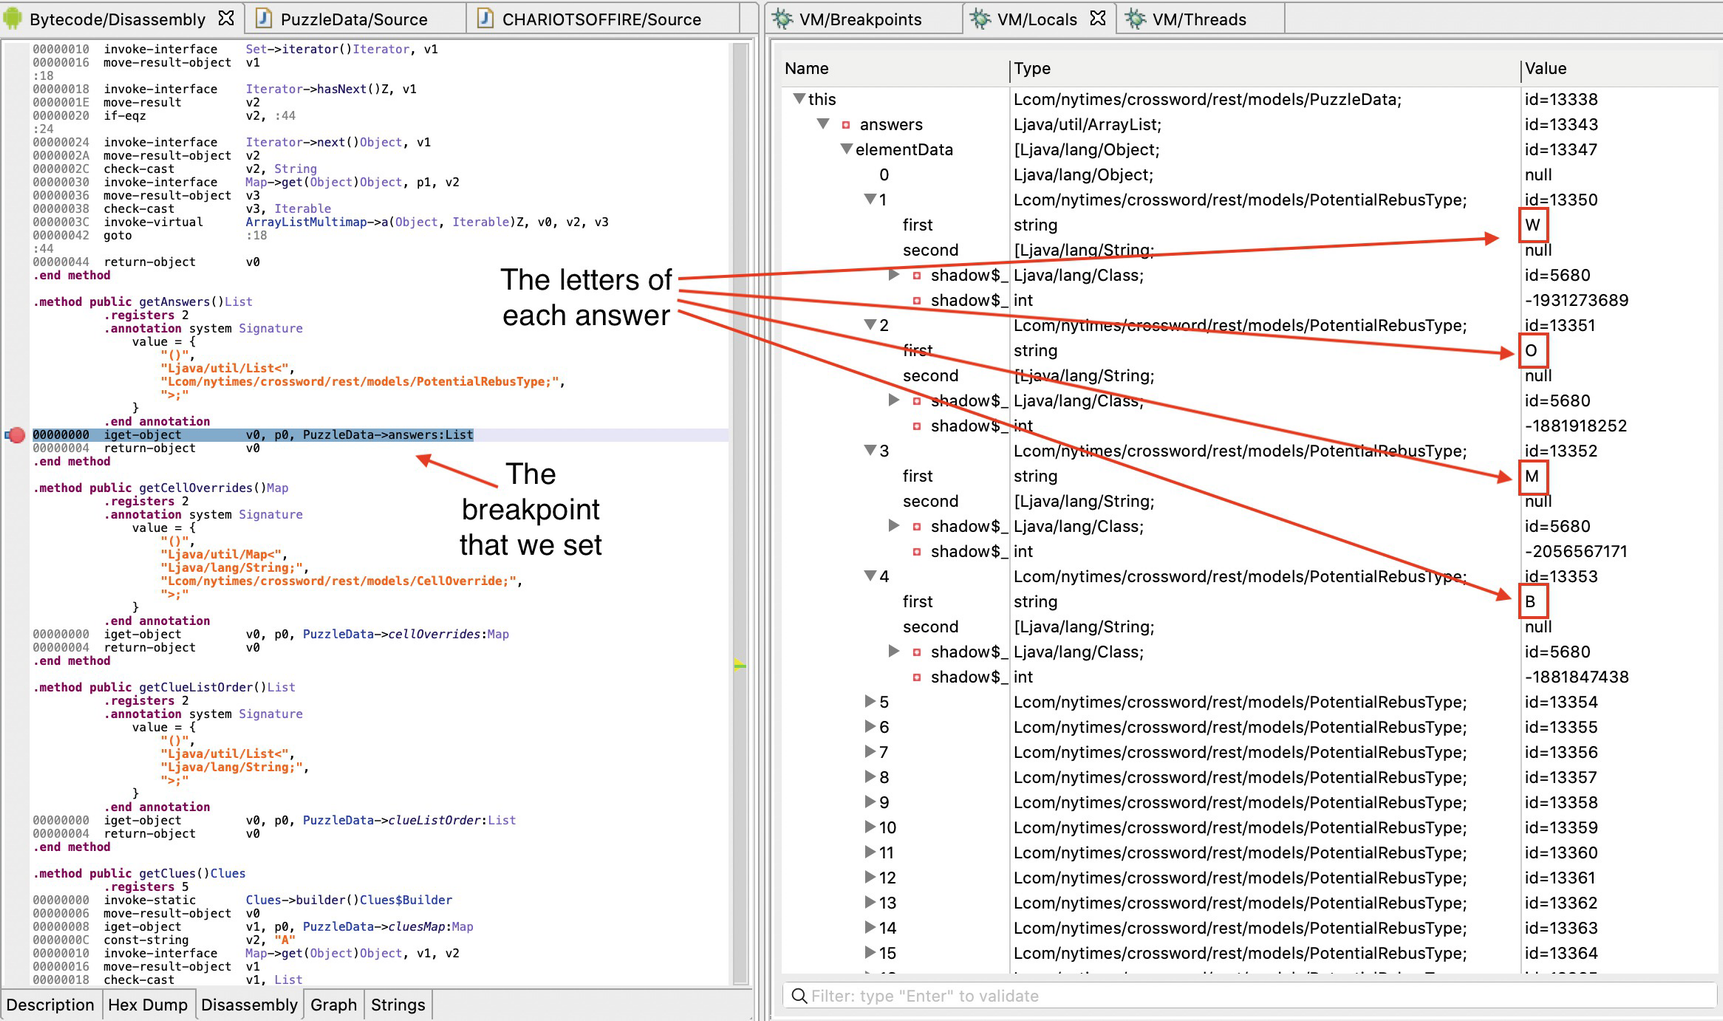
Oh my. Would you look at that in Figure 7-8? This is what my JEB screen showed me. On the left, you will see the highlighted line of text next to the circle (which is our breakpoint). The highlighted line is the line of code where the app execution stopped. On the right is the pane that allows you to inspect your breakpoints, local variables, and the threads running. Generally, we’re almost always interested in the values section and with good reason. I’ve gone ahead and expanded the values for you to see. PuzzleData contains the List answers. Expanding answers shows us that each item in this list is a PotentialRebusType class. Expanding each one, you will see its structure. But more importantly, you will see a list of all the letters in each of the answers. I think there’s absolutely nothing wrong for you to take some time and say out loud: Jackpot!
Figure 7-8
JEB user interface showing local variables and answers from our puzzle
I try out some of the answers, and sure enough, they work a treat. So, I guess we accomplished our mission of finding out the answers to the puzzle before we attempt it.
Debugging for Free
I know by now you have two questions in your head. Number 1, “Sheran, you’re an ass. Why do you have to show us this on a tool that costs a lot of money?” and number 2, “Your solution seems very clunky especially to be able to read the answers off the debugger like that. Can’t you pretty print the answers?”
Allow me to answer those questions. For number 1, I anticipated you would ask me this which is why I’m writing this part of the chapter. For number 2, all I can say is: Stop whining! Nothing about app reverse engineering and debugging is pretty. But let’s see what we can do all the same.
If you turn your attention back to Chapter 6, you will recall I mentioned a tool called Frida. Frida isn’t a debugger per se; it dubs itself as a dynamic instrumentation toolkit. Basically, it can do a lot of cool stuff, and if you ever meet Ole André V. Ravnås, the author of Frida, you should buy him a beer. Hell, buy him a whole bottle of Scotch. Again, in Chapter 6, I showed you how to install the Frida tools onto your workstation. The next step that we have to get done is to install the Frida server on the mobile device. Let’s use our emulator for this. If you recall, I showed you how to set up Android Studio and create a virtual device using the AVD manager. We’re going to need a virtual device for this exercise. Go and create a virtual device that can run root commands. Any image that doesn’t have the Google Play Store enabled will do. I created a Pixel 2 XL device running API version 27. Once you get that done, fire it up and install the Frida server. I download the prebuilt version of the Frida server, and you can find it here: https://github.com/frida/frida/releases. You will have to get the version that matches your hardware. In this case, since we’re running our emulator on our laptop, you will need to get the x86 version. The one we want is frida-server-12.8.20-android-x86.xz. I use a plain old wget to download the file thusly:
What we’re doing line by line is connecting to the emulator, then switching over to the root shell.
If your su command fails, then you may have to restart your adb server to support switching to the root user. Execute adb root first before you try to use adb shell.
Then we change the owner for the frida-x86 file and make sure we change the mode of the file to be able to execute. Lastly, we execute it and send it to the background with the ampersand. You can verify that the Frida server is running by doing a ps command:
generic_x86:/data/local/tmp # ps |grep frida
root 9434 4404 86036 48068 poll_schedule_timeout e9a01af0 S frida-x86
generic_x86:/data/local/tmp #
We can test if Frida server is running fine on the emulator by starting up Frida and attaching to the Crossword app. We can then run some commands to show the process id, for example, or the current platform it is running on. Frida has command completion which is really useful. For the full set of JavaScript API calls that you can execute on the console, see here: https://frida.re/docs/javascript-api/.
As a quick check to see if you have got everything up and running, you can run
frida-ps -U
And if all is set up well, you should be able to see the process list of the emulator. The output looks similar to the previous chapter’s Figure 6-16.
I would have liked to title that Frida’s Interesting Trick, because frankly it does one thing really well which is to allow you to hook functions either native or Java. It does a lot more than just that, but I will now show you how we can use exactly this technique to do something fun with this Crossword app.
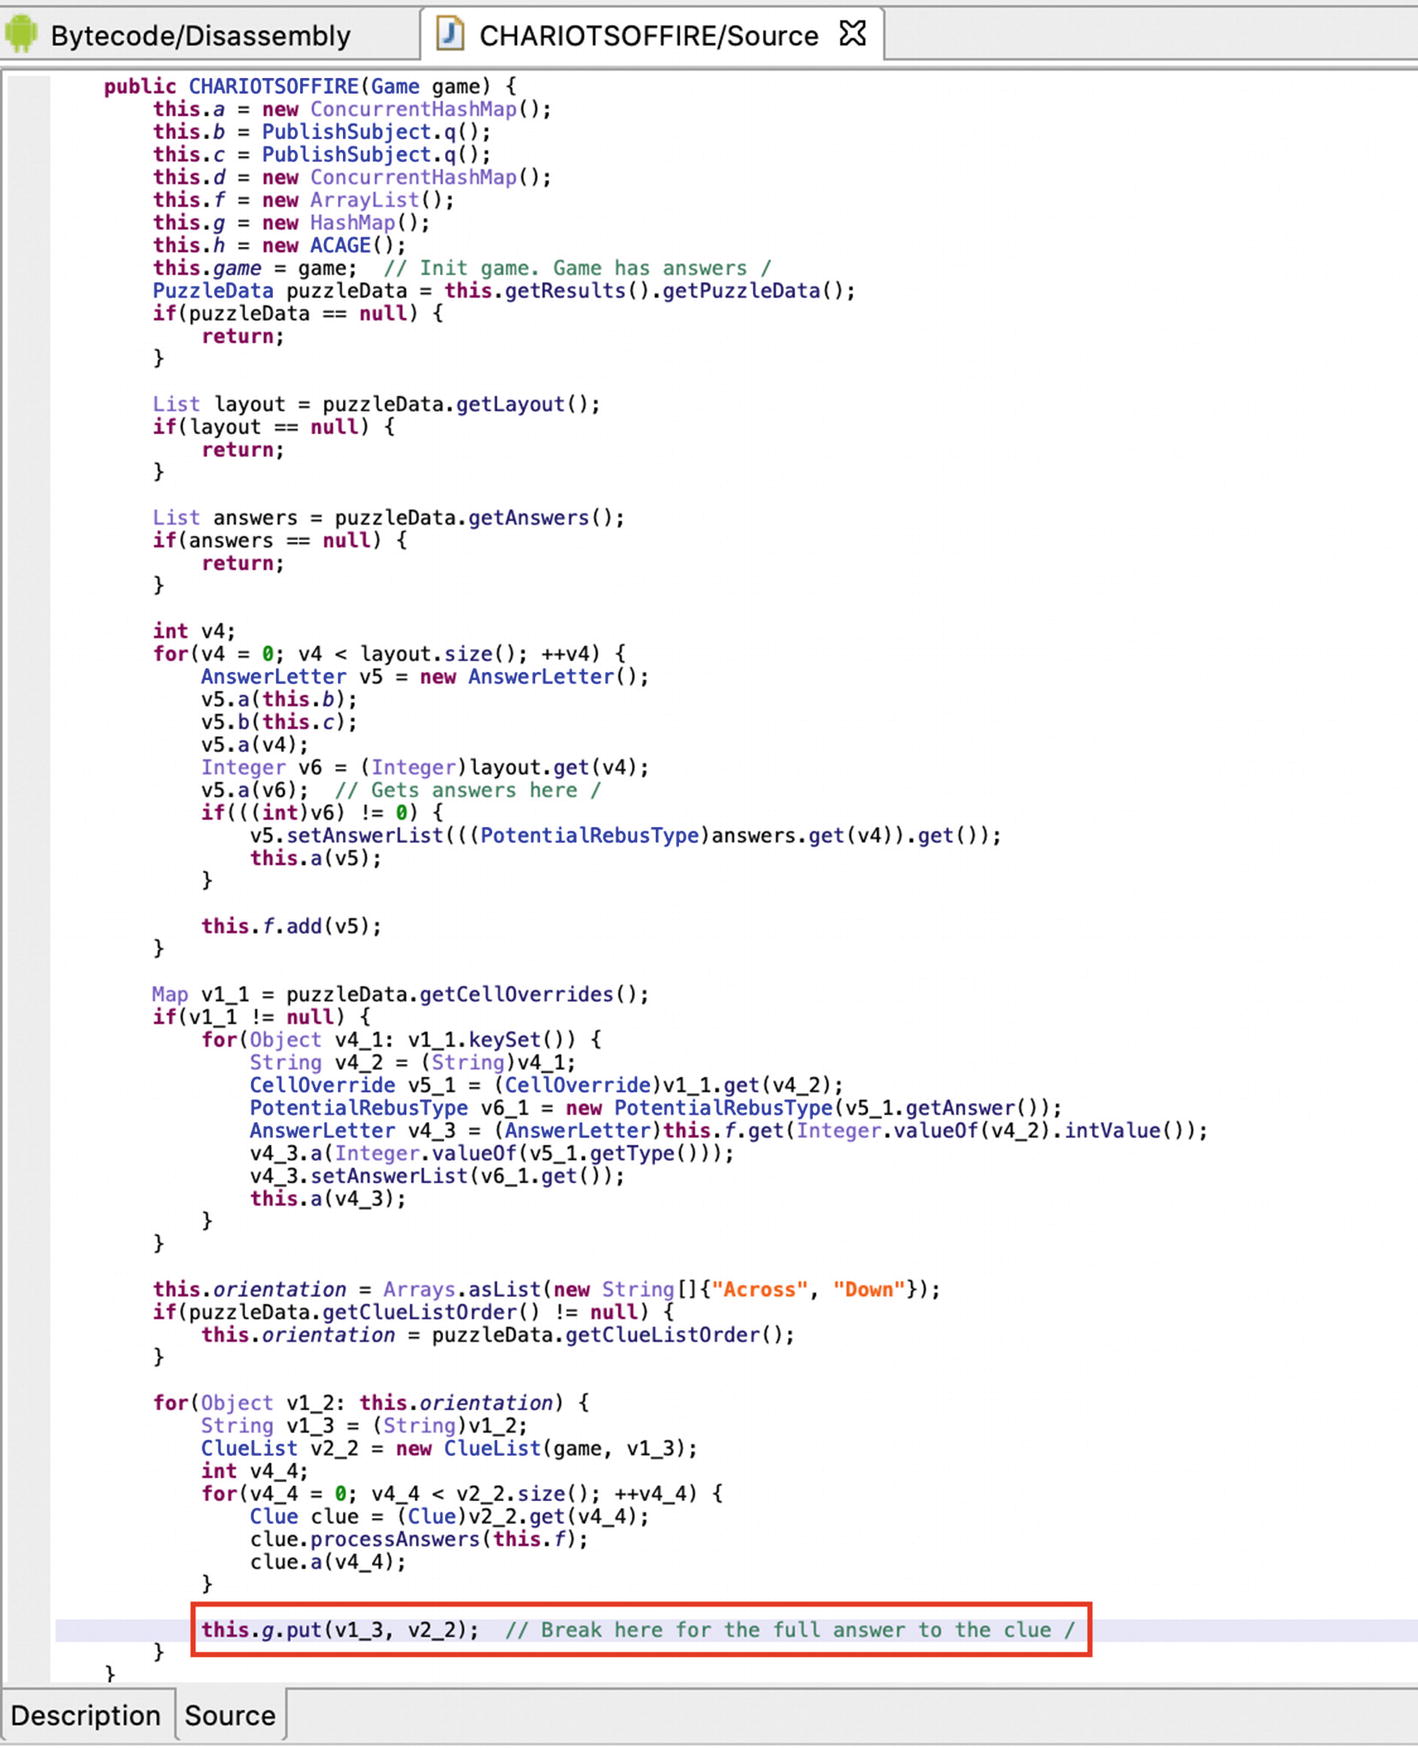
What we’re going to do is to hook the Java HashMap class’ put() method to intercept the data that is being placed into a HashMap. Why do this? Let me show you in Figure 7-9. You will notice that we’re looking at a class called CHARIOTSOFFIRE. This class is initiated with the Game object. Within this Game object lies not just the clues to the crossword but also the related answers. You will see the line of code that I have highlighted is the one where the answer is put into a HashMap. If we can successfully hook the HashMap's put method, then we can see each key and value that is being stored by this line of code.
Figure 7-9
The CHARIOTSOFFIRE class that shows when the answer is written to a HashMap
We can hook functions using Frida in many ways. I will show you how to do it using Frida and a bit of JavaScript code. Let’s go over the code first:
34: return this.put(k,v); // Execute the actual HashMap.put() function
35: }
36:
37: });
This script, which we saved as intercept.js, hooks the put() method of the HashMap class. We first instantiate the HashMap class in this script using Frida’s Java.use() method (line 3) and then overwrite the implementation of the put() method in line 11. This means that we now control the put() method. The first thing I want to ensure is that we do not interrupt how the actual HashMap.put() method works. So we execute the default put() method in line 34. OK, now we must find the HashMap.put() method that is called with the value type of com.nytimes.crosswordlib.models.ClueList. We check that in line 12. Then, we proceed to iterate over the ClueList to find BROKENPROMISE objects, which I have named as Clue objects. Within Clue objects are the answers and the text of the clue. This is what we’re after. Since the app deals with crosswords, the answers themselves will not be stored as full strings. Instead, they are stored to mimic how letters would look on a crossword and thus are stored a character at a time usually in a Java ArrayList. The h() method that I call in line 19 is actually equivalent to a getAnswers() method. Once again, I have to iterate over the answers because, remember, they are stored as a list of characters; in this case, they are stored as a list of CONNOTES objects which I named as an AnswerLetter (line 23). This object then contains another ArrayList of the letter of the answer. The letter seems to be always stored in the first element of the ArrayList. To get this ArrayList, we have to access a private field called c. I had to do some Java trickery to get the field, because there were two other methods also named c which made things ambiguous. This happens after code obfuscation. This happens on lines 25–28.
This is all an elaborate way of saying: Watch the HashMap.put() method, and when a list of clues is seen, take note of the clue text and the answers and print them out to the console. Simple enough right? Well, let’s find out by running it.
This tells Frida to connect to a USB device, in this case, the emulator. Then it says execute the code in the intercept.js file as soon as you attach to the process. Frida usually always pauses the process as soon as it starts, so we turn off the pause functionality. We then select a crossword to play, and the script begins to execute. The results are pretty cool and can be seen in Figure 7-10.
Figure 7-10
Frida running with our intercept.js script
What we can see is the clue text followed by an all caps version of the answer to that clue – all printed out even before you attempt the crossword. Fantastic! Now all that’s left is to play the crossword with our answers. See Figures 7-11 and 7-12. I averaged almost 4 minutes to play a puzzle with about 60 clues. Slow, I know, but my excuse was that I was playing on an emulator and I had to use the emulator keyboard and not my own hardware keyboard.
Figure 7-11
Completed 60-clue puzzle in under 4 minutes
Figure 7-12
Victory is mine!
Where do we go from here? Well, the sky is the limit of course. We can play around with the chronometer and basically stop the clock, do the puzzle, then start it up again to post some ridiculously implausible time. I highly recommend that you purchase and subscribe to the NYTimes Crossword puzzle app. It’s really great to pass the time with.
We’ve seen how we can debug (kinda) an app for free using Frida. We also figured out how to print the answers in a marginally prettier manner. As for the deadlisting of code, you can generate that with some of the free decompilers out there like JADX, dex2jar together with JD-GUI, or even Android Studio. But it is essential that you have some form of view of the code as well to make things smoother. You could possibly do it with only Frida, but I think this may take you a little longer to finish up as you may have to trial and error your way through. Some other cool things you can do would be to hook network calls so that you can see traffic going back and forth between the app and the server. Essentially, if you can think it up, then you can most likely get it done using JEB and Frida. A word to the wise: Don’t be mean and don’t be destructive. App developers spend considerable time, effort, and even money writing apps. We should be respectful in our use of apps (except for those goddamned spyware-laden ones), and if we like an app and find it useful, then we should always pay for it.