
Chapter 11. Telephone Applications
Android began as a platform for cellular telephone handsets, so it is no surprise that Android apps are very capable of dealing with the phone. You can write apps that dial the phone, or that guide the user to do so. You can write apps that verify or modify the number the user is calling (e.g., to add a long-distance dialing prefix). You can also write apps that send and receive SMS (Short Message Service) messages, a.k.a. text messages, assuming the device is telephony-equipped. Nowadays, a great many Android tablets are WiFi-only, and do not have 4G, 3G, or even 2G telephone/SMS capabilities. For these devices, other capabilities such as SMS via internet and VoIP (Voice over IP, usually using SIP) have to be used.
This chapter covers most of these topics; a few are discussed elsewhere in this book.
11.1 Doing Something When the Phone Rings
Johan Pelgrim
Discussion
If you want to do something when the phone rings you have to implement a broadcast receiver, which listens for the TelephonyManager.ACTION_PHONE_STATE_CHANGED Intent action. This is a broadcast Intent action indicating that the call state (cellular) on the device has changed. Example 11-1 shows the code for the incoming call interceptor, and Example 11-2 shows the incoming call interceptor’s layout file.
Example 11-1. The incoming call interceptor
packagenl.codestone.cookbook.incomingcallinterceptor;importandroid.content.BroadcastReceiver;importandroid.content.Context;importandroid.content.Intent;importandroid.telephony.TelephonyManager;importandroid.widget.Toast;publicclassIncomingCallInterceptorextendsBroadcastReceiver{@OverridepublicvoidonReceive(Contextcontext,Intentintent){Stringstate=intent.getStringExtra(TelephonyManager.EXTRA_STATE);Stringmsg="Phone state changed to "+state;if(TelephonyManager.EXTRA_STATE_RINGING.equals(state)){StringincomingNumber=intent.getStringExtra(TelephonyManager.EXTRA_INCOMING_NUMBER);msg+=". Incoming number is "+incomingNumber;// This is where you have to "Do something when the phone rings" ;-)Toast.makeText(context,msg,Toast.LENGTH_LONG).show();}}}

Create an
IncomingCallInterceptorclass that extendsBroadcastReceiver.
Override the
onReceive()method to handle incoming broadcast messages.
The
EXTRA_STATEIntent extra in this case indicates the new call state.
If (and only if) the new state is
RINGING, a second Intent extra,EXTRA_INCOMING_NUMBER, provides the incoming phone number as a string.
Extract the number information from the
EXTRA_INCOMING_NUMBERIntent extra.
Note
Additionally, you can act on a state change to OFFHOOK or IDLE when the user picks up the phone or ends/rejects the phone call, respectively.
Example 11-2. The incoming call interceptor’s AndroidManifest() file
<?xml version="1.0" encoding="utf-8"?><manifestxmlns:android="http://schemas.android.com/apk/res/android"package="nl.codestone.cookbook.incomingcallinterceptor"android:versionCode="1"android:versionName="1.0"><uses-sdkandroid:minSdkVersion="3"/><applicationandroid:icon="@drawable/icon"android:label="Incoming Call Interceptor"><receiverandroid:name="IncomingCallInterceptor"><intent-filter><actionandroid:name="android.intent.action.PHONE_STATE"/></intent-filter></receiver></application><uses-permissionandroid:name="android.permission.READ_PHONE_STATE"/></manifest>
We register our
IncomingCallInterceptoras areceiverwithin theapplicationelement.We register an
intent-filter…And an
actionvalue that registers our receiver to listen forTelephonyManager.ACTION_PHONE_STATE_CHANGEDbroadcast messages.Finally, we register a
uses-permissionso that we are allowed to listen to phone state changes.
If all is well, you should see something like Figure 11-1 when the phone rings.

Figure 11-1. Incoming call intercepted
What happens if two receivers listen for phone state changes?
In general, a broadcast message is just that: a message that is sent out to many receivers at the same time. This is the case for a normal broadcast, which is used to send out the ACTION_PHONE_STATE_CHANGED Intent as well. All receivers of the broadcast are run in an undefined order, often at the same time, and for that reason order is not applicable.
In other cases the system sends out an ordered broadcast, which is described in more detail in Recipe 11.2.
Final notes
When your BroadcastReceiver does not finish the processing in its onMessage() method within 10 seconds, the Android framework will show the infamous Application Not Responding (ANR) dialog, giving your users the ability to kill your program.
It is common for a BroadcastReceiver to simply start a Service.
Since a BroadcastReceiver has no user interface, it can either start an Activity (using the inherited startActivity() method) or
create and show a Notification (see Recipe 7.13).
See Also
Recipe 11.2, the developer documentation on BroadcastReceiver and ACTION_PHONE_STATE_CHANGED.
Source Download URL
The source code for this project is in the Android Cookbook repository, in the subdirectory CallInterceptorIncoming (see “Getting and Using the Code Examples”).
11.2 Processing Outgoing Phone Calls
Johan Pelgrim
Solution
Listen for the Intent.ACTION_NEW_OUTGOING_CALL broadcast action and set the result data of the broadcast receiver to the new number.
Discussion
If you want to intercept a call before it is placed, you can implement a broadcast receiver and listen for the Intent.ACTION_NEW_OUTGOING_CALL action. This recipe is similar to Recipe 11.1, but it is more interesting since we can actually manipulate the phone number in this case!
Example 11-3 shows the code.
Once the broadcast is finished, the result data is used as the actual number to call. If the result data is null, no call will be placed at all!
Example 11-3. The outgoing call interceptor (a BroadcastReceiver)
packagenl.codestone.cookbook.outgoingcallinterceptor;importandroid.content.BroadcastReceiver;importandroid.content.Context;importandroid.content.Intent;importandroid.widget.Toast;publicclassOutgoingCallInterceptorextendsBroadcastReceiver{@OverridepublicvoidonReceive(Contextcontext,Intentintent){finalStringoldNumber=intent.getStringExtra(Intent.EXTRA_PHONE_NUMBER);this.setResultData("0123456789");finalStringnewNumber=this.getResultData();Stringmsg="Intercepted outgoing call. Old number "+oldNumber+", new number "+newNumber;Toast.makeText(context,msg,Toast.LENGTH_LONG).show();}}
-
Create an
OutgoingCallInterceptorclass that extendsBroadcastReceiver. -
Override the
onReceive()method. -
Extract the phone number that the user originally intended to call via the
Intent.EXTRA_PHONE_NUMBERIntent extra. -
Replace this number by calling
setResultData()with the new number as theStringargument.
Example 11-4 shows the code in the outgoing call interceptor’s AndroidManifest.xml file.
Example 11-4. The outgoing call interceptor’s AndroidManifest.xml file
<?xml version="1.0" encoding="utf-8"?><manifestxmlns:android="http://schemas.android.com/apk/res/android"package="nl.codestone.cookbook.outgoingcallinterceptor"android:versionCode="1"android:versionName="1.0"><uses-sdkandroid:minSdkVersion="3"/><applicationandroid:icon="@drawable/icon"android:label="Outgoing Call Interceptor"><receiverandroid:name="OutgoingCallInterceptor"><intent-filterandroid:priority="1"><actionandroid:name="android.intent.action.NEW_OUTGOING_CALL"/></intent-filter></receiver></application><uses-permissionandroid:name="android.permission.PROCESS_OUTGOING_CALLS"/></manifest>
We register our
OutgoingCallInterceptoras areceiverwithin theapplicationelement.We add an
intent-filterelement within thisreceiverdeclaration and set anandroid:priorityof1.We add an
actionelement within theintent-filter, to only receiveIntent.ACTION_NEW_OUTGOING_CALLIntent actions.We have to hold the
PROCESS_OUTGOING_CALLSpermission to receive this intent, so we register auses-permissiontoPROCESS_OUTGOING_CALLSright below theapplicationelement.
Now, when you try to dial the number 11111 you will actually be forwarded to 0123456789 instead! (See Figure 11-2.)
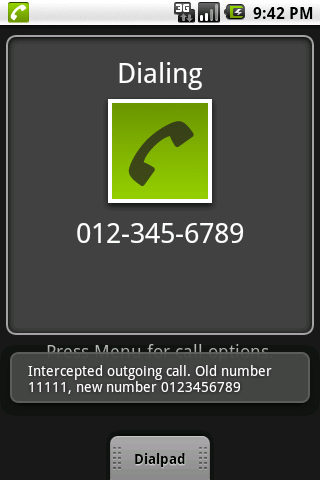
Figure 11-2. Outgoing call intercepted
What happens if two receivers process outgoing calls?
The Intent.ACTION_NEW_OUTGOING_CALL is an ordered broadcast and is a protected intent that can only be sent by the system. Compared to normal broadcast messages, ordered broadcast messages have three additional features:
-
You can use the
intent-filterelement’sandroid:priorityattribute to influence your position in the sending mechanism. Theandroid:priorityis an integer indicating which parent (receiver) has higher priority in processing the incoming broadcast message. The higher the number, the higher the priority and the sooner that receiver can process the broadcast message. -
You can propagate a result to the next receiver by calling the
setResultData()method. -
You can completely abort the broadcast by calling the
abortBroadcast()method so that it won’t be passed to other receivers.
Note that, according to the API, any BroadcastReceiver receiving the Intent.ACTION_NEW_OUTGOING_CALL must not abort the broadcast by calling the abortBroadcast() method. Doing so does not present any errors, but apparently some system receivers still want to have a go at the broadcast message. Emergency calls cannot be intercepted using this mechanism, and other calls cannot be modified to call emergency numbers using this mechanism.
It is perfectly acceptable for multiple receivers to process the outgoing call in turn: for example, a parental control application might verify that the user is authorized to place the call at that time, and then a number-rewriting application might add an area code if one was not specified.
If two receivers are defined with an equal android:priority attribute they will be run in an arbitrary order (according to the API). However, in practice, when they both reside in the same AndroidManifest.xml file it appears that the order in which the receivers are defined determines the order in which they will receive the broadcast message.
Furthermore, if two receivers are defined with an equal android:priority attribute but they are defined in different AndroidManifest.xml files (i.e., they belong to different applications), it appears that the broadcast receiver that was installed first is registered first and thus will be the one that is allowed to process the message first. But again, don’t count on it!
If you want to have a shot at being the very first to process a message, you can set the priority to the maximum integer value (2147483647). Even though using this feature of the API still does not guarantee you will be first, you will have a pretty good chance!
Also, other applications could have intercepted the phone number before your app. If you are pretty sure you want to take action on the original number, you can use the EXTRA_PHONE_NUMBER Intent extra as described earlier and completely ignore the result from the receiver before you. If you simply want to fall in line and pick up where another broadcast receiver has left off, you can retrieve the intermediary phone number via the getResultData() method.
For consistency, any receiver whose purpose is to prohibit phone calls should have a priority of 0, to ensure that it will see the final phone number to be dialed. Any receiver whose purpose is to rewrite phone numbers to be called should have a positive priority. Negative priorities are reserved for the system for this broadcast; using them may cause problems.
See Also
Recipe 11.1; , the developer documentation on ACTION_NEW_OUTGOING_CALL.
Source Download URL
The source code for this project is in the Android Cookbook repository, in the subdirectory CallInterceptorOutgoing (see “Getting and Using the Code Examples”).
11.3 Dialing the Phone
Ian Darwin
Solution
Start an Intent to dial the phone.
Discussion
One of the beauties of Android is the ease with which applications can reuse other applications, without being tightly coupled to the details (or even names) of the other programs, using the Intent mechanism. For example, to dial the phone, you only need to create and start an Intent with an action of DIAL and a URI of “tel:” + the number you want to dial. Thus, a basic dialer can be as simple as Example 11-5.
Example 11-5. Simple dialer Activity
publicclassMainextendsActivity{StringphoneNumber="555-1212";StringintentStr="tel:"+phoneNumber;/** Standard creational callback.* Just dial the phone.*/@OverridepublicvoidonCreate(BundlesavedInstanceState){super.onCreate(savedInstanceState);setContentView(R.layout.main);Intentintent=newIntent("android.intent.action.DIAL",Uri.parse(intentStr));startActivity(intent);}}
You need to have the permission android.permission.CALL_PHONE to use this code. The user will see the screen shown in Figure 11-3; users know to press the green phone button to let the call proceed.

Figure 11-3. Simple dialer
Typically, in real life, you would not hardcode the number. In other circumstances you might want the user to call a number from the phone’s Contacts list.
Source Download URL
The source code for this example is in the Android Cookbook repository, in the subdirectory SimpleDialer (see “Getting and Using the Code Examples”).
11.4 Sending Single-part or Multipart SMS Messages
Colin Wilcox
Discussion
SMS messages, also called text messages, have been part of cellular technology for years. The Android API allows you to send an SMS message either by an Intent or in code; we’re only covering the code approach here.
SMS messages are limited to about 160 characters, depending on the carrier (in case you ever wondered where Twitter got the idea for 140-character messages). Text messages above this size must be broken into chunks. To give you control over this, the SmsManager class allows you to break a message into “parts,” and returns a list of them.
Note
For information about how the division of longer messages into parts works “under the hood,” see https://en.wikipedia.org/wiki/Concatenated_SMS.
If there is only one part, the message is short enough to send directly, so we use the sendTextMessage() method. Otherwise, we have to send the list of parts, so we pass the list back into the sendMultipartTextMessage() method. The actual sending code is shown in Example 11-6. The downloadable code features a trivial Activity to invoke the sending code.
Example 11-6. The SMS sender
packagecom.example.sendsms;importjava.util.ArrayList;importandroid.telephony.SmsManager;importandroid.util.Log;/** The code for dealing with the SMS manager;* called from the GUI code.*/publicclassSendSMS{staticStringTAG="SendSMS";SmsManagermSMSManager=null;/* The list of message parts our message* gets broken up into by SmsManager */ArrayList<String>mFragmentList=null;/* Service Center - not used */StringmServiceCentreAddr=null;SendSMS(){mSMSManager=SmsManager.getDefault();}/* Called from the GUI to send one message to one destination */publicbooleansendSMSMessage(StringaDestinationAddress,StringaMessageText){if(mSMSManager==null){return(false);}mFragmentList=mSMSManager.divideMessage(aMessageText);intfragmentCount=mFragmentList.size();if(fragmentCount>1){Log.d(TAG,"Sending "+fragmentCount+" parts");mSMSManager.sendMultipartTextMessage(aDestinationAddress,mServiceCentreAddr,mFragmentList,null,null);}else{Log.d(TAG,"Sending one part");mSMSManager.sendTextMessage(aDestinationAddress,mServiceCentreAddr,aMessageText,null,null);}returntrue;}}
Although sent as three parts, it arrives as a single message, as shown in Figure 11-4.
As you might expect, the application needs the android.permission.SEND_SMS permission in its AndroidManifest.xml file.
See Also
For information on the SmsManager, see the official documentation.
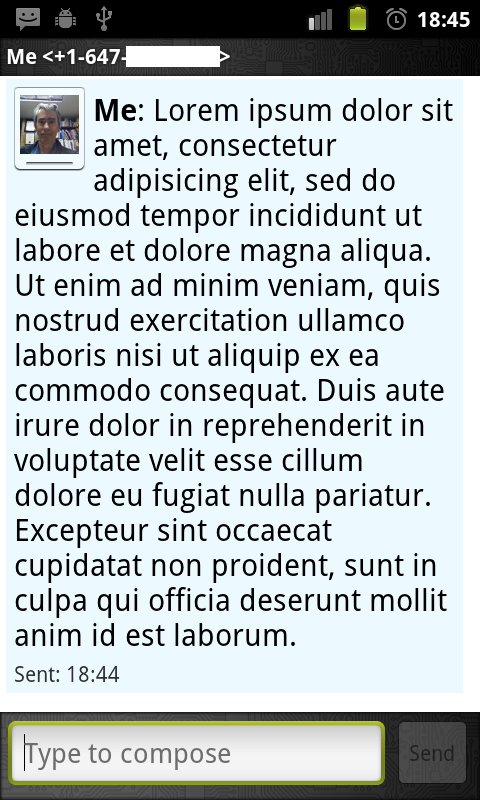
Figure 11-4. The multipart message arrived
Source Download URL
The source code for this example is in the Android Cookbook repository, in the subdirectory SendSMS (see “Getting and Using the Code Examples”).
11.5 Receiving an SMS Message
Rachee Singh
Discussion
When an Android device receives a message, a broadcast Intent is fired (the Intent also includes the SMS message that was received). The application can register to receive these Intents.
The Intent has an action, android.provider.Telephony.SMS_RECEIVED. The application designed to receive SMS messages should include the RECEIVE_SMS permission in the manifest:
<uses-permissionandroid:name="android.permission.RECEIVE_SMS"/>
When a message is received, the onReceive() method is called. Within this method, you can process the message. From the Intent that is received, the SMS message has to be extracted using the get() method. The BroadcastReceiver with the code for extracting the message part looks like Example 11-7.
The code makes a Toast to display the contents of the received SMS message.
Example 11-7. The SMS BroadcastReceiver
publicclassInvitationSmsReceiverextendsBroadcastReceiver{publicvoidonReceive(Contextcontext,Intentintent){Bundlebundle=intent.getExtras();SmsMessage[]msgs=null;Stringmessage="";if(bundle!=null){Object[]pdus=(Object[])bundle.get("pdus");msgs=newSmsMessage[pdus.length];for(inti=0;i<msgs.length;i++){msgs[i]=SmsMessage.createFromPdu((byte[])pdus[i]);message=msgs[i].getMessageBody();Toast.makeText(context,message,Toast.LENGTH_SHORT).show();}}}}
To register the InvitationSmsReceiver class for receiving the SMS messages, add the following to the manifest:
<receiverandroid:name=".InvitationSmsReceiver"android:enabled="true"><intent-filter><actionandroid:name="android.provider.Telephony.SMS_RECEIVED"/><categoryandroid:name="android.intent.category.DEFAULT"/></intent-filter></receiver>
Source Download URL
The source code for this project is in the Android Cookbook repository, in the subdirectory SMSReceiver (see “Getting and Using the Code Examples”).
11.6 Using Emulator Controls to Send SMS Messages to the Emulator
Rachee Singh
Discussion
To test whether your application responds to incoming SMS messages, you need to send an SMS message to the emulator. The DDMS perspective of Eclipse or the Android Device Monitor of Android Studio provides this function. (You may wish to maximize the Emulator Control window as otherwise the important parts of it may be hidden and require both vertical and horizontal scrolling to access.) In the Emulator Control tab, go to Telephony Actions and provide a phone number. This number can be any number that you want the message to appear to come from. Select the SMS radio button. In the Message box, type the message you wish to send. Finally, press the Send button below the message text. See Figure 11-5.
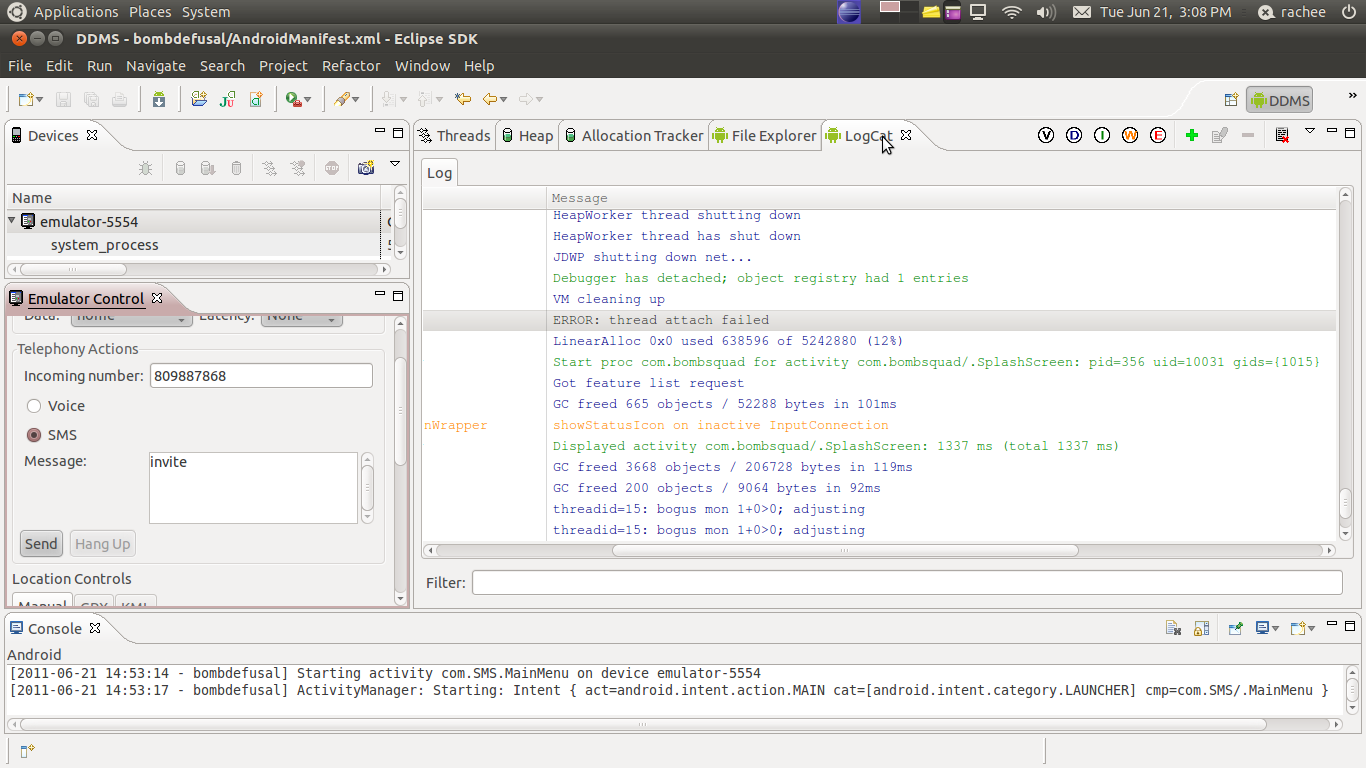
Figure 11-5. Emulator control sending an SMS message
11.7 Using Android’s TelephonyManager to Obtain Device Information
Pratik Rupwal
Discussion
Android’s TelephonyManager provides information about the Android telephony system. It assists in collecting information such as cell location, International Mobile Equipment Identity (IMEI) number, and network provider.
The program in Example 11-8 is long and covers most of the facilities provided by the Android TelephonyManager. It is unlikely you will need all of these in a single application, but they are consolidated here to provide a comprehensive example.
Example 11-8. The phone state sample Activity
...importandroid.telephony.CellLocation;importandroid.telephony.NeighboringCellInfo;importandroid.telephony.PhoneStateListener;importandroid.telephony.ServiceState;importandroid.telephony.TelephonyManager;importandroid.telephony.gsm.GsmCellLocation;publicclassPhoneStateSampleextendsActivity{privatestaticfinalStringAPP_NAME="SignalLevelSample";privatestaticfinalintEXCELLENT_LEVEL=75;privatestaticfinalintGOOD_LEVEL=50;privatestaticfinalintMODERATE_LEVEL=25;privatestaticfinalintWEAK_LEVEL=0;// These are used to store Strings into an array for displayprivatestaticfinalintINFO_SERVICE_STATE_INDEX=0;privatestaticfinalintINFO_CELL_LOCATION_INDEX=1;privatestaticfinalintINFO_CALL_STATE_INDEX=2;privatestaticfinalintINFO_CONNECTION_STATE_INDEX=3;privatestaticfinalintINFO_SIGNAL_LEVEL_INDEX=4;privatestaticfinalintINFO_SIGNAL_LEVEL_INFO_INDEX=5;privatestaticfinalintINFO_DATA_DIRECTION_INDEX=6;privatestaticfinalintINFO_DEVICE_INFO_INDEX=7;// These are the IDs of the displays; must keep in sync with above constantsprivatestaticfinalint[]info_ids={R.id.serviceState_info,R.id.cellLocation_info,R.id.callState_info,R.id.connectionState_info,R.id.signalLevel,R.id.signalLevelInfo,R.id.dataDirection,R.id.device_info};@OverridepublicvoidonCreate(BundlesavedInstanceState){super.onCreate(savedInstanceState);setContentView(R.layout.main);startSignalLevelListener();displayTelephonyInfo();}@OverrideprotectedvoidonPause(){super.onPause();stopListening();}@OverrideprotectedvoidonResume(){super.onResume();startSignalLevelListener();}@OverrideprotectedvoidonDestroy(){stopListening();super.onDestroy();}privatevoidsetTextViewText(intid,Stringtext){((TextView)findViewById(id)).setText(text);}privatevoidsetSignalLevel(intid,intinfoid,intlevel){intprogress=(int)((((float)level)/31.0)*100);StringsignalLevelString=getSignalLevelString(progress);((ProgressBar)findViewById(id)).setProgress(progress);((TextView)findViewById(infoid)).setText(signalLevelString);Log.i("signalLevel ",""+progress);}privateStringgetSignalLevelString(intlevel){StringsignalLevelString="Weak";if(level>EXCELLENT_LEVEL)signalLevelString="Excellent";elseif(level>GOOD_LEVEL)signalLevelString="Good";elseif(level>MODERATE_LEVEL)signalLevelString="Moderate";elseif(level>WEAK_LEVEL)signalLevelString="Weak";returnsignalLevelString;}privatevoidstopListening(){TelephonyManagertm=(TelephonyManager)getSystemService(TELEPHONY_SERVICE);tm.listen(phoneStateListener,PhoneStateListener.LISTEN_NONE);}privatevoidsetDataDirection(intid,intdirection){intresid=getDataDirectionRes(direction);((ImageView)findViewById(id)).setImageResource(resid);}privateintgetDataDirectionRes(intdirection){intresid=R.drawable.data_none;switch(direction){caseTelephonyManager.DATA_ACTIVITY_IN:resid=R.drawable.data_in;break;caseTelephonyManager.DATA_ACTIVITY_OUT:resid=R.drawable.data_out;break;caseTelephonyManager.DATA_ACTIVITY_INOUT:resid=R.drawable.data_both;break;caseTelephonyManager.DATA_ACTIVITY_NONE:resid=R.drawable.data_none;break;default:resid=R.drawable.data_none;break;}returnresid;}privatevoidstartSignalLevelListener(){TelephonyManagertm=(TelephonyManager)getSystemService(TELEPHONY_SERVICE);intevents=PhoneStateListener.LISTEN_SIGNAL_STRENGTH|PhoneStateListener.LISTEN_DATA_ACTIVITY|PhoneStateListener.LISTEN_CELL_LOCATION|PhoneStateListener.LISTEN_CALL_STATE|PhoneStateListener.LISTEN_CALL_FORWARDING_INDICATOR|PhoneStateListener.LISTEN_DATA_CONNECTION_STATE|PhoneStateListener.LISTEN_MESSAGE_WAITING_INDICATOR|PhoneStateListener.LISTEN_SERVICE_STATE;tm.listen(phoneStateListener,events);}...
Much of the information-gathering in this program is done by the various listeners. One exception is the method displayTelephonyInfo(), shown in Example 11-9, which simply gathers a large number of information bits directly from the TelephonyManager and adds them to a long string, which is displayed in the TextView.
Example 11-9. The phone state Activity (continued)
...privatevoiddisplayTelephonyInfo(){TelephonyManagertm=(TelephonyManager)getSystemService(TELEPHONY_SERVICE);GsmCellLocationloc=(GsmCellLocation)tm.getCellLocation();intcellid=loc.getCid();intlac=loc.getLac();Stringdeviceid=tm.getDeviceId();Stringphonenumber=tm.getLine1Number();Stringsoftwareversion=tm.getDeviceSoftwareVersion();Stringoperatorname=tm.getNetworkOperatorName();Stringsimcountrycode=tm.getSimCountryIso();Stringsimoperator=tm.getSimOperatorName();Stringsimserialno=tm.getSimSerialNumber();Stringsubscriberid=tm.getSubscriberId();Stringnetworktype=getNetworkTypeString(tm.getNetworkType());Stringphonetype=getPhoneTypeString(tm.getPhoneType());logString("CellID: "+cellid);logString("LAC: "+lac);logString("Device ID: "+deviceid);logString("Phone Number: "+phonenumber);logString("Software Version: "+softwareversion);logString("Operator Name: "+operatorname);logString("SIM Country Code: "+simcountrycode);logString("SIM Operator: "+simoperator);logString("SIM Serial No.: "+simserialno);logString("Sibscriber ID: "+subscriberid);Stringdeviceinfo="";deviceinfo+=("CellID: "+cellid+" ");deviceinfo+=("LAC: "+lac+" ");deviceinfo+=("Device ID: "+deviceid+" ");deviceinfo+=("Phone Number: "+phonenumber+" ");deviceinfo+=("Software Version: "+softwareversion+" ");deviceinfo+=("Operator Name: "+operatorname+" ");deviceinfo+=("SIM Country Code: "+simcountrycode+" ");deviceinfo+=("SIM Operator: "+simoperator+" ");deviceinfo+=("SIM Serial No.: "+simserialno+" ");deviceinfo+=("Subscriber ID: "+subscriberid+" ");deviceinfo+=("Network Type: "+networktype+" ");deviceinfo+=("Phone Type: "+phonetype+" ");List<NeighboringCellInfo>cellinfo=tm.getNeighboringCellInfo();if(null!=cellinfo){for(NeighboringCellInfoinfo:cellinfo){deviceinfo+=(" CellID: "+info.getCid()+", RSSI: "+info.getRssi()+" ");}}setTextViewText(info_ids[INFO_DEVICE_INFO_INDEX],deviceinfo);}privateStringgetNetworkTypeString(inttype){StringtypeString="Unknown";switch(type){caseTelephonyManager.NETWORK_TYPE_EDGE:typeString="EDGE";break;caseTelephonyManager.NETWORK_TYPE_GPRS:typeString="GPRS";break;caseTelephonyManager.NETWORK_TYPE_UMTS:typeString="UMTS";break;default:typeString="UNKNOWN";break;}returntypeString;}privateStringgetPhoneTypeString(inttype){StringtypeString="Unknown";switch(type){caseTelephonyManager.PHONE_TYPE_GSM:typeString=GSM"; break;case TelephonyManager.PHONE_TYPE_NONE:typeString = UNKNOWN";break;default:typeString="UNKNOWN";break;}returntypeString;}privateintlogString(Stringmessage){returnLog.i(APP_NAME,message);}privatefinalPhoneStateListenerphoneStateListener=newPhoneStateListener(){@OverridepublicvoidonCallForwardingIndicatorChanged(booleancfi){Log.i(APP_NAME,"onCallForwardingIndicatorChanged "+cfi);super.onCallForwardingIndicatorChanged(cfi);}@OverridepublicvoidonCallStateChanged(intstate,StringincomingNumber){StringcallState="UNKNOWN";switch(state){caseTelephonyManager.CALL_STATE_IDLE:callState="IDLE";break;caseTelephonyManager.CALL_STATE_RINGING:callState="Ringing ("+incomingNumber+")";break;caseTelephonyManager.CALL_STATE_OFFHOOK:callState="Offhook";break;}setTextViewText(info_ids[INFO_CALL_STATE_INDEX],callState);Log.i(APP_NAME,"onCallStateChanged "+callState);super.onCallStateChanged(state,incomingNumber);}@OverridepublicvoidonCellLocationChanged(CellLocationlocation){StringlocationString=location.toString();setTextViewText(info_ids[INFO_CELL_LOCATION_INDEX],locationString);Log.i(APP_NAME,"onCellLocationChanged "+locationString);super.onCellLocationChanged(location);}@OverridepublicvoidonDataActivity(intdirection){StringdirectionString="none";switch(direction){caseTelephonyManager.DATA_ACTIVITY_IN:directionString="IN";break;caseTelephonyManager.DATA_ACTIVITY_OUT:directionString="OUT";break;caseTelephonyManager.DATA_ACTIVITY_INOUT:directionString="INOUT";break;caseTelephonyManager.DATA_ACTIVITY_NONE:directionString="NONE";break;default:directionString="UNKNOWN: "+direction;break;}setDataDirection(info_ids[INFO_DATA_DIRECTION_INDEX],direction);Log.i(APP_NAME,"onDataActivity "+directionString);super.onDataActivity(direction);}@OverridepublicvoidonDataConnectionStateChanged(intstate){StringconnectionState="Unknown";switch(state){caseTelephonyManager.DATA_CONNECTED:connectionState="Connected";break;caseTelephonyManager.DATA_CONNECTING:connectionState="Connecting";break;caseTelephonyManager.DATA_DISCONNECTED:connectionState="Disconnected";break;caseTelephonyManager.DATA_SUSPENDED:connectionState="Suspended";break;default:connectionState="Unknown: "+state;break;}setTextViewText(info_ids[INFO_CONNECTION_STATE_INDEX],connectionState);Log.i(APP_NAME,"onDataConnectionStateChanged "+connectionState);super.onDataConnectionStateChanged(state);}@OverridepublicvoidonMessageWaitingIndicatorChanged(booleanmwi){Log.i(APP_NAME,"onMessageWaitingIndicatorChanged "+mwi);super.onMessageWaitingIndicatorChanged(mwi);}@OverridepublicvoidonServiceStateChanged(ServiceStateserviceState){StringserviceStateString="UNKNOWN";switch(serviceState.getState()){caseServiceState.STATE_IN_SERVICE:serviceStateString="IN SERVICE";break;caseServiceState.STATE_EMERGENCY_ONLY:serviceStateString="EMERGENCY ONLY";break;caseServiceState.STATE_OUT_OF_SERVICE:serviceStateString="OUT OF SERVICE";break;caseServiceState.STATE_POWER_OFF:serviceStateString="POWER OFF";break;default:serviceStateString="UNKNOWN";break;}setTextViewText(info_ids[INFO_SERVICE_STATE_INDEX],serviceStateString);Log.i(APP_NAME,"onServiceStateChanged "+serviceStateString);super.onServiceStateChanged(serviceState);}@OverridepublicvoidonSignalStrengthChanged(intasu){Log.i(APP_NAME,"onSignalStrengthChanged "+asu);setSignalLevel(info_ids[INFO_SIGNAL_LEVEL_INDEX],info_ids[INFO_SIGNAL_LEVEL_INFO_INDEX],asu);super.onSignalStrengthChanged(asu);}};}
The main.xml layout, shown next, consists of a variety of nested linear layouts so that all the information gathered in the preceding code can be displayed neatly:
<?xml version="1.0" encoding="utf-8"?><ScrollViewxmlns:android="http://schemas.android.com/apk/res/android"android:layout_width="fill_parent"android:layout_height="wrap_content"android:orientation="vertical"android:scrollbarStyle="insideOverlay"android:scrollbarAlwaysDrawVerticalTrack="false"><LinearLayoutandroid:orientation="vertical"android:layout_width="fill_parent"android:layout_height="fill_parent"><LinearLayoutandroid:layout_width="fill_parent"android:layout_height="wrap_content"android:orientation="horizontal"><TextViewandroid:text="Service State"style="@style/labelStyleRight"/><TextViewandroid:id="@+id/serviceState_info"style="@style/textStyle"/></LinearLayout><LinearLayoutandroid:layout_width="fill_parent"android:layout_height="wrap_content"android:orientation="horizontal"><TextViewandroid:text="Cell Location"style="@style/labelStyleRight"/><TextViewandroid:id="@+id/cellLocation_info"style="@style/textStyle"/></LinearLayout><LinearLayoutandroid:layout_width="fill_parent"android:layout_height="wrap_content"android:orientation="horizontal"><TextViewandroid:text="Call State"style="@style/labelStyleRight"/><TextViewandroid:id="@+id/callState_info"style="@style/textStyle"/></LinearLayout><LinearLayoutandroid:layout_width="fill_parent"android:layout_height="wrap_content"android:orientation="horizontal"><TextViewandroid:text="Connection State"style="@style/labelStyleRight"/><TextViewandroid:id="@+id/connectionState_info"style="@style/textStyle"/></LinearLayout><LinearLayoutandroid:layout_width="fill_parent"android:layout_height="wrap_content"android:orientation="horizontal"><TextViewandroid:text="Signal Level"style="@style/labelStyleRight"/><LinearLayoutandroid:layout_width="fill_parent"android:layout_height="wrap_content"android:layout_weight="0.5"android:orientation="horizontal"><ProgressBarandroid:id="@+id/signalLevel"style="@style/progressStyle"/><TextViewandroid:id="@+id/signalLevelInfo"style="@style/textSmallStyle"/></LinearLayout></LinearLayout><LinearLayoutandroid:layout_width="fill_parent"android:layout_height="wrap_content"android:orientation="horizontal"><TextViewandroid:text="Data"style="@style/labelStyleRight"/><ImageViewandroid:id="@+id/dataDirection"style="@style/imageStyle"/></LinearLayout><TextViewandroid:id="@+id/device_info"style="@style/labelStyleLeft"/></LinearLayout></ScrollView>
Our code uses some UI styles, which are declared in this file, named styles.xml:
<?xml version="1.0" encoding="utf-8"?><resources><stylename="labelStyleRight"><itemname="android:layout_width">fill_parent</item><itemname="android:layout_height">wrap_content</item><itemname="android:layout_weight">0.5</item><itemname="android:textSize">15dip</item><itemname="android:textStyle">bold</item><itemname="android:layout_margin">10dip</item><itemname="android:gravity">center_vertical|right</item></style><stylename="labelStyleLeft"><itemname="android:layout_width">fill_parent</item><itemname="android:layout_height">wrap_content</item><itemname="android:layout_weight">0.5</item><itemname="android:textSize">15dip</item><itemname="android:textStyle">bold</item><itemname="android:layout_margin">10dip</item><itemname="android:gravity">center_vertical|left</item></style><stylename="textStyle"><itemname="android:layout_width">fill_parent</item><itemname="android:layout_height">wrap_content</item><itemname="android:layout_weight">0.5</item><itemname="android:textSize">15dip</item><itemname="android:textStyle">bold</item><itemname="android:layout_margin">10dip</item><itemname="android:gravity">center_vertical|left</item></style><stylename="textSmallStyle"><itemname="android:layout_width">fill_parent</item><itemname="android:layout_height">fill_parent</item><itemname="android:layout_weight">0.5</item><itemname="android:textSize">10dip</item><itemname="android:layout_margin">10dip</item><itemname="android:gravity">center_vertical|left</item></style><stylename="progressStyle"><itemname="android:layout_width">fill_parent</item><itemname="android:layout_height">wrap_content</item><itemname="android:layout_margin">10dip</item><itemname="android:layout_weight">0.5</item><itemname="android:indeterminateOnly">false</item><itemname="android:minHeight">20dip</item><itemname="android:maxHeight">20dip</item><itemname="android:progress">15</item><itemname="android:max">100</item><itemname="android:gravity">center_vertical|left</item><itemname="android:progressDrawable">@android:drawable/progress_horizontal</item><itemname="android:indeterminateDrawable">@android:drawable/progress_indeterminate_horizontal</item></style><stylename="imageStyle"><itemname="android:layout_width">fill_parent</item><itemname="android:layout_height">wrap_content</item><itemname="android:layout_weight">0.5</item><itemname="android:src">@drawable/icon</item><itemname="android:scaleType">fitStart</item><itemname="android:layout_margin">10dip</item><itemname="android:gravity">center_vertical|left</item></style></resources>
The application uses the ACCESS_COARSE_LOCATION permission (to get the approximate location from the cell radio service), which needs to be added to your project’s AndroidManifest.xml file:
<uses-permissionandroid:name="android.permission.ACCESS_COARSE_LOCATION"/>
The application also uses some images for indicating the data communication state as no data communication, incoming data communication, outgoing data communication, or both-ways data communication. These images are, respectively, named data_none.png, data_in.png, data_out.png, and data_both.png. Please add some icons with the aforementioned names in the res/drawable folder of your project structure.
Figure 11-6 shows the result.
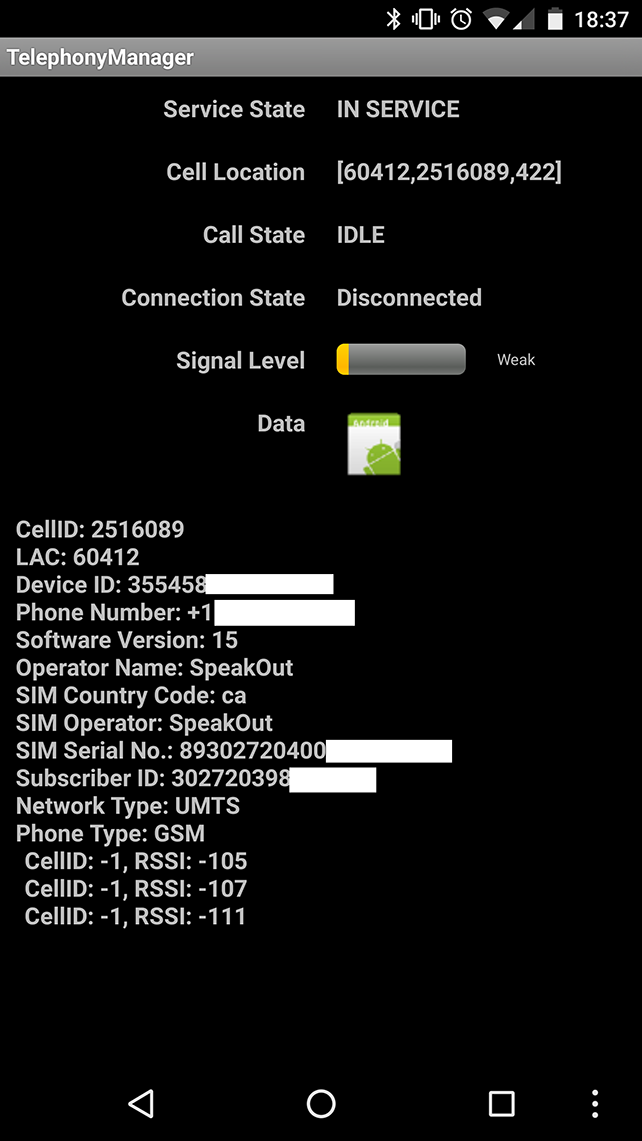
Figure 11-6. TelephonyManagerDemo in action
Source Download URL
The source code for this example is in the Android Cookbook repository, in the subdirectory TelephonyManager (see “Getting and Using the Code Examples”).