
Chapter 21. Packaging, Deploying, and Distributing/Selling Your App
The success of Android has led to a proliferation of application markets. But the official Google Play Store remains the largest marketplace for distributing your app, so we will cover that here, along with information on preparing your app, making it harder to reverse-engineer, and other information you may need along the way.
21.1 Creating a Signing Certificate and Using It to Sign Your Application
Zigurd Mednieks
Discussion
Google has stated that one of its intentions with Android was to minimize the hassle of getting applications signed. You don’t have to go to a central signing authority to get a signing certificate; you can create the certificate yourself. Once you generate the certificate, you can sign your application using the jarsigner tool that comes with the Java JDK. Once again, you don’t need to apply for or get anyone’s approval. As you’ll see, it’s about as straightforward as signing can be.
In this recipe, we are going to create an encrypted signing certificate and use it to sign an application. You can sign every Android application you develop with the same signing certificate. You can create as many signing certificates as you want, but you really only need one for all your applications. And using one certificate for all your applications lets you do some things that you couldn’t do otherwise:
- Simplify upgrades
-
Signing certificates are tied to the application package name, so if you change the signing certificate you use with subsequent versions of your application, you’ll have to change the package name, too. Changing certificates is manageable, but messy.
- Run multiple applications per user ID
-
When all your applications share the same signing certificate, they can run in the same Linux process. You can use this to separate your application into smaller modules (each one an Android application) that together make up the larger application. If you were to do that, you could update the modules separately and they could still communicate freely.
- Share code/data
-
Android lets you enable or restrict access to parts of your application based on the requester’s signing certificate. If all your applications share the same certificate, it’s easy for you to reuse parts of one application in another.
When you generate a key pair and certificate, you’ll be asked for the validity period you desire for the certificate. Although usual practice in website development is to use 1 or 2 years, Google recommends that you set the validity period to at least 25 years, and in fact, if you’re going to use the Google Play Store to distribute your application, it requires that your certificate be valid at least until October 22, 2033 (25 years to the day from when Google opened the Play Store, then known as the Android Market).
Generating a key pair (public and private keys) and a signing certificate
To generate a pair of public/private keys, use a tool called keytool, which came with the Sun JDK when you installed it onto your development computer. keytool asks you for some information and uses that to generate the pair of keys:
-
A private key that will be kept in a keystore on your computer, secured with passwords. You will use this key to sign your application, and if you need a Maps API key for your application, you will use the MD5 fingerprint of the signing certificate to generate that key.
-
A public key that Android can use to decrypt your signing certificate. You will send this key along with your published application so that it can be made available in the runtime environment. Signing certificates are actually checked only at install time, so once installed your application is good to run, even if the certificate or keys expire.
keytool is pretty straightforward. From your operating system’s command line, enter something like the following:
$ keytool -genkey -v -keystore myapp.keystore -alias myapp -keyalg RSA
 -validity 10000
This asks keytool to generate a key pair and self-signed certificate (-genkey) in verbose mode (-v), so you get all the information, and put it in a keystore called myapp.keystore (-keystore). It also says that in the future you want to refer to that key by the name myapp (-alias), and that keytool should use the RSA algorithm for generating public/private key pairs (-keyalg). Finally, it says that you’d like the key to be valid for 10,000 days (-validity), or about 27 years.
keytool will prompt you for some information it uses to build the key pair and certificate:
-
A password to be used in the future when you want to access the keystore
-
Your first and last names
-
Your organizational unit (the name for your division of your company, or some- thing like “self” if you aren’t developing for a company)
-
Your organization’s name (the name of your company, or anything else you want to use)
-
The name of your city or locality
-
The name of your state or province
-
The two-letter country code where you are located
keytool will then echo all this information back to you to make sure it’s accurate, and if you confirm the information it will generate the key pair and certificate. It will then ask you for another password to use for the key itself (and give you the option of using the same password you used for the keystore). Using that password, keytool will store the key pair and certificate in the keystore.
Signing your application
Having created a key pair, and a Maps API key if needed, you are almost ready to sign your application—but first you need to create an unsigned version that you can sign with your digital certificate. To do that, in the Package Explorer window of Eclipse, right-click your project name. You’ll get a long pop-up menu; toward the bottom, click Android Tools. You should see another menu that includes the item you want: Export Unsigned Application Package. This item takes you to a dialog box where you can pick a place to save the unsigned version of your APK file. It doesn’t matter where you put it, just pick a spot you can remember.
Now that you have an unsigned version of your APK file, you can go ahead and sign it using jarsigner. Open a terminal or command window in the directory where you stored the unsigned APK file. To sign MyApp, using the key you generated earlier, enter this command:
$ jarsigner -verbose -keystore myapp.keystore MyApp.apk myapp
You should now have a signed version of your application that can be loaded and run on any Android device. But before you send it in to the Google Play Store, there’s one more intervening step: you have rebuilt the application, so you must test it again, on real devices. If you don’t have a real device, get one. If you only have one, get more, or make friends with somebody who owns a device from a different manufacturer.
Note that in the current version of the IDE, there is an Export Signed Application Package option that will allow you to create the keys and sign your application all from one wizard. This option is available in the project’s context menu in the Android Tools submenu and also in the File menu under Export, where it is known simply as Export Android Project.
Warning
This action is so convenient that it probably makes it more likely that you will forget where you put the keystore. Don’t do that! In fact, you must not lose either your keystore file or the keyphrase used to unlock it, or you will never be able to update your application. There is no recovery from this failure mode; it is not possible to reverse-engineer your key from your application (or else the bad guys would be able to do it, and install malware versions of your app!).
See Also
If you’re not familiar with the algorithms used here, such as RSA and MD5, you don’t actually need to know much. Assuming you’ve a modicum of curiosity, you can find out all you need to know about them with any good web search engine.
You can get more information about security, key pairs, and the keytool utility on the Java website.
21.2 Distributing Your Application via the Google Play Store
Zigurd Mednieks
Solution
Submit your app to the Google Play Store.
Discussion
Note
The original Android Market was combined with Google Books and other services to create the Play Store shortly after the first edition of this book went to press.
After you’re satisfied that your application runs as expected on real Android devices, you’re ready to upload it to the Play Store, Google’s service for publishing and downloading Android applications. The procedure is pretty straightforward:
-
Sign up as an Android developer (if you haven’t done so already).
-
Upload your signed application.
Signing up as an Android developer
Go to Google’s website, and fill out the forms provided. You will be asked to:
-
Use your Google account to log in (if you don’t have a Google account, you can get one for free by following the Create Account link on the login page),
-
Agree to the Google Play Developer distribution agreement.
-
Pay a one-time fee of $25 (payable by credit card via Google Checkout; again, if you don’t have an account set up, you can do so quickly).
-
If the game is being charged for, specify your payment processor (again, you can easily sign up for a Google Payments account).
The forms ask for a minimal amount of information—your name, phone number, and so on. Once you provide that info, you’re signed up.
Uploading your application
Now you can upload your application. To identify and categorize your application, you will be asked for the following:
- Application APK filename and location
-
This refers to the APK file of your application, signed with your private signing certificate.
- Title and description
-
These are very important, because they are the core of your marketing message to potential users. Try to make the title descriptive and catchy, and describe the application in a way that will make your target market want to download it.
- Application type
-
There are currently two choices: Applications or Games.
- Category
-
The list of categories varies depending on application type. The currently available categories for apps include items such as Business, Communications, Education, Entertainment, Finance, Lifestyle, Maps & Navigation, Productivity, Shopping, Social, Tools, Travel & Local, Video Players & Editors, and Weather. For games, the available categories include Action, Arcade, Card, Casino, Puzzle, Role Playing, Sports, and more.
- Price
-
This can be Free or a fixed price. Refer to the agreement you agreed to earlier to see what percentage you actually get to keep.
- Distribution
-
You can limit where your application is available, or make it available everywhere.
Finally, you are asked to confirm that your application meets the Android Content Ratings Guidelines and that it does not knowingly violate any export laws. After that, you can upload your APK file, and within a few hours your application will appear on the Google Play online catalog, accessible from any connected Android device. To view your application, just open Google Play on your device and use its Search box, or load in the device’s browser a file with a URL of the form market://details?id=com.yourorg.yourprog, but with your application’s actual package name. You can also visit the Play Store in a desktop browser and view your app’s details page.
Then what?
Sit back and watch the fame or money—and the support emails—roll in. Be patient with end users, for they do not think as we do.
21.3 Distributing Your Application via Other App Stores
Ian Darwin
Discussion
To use any “unofficial” source, the user will have to enable “Unknown sources” in the Settings app, which comes with a security warning. “Unofficial source” means an app store that is not shipped by default with the device. For the vast majority of devices, Google Play is the official store. However, for Amazon Kindle devices, Google Play is not even available, and the Amazon Appstore is the only official app store. BlackBerry maintains its own market as well, also without Google Play. There may be some other devices that ship with a different app store, particularly in Asia. Google does a really good job of vetting apps for security problems; it is not known to what extent these other stores do so (well, actually it is, but we can’t say it here; just do a web search for which app stores have the worst security track record).
Note
Apps using Google Maps or other Google Play Services will not succeed in marketplaces that do not support Google Play.
From a developer point of view, you of course want to reach as many consumers as possible, so getting your app into multiple stores makes sense. Google Play and the Amazon Appstore are the two largest stores, so start there. To get your app into one of the others, start with the URL from Table 21-1, look at the store carefully, and see if you want to be associated with it. If so, look around for the “developer” or “partner” or “publisher” link, and sign up.
| Name | Comments | URL |
|---|---|---|
Google Play |
Formerly Android Market |
|
Amazon Appstore |
Most Android apps can run unchanged |
|
Barnes & Noble |
Discontinued |
N/A |
BlackBerry World |
Most Android apps run unchanged |
|
F-Droid |
Free (open source) apps only! |
|
GetJar |
Not limited to Android |
|
Samsung Galaxy Apps |
Included in Galaxy devices |
|
SlideME |
See Also
Table 21-1, although focused only on the major stores, will probably always be out of date, but updates are welcome. A web search on “alternative android market” will find some smaller/newer app stores. A fairly comprehensive list can be found on the AlternativeTo website.
21.4 Monetizing Your App with AdMob
Enrique Diaz, Ian Darwin
Solution
Using AdMob libraries, you can display ads in your free app, getting money each time a user taps/clicks an ad.
Discussion
AdMob, which is owned by Google, is one of the world’s largest mobile advertising networks. You can get more information and download the SDK for various platforms from the AdMob website.
The AdMob Android SDK contains the code necessary to install AdMob ads in your application.
You can manually perform all the steps involved in integrating AdMob, but it’s easier to let Android Studio add the code for you. Just create a project whose main Activity already includes the AdMob code, or add an AdMob Activity to your existing app. Figure 21-1 shows how to select the AdMob Activity.
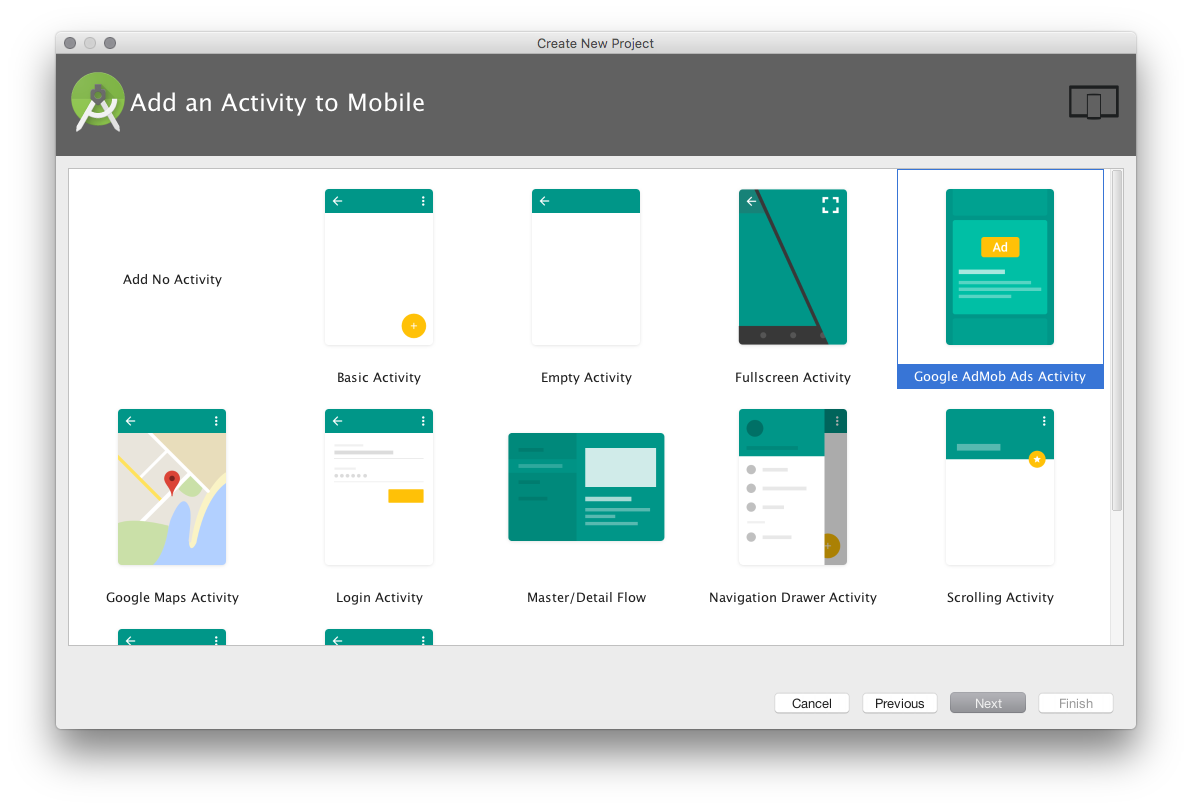
Figure 21-1. Creating the AdMob Activity
Figure 21-2 shows how to customize the Activity. The main choice that’s ad-specific is the Ad Format. You can choose from one of the following (only the first two are supported in this AdMob Activity wizard):
- Interstitial
-
Interstitial means “in the spaces between.” Interstitial ads appear in their own Activity so they cover up the rest of the app, forcing the user to interact.
- Banner
-
Banner ads appear at the top or bottom of the regular Activity; the user is more free to ignore them.
- Video
-
These are videos that play to drive the user to the advertiser’s site.
- Native
-
These are graphics that are placed inside your Activity; supported with Firebase AdMob integration.
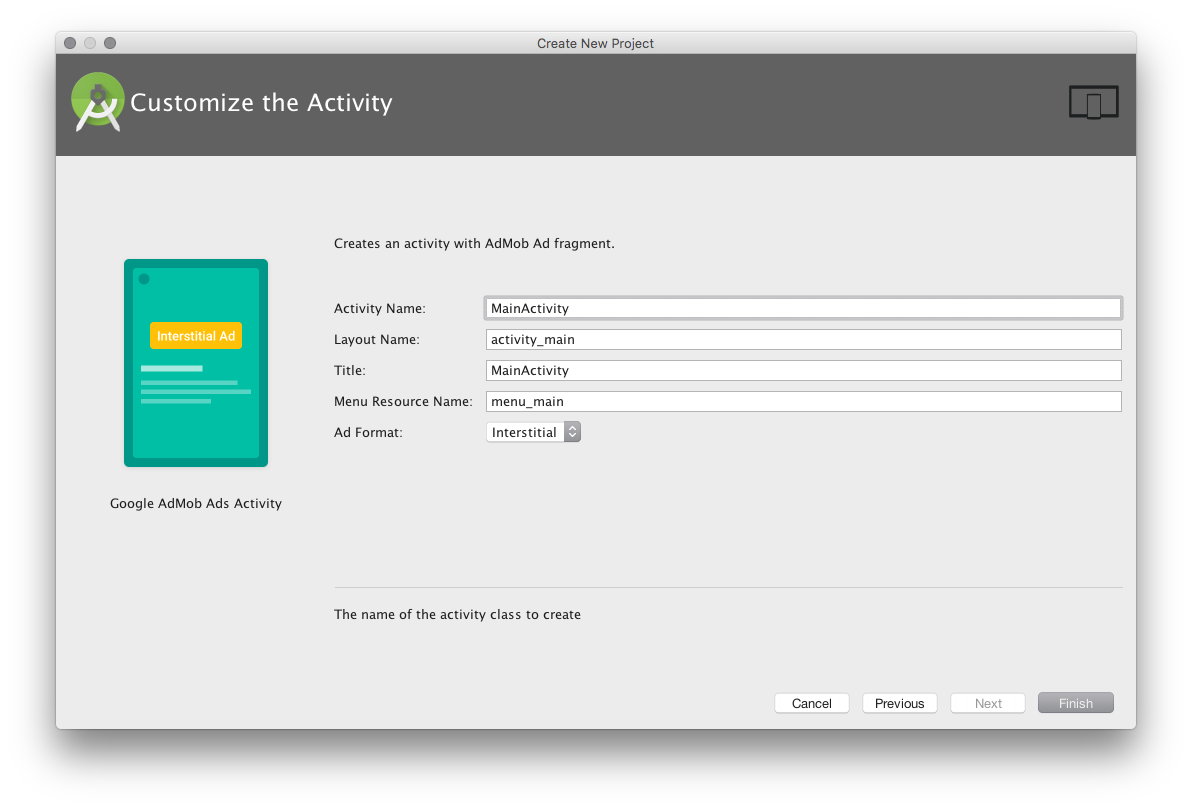
Figure 21-2. Configuring the Activity
Since the code is different for each type of ad, and because interstitials are usually more profitable (even though they are more annoying), this recipe will just show the interstitial type.
In this example, the New Activity wizard creates an app with two Activity classes, one that simulates a game with multiple levels,
and another that shows the actual ads (initially a dummy ad) so you can get on with developing the
rest of your application. Notice the following Toast text:
publicclassMainActivityextendsActivity{// Remove the following line after defining your own ad unit IDprivatestaticfinalStringTOAST_TEXT="Test ads are being shown. "+"To show live ads, replace the ad unit ID in "+"res/values/strings.xml with your own ad unit ID.";
The string TOAST_TEXT is displayed in the sample application; you can remove it
after you’ve installed your real application key, as discussed later in this recipe.
This basic Activity will work out of the box, as shown in the first image of Figure 21-3. When the user presses the Next Level button, the ad is imposed on the screen ahead of the next-level Activity, as shown in the second image of Figure 21-3. The user can either press the X in the upper left to ignore the ad and go on to the next level (third image), or tap anywhere in the ad and get taken to the ad’s website (fourth image).

Figure 21-3. AdMob basic Activity running
If you’d rather perform all the steps by hand, here’s a brief summary:
-
Add the Google Play “Ad Services” dependency (
com.google.android.gms:play-services-ads:10.0.1) to your build file. -
Add an
AdActivityto your AndroidManifest.xml file. -
Add the
INTERNETandACCESS_NETWORK_STATEpermissions to your AndroidManifest.xml file. -
Add a field of type
InterstitialAdto your main Activity. -
Add code to instantiate the
InterstitialAd, configure it, and load it in the background with a listener to record completed loading (see Example 21-1).
Example 21-1. Code from main Activity to manage interstitial ad
// In onCreate():mInterstitialAd=newInterstitialAd();loadInterstitial();// Method to get a new adprivateInterstitialAdnewInterstitialAd(){InterstitialAdinterstitialAd=newInterstitialAd(this);interstitialAd.setAdUnitId(getString(R.string.interstitial_ad_unit_id));interstitialAd.setAdListener(newAdListener(){@OverridepublicvoidonAdLoaded(){mNextLevelButton.setEnabled(true);}@OverridepublicvoidonAdFailedToLoad(interrorCode){mNextLevelButton.setEnabled(true);}@OverridepublicvoidonAdClosed(){// Proceed to the next levelgoToNextLevel();}});returninterstitialAd;}privatevoidshowInterstitial(){// Show the ad if it's ready; otherwise toast and reload the adif(mInterstitialAd!=null&&mInterstitialAd.isLoaded()){mInterstitialAd.show();}else{Toast.makeText(this,"Ad did not load",Toast.LENGTH_SHORT).show();goToNextLevel();}}privatevoidloadInterstitial(){// Disable the next level button and load the admNextLevelButton.setEnabled(false);AdRequestadRequest=newAdRequest.Builder().setRequestAgent("android_studio:ad_template").build();mInterstitialAd.loadAd(adRequest);}
For this code to compile, you must also provide the goToNextLevel() method, which is highly application-dependent,
but should at least have these two calls:
    mInterstitialAd = newInterstitialAd(); // Get the next ad to be displayed
    loadInterstitial();                    // Start the ad loading
When your application is complete and you are ready to ship it and display ads and generate revenue, you must open an AdMob account, which in turn requires an AdWords account. To get these accounts, go to https://admob.com, click the signup button, and follow the steps to create an account and set up an Android interstitial ad.
When you have your “ad unit” set up, copy and paste the “Ad Unit ID”—a long string that begins
with ca-app-pub-—over top of the fake one ("ca-app-pub- 3940256099942544/1033173712")
in the provided strings.xml.
Tip
This string resource can be put into a file all by itself, so that if you are sharing your source code you can choose whether to give out your map key along with the code.
Note that even with a live ID, the software will always show fake test ads when run on the emulator. Also, do not click live ads, as that would generate false pay-per-click statistics and can result in suspension of your AdMob account.
See Also
There is much more to AdMob, including other types of ads, monitoring, Firebase integration, and more. See the website for details on these topics.
For more on interstitial ads and the Firebase integration, see the Firebase documentation. For a comparison of mobile ad options, see Brittany Fleit’s blog post on the topic. You may also want to join AdMob Publisher Discuss, the official support forum for AdMob.
Source Download URL
The source code for this project is in the Android Cookbook repository, in the subdirectory AdMobDemo (see “Getting and Using the Code Examples”).
21.5 Obfuscating and Optimizing with ProGuard
Ian Darwin
Solution
The optimization and obfuscation tool ProGuard is supported by the build script provided with the Android New Project Wizard in the IDEs, needing only to be enabled.
Discussion
Obfuscation of code is the process of trying to hide information (such as compile-time names visible in the binary) that would be useful in reverse-engineering your code. If your application contains commercial or trade secrets, you probably want to obfuscate it. If your program is open source, there is probably no need to obfuscate the code. You decide.
Optimization of code is analogous to refactoring at the source level, but it usually aims to make the code either faster, smaller, or both.
The normal development cycle involves compilation to standard Java bytecode and then conversion to the Android-specific DEX format.
DEX is the Dalvik Executable format (Dalvik being the old version of the Android Runtime).
With Eclipse, the compilation is done by the built-in compiler (Eclipse being a full IDE).
With Android Studio and other tools, a compiler (presumably javac) is invoked as part of the build.
In either case, the Android SDK tool dex or dx is invoked; the current usage clause from dx
explains that it is used to “Convert a set of classfiles into a dex file.”
Current versions of Android Studio provide an alternate build chain called Jack, which
supports the latest version of Java, Java 8, providing both compilation and translation to DEX.
ProGuard is Eric Lafortune’s open source, free software program for optimizing and obfuscating Java bytecode. ProGuard is not Android-specific; it works with console-mode applications, applets, Swing applications, Java ME midlets, Android applications, and just about any type of Java program. ProGuard works on compiled Java (.class format),
so it must be interposed in the development cycle before conversion to DEX. This is most readily achieved using the standard Java build tool Ant.
Most build chains (see Chapter 1) include support for ProGuard.
If using the older ant process, for example, you only need to edit the file build.properties to include the following line, which gives the name of the configuration file:
proguard.config=proguard.cfg
When using Maven, the command mvn android:proguard will run ProGuard.
At present it does not appear possible to use ProGuard with the Java 8 compiler Jack (described in Recipe 1.18).
Configuration file
Regardless of your build process, the actual operation of ProGuard is controlled by the configuration file (normally called proguard.cfg), which has its own syntax. Basically, keywords begin with a - in the first character position, followed by a keyword, followed by optional parameters. Where the parameters reference Java classes or members, the syntax somewhat mimics Java syntax to make your life easier. Here is a minimal ProGuard configuration file for an Android application:
-injars      bin/classes
-outjars     bin/classes-processed.jar
-libraryjars /usr/local/android-sdk/platforms/android-19/android.jar

-dontpreverify
-repackageclasses ''
-allowaccessmodification
-optimizations !code/simplification/arithmetic

-keep public class com.example.MainActivity
The first section specifies the paths of your project, including a temporary dir3ectory for the optimized classes.
The Activity class (in this example com.example.MainActivity) must be present in the output of the optimization and obfuscation process, since it is the main Activity and is referred to by name in the AndroidManifest.xml file.
This would also apply to any components mentioned by name in AndroidManifest.xml.
A full working proguard.cfg file will normally be generated for you by the Eclipse New Android Project wizard. Example 21-2 is one such configuration file.
Example 21-2. Example proguard.cfg file
-optimizationpasses 5
-dontusemixedcaseclassnames
-dontskipnonpubliclibraryclasses
-dontpreverify
-verbose
-optimizations !code/simplification/arithmetic,!field/*,!class/merging/*

-keep public class * extends android.app.Activity
-keep public class * extends android.app.Application
-keep public class * extends android.app.Service
-keep public class * extends android.content.BroadcastReceiver
-keep public class * extends android.content.ContentProvider
-keep public class * extends android.app.backup.BackupAgentHelper
-keep public class * extends android.preference.Preference
-keep public class com.android.vending.licensing.ILicensingService

-keepclasseswithmembernames class * {
    native <methods>;
}

-keepclasseswithmembernames class * {
    public <init>(android.content.Context, android.util.AttributeSet);
}

-keepclasseswithmembernames class * {
    public <init>(android.content.Context, android.util.AttributeSet, int);
}

-keepclassmembers enum * {
    public static **[] values();
    public static ** valueOf(java.lang.String);
}

-keep class * implements android.os.Parcelable {
    public static final android.os.Parcelable$Creator *;
}
The prolog is mostly similar to the earlier example. The keep, keepclasseswithmembernames, and keepclassmembers entries specify particular classes that must be retained. These are mostly obvious, but the enum entries may not be: the Java 5 enum methods values() and valueOf() are sometimes used with the Reflection API, so they must remain visible, as must any classes that you access via the Reflection API.
The ILicensingService entry is only needed if you are using Android’s License Validation Tool (LVT):
-keep class com.android.vending.licensing.ILicensingService
See Also
The ProGuard Reference Manual has many more details. There is also information on optimization in at the Android Studio User Guide. Finally, Matt Quigley has written a helpful article titled “Optimizing, Obfuscating, and Shrinking your Android Applications with ProGuard” on the Android Engineer Blog.
21.6 Hosting Your App on Your Own Server
Ian Darwin
Solution
Just put your APK up on a web server, and get users to download it from the browser on their devices.
Discussion
You can host an application yourself on your own web server or a web server you can upload files to. Just install the APK file and tell users to visit that URL in their device’s browser. The browser will give the usual security warnings, but will usually allow the user to install the application.
Hopefully most users will be skeptical of the security implications of downloading an app from some website they’ve never heard of, but for internal-only use, this approach is simpler than setting up an account on a major app store.
This will be especially interesting to enterprise users where it isn’t necessary or desirable to put an internal-use application out into a public marketplace like Google Play.
Here is the formula to upload an APK to a web server using scp, the secure copy program
(use of the old unencrypted ftp being generally considered hopelessly insecure
in this day and age):
$ scp bin/*.apk [email protected]:/www/tmp
Enter password for testuser:
ShellCommand.apk           100%   15KB  14.5KB/s   00:00
$
For this example we just reused the ShellCommand APK from Recipe 19.2.
Then you can visit the site in a browser on your device (Chrome, in this example) and ask for the file by its full URL, e.g., https://myserver.com/tmp/ShellCommand.apk. You’ll get the expected security warning (see Figure 21-4), but if you click OK, the app will install.
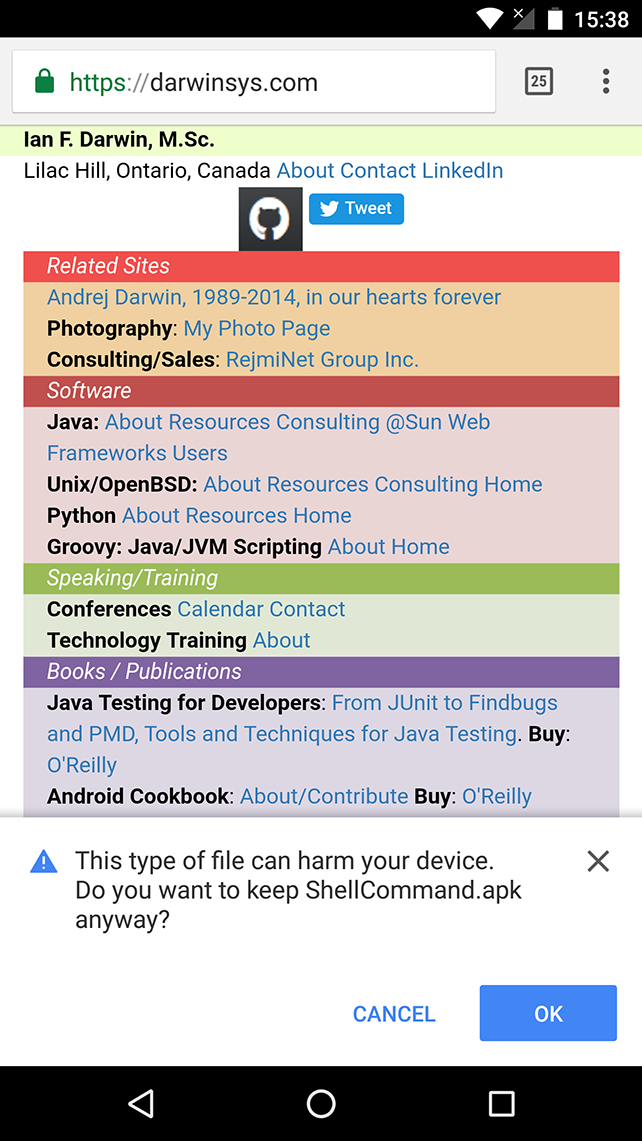
Figure 21-4. The security warning
Then you can open the app like any other app.
This whole process could be automated by having some other application open an Intent for the URL, but that begs the question of how you would get that app onto the users’ devices.
Because it is not in an app store, this app will not get updates automatically. You can simply tell users to fetch it again, or you can use the fancier technique described in Recipe 21.7.
21.7 Creating a “Self-Updating” App
Solution
You can find the last time your app was updated by use of the package manager. And you can usually get the last time the APK on the web server was updated just by sending an HTTP HEAD request. Compare the two timestamps, and if the web file is newer, open an Intent for the same URI used in the HTTP HEAD, and let the browser handle things from there.
Discussion
If you are hosting your app yourself, as discussed in Recipe 21.6, you almost certainly want a way to notify users when you update the app. Sending emails doesn’t scale well unless you have a scheme for capturing users’ email addresses with each download. And even then, many users will be too busy to update the app manually. Automating this task makes sense.
The package manager knows when it last updated the app, and the web server knows when you last updated the file containing the app. You just have to ask them both and compare the timestamps. If the web file is newer, you have an install candidate; start your UpdateActivity to ask the user if it’s OK to update. If she says yes, open the browser via a URI back to the web server file. For a slightly better experience, send her to a page about the update. The browser will ultimately prompt the user for the final install. You will need to convince your users that it’s OK to accept the somewhat scary warning about installing a non–Play Store app in this way, but they will have already needed to enable the Settings option to download from unknown sources to get your app installed in the first place.
This code in the AutoUpdater project uses a background Service (Recipe 4.6) to check once a day for an updated APK on the web server:
protectedvoidonHandleIntent(Intentintent){Log.d(TAG,"Starting One-time Service Runner");/* Now the simple arithmetic: if web package was updated after* last time app was updated, then it's time* again to update!*/finallongappUpdatedOnDevice=getAppUpdatedOnDevice();finallongwebPackageUpdated=getWebPackageUpdated();if(appUpdatedOnDevice==-1||webPackageUpdated==-1){return;// FAIL, try another day}if(webPackageUpdated>appUpdatedOnDevice){triggerUpdate();}}publiclonggetAppUpdatedOnDevice(){PackageInfopackageInfo=null;try{packageInfo=getPackageManager().getPackageInfo(getClass().getPackage().getName(),PackageManager.GET_PERMISSIONS);}catch(NameNotFoundExceptione){Log.d(TAG,"Failed to get package info for own package!");return-1;}returnpackageInfo.lastUpdateTime;}protectedvoidtriggerUpdate(){Log.d(TAG,"UpdateService.triggerUpdate()");finalIntentintent=newIntent(this,UpdateActivity.class);intent.setData(Uri.parse("http://"+SERVER_NAME+PATH_TO_APK));intent.setFlags(Intent.FLAG_ACTIVITY_NEW_TASK);startActivity(intent);}
The code of getWebPackageUpdated() is not shown, but it basically sends a HEAD request
for the same URL handled in triggerUpdate(),
and extracts the value of the Last-Modified header from the HTTP response.
A better way to get the installer to open your file is to save it locally yourself and to open it via an Intent.
The AppDownloader project downloads the API to a local file in an AsyncTask (Recipe 4.10) and does the following to install the file:
// Do the installnotifyFromBackground("Installing...");IntentpromptInstall=newIntent(Intent.ACTION_VIEW).setDataAndType(Uri.fromFile(outputFile),"application/vnd.android.package-archive");startActivity(promptInstall);
See Also
https://dzone.com/articles/12-dev-tools-to-update-your-app-instantly-skip-the discusses several other methods for updating your app without going back to the Play market.
21.8 Providing a Link to Other Published Apps in the Google Play Store
Daniel Fowler
Solution
Use an Intent and a URI that contains your publisher name or the package name.
Discussion
Android’s Intent system is a great way for your application to leverage functionality that has already been written by other developers. The Google Play application, which is used to browse and install apps, can be called from an application using an Intent. This allows an existing app to link to other apps on Google Play, thus allowing app developers and publishers to encourage users to try their other apps.
To view an app in the Google Play app, the standard Intent mechanism is used, as described in Recipe 4.1. The uniform resource identifier (URI) used is market://search?q=search_term, where search_termis replaced with the appropriate text, such as the program name or keyword. The Intent action is ACTION_VIEW.
The URI can also point directly to the Google Play details page for a package by using market://details?id=package_name, where package_name_ is replaced with the unique package_name for the app.
The program shown in this recipe (and whose output is shown in Figure 21-5) will allow a text search of Google Play or show the details page for a given app. Example 21-3 is the layout.
Example 21-3. The main layout
<LinearLayoutxmlns:android="http://schemas.android.com/apk/res/android"android:orientation="vertical"android:layout_width="fill_parent"android:layout_height="fill_parent"><EditTextandroid:id="@+id/etSearch"android:layout_width="fill_parent"android:layout_height="wrap_content"android:textSize="20sp"android:singleLine="true"/><RadioGroupandroid:layout_width="wrap_content"android:layout_height="wrap_content"><RadioButtonandroid:id="@+id/rdSearch"android:layout_height="wrap_content"android:layout_width="wrap_content"android:checked="true"android:text="search"android:textSize="20sp"/><RadioButtonandroid:id="@+id/rdDetails"android:layout_height="wrap_content"android:layout_width="wrap_content"android:text="details"android:textSize="20sp"/></RadioGroup><Buttonandroid:id="@+id/butSearch"android:layout_width="wrap_content"android:layout_height="wrap_content"android:textSize="20sp"android:text="Search Google Play"/></LinearLayout>
An EditText allows entry of the search term, and a RadioButton can be used to choose to do a straight search or show an app’s details page (provided the full package name is known). The Button starts the search.
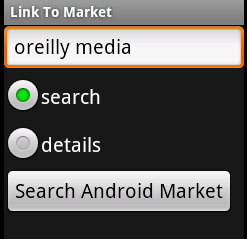
Figure 21-5. Google Play search
The important point to notice in the code shown in Example 21-4 is that the search term is URL-encoded.
Example 21-4. The main Activity
publicclassMainextendsActivity{RadioButtonpublisherOption;// Option for straight search or details@OverridepublicvoidonCreate(BundlesavedInstanceState){super.onCreate(savedInstanceState);setContentView(R.layout.main);// Search button press processed by inner class HandleClickfindViewById(R.id.butSearch).setOnClickListener(newOnClickListener(){publicvoidonClick(Viewarg0){StringsearchText;// Reference search inputEditTextsearchFor=(EditText)findViewById(R.id.etSearch);try{// URL encoding handles spaces and punctuation in search termsearchText=URLEncoder.encode(searchFor.getText().toString(),"UTF-8");}catch(UnsupportedEncodingExceptione){searchText=searchFor.getText().toString();}Uriuri;// Stores Intent Uri// Get search optionRadioButtonsearchOption=(RadioButton)findViewById(R.id.rdSearch);if(searchOption.isChecked()){uri=Uri.parse("market://search?q="+searchText);}else{uri=Uri.parse("market://details?id="+searchText);}Intentintent=newIntent(Intent.ACTION_VIEW,uri);try{main.this.startActivity(intent);}catch(ActivityNotFoundExceptionanfe){Toast.makeText(main.this,"Please install the Google Play App",Toast.LENGTH_SHORT);}}});}}
A straight text search is simply the text appended to the URI market://search?q=. To search by publisher name use the pub: qualifier; that is, append the publisher’s name to market://search?q=pub:.
The regular search is not case-sensitive; however,
the pub: search qualifier is case-sensitive. Thus, market://search?q=pub:IMDb returns a result but market://search?q=pub:imdb does not.
It’s also possible to search for a specific application (if the package name is known) by using the id: qualifier. So, if an app has a package name of com.example.myapp, the search term will be market://search?q=id:com.example.myapp. Even better is to go straight to the app’s details page with market://details?q=id:com.example.myapp. For example, O’Reilly has a free app, the details of which can be shown using market://details?id=com.aldiko.android.oreilly.isbn9781449388294.
Figure 21-6 shows the output of the search entered in Figure 21-5.
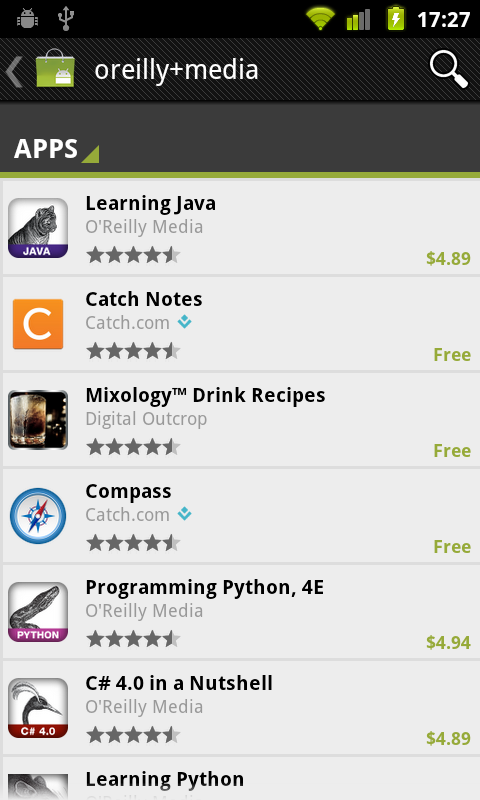
Figure 21-6. Google Play search results
Using these techniques, it is very easy to put a button or menu option on a screen to allow users to go directly to other apps that you’ve published.
See Also
The developer documentation on launch checklists.
Source Download URL
The source code for this project is in the Android Cookbook repository, in the subdirectory MarketSearch (see “Getting and Using the Code Examples”).