Chapter 19. All the World’s Not Java: Other Programming Languages and Frameworks
Developing new programming languages is a constant process in this industry. Several new (or not-so-new) languages have become popular recently. These include JVM languages like Groovy, Kotlin, Clojure, Scala as well as non-JVM languages such as Scheme, Erlang, C#, F#, Haskell, and more. Android encourages the use of many languages. You can write your app in pure Java using the SDK, of course—that’s the subject of most of the rest of this book. You can also mix some C/C++ code into Java using Android’s NDK for native code (see Recipe 19.3). People have made most of the major compiled languages work, especially (but not exclusively) the JVM-based ones. You can write using a variety of scripting languages such as Perl, Python, and Ruby (see Recipe 19.4). And there’s more…
If you want a very high-level, drag-and-drop development process, look at Android App Inventor, a Google-originated environment for building applications easily using the drag-and-drop metaphor and “blocks” that snap together. App Inventor is now maintained at MIT.
If you are a web developer used to working your magic in HTML, JavaScript, and CSS, there is a route for you to become an Android developer using the tools you already know. There are, in fact, five or six technologies that go this route, including AppCelerator Titanium, PhoneGap/Cordova (see Recipe 19.10), and more. These generally use CSS to build a style that looks close to the native device toolkit, JavaScript to provide actions, and W3 standards to provide device access such as GPS. Most of these work by packaging up a JavaScript interpreter along with your HTML and CSS into an APK file. Many have the further advantage that they can be packaged to run on iPhone, BlackBerry, and other mobile platforms. The risk I see with these is that, since they’re not using native toolkit items, they may easily provide strange-looking user interfaces that don’t conform either to the Android Guidelines or to users’ expectations of how apps should behave on the Android platform. That is certainly something to be aware of if you are using one of these toolkits.
One of the main design goals of Android was to keep it as an open platform. The wide range of languages that you can use to develop Android apps testifies that this openness has been maintained.
19.1 Learning About Cross-Platform Solutions
Ian Darwin
Discussion
There are many paths to cross-platform development that allow you to develop applications that run both on Android and on iOS, and possibly other less-used platforms. One thing to beware of is that many of these paths do not give the full native experience. Android’s user interface is not the same as that of iOS, for example, and it’s difficult to reconcile them; the basics are easy, but the nuances are hard. Some cross-platform apps don’t even have the Android “Back button” working correctly! However, on the plus side, some of these development approaches also generate desktop apps for Microsoft Windows, macOS, or desktop Java versions. Table 19-1 lists some of the better-known tools at the time of this writing. Before using any of these, study it well.
| Name | Language | URL | Notes |
|---|---|---|---|
Appcelerator Platform |
JavaScript |
http://www.appcelerator.com/mobile-app-development-products/ |
|
App Inventor |
Blocks (Logo) |
Visual, no-code solution |
|
Application Craft |
HTML5 |
Cloud-based development; uses Cordova for Mobile |
|
B4A (formerly Basic4android) |
BASIC |
||
Cordova |
HTML5 |
See Recipe 19.10 |
|
Corona |
Lua |
||
Gluon Mobile |
Java |
Own Java API for device/hardware features; FOSS version |
|
Intel XDK |
HTML5 |
Uses Cordova for Mobile |
|
Monkey X |
BASIC |
Focus on 2D games |
|
Kivy |
Python |
||
MonoGame |
C# |
||
NDK |
C/C++ |
- |
Standard Android toolset for using native code; see Recipe 19.3 |
NSB/AppStudio |
BASIC |
||
PhoneGap |
HTML5 |
Now known as Cordova; see above |
|
RFO BASIC! |
BASIC |
||
RhoMobile Suite |
Ruby |
||
Xamarin |
C# |
Acquired by Microsoft |
Of these, Cordova/PhoneGap is covered in Recipe 19.10 and Xamarin is covered in Recipe 19.9.
19.2 Running Shell Commands from Your Application
Rachee Singh
Discussion
The Runtime class is a part of standard Java (Java SE), and works the same here as it does in Java SE.
Your applications cannot create an instance of the Runtime class, but rather can get an instance by invoking the static getRuntime() method. Using this instance you call the exec() method, which executes the specified program in a separate native process. It takes the name of the program to execute as an argument. The exec() method returns the new Process object that represents the native process.
Usually standard Unix/Linux programs live in /system/bin, but this path does vary on some
versions or some distributions;
you can explore the paths to find commands using a file manager application, or using adb ls.
As an example, we will run the ps command that lists all the processes running on the system.
The full location of this command (/system/bin/ps) is specified as an argument to exec().
We get the output of the command and return the string. Then process.waitFor() is used to wait for the command to finish executing. See Example 19-1.
Example 19-1. Running a shell command
privateStringrunShellCommand(){try{Processprocess=Runtime.getRuntime().exec("/system/bin/ps");InputStreamReaderreader=newInputStreamReader(process.getInputStream());BufferedReaderbufferedReader=newBufferedReader(reader);intnumRead;char[]buffer=newchar[5000];StringBuffercommandOutput=newStringBuffer();while((numRead=bufferedReader.read(buffer))>0){commandOutput.append(buffer,0,numRead);}bufferedReader.close();process.waitFor();returncommandOutput.toString();}catch(IOExceptione){thrownewRuntimeException(e);}catch(InterruptedExceptione){thrownewRuntimeException(e);}}
Figure 19-1 shows the output of the ps command displayed in a TextView.
You could, of course, capture the output of any system command back into your program and either parse it for display in, for example, a ListView, or display it as text in a TextView as was done here.
Source Download URL
The source code for this project is in the Android Cookbook repository, in the subdirectory ShellCommand (see “Getting and Using the Code Examples”).
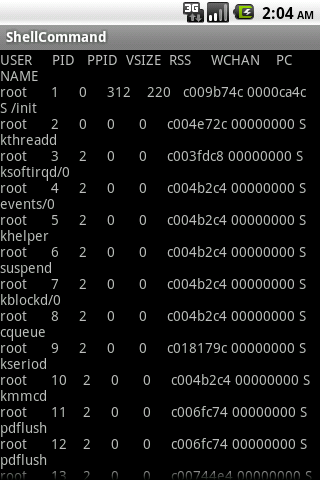
Figure 19-1. Android ps(1) command output
19.3 Running Native C/C++ Code with JNI on the NDK
Ian Darwin
Solution
Use JNI (Java Native Interface) via the NDK, the Android Native Development Kit.
Discussion
Standard Java has always allowed you to load native or compiled code into your Java program, and the Android Runtime supports this in a way that is pretty much identical to the original. Why would you as a developer want to do such a thing? One reason might be to access OS-dependent functionality. Another is speed: native code will likely run faster than Java, at least at present, although there is some contention as to how much of a difference this really makes. Search the web for conflicting answers.
The native code language bindings are defined for code that has been written in C or C++. If you need to access a language other than C/C++, you could write a bit of C/C++ and have it pass control to other functions or applications, but you should also consider using the Scripting Layer for Android (see Recipe 19.4).
For this example I use a simple numeric calculation, computing the square root of a double using the Newton–Raphson iterative method. The code provides both a Java and a C version, to compare the speeds.
Ian’s basic steps: Java calling native code
To call native code from Java, follow these steps:
-
Install the NDK in addition to the Android Development Kit (ADK).
-
Write Java code that declares and calls a native method.
-
Compile this Java code.
-
Create an .h header file using
javah. -
Write a C function that includes this header file and implements the native method to do the work.
-
Prepare the Android.mk (and optionally Application.mk) configuration file.
-
Compile the C code into a loadable object using
$NDK/ndk-build. -
Package and deploy your application, and test it.
We will now walk through the details of each of these steps.
The preliminary step is to download the NDK as a TAR or ZIP file. Extract it someplace convenient, and set the environment variable NDK to the full path where you’ve installed it, for referring back to the NDK install. You’ll want this to read documentation as well as to run the tools.
The next step is to write Java code that declares and calls a native method (see Example 19-2). Use the keyword native in the method declaration to indicate that the method is native. To use the native method, no special syntax is required, but your application—typically in the main Activity—must provide a static code block that loads your native method using System.loadLibrary(), as shown in Example 19-3. (The dynamically loadable module will be created in step 6.) Static blocks are executed when the class containing them is loaded; loading the native code here ensures that it is in memory when needed!
Object variables that your native code may modify should carry the volatile modifier. In my example, SqrtDemo.java contains the native method declaration (as well as a Java implementation of the algorithm).
Example 19-2. The Java code (SqrtDemo.java)
publicclassSqrtDemo{publicstaticfinaldoubleEPSILON=0.05d;publicstaticnativedoublesqrtC(doubled);publicstaticdoublesqrtJava(doubled){doublex0=10.0,x1=d,diff;do{x1=x0-(((x0*x0)-d)/(x0*2));diff=x1-x0;x0=x1;}while(Math.abs(diff)>EPSILON);returnx1;}}
Example 19-3. The Activity class Main.java uses the native code
// In the Activity class, outside any methods:static{System.loadLibrary("sqrt-demo");}// In a method of the Activity class where you need to use it:doubled=SqrtDemo.sqrtC(123456789.0);
The next step is simple: just build the project normally, using your usual build process.
Next, you need to create a C-language .h header file that provides the interface between the JVM and your native code. Use javah to produce this file. javah needs to read the class that declares one or more native methods, and will generate an .h file specific to the package and class name (in the following example, foo_ndkdemo_SqrtDemo.h):
$ mkdir jni # Keep everything JNI-related here
$ javah -d jni -classpath bin foo.ndkdemo.SqrtDemo
The .h file produced is a “glue” file, not really meant for human consumption and particularly not for editing. But by inspecting the resultant .h file, you’ll see that the C method’s name is composed of the name “Java,"” the package name, the class name, and the method name:
JNIEXPORTjdoubleJNICALLJava_foo_ndkdemo_SqrtDemo_sqrtC(JNIEnv*,jclass,jdouble);
Now create a C function that does the work. You must import the .h file and use the same function signature as is used in the .h file.
This function can do whatever it wishes. Note that it is passed two arguments before any declared arguments: a JVM environment variable and a “this” handle for the invocation context object. Table 19-2 shows the correspondence between Java types and the C types (JNI types) used in the C code.
| Java type | JNI | Java array type | JNI |
|---|---|---|---|
|
|
|
|
|
|
|
|
|
|
|
|
|
|
|
|
|
|
|
|
|
|
|
|
|
|
|
|
|
|
|
|
|
|
||
|
|
|
|
|
|
||
|
|
||
|
|
||
|
|
Example 19-4 shows the complete C native implementation. It simply computes the square root of the input number, and returns the result. The method is static, so the “this” pointer is not used.
Example 19-4. The C code
// jni/sqrt-demo.c#include <stdlib.h>#include "foo_ndkdemo_SqrtDemo.h"JNIEXPORTjdoubleJNICALLJava_foo_ndkdemo_SqrtDemo_sqrtC(JNIEnv*env,jclassclazz,jdoubled){jdoublex0=10.0,x1=d,diff;do{x1=x0-(((x0*x0)-d)/(x0*2));diff=x1-x0;x0=x1;}while(labs(diff)>foo_ndkdemo_SqrtDemo_EPSILON);returnx1;}
The implementation is basically the same as the Java version. Note that javah even maps the final double EPSILON from the Java class SqrtDemo into a #define for use within the C version.
The next step is to prepare the file Android.mk, also in the jni folder. For a simple shared library, Example 19-5 will suffice.
Example 19-5. An Android.mk makefile example
# Android.mkLOCAL_PATH :=$(call my-dir)include$(CLEAR_VARS)LOCAL_MODULE :=sqrt-demo LOCAL_SRC_FILES :=sqrt-demo.c include$(BUILD_SHARED_LIBRARY)
Finally, you compile the C code into a loadable object. In desktop Java, the details depend on the platform, compiler, and so on. However, the NDK provides a build script to automate this. Assuming you have set the NDK variable to the install root of the NDK download from step 1, you only need to type the following:
$ $NDK/ndk-build  # For Linux, Unix, macOS?
> %NDK%/ndk-build # For MS-Windows

Compile thumb  : sqrt-demo <= sqrt-demo.c
SharedLibrary  : libsqrt-demo.so
Install        : libsqrt-demo.so => libs/armeabi/libsqrt-demo.so
And you’re done! Just package and run the application normally. The output should be similar to Figure 19-2.The full download example for this chapter includes buttons to run the sqrt function a number of times in either Java or C and compare the times. Note that at present it does this work on the event thread, so large numbers of repetitions will result in Application Not Responding (ANR) errors, which will mess up the timing.
Congratulations! You’ve called a native method. Your code may run slightly faster. However, you will have to do extra work for portability; as Android begins to run on more hardware platforms, you will have to (at least) add them to the Application.mk file. If you have used any assembly language (machine-specific) code, the problem is much worse.
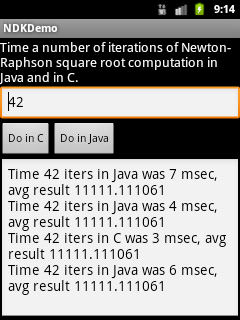
Figure 19-2. NDK demonstration output
Beware that problems with your native code can and will crash the runtime process right out from underneath the Java Virtual Machine. The JVM can do nothing to protect itself from poorly written C/C++ code. Memory must be managed by the programmer; there is no automatic garbage collection of memory obtained by the system runtime allocator. You’re dealing directly with the operating system and sometimes even the hardware, so “Be careful. Be very careful.”
See Also
There is a recipe in Chapter 26 of my Java Cookbook, published by O’Reilly, that shows variables from the Java class being accessed from within the native code. The official documentation for Android’s NDK is found on the Android Native SDK information page. Considerable documentation is included in the docs folder of the NDK download. If you need more information on Java native methods, you might be interested in the comprehensive treatment found in Essential JNI: Java Native Interface by Rob Gordon (Prentice Hall), originally written for desktop Java.
Source Download URL
The source code for this example is in the Android Cookbook repository, in the subdirectory NdkDemo (see “Getting and Using the Code Examples”).
19.4 Getting Started with SL4A, the Scripting Layer for Android
Ian Darwin
Solution
One of the best approaches is to use the Scripting Layer for Android (SL4A).
Caution
The original developers of SL4A appear to have abandoned it, but there are several alternative builds still available; you can find these by searching for “sl4a” on GitHub.
Here’s how to get started:
-
Download the Scripting Layer for Android (formerly Android Scripting Environment) from GitHub.
-
Add the interpreter(s) you want to use.
-
Type in your program.
-
Run your program immediately—no compilation or packaging steps are needed!
Discussion
SL4A provides support for several popular scripting languages (including Python, Perl, Lua, and BeanShell). An Android object is provided that gives access to most of the underlying Android APIs from this language. This recipe shows how to get started; several of the following recipes explore particular aspects of using SL4A. The SL4A application is not in the Google Play Store, so you have to visit the website and download it (there is a QR code for downloading on the website referenced in step 1, so start there, in your laptop or desktop browser). Before doing that, you’ll have to go into Settings and allow applications from “Unknown sources.” Also note that since you are not downloading via the Play Store, you will not be notified if the Google project releases a new binary.
Once you have the SL4A binary installed, you must start it and download the particular interpreter you want to use. The following are available as of this writing:
-
Python
-
Perl
-
JRuby
-
Lua
-
BeanShell
-
JavaScript
-
Tcl
-
Unix shell
Some of the interpreters (e.g., JRuby) run in the Android VM, while others (e.g., Python) run the “native” version of the language under Linux on your device. Communication happens via a little server that is started automatically when needed or can be started from the Interpreters menu bar.
The technique for downloading new interpreters isn’t very intuitive. When you start the SL4A application it shows a list of scripts, if you have any. Click the Menu button, then go to the View menu and select Interpreters (while here, notice that you can also view the LogCat, the system exception logfile). From the Interpreters list, clicking Menu again will get you a menu bar with an Add button, and this lets you add another interpreter.
Pick a language (Python)
Suppose you think Python is a great language (which it is).
Once your interpreter is installed, go back to the SL4A main page and click the Menu button, then Add (in this context, Add creates a new file, not another interpreter). Select the installed interpreter and you’ll be in Edit mode. We’re trying Python, so type in this canonical “Hello, World” example:
import android
droid = android.Android()
droid.makeToast("Hello, Android")
Click the Menu button, and choose “Save and Run” if enabled, or “Save and Exit” otherwise. The former will run your new app; the latter will return you to the list of scripts, in which case you want to tap your script’s name. In the resultant pop-up, the choices are (left to right):
-
Run (DOS box icon)
-
Disabled
-
Edit (pencil icon)
-
Save (1980s floppy disk icon)
-
Delete (trash can icon)
If you long-press a filename, a pop-up gives you the choice of Rename or Delete.
When you run this trivial application, you will see the toast near the bottom of your screen.
Source editing
If you want to keep your scripts in a source repository, and/or if you prefer to edit them on a laptop or desktop with a traditional keyboard, just copy the files back and forth (if your phone is rooted, you can probably run your repository directly on the phone). Scripts are stored in sl4a/scripts on the SD card. If you have your phone mounted on your laptop’s /mnt folder, for example, you might see the code shown in Example 19-6 (on Windows it might be E: or F: instead of /mnt).
Example 19-6. List of scripting files
laptop$ ls /mnt/sl4a/
Shell.log demo.sh.log dialer.py.log hello_world.py.log ifconfig.py.log
notify_weather.py.log phonepicker.py.log say_chat.py.log say_time.py.log
say_weather.py.log scripts/ sms.py.log speak.py.log take_picture.py.log
test.py.log
laptop$ ls /mnt/sl4a/scripts
bluetooth_chat.py demo.sh dialer.py foo.sh hello_world.py ifconfig.py
notify_weather.py phonepicker.py say_chat.py say_time.py say_weather.py
sms.py speak.py take_picture.py test.py weather.py weather.pyc
laptop$
19.5 Creating Alerts in SL4A
Rachee Singh
Discussion
Begin by starting the SL4A app on your emulator/device (see Recipe 19.4). Then add a new Python script by clicking the Menu button and choosing Add (see Figure 19-3).

Figure 19-3. Starting to add a new script
Choose the Python 2.x option from the submenu that appears, as shown in Figure 19-4.

Figure 19-4. Choosing the language
This opens an editor, with the first two lines (shown in Figure 19-5) already filled in for you. Enter the name of the script (I have named mine alertdialog.py).

Figure 19-5. Composing the script
Now we are ready to enter the code to create the alert dialogs. Type in the code shown in Example 19-7.
Example 19-7. A simple SL4A Python script
title='Sample Alert Dialog'text='Alert Dialog Type 1!'droid.dialogCreateAlert(title,text)droid.dialogSetPositiveButtonText('Continue')droid.dialogShow()
Press the Menu button and choose “Save and Run” from the menu. This runs the script. The alert dialog should look like Figure 19-6.
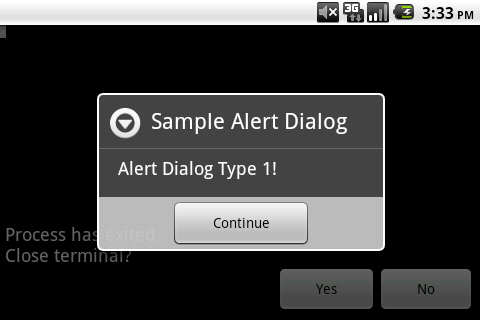
Figure 19-6. Sample alert dialog
Now let’s create an alert dialog with two buttons, using the code in Example 19-8.
Example 19-8. Composing an alert with three choices
title = 'Sample Alert Dialog'
text = 'Alert Dialog Type 2 with buttons!'
droid.dialogCreateAlert(title, text)
droid.dialogSetPositiveButtonText('Yes')
droid.dialogSetNegativeButtonText('No')
droid.dialogSetNeutralButtonText('Cancel')
droid.dialogShow()
Figure 19-7 shows how this alert dialog looks.
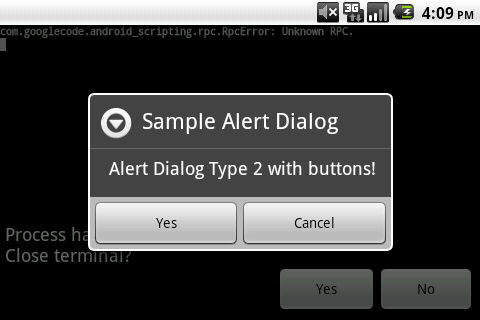
Figure 19-7. Alert dialog with two choices in action
Now try the code in Example 19-9 to create an alert dialog with a list.
Example 19-9. Another approach to composing an alert with three choices
      title = 'Sample Alert Dialog'
      droid.dialogCreateAlert(title)
      droid.dialogSetItems(['mango', 'apple', 'strawberry'])
      droid.dialogShow()
Figure 19-8 shows how this alert dialog looks.
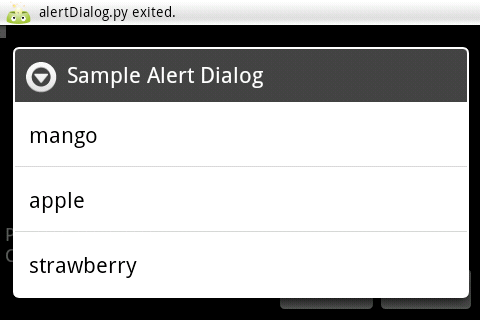
Figure 19-8. Dialog with three choices
19.6 Fetching Your Google Documents and Displaying Them in a ListView Using SL4A
Rachee Singh
Discussion
Fire up the Scripting Layer for Android on your device (or emulator). Open a new Python script and add to the script the code shown in Example 19-10. If you have not worked in Python before, be aware that indentation, rather than braces, is used for statement grouping, so you must be very consistent about leading spaces.
Example 19-10. Composing a script to fetch Google documents
importandroidimportgdata.docs.servicedroid=android.Android()client=gdata.docs.service.DocsService()username=droid.dialogGetInput('Username').resultpassword=droid.dialogGetPassword('Password','For'_username).resultdeftruncate(content,length=15,suffix='...'):iflen(content)<=length:returncontentelse:returncontent[:length]+suffixtry:client.ClientLogin(username,password)except:droid.makeToast("Login Failed")docs_feed=client.GetDocumentListFeed()documentEntries=[]forentryindocs_feed.entry:documentEntries.append('%-18s%-12s%s'%(truncate(entry.title.text.encode('UTF-8')),entry.GetDocumentType(),entry.resourceId.text))droid.dialogCreateAlert('Documents:')droid.dialogSetItems(documentEntries)droid.dialogShow()

Note these two lines should be entered as one long line.
Figure 19-9 shows how the editor should look after you have finished entering the code.
In this Python code, we use the gdata.docs.service.DocsService() method to connect to the Google account of a user. The username and password are taken from the user. Once the login is done successfully, the GetDocumentListFeed() method is used to get the feed list of the Google documents. We format the details of each entry and append them to a list named documentEntries. This list is then passed as an argument to the alert dialog, which displays all the entries in a list.

Figure 19-9. Google document fetcher in action
Figure 19-10 shows how my own document list looks.
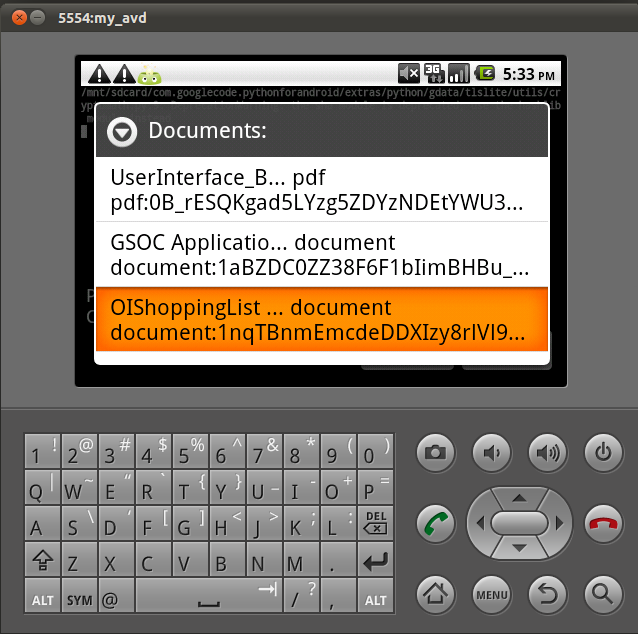
Figure 19-10. List of Google documents
19.7 Sharing SL4A Scripts in QR Codes
Rachee Singh
Solution
Use a tool such as ZXing’s QR Code Generator to generate a QR code that contains your entire script in the QR code graphic, and share this image.
Discussion
Most people think of QR codes as a convenient way to share URL-type links. But the QR code format is quite versatile, and can be used to package all sorts of things, like VCard (name and address) information. Here we use it to wrap the “plain text” of an SL4A script so that another Android user can get the script onto his device without retyping it. QR codes are a great way to share your scripts if they are short (QR codes can only encode 4,296 characters of content). Follow these simple steps to generate a QR code for your script:
-
Visit the QR Code Generator in your mobile device’s browser.
-
Select Text from the Contents drop-down menu.
-
In the “Text content” box, put the script’s name in the first line.
-
From the next line onward, enter the script. (Or, as an alternative to steps 3 and 4, copy the script from an SL4A editor window and paste it into the “Text content” box in the browser).
-
Choose Large for the barcode size and click Generate.
Figure 19-11 shows how this looks in action.
Many QR code readers are available for Android. Any such application can decipher the text that the QR code encrypts. For example, with the common ZXing Barcode Scanner, the script is copied to the clipboard (this is controlled by a “When a Barcode is found…” entry in the Settings). Then start the SL4A editor, pick a name for your script (ideally the same as the original, if you know it—depending on how it was pasted into the QR code generator it may appear as the first line) then long-press in the body area and select Paste. You are now ready to save the script and run it! It should look like Figure 19-12.

Figure 19-11. Barcode generated from the SL4A script
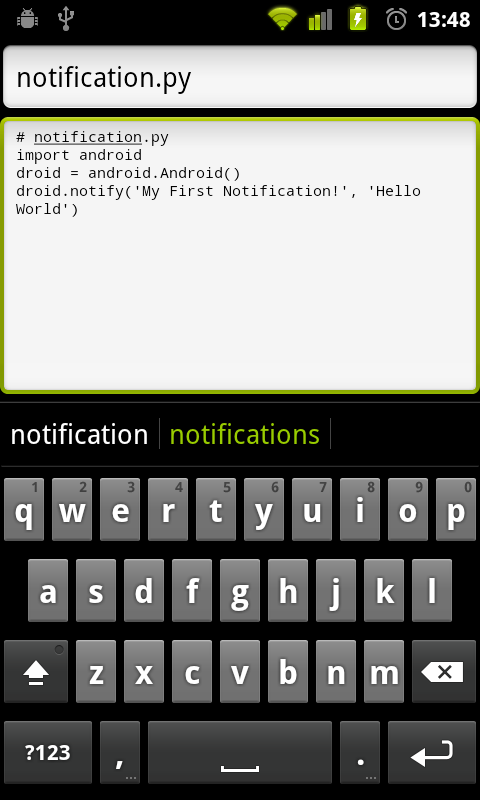
Figure 19-12. The script, downloaded
I was able to run the script from the QR code with no further work other than commenting out the script name in the body and typing it into the filename field, then clicking “Save and Run” (see Figure 19-13).

Figure 19-13. The script running, showing a notification
19.8 Using Native Handset Functionality from a WebView via JavaScript
Colin Wilcox
Problem
The availability of HTML5 as a standard feature in many browsers means that developers can exploit the features of the HTML5 standard to create applications much more quickly than they can in native Java. This sounds great for many applications, but alas, not all of the cool functionality on the device is accessible through HTML5 and JavaScript. Webkits attempt to bridge this gap, but they may not provide all the functionality needed in all cases.
Solution
You can invoke Java code in response to JavaScript events using a bridge between the JavaScript and Java environments.
Discussion
The idea is to tie up events within the JavaScript embedded in an HTML5 web page and handle the event on the Java side by calling native code.
The following code creates a button in HTML5 embedded in a WebView which, when clicked, causes the Contacts application to be invoked on the device through the Intent mechanism.
First, we write some thin bridge code in Java, as shown in Example 19-11.
Example 19-11. The bridge code
publicclassJavaScriptInterface{privatestaticfinalStringTAG="JavaScriptInterface";ContextiContext=null;/** Instantiate the interface and set the context */JavaScriptInterface(ContextaContext){// Save the local content for later useiContext=aContext;}publicvoidlaunchContacts();{iContext.startActivity(contactIntent);launchNativeContactsApp();}}
The Java code to actually launch the Contacts app is shown in Example 19-12.
Example 19-12. Java code to launch contacts
privatevoidlaunchNativeContactsApp(){StringpackageName="com.android.contacts";StringclassName=".DialtactsContactsEntryActivity";Stringaction="android.intent.action.MAIN";Stringcategory1="android.intent.category.LAUNCHER";Stringcategory2="android.intent.category.DEFAULT";Intentintent=newIntent();intent.setComponent(newComponentName(packageName,packageName+className));intent.setAction(action);intent.addCategory(category1);intent.addCategory(category2);startActivity(intent);}
The JavaScript that ties this all together is shown in the following snippet. In this case the call is triggered by a click event:
<inputtype="button"value="Say hello"onClick="showAndroidContacts())"/><scripttype="text/javascript">function showAndroidContacts() { Android.launchContacts(); }</script>
The only preconditions are that the web browser has JavaScript enabled and the interface is known. This is done by:
WebViewiWebView=(WebView)findViewById(R.id.webview);iWebView.addJavascriptInterface(newJavaScriptInterface(this),"Android");
19.9 Building a Cross-Platform App with Xamarin
Ian Darwin
Solution
One solution is to use Xamarin.
Discussion
I have always contended—and it is a main theme of this book—that you should write Android apps using the Android SDK, because if you write them in a generic way, the user will not have a great experience with your app as generic interfaces don’t know about Activities, Services, the Android Back button behavior, etc.
Xamarin is a toolchain and set of libraries that allows you to build apps in the C# or F# programming language. Xamarin-based apps can run on Android, iOS, Windows, and a few other platforms. Xamarin depends on the open source Mono implementation of the .NET runtime. Xamarin Inc. began life as an independent company but was acquired by Microsoft in March 2016 as a way to get developers up to speed on Microsoft’s Java clone C# and on the Microsoft .NET environment.
Note that Xamarin is not a cross-platform UI toolkit. You write real Android UI code using the Xamarin API, as shown in Example 19-13. The cross-platform aspect comes in when Xamarin is able to share business logic, persistence API, and other code that you write in C# across platforms. On Android it can import existing Java libraries (JAR files); on other platforms it can import those platforms’ equivalent compiled code.
Example 19-13. A “Hello, World” Android application in Xamarin
using Android.App;
using Android.Widget;
using Android.OS;

namespace HelloXamarin {
	[Activity(Label = "HelloXamarin",
	  MainLauncher = true, Icon = "@mipmap/icon")]
	public class MainActivity : Activity {
		int count = 1;

		protected override void OnCreate(Bundle savedInstanceState) {
			base.OnCreate(savedInstanceState);

			// Set our view from the "main" layout resource
			SetContentView(Resource.Layout.Main);

			// Get our button from the layout resource,
			// and attach an event to it
			Button button = FindViewById<Button>(Resource.Id.myButton);

			button.Click += delegate {
				button.Text = string.Format("{0} clicks!", count++);
			};
		}
	}
}
If you’ve read this far in the book, you can figure out what this code is doing:
read extends for “:” in a class definition, super for base, and
a lambda expression or anonymous class for delegate; lowercase the first
letter of the method names; use the odd-looking type parameter as a
typecast instead; and so on. The general shape is quite recognizable—unsurprising, since historically C# began as a way to get around Java’s licensing.
When getting started with Xamarin you have your choice of two IDEs:
- Xamarin Studio
-
Its own IDE, which stores files in a format that Visual Studio can use
- Visual Studio
-
Xamarin plug-in-based extension to Microsoft Visual Studio
For this example we used the free Community edition of Xamarin Studio.
Note that this edition is only “free” in the sense that you don’t have to pay
to license it if you are an indie developer or “small team”; for “enterprise” players,
there is a licensing fee. The underlying mono toolkit is open source on GitHub,
but most of the tooling is not open source.
Installing Xamarin Studio is a bit quirky: it correctly detected that I had the Intel HAXM emulator installed, but wasn’t able to find the several Android SDK installations on my hard drive. Cue up some music to listen to while waiting for the 4 GB download (see Figure 19-14).
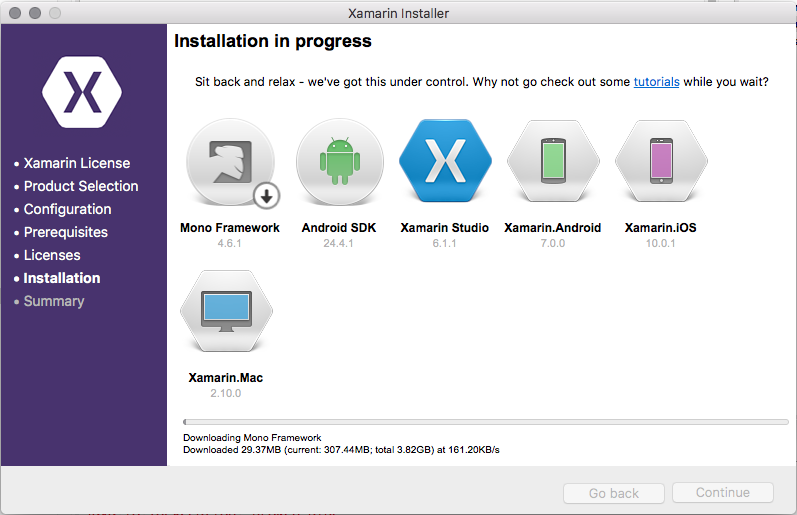
Figure 19-14. Xamarin download
Once the download finished, the installation was standard, and it placed Xamarin in the standard /Applications folder on macOS. Once run, it offered the choice to start a new project (“solution”), then to create one of several types of Android applications (see Figure 19-15).
The next few steps are pretty similar to using a Java IDE: give your application a name, choose the Java package name, choose a version (see Figure 19-16), click Next, and then click Finish.
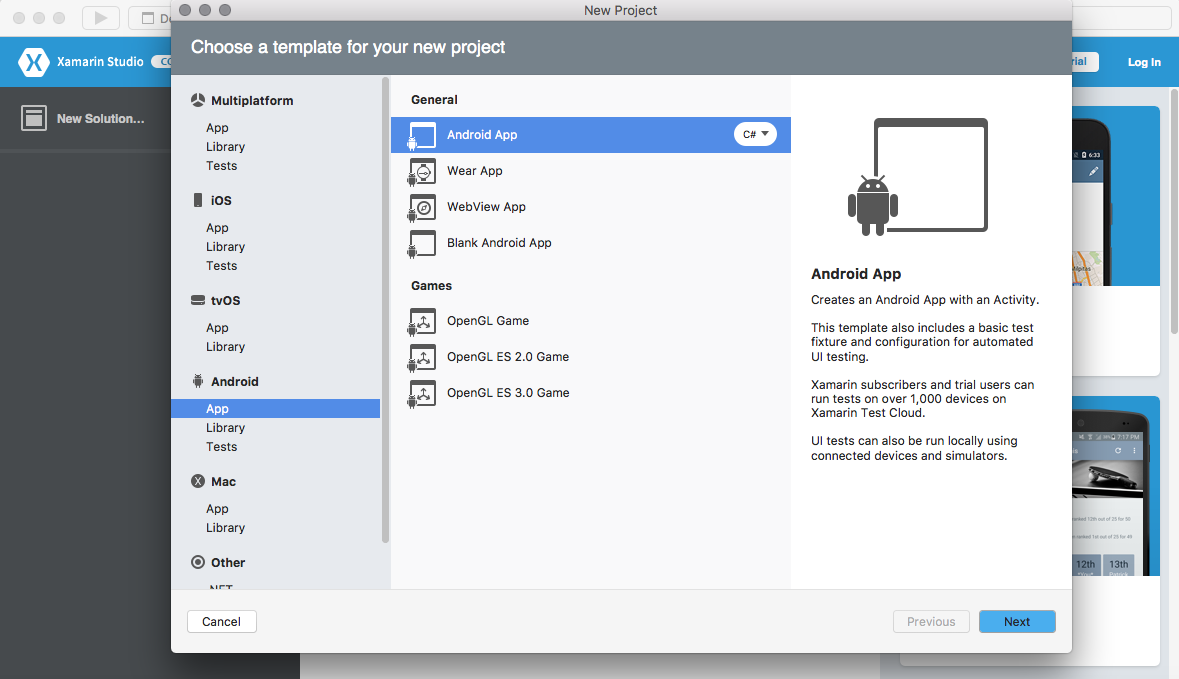
Figure 19-15. Xamarin creating an Android project

Figure 19-16. Xamarin Android version
Once the project is configured and set up, you will see a fairly standard IDE editing screen (Figure 19-17).

Figure 19-17. Xamarin project view
Press the Run button in the top toolbar and Xamarin will start an emulator and run your application (this took two tries the first time I ran it; the communication seemed to time out the first time). See Figure 19-18.
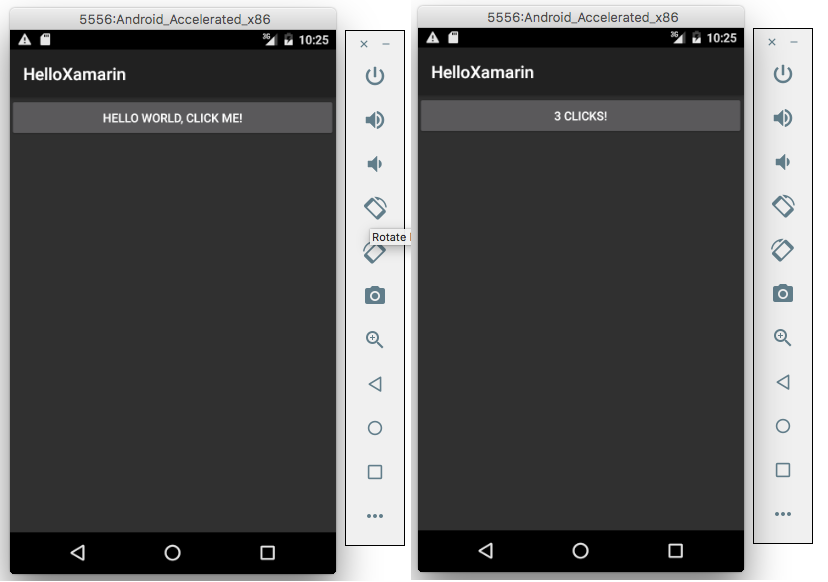
Figure 19-18. Xamarin app running
I did not take the time to learn macOS or Windows Phone UI coding, so this example doesn’t show the cross-platform aspect of Xamarin, but it does show that you can use Xamarin Studio to build UI code and build runnable apps with it. A large amount of documentation and many startup videos and longer examples are available on the Xamarin website.
19.10 Creating a Cross-Platform App Using PhoneGap/Cordova
Shraddha Shravagi and Ian Darwin
Solution
Cordova (better known as PhoneGap) is an open source mobile development framework. If you plan to develop an application for multiple platforms, PhoneGap is one good solution—so much so that Oracle and BlackBerry, among others, either endorse it or base products on it. PhoneGap does not use traditional platform GUI controls; rather, you write a web page with buttons—made to approximate the native look of Android (and other platforms) by careful use of CSS—and PhoneGap runs this “mobile app” for you.
PhoneGap was written by Nitobi, a small company that Adobe Systems Inc. acquired in fall 2011. Adobe has donated the framework source code to the Apache Software Foundation, where its development continues under the name “Cordova.” However, Adobe has continued to develop tooling for it under the name PhoneGap, and says that “Apache Cordova is… the engine that powers PhoneGap, much like WebKit is the engine that powers many modern web browsers. It’s the robust tools that sets PhoneGap apart, including: our command line interface, the PhoneGap Desktop app, the PhoneGap developer app, and PhoneGap Build.”
Cordova supports many platforms, including Android, iOS, Microsoft Windows (and Windows Phone), BlackBerry 10, Ubuntu, and (because Cordova apps are web apps) Firefox, and more. A matrix of supported environments versus features supported on each is provided on the Cordova website.
Discussion
We will start with an Android application. We don’t use the normal Android layouts, nor any Java code, nor the notion of “one activity per screen”; instead, we create HTML and JavaScript files, which can run on different platforms. In fact, the app is mostly a “mobile web app” that is packaged as an Android app.
Note
There are two slightly different versions of the setup, depending on whether you want to use the Adobe tooling or the Apache tooling. We’ll use the latter here.
You must have NPM (the Node Package Manager) installed. NPM itself is command-line based. If it’s not installed, visit the Node.js npm installer and follow the steps there for major operating systems. Or go straight to Node.js and download and install Node and npm. As of May 1, 2017, the recommended version is v6.10.2 LTS.
After installation, check it:
$ node -v
    v6.10.2
$
Install cordova itself:
npm install -g cordovaYou either have to do this as root, or arrange to install it in your own directory. This will run for a long time as it downloads most of the internet: 620 packages at last check. It will print a tree of the dependencies, looking something like this (but about 600 lines longer):
$ sudo npm install -g cordova
npm WARN deprecated [email protected]: Use uuid module instead
/usr/local/bin/cordova -> /usr/local/lib/node_modules/cordova/bin/cordova
/usr/local/lib
└─┬ [email protected]
  ├─┬ [email protected]
  │ ├── [email protected]
  │ ├─┬ [email protected]
  │ │ └── [email protected]
  │ ├── [email protected]
  ...
$
Create a project and configure it:
$ cd SomePlaceNice
$ cordova create CordovaDemo
Creating a new cordova project.
$ cd CordovaDemo
$ cordova platform add android
Adding android project...
Creating Cordova project for the Android platform:
    Path: platforms/android
    Package: io.cordova.hellocordova
    Name: HelloCordova
    Activity: MainActivity
    Android target: android-25
Subproject Path: CordovaLib
Android project created with [email protected]
Discovered plugin "cordova-plugin-whitelist" in config.xml. Adding it to the
    project
Fetching plugin "cordova-plugin-whitelist@1" via npm
Installing "cordova-plugin-whitelist" for android
$
Run your demo project:
$ cordova run android
If you get the following message:
Error: Could not find gradle wrapper within Android SDK. Might need to update your
    Android SDK.
Looked here: /Users/YOURNAME/android-sdk-macosx/tools/templates/gradle/wrapper
this is because your Android SDK is newer than the cordova you’ve installed (newer versions no longer feature this templates directory). Try this workaround:
$ cordova platform update [email protected]
Updating android project...
Subproject Path: CordovaLib
Android project updated with [email protected]
And try the run again:
$ cordova run android
ANDROID_HOME=/Users/ian/android-sdk-macosx
JAVA_HOME=/Library/Java/JavaVirtualMachines/jdk1.8.0.jdk/Contents/Home
Starting a Gradle Daemon (subsequent builds will be faster)
:wrapper
BUILD SUCCESSFUL
Total time: 10.935 secs
Subproject Path: CordovaLib
Starting a Gradle Daemon (subsequent builds will be faster)
Download https://jcenter.bintray.com/com/android/tools/build/gradle/2.2.3/
    gradle-2.2.3.pom
Download https://jcenter.bintray.com/com/android/tools/build/gradle-core/2.2.3/
    gradle-core-2.2.3.pom
Download https://jcenter.bintray.com/com/android/tools/build/builder/2.2.3/
    builder-2.2.3.pom
Download https://jcenter.bintray.com/com/android/tools/lint/lint/25.2.3/
    lint-25.2.3.pom
Again, it may take a time-out to download another half of the Internet.
Finally it should end up building an APK:
CordovaDemo/platforms/android/build/outputs/apk/android-debug.apkIt will run it if there is an emulator running or a device connected that’s usable by ADB, or else it will error out at this point.
You can build your app for any of the other supported applications just by using
cordova platform add platnamefollowed bycordova run platname.Now that the structure is in place, you can build out your JavaScript application, starting with the “main program” web page file
www/index.htmland JavaScript filewww/js/index.js. That is not detailed here since this is not a JavaScript book, but we’ll give a brief example.In the body of this HTML page, change the
h1element to read:<h1>Hello World</h1>You can add all your HTML/jQuery mobile code in the div element named app in the HTML file. For example, to add a button:
<adata-role="button"data-icon="grid"data-theme="b"onClick="showAlert()">Click Me!!!</a>In this JavaScript file you can add all your jQuery mobile and JavaScript code:
functionshowAlert(){alert('HelloWorldfromCordovausingJavaScript!!!');}
That’s it. You should be able to run the application.
See Also
http://cordova.apache.org/ is the current home page for the Apache Cordova project.
http://phonegap.com/ is the current home page for the Adobe PhoneGap tooling for Cordova.
Also, Building Android Apps with HTML, CSS, and JavaScript by Jonathan Stark (O’Reilly) gives slightly older PhoneGap-centric coverage of these “background” technologies as well as more information on PhoneGap development.
Source Download URL
The source code for this example is in the Android Cookbook repository, in the subdirectory CordovaDemo (see “Getting and Using the Code Examples”).