
2. Android Market and App Business Issues
Objectives
In this chapter you’ll be introduced to:
• Characteristics of great Android apps.
• User interface guidelines for designing your apps.
• Registering for Android Market.
• Submitting your apps to Android Market.
• Pricing your apps and the benefits of free vs. paid apps.
• In-app billing.
• Launching Android Market from within an app.
• Marketing and monetizing your apps.
• Other Android app stores.
• Other popular mobile and Internet app platforms to which you can port your apps.
• Android humor.
2.2 Building Great Android Apps
2.3.2 Supporting Multiple Screens
2.3.3 Android User Interface Guidelines
2.4 Registering at Android Market
2.5 Setting Up a Google Checkout Merchant Account
2.7 Preparing Your Apps for Publication
2.8 Uploading Your Apps to Android Market
2.9 Other Android App Marketplaces
2.10 Pricing Your App: Free or Fee
2.11 Monetizing Apps with In-App Advertising
2.12 Monetizing Apps: Using In-App Billing to Sell Virtual Goods in Your Apps
2.13 Launching the Market App from Within Your App
2.14 Managing Your Apps in Android Market
2.16 Other Popular App Platforms
2.17 Android Developer Documentation
Self-Review Exercises | Answers to Self-Review Exercises | Exercises
2.1. Introduction
In Chapters 3–18, we’ll develop a wide variety of Android apps. Once you’ve developed and tested your own apps—both in the emulator and on Android devices—the next step is to submit them to Android Market—or other app marketplaces—for distribution. In this chapter, we’ll discuss the User Interface Guidelines and Best Practices to follow when designing apps, and provide characteristics of great apps. You’ll learn how to register for Android Market and set up a Google Checkout account so that you can sell apps. You’ll learn how to prepare your apps for publication and how to upload them to Android Market. We’ll discuss some considerations for making your apps free or selling them for a fee, and mention key resources for monetizing apps. We’ll provide resources for marketing your apps, and mention other popular app platforms to which you may want to port your Android apps. And, we’ll point you to online Android developer documentation for additional information.
2.2. Building Great Android Apps
With hundreds of thousands of apps in Android Market, how do you create an Android app that people will find, download, use and recommend to others? Consider what makes an app fun, useful, interesting, appealing and enduring. A clever app name, an attractive icon and an engaging description might lure people to your app on Android Market or one of the many other Android app marketplaces. But once users download the app, what will make them use it regularly and recommend it to others? Figure 2.1 shows some characteristics of great apps.
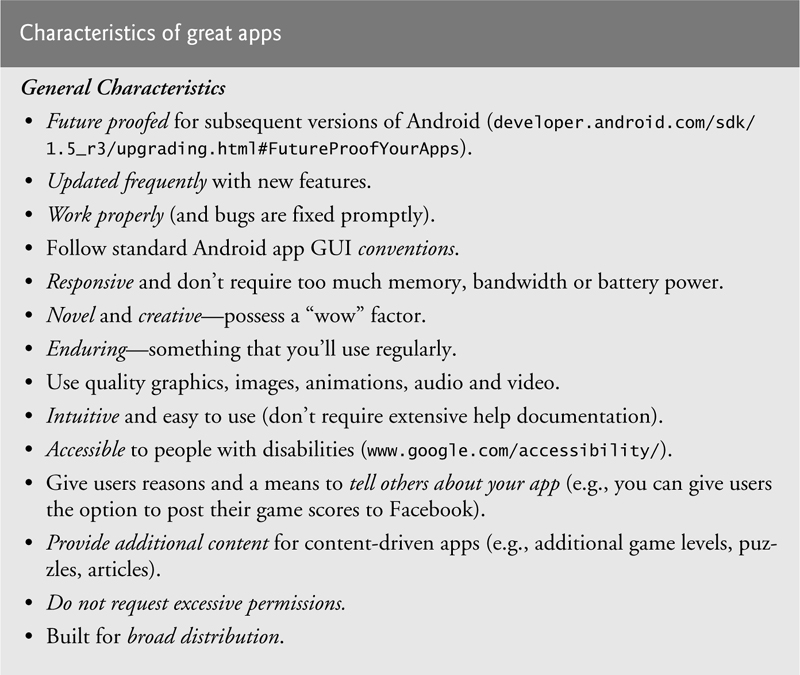
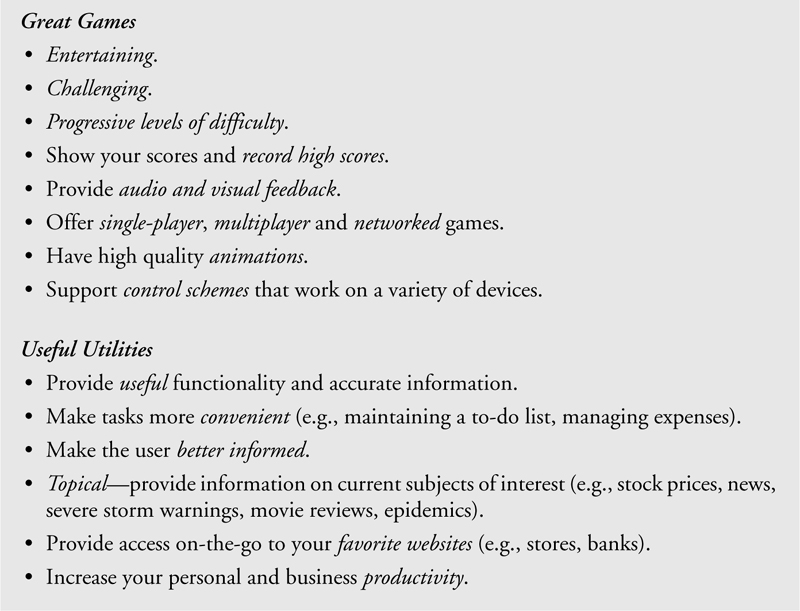
Fig. 2.1. Characteristics of great apps.
2.3. Android Best Practices
The Android Developer’s Guide (called the Dev Guide) Best Practices section discusses compatibility, supporting multiple screens, user interface guidelines, and designing for performance, responsiveness and seamlessness. You should also check out the general mobile app design guidelines available from other online resources (Fig. 2.2).
Fig. 2.2. Online resources for mobile app design.
2.3.1. Compatibility
When developing an Android app, you need to determine which devices and versions of the operating system it will target. The <uses-feature> elements listed in your app’s manifest file describe the app’s feature needs (Fig. 2.3), allowing Android Market to filter the app so that only users with compatible devices can view and download it.
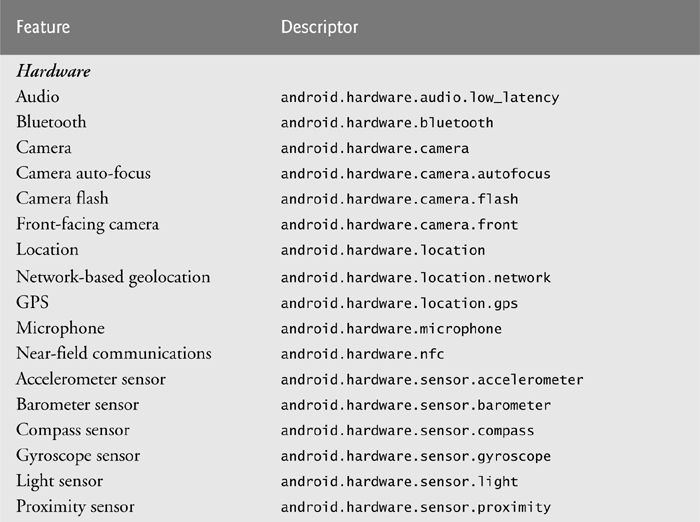
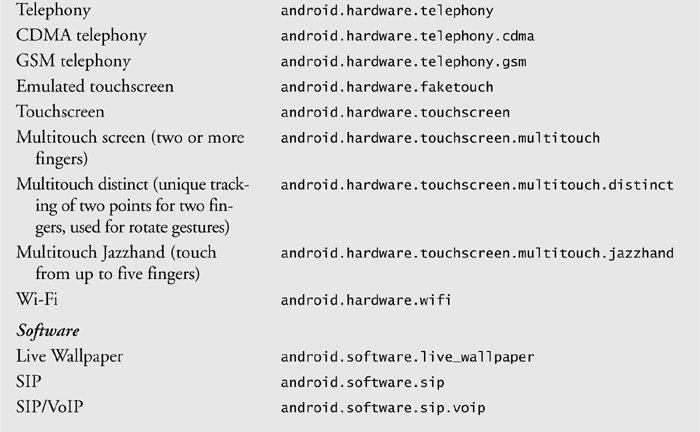
Fig. 2.3. Feature descriptors for specifying hardware and software requirements in the manifest file (developer.android.com/guide/topics/manifest/uses-feature-element.html).
You also can filter sales and downloads of your app by country and wireless carrier. For example, your app might be relevant to only Verizon customers or to users located in the United Kingdom. These Market filters can be added when you log into Android Market to publish the app. Apps can also dynamically query the device to determine its capabilities. For example, if your app includes features that use the camera but does not require the camera, the app can query the device to determine if a camera is available.
For information about designing for multiple devices and ensuring that your app will continue to work after new versions of Android are released, see developer.android.com/guide/practices/compatibility.html. For information about Market filters for restricting app distribution, see developer.android.com/guide/appendix/market-filters.html.
2.3.2. Supporting Multiple Screens
Android SDK 1.6 and higher support multiple screen sizes (the diagonal measurement) and screen densities (the distribution of pixels across the screen). But you do not need (nor would you want to try) to design your app for every possible screen size and density.
Android provides four generalized screen sizes (small, normal, large and extra large) and densities (low, medium, high and extra high), making it easier for you to design apps that work on multiple screens. You can use these screen sizes and densities when developing your app, even though the exact sizes of the devices might vary. You may need to create multiple resources (e.g., layouts, icons, graphics) to ensure that they scale properly to the appropriate screens. When the user runs the app, Android automatically renders it at the device’s actual screen size and density and chooses the appropriate resources if you’ve specified separate ones for different screen sizes. You can set the <supports-screens> element in the AndroidManifest.xml file to specify the screen sizes your app supports. For additional information, see Supporting Multiple Screens at
developer.android.com/guide/practices/screens_support.html.
2.3.3. Android User Interface Guidelines
It’s important when creating Android apps to follow the Android User Interface Guidelines for designing icons, widgets, activities, tasks and menus:
developer.android.com/guide/practices/ui_guidelines/index.html
Icon Design Guidelines
The Icon Design Guidelines provide information about each of the icons you’ll need to provide (e.g., launcher, menu, status bar, tab, dialog and list view icons) and the design specifications for each (size, color, positioning, effects, etc.). It also includes a downloadable Android Icon Templates Pack, where you’ll find templates for creating your own app icons in Adobe Photoshop and Adobe Illustrator.
Widget Design Guidelines
The Widget Design Guidelines provide specifications for designing widgets—displays of timely information on the user’s Home screen, such as the current weather, stock prices and news (Fig. 2.4). Widgets can be stand-alone (as demonstrated in Chapter 14, Weather Viewer App), but they’re typically included as an optional feature of an app to engage the user. For example, ESPN’s ScoreCenter app includes a widget for tracking your favorite sports teams on your Home screen rather than launching your app each time you want to check the scores. The user can choose whether or not to display an app’s widget on their Home screen.

Fig. 2.4. Popular Android widgets.
Activity and Task Design Guidelines
The Activity and Task Design Guidelines discuss:
• Activities—reusable components used to build an app’s user interface. Activities perform actions such as searching, viewing information and dialing a phone number. A separate activity is often associated with each different screen of an app. We discuss activities in Chapter 4.
• The activity stack—a reverse chronological history of all of the activities, allowing the user to navigate to the previous activity using the Back button.
• Tasks—a series of activities that enable the user to complete an objective within an app or across multiple apps.
Menu Design Guidelines
The Menu Design Guidelines discuss Options and Context menus. The Options menu—accessed through the device’s Menu button—provides actions and operations for the app’s current screen. For example, selecting the Options menu in the Messaging app brings up a menu of icons including Compose, Delete Threads, Search and Settings. Selecting the Context menu from within a message in the Messaging app (by touching and holding—also called long pressing—within the message on a touchscreen) brings up a menu of options specific to that message, including Select all, Select text, Cut all, Copy all, Paste and Input method.
Figures 2.5 and 2.6 provide suggestions for designing user interfaces for your apps, including tips to ensure that your apps are responsive to user interactions and will perform efficiently and seamlessly on mobile devices. We’ll introduce additional best practices in the code walkthroughs throughout the book.
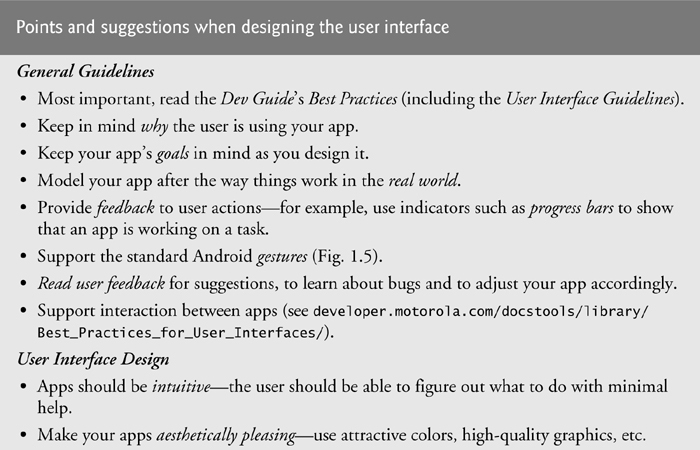
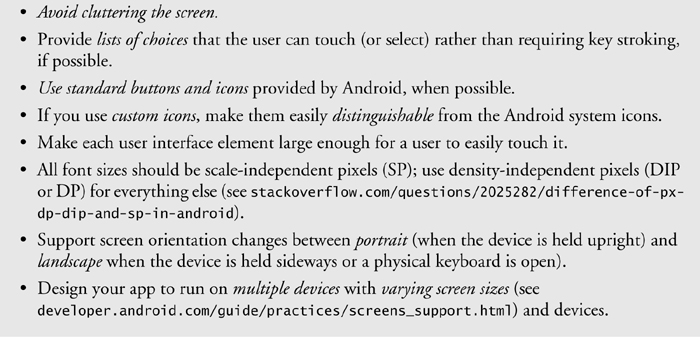
Fig. 2.5. Points and suggestions when designing the user interface.
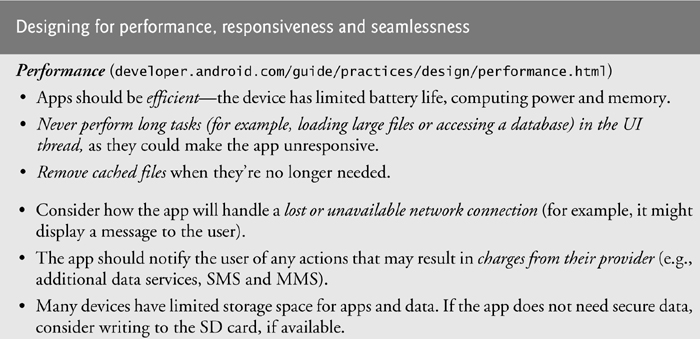
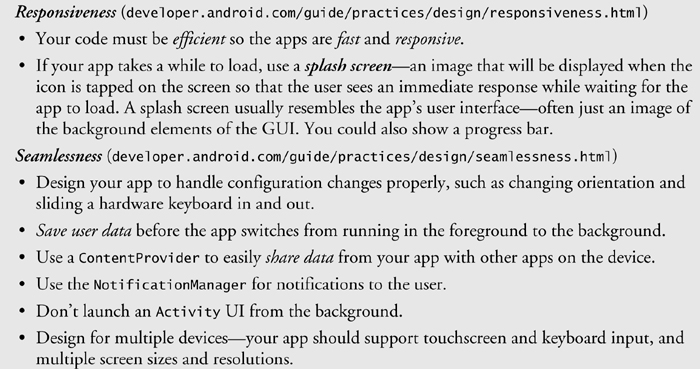
Fig. 2.6. Designing for performance, responsiveness and seamlessness.
Designing for Accessibility
Android includes built-in tools to help you design apps that are accessible to people with disabilities such as low vision or blindness. The Text-to-Speech (TTS) speech synthesis capability (available in English, Spanish, French, German and Italian) allows apps to “speak” text strings. We’ll use the text-to-speech (speech synthesis) and speech-to-text (speech recognition) input to create a talking app in Chapter 15, Pizza Ordering App. You can also incorporate responses to user input such as making sounds (for the visually impaired) and vibrating (for the hearing impaired).
Localization
If you intend to make your app available in multiple countries, you should consider localizing it for each. For example, if you intend to offer your app in France, you should translate its resources (e.g., text, audio files) into French. You might also choose to use different colors, graphics and sounds based on the locale. For each locale, you’ll have a separate, customized set of resources for your app. When the user launches the app, Android automatically finds and loads the resources that match the locale of the device. To learn about how to set up multiple resource directories to localize your apps, see developer.android.com/guide/topics/resources/localization.html.
2.4. Registering at Android Market
To publish your apps on Android Market, you must register for an account at
market.android.com/publish/
There’s a one-time registration fee. Unlike with other popular mobile platforms, Android Market has no approval process for uploading apps. You must, however, adhere to the Android Market Content Policy for Developers. If your app is in violation of this policy, it can be removed at any time; serious or repeated violations may result in account termination (Fig. 2.7).

Fig. 2.7. Violations of the Android Market Content Policy for Developers (www.android.com/market/terms/developer-content-policy.html).
2.5. Setting Up a Google Checkout Merchant Account
To sell your apps on Android Market, you’ll need a Google Checkout merchant account, available to Android Market developers located in 29 countries at the time of this writing (Fig. 2.8).1 Once you’ve registered and logged into Android Market at market.android.com/publish/, click the Setup Merchant Account link. You’ll need to
1 checkout.google.com/support/sell/bin/answer.py?answer=150324&cbid=-eqo3objy740w&src=cb&lev=%20index.
• provide private information by which Google can contact you.
• provide customer-support contact information where users can contact you.
• provide financial information so that Google may perform a credit check.
• agree to the Terms of Service, which describe the features of the service, permissible transactions, prohibited actions, service fees, payment terms and more.
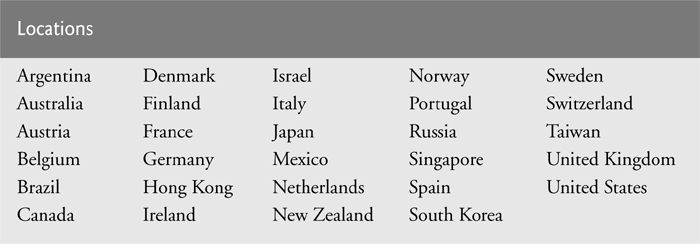
Fig. 2.8. Supported locations for Google Checkout merchants.
Google Checkout processes payments and helps protect you from fraudulent purchases. The standard payment processing rates are waived for your Android Market sales,2 but you do pay a transaction fee of 30% of the app price, charged by Android Market. Note that once you set up a Google Checkout account, you’ll be able to use it for much more than just selling your apps. Similar to PayPal, Google Checkout is used as a payment service for online transactions. Android Market may add other payment services such as PayPal in the future.
2 checkout.google.com/termsOfService?type=SELLER.
2.6. AndroidManifest.xml File
The AndroidManifest.xml file, referred to as the manifest, provides information needed to run your app in Android and to filter it properly in Android Market. This allows you to hide your app from users who are browsing Android Market on devices that are not compatible with your app. For example, a user whose device does not have a camera will not see apps that require a camera per the app’s manifest. The manifest is automatically generated by the ADT Plugin for Eclipse, but you’ll need to manually add information to the file before you upload the app to Android Market. The ADT Plugin for Eclipse includes an Android Manifest Editor, which enables you to easily edit the manifest file rather than updating the code directly in the XML file.
To access the Android Manifest Editor in Eclipse, go to the Packages Explorer tab and double-click the AndroidManifest.xml file in the app’s folder. The file will open in the Eclipse workspace. Select the Manifest tab at the bottom of the workspace page to display the Manifest General Attributes page, where you’ll provide basic information about your app, including package names, version numbers and elements. Figure 2.9 lists some of the common elements included in the manifest. You can find a complete list of elements at
developer.android.com/guide/topics/manifest/manifest-intro.html
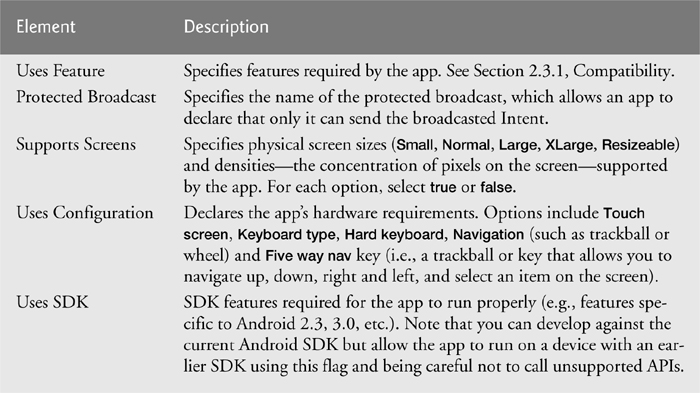
Fig. 2.9. Some common elements to add to your app’s manifest.
When your app is ready, you’ll come back to the Manifest General Attributes page to prepare it for distribution (which we discuss in Section 2.8).
On the Application tab at the bottom of the editor you’ll define the attributes specific to the app, including the icon, description, permission, debugging and more. On the Permissions tab you’ll specify if the app must use protected features on the device (that is, features that require permission to be accessed), such as writing SMS messages, setting the wallpaper or accessing location. Before installing an app, Android Market displays a list of permissions the app requires. You should request only the permissions that your app needs to execute correctly. For a list of permissions, see developer.android.com/reference/android/Manifest.permission.html. We discuss editing the manifest file in more detail in Section 2.7.
2.7. Preparing Your Apps for Publication
Preparing to Publish: A Checklist in the Dev Guide at developer.android.com/guide/publishing/preparing.html lists items to consider before publishing your app on Android Market, including:
• Testing your app on Android devices
• Considering including an End User License Agreement with your app (optional)
• Adding an icon and label to the app’s manifest
• Turning off logging and debugging
• Versioning your app (e.g., 1.0, 1.1, 2.0, 2.3, 3.0)
• Getting a cryptographic key for digitally signing your app
• Compiling your app
• Signing your app
We discuss some of these next.
Testing Your App
Before submitting your app to Android Market, test it thoroughly to make sure it works properly on a variety of devices. Although the app might work perfectly using the emulator on your computer, problems could arise when running it on a particular Android device. Figure 2.10 lists Android functionality that’s not available on the emulator.
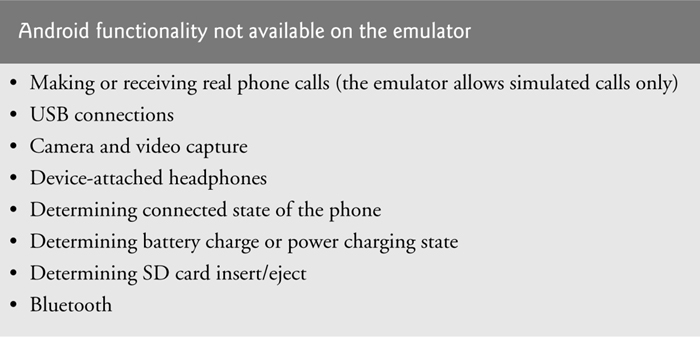
Fig. 2.10. Android functionality not available on the emulator (developer.android.com/guide/developing/devices/emulator.html).
To enable an Android device for testing and debugging apps, go to Settings > Applications > Development on the device and select the checkbox for USB (Universal Serial Bus) Debugging.
End User License Agreement
You have the option to include an End User License Agreement (EULA) with your app. An EULA is an agreement through which you license your software to the user. It typically stipulates terms of use, limitations on redistribution and reverse engineering, product liability, compliance with applicable laws and more. You might want to consult an attorney when drafting an EULA for your app. To view a sample EULA, see
www.developer-resource.com/sample-eula.htm.
Icons and Labels
Design an icon for your app and provide a text label (a name) that will appear in Android Market and on the user’s device. The icon could be your company logo, an image from the app or a custom image. Create the icon for multiple screen densities:
• Medium-density screens: 48 x 48 pixels
• Low-density screens: 36 x 36 pixels
You’ll also need a high-resolution app icon for use in Android Market.3 This icon should be:
3 market.android.com/support/bin/answer.py?answer=1078870.
• 512 x 512 pixels
• 1,024 KB maximum
• High-density screens: 72 x 72 pixels
For further specifications and best practices, see the Icon Design Guidelines at developer.android.com/guide/practices/ui_guidelines/icon_design.html. Consider hiring an experienced graphic designer to help you create a compelling, professional icon (Fig. 2.11). We’ve found custom app icon design services ranging from $65 to $400 or more. Once you’ve created the icon and label, you’ll need to specify them in the app’s manifest. Go to the Android Manifest Editor and click on the Application tab at the bottom of the editor.
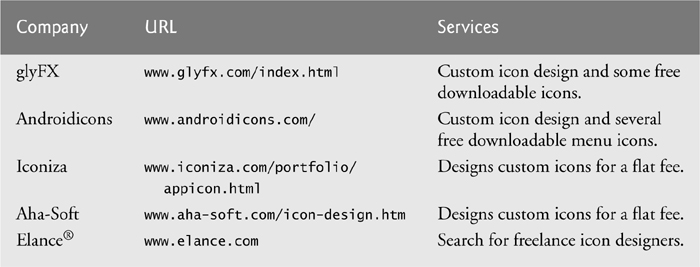
Fig. 2.11. Custom app icon design firms.
Turning Off Logging and Debugging
Before publishing your app you must turn off debugging. Click on the Application tab in the Android Manifest Editor and set the Debuggable attribute to false. Remove extraneous files such as log or backup files.
Versioning Your App
It’s important to include a version name (shown to the users) and a version code (an integer used by Android Market) for your app, and to consider your strategy for numbering updates. For example, the first version code of your app might be 1.0, minor updates might be 1.1 and 1.2, and the next major update might be 2.0. For additional guidelines, see Versioning Your Applications at
developer.android.com/guide/publishing/versioning.html
Shrinking, Optimizing and Obfuscating Your App Code
The Android Market licensing service allows you to create licensing policies to control access to your paid apps. For example, you might use a licensing policy to limit how often the app checks in with the server, how many simultaneous device installs are allowed, and what happens when an unlicensed app is identified. To learn more about the licensing service, visit
developer.android.com/guide/publishing/licensing.html
In addition to creating a licensing policy, you should “obfuscate” any apps you upload to Android Market to prevent reverse engineering of your code and further protect your apps. The ProGuard tool—which runs when you build your app in release mode—shrinks the size of your .apk file and optimizes and obfuscates the code. To learn how to set up and use the ProGuard tool, go to
developer.android.com/guide/developing/tools/proguard.html
For additional information about protecting your apps from piracy using code obfuscation and other techniques, visit
android-developers.blogspot.com/2010/09/securing-android-lvl-
applications.html
Getting a Private Key for Digitally Signing Your App
Before uploading your app to a device, to Android Market or to other app marketplaces, you must digitally sign the .apk file (Android app package file) using a digital certificate that identifies you as the author of the app. A digital certificate includes your name or company name, contact information, etc. It can be self-signed using a private key (i.e., a secure password used to encrypt the certificate); you do not need to purchase a certificate from a third-party certificate authority (though it’s an option). During development, Eclipse automatically digitally signs your app so that you can run it on test devices. That digital certificate is not valid for use with the Android Market. The Java Development Kit (JDK) includes the tools you’ll need to sign your apps. The Keytool generates a private key and Jarsigner is used to sign the .apk file. When running your app from Eclipse, the build tools included in the ADT Plugin automatically use the Keytool to sign the .apk file—you won’t be asked for a password. They then run the zipalign tool to optimize the app’s memory usage.
If you’re using Eclipse with the ADT Plugin, you can use the Export Wizard to compile the app, generate a private key and sign the .apk file in release mode:
1. Select the project in the Package Explorer, then select File > Export.
2. Double click to open the Android folder, select Export Android Application, then click Next.
3. Select the project (i.e., your app) to export, then click Next.
4. Select the Create new keystore radio button. Enter a Location for your keystore where your digital certificate and private key will be stored (e.g., c:androidkeystore). Create a secure Password, Confirm the password, then click Next to go to the Key Creation GUI.
5. In the Alias field, enter a unique name for your key (e.g., “releasekey”). Note that only the first eight characters of the alias will be used. In the Password field, enter a secure password for your key, then re-enter the password in the Confirm field. In the Validity field, enter the number of years that the key will be valid. Android Market requires that the private key be valid beyond October 22, 2033, and Google suggests that it should be valid for more than 25 years (longer than the anticipated life of the app), so that all updated versions of the app are signed with the same key. If you sign updated versions with a different key, users will not be able to seamlessly upgrade to the new version of your app. In the next several fields enter your personal information, including your First and Last Name, Organizational Unit, Organization, City or Locality, State or Province and two-letter Country Code (e.g., US). Click Next.
For additional information, see Signing Your Applications at:
developer.android.com/guide/publishing/app-signing.html
Screenshot(s)
Take at least two screenshots of your app that will be included with your app description in Android Market (Fig. 2.12). These provide a preview, since users can’t test the app before downloading it. Choose attractive screenshots that show the app’s functionality. Also, take screenshots from an emulator that does not have any extra icons in the status bar or that use custom skins that can be confusing or distracting for users. When you upload your app to Android Market, you’ll have the option to include a URL for a promotional video.
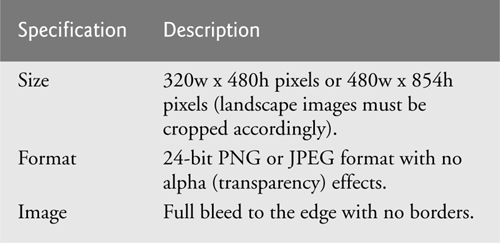
Fig. 2.12. Screenshot specifications.
The Dalvik Debug Monitor Service (DDMS), which is installed with the ADT Plugin for Eclipse, helps you debug your apps running on actual devices. The DDMS also enables you to capture screenshots on your device. To do so, perform the following steps:
1. Run the app on your device as described at the end of Section 1.11.
2. In Eclipse, select Window > Open Perspective > DDMS, which allows you to use the DDMS tools.
3. In the Devices window (Fig. 2.13), select the device from which you’d like to obtain a screen capture.
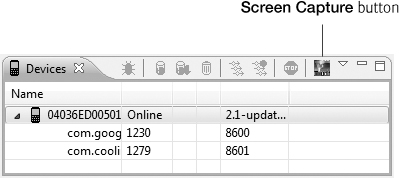
Fig. 2.13. Devices window in the DDMS perspective.
4. Click the Screen Capture button to display the Device Screen Capture window (Fig. 2.14).
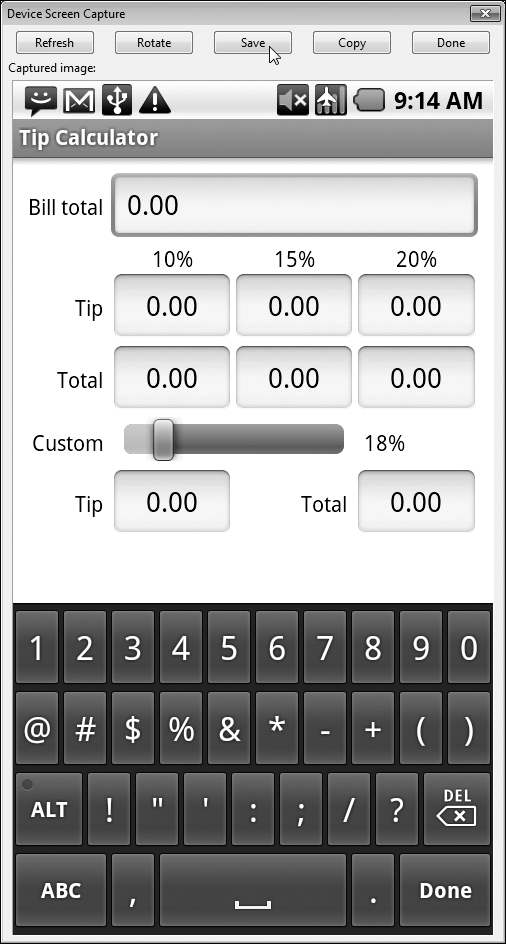
Fig. 2.14. Device Screen Capture window showing a capture of the Tip Calculator app from Chapter 4.
5. After you’ve ensured that the screen is showing what you’d like to capture, you can click the Save button to save the image.
If you wish to change what’s on your device’s screen before saving the image, make the change on the device, then press the Refresh button in the Device Screen Capture window to recapture the device’s screen.
2.8. Uploading Your Apps to Android Market
Once you’ve prepared all of your files and you’re ready to upload your app, read the steps at:
developer.android.com/guide/publishing/publishing.html
Then log into Android Market at market.android.com/publish (Section 2.4) and click the Upload Application button to begin the upload process. The remainder of this section discusses some of the steps you’ll encounter.
Uploading Assets
1. App .apk file. Click the Choose File button to select the Android app package (.apk) file, which includes the app’s code files (.dex files), assets, resources and the manifest file. Then click Upload.
2. Screenshots. Click the Choose File button to select at least two screenshots of your app to be included in Android Market. Click Upload after you’ve selected each screenshot.
3. High-resolution app icon. Click the Choose File button to select the 512 x 512 pixels app icon to be included in Android Market. Then click Upload.
4. Promotional graphic (optional). You may upload a promotional graphic for Android Market to be used by Google if they decide to promote your app (for examples, check out some of the graphics for featured apps on Android Market). The graphic must be 180w x 120h pixels in 24-bit PNG or JPEG format with no alpha transparency effects. It must also have a full bleed (i.e., go to the edge of the screen with no border in the graphic). Click the Choose File button to select the image, then click Upload.
5. Feature Graphic (optional). This graphic is used in the Featured section on Android Market. The graphic must be 1024w x 500h pixels in 24-bit PNG or JPEG format with no alpha transparency effects.4 Click the Choose File button to select the image, then click Upload.
4 market.android.com/support/bin/answer.py?hl=en&answer=1078870.
6. Promotional video (optional). You may include a URL for a promotional video for your app (e.g., a YouTube link to a video that demonstrates how your app works).
7. Marketing opt-out. Select the checkbox if you do not want Google to promote your app outside Android Market or other Google-owned sites.
Listing Details
1. Language. By default, your app will be listed in English. If you’d like to list it in additional languages, click the add language hyperlink and select the checkboxes for the appropriate languages (Fig. 2.15), then click OK. Each language you select will appear as a hyperlink next to Language in the Listing Details. Click on each language to add the translated title, description and promotional text.
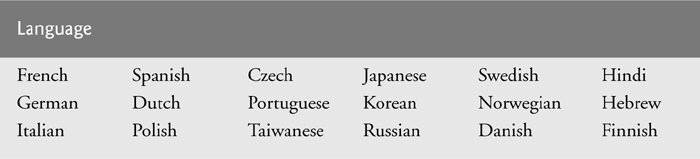
Fig. 2.15. Languages for listing apps in Android Market.
2. Title. The title of your app as it will appear in Android Market (30 characters maximum). It does not need to be unique among all Android apps.
3. Description. A description of your app and its features (4,000 characters maximum). It’s recommended that you use the last portion of the description to explain why each permission is required and how it’s used.
4. Recent changes. A walkthrough of any changes specific to the latest version of your app (500 characters maximum).
5. Promo text. The promotional text for marketing your app (80 characters maximum).
6. App type. Choose Applications or Games.
7. Category. Select the category (Fig. 1.16) that best suits your game or app.
8. Price. This defaults to Free. To sell your app for a fee, click the Setup a Merchant Account at Google Checkout link to apply.
Publishing Options
1. Content rating. You may select Mature, Teen, Pre-teen or All. For more information, read the Android Market Developer Program Policies and the Content Rating Guidelines at market.android.com/support/bin/answer.py?answer=188189.
2. Locations. By default, All Locations is selected, which means that the app will be listed in all current and future Android Market locations. To pick and choose specific Android Markets where you’d like your app to be listed, uncheck the All Locations checkbox to display the list of countries. Then select each country you wish to support.
Contact Information
1. Website. Your website will be listed in Android Market. If possible, include a direct link to the page for the app, so that users interested in downloading your app can find more information, including marketing copy, feature listings, additional screenshots, instructions, etc.
2. E-mail. Your e-mail address will also be included in Android Market, so that customers can contact you with questions, report errors, etc.
3. Phone number. Sometimes your phone number is included in Android Market, therefore it’s recommended that you leave this field blank unless you provide phone support. You may also want to provide a phone number for customer service on your website.
Consent
1. Read the Android Content Guidelines at www.android.com/market/terms/developer-content-policy.html (see Section 2.4), then check the This application meets Android Content Guidelines checkbox.
2. Next, you must acknowledge that your app may be subject to United States export laws (which generally deal with software that uses encryption), that you’ve complied with such laws and you certify that your app is authorized for export from the U.S. If you agree, check the checkbox. For more information about export laws, click Learn More, where you’ll find some helpful links.
If you’re ready to publish your app, click the Publish button. Otherwise, click the Save button to save your information to be published at a later date.
2.9. Other Android App Marketplaces
In addition to Android Market, you may choose to make your apps available through other Android app marketplaces (Fig. 2.16), or even through your own website using services such as AndroidLicenser (www.androidlicenser.com). However, according to the Android Market Terms of Service, you cannot use customer information obtained through Android Market to sell or distribute your apps elsewhere.
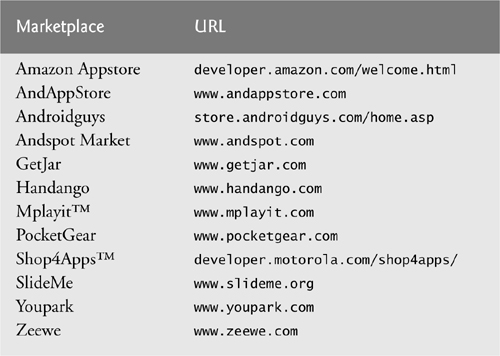
Fig. 2.16. Other Android app marketplaces.
2.10. Pricing Your App: Free or Fee
You set the price for the apps that you distribute through Android Market. Developers often offer their apps for free as a marketing and publicity tool, earning revenue through increased sales of products and services, sales of more feature-rich versions of the same app, or in-app advertising. Figure 2.17 lists ways to monetize your apps.
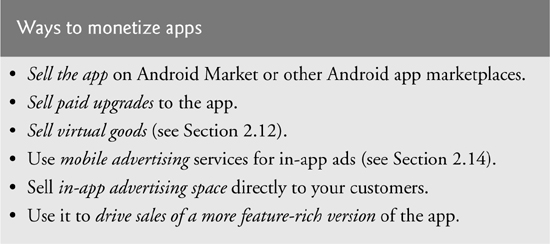
Fig. 2.17. Ways to monetize apps.
Paid Apps
According to a study by research firm Ovum (www.ovum.com/), the average price of paid
Android apps is around $3.135. Although these prices may seem low, keep in mind that successful apps could sell tens of thousands, hundreds of thousands or even millions of copies! According to AdMob (www.admob.com/), Android users who purchase apps download an average of five apps per month.6 When setting a price for your app, start by researching your competition. How much do their apps cost? Do theirs have similar functionality? Is yours more feature-rich? Will offering your app at a lower price than the competition attract users? Is your goal is to recoup development costs and generate additional revenue?
5 techcrunch.com/2011/09/12/report-android-market-nearing-6-billion-downloads-weather-apps-are-makin-it-rain/.
6 metrics.admob.com/2010/06/may-2010-mobile-metrics-report/.
Financial transactions for paid apps in Android Market are handled by Google Checkout (checkout.google.com), though customers of some mobile carriers (such as AT&T, Sprint and T-Mobile) can opt to use carrier billing to charge paid apps to their wireless bill. Google retains 30% of the purchase price and distributes 70% to you. Earnings are paid to Google Checkout merchants monthly.7 It may take your bank a few business days to deposit the payout in your account. You’re responsible for paying taxes on the revenue you earn through Android Market.
7 checkout.google.com/support/sell/bin/answer.py?hl=en&answer=25400.
Free Apps
There are now more free apps for Android than iPhone.8 Approximately 57% of apps on Android Market are free, and they comprise the vast majority of downloads.9 Given that users are more likely to download an app if it’s free, consider offering a free “lite” version of your app to encourage users to download and try it. For example, if your app is a game, you might offer a free lite version with just the first few levels. When the users finished playing any of the free levels, the app would display a message encouraging them to buy your more robust app with numerous game levels through Android Market, or a message that they can purchase additional levels using in-app billing (for a more seamless upgrade). According to a recent study by AdMob, upgrading from the “lite” version is the number one reason why users purchase a paid app.10
8 techcrunch.com/2011/04/27/there-are-now-more-free-apps-for-android-than-for-theios-platform-distimo/?utm_source=feedburner&utm_medium=email&utm_campaign=Feed%3A+Techcrunch+%28TechCrunch%29.
9 gizmodo.com/5479298/android-app-store-is-57-free-compared-to-apples-25.
10 metrics.admob.com/wp-content/uploads/2009/08/AdMob-Mobile-Metrics-July-09.pdf.
Many companies use free apps to build brand awareness and drive sales of other products and services (Fig. 2.18).
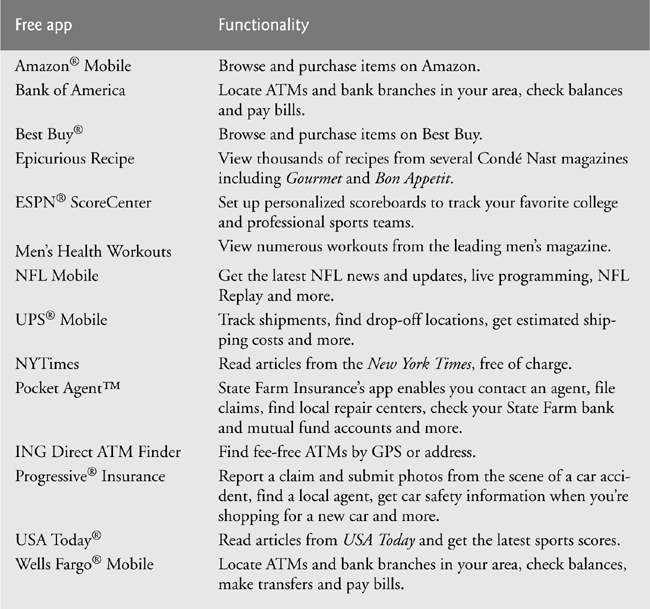
Fig. 2.18. Free Android apps that build brand awareness.
2.11. Monetizing Apps with In-App Advertising
Some developers offer free apps monetized with in-app advertising—often banner ads similar to those you find on websites. Mobile advertising networks such as AdMob (www.admob.com/) and Google AdSense for Mobile (www.google.com/mobileads/publisher_home.html) aggregate advertisers for you and serve the ads to your app (see Section 2.15). You earn advertising revenue based on the number of views. The top 100 free apps might earn anywhere from a few hundred dollars to a few thousand dollars per day from in-app advertising. In-app advertising does not generate significant revenue for most apps, so if your goal is to recoup development costs and generate profits, you should consider charging a fee for your app. According to a study by Pinch Media, 20% of people who download a free iPhone app will use it within the first day after they download it, but only 5% will continue to use it after 30 days11—we haven’t seen a comparable study for Android yet, but the results are probably similar. Unless your app is widely downloaded and used, it will generate minimal advertising revenue.
11 www.techcrunch.com/2009/02/19/pinch-media-data-shows-the-average-shelf-life-ofan-iphone-app-is-less-than-30-days/.
2.12. Monetizing Apps: Using In-App Billing to Sell Virtual Goods in Your Apps
The Android Market In-app Billing service enables you to sell virtual goods (e.g., digital content) through apps on devices running Android 2.3 or higher (Fig. 2.19). According to Google, apps that use in-app billing earn profoundly more revenue than paid apps alone. Of the top 10 revenue-generating games on Android Market, the top nine use in-app billing.12 The In-app Billing Service is available only for apps purchased through Android Market; it may not be used in apps sold through third-party app stores. To use in-app billing, you’ll need an Android Market publisher account (see Section 2.4) and a Google Checkout merchant account (see Section 2.5). Google collects 5% of the price of all in-app purchases—other app stores charge up to 30%.
12 www.youtube.com/watch?v=GxU8N21wfrM.
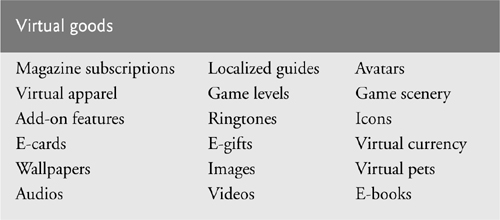
Fig. 2.19. Virtual goods.
Selling virtual goods can generate higher revenue per user than advertising.13 Virtual goods generated $1.6 billion in the United States in 2010 ($10 billion globally14), and U.S. sales are expected to grow to $2.1 billion in 2011.15 A few websites that have been successful selling virtual goods include Second Life®, World of Warcraft®, Farmville™ and Stardoll™. Virtual goods are particularly popular in mobile games. According to a report by the research company Frank N. Magid Associates, over 70 million Americans own smartphones, of whom 16% spend an average of $41 per year on in-game virtual goods.16
13 www.virtualgoodsnews.com/2009/04/super-rewards-brings-virtual-currency-platform-to-social-web.html.
14 www.internetretailer.com/2010/05/28/consumers-are-buying-digital-goods-new-ways.
15 www.bloomberg.com/news/2010-09-28/u-s-virtual-goods-sales-to-top-2-billion-in-2011-report-says.html.
16 www.webwire.com/ViewPressRel.asp?aId=118878.
To implement in-app billing, follow these steps:
1. In your app’s manifest file, add the com.android.vending.BILLING permission. Then, upload your app per the steps in Section 2.8.
2. Log into your Android Market publisher account at market.android.com/publish.
3. Go to All Android Market Listings. You’ll see a list of your uploaded apps. Under the appropriate app, click In-app Products. This page lists all in-app products for the app.
4. Click Add in-app product. This takes you to the Create New In-app Product page, where you can enter the details about each product.
5. In-app product ID. Enter an identifying code (up to 100 characters) you’ll use for each separate in-app product. The ID must start with a number or a lowercase letter and may use only numbers, lowercase letters, underscores (_) and dots (.).
6. Purchase type. If you select the Managed per user account radio button, the item may be purchased only once per user account. If you select the Unmanaged radio button, users can purchase the item multiple times.
7. Publishing state. To make your products available to users, the publishing state must be set to Published.
8. Language. The default language for the product is the same as the language you selected when uploading and publishing the app.
9. Title. Provide a unique title (up to 25 characters) for the product that will be visible to users.
10. Description. Provide a brief description (up to 80 characters) of the item that will be visible to users.
11. Price. Provide a price for the item in U.S. dollars.
12. Click Publish to make the items available or Save if you want to leave the item to be published at a later date.
For additional information about in-app billing, including sample apps, security best practices and more, visit developer.android.com/guide/market/billing/index.html.
In-app Purchase for Apps Sold Through Other App Marketplaces
If you choose to sell your apps through other app marketplaces (see Section 2.9), several third-party mobile payment providers can enable you to build in-app purchase into your apps using APIs from mobile payment providers (Fig. 2.20). Start by building the additional locked functionality (e.g., game levels, avatars) into your app. When the user opts to make a purchase, the in-app purchasing tool handles the financial transaction and returns a message to the app verifying payment. The app then unlocks the additional functionality. According to the mobile payment company Boku, mobile carriers collect between 25% and 45% of the price.17
17 www.boku.com/help/faq/publisher/.
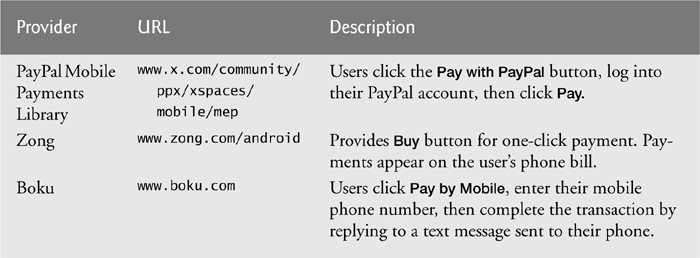
Fig. 2.20. Mobile payment providers for in-app purchase.
2.13. Launching the Market App from Within Your App
To drive additional sales of your apps, you can launch the Market app (Android Market) from within your app (typically by including a button that users can touch) so that the user can download other apps you’ve published or purchase a related app with functionality beyond that of the previously downloaded version. You can also launch the Market app to enable users to download the latest updates.
There are two ways to launch the Market app. First, you can bring up Android Market search results for apps with a specific developer name, package name or a string of characters. For example, if you want to encourage users to download other apps you’ve published, you could include a button in your app that, when touched, launches the Market app and initiates a search for apps containing your name or company name. The second option is to bring the user to the details page in the Market app for a specific app.
To learn about launching Market from within an app, see Publishing Your Applications: Using Intents to Launch the Market Application on a Device at developer.android.com/guide/publishing/publishing.html#marketintent.
2.14. Managing Your Apps in Android Market
The Android Market Developer Console allows you to manage your account and your apps, check users’ star ratings for your apps (0 to 5 stars), track the overall number of installs of each app and the number of active installs (installs minus uninstalls). You can view installation trends and the distribution of app downloads across Android versions, devices, and more. Android Application Error Reports list any crash and freeze information from users. If you’ve made upgrades to your app, you can easily publish the new version. You may remove the app from Market, but users who downloaded it previously may keep it on their devices. Users who uninstalled the app will be able to reinstall it even after it’s been removed (it will remain on Google’s servers unless it’s removed for violating the Terms of Service).
2.15. Marketing Your App
Once your app has been published, you’ll want to market it to your audience.18 Viral marketing (i.e., word-of-mouth) through social media sites such as Facebook, Twitter and YouTube, can help you get your message out. These sites have tremendous visibility. According to comScore, YouTube accounts for 10% of all time spent online worldwide and Facebook accounts for a remarkable 17%.19 Figure 2.21 lists some of the most popular social media sites. Also, e-mail and electronic newsletters are still effective and often inexpensive marketing tools.
18 To learn more about marketing your Android apps, check out the book Android Apps Marketing: Secrets to Selling Your Android App by Jeffrey Hughes.
19 tech.fortune.cnn.com/2010/07/29/google-the-search-party-is-over/.

Fig. 2.21. Popular social media sites.
Facebook, the premier social networking site, has more than 600 million active users (up from 200 million in early 200920), each with an average of 130 friends,21 and it’s growing at about 5% per month! It’s an excellent resource for viral (word-of-mouth) marketing. Start by setting up an official Facebook page for your app. Use the page to post:
20 topics.nytimes.com/top/news/business/companies/facebook_inc/index.html.
21 techcrunch.com/2010/07/15/facebook-500-million-users/?utm_source=feedburner&utm_medium=email&utm_campaign=Feed:+Techcrunch+(TechCrunch).
• App information
• News
• Updates
• Reviews
• Tips
• Videos
• Screenshots
• High scores for games
• User feedback
• Links to Android Market where users can download your app
Next, you need to spread the word. Encourage your co-workers and friends to “like” your Facebook page and tell their friends to do so as well. As people interact with your page, stories will appear in their friends’ news feeds, building awareness to a growing audience.
Twitter is a micro blogging, social networking site that attracts over 190 million visitors per month.22 You post tweets—messages of 140 characters or less. Twitter then distributes your tweets to all your followers (at the time of this writing, one famous rock star had over 8.5 million followers). Many people use Twitter to track news and trends. Tweet about your app—include announcements about new releases, tips, facts, comments from users, etc. Also encourage your colleagues and friends to tweet about your app. Use a hashtag (#) to reference your app. For example, when tweeting about this book on our Twitter feed, @deitel, we use the hashtag #AndroidHTP. Others may use this hashtag as well to write comments about the book. This enables you to easily search tweets for messages related to Android How to Program.
22 techcrunch.com/2010/06/08/twitter-190-million-users/.
Viral Video
Viral video—shared on video sites (e.g., YouTube, Dailymotion, Bing Videos, Yahoo! Video), on social networking sites (e.g., Facebook, Twitter, MySpace), through e-mail, etc.—is another great way to spread the word about your app. If you create a compelling video, which is often something humorous or even outrageous, it may quickly rise in popularity and may be tagged by users across multiple social networks.
E-Mail Newsletters
If you have an e-mail newsletter, use it to promote your app. Include links to Android Market, where users can download the app. Also include links to your social networking pages, such as your Facebook page and Twitter feed, where users can stay up-to-date with the latest news about your app.
App Reviews
Contact influential bloggers and app review sites (Fig. 2.22) and tell them about your app. Provide them with a promotional code to download your app for free (see Section 2.10). Influential bloggers and reviewers receive many requests, so keep yours concise and informative without too much marketing hype. Many app reviewers post video app reviews on YouTube and other sites (Fig. 2.23).
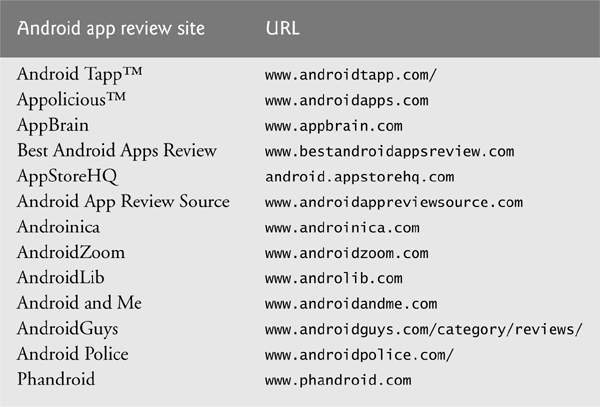
Fig. 2.22. Android app review sites.
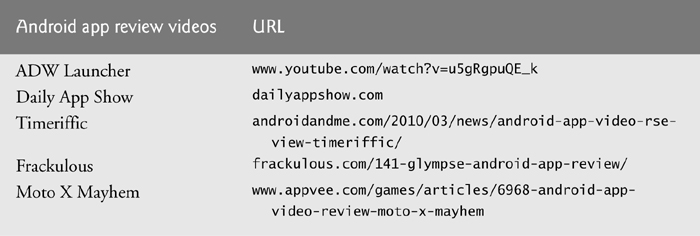
Fig. 2.23. Sample Android app review videos.
Internet Public Relations
The public relations industry uses media outlets to help companies get their message out to consumers. With the phenomenon known as Web 2.0, public relations practitioners are incorporating blogs, podcasts, RSS feeds and social media into their PR campaigns. Figure 2.24 lists some free and fee-based Internet public relations resources, including press-release distribution sites, press-release writing services and more. For additional resources, check out our Internet Public Relations Resource Center at www.deitel.com/InternetPR/.

Fig. 2.24. Internet public relations resources.
Mobile Advertising Networks
Purchasing advertising spots (e.g., in other apps, online, in newspapers and magazines or on radio and television) is another way to market your app. Mobile advertising networks (Fig. 2.25) specialize in advertising Android (and other) mobile apps on mobile platforms. You can pay these networks to market your Android apps. Keep in mind that most apps don’t make much money, so be careful how much you spend on advertising. You can also use these advertising networks to monetize your free apps by including banner ads within the apps. Many of these mobile advertising networks can target audiences by location, carrier, device (e.g., Android, iPhone, BlackBerry, etc.) and more.
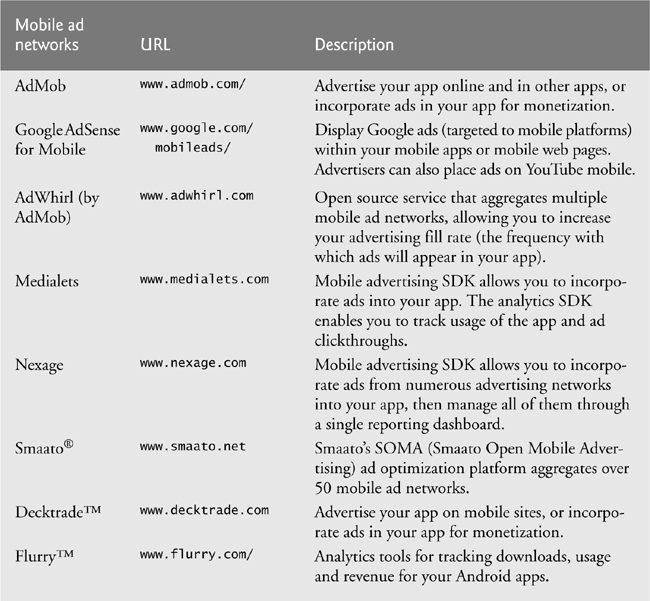
Fig. 2.25. Mobile advertising networks.
Advertising Costs
The eCPM (effective cost per 1000 impressions) for ads in Android apps ranges from $0.09 to $4, depending on the ad network and the ad.23 Most ads on the Android pay based on clickthrough rate (CTR) of the ads rather than the number of impressions generated. If the CTRs of the ads in your app are high, your ad network may serve you higher-paying ads, thus increasing your earnings. CTRs are generally 1 to 2% on ads in apps (though this varies based on the app).
23 seoamit.wordpress.com/2010/02/06/monetizing-mobile-apps-android-and-iphone/.
2.16. Other Popular App Platforms
By porting your Android apps to other platforms such as iPhone and BlackBerry, you could reach an enormous audience (Fig. 2.26). According to a study by AdMob, over 70% of iPhone developers planned to develop for Android over the subsequent six months and 48% of Android developers planned to develop for the iPhone.24 The disparity occurs because iPhone apps must be developed on Macs, which can be costly, and with the Objective-C programming language, which only a small percentage of developers know. Android, however, can be developed on Windows, Linux or Mac computers with Java—the world’s most widely used programming language. The new BlackBerry Playbook tablet is able to run Android apps (which will soon be available for sale in BlackBerry’s App World store).
24 metrics.admob.com/wp-content/uploads/2010/03/AdMob-Mobile-Metrics-Mar-10-Publisher-Survey.pdf.
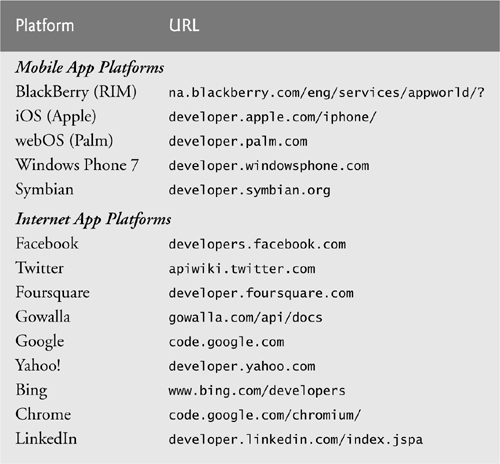
Fig. 2.26. Other popular app platforms besides Android.
2.17. Android Developer Documentation
Figure 2.27 lists some of the key Android developer documentation. For additional documentation, go to developer.android.com/.
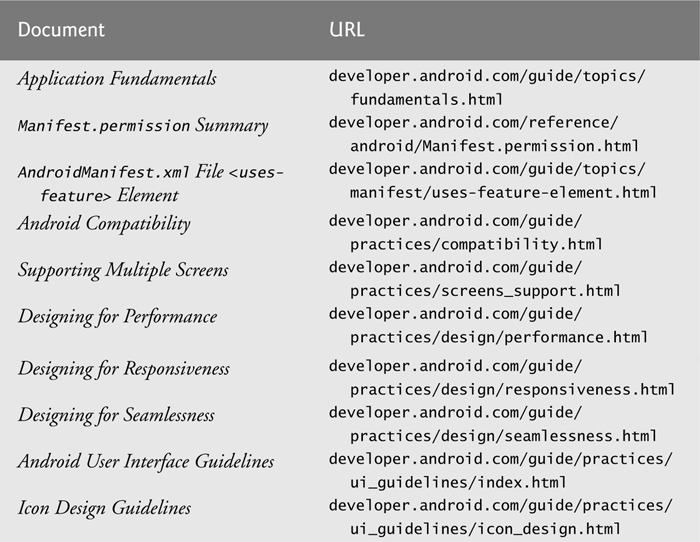
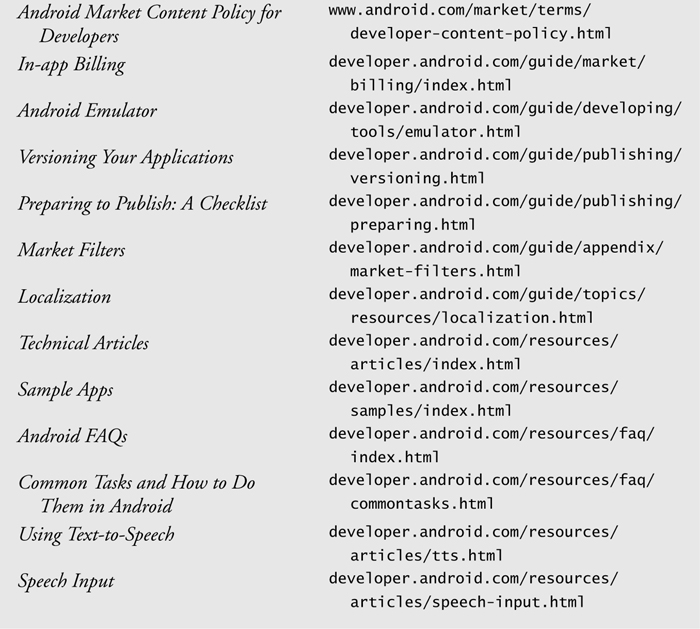
Fig. 2.27. Android developer documentation.
2.18. Android Humor
Figure 2.28 lists sites where you’ll find Android-related humor.
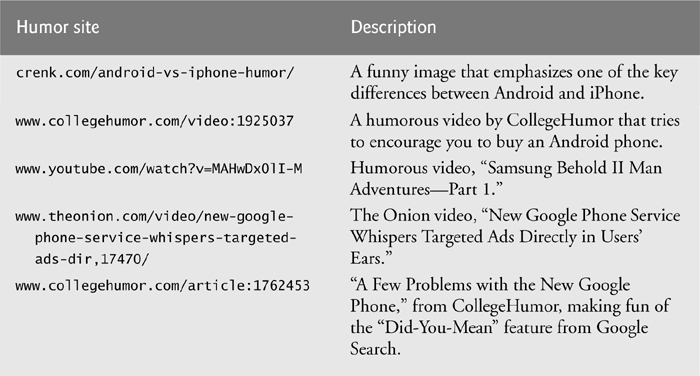
Fig. 2.28. Android humor.
2.19. Wrap-Up
In this chapter, we walked through the registration process for Android Market and setting up a Google Checkout account so you can sell your apps. We showed you how to prepare apps for submission to Android Market, including testing them on the emulator and on Android devices, creating icons and splash screens, following the Android User Interface Guidelines and best practices, and editing the AndroidManifest.xml file. We walked through the steps for uploading your apps to Android Market. We provided alternative Android app marketplaces where you can sell your apps. We also provided tips for pricing your apps, and resources for monetizing them with in-app advertising and in-app sales of virtual goods. And we included resources for marketing your apps, once they’re available through Android Market.
Chapters 3–18 present 16 complete working Android apps that exercise a broad range of functionality, including the latest Android 2.3 and 3.0 features. In Chapter 3, you’ll use the Eclipse IDE to create your first Android app, using visual programming without writing any code, and you’ll become familiar with Eclipse’s extensive help features. In Chapter 4, you’ll begin programming Android apps in Java.
Self-Review Exercises
2.1. Fill in the blanks in each of the following statements:
a. The __________ is a reverse chronological history of all of the activities, allowing the user to navigate to the previous activity using the Back button.
b. Selecting the Context menu from within a message in the Messaging app (by touching and holding—also called __________—within the message on a touchscreen) brings up a menu of options specific to that message, including Select all, Select text, Cut all, Copy all, Paste and Input method.
c. To sell your apps on Android Market, you’ll need a(n) __________ merchant account.
d. Before uploading your app to a device, Android Market or other app marketplaces, you must digitally sign the .apk file (Android app package file) using a(n) __________ that identifies you as the author of the app.
e. The Android Market __________ allows you to manage your account and your apps, check users’ star ratings for your apps (0 to 5 stars), track the overall number of installs of each app and the number of active installs (installs minus uninstalls).
2.2. State whether each of the following is true or false. If false, explain why.
a. Android provides four generalized screen sizes (small, normal, large and extra large) and densities (low, medium, high and extra high), making it easier for you to design apps that work on multiple screens.
b. A splash screen usually resembles the app’s user interface—often just an image of the background elements of the GUI.
c. When an app works perfectly using the emulator on your computer, it will run on your Android device.
d. You might use a licensing policy to limit how often the app checks in with the server, how many simultaneous device installs are allowed, and what happens when an unlicensed app is identified.
e. The title of your app as it will appear in Android Market must be unique among all Android apps.
f. According to a study by app store analytics firm Distimo (www.distimo.com/), the average price of paid Android apps is around $36.20.
g. According to Google, apps that use in-app billing earn profoundly more revenue than paid apps alone.
h. If you choose to sell your apps through other app marketplaces, several third-party mobile payment providers can enable you to build in-app purchase into your apps using APIs from mobile payment providers.
Answers to Self-Review Exercises
a. activity stack.
b. long pressing.
c. Google Checkout.
d. digital certificate.
e. Developer Console.
a. True.
b. True.
c. False. Although the app might work perfectly using the emulator on your computer, problems could arise when running it on a particular Android device.
d. True.
e. False. The title of your app as it will appear in Android Market does not need to be unique among all Android apps.
f. False. According to the study, the average price of paid Android apps is around $3.62 (the median is $2.72).
g. True.
h. True.
Exercises
2.3. Fill in the blanks in each of the following statements:
a. __________ are displays of timely information on the user’s Home screen, such as the current weather, stock prices and news.
b. __________ are reusable components used to build an app’s user interface. They perform actions such as searching, viewing information and dialing a phone number. A separate one is often associated with each different screen of an app.
c. The __________ menu—accessed through the device’s Menu button—provides actions and operations for the app’s current screen.
d. If your app takes a while to load, use a(n) __________—an image that will be displayed when the icon is tapped on the screen so that the user sees an immediate response while waiting for the app to load.
e. The __________ file, referred to as the manifest, provides information needed to run your app in Android and to filter it properly in Android Market.
f. A(n) __________ is an agreement through which you license your software to the user. It typically stipulates terms of use, limitations on redistribution and reverse engineering, product liability, compliance with applicable laws and more.
g. The __________, which is installed with the ADT Plugin for Eclipse, helps you debug your apps running on actual devices.
h. According to a recent study by AdMob, __________ is the number one reason why users purchase a paid app.
2.4 State whether each of the following is true or false. If false, explain why.
a. You must design your app for every possible screen size and density.
b. Use a BroadcastReceiver to easily share data from your app with other apps on the device.
c. The functionality of these sensors—accelerometer, barometer, compass, light sensor and proximity sensor—is not available on the emulator.
d. You should “obfuscate” any apps you upload to Android Market to encourage reverse engineering of your code.
e. According to AdMob (www.admob.com/), Android users who purchase apps download an average of five apps per month.
f. There are now more free apps for Android than iPhone.
g. Approximately 90% of apps on Android Market are free, and they comprise the vast majority of downloads.
h. According to comScore, YouTube and Facebook each account for 10% of all time spent online worldwide.