
Chapter 2. Android application fundamentals
In this chapter
- Core building blocks
- The application manifest
- Working with resources, layouts, views, and widgets
- Adapters, intents, and intent filters
I’d take the awe of understanding over the awe of ignorance any day.
Douglas Adams
To build solid Android applications you need to start with the basics. It’s the same with learning any technology, skill, or sport. This is the point where a basketball coach would give the speech about learning to dribble and pass, before trying to perfect the alley-oop. Advanced techniques will come, but they’re built on a basis of mastering the fundamentals.
To that end, in this chapter we’ll focus on the core building blocks of Android application development. This means we’ll revisit and expand upon the fundamental concepts we introduced in chapter 1, and we’ll fill in more detail too. Specifically, we’ll take a closer look at the entire scope of an Android application. We’ll start with the manifest and resources, and then we’ll explore layout and views, then activities and intents, and the use of Adapters to bind data to widgets. Finally, we’ll also touch on passing internal data between activities using the Application object. All of these concepts relate to common ways to accomplish basic tasks with the Android platform, and they’re all part of the foundation we need to build before diving deeper in later parts of the book.
With the wide array of topics to address in mind, we’re going to build another sample application that pulls in all of these parts. Though the application we’ll be building isn’t trivial, it’s not overly complicated either. This is because we want to cover a wide variety of the essential programming techniques found in many Android applications, and we want to keep things relatively straightforward at the same time. This application isn’t going to be intricate or pretty, but it’ll get the job done. If you want your application to look good, you’ll have to wait until chapter 4, and if you want to add more features, we’ll come to those in later chapters too. Until then you’ll have to live with a homely application that only a developer could love. Without further ado, let’s meet the DealDroid.
2.1. The DealDroid application
DealDroid is a nice application that displays the “Daily Deals” from eBay. More importantly, it also illustrates a lot of the basic components and common techniques used in many Android applications. So what’s DealDroid? Well, let’s start with eBay’s Daily Deals.
Daily Deals is a popular application on the eBay web site that shows limited-time sales for savvy e-commerce shoppers. You can view it at http://deals.ebay.com, but who wants to view this in a boring web page when you could instead check it out in a convenient Android application? Do you see where this is going? Figure 2.1 shows the opening screen of the DealDroid application, which displays the eBay Daily Deals.
Figure 2.1. The main screen of the DealDroid application shows the featured deals of the day in an Android ListView.

Grab the Project: Dealdroid

You can get the source code for this project and the packaged APK to run it at the Android in Practice code web site. Because some code listings here are shortened to focus on specific concepts, we recommend that you download the complete source code and follow along within Eclipse (or your favorite IDE or text editor).
Source: http://mng.bz/r560, APK file: http://mng.bz/ARip
The opening screen of DealDroid, aptly named DealList, displays a list of the featured Daily Deals for the current day. This is dynamic data from eBay that changes, well, daily. It can change more frequently than daily, as deals often sell-out and are replaced by new deals. Not only will this application show the current Daily Deals, it can also show other deals in various categories of more specific interest, like gadgets and fashion. When you find a deal that you like, you can view more detail by clicking on it and drilling down into the DealDetails screen, as seen in Figure 2.2.
Figure 2.2. The DealDetails screen of the DealDroid application shows specific deal information. Selecting a deal on the DealList screen will take you to this screen.

That about does it for the core UI of the DealDroid. As we said, it’s simple and somewhat ugly. Beyond the UI though, what if you want to do more than look at a deal? DealDroid lets you email the deal to a friend, by leveraging the bundled Android mail application. Also, if you want to share the deal by another means, such as via FaceBook or Twitter (or any other application wired in by the framework to allow sharing), DealDroid lets you to do that too. If instead you love the deal so much that you want to buy it, then DealDroid uses Android’s excellent browser and sends you to eBay’s mobile website. Figure 2.3 shows the sharing menu, and what each menu option launches.
Figure 2.3. DealDroid likes to share with other apps. Tapping the phone menu button displays the sharing options from the detail screen.

DealDroid is capable of running a background Service to keep an eye out for new deals as they show up (maybe a deal ran out and a new one replaced it, or you had the application running when the day’s new deals were revealed) and issuing a Notification. We aren’t including those features in the discussion in this chapter, because Services have their own focus in chapter 5, and we want to stay on track here. For this reason, the source code download for the book includes two versions of DealDroid: basic as we’ll build here, and DealDroidWith-Service, which includes several broadcast receivers and a background Service.
Now that we’ve seen what this application can do, let’s tear it apart and see how it works. This is your red pill/blue pill moment: if you don’t want to see the android behind the curtain revealed, then stop reading now! Otherwise, keep going and get ready for the gruesome details of Android applications.
2.2. Core building blocks
One of the most valuable aspects of a platform like Android is its application framework. Not only does it provide access to the GPS sensor on a device, or let you make HTTP requests, it gives you a structure to fit your application into. It makes a deal with you. If you put certain kinds of files in certain kinds of places, it’ll use those files in a well-understood, predefined manner. You’re given a blueprint to follow. A lot of boilerplate tasks are stripped away, and you can focus on your application. This can be liberating for developers. You have less to worry about because of what the platform takes care of for you. This is a key, but often-ignored reason for the success of native mobile application platforms such as Android, over mobile web applications. A mobile web application developer may have more freedom in many ways, but they may also have more tedious things to deal with and worry about. In several ways it’s easier to develop on a native platform such as Android. Figure 2.4 shows the main components that Android provides for building applications.
Figure 2.4. The essential application components provided by the Android platform

We’ve already seen a quick tour of a basic Android application in chapter 1, but now it’s time to define the components, and then in the upcoming sections we’ll look at each in more detail. First, Android applications are mainly built with several core entities:
- Activity— The foreground; they dictate the UI, and handle events and interaction
- Service— The background; they can perform long-running tasks or poll
- BroadcastReceiver— Handlers that can wake up and respond to broadcast events (intents)
- ContentProvider— Allows you to expose a data API to other applications
These entities are what you’ll use to build user interface screens, create background processes, and react to certain types of events. Additional components are used in the construction of these entities, their logic, and wiring between them:
- Views— UI elements that are drawn onscreen
- Layouts— View hierarchies that control screen format/appearance
- Intents— Messages wiring components together
- Resources— External elements, such as strings and drawables (pictures)
- Manifest— Configuration for applications
We’ll learn about all of these concepts in the upcoming sections as we review the sample DealDroid application step by step. We’ll begin with the bottom layer, the manifest file that defines the relationships, capabilities, permissions, and configuration of every Android application.
2.3. Application manifest
As we saw in chapter 1, the application manifest is the starting point for any Android application. This isn’t some platitude—it’s literally true. When a user launches an Android application, the first thing that the Android OS does is read the application’s manifest. It does this before any code can execute, because the manifest tells it what code needs to be executed. This follows the traditional executable application model of Java, where an application is packaged as a jar file, with a manifest file that tells the Java virtual machine what class (in the jar file) is the entry point to the application. In the Android world, activities are the units of work; an application’s manifest file must indicate which Activity is the entry point of the application. Let’s look at a more concrete example of this: the DealDroid manifest file in the following listing.
Listing 2.1. The AndroidMainfest.xml manifest file of the DealDroid application

If you’ve programmed in Java for long, then a manifest file is probably a familiar concept to you. This file, always named
AndroidManifest.xml for Android applications, provides internal configuration and metadata about your application to the Android
runtime. In the manifest element, the package name and version identifiers for your application are listed. The application
element then tells the runtime what the name, icon, and label are for your application ![]() . Finally, the child elements of application define all of the things your application can do.
. Finally, the child elements of application define all of the things your application can do.
This includes the entry point Activity class with the name .DealList, and an IntentFilter that declares action MAIN and category LAUNCHER ![]() . The activity class name is relative to the application’s package. The IntentFilter tells the runtime that it should register this application and make it selectable from the phone’s home screen (also known
as the Launcher application). More generally, an IntentFilter is an expression of capability. Other components then use an Intent to declare an action to be completed. These concepts are important in Android because they allow different components to
be combined and used in conjunction with each other at runtime (late binding). We’ll learn more about this in section 2.9.
. The activity class name is relative to the application’s package. The IntentFilter tells the runtime that it should register this application and make it selectable from the phone’s home screen (also known
as the Launcher application). More generally, an IntentFilter is an expression of capability. Other components then use an Intent to declare an action to be completed. These concepts are important in Android because they allow different components to
be combined and used in conjunction with each other at runtime (late binding). We’ll learn more about this in section 2.9.
Along with the entry point, all other activities must be declared in the manifest ![]() . The same is also true of other components such as BroadcastReciever, Service, and ContentProvider (though we don’t have any here). A BroadcastReceiver is a special filter that listens for intents that are broadcast through the system, and a Service is a background process. We’ll focus on these concepts in chapter 5. A ContentProvider allows you to expose a data API to other applications; we’ll learn about this in chapter 8. Back to the manifest: after the main components are declared, we then also have permissions
. The same is also true of other components such as BroadcastReciever, Service, and ContentProvider (though we don’t have any here). A BroadcastReceiver is a special filter that listens for intents that are broadcast through the system, and a Service is a background process. We’ll focus on these concepts in chapter 5. A ContentProvider allows you to expose a data API to other applications; we’ll learn about this in chapter 8. Back to the manifest: after the main components are declared, we then also have permissions ![]() , which rounds out our DealDroid configuration.
, which rounds out our DealDroid configuration.
2.3.1. Permissions
DealDroid declares that it should be allowed to use the Internet (it parses an RSS feed from eBay to get deal information), and that it should be allowed to check the status of the network state. Android’s permissions system labels each protected action declared this way, and then displays them to the user when they elect to install an application. This detail is important. There are no checks at runtime. The user sees what an application wants to do when they install it, and if they allow it, the permissions are permanently granted. If an application tries to perform an action for which it doesn’t have permission, a SecurityException is thrown.
Along with Internet and system events, you can also declare things such as whether your application will read or write to the filesystem, whether it’ll read or write user contact data, whether it can wake up the phone when it’s sleeping, and much more. The constants class Manifest.permission in the SDK is where you can easily see all the built in permissions available.
A less common use case is the need to declare and enforce your own permissions, going beyond the system declarations. If you need to, you can declare custom permissions in the manifest, and enforce them within components (activities, services, broadcast receivers and so on).
Moving past the manifest, the next step concept we need to address for DealDroid are the noncode elements it includes, namely resources.
2.4. Resources
Resource is a broad term. It can mean images used in your application, internationalized text, or any type of static value that you want to externalize from your application code, as we discussed in chapter 1. Resources are defined by placing files in the /res directory of your project. Resources can then be accessed either in code or through references in XML.
2.4.1. Defining resources
Everything declared in the /res directory will not only be packaged up as part of your application, but will also be programmatically accessible in your application code. Resources have a few key properties it’s important to remember:
- Every resource has an ID
- Every resource has a specific type
- Resources have a specific location and file they are defined in
You’ll typically define resources of a few different types, such as strings or layouts, using XML. This is by far the most common usage of resources. Resources don’t end there though. You can define shapes, colors, drawables, styles, themes, menus, static data arrays, and a lot more as XML resources. Resources that you don’t define in XML can either be placed in specified locations, such as res/drawable for images, or placed in the /res/raw directory and accessed as direct streams (such as for audio and video files). Once you define a resource by placing an item in the /res folder, the platform automatically parses it (unless it’s raw) and uses the aapt tool to link the ID through the R class we saw in chapter 1. The R class maps each resource ID to its location or compiled content.
Why Resources?
Android goes to a lot of trouble to define resource types and make support of resources available through the API. You might wonder why this is necessary. There are several reasons. First, they separate code from external entities such as images and strings. Such separation is a good thing because it keeps the code focused and uncluttered. Second, resources are efficient and fast. XML resources are compiled into a binary format. This makes them friendly at development time, without being slow at runtime. Third, resources enable the support of dynamic loading at runtime based on various environment properties such as language, screen configuration, and hardware capability. This enables internationalization and localization, which we’ll learn more about later, and other environment specific changes.
The resources that we’ll deal with for DealDroid are simple: they’re strings, plurals, and layouts. Plurals are a special type of resource that allow the system to automatically deal with plurality for strings; we’ll come to those in a moment. First, let’s look at the strings DealDroid uses in the following listing.
Listing 2.2. The res/values/strings.xml resources file showing values for named strings

As promised, the strings we use in the DealDroid application are externalized and defined in an XML file. This XML file is
strings.xml and it’s placed in /res/values. The file starts off with the typical XML stanza and then has a root element named resources ![]() . Each string is then defined in its own element with an attribute for the name
. Each string is then defined in its own element with an attribute for the name ![]() . The name will be the ID for the resource, as well as the constant identifier in the generated R class.
. The name will be the ID for the resource, as well as the constant identifier in the generated R class.
All of the strings we defined in strings.xml will be present as constants in the R class with hexadecimal values. The values are pointers to where the initial values have been compiled and stored in the internal resource table. You shouldn’t ever need to dig into the resource table unless you’re doing serious Android hacking, but it helps to understand that this is how compiled resources work.
Nonresource Resources—Assets
If you need to access normal files that aren’t preprocessed as resources and assigned an ID, you can use the /assets directory. Any file placed in /assets is available to your application. An example of an asset might be HTML source file for use with a WebView.
The other notable resources DealDroid uses are the XML screen layouts and the mysterious plurals file we mentioned previously. Plurals are an obscure but useful Android resource type that allow you to easily, and in an internationalized manner, deal with plural values. This next listing shows how plurals are defined in XML.
Listing 2.3. The res/values/plurals.xml resource file using the XLIFF format

Plurals are different from most other XML resources in that they use a special format, OASIS XLIFF ![]() . You don’t have to know a lot about this to use it. You define at least two text labels—one for items with a quantity of
one, and another for items that are plural in quantity (a quantity of other)
. You don’t have to know a lot about this to use it. You define at least two text labels—one for items with a quantity of
one, and another for items that are plural in quantity (a quantity of other) ![]() —and the framework will return a proper value. Android string resources support String.format style arguments too, as we’ve done with %d
—and the framework will return a proper value. Android string resources support String.format style arguments too, as we’ve done with %d ![]() (this marker will be replaced with the digit we supply when we get the resource later).
(this marker will be replaced with the digit we supply when we get the resource later).
Why are plurals important? Why not say “10 new deal(s)” and be done with it? Well, you could do that, but it’s arguably ugly, and it’s not internationalized. Things can get tricky in a hurry with multiple languages and plural values. For example, there is no plural in Japanese and several plurals in Slovakian (for 1, 2, 3, 4, 5, or more). The plurals format alleviates that. The next thing we need to discuss is how to access resources.
2.4.2. Accessing resources
Once you’ve defined resources you’ll then refer to them either in code or in XML by using their IDs. We’ll learn more about this as we step through our DealDroid Activity classes later in this chapter, and when we start using styles and themes in chapter 4, but for now let’s touch on the basics.
To access a resource in code, you use the R-defined constant’s ID, such as R.string.deal_details. From this ID notation, you can tell that it’s a local resource and not a system resource, and that it’s a string. System resources are distinguished from local resources by the android namespace prefix, such as android.R. string.yes. You can use the ID with various methods, most notably with the Resources class as follows:
- For standard strings use Resources.getString(R.string.deal_details)
- For plurals use Resources.getQuantityString(R.plurals.deal_service_new_deal, 1);
Making references to resources in XML is even easier. To do this you reference the resource ID you’re interested in with the @ prefix. For example, you’d refer to the deal_details string as @string/deal_details. To include the android namespace you use a colon, such as @android:string/yes.
Types of Resources
There are many different types of data you can externalize as resources on Android. We’ve seen strings, plurals, and a few layouts at this point (more of those coming up), but you should know that menus, styles, animations, shapes, arrays of data, and more can also be defined as resources. We’ll see more resources and different resource types as we progress through the book. For a complete and up-to-date guide of all the supported types, see the Android resources documentation at http://mng.bz/aLRy.
You need to be aware of a few more subtleties with XML resource access, such as how to define new IDs in XML and how to work with layouts. This takes us into designing the screen for an Activity, and working with view hierarchies, views, and widgets.
2.5. Layout, views, and widgets
A special resource known as a layout is what you’ll use to design screens, items for lists, and other UI elements in Android. We introduced layouts in chapter 1, but here we’ll clarify how you declare them as XML, and we’ll touch on the components that comprise them: views and widgets.
We won’t be done with layout, views, and widgets with one short discussion here, but we’ll add detail as we keep the focus on the basics of Android development. Then, in chapter 4 we’ll come back to these topics and take the deep dive.
2.5.1. Declaring layouts
When it comes to creating the basic UI elements in an application, Android separates the presentation into layout resources that resemble an HTML-like approach. This is in contrast to typical Java UI frameworks such as Swing. The basic idea is to statically declare the UI for a given view as an XML resource and then use IDs to refer to UI elements in code. Let’s look at an example. The following listing shows the layout XML for the first screen in the DealDroid application.
Listing 2.4. The res/layout/deallist.xml layout resource file, showing views and widgets

A layout file is an XML file. It’s a different set of elements, but the concept is similar to the kind of HTML that would
be used to create a web page. Whereas HTML elements tend to be low-level, Android’s layout elements are more sophisticated.
The root element of this layout file is a container of View classes known as a LinearLayout ![]() . LinearLayout puts all of its child views into either a single row or column. Other layout types are provided, such as FrameLayout, RelativeLayout, and TableLayout, and you can create your own, but for now we’re going to stick to LinearLayout and we’ll meet the other types in chapter 4.
. LinearLayout puts all of its child views into either a single row or column. Other layout types are provided, such as FrameLayout, RelativeLayout, and TableLayout, and you can create your own, but for now we’re going to stick to LinearLayout and we’ll meet the other types in chapter 4.
In our example, the orientation of our LinearLayout (defined as an attribute of the element) is vertical. This means all of the child views will be laid out in a single column,
top-to-bottom in the same order as they are specified in the layout file. Inside the layout, we include two child elements:
a ListView with a special reserved ID of list ![]() , and a Spinner
, and a Spinner ![]() . We can also see that we’re defining attributes for these elements, such as layout_width, layout_height, and layout_weight. These control the size and positioning of the view elements, and again we’ll get to the specifics surrounding these and
other layout attributes in chapter 4.
. We can also see that we’re defining attributes for these elements, such as layout_width, layout_height, and layout_weight. These control the size and positioning of the view elements, and again we’ll get to the specifics surrounding these and
other layout attributes in chapter 4.
As seen in the screenshot in figure 2.5, which our deallist layout produces, a ListView is a widget that shows a list of items, and a Spinner is a widget that displays a selection of choices with one element at a time showing (we’ll learn more about each of these when we see the code that corresponds to this layout in the next few sections). Going back to listing 2.4, note how both widgets have resource IDs, like you’d assign to an HTML element.
Figure 2.5. This DealDroid DealList screen shows the two components, a ListView and a Spinner, defined in the deallist.xml layout.

One thing you may have noticed is that the Spinner resource ID is declared with a + sign in front of it: @+id/section_spinner. This special notation means go ahead and create the resource ID in the resource table (and R.java file) if it doesn’t already exist. If you reuse a resource ID, or otherwise refer to one that already exists, you don’t need to include the plus.
XML isn’t the Only Game in Town
XML-based layouts are convenient and arguably a solid design choice that separate responsibilities, but it’s important to note that you don’t have to use XML at all. Layouts, other XML resources, and all other views and widgets can also be defined within Java code. All of the XML layouts that Android uses are representations of framework Java classes that are parsed and inflated into Java objects. We’ll learn more about writing raw views later in the book, and more about layout inflation later in this chapter, but keep in mind that XML isn’t the only way to define UI components in your Android application.
IDs in XML layouts let us refer to widgets in code, so we can populate them with data, attach event listeners, and so on. Also note that the elements’ XML layouts correspond to much richer components than the low-level elements in HTML.
We aren’t done with our discussions of layouts yet, because we have one more screen (the detail screen) to build for DealDroid, and we’ll focus on the UI in chapter 4. Nevertheless, this gives us a good foothold into what they are; now we need to define the other terms we are bandying about: views and widgets.
2.5.2. Views and widgets
As we touched on in chapter 1, the class android.view.View is the base class for UI objects in Android. This is where every onscreen element in any Android application begins. There are three major types of views:
- SurfaceView
- ViewGroup
- Widget
The first and most basic view type is SurfaceView, which provides a direct drawing surface. We won’t deal with these directly in this chapter, but you’ll learn more about them when we talk about drawing and graphics in later chapters. The next view type is ViewGroup. These are an abstraction of layouts and other view containers (views that contain other views). We’ve already seen a few simple layouts, and we’ll learn more about them and how they relate to view hierarchies and groups coming up. Finally, the last view type is Widget. These are the classic UI components you’ll use most often.
Widgets, which are part of the android.widget package, are views that often interact with the user and can be backed by a data source. This means simple form elements such as text input boxes and buttons are widgets, and are more involved components like ListView and Spinner, as we’ve seen.
Now that we’ve declared views and widgets in layouts and touched on what these terms mean (knowing there’s more to come), the next thing we need to do is link to these components in code and bring them to life with activities.
2.6. Activities
An Activity is a single focused thing that the user can do. Typically each screen in your application will be defined with a layout, and made up of views and widgets that are controlled by a corresponding Activity. Each Activity creates a window for UI, manages lifecycle and state, provides an endpoint for intents (which we’ll learn about in section 2.8), handles interface events, controls menus, and more.
A Single Focused Thing
Typically an Activity will correspond to a screen in an application, but note the careful wording of the definition from the documentation. A “single focused” thing isn’t a screen. The screen abstraction works most of the time, and it’s a useful analogy, but keep in mind that an Activity can also be a floating window on top of another Activity.
To create an Android screen in an application you’ll extend the Activity class or one of its specialized subclasses (and you’ll usually define the UI for that screen with a layout resource, as we’ve seen). We’ll cover some of the trickier parts of dealing with the Activity class, including lifecycle subtleties and how activities relate to tasks, in chapter 3. Here we’ll address the basics of working with the Activity class, and we’ll see our first use of a specialized Activity subclass for dealing with lists, ListActivity. We’ll start with the most important parts of the Activity class, the methods that you’ll implement often.
2.6.1. Activity basics
The Android platform performs an intricate juggling act to manage resources. With limited CPU power and memory available, Android uses a stack of activities that the system controls to try to keep the most relevant things a user is interested in running, and push other things into the background.
What’s most relevant, and how does the system perform this juggling act? Most relevant is any application the user is using. An application is typically composed of a set of components, including activities, services, and broadcast receivers, that are run using the same user ID and process on the platform (as we noted in chapter 1). As users click on buttons or respond to notifications to open new activities, the system shuffles existing activities to the background. To do this, the system pushes activities through their lifecycle methods. The most common Activity lifecycle methods are:
- onCreate— Called when an Activity is first created
- onPause— Called when an Activity is going into the background
- onResume— Called when an Activity is being resumed after having been in the background
There are more lifecycle methods (we’ll discuss all of them in the next chapter), but onCreate is where things are initiated, onPause is where they should be cleaned up or persisted, and onResume is where things are reloaded or reset. You’ll override onCreate with every Activity you build, and in most (but not all) onPause and onResume.
In addition to the lifecycle phase hooks, Activity also extends Context and provides a host of event, state, menu, and other helper methods. The lifecycle methods of Activity are essential to understand and use correctly. Using these methods properly will result in a responsive and error-free application. Because these methods and the related concepts are important, we’ll focus on this topic and related things such as managing state and using some of the other Activity methods in the next chapter. Before we get into those details, we’re first going to look at the Activity implementation to create the deal list screen for DealDroid.
2.6.2. List-based activities
Lists in Android are a great place to start digging into views and activities, and a good example of the Model-View-Controller (MVC) design pattern. It’s important to understand how data and its representation are decoupled from each other and how this is reflected in the framework interfaces.
Recall from figure 2.6 that DealDroid displays lists of deal data using a ListView. ListView is a scrolling container that may have an arbitrary number of child views, which we call list items. A list item can be any kind of view, and not all list items have to be of the same kind, which enables you to create lists of varied complexity. ListView does all the heavy lifting for you: it takes care of recycling and redrawing all visible list items if the underlying data changes, it handles touch events, and so on.
Even though it’s perfectly fine to use ListView directly (and sometimes you need to), it’s typically used indirectly by going through Android’s ListActivity class. What ListActivity does is manage a ListView for you, and hence saves you from writing the boilerplate code required for setting it up and responding to events, and so on.
Here we’ll take the ListActivity approach and build out the code that provides the ListView for DealDroid. The DealList class is our first nontrivial piece of code. We’re going to break it into separate sections to discuss, starting with the biggest part: the declaration and onCreate method, as shown in the following listing.
Listing 2.5. Start of the DealList.java Activity class, from declaration through onCreate


The first thing to note with listing 2.5 is that, as promised, we’re extending ListActivity ![]() . From there, we see what almost every Activity will start out with, overriding onCreate
. From there, we see what almost every Activity will start out with, overriding onCreate ![]() . This is part of the all-important Activity lifecycle that we’ll focus on in chapter 3. For now, we need to understand that onCreate is where we set things up when our Activity is created. Inside of onCreate, we associate the layout file we built in listing 2.4 as the content view using setContentView
. This is part of the all-important Activity lifecycle that we’ll focus on in chapter 3. For now, we need to understand that onCreate is where we set things up when our Activity is created. Inside of onCreate, we associate the layout file we built in listing 2.4 as the content view using setContentView ![]() . We’ll learn more about what exactly this is doing when we talk about inflating layouts in chapter 4. For now, keep in mind that this method is how we associate our XML layout with our Activity.
. We’ll learn more about what exactly this is doing when we talk about inflating layouts in chapter 4. For now, keep in mind that this method is how we associate our XML layout with our Activity.
After the initial setup, we’re instantiating an Application object ![]() , which we’ll use later to store some global state and define some utility methods. The code for this class, and more discussion
about Application objects in general, will be in section 2.9. Next, we get to the heart of the ListView matter, using an Adapter to provide data for our list.
, which we’ll use later to store some global state and define some utility methods. The code for this class, and more discussion
about Application objects in general, will be in section 2.9. Next, we get to the heart of the ListView matter, using an Adapter to provide data for our list.
In this case, we’re using a regular Java Collection (a List), and passing it into a DealsAdapter class ![]() . The DealsAdapter is a custom class that extends Adapter and supplies the deal items for our list. In general terms, this is what adapters do: they provide data. Adapters come in various
forms. They can be backed by arrays, collections, or even files or database cursors, and they can be trivial or complex. We’ll
learn more about adapters, and see the code for DealsAdapter, in section 2.7. For now, trust that the adapter will supply deal items to the ListView. We make the association between the Adapter and the ListView with setListAdapter
. The DealsAdapter is a custom class that extends Adapter and supplies the deal items for our list. In general terms, this is what adapters do: they provide data. Adapters come in various
forms. They can be backed by arrays, collections, or even files or database cursors, and they can be trivial or complex. We’ll
learn more about adapters, and see the code for DealsAdapter, in section 2.7. For now, trust that the adapter will supply deal items to the ListView. We make the association between the Adapter and the ListView with setListAdapter ![]() .
.
One important thing to note is that we haven’t directly referenced a ListView anywhere. This is one of the conveniences ListActivity provides. We can imagine you frowning. How does this work, considering we haven’t done any additional setup? We did, but it was subtle. Remember how we passed a reserved ID to the <ListView> element in the layout in listing 2.4? The trick is that whenever you inherit from ListActivity, it’ll look for a <ListView> declaration in the activity’s layout that carries the android:id/list resource ID. It’ll then automatically connect this widget with the operations in the setListAdapter method (and other helper methods, such as getListView). No rocket science involved.
Reserved Resource IDs
Android uses predefined reserved IDs not only for lists, but also in some other places. One other example of this is TabActivity, which will look for the tabhost, tabcontent, and tabs IDs in your layout. You can also use them to access views defined in some of Android’s predefined layouts. For instance, Android ships with default layouts for list items, such as simple_list_item_1 and simple_list_item_2 for single- and two-line text-based list items.
Getting past the adapter setup for our ListView, we then come to a method call that checks whether the current deal section list of items is already populated. If it’s not,
we check whether the network is available, and we then issue a mysterious call to ParseFeedTask.execute ![]() . This is an invocation of an AsyncTask implementation. An AsyncTask lets us perform a long-running operation on a separate Thread from the UI (in this case, make a network call and parse the eBay deals RSS feed). We aren’t going to step into this code
here because it’s off the fundamentals track, but don’t worry; we’ll cover threading, and AsyncTask in detail, in chapter 6 (and if you’re interested in jumping ahead now, you can see this code in the download for the DealDroid project). The takeaway
here is that we don’t want to do any long-running and/or blocking work in our onCreate method (or anywhere on the main UI Thread for that matter). Also, if we can’t run our AsyncTask because we can’t connect to the network, we show the user a pop-up message on the screen using a Toast
. This is an invocation of an AsyncTask implementation. An AsyncTask lets us perform a long-running operation on a separate Thread from the UI (in this case, make a network call and parse the eBay deals RSS feed). We aren’t going to step into this code
here because it’s off the fundamentals track, but don’t worry; we’ll cover threading, and AsyncTask in detail, in chapter 6 (and if you’re interested in jumping ahead now, you can see this code in the download for the DealDroid project). The takeaway
here is that we don’t want to do any long-running and/or blocking work in our onCreate method (or anywhere on the main UI Thread for that matter). Also, if we can’t run our AsyncTask because we can’t connect to the network, we show the user a pop-up message on the screen using a Toast ![]() .
.
After our data retrieval is out of the way, we then get to our Spinner widget ![]() . As we saw in figure 2.6, the Spinner provides a stacked list of choices, much like an HTML select tag. The Spinner also uses an Adapter as a data source. This time it’s a standard ArrayAdapter that gets data from our Application object (again, we’ll get into the adapter details in the next section).
. As we saw in figure 2.6, the Spinner provides a stacked list of choices, much like an HTML select tag. The Spinner also uses an Adapter as a data source. This time it’s a standard ArrayAdapter that gets data from our Application object (again, we’ll get into the adapter details in the next section).
After the data is set up via the Adapter, we’re then attaching an OnItemSelectedListener to our Spinner ![]() . This allows us to receive an event anytime an item in the Spinner is selected. For this case, we get the clicked item, determine whether it’s different than what we’re already working with,
and if so, call resetListItems with the selection
. This allows us to receive an event anytime an item in the Spinner is selected. For this case, we get the clicked item, determine whether it’s different than what we’re already working with,
and if so, call resetListItems with the selection ![]() . We’ll see what this method does in our next listing; first let’s expand on how an Android View component reacts to an event. There are many listeners like this in the Android framework for all kinds of events: items
being clicked, items being long clicked, scrolling, flinging, focus changes, and more. Listeners are interfaces. Here we’ve
created an in place implementation of the OnItemSelectedListener interface with an anonymous inner class.
. We’ll see what this method does in our next listing; first let’s expand on how an Android View component reacts to an event. There are many listeners like this in the Android framework for all kinds of events: items
being clicked, items being long clicked, scrolling, flinging, focus changes, and more. Listeners are interfaces. Here we’ve
created an in place implementation of the OnItemSelectedListener interface with an anonymous inner class.
Anonymous Inner Classes
You could define a class in a separate file that implements a listener interface when you need it, then create an instance of that class, and then use it for the adapter’s listener. Alternatively you could declare that the current class you’re working on implements the interface and you could include the required method locally (and if you have multiple listeners, you can use the same method and filter for the correct component within it). There are several approaches to dealing with this situation, and which one to choose depends on the situation to some degree, and your personal preference. We find anonymous inner classes convenient and capable, and that’s why we’ve chosen them, although they aren’t easy to understand at first. One of the advantages of anonymous inner classes is that they have variable scope access to the enclosing method and class variables through a feature known as lexical closure.
That’s it for the onCreate method of DealList. It’s not trivial, so don’t worry if you don’t completely understand it yet. As we flesh out the details of the Adapters and work through the remaining listings, things will come into focus. We’ll start with what happens when we have a new list of items to display in our ListView, such as when a selection is made from the Spinner. This takes us into the aforementioned resetListItems method, which is seen in the following listing.
Listing 2.6. Resetting the ListView adapter in the DealList.java Activity class

The resetListItems method is short and sweet. In it, we take in a new List of Item, and we use it to repopulate the class member variable we’ve assigned for items ![]() . Recall that this same instance of items is what we passed into DealsAdapter when we constructed it. It’s the same instance, and after we change it, we call notifyDataSetChanged
. Recall that this same instance of items is what we passed into DealsAdapter when we constructed it. It’s the same instance, and after we change it, we call notifyDataSetChanged ![]() on DealsAdapter, and our list is updated and the views are redrawn. We’ll see the code for our custom adapter, and learn more about adapters
in general, coming up.
on DealsAdapter, and our list is updated and the views are redrawn. We’ll see the code for our custom adapter, and learn more about adapters
in general, coming up.
Now that we’ve seen how our ListView will get updated when we want to reset the data, the next thing we need to handle is how to respond when a user clicks a specific item in the list. This is done with the aptly named onListItemClick method in the following listing.
Listing 2.7. Handling a click event for an item in the ListView of DealList.java Activity

The onListItemClick method, which is part of ListActivity, is an event-handling callback. If a user selects an item in a ListView, this method is fired, and we override it ![]() to do whatever we want
to do whatever we want ![]() . Within it we set some global application state on the previously noted Application object, and then we launch the DealDetails Activity using an Intent. As we’ve touched on, intents are the wiring of Android applications; we’ll learn more about them in section 2.8.
. Within it we set some global application state on the previously noted Application object, and then we launch the DealDetails Activity using an Intent. As we’ve touched on, intents are the wiring of Android applications; we’ll learn more about them in section 2.8.
The Power of Listview
As we’ve seen, ListView presents a scrollable list of selectable items. ListView is one of the most useful and powerful widgets Android provides. Though we aren’t using more advanced features here, you should know that ListView could also support filtering, sorting, complex item views, custom layouts, headers, footers, and more. We’ll see ListView again in many later examples in the book, and we’ll exercise more of it as we go, but check the documentation for a comprehensive outline of the capabilities: http://mng.bz/2LZM.
After the ListView and the Spinner, we need to expand on one more aspect to the DealList screen: the options menu. The options menu is shown if the user presses the device’s Menu button. For this version of DealDroid, our options menu only has one choice: reparse the data feed (because we aren’t using a Service to do that for us, we have a menu choice to do it). Setting the options menu up, and reacting to menu events, are both accomplished in the following listing.
Listing 2.8. Setting up the menu for the DealList.java Activity class

Any Activity can choose whether to include an options menu. To create one, you can override onCreateOptionsMenu ![]() and then append MenuItems to the passed-in Menu, as we’ve done here. The Menu.add method lets us specify a group ID, item ID, order, and a String to display
and then append MenuItems to the passed-in Menu, as we’ve done here. The Menu.add method lets us specify a group ID, item ID, order, and a String to display ![]() (among other options, although we aren’t using anything else here). The options menu can hold as many items as you want,
although only the first six can be shown on what’s called the Icon Menu. Beyond six, the Expanded Menu can be accessed by selecting More from the Icon Menu. Because we only have one item here, we aren’t too worried about the
group and item IDs, but they’re useful when you have more items. We return true in onCreateOptionsMenu because we want the menu to be displayed (you can return false if you don’t want the menu to be displayed).
(among other options, although we aren’t using anything else here). The options menu can hold as many items as you want,
although only the first six can be shown on what’s called the Icon Menu. Beyond six, the Expanded Menu can be accessed by selecting More from the Icon Menu. Because we only have one item here, we aren’t too worried about the
group and item IDs, but they’re useful when you have more items. We return true in onCreateOptionsMenu because we want the menu to be displayed (you can return false if you don’t want the menu to be displayed).
To respond when a user selects an item from the options menu, we’ve also overridden the onOptionsItemSelected method ![]() . Here, the selected MenuItem is passed in, and we use the item ID to tell which one we’re dealing with. Once we have the specific MenuItem we’re concerned with, we can perform whatever action we need to (in our case, reparse the daily deals feed, again using the
AsyncTask).
. Here, the selected MenuItem is passed in, and we use the item ID to tell which one we’re dealing with. Once we have the specific MenuItem we’re concerned with, we can perform whatever action we need to (in our case, reparse the daily deals feed, again using the
AsyncTask).
Options Menu as an XML Resource
You can define your options menu in code, as we’ve done for DealList, or you can use an XML menu resource (/res/menu). There are many possibilities and options; for complete details on the options menu, see the current documentation: http://mng.bz/h8c0.
With the menu out of the way, the final piece of main Activity code we need to address for DealList is the all-important onPause method, which is shown in the next listing.
Listing 2.9. The onPause method in the DealList.java Activity class
@Override
  public void onPause() {
     if (progressDialog.isShowing()) {
        progressDialog.dismiss();
     }
     super.onPause();
  }
The Activity lifecycle, which we’ve already mentioned and will cover in detail in chapter 3, is managed by overriding lifecycle methods, such as onCreate and onPause. onCreate was where we built up the components our Activity needs, and onPause is where we need to perform any necessary cleanup. For DealDroid we’re using a ProgressDialog to indicate to users that something is happening at certain points (such as when we make the network call to get deal data). A ProgressDialog is an interactive pop-up dialog that can show progress, such as a horizontal bar filling up, or a spinning circle. If this dialog is showing when our Activity is stopped, it’ll effectively be leaked, and that can cause force close (FC) errors. This is why we need to dismiss it, if it’s showing, within onPause.
Now that we’ve touched on how Activity lifecycle methods are used (as a primer to chapter 3), and seen how a ListActivity works, the next step is to finish up and see how the adapters backing our views are implemented.
2.7. Adapters
When you have to feed data from a data source to a view, you’ll use an Adapter, as we’ve seen. As the name suggests, an Adapter adapts a certain data source and hence lets you plug in different kinds of data sources into a view (an AdapterView) that can then render this data to the screen. ListView and Spinner are AdapterView views. Android ships with several predefined adapters, most notably ArrayAdapter, for serving data from a Java array object or Collection, and CursorAdapter for fetching data from a SQLite database (we’ll learn more about databases and cursors in chapter 7). You’re by no means restricted to the built-in adapters; you can, for instance, implement an adapter that wraps a web service and fetches data from the Internet directly into your views. Anything’s possible!
2.7.1. Adapter basics
The most basic way to use an adapter is to leverage one of the existing implementations Android provides, such as ArrayAdapter (which, despite the name, also works with collections). To see how this works, let’s take a quick look back at how we provided data for our Spinner in listing 2.5:
spinnerAdapter =
   new ArrayAdapter<Section>(DealList.this,
   android.R.layout.simple_spinner_item, sectionList);
To instantiate this ArrayAdapter, we’re using DealList.this for the Context, then a layout resource to tell the Adapter how to display each item, and finally the data itself in the form of a List of Section objects. Section is a simple JavaBean-style class (getters and setters) with a title and a collection of Items that comes from our own model. Item is another simple bean that represents a particular deal with an ID, title, price, location, and so on (for the complete source on these classes, see the code download for this project). The layout we’re using for the Spinner item is set using the reserved ID android.R.layout.simple_spinner_item. By default, ArrayAdapter expects a layout that represents a single TextView. As we can tell by the android name prefix, we’re using a layout provided by the framework for this purpose. Our Spinner is simple, so we’ll use this built-in layout. If we wanted, we could change this layout and define our own. The default behavior of an ArrayAdapter is to call the toString method on each piece of data it has and render it using the specified layout. If you want to do something different, you can override the getView method of ArrayAdapter as we’ll see in the next section.
Android and Context
If you look through the various Android APIs, you’ll notice that many of them take an android.content.Context object as a parameter. You’ll also see that an Activity or a Service is usually used as a Context. This works because both of these classes extend from Context. What’s Context exactly? Per the Android reference documentation, it’s an entity that represents various environment data. It provides access to local files, databases, class loaders associated to the environment, services including system-level services, and more. Throughout this book, and in your day-today coding with Android, you’ll see the Context passed around frequently.
A basic adapter provides a quick way to pour data into a view, but what if we need to customize the views, or moreover, what if we need to reflect changes in the data to the view, or vice versa? To deal with either or both of those conditions, we often need a custom adapter.
2.7.2. Custom adapters
Creating your own adapter means creating a class that implements the Adapter interface. There are several convenience classes such as ArrayAdapter or BaseAdapter from which you can inherit, and you need to override or add those parts that are relevant to you. The getView method is called whenever a list item must be (re)drawn. This happens frequently, for example when scrolling through the list. If the list data changes, you must tell the list view that it should redraw its children by calling Adapter.notifyDataSetChanged, as we saw in listing 2.6.
The DealsAdapter we referenced in listing 2.5 is a custom adapter that extends ArrayAdapter. In listing 2.5 we instantiated this Adapter and set it as the backing for the entire ListActivity using setListAdapter(dealsAdapter). The DealsAdapter code is shown in this next listing.
Listing 2.10. The DealsAdapter.java custom Adapter for supplying views to the DealList

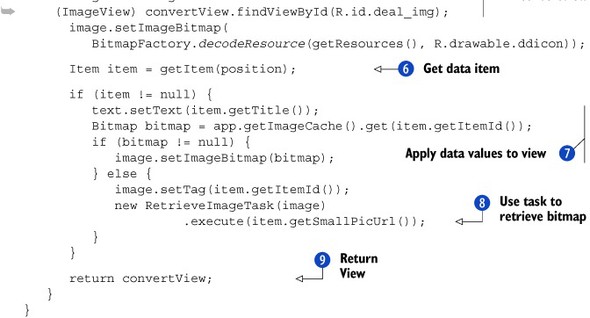
The DealsAdapter class has a lot happening in it. This is the first custom Adapter we’ve seen, but it won’t be the last. This concept is important when you want to do anything beyond the defaults with widgets. We need to go beyond the defaults because our ListView, as seen in figure 2.6, has a custom layout with a small picture and the title of the deal for each Item in the list. Recall that the default for ArrayAdapter, as we saw with our Spinner, is to display the toString value of the each data item. We need more than that.
DealsAdapter begins by extending ArrayAdapter ![]() . This is important because Adapter is an interface with quite a few methods, and we only want to override the View being drawn, not all of the other plumbing. You can implement your own Adapter from scratch, or extend BaseAdapter to start from a lower level, but we want to reuse as much of the framework as we can, so we’re extending ArrayAdapter.
. This is important because Adapter is an interface with quite a few methods, and we only want to override the View being drawn, not all of the other plumbing. You can implement your own Adapter from scratch, or extend BaseAdapter to start from a lower level, but we want to reuse as much of the framework as we can, so we’re extending ArrayAdapter.
The first thing our DealsAdapter class does is define its own constructor that passes along the required elements to ArrayAdapter ![]() . To use an ArrayAdapter you need the Context, a layout resource ID, and an array or Collection of data. After the constructor, we override the getView method
. To use an ArrayAdapter you need the Context, a layout resource ID, and an array or Collection of data. After the constructor, we override the getView method ![]() . This is where the Android framework steps up and does something clever to help draw ListView screens faster: it uses a convertView. A convertView is an existing View that if present, and if of the right type, can be reused. Because a ListView can scroll many items on a screen, and often they can be represented by the same views with different contents (a new name
and picture in our case), reusing views rather than re-creating them for every position is a major optimization. Even if the list
has 1,000 items, they aren’t all on the screen at the same time. We’re effectively paging through the data, and paging through
the UI elements and repurposing them, by using a convertView View. For our example, if the convertView passed in is null, we establish it by inflating the layout we want to use, R.layout.list_item
. This is where the Android framework steps up and does something clever to help draw ListView screens faster: it uses a convertView. A convertView is an existing View that if present, and if of the right type, can be reused. Because a ListView can scroll many items on a screen, and often they can be represented by the same views with different contents (a new name
and picture in our case), reusing views rather than re-creating them for every position is a major optimization. Even if the list
has 1,000 items, they aren’t all on the screen at the same time. We’re effectively paging through the data, and paging through
the UI elements and repurposing them, by using a convertView View. For our example, if the convertView passed in is null, we establish it by inflating the layout we want to use, R.layout.list_item ![]() .
.
This is another static layout that we’ve declared in XML, and we’re using the system LAYOUT_INFLATER_SERVICE to “inflate” it into code. This layout, which we’ve placed in the /res/layout directory in our project, is a simple RelativeLayout:
<RelativeLayout xmlns:android="http://schemas.android.com/apk/res/android"
      android:layout_width="fill_parent"
      android:layout_height="fill_parent">
   <ImageView android:id="@+id/deal_img"
      android:layout_width="50dp"
      android:layout_height="50dp"
      android:layout_margin="5dp />"
   <TextView android:id="@+id/deal_title"
      android:layout_toRightOf="@id/deal_img"
      android:layout_width="fill_parent"
      android:layout_height="wrap_content"
      android:layout_margin="5dp" />
</RelativeLayout>
A RelativeLayout works differently than the LinearLayouts we’ve seen up to now. Rather than lining up elements horizontally or vertically, it lays them out in relation to one another as you specify. Again, we’ll find out more about this and all layouts in chapter 4.
Once the layout is established we use findViewById to get a handle to the View elements it references ![]() . After we have the references, we then get the current data Item
. After we have the references, we then get the current data Item ![]() and apply the data values to the views
and apply the data values to the views ![]() . The title comes right from the Item data class we’re using, and the image we set first as a default using a resource drawable named ddicon (the file for this is located at res/drawable-mdpi/ddicon.gif). After the default image is set, we then try to get the image
for the deal from the Internet using the item’s URL
. The title comes right from the Item data class we’re using, and the image we set first as a default using a resource drawable named ddicon (the file for this is located at res/drawable-mdpi/ddicon.gif). After the default image is set, we then try to get the image
for the deal from the Internet using the item’s URL ![]() (if it isn’t already cached in our Application object). We do this using another AsyncTask, RetrieveImageTask, which makes an HTTP call over the network (the code isn’t shown here so we can stay on topic, but again it’s available with
the project download if you’re interested). Finally, getView returns the View it has worked to build
(if it isn’t already cached in our Application object). We do this using another AsyncTask, RetrieveImageTask, which makes an HTTP call over the network (the code isn’t shown here so we can stay on topic, but again it’s available with
the project download if you’re interested). Finally, getView returns the View it has worked to build ![]() , and the AdapterView displays it.
, and the AdapterView displays it.
In all, our custom adapter is drawing custom views and reflecting data model changes to those views. We’re using the adapter’s notifyDataSetChanged method within the earlier resetListItems method we saw in listing 2.6 to initially prime the adapter (and also when a user picks a different deal-type section from the Spinner selection listener). Again, this causes the views to be redrawn to reflect the current data.
The other side of this coin would be updating the data model based on actions in the user interface. This could be users selecting items in the list (and needing to keep track of what’s selected, and what isn’t), or more complicated interface elements in each list item that allow users to fill in form fields or otherwise interact with the data (you can make each item as detailed as you need). We don’t need this for DealDroid, but it’s important to note that this type of two-way data binding can be done with a custom adapter (we’ll see examples in later chapters that include this).
A Pattern Emerges: Model-View-Controller
You may have noticed a familiar pattern here: we have a view that renders data from a data source (the model), and we have an Activity that dispatches user input to the view and notifies it about changes in the underlying data so that it can redraw itself (the controller). That’s MVC all right! If you look closely, the framework is full of object interaction that follows the MVC pattern. Keep this in mind: it’s a flexible and powerful design pattern commonly found in widget frameworks (as is the Adapter pattern, by the way).
Think about how flexible the adapter solution is. If we were to store our data in a database, or retrieve it in a paged fashion from a web service, we could replace our adapter object with one that iterates over the data source we need. We wouldn’t have to change a thing about our list view. That’s loose coupling and object orientation par excellence.
Beyond the way activities can use views that are loosely coupled from their data sources via adapters, Android also provides another type of loose coupling between activities and other components: intents.
2.8. Intents and IntentFilters
One area where Android shines is the flexibility it provides in communicating between components, and sharing data between them. Android makes this possible using Intent- and IntentFilter-based events. As we’ve noted, an Intent is a description of an action you want to happen, and an IntentFilter is a means for a component to declare it’s capable of handling a specific Intent. Intents themselves don’t do any work; rather, they describe something that needs to be done.
If a component wants to perform an action, it declares that intention with an Intent and hands it off to the system. The system then decodes the Intent and decides which other component, Activity, Service, or BroadcastReceiver, can handle the job.
Also, if an Activity, BroadcastReceiver, or Service wants to offer some action to be available to other components, it declares an IntentFilter. The Android platform keeps track of all the IntentFilter declarations that the current running system is capable of handling, and then resolves intents as they come in to the most suitable component dynamically, on the fly, at runtime. Figure 2.6 looks at this another way, using interlocking shapes as an analogy to depict the Intent/IntentFilter relationship.
To see how the Intent process works, we’ll implement the DealDetails part of DealDroid, which will involve declaring several different types of intents and talking a bit more about intent filters.
Figure 2.6. Intents and IntentFilters combine to filter and respond to events by dispatching them to registered components.

2.8.1. Using intents
To see what goes into an Intent object, we’re going to build the final Activity of the DealDroid application, DealDetails. If you recall from section 2.1, the DealDetails screen displays the details of a deal after a user clicks on it from the DealList screen. Along with displaying information, the other major thing DealDetails does is allow the user to share the deal in several ways using intents and menu options, as seen in the following listing.
Listing 2.11. The first part of the DealDetails.java Activity class


Within the DealDetails class we see the standard pattern of extending Activity ![]() , then overriding the onCreate lifecycle method
, then overriding the onCreate lifecycle method ![]() , and setting our layout using setContentView (the layout for DealDetails isn’t shown here because it’s simple and doesn’t add to the discussion at this point). After
those familiar steps, we come to onCreateOptionsMenu
, and setting our layout using setContentView (the layout for DealDetails isn’t shown here because it’s simple and doesn’t add to the discussion at this point). After
those familiar steps, we come to onCreateOptionsMenu ![]() , where we set up the option menu items
, where we set up the option menu items ![]() for performing actions with a particular deal. This method returns true to make sure the menu is shown (it won’t be shown
unless the return value is true).
for performing actions with a particular deal. This method returns true to make sure the menu is shown (it won’t be shown
unless the return value is true).
After the option menu items are defined, we then override the onOptionItemSelected method that’ll be called when an option item is selected ![]() . Here we respond to the different option items: share a deal using a chooser with the text/html MIME type
. Here we respond to the different option items: share a deal using a chooser with the text/html MIME type ![]() , open the deal in the Browser application
, open the deal in the Browser application ![]() , or share it using a chooser with the text/* MIME type
, or share it using a chooser with the text/* MIME type ![]() (which offers more options than text/html). In each case that we explicitly handle here, we return true, which indicates that the menu processing should stop. In case
any menu items are passed in that we don’t handle, the default case passes off to the super implementation.
(which offers more options than text/html). In each case that we explicitly handle here, we return true, which indicates that the menu processing should stop. In case
any menu items are passed in that we don’t handle, the default case passes off to the super implementation.
A chooser is a dialog of choices of how to handle an Intent, as we’ll see momentarily. The following listing fills in the detail of exactly how we’re performing these actions through intents, by diving into the shareDealUsingChooser and openDealInBrowser methods.
Listing 2.12. The sharing actions of the DealDetails Activity, handled through Intents


Inside the shareDealUsingChooser method, where we do a lot of Intent-related work, we first set up an Intent with the action set to ACTION_SEND ![]() . This step is small but key. Action is one of the primary pieces of information an Intent can contain, along with data (as we’ll see in a second), and MIME type
. This step is small but key. Action is one of the primary pieces of information an Intent can contain, along with data (as we’ll see in a second), and MIME type ![]() . A Bundle of extras can also be included. The extra data can be simple types (strings, primitives, and so on), or custom types that
are made Parcelable (serializable across processes). Here we’re including a subject header and deal details in the form of a String
. A Bundle of extras can also be included. The extra data can be simple types (strings, primitives, and so on), or custom types that
are made Parcelable (serializable across processes). Here we’re including a subject header and deal details in the form of a String ![]() (which is built by the createDealMessage method
(which is built by the createDealMessage method ![]() ). Once the Intent is ready, we then use startActivity with createChooser to fire it
). Once the Intent is ready, we then use startActivity with createChooser to fire it ![]() . The chooser shown when we press the Share menu option in DealDroid (on an device, not the emulator, which has fewer capabilities)
is seen in figure 2.7.
. The chooser shown when we press the Share menu option in DealDroid (on an device, not the emulator, which has fewer capabilities)
is seen in figure 2.7.
Figure 2.7. The DealDroid details screen Share deal menu option chooser shows the many ways one particular type of Intent can be handled.

The chooser seen in figure 2.8 demonstrates that many registered components can handle a SEND text/* type Intent (which the DealDetails share button creates). By using a chooser, we’re specifically indicating that we want the user to make a choice each time. If we hadn’t used a chooser, the user would still have a choice to make, but they’d also have the option of selecting a default action. By changing one line in DealDetails, we can see how this works. If we edit the shareDealUsingChooser method and change the startActivity line from the following:
Figure 2.8. The same set of choices, without specifically using a chooser, shows that the user can set a default preference.

startActivity(Intent.createChooser(i, "Share deal ..."));
to
startActivity(i);
Then we can invoke the Share button again, and we’ll get the choices seen in figure 2.8.
If we control the chooser (figure 2.7), we can set the title, and we can require the user to make a choice each time they perform the action (if more than one component can handle the action). If, on the other hand, we let the system present the choices (figure 2.8), we can’t control the title, and the user is offered the choice of setting a default for the Intent. Either way, the more generic the Intent, the more choices. As we can see, SEND text/* is generic, and results in a long list of choices (there are more not seen in the screenshots, if the user scrolls).
Getting back to listing 2.12, in the openDealInBrowser method, we see a different way to create an Intent. Here we’re setting the action to VIEW, and the data to a Uri (in this case the HTTP URL to the deal). This is a far more specific Intent because we want to view the item, and the URI indicates a more particular type of data (it contains a URL with the protocol—HTTP—and a hostname and path). When we indicate that we want to view an HTTP URL in this manner, only one type of component should respond, a web browser. If there are multiple browsers on the system (which is possible, if the user has installed additional browsers), then this still could result in a choice, but that’s far less likely than sharing SEND action.
To see how we can create even more specific intents, and how the parts of an Intent affect what component will be able to respond to them, we need to discuss the different types of intents.
2.8.2. Intent types
Going back to listing 2.7, to get from the DealList Activity to the DealDetails Activity we used the following Intent:
Intent dealDetails = new Intent(DealList.this, DealDetails.class);
      startActivity(dealDetails);
In this case, the Intent doesn’t have an action, a type, or data, like the ones we used in the previous section did. Instead this Intent points directly at a specific class, DealDetails.class, and says “you’re it.” This is an explicit Intent. Explicit intents are fairly common inside of a single application, where you know exactly what each component does, and you know the class name (they’re simple and direct).
If, on the other hand, you want to reach out across application boundaries and/or use features that are described in a more abstract way (show this web page, dial this phone number, display this map, and so on), you use an implicit Intent. Implicit intents are resolved to components that can handle them using a combination of the available optional attributes present. These include action, data, type, and a few other things, as defined in table 2.1.
Table 2.1. Attributes that can be defined and used when declaring and resolving Intents
|
Intent attribute name |
Description |
Examples |
|---|---|---|
| action | The action to be performed. | ACTION_VIEW, ACTION_DIAL, ACTION_SHARE, ACTION_EDIT |
| data | The data to operate on. | content://contacts/people/1, http://www.reddit.com |
| type | The MIME type for any Intent data. Optional, can also be inferred from the data itself. | text/*, text/plain,text/html, image/png |
| category | Additional hints about the action to execute. | CATEGORY_LAUNCHER, CATEGORY_ALTERNATIVE |
| extras | A Bundle of additional information | putExtra("KEY", "VALUE") |
| component | The component class to use, bypassing all other Intent evaluation. | MyActivity.class |
The action, data, type, and category are used to map an implicit Intent to a component that declares it can handle it. Alternatively, explicit intents hard-code the component that’ll be invoked. The explicit part is easy to understand; the implicit approach is more complicated, and it involves a process of Intent resolution.
2.8.3. Intent resolution
Intents declare what you want to do. You use them to invoke other components. The other piece of the puzzle is declaring what actions, types, and categories your components support so that they can be used to fulfill intents from others. To do this, you declare and use an IntentFilter.
We saw an example of declaring an IntentFilter in the DealDroid application manifest in listing 2.1. That filter had an action of MAIN and a category of LAUNCHER. This declares that our DealList Activity can be made available on the Home screen (the platform Launcher application). Another example of an IntentFilter is one of the many declared in the platform built-in Messaging application, as shown:
<intent-filter>
   <action android:name="android.intent.action.SEND" />
   <category android:name="android.intent.category.DEFAULT" />
   <data android:mimeType="text/plain" />
</intent-filter>
As we can see from the IntentFilter declared in the Messaging application, it says make me available when something wants to use the SEND action, with the DEFAULT category, and a data MIME type of text/plain. In listing 2.12, the shareDealUsingChooser method created an Intent with similar parameters. We didn’t declare a category there, but that’s okay because categories only have to match if they’re declared in the Intent. More specifically, if the Intent has a category defined, the IntentFilter must contain it for there to be a match. If the Intent has no categories defined, it matches any category.
One caveat to this can be tricky. Anytime the Context.startActivity method is called with an implicit intent (the component isn’t set), it automatically adds the DEFAULT category to the Intent. This means any IntentFilter that wants to handle implicit intents should declare that it supports the DEFAULT category (like the Messaging IntentFilter does).
Because the Messaging IntentFilter matches the Intent we created in shareDealUsingChooser, the ComposeMessageActivity from the Messaging application shows up on our list of choices in figures 2.8.
We’ll see many more examples of intents and intent filters as we proceed through the book, but the main thing to realize here is that Android is keeping track of all of the intent filters available and matching intents as they come to the components that can handle them at runtime. Android keeps track of the registered IntentFilter declarations with the PackageManager (which you can also query if you need to; it can tell you what is and isn’t available at any given time). When a new application is installed, its declarations are added, and when an application is uninstalled, its declarations are removed.
At this point, we’ve created a good bit of the DealDroid application. We’ve constructed the DealList layout and Activity, and the DealDetails Activity. We’ve also explored setting up the manifest, declaring and using resources, declaring and invoking intents, working with views and widgets, and dealing with adapters. Now, the final thing we need to do to wrap up the DealDroid application is build and understand the Application object we’ve previously referred to in several listings.
2.9. The Application object
We’ve seen a lot of code in this chapter, and in several places we’ve seen a reference to an app object. If you recall, this object was a reference to a DealDroidApp class when we assigned it. DealDroidApp extends Android’s Application object. An Application object has a well-defined lifecycle, and can be used as a data structure for holding an application’s global state. We’ll talk more about lifecycle in chapter 3, but the important thing to keep in mind with the Application object is that it’s created when the process for your application is created, and it isn’t bound to a particular Activity or Service. This means it’s a great and extremely simple way to hold onto and share nontrivial and nonpersistent data between activities and services within your application. By nontrivial and nonpersistent, we mean data that your application needs which would be cumbersome to pass around as Intent extras everywhere, and also isn’t appropriate for a file or database.
Another Way to Share In-App Data
Another good choice for nontrivial and nonpersistent data is a static singleton object. You have to be careful with statics, though. They don’t have a well-defined lifecycle, and it’s easy to hang onto a reference that could cause a memory leak. If you prefer statics over the Application object, that’s fine, but consider setting up and tearing down your static classes from the Application object, which does have a well-defined lifecycle, for the best of both worlds.
In the following listing we finally see the DealDroidApp object that we’ve used from several previous activities.
Listing 2.13. DealDroidApp.java file provides the shared Application object for DealDroid


Like most custom Application instances ![]() , the DealDroidApp object includes several data members we’ve used in various places in the application, and a few utility methods (which we
aren’t showing here). For the DealDroidApp, the data members we’ve included are
, the DealDroidApp object includes several data members we’ve used in various places in the application, and a few utility methods (which we
aren’t showing here). For the DealDroidApp, the data members we’ve included are ![]() :
:
- The ConnectivityManager
- A DailyDealsFeedParser XMLPullParser implementation for parsing RSS
- The list of Sections, if any
- A Map to cache small images
- The currently selected Item, if any
After the member variables are declared, we then override the onCreate lifecycle method ![]() to set up our Application instance. Within onCreate, we see that we instantiate a few interesting things. First we create the ConnectivityManager, which is a system service that we can use to check network state (we’ll learn more about this in later examples). Second
we create an instance of the DailyDealsFeedParser class, which we used from the DealList Activity to parse the daily deals RSS feed (we’ll discuss XML parsing in chapter 6). Then we instantiate a few standard Java Collection objects to hold data.
to set up our Application instance. Within onCreate, we see that we instantiate a few interesting things. First we create the ConnectivityManager, which is a system service that we can use to check network state (we’ll learn more about this in later examples). Second
we create an instance of the DailyDealsFeedParser class, which we used from the DealList Activity to parse the daily deals RSS feed (we’ll discuss XML parsing in chapter 6). Then we instantiate a few standard Java Collection objects to hold data.
The final step is to make sure our application will use our custom Application object, which we already handled in the manifest. Back in listing 2.1 we did this by using the name attribute for the application element (without this, the default Application object would be used):
<application android:icon="@drawable/ddicon"
   android:label="@string/app_name"
   android:name=".DealDroidApp">
And that does it! The DealDroid application is complete now that we’ve placed some global state and provided utility methods via the Application object. This final part of DealDroid is also the final stop on our tour of the Android application fundamentals.
2.10. Summary
In completing the DealDroid application we’ve covered a lot of fundamental Android application development ground. We took this journey in order to work on the basics, to make sure you know what the core components of Android applications are and how they’re used outside of a trivial example. That said, we’ve still tried to keep things at a relatively high level to this point.
We’ve learned that the main Android application-building blocks are the application manifest, resources, layouts, views, activities, and intents. The manifest is the configuration for your application, and resources are externalized elements (such as strings and images). The code begins with activities, which pull in resources and layouts. Layouts are groups of views that organize the UI of a screen or component. Often layouts are described in XML and inflated at runtime, which further helps separate responsibilities. Activities use views and widgets to create elements that are displayed to the user, or the user interacts with. Intents are the wiring between components, and even between different applications.
With DealDroid, and the basics of the components involved behind us, the next area we need to focus on is overall application and component lifecycle.