
Chapter 7. Storing data locally
In this chapter
- Reading and writing files
- Setting and remembering shared preferences
- Working with SQLite databases
Data is a precious thing and will last longer than the systems themselves.
Tim Berners-Lee
Data is essential to any application, and Android provides several local storage avenues. But Android doesn’t stop there—you also have access to data from other applications on the device and the network, which we’ll learn about in upcoming chapters. First, we’ll focus on local data storage.
To explore local data storage we’ll start with the filesystem. Don’t forget: Android devices are small computers, and they have filesystems. We’ll see how you can check whether the filesystem is available, how you can use it, how permissions come into play, and the differences between internal and external storage. After basic files, we’ll visit SharedPreferences, which is a helpful class for storing key-value pair data. SharedPreferences uses the filesystem, but it hides some of the details and makes for a more convenient approach in some cases. Once we understand files, we’ll look at more sophisticated data storage using Android’s built-in database, SQLite. SQLite isn’t the same as your typical server side relational database, but it’s no slouch either. We’ll explore how to use it, how to create a data access layer around it, and how it differs from what you may be used to.
Our first steps with local data storage will take us back to some of the concepts we discussed in chapter 1, user IDs and permissions, which always matter when working with the filesystem.
7.1. Reading and writing files
The most fundamental type of local storage in Android is the filesystem to read and write files. You can use this mechanism to persist and share data among different application components as well as across different application instances. If your application is killed, it’ll lose all its nonpersistent state (as we touched on in chapter 3), but it won’t lose anything stored in the filesystem.
If you’re familiar with java.io, you already know the basics of file storage, but here we’ll cover some Android specifics, additional details such as permissions and the difference between internal and external storage.
7.1.1. Internal versus external storage
The first thing to get out of the way before we start reading and writing files is understanding the difference between internal and external storage on Android. At a high level, the differences are as follows:
- Internal storage is on the internal device memory; it’s private and always available
- External storage may be on removable media; it’s not private and not always available
Internal storage is the easiest to work with because it’s always there (it’s never unmounted), and it’s secure. External storage isn’t guaranteed to be available, and isn’t secure. Availability varies because users can dismount and remove their external storage, or mount it as USB storage that makes it unavailable to the device. To get a better idea of what a mount point is and how different resources are mounted with various properties, let’s run the mount command against a device running Android 2.2, as seen in figure 7.1.
Figure 7.1. The mount command shows some of the locations and types of filesystems Android uses.

This partial output of the mount command shows us that Android uses several types of filesystems mounted at different locations, each with a different set of properties. First it uses rootfs for the / partition. This is a special partition that allows all other devices to attach under one tree. Another special partition is the system partition, which like / is marked ro, or read only. These partitions contain essential operating system files and data. You won’t typically use these partitions directly; instead you’ll use the other locations such as /data and /cache.
The /data and /cache mount pointsare the internal storage locations, and they’re mounted using various filesystem types (the figure shows Yet Another Flash File System 2, yaffs2, which is designed for use on embedded flash memory devices, but the type can vary based on the device). These are writable, as indicated by the rw, or read-write notation.
Along with these and several other special partitions, we see the /mnt/sdcard location mounted with type vfat. That’s the external location, and the fact that it’s using a FAT (File Allocation Table) type of filesystem is significant. FAT is simple, and almost every operating system can read and write to it. This is why so many memory cards and cameras use it. Also, it can be mounted through a USB connection and used as a virtual drive with almost any host operating system. The simplicity it provides sacrifices security.
Many times the external location also uses a removable media format such as a Secure Digital (SD) card (hence the sdcard path name). Yet, it’s important to understand that this isn’t always the case. Some devices have no removable storage, and some devices have internal storage they treat as external in Android terms, and some have both. This means, in effect, there are two types of external storage: removable and nonremovable. Android only mounts and deals with one at a time (and most prefer the internal-external storage when available, because it’s thought to be more reliable, per discussions on the group mailing lists).
We’ll learn more about the security aspects and paths as we start reading and writing files, beginning with internal storage.
Technique 28: Using internal storage
Now that we’ve seen the difference between internal and external storage, and discussed how internal storage is more secure and reliable, you might reasonably wonder why you wouldn’t use it for everything! Like anything else, there are tradeoffs.
Internal storage space is limited, and when it’s used up, no further applications can be installed. Because of this, savvy users will check how much space your application takes up, and they’ll rightly scoff if you’re storing a lot of data on the internal memory. It’s understandable if your application is Google Earth and it takes up a few megabytes. Yet, if your fantasy football application takes up 30 megabytes, you’ve failed, and users will notice.
Running Your App on External Storage
Android API level 8 and above (2.2) supports running applications from the external storage area. This capability is enabled in the manifest with the android:installLocation attribute. If this is set to preferExternal or auto, then certain application components may be placed on an encrypted separate mount point on the external storage. Other data such as databases and user private data aren’t placed on the external storage. This saves the user’s internal space, and users appreciate that. Performance isn’t affected. The only drawback is that if the user mounts the external storage via USB, any running applications that are on external storage will be stopped. This means that applications that need to maintain running services, register alarms, or which may otherwise be affected by being stopped, shouldn’t use this approach.
Due to space constraints, you must decide what data rates high enough for internal storage and what can be moved to external storage. The clearest way to make that distinction is to decide what your application can and can’t live without. If you need to cache images, it might be better to do so on external storage and show placeholders when it’s not available. On the other hand, the data model for your application—names, places, movies, football teams, and so on—probably needs to be on internal storage (though you should still try to keep it as slim as possible).
Problem
You understand the different locations where you can store files and other data, and you want to use the internal storage. You also want to be able to explore and verify data that has been stored.
Solution
This time we’ll use a sample application to read and write data to and from the internal storage location, and then we’ll use the adb shell to examine the data. Figure 7.2 shows the simple screens for FileExplorer. Once again, our sample application isn’t pretty, but it gets the job done.
Figure 7.2. The FileExplorer application shows writing and reading of a text file stored on the internal storage.

Grab the Project: FileExplorer

You can get the source code for this project, and/or the packaged APK to run it, at the Android in Practice code website. Because some code listings here are shortened to focus on specific concepts, we recommend that you download the complete source code and follow along within Eclipse (or your favorite IDE or text editor).
Source: http://mng.bz/FRV9, APK File: mng.bz/XuAp
The first Activity in FileExplorer is a screen that allows users to choose whether to work with the internal or external storage. That code is simple, so we won’t show it here (it’s available with the project download). If the user chooses the internal storage path, we then go to an Activity named InternalStorage. This Activity includes the EditText, TextView, and buttons we see in figure 7.2. There the user enters some text and clicks the Write button to store that text to a file. When they click Read, the file is read back and displayed. The code for these methods, shown in the next listing, is the interesting part.
Listing 7.1. The read and write methods of the InternalStorage.java Activity


The easiest way to write simple files to internal storage is to use the input and output stream convenience methods provided by Context. This makes reading and writing files work much the same as it would with typical java.io code.
First, you obtain a FileOutputStream with openFileOutput ![]() . This special method creates the file in the correct internal location for your application if it doesn’t exist and allows
you to set the permissions mode. Most often you’ll keep internal files private, but you do have the option of making them
MODE_WORLD_READABLE or even MODE_WORLD_WRITABLE as well. Once you have the stream, you write data to it
. This special method creates the file in the correct internal location for your application if it doesn’t exist and allows
you to set the permissions mode. Most often you’ll keep internal files private, but you do have the option of making them
MODE_WORLD_READABLE or even MODE_WORLD_WRITABLE as well. Once you have the stream, you write data to it ![]() , and then make sure to close it when done
, and then make sure to close it when done ![]() .
.
Reminder: Look Out for Oversimplified Examples
In our file-handling example activities you may notice a subtle potential problem. We’re performing I/O operations from the main UI thread. This is almost never a good idea. Reading and writing data to and from filesystem, internal or external, can block the main UI thread. In a real implementation, you’ll want to do this from a Handler or an AsyncTask (passing in the file reference). We haven’t here because we want to keep each example as short and focused as possible (we learned about threading in chapter 6).
If we crack open the adb shell and go to the internal location /data/data/<package-name>/files, we can see the file written by the InternalStorage class. For example, after typing in the text seen in figure 7.2 and then pressing the Write button, we can see the file permissions details and contents via shell commands as shown in figure 7.3.
Figure 7.3. The adb shell examines a file written to the internal storage location by FileExplorer.

One other notable aspect of the internal storage is that the Context provides several other convenience methods for listing and deleting files, and for getting the internal cache directory. We’ll touch on the significance of cache directories in technique 30.
Discussion
Overall, internal storage is straightforward; the key is to use Android’s convenience methods so files end up in the correct location or automatically created if necessary. From there, reading and writing data involves standard java.io operations. And, as we’ve seen, the shell is helpful for exploring data and troubleshooting (you can use the command-line shell or the file explorer provided by the ADT plugin in Eclipse).
Our next step is using the external storage.
Technique 29: Using external storage
As we’ve already noted, the external storage on Android (whether removable or not) is mounted with a different filesystem than the internal. It’s inherently less secure, but it’s also easy to use and keeps things out of the scarce internal storage space. For many application files, backup data, caches, images, and so on, you’ll want to use the external storage. And you can use the external storage to store data you want to make accessible to other applications.
Problem
You want to store data on the external storage. Also, you want to be able to easily determine when the external storage is and isn’t available, regardless of the version of the Android SDK you’re using.
Solution
To see the external storage in action, we’re going to continue with the FileExplorer sample application and repeat the same operations we used for the internal storage example. We’ll write some text into a text box that’s saved to a file, and then we’ll read it back. From the UI standpoint, this looks identical to using the internal storage, as seen in figure 7.4.
Figure 7.4. The FileExplorer application shows writing and reading of a text file on the internal storage.

The ExternalStorage Activity class, in the next listing, is much the same as the InternalStorage class, but it has different implementations in the read and write methods.
Listing 7.2. The read and write methods of the ExternalStorage Activity class


The first thing of note in the ExternalStorage read and write methods is that we’re using a FileUtil class in several places. This is an example of a small utility class that we’ve included in our application. It contains some useful methods that we may use for more than one Activity, and even for more than one application. We’ll see the code for it next, after we get through the read and write methods.
The first thing we do with FileUtil in the write method is check whether the external storage is writable ![]() (if you’re using an emulator for this example you’ll have to make sure that you created an SD card for the instance you’re
working with). Then, if it is, we use it again to get a reference to the File that represents the recommended external path for our application
(if you’re using an emulator for this example you’ll have to make sure that you created an SD card for the instance you’re
working with). Then, if it is, we use it again to get a reference to the File that represents the recommended external path for our application ![]() . That path will be /sdcard/Android/data/<packagename>/files. You might notice a pattern there—this path mirrors the internal data directory path (with a different mount point and parent).
After we have the path, we create a File and write to it
. That path will be /sdcard/Android/data/<packagename>/files. You might notice a pattern there—this path mirrors the internal data directory path (with a different mount point and parent).
After we have the path, we create a File and write to it ![]() . Later in the read method, we use a similar approach. We check whether the external storage is readable
. Later in the read method, we use a similar approach. We check whether the external storage is readable ![]() , then get the path
, then get the path ![]() and read the data
and read the data ![]() . If we open the shell, we can see the file at the specified location on the external storage, as demonstrated in figure 7.5.
. If we open the shell, we can see the file at the specified location on the external storage, as demonstrated in figure 7.5.
Figure 7.5. The adb shell examines a file written to the external storage location by the FileExplorer sample application.

The guts of the file I/O code can be found in FileUtil itself, which is shown in the next listing.
Listing 7.3. The FileUtil class that performs reusable file related operations


At the start, FileUtil defines several constants for the recommended external storage file paths ![]() . We’ll see why these are necessary in a moment. After that it also defines an Object[] array that it’ll later use as a lock for synchronized blocks
. We’ll see why these are necessary in a moment. After that it also defines an Object[] array that it’ll later use as a lock for synchronized blocks ![]() . Because these utility methods may be accessed by different threads and could possibly touch the same files, we’ll synchronize
them to avoid concurrent modification problems. Then, it defines the methods we used earlier, such as those that check whether
the external storage is writable and readable
. Because these utility methods may be accessed by different threads and could possibly touch the same files, we’ll synchronize
them to avoid concurrent modification problems. Then, it defines the methods we used earlier, such as those that check whether
the external storage is writable and readable ![]() . This is done using the Environment class, which has utility methods to return this information. We could call Environment from our activities (and sometimes that makes sense), but here we chose to put the logic in one place so as not to have to repeat
it.
. This is done using the Environment class, which has utility methods to return this information. We could call Environment from our activities (and sometimes that makes sense), but here we chose to put the logic in one place so as not to have to repeat
it.
After the state-checking methods, we then see the methods getExternalFilesDirAllApiLevels and getExternalCacheDirAllApiLevels methods ![]() , which are wrappers around the private getExternalDirAllApiLevels
, which are wrappers around the private getExternalDirAllApiLevels ![]() . This is all done to provide a backward-compatible way to get to the recommended paths we’ve already seen. If we knew we’d
always be running our code on devices that support API level 8 or later, we could call Context.getExternalFilesDir or Context.getExternalCacheDir. But we don’t know that. Many users still have devices that run earlier versions of Android, so we shouldn’t rely on those
methods. That’s why we created the utility methods that give us the same thing, for any API version. This is done using the
getExternalStorageDirectory method (which all versions have) and then appending the recommended paths via the constants we noted earlier.
. This is all done to provide a backward-compatible way to get to the recommended paths we’ve already seen. If we knew we’d
always be running our code on devices that support API level 8 or later, we could call Context.getExternalFilesDir or Context.getExternalCacheDir. But we don’t know that. Many users still have devices that run earlier versions of Android, so we shouldn’t rely on those
methods. That’s why we created the utility methods that give us the same thing, for any API version. This is done using the
getExternalStorageDirectory method (which all versions have) and then appending the recommended paths via the constants we noted earlier.
Why the Recommended Paths?
If you’ve used Android for any length of time and poked around on the external storage area of your device, you’ve likely seen files stuffed in all sorts of different directories. This is because the first several versions of Android had no recommended paths and each application chose what it wanted to use. This was problematic because it caused an explosion of directories, and because none of these files were deleted when applications were uninstalled. If you use the recommended path, things will be more organized, users (and other applications) will know the convention, and files can be cleaned up by the platform.
After those helper methods, we then use the writeStringAsFile and readFileAsString methods. These don’t have any Android-isms in them. Instead they use standard java.io and they’re passed the File references they require. Specifically, we use FileWriter ![]() and FileReader
and FileReader ![]() for reading and writing file data, respectively. For either case, if we needed more control, such as specifying the file
encoding, we could’ve used the lower-level FileInputStream and or FileOutputStream classes. Instead we chose the reader and writer because they’re less verbose and we’re fine with the system encoding in this
case.
for reading and writing file data, respectively. For either case, if we needed more control, such as specifying the file
encoding, we could’ve used the lower-level FileInputStream and or FileOutputStream classes. Instead we chose the reader and writer because they’re less verbose and we’re fine with the system encoding in this
case.
Even though these use less code than other Java IO classes, they aren’t exactly tidy. This isn’t code we’d want to repeat in multiple Android components. This is one reason we’ve moved these operations into a utility class.
Hiding Application Data
If you’re storing images, music, or anything else that might be picked up by the Android media scanner on the external storage, you might want to also include a .nomedia file in the same directory. This file is hidden (which is why the name starts with dot), and it tells the media scanner to skip the present directory. If you don’t do this, your application images will end up in the Gallery application. This may not be what you want.
Along with using the recommended external storage paths we’ve noted, there are also several conventions for data if you want to make it public. If you want to share a file on the external storage, you start with the same getExternalStorageDirectory path, and then you append the correct directory convention. These include /Music, /Movies, /Pictures, and more. We’ll learn more about multimedia, and the public paths for sharing data using the external storage, in chapter 11.
Discussion
Storing external data is similar to storing internal data. You need to start with Android’s convenience methods to get to the correct locations, and then you’ll use java.io to perform operations. The exceptions with external data are that you’ll need to make sure the external paths are available before trying to use them (and have fallbacks, such as placeholder images, for when they aren’t), and that everything is readable/writable (there’s no security). You can also explore and troubleshoot the external storage the same way as you would the internal, starting from the /sdcard path.
With the basics of reading and writing files in general wrapped up, the next thing we need to address is cache directories.
Technique 30: Using cache directories
Android provides cache directories on both the internal and external storage. So what makes these directories special, and why are they necessary? Fundamentally they’re directories that are marked for some level of management by the platform. That management includes being deleted if an associated application is deleted and sometimes being automatically pruned if space requirements dictate it.
Problem
You need to store some type of temporary data, and you’d like that data to be in a predefined recommended location so that the Android platform can help manage it.
Solution
If you have data that you want to keep around for some period of time but not permanently, such as images from web service feeds, you should use the internal and external cache directories. Caching is an art, so it depends on the context—what needs to be cached and how it should be maintained—but Android tries to help by providing specific cache directories on both the internal and external file systems.
The Context.getCacheDir method will return a reference to the /data/data/<packagename/cache internal storage cache directory. Even though the cache directory can be cleaned up by the system if it needs to reclaim the space, you shouldn’t rely on that behavior. Instead, your application still needs to keep an eye on the cache and not allow the directory size to grow beyond a reasonable maximum (the documentation recommends 1MB as the maximum).
Similarly, Context.getExternalCacheDir is available, for API levels 8 and above, to get a reference to the external cache directory. If you want to make sure earlier API versions will work, you can also do something similar in listing 7.3 and manually construct the same path that getExternalCacheDir creates.
Discussion
Rather than creating your own special caching locations, you should try to use the platform-recommended paths because they’re managed. When applications use the platform cache directories properly, the system can manage space as needed. First the system can prune files to save space as necessary, and second it completely removes such cache directories when the application referring to them is uninstalled. This helps organize and control files and allows applications to work together and share resources more efficiently.
Knowing how and where to save files, even particular types of files such as those intended for a cache, is essential. Unfortunately, it’s not the only thing you need to consider. To be absolutely sure your files are saved to disk when you need them to be, you also need to be aware of how to sync them.
Technique 31: Making sure files are saved with sync
Most Android devices up to version 2.2 use filesystems that don’t buffer aggressively (such as YAFFS). When you save a file, it’s immediately written to disk. Some newer devices (and custom ROMs), particularly those running Android 2.3, may use journaled filesystems such as ext4. These types of filesystems use more buffering, which means files aren’t always immediately written to disk. The buffering allows the filesystem to be more robust (handle crashes better), and to more efficiently handle writing blocks of data, but it can also be a headache for developers at times.
Problem
You need to guarantee that file data is written to disk immediately, regardless of the filesystem in use and the platform version.
Solution
There are times when you need to guarantee that your file data is written to disk before moving on to other operations. For example, if you write file data in one process, and need to read that same file from another process, you’ll want to make sure the data is written before trying to read it. To guarantee the file is written immediately, regardless of the filesystem involved, you can manually call sync. Syncing ensures that the buffer catches up with the physical disk. You might be surprised to learn that FileOutputStream methods such as flush, write, and even close don’t ensure this, but it’s true.
The FileDescriptor object in Java is where you’ll find the sync method. FileDescriptor is a low-level handle to operations on the underlying machine-specific filesystem. You can get a FileDescriptor reference from FileOutputStream, and then sync, as shown in the next listing.
Listing 7.4. Using a FileDescriptor to guarantee data is written to the filesystem
public static boolean syncStream(FileOutputStream fos) {
   try {
      if (fos != null) {
         try {
            fos.getFD().sync();
        } catch (IOException e) {
            Log.e(Constants.LOG_TAG,
               "Error syncing fos " + e.getMessage(), e);
        }
        return true;
   }
   return false;
}
You don’t always want to sync files immediately, because there’s overhead to doing so, and it’s not necessary if you’re writing to a single file from one process. But it’s important to know that you can (and should) when you need to guarantee the file data is written immediately.
Discussion
If you use your own file storage on Android, you need to keep the filesystem and sync situation in mind. On the other hand, if you use other Android APIs such as a SQLite database, or SharedPreferences (both of which we’ll visit in upcoming sections in this chapter), the syncing is handled for you.
Now that we’ve seen the differences between internal and external storage, done some basic I/O, discussed caching, and dealt with syncing, our next point of interest is the next level of abstraction with storage, the aforementioned SharedPreferences.
7.2. Maintaining preferences
Android provides an easy-to-use data storage class called SharedPreferences that allows you to read and write primitive key-value pairs. The not-so-secret secret is that shared preferences are files that the platform helps to manage. The preference level is an easier, less verbose wrapper around storing simple persistent items in files.
Technique 32: Reading and writing preference data
SharedPreferences allow you to read and write data, and to set access modes on the files that contain them. This means you can use them to share data among different components (activities, services, and more), and even among different applications (though that should be uncommon because it requires the applications to know each others’ package names and use world-writable files or shared user IDs, all of which should only be done in special circumstances).
Problem
You want an easy way to store simple information, such as strings and primitive values.
Solution
You can use SharedPreferences to easily store and retrieve data. The following listing is an example.
Listing 7.5. Using SharedPreferences to write and read data
SharedPreferences prefs = getSharedPreferences("myPrefs",
     Context.MODE_PRIVATE);
Editor editor = prefs.edit();
editor.putString("HW_KEY", "Hello World");
editor.commit();

//. . . later, or from another component
String helloWorld = prefs.getString("HW_KEY", "default value");
Context.MODE_PRIVATE);
Editor editor = prefs.edit();
editor.putString("HW_KEY", "Hello World");
editor.commit();
//. . . later, or from another component
String helloWorld = prefs.getString("HW_KEY", "default value");
To use preferences, you first get a reference to a SharedPreferences object (via the Context), then you use an Editor to write data and simple get methods to read data.
Discussion
SharedPreferences objects are useful and easy to work with. You can create your own, as we’ve done in listing 7.5, or you can use one of several convenience methods the framework supplies to make this even simpler. The default preferences are available from any component using PreferenceManager.getDefaultSharedPreferences (Context c). This returns a preference object using the package name the context represents. You can also use Activity.getPreferences(int mode), which will return an object using the class name. Remember, under the covers SharedPreferences are XML files that are stored at the /data/data/<PACKAGE_NAME>/shared_prefs location on the internal file system (if you need to edit them manually, or just want to check them out, that’s where you can find them).
SharedPreferences also support listeners. You can attach an OnSharedPreferenceChangeListener that acts as a callback to notify you when preferences are changed. We’ll see how that works inside a more useful example where we’ll include a PreferenceActivity.
Technique 33: Using a PreferenceActivity
Android takes preferences one step further than allowing them to store data and be shared among components: it can automatically wire them into onscreen selections for user preferences. To do this, Android uses a specialized activity class—PreferenceActivity.
Problem
You need to allow users to set preferences for your application and easily persist them to SharedPreferences files.
Solution
You’ve probably seen PreferenceActivity in action. In fact, the main Android settings screen uses it and so do many other built-in applications. Here we’ll see how it works so you too can leverage it, and we’ll also see how to make it more useful by having it show the current preference (rather than a description) and immediately reflect changes.
To do this, we’ll be extending the MyMovies project we worked with in chapter 4. We’ll create a new version of that project that changes MyMovies in several notable ways. We’ll add a database to it and making it dynamic by retrieving data from the web. We’ll learn more about those features soon, but first, we want to include a preference screen that allows us to enable or disable the splash screen.
Grab the Project: MymoviesDatabase
You can get the source code for this project, and/or the packaged APK to run it, at the Android in Practice code website. Because some code listings here are shortened to focus on specific concepts, we recommend that you download the complete source code and follow along within Eclipse (or your favorite IDE or text editor).
Source: http://mng.bz/5M06, APK File: mng.bz/03ta
Our Preferences Activity for MyMoviesDatabase, which will be accessible via the menu once we’re done, is seen in figure 7.6.
Figure 7.6. The preferences screen for MyMoviesDatabase shows the current enabled/disabled status of the splash screen.

There are two parts to making the preference activity screen work. There’s a preference resource XML file that defines the elements, and there’s a PreferenceActivity. This is the same arrangement as with a standard layout resource or Activity, but it’s specialized for preferences. We’ll start by examining the XML resource, shown in listing 7.6.
Listing 7.6. The preferences.xml resource file used to define the preference hierarchy

Every preference XML resource starts with a root PreferenceScreen element ![]() , and then includes categories with titles
, and then includes categories with titles ![]() and preference elements. There are several types of built-in preference objects including DialogPreference, ListPreference, EditTextPreference, and the one we’re using, CheckBoxPreference
and preference elements. There are several types of built-in preference objects including DialogPreference, ListPreference, EditTextPreference, and the one we’re using, CheckBoxPreference ![]() . Each preference object has a title, key, value, and summary. Most often the summary is left as static text such as “Enable
or disable the splash screen.” We’re going to demonstrate how to make this dynamic and use it to show the current setting
(such as in figure 7.6). The other half of all this is the PreferenceActivity class, shown in the following listing.
. Each preference object has a title, key, value, and summary. Most often the summary is left as static text such as “Enable
or disable the splash screen.” We’re going to demonstrate how to make this dynamic and use it to show the current setting
(such as in figure 7.6). The other half of all this is the PreferenceActivity class, shown in the following listing.
Listing 7.7. The Preferences.java Activity in the MyMoviesDatabase application


Right up front, we take the help Android provides us by extending PreferenceActivity ![]() . PreferenceActivity shows a hierarchical list of Preference objects to the user, and automatically saves the selections to a backing SharedPreferences file. As we saw with the XML file, preference objects such as CheckBoxPreference are used from within the activity
. PreferenceActivity shows a hierarchical list of Preference objects to the user, and automatically saves the selections to a backing SharedPreferences file. As we saw with the XML file, preference objects such as CheckBoxPreference are used from within the activity ![]() .
.
Here we only have the one preference, so it’s simple, but the pattern is the same no matter how many you may have. We set
the XML preference hierarchy in the activity with addPreferencesFromResource ![]() . To obtain a reference to a specific preference object that’s declared in the XML, we use findPreference
. To obtain a reference to a specific preference object that’s declared in the XML, we use findPreference ![]() . This is much like findViewById, but it’s for preferences.
. This is much like findViewById, but it’s for preferences.
After our initial setup, we then access the default SharedPreferences object ![]() , because that’s where PreferenceActivity saves data, and we attach an OnSharedPreferenceChangeListener
, because that’s where PreferenceActivity saves data, and we attach an OnSharedPreferenceChangeListener ![]() . Every time a preference is updated, this event is fired with the preferences and key that was changed. Within the listener,
we check whether the key is the one we’re interested in. If it is, we change the preference objects summary with an internal
helper method named setCheckBoxSummary
. Every time a preference is updated, this event is fired with the preferences and key that was changed. Within the listener,
we check whether the key is the one we’re interested in. If it is, we change the preference objects summary with an internal
helper method named setCheckBoxSummary ![]() . If we had multiple checkboxes, we could use this same method for each.
. If we had multiple checkboxes, we could use this same method for each.
Discussion
With a PreferenceActivity and its backing SharedPreferences file, we not only now have a preferences screen, but it updates automatically to show the user what the current state/setting is. Even though we don’t have many preferences here, our users will appreciate the fact that by default the splash screen is shown only once, and after that we allow them to enable it if they want (we don’t force them to look at it every time they open the application).
At this point we’ve seen several forms of accessing and using SharedPreferences, and we’ve kicked off the MyMoviesDatabase sample application. Next up we’ll include a SQLite database to store movie selections locally and to live up to the Database part of our sample application’s name.
7.3. Working with a database
When you need to store more complex data for your application, using a relational database is often a good choice. Databases are built for taking care of details such as inserting data with transactions and allowing multiple connections at once. Most developers are familiar with a relational database management system (RDBMS) of one form or another. They’re a common and powerful way to structure and store data, built on the principles of relational algebra.
To see a database in use with an Android application, we’re going to change the MyMovies application we’ve seen in previous chapters. We’ll modify it so that it includes a local database to store movie data rather than using a flat text resource file, and we’ll allow users to search for movies to add to their collection. We’ll be pulling data from a web service to get movie information, and we’ll store it in several database tables. We’ll focus on the database aspects of this version of MyMovies, but the code download has the networking and XML parsing portions if you’re interested—we’ll cover those concepts in chapter 9. The finished MyMoviesDatabase product will look like figure 7.7.
Figure 7.7. The MyMoviesDatabase application displays a movie list, search, and detail screens.

To store local movie data for MyMoviesDatabase, we’ll create a layered architecture to allow our application components (activities in this case) to easily save and retrieve plain Java objects to and from a database. We’ll walk through the layers and look at each level up close, but first we’ll touch on the database system Android provides that will ultimately store our data: SQLite.
What’s SQLite? Most database systems are large server-based applications. For example many web applications use multiple servers and clusters of databases on the server side. Android can access these systems through the network, but as we noted in chapter 1, it also provides a small open source embedded database named SQLite. SQLite is often used within applications to manage local data. Apple OS X, DropBox, Firefox, and Chrome all use it, as do many other applications and products.
SQLite uses the Structured Query Language (SQL), as its name implies, to allow you to create and maintain tables and to insert and select data. Though SQLite uses SQL, it isn’t meant to replace the large server offerings that Oracle, Microsoft, IBM, and others supply. Instead, it’s designed to be small, fast, and easy to use for in-process data. If you’ve worked with SQL before, you’ll be right at home with most of what SQLite offers. If you haven’t, that’s okay too because it’s a great way to get started learning SQL without the overhead of larger systems.
Even though it’s small and fast, SQLite is powerful. It supports transactions (which are atomic even after system crashes), foreign keys, functions, triggers, and more. We’ll learn about many of these features as we use them in the MyMoviesDatabase application. In addition, although SQLite has many features other SQL systems have, it doesn’t have them all. SQLite doesn’t support certain join types (right outer, full outer), some alter statements, and it treats data types more loosely than other systems. We won’t cover every facet of SQLite here, but we hope to get you started and provide information on the most common patterns you’re likely to need when working with it on the Android platform. For full information on SQLite, you’ll want to check the excellent online documentation: http://www.sqlite.org/.
To use SQLite we’ll need to first define what we want to store, then create a database, and finally build several layers to hide the hairy details and make data persistence easy for our application components. We’ll start with a tour of the database related packages Android provides.
7.3.1. Android data packages
Android provides two main packages for working with databases. The first, android.database, isn’t specific to a particular underlying database type. In this package you’ll find the Cursor interface, base implementations, several types of data and content observers, and some helper classes. The second, android.database.sqlite, is specific to SQLite. Therein, you’ll find the SQLite cursor implementation, classes for creating and updating SQLite databases, classes for querying data, and more. Table 7.1 provides a high-level outline of these packages; for complete information see the API documentation.
Table 7.1. An overview of the Android database related packages and some of the main classes
|
Package |
Class |
Description |
|---|---|---|
| android.database | Cursor/AbstractCursor | Cursor defines random read/write access to a result set. AbstractCursor provides a base implementation. |
| DatabaseUtils | Many utility methods for creating properly escaped query strings, working with Cursors, and running common but simple queries. | |
| android.database.sqlite | SQLiteCursor | A Cursor implementation that deals with results from a SQLiteDatabase. |
| SQLiteDatabase | A wrapper that exposes SQLite database methods, including opening and closing connections, and performing queries and statements. | |
| SQLiteOpenHelper | A helper class designed to create and update databases and manage schema versions. | |
| SQLiteQueryBuilder | A helper class for creating SQLite queries. | |
| SQLiteStatement | A SQLite type of precompiled SQL statement. |
If you haven’t worked with cursors before, or aren’t familiar with the term, don’t worry; they’re simple. Cursor objects provide a way to traverse database result sets. In essence, cursors iterate over result sets and provide access to data one row at a time. We’ll see how this works as we get into code examples shortly. In addition, we’ll touch on all of the other key classes involved in creating and using a SQLite database on Android.
That said, we don’t intend to cover all of the classes in the Android data APIs in this chapter, nor do we plan to get into basic SQL details. We’ll focus on the big picture and the main Android classes. We’ll talk more about the APIs as we progress, but let’s start with a grander scheme, an overall pattern that will serve as our data access layer.
7.3.2. Designing a data access layer
In the next few sections, we’re going to define the tables we need and create a database. From there, we’ll use SQL to insert, update, select, and delete data. But before we get to that, we’ll take a step back and think about architecture and design.
We don’t want to get carried away with architecture. We aren’t planning a space shuttle mission; we’re building a small embedded data access layer. Yet we still want to encapsulate all the details so that our application components don’t have to speak SQL themselves, and so they don’t have to know anything about the persistence mechanism. We’ll want simple plain Java objects (which we’ll call model objects), and a simple interface for saving and retrieving those objects. If you’ve used the Data Access Object (DAO) pattern before, this should sound familiar. We’re going to create DAOs for our model objects, and we’re also going to create a data manager layer to wrap around those DAOs and nicely corral all the data-handling details in one place.
We’ll get our hands dirty with Android SQL statements too, but we’ll do so inside our DAOs so that they’re focused on what they need to do. Ultimately, we’ll have a layered architecture as depicted in figure 7.8.
Figure 7.8. A diagram of the organization of the key parts of our data access approach, from SQLiteOpenHelper through other components, and to the database itself

Server-Side-Ish, But Not Too Server-Side-Ish
Scott Adams once had Dilbert’s infamous boss ask him to make a web site “more webbish, but not too webbish” (http://search.dilbert.com/comic/Webbish). In the next few sections we’ll outline a set of data access principles we find helpful on Android because they nicely separate responsibilities and keep code focused. But we need to keep in mind that this isn’t the only way to use a database on Android. We also don’t want to take the server-side patterns and analogues too far—we need to keep in mind that this isn’t the server side; it’s a small embedded database.
We’ll start by designing our tables, then the model objects to go with those tables, and then the DAOs. Finally, we’ll wrap the DAOs from within a data manager interface implementation that will be in charge of saving and retrieving data.
Technique 34: Creating a database and model objects
Before an Android application can start using a database, it has to create one. And before we can create a database, we need to have an idea of what we want to store, and what the relationships are. To do this we’ll need table definitions and model objects our main application code can use first. Then, we’ll create several helper classes to define the necessary SQL statements.
Problem
You want to create a database and model objects to store and retrieve, and you’d like to keep the definition of the tables separate from each other and from the main database creation code. This is useful because it helps keep each class focused on a particular function, which can make database-related code easier to understand and maintain.
Solution
Android provides a lot of convenience when it comes to creating and using databases, but a few extra classes of our own can help even more. Here, we’ll start by diagramming the tables we’ll want our database to have. Then, we’ll create model objects we can use to save and store data in those tables. From there, we’ll create a separate class for each table that will hold the code needed to create and update our database schema, and we’ll use the classes from an implementation of a SQLiteOpenHelper (a base class Android provides for creating and updating databases, and accessing data).
After we have our tables defined, our model objects built, and our database ready to be created with a SQLiteOpenHelper, we’ll define our DAOs and data manager interface. We’ll start by defining the tables we’ll need.
Tables
To lay out our required tables we’ll use an entity relationship diagram (ERD). For MyMoviesDatabase we’ll have only three tables, so it’s a small diagram, but it still helps to visualize it, as seen in figure 7.9.
Figure 7.9. The ERD diagram for the MyMoviesDatabase database tables

The three tables we’ll use are Movie, MovieCategory, and Category. The Movie and Category tables have a unique ID named _id that’s significant for Android. If you want to share your data across different Android applications, like the built-in Contacts database does, you’ll need to create a ContentProvider. We’ll learn about ContentProviders in the next chapter. For now, we need to keep in mind that if we want to use a ContentProvider to expose our tables later, they must have an _id column, which is the primary key (the unique ID for the table).
When to Use a Contentprovider
You can also use a ContentProvider within your application to access your local database. This raises the question: when should you use a direct local database, and when you should go the extra mile and create a ContentProvider? Like many nuanced questions, there’s no correct answer. ContentProviders have some nice features, but they’re more complicated than direct local database access. In general, if you need to share your data with other applications you must create a ContentProvider. And, if you don’t need to share data, it’s usually simpler to use a database directly.
The Movie table also has other attributes you might expect: homepage, name, rating, and so on. We’ll use all of these attributes to sort and display movies. The Category table is even simpler than the movie table: it’s _id and name. We’ll display the movies’ categories when we show the detail information, and we could use it for sorting and so on. The MovieCategory table is the odd man out here. It’s not used for direct display purposes; rather it’s a linking table. It allows us to express the many-to-many relationship we need—one movie can be in many categories, and one category can represent many movies (and we don’t need to repeat the category names all over the place; our data is normalized).
Model objects
Along with tables, we’ll create JavaBean-style model objects to represent our data entities. These will be the classes our activities and other code will use when saving, retrieving, and displaying movies. These won’t match our tables exactly, but they’ll be pretty close. We’ll include objects for both Movie and Category. Our Movie model object is shown in the next listing.
Listing 7.8. The Movie JavaBean style model object
public class Movie extends ModelBase {

   private String providerId;
   private String name;
   private int year;
   private double rating;
   private String url;
   private String homepage;
   private String trailer;
   private String tagline;
   private String thumbUrl;
   private String imageUrl;
   private Set<Category> categories;

// . . . constructor, getters/setters, equals/hashCode omitted for brevity

}
The difference between our database tables and our model objects is the relationship between movies and categories. As we see in listing 7.8, the Movie class has a collection of Category as a member (and there’s no MovieCategory class). Our tables on the other hand were separate. We’ll handle this difference between the way our database and Java represent the relationship inside our SQL statements when we come to that. Category is similar to Movie; it’s a bean, but it has only one property, String name. The ModelBase class, which both Movie and Category extend, contains only a long id.
SQLiteOpenHelper
So now that we know what data we want to store, we need to somehow tell Android to build these tables when our application starts. This is done by extending SQLiteOpenHelper, as shown in the next listing.
Listing 7.9. The SQLiteOpenHelper used for creating and updating databases


SQLiteOpenHelper is provided by Android for setting up databases and opening connections. To use a local database, we start by extending it
![]() . Within its constructor we then provide a database name and version
. Within its constructor we then provide a database name and version ![]() , and we call through to the super constructor.
, and we call through to the super constructor.
Then we can implement the lifecycle-style methods OpenHelper provides as needed. These include onOpen ![]() (which is optional to override, and we show for completeness, though we aren’t doing anything special with it), onCreate
(which is optional to override, and we show for completeness, though we aren’t doing anything special with it), onCreate ![]() , and onUpgrade
, and onUpgrade ![]() . The framework will call these methods as needed, returning a connection on normal use, creating the database when it doesn’t
already exist, and upgrading it when the version number is higher than the current one.
. The framework will call these methods as needed, returning a connection on normal use, creating the database when it doesn’t
already exist, and upgrading it when the version number is higher than the current one.
Within onCreate we come to a pattern that we find helpful when working with Android local databases: using table-specific classes for each
table we’ll work with. We’ll see what these classes look like in the next few listings, but the idea here is to keep the responsibilities for defining,
creating, and upgrading each table separate from the OpenHelper. This isn’t required, but it prevents OpenHelper from becoming a large complicated class, and allows us to easily reuse the tables for other projects if we need to. Each
table object has a static method for onCreate and onUpgrade ![]() that’s called from OpenHelper’s methods.
that’s called from OpenHelper’s methods.
Priming a database with predefined data
Along with setting up the database in listing 7.9, inside onCreate we also read a resource file, R.array.tmdb_categories, and use the CategoryDao object to store that data in our database ![]() . We do this so our database will have some initial categories as soon as it’s created. Some databases need this type of seed
data. Typically, you may use this approach for things such as countries, states, roles, categories, and so on. For small amounts
of data this works fine. If you need to include larger amounts of already defined data with your application, then this isn’t
a good idea because it’ll be too slow (individual insert statements for each data item). Instead, for large volumes of data,
you can create your SQLite db file ahead of time (each SQLite database is stored as a single file) and ship it as part of
the assets included with your application. You can then copy that file over to the database file your application needs (be sure to
do this only once!). At runtime each application database is stored in a file at the /data/data/<packagename>/databases/ internal storage location.
. We do this so our database will have some initial categories as soon as it’s created. Some databases need this type of seed
data. Typically, you may use this approach for things such as countries, states, roles, categories, and so on. For small amounts
of data this works fine. If you need to include larger amounts of already defined data with your application, then this isn’t
a good idea because it’ll be too slow (individual insert statements for each data item). Instead, for large volumes of data,
you can create your SQLite db file ahead of time (each SQLite database is stored as a single file) and ship it as part of
the assets included with your application. You can then copy that file over to the database file your application needs (be sure to
do this only once!). At runtime each application database is stored in a file at the /data/data/<packagename>/databases/ internal storage location.
SQLiteDatabase
Once we have a SQLiteOpenHelper, we can use it from anywhere in our application to create a SQLiteDatabase object. The SQLiteDatabase object is the keystone of Android SQLite database operations. This is where we’ll create connections and perform data operations such as select, update, insert, and delete.
We’ll see how this is done when we discuss the DataManager interface and implementation object our application will use to wrap up all of our data operations methods in technique 35, but for now here’s an example of using our OpenHelper to obtain a SQLiteDatabase reference:
SQLiteOpenHelper openHelper = new OpenHelper(this.context);
SQLiteDatabase db = openHelper.getWritableDatabase();
The getWritableDatabase method of SQLiteOpenHelper will call onCreate the first time it’s called, and thereafter will call onOpen. So this is how the helper methods get kicked off and the chain reaction is started. You can call this method as many times as you want (the instance is cached), but you should make sure to call close when you’re done using a database instance.
Table classes
Having the OpenHelper implementation gets us rolling, but because it hands off to the table classes, we still haven’t seen the real database dirty work. Here, we’ll step into the details a bit more, starting with MovieTable in listing 7.10.
Listing 7.10. The MovieTable class with static methods and inner class MovieColumns


The first thing we do in each of our table classes is define a constant for the table name ![]() . Then we include a nested inner class that implements BaseColumns and defines the column names with more constants
. Then we include a nested inner class that implements BaseColumns and defines the column names with more constants ![]() . BaseColumns is provided by Android, and it defines the _id column we mentioned earlier. Once the names are out of the way, we include static onCreate
. BaseColumns is provided by Android, and it defines the _id column we mentioned earlier. Once the names are out of the way, we include static onCreate ![]() and onUpgrade
and onUpgrade ![]() methods, where we use SQL commands to CREATE and/or update our table
methods, where we use SQL commands to CREATE and/or update our table ![]() . Note that our current onUpgrade implementation DROPs the table and recreates it
. Note that our current onUpgrade implementation DROPs the table and recreates it ![]() . This probably won’t be what you want in production applications (you’ll need to do more, such as extract the current data
first, update the schema, and then reinsert the data as necessary).
. This probably won’t be what you want in production applications (you’ll need to do more, such as extract the current data
first, update the schema, and then reinsert the data as necessary).
The table CREATE command is fairly understandable, but remember it’s not intended for any database—it’s SQLite-specific. Within it, we’re defining the data type. such as TEXT and INTEGER, for each of our columns, and we’ve used a few constraints such as UNIQUE and NOT NULL. The constraints are self-explanatory, but requiring the name to be unique is an oversimplification. Obviously, not all movies have unique names. Our database could support multiple movies with the same name, using different primary key IDs, but that would complicate our example in several areas. Because of this we’ve chosen to support only unique names to keep it simple.
Sqlite “Dynamic” Data Types
One peculiarity of SQLite versus many other database systems is that it uses dynamic data types. That means you can declare a column of type TEXT and still put a number into it. And, you can put text into an INTEGER column as well. This is because SQLite uses storage classes that have affinity to particular types, but it converts any data it’s handed as best it can. This can be confusing if you’re not used to it, and it can affect the way sort order and operators work. For complete details, see the SQLite documentation on data types: http://www.sqlite.org/datatype3.html.
The other table classes follow the exact same pattern. CategoryTable is simple; it has only an ID and a unique category name (so we won’t bother including it here). MovieCategoryTable is more complicated in that it includes foreign key references. It’s shown in the next listing.
Listing 7.11. The MovieCategory class showing the declaration of foreign key references


The MovieCategoryTable class starts off the same way as our other table classes: it declares a constant for the table name, and then includes a
static nested class to represent the columns (which are also constants). The difference this time is that the columns class
doesn’t implement BaseColumns ![]() . This is because this table won’t use the _id key, and won’t ever need to be exposed via a ContentProvider (it’s an internal mapping table; it doesn’t represent a data entity on its own).
. This is because this table won’t use the _id key, and won’t ever need to be exposed via a ContentProvider (it’s an internal mapping table; it doesn’t represent a data entity on its own).
The next significance to the MovieCategoryTable is that it contains FOREIGN_KEY mappings with REFERENCES to other tables ![]() . In this case the mapping table has movie ID and category ID columns that reference the Movie and Category tables. Why would
we do this? Why do we want foreign keys? For referential integrity. These keys will make sure our table relationships remain
meaningful. We won’t be able to delete a Movie, for instance, and leave its Category reference unattached
. In this case the mapping table has movie ID and category ID columns that reference the Movie and Category tables. Why would
we do this? Why do we want foreign keys? For referential integrity. These keys will make sure our table relationships remain
meaningful. We won’t be able to delete a Movie, for instance, and leave its Category reference unattached ![]() . We could make do without these, and have our own checks, but it’s easier to use what the database offers and fail fast if
a condition we don’t expect is encountered.
. We could make do without these, and have our own checks, but it’s easier to use what the database offers and fail fast if
a condition we don’t expect is encountered.
It should be noted here that not all versions of SQLite enforce foreign key constraints. Specifically Android 1.5, 1.6, and 2.1 include SQLite 3.5.9, which can parse foreign key constraint statements, but doesn’t enforce them. Newer Android versions, 2.2 and 2.3, both support SQLite version 3.6.22, which does enforce foreign keys. Most of the time it doesn’t hurt to include foreign key statements in any Android version; remember that they aren’t always enforced. Often, such lack of enforcement won’t hurt you, if you’re not relying on it for conditional processing or cascading deletes, and so on. If you need to guarantee enforcement, you can query the state of the foreign key support when the database is created, and fall back to triggers.
Discussion
Overall we now have an idea of what we want to store and what the relationships are. We have model objects for working with the data in our application’s Java code and table objects to keep the details for each table separate from one another. We also have a SQLiteOpenHelper implementation that can be used to create and update our database, and to provide references to the SQLiteDatabase objects we’ll later use to store and retrieve data.
Most of this is standard fare. Model objects are a common way to represent data (and though ours are intentionally anemic, they can also contain operations), and Android requires you to include a SQLiteOpenHelper. The only thing that isn’t standard or required here is our use of separate table objects. These are our own creation, but we think they’re a nice way to keep the code clean and focused.
With our OpenHelper and our table classes, we now have a database that’s ready for action. What’s next? We need a way to store and retrieve data, and for that we’ll turn to the DataManager helper class and DAOs we’ve mentioned a few times.
Technique 35: Creating DAOs and a data manager
Android gives you many ways to access SQL data. As we’ll see, the SQLiteDatabase object provides both low-level methods, such as execSql(String sql), various higher-level query and insert methods, access to SQLiteStatement for compiled SQL statements, methods to set transaction boundaries, and more. Still, we don’t want to litter our main application code with low-level database-related operations. In fact, if we can help it, we don’t even want our main application code to know the persistence mechanism is a database.
Problem
You want to create a simple API your application can use to store and retrieve data, rather than include SQL statements and other data operations next to application logic.
Solution
By creating DAOs to hide SQL details for each table, and creating a larger data manager layer that application components can use to access data, you can separate main application code from persistence details, avoid duplication, and keep code more focused. To see how this works we’re going to start with a DAO for each table, and then we’ll define our data manager layer.
Data Access Objects
Many developers are probably familiar with the DAO pattern. DAOs are used to represent various levels of interaction with tables and the database, and definitions of the term vary. Here we’ll use one DAO per table, and we’ll keep each DAO focused on only its table (not the relationships between the tables). This keeps the level of abstraction of the DAO well defined and provides an interface on top of the persistence mechanism for data operations.
The DAO interface that we’ll use for the MyMoviesDatabase application is shown in the next listing.
Listing 7.12. The DAO interface that defines common data operations
public interface Dao<T> {
   long save(T type);
   void update(T type);
   void delete(T type);
   T get(long id);
   List<T> getAll();
}
Our DAO interface is simple and fairly typical. The only notable thing about it is that it’s parameterized. The type T represents the data model class it’ll operate on (which will end up being our Movie and Category classes we noted earlier). With this interface and the related implementations, we’ll be able to save and update our model objects with ease—hiding all the details inside the DAOs.
One thing to note here is that DAOs aren’t always the right approach. DAOs are somewhat coarse-grained and can lead to more data being returned than is required in every situation. For example, if we needed to populate a selection of choices with only the name of each movie in our system, we’d have to return all the data (rather than the names). We can mitigate this by extending our interface in DAOs that need other data access methods, but the point is that DAOs aren’t perfect. Also, DAOs do create a few more classes and a little more code, but we think the clean separation and ease of use they provide are often (not always) worth this overhead.
To explore our DAO implementations, we’ll look at the most involved one we have for MyMoviesDatabase, the MovieDao. This DAO, the first part of which is seen in the following listing, touches on a lot of the different types of SQL usage an Android application might need.
Listing 7.13. The first portion of the MovieDao class—saving a new movie
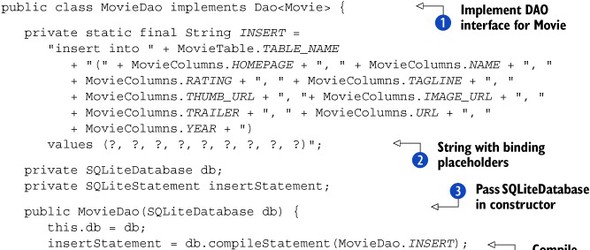

To start off, MovieDAO implements our DAO interface ![]() . Then, it includes a SQL insert String constant that explicitly lists each column where we’ll store data and includes question marks for placeholders for the values
. Then, it includes a SQL insert String constant that explicitly lists each column where we’ll store data and includes question marks for placeholders for the values
![]() . Next, in our constructor, we pass in the SQLiteDatabase object we’ll use to connect to the database and perform operations
. Next, in our constructor, we pass in the SQLiteDatabase object we’ll use to connect to the database and perform operations ![]() , and we’ll compile our insert String into a SQLiteStatement
, and we’ll compile our insert String into a SQLiteStatement ![]() .
.
Using a compiled statement, as opposed to a raw SQL insert, will be faster because the framework can precompute and reuse the execution plan. But you can only use compiled statements for tasks that don’t return any rows or that return only one row and column (a single long or String). Because they offer good performance, yet can’t return multiple rows, compiled statements are a perfect fit for insert operations.
After the constructor, we see the save method, where our insertStatement is put to work ![]() . First we clear any previous bindings, and then we bind each of the placeholders in the statement with the correct value
from our model object. Once the bindings are set, we call executeInsert and we pass along the ID it returns (which is the ID of the row in the Movie table for the inserted data). That’s it for
insert; when one table is involved it’s simple.
. First we clear any previous bindings, and then we bind each of the placeholders in the statement with the correct value
from our model object. Once the bindings are set, we call executeInsert and we pass along the ID it returns (which is the ID of the row in the Movie table for the inserted data). That’s it for
insert; when one table is involved it’s simple.
The next part of our MovieDAO class is the update method in the next listing.
Listing 7.14. The second portion of the MovieDao class—updating a movie

For an update operation, we first set up a ContentValues object that saves key-value pairs of the column names and data we want to update ![]() . ContentValues is a class that we’ll see again when we deal with creating content providers in the next chapter. For now, think of it as
a map for data you need to update. Once we’re ready, we use the update method on our SQLiteDatabase object, passing it a table name, values, a where clause, and where clause arguments
. ContentValues is a class that we’ll see again when we deal with creating content providers in the next chapter. For now, think of it as
a map for data you need to update. Once we’re ready, we use the update method on our SQLiteDatabase object, passing it a table name, values, a where clause, and where clause arguments ![]() .
.
The update is standard Android stuff, much like the delete method, shown in the next listing.
Listing 7.15. The third portion of the MovieDao class—deleting a movie

The delete method works much the same way as the update method, except it doesn’t involve values. We pass it a table name, where clause,
and where clause arguments ![]() . After the delete method, next up are the get and getAll methods, which query the Movie table and return Movie objects using a Cursor.
. After the delete method, next up are the get and getAll methods, which query the Movie table and return Movie objects using a Cursor.
Listing 7.16. The fourth portion of the MovieDao class—getting movies


The get methods are more involved than the last few we’ve seen. The first thing of note is that the query methods return a
Cursor ![]() . If you’ve done Java JDBC work, then you’ve probably used a ResultSet object. A ResultSet is a cursor, wrapped with some additional functionality (and some of the methods will be familiar for Java developers). Cursors
are part of most databases, SQLite included. Because we aren’t using JDBC with Android, we don’t have ResultSet.
. If you’ve done Java JDBC work, then you’ve probably used a ResultSet object. A ResultSet is a cursor, wrapped with some additional functionality (and some of the methods will be familiar for Java developers). Cursors
are part of most databases, SQLite included. Because we aren’t using JDBC with Android, we don’t have ResultSet.
Why Not JDBC?
There are pros and cons to JDBC. If Android supported JDBC it would be easier to have portable code or reuse code that you may already have with SQLite. But Android intentionally doesn’t support JDBC, presumably because of the overhead it adds and the fact that there’s already a simple to use API in place via the android.database.sqlite package. If you promise not to mention it to anyone we’ll let you in on a secret though: Android does include a SQLite JDBC driver, and it does work, but it’s undocumented and unsupported (because it may not be available on every device). Even though it’s there, and we mention it because you may stumble across it, we strongly suggest that you avoid any unsupported part of the Android platform.
The query methods themselves (there are several overloaded variants on the SQLiteDatabase object) take in the table name, selection clause, and selection clause arguments. They also offer several more options, such as order by, group by, having, and limit. These SQL select constructs allow you to tailor your query as needed. Ultimately, after each query method is parsed, a select statement is issued, and a Cursor is returned.
For our get method, we use query ![]() , and then if the Cursor it returns has a first result row
, and then if the Cursor it returns has a first result row ![]() , we call the buildMovieFromCursor method
, we call the buildMovieFromCursor method ![]() to create a Movie from the row’s data
to create a Movie from the row’s data ![]() . Finally, we close the Cursor object when we’re done
. Finally, we close the Cursor object when we’re done ![]() . Closing the cursor is essential. If we don’t close it, we’ll leak it, and potentially hang on to the calling component and
cause all sorts of havoc.
. Closing the cursor is essential. If we don’t close it, we’ll leak it, and potentially hang on to the calling component and
cause all sorts of havoc.
Along with the get method, we also have a getAll method. The difference with getAll is that the select query it uses isn’t constrained by an ID, and so it’ll return all the movie rows. We handle these multiple rows with a do-while
loop ![]() using the cursor’s moveToNext method
using the cursor’s moveToNext method ![]() . Inside each loop iteration we again call the buildMovieFromCursor method. Within this method we process the row by calling the necessary typed get methods to retrieve each field of data.
. Inside each loop iteration we again call the buildMovieFromCursor method. Within this method we process the row by calling the necessary typed get methods to retrieve each field of data.
Now that we have save, update, delete, get, and getAll methods ![]() for our DAO, we’re nearly done. The only thing we have left is an addition to the interface that we’ve included to find a
movie by its name.
for our DAO, we’re nearly done. The only thing we have left is an addition to the interface that we’ve included to find a
movie by its name.
Listing 7.17. The final portion of the MovieDao class—finding a movie by name

The find method, which is used to search for movies already saved in the database, works much the same as our other data retrieval
methods, except it uses a rawQuery ![]() . We don’t have to use a raw query here, but we wanted to demonstrate that this approach is available, and it’s an easy way
to include the limit statement in our query and use a SQLite function.
. We don’t have to use a raw query here, but we wanted to demonstrate that this approach is available, and it’s an easy way
to include the limit statement in our query and use a SQLite function.
In this case, we’re using the SQLite upper function to compare the database field, converted to all uppercase characters ![]() , to our String (also converted to uppercase). This will make sure our comparison matches regardless of the case, and it shows that SQLite
does support functions, like many other databases (for a complete list, see the documentation).
, to our String (also converted to uppercase). This will make sure our comparison matches regardless of the case, and it shows that SQLite
does support functions, like many other databases (for a complete list, see the documentation).
The last thing of note with the find method is that it makes two trips to the database. Our first query gets the movie ID we’re interested in, and then another
query is issued when we call our own previously defined get method ![]() . This isn’t the most efficient way to retrieve data, but we accept that. This is an easy to understand and maintain approach,
and for such a small amount of data it’s a reasonable trade-off. If we notice a performance issue later we can always make
this code do its work with a single query, but there’s no need to optimize it before we have a problem.
. This isn’t the most efficient way to retrieve data, but we accept that. This is an easy to understand and maintain approach,
and for such a small amount of data it’s a reasonable trade-off. If we notice a performance issue later we can always make
this code do its work with a single query, but there’s no need to optimize it before we have a problem.
The MovieDAO is our most involved DAO class. It inserts, updates, deletes, and selects data in multiple ways. Our other DAO, CategoryDAO does much the same thing for the Category table. So are we ready to roll? Should we start using this DAO from our activities and other components? Well, not quite. First, as we’ve discussed, we’ll create one more layer to wrap the DAOs in an easy to use data manager.
Creating a data manager
Our DAO objects represent the individual data entities our application needs, Movie and Category. Yet they intentionally don’t worry about the relationships between the different tables involved. For example, if we want to save a new Movie, the model object comes in with a List<Category>, but the MovieDAO doesn’t touch that (its only job is to handle the Movie table).
Because our DAOs are each unaware of any table other than their own, we’re also going to create a DataManager interface, an implementation class that will wrap the multiple DAOs and take care of the remaining duties from one place. Such duties will include storing data in multiple tables and dealing with transactions. Our application components will ultimately use this class to save and retrieve data. This technique, shown in the next listing, will keep all of the SQL and logic out of our application components and views.
Listing 7.18. The DataManager interface defines all possible operations
public interface DataManager {

   public Movie getMovie(long movieId);
   public List<Movie> getMovieHeaders();
   public Movie findMovie(String name);
   public long saveMovie(Movie movie);
   public boolean deleteMovie(long movieId);

   public Category getCategory(long categoryId);
   public List<Category> getAllCategories();
   public Category findCategory(String name);
   public long saveCategory(Category category);
   public void deleteCategory(Category category);
}
Our data manager interface is pretty basic. It has a set of methods relating to common data operations such as get, save, and delete for each of our main model objects—Movie and Category. Our application components will use references to this interface to perform data operations.
The more interesting parts of this layer are within the database-backed implementation of this class, which uses our DAOs. This first portion of this is shown in the next listing.
Listing 7.19. The first part of DataManagerImpl implements the DataManager interface

The DataManagerImpl isn’t extending or building on any Android support, it’s our own invention that implements our DataManager interface ![]() . Within it, we include a constant to define the current database version
. Within it, we include a constant to define the current database version ![]() and member variables that reference each of our DAOs
and member variables that reference each of our DAOs ![]() . Also, inside its constructor we instantiate the SQLiteOpenHelper class we built earlier
. Also, inside its constructor we instantiate the SQLiteOpenHelper class we built earlier ![]() , and use it to connect to our database
, and use it to connect to our database ![]() .
.
Once the member variables and initial wiring are out of the way, we then move on to DAO wrapper methods.
Listing 7.20. The rest of DataManagerImpl, with data methods to wrap the DAOs
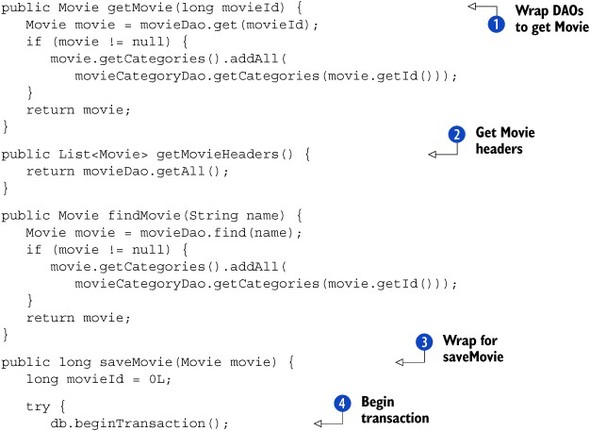


At the heart of the DataManagerImpl class are the data management methods that use our DAO objects. These include the getMovie method ![]() , which uses both the MovieDao and the CategoryDao to return a complete single Movie. The getMovieHeaders method, on the other hand, returns a collection of movies without the categories
, which uses both the MovieDao and the CategoryDao to return a complete single Movie. The getMovieHeaders method, on the other hand, returns a collection of movies without the categories ![]() (these “headers” can be used to list movie data when underlying detail isn’t required).
(these “headers” can be used to list movie data when underlying detail isn’t required).
One of the most interesting aspects of the DataManagerImpl class, and another reason we’re using a separate manager layer, can be seen in the saveMovie method ![]() . Here we again use separate DAOs, but we do so within a transaction. A transaction ensures that if one part of our operation
fails, the entire thing will be rolled back. This prevents us from ending up with an inconsistent state. For example if we
are able to insert a new movie
. Here we again use separate DAOs, but we do so within a transaction. A transaction ensures that if one part of our operation
fails, the entire thing will be rolled back. This prevents us from ending up with an inconsistent state. For example if we
are able to insert a new movie ![]() and the categories its associated with
and the categories its associated with ![]() , but for some reason couldn’t insert its category associations
, but for some reason couldn’t insert its category associations ![]() , we then wouldn’t want anything to be saved (we don’t want to save the movie or categories without the correct associations).
The transaction makes sense here, at this level, but it may not be appropriate for the DAO itself (the manager has the contextual
information to know a transaction is needed).
, we then wouldn’t want anything to be saved (we don’t want to save the movie or categories without the correct associations).
The transaction makes sense here, at this level, but it may not be appropriate for the DAO itself (the manager has the contextual
information to know a transaction is needed).
To control the transaction, we explicitly begin it ![]() , set its status as successful if we don’t have any exceptions
, set its status as successful if we don’t have any exceptions ![]() , and end it
, and end it ![]() . Note that there’s no rollback method. Instead, once the beginTransaction method has started the process, if the endTransaction method is encountered before setTransactionSuccessful has been called, a rollback will happen implicitly (and endTransaction is inside a finally block, so it’ll be called even if there’s an earlier exception).
. Note that there’s no rollback method. Instead, once the beginTransaction method has started the process, if the endTransaction method is encountered before setTransactionSuccessful has been called, a rollback will happen implicitly (and endTransaction is inside a finally block, so it’ll be called even if there’s an earlier exception).
After the saveMovie method, our manager has a similar deleteMovie method that also has transaction support ![]() . Then we include similar wrapper methods for categories (though they only need to use one DAO because they’re simpler, we
still use the manager as an access point). The remaining DAO wrapper methods, and the internal OpenHelper class which we saw earlier, round out the DataManager class and complete our data management layer.
. Then we include similar wrapper methods for categories (though they only need to use one DAO because they’re simpler, we
still use the manager as an access point). The remaining DAO wrapper methods, and the internal OpenHelper class which we saw earlier, round out the DataManager class and complete our data management layer.
Using the DataManager
How do we use our new data management layer from within the MyMoviesDatabase application? We create an instance of it inside the Application object that all our activities and other components have access to, and we call it as needed. For instance the MyMovies activity is still the main ListView our application needs. But instead of using an Adapter that’s backed with List<String>, we change to one that uses List<Movie> and we get that data from our database as follows:
 private MovieAdapter adapter;
 private List<Movie> movies;
...
 movies.addAll(app.getDataManager().getMovieHeaders());
 adapter.notifyDataSetChanged();
Another alternative we might’ve chosen would’ve been to implement a CursorAdapter. A CursorAdapter is an adapter that can pull data from a database. Sometimes this is convenient, such as when multiple things might modify the underlying database. With a CursorAdapter, a ListView can manage the cursor and automatically update the view items as data is added. One downside with CursorAdapter is that database concepts such as Cursor leak into the logic of the activity (for example, when a list item is clicked). So usage of a CursorAdapter makes sense sometimes, and other times it’s easier to do without it. For MyMoviesDatabase we’ve included both approaches in the source code for the project (see the comments in the MyMovies activity to switch between them).
Discussion
We can now easily use our model objects and our DataManager interface implementation, which wraps our DAOs, from any of our application components. We’ve encapsulated all the database-related code in one place, and we’ve hidden the underlying details. In fact, we could change the implementation of our DataManager to use files, or to use web service calls (which might not be a good idea, but it’s a strained theoretical example), and our main application code (our activities and so on) wouldn’t need to be touched.
Behind the manager layer, we’ve also created separate classes to create and update our tables, and to create and open our database. We have all the layers we discussed earlier, and along the way we’ve touched on many of the details of working with databases on the Android platform. With our database layer in hand, we’ll now move on to how to inspect and troubleshoot a SQLite database.
7.4. Inspecting SQLite databases
Outside of your application, there are many times when you’ll want to access and inspect your SQLite database directly. You’ll want to make sure your tables are there, and that they have the structure you intended. And you’ll want to run test queries and experiment with the results. For these times you’ll need data tools.
In the next few sections, we’ll review mymovies.db using the command-line SQLite shell and a third-party GUI tool, SQLiteManager. There are many third-party SQLite GUI tools; we’ve chosen SQLiteManager as an example because it’s cross-platform (it’s a Firefox browser extension), open source, and free.
Sqlite Shell
SQLite comes with its own command shell, a command-line utility named sqlite3. This tool is the Swiss-Army knife for SQLite. To access sqlite3 on an Android device or emulator, you need to first connect with the adb shell, and then invoke the SQLite shell on the database you’re interested in. Figure 7.10 shows this process for MyMoviesDatabase and the mymovies.db file.
Figure 7.10. Using the SQLite shell tool, sqlite3, on the mymovies.db database

From the adb shell session started in figure 7.10, we first navigate to the /data/data/<packagename>/databases file location, and then we list the contents. There we see the mymovies.db file. Next, we invoke the SQLite shell with sqlite3 mymovies.db. Once we’re in the SQLite shell, we have access to all of the commands it provides. Some of the most useful commands to remember are shown in table 7.2.
Table 7.2. Useful sqlite3 shell commands for working with SQLite databases
|
sqlite3 command |
Description |
|---|---|
| .help | List all commands and options |
| .tables | Show tables for current database |
| .schema | Show CREATE statements used to create tables for current database |
| .explain | Parse and analyze SQL statement showing execution plan |
You’ll also often be running direct SQL statements in the shell, such as select, insert, delete, and so on. If you want to know more about sqlite3, which is a powerful tool, you can find the complete documentation online at http://www.sqlite.org/sqlite.html.
SQLiteManager
If you’d rather use a GUI tool to inspect and manipulate your database, one of the easiest to use is the SQLiteManager Firefox extension. To use this tool, you’ll need Fire-fox and the extension at http://mng.bz/iG6q. Once you have installed the extension, you can access SQLiteManager from the Firefox Tools menu. When you first launch it, it’ll show a new blank window. To do anything with it, you need to point it at a SQLite database file.
There isn’t a convenient (or secure) way to automatically connect to a running device or emulator and browse the database file, so to do this you’ll need to copy the file to your local computer. This can be done with the adb pull command, or with the Android file explorer provided in the Eclipse ADT or DDMS tools, as seen in figure 7.11.
Figure 7.11. Copy the database file from a running device or emulator to the local host computer using DDMS.

Once you have the database file available, it’s a simple matter of opening the file with SQLiteManager. You can click and browse through the database contents, check the settings, and even execute SQL commands. Figure 7.12 shows us exploring mymovies.db.
Figure 7.12. Use SQLiteManager to explore a SQLite database file.
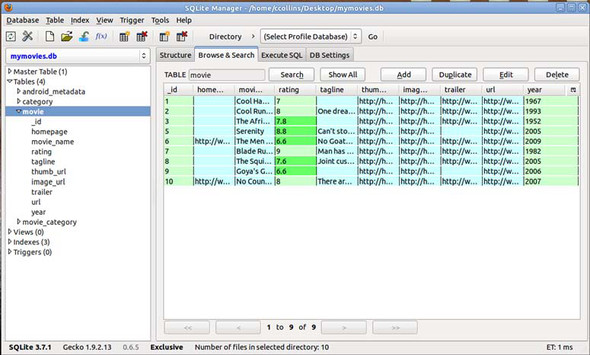
All told, there are many ways to access and inspect SQLite databases. The SQLite shell is always available, and it’s connected to live data. Other tools, such as SQLiteManager, provide an easy-to-work-with GUI approach.
Now that we have a working sample application complete with preferences using files, data access layer, DAOs, and database, and we’ve seen how to explore our data and use tools to verify the schema, run sample queries, and even explain the processing plan, our journey through local data storage on Android is complete.
7.5. Summary
We’ve covered a good bit of data storage and persistence territory. We haven’t touched on every possibility, because there are too many, but we’ve dealt with the most common and often most useful ways to store and retrieve local data for an Android application.
We started with the filesystem, and the basics of reading and writing data to files. We then looked at the file-backed but easier-to-use SharedPreferences mechanism Android provides, and finally we topped it off with using a local SQLite database. We went into a lot of detail on the database side of things because that’s the most powerful local storage mechanism Android provides. There, we separated the responsibilities for creating our database and the individual tables, and we used Data Access Objects (DAOs) for containing data logic, as well as a data manager to wrap it all up. In all, we built a layered architecture around our database and hid the gory details from our application components. Finally, we topped off our local data excursion with a look at exploring and troubleshooting databases from the command shell, and with external tools.
We did all of this in order to take the MyMovies sample application we’d seen in previous chapters to the next level. We modified it to be able to search for data, to use preferences, and to store data in a database. Now, it’s not using predefined data stuck in a resources file; it’s dynamic and user-defined.
Next, in chapter 8, we’ll look beyond storing data locally and learn how to consume data from other applications, such as the built in Contacts manager, and we’ll also learn how to share our own data—these are both the realm of the ContentProvider.