
Chapter 14. Build management
- Automated builds
- Managing builds with Maven
- Continuous builds
A tool is but the extension of a man’s hand, and a machine is but a complex tool. And he that invents a machine augments the power of a man and the well-being of mankind.
Henry Ward Beecher
In any but the simplest software projects, there comes a point where the complexity of an application outgrows the tooling and project structure initially used to set it up. As a developer you’ve probably hit that problem more than once. As the number of classes and resource files in your application grows, dependencies to external libraries increase, and it all starts getting monolithic and unwieldy.
What can you do when things start to get messy? First, you could start breaking down your application into distinct modules that can be maintained and built separately, perhaps even reused for other projects. With an increasing number of library dependencies, you may also want to start employing a dependency management system, which can take care of resolving version conflicts and the like.
Shared code modules are maintained and built separately, so you need software that allows you to describe, build, and wire these projects together in order to arrive at your final executable application. At the same time, you often want to gain more control over the build process itself, so as to perform extra steps such as generating project reports and documentation, publishing and signing build artifacts, and so forth.
As application and build complexity increase, you typically also have more people working on the project at the same time. So it can be indispensable to keep a build server around; you can automatically run tests and assemble new application builds, so as to ensure that you’re not accidentally breaking the project under source control by committing a defective piece of code, and to regularly archive stable builds.
What you’ve seen in this book so far in terms of project and build management is the simple and standard functionality you get from the ADT and its application wizard. This is enough for simple applications, but leaves a lot to be desired for larger ones, with respect to the demands we mentioned:
- Project modularization is a difficult and highly manual process. There’s no notion of submodules or shared projects in Eclipse/ADT.
- Dependency management in Eclipse/ADT doesn’t go beyond “A needs B” style dependencies. Transitive dependencies, versions, and version conflicts aren’t handled at all.
- Extending the build process with custom steps is difficult and inflexible.
- Eclipse/ADT are visual tools with no command-line interfaces, which makes them impossible to use on a build server.
- The level of build automation gained from Eclipse/ADT is limited. For example, no hooks can be defined that can automatically trigger a build.
In order to address these deficiencies of Eclipse and the ADT, we need to look at alternative solutions to give us more flexibility, expressiveness, and control when building Android applications. Unfortunately, this also means that you’ll have to leave the world of graphical interfaces behind and turn to your good old command shell.
Although it may sound scary to leave the comforting visual environment of the Eclipse IDE for this chapter, the good news is that we don’t have to start from scratch. Android comes with a set of command-line tools and premade Ant tasks (we’ll see in a bit what they do) that will help you create powerful build environments. And here’s a promise: at the end of this chapter, your Android builds will not only be as simple to start as from within Eclipse, they’ll even start all by themselves!
That being said, here’s the roadmap for this chapter. It’s divided into three sections, with each section following an overarching goal. Our first goal is to drive Android builds from the command line, because this is a necessity for everything that follows. As part of this section we’re quickly going to look at the Android build process, along with the steps and tools that comprise it. Moreover, we’ll show you how to use Android’s Ant tasks to easily trigger builds from the shell prompt.
We’ll then go beyond the tooling provided by the Android SDK and explore ways to arrive at project layouts that allow for better modularization and powerful dependency handling. Specifically, we’ll show you how to use Maven and its Android plugin to describe and build Android applications, how to use Maven’s dependency management system to enable fuss-free and simple external library management, and how to integrate Maven back into your familiar Eclipse IDE.
Last but not least, we’ll show you how to employ build servers in order to assemble and test applications in a fully automated fashion. We’ll see how a build server can trigger a new build with every commit we do, as well as how to have it launch multiple emulators at once in different configurations, run and test applications on them, and inform us if it finds that something doesn’t check out.
Truth be told, this is going to be a long ride. Build automation is an advanced topic, but it’s an essential one for companies of all sizes that create Android applications professionally. The material behind this topic is grossly under documented on the official Android website, so we hope that although this chapter contains a lot of information, it’ll be more than worth your while.
14.1. Building Android applications
If you’ve haven’t done much Android programming before, except to follow the examples in this book, chances are that you use Eclipse to build, test, and deploy Android applications. The ADT, the Android plugin for Eclipse, does a good job of providing these functions in a graphical environment—making them easily accessible to humans. In fact, building an Android APK from your source code in Eclipse is as simple as clicking the Save button. Doing so will trigger the tool chain responsible for turning an Android Eclipse project into something that’s executable on a device.
You’d be surprised how much happens under the hood when issuing a save on a source code or resource file. We plan to build Android applications from the command line, so it’s essential that you understand what’s happening there. Hence, this first section of the chapter is meant to give you a solid understanding of the steps and tools required to build an application. We’ll wrap it up with this chapter’s first technique, which will show you how to build a typical Android application from the command line with the Apache Ant build system.
14.1.1. The Android build process
The process of arriving from a set of source and resource files at an executable Android application is involved. This may surprise you because this process in Eclipse is so strikingly simple. The truth is that the process involves at least seven separate steps, and several different tools, so it’s worth taking a closer look at what’s happening under the hood. The steps executed to build an Android APK file are shown in figure 14.1.
Figure 14.1. The standard build process employed by Android consists of seven distinct steps. Resources and source code are compiled into an APK file, which is then signed and byte aligned.

Even more steps may be involved, depending on your mileage. For instance, some companies may decide to obfuscate the application code as a post-processing step to the class file generation, so as to make reverse-engineering an application difficult or impossible. Let’s go through each step in detail. Let us stress that we cover all this for you to better understand the process. You won’t have to perform all these steps manually. In fact, in technique 81, we’ll show you how Android’s Ant targets greatly simplify this for you.
Step 1: Generating Java Source Code
As you may recall from earlier chapters, Android handles resources such as pictures, layouts, strings, and so forth, by generating resource IDs and writing them to a file named R.java. This is usually done by the ADT, so every time you create a resource (say, by dropping a PNG into the res/drawables folder, and pressing F5 to refresh), the ADT will update R.java and create a new ID field for that resource. That’s why you should never hand-edit that file; your changes will be overwritten. When creating an APK outside Eclipse, a build system must generate that file itself. This can be done with the aapt SDK tool (the Android Asset Packaging Tool), which allows you, among other things, to generate the R class from a set of resources, as well to generate the Manifest class, which is the runtime representation of the AndroidManifest.xml file.
Where Can I Find the SDK Tools?
Throughout this chapter we’ll mention a few command-line tools that ship with the SDK. We won’t cover their usage in much detail, but if you want to use them manually or toy around with them, you can find them in either $ANDROID_HOME/tools or $ANDROID_HOME/platform-tools.
Another thing to consider are remote objects defined using the AIDL, the Android Interface Definition Language, as seen in chapter 5. The interfaces to communicate with a remote service must be generated using the aidl tool, and they’re required to compile the application. At the end of this step, we have all source code files together, and they’re ready to be compiled.
Step 2: Compiling Java Source Code
The application source code from the src/ folder, the Java source files for the R class, the Manifest class, and the AIDL interfaces (if any) are then compiled into Java class files. This is an invocation of the javac compiler; there’s nothing Android-specific about this step. After this, we have a set of standard Java class files for every Java class in the application, whether hand-written or generated in the previous step. At this point, you can hook into the build lifecycle for any custom class file post-processing, such as for bytecode injection or manipulation. For instance, a common task is to minimize and obfuscate classes using ProGuard (see appendix C).
Step 3: Converting to Dalvik Bytecode
The Java class files from the previous step contain standard Java bytecode, and Dalvik can’t read that. That’s why a build system must convert all Java class files into the Dalvik Executable format (DEX) using the dx tool (sometimes informally referred to as the dexer). This includes not only your own classes, but also any classes coming from JAR files that your application depends on. The result is a single classes.dex file that contains the entire program code plus dependencies in a compact and efficient representation suitable to be run by the Dalvik virtual machine. We’ve already talked about the optimizations applied by the dx tool in chapter 1, when we first introduced the Dalvik VM. The application code is now ready to be packaged up, but before we do that, we need to process the application’s resource files.
Step 4: Packaging Application Resources
We already have the application code ready for execution, but we can’t build an APK yet. We must first package up the resources used by the application, similar to how we dealt with the source code. A build system would do that, again using aapt. For this particular step, aapt will process all resources in your application’s res/ and assets/ folders by converting them into a more compact representation. Whereas binary files, such as images, remain untouched, any XML files, such as layouts or the manifest, will be rewritten using a binary format. They will be both smaller and more efficient to read at runtime. Values such as strings won’t be kept in separate files at all, but are directly written to a file called resources.arsc, along with references to rewritten resources like layouts. The optimized AndroidManifest.xml, the optimized resource files, and the resources.arsc file are then packaged into a JAR file that’s already our APK, but still without the application code.
Step 5: Assembling the APK
We now have both the application code and resources, and we’re ready to package them together into an APK. Truth be told, steps 4 and 5 are done in a single step using aapt, but it’s easier to think about them as separate steps. In any case, a build system must add the classes.dex file to the final APK, either using the aapt add command or by already including it in step 4. The point is that after this step we have the final APK containing both resources and code. To avoid confusion, there’s nothing special about an APK file; it’s an ordinary Java JAR file. In return, a JAR file is an ordinary ZIP file with a META-INF folder that contains some information about the package contents. If you’re curious, go to your Eclipse workspace and decompress an .apk file using your archive tool of choice. You’ll see a directory structure like the one shown in figure 14.2.
Figure 14.2. APK files are ordinary ZIP files. Uncompressing them yields a directory structure like the one above.

At this point, we have a fully assembled APK, so aren’t we done? The answer is no, because we can’t do anything with it. Installing APKs to the emulator or devices requires that they be signed using a security certificate, so we must first sign our APK.
Step 6: Signing the APK
We said that you can’t install unsigned APKs, not even to an emulator. This is done to add a layer of trust to deployed applications; it prevents users from replacing an application with another version of the same application, unless their security signatures match. The correct signature can only be written by the authority that initially created the application. Frauds tinkering with the application can’t redistribute it, because they don’t have the private key that was used to sign the original package.
Because an APK file is a JAR file, signing an APK is done the same way as signing a JAR: using the jarsigner tool. Like javac, the jarsigner tool has nothing to do with Android; it’s part of any ordinary JDK installation. The jarsigner tool works off of a key-store file and a security certificate. The security certificate for signing APKs can be self-issued; you don’t need to apply for a certificate at Google or any other trusted authority. In addition, it’s always a good idea to use the same certificate to sign an application that’s deployed to more than one marketplace or app store so updates remain compatible.
When signing an APK involves a keystore and certificate files, you may be wondering how Eclipse does it when you Run As > Android application. The trick is that by default, the ADT use a debug keystore that was generated for you (on MacOS- and UNIX-based systems, this file is located at ~/.android/debug.keystore). This is fine when running the application on a development machine, but for a production release, you should use a separate keystore and a security certificate that identifies your company. We won’t get into the details of signing an APK using jarsigner, but if you’re curious, it’s fully documented on the official Android website at http://mng.bz/La8q.
Step 7: Aligning Resources in the APK
Strictly speaking, we’re done after the previous step, because we have a signed APK that we can install on devices. This last step is done purely for optimization, and is entirely optional, although highly encouraged. According to Google, uncompressed resources such as PNGs or raw resources should always be aligned to 4-byte boundaries in a compressed APK, so that Android can more efficiently access these resources at runtime via memory-mapped I/O routines. This alignment of resources can be easily accomplished using the zipalign tool. Again, the ADT will automatically zip-align exported APKs, but in a custom build setup, you must invoke this tool manually. Calling zipalign should always be the last step in the build process; any modifications to the APK file after aligning it will render the alignment useless.
Equipped with the knowledge about how Android’s build procedure is structured and which tools are involved, it’s time to think about ways to automate this. There are many steps and moving parts, so it would be good to pour this bulky process into something that’s a tad easier to handle.
14.1.2. Moving toward automated builds
Because remembering and performing all the different steps we’ve seen can become tedious and error prone, we’ll look at tools that allow us to automate this process. Scripted build tools do exactly that—they take the raw application files as input, walk through the steps we explained previously, and churn out APKs. Think of an assembly line equipped with machines. We feed something in at the front (our project folder), have the machines (the platform tools) convert the different components to intermediate goods, and the final product (the APK) plops out at the end.
A build system can do even more for us, such as installing the application on a device and running the test suite. Figure 14.3 shows the typical steps a build system like Ant would perform when used in an Android environment.
Figure 14.3. A build system such as Apache Ant can greatly simplify the build lifecycle by executing each step using a build script. A build system can usually be triggered using a simple shell command.
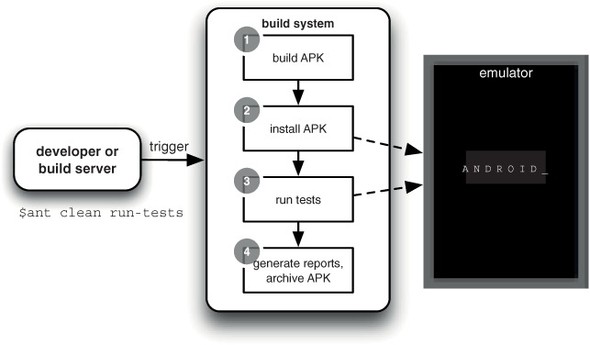
We’re not limited to one kind of build system Fortunately, there are plenty: GNU Make, Ant, Maven, Gradle, SBT, Rake, Buildr.... the list is long. Which one is the best for you depends on your mileage, but we’ll review two of the most popular ones, Ant and Maven, against the backdrop of Android.
We’ll start with what’s probably the simplest and also best-known build system in the Java universe: Apache Ant. A word of warning before we continue: none of the techniques about build systems that follow are meant to be in-depth introductions into the build systems themselves. Such intense cover would blow this book’s scope way out of proportion. Entire books have been written on using Ant or Maven, but this isn’t one of them. Instead, we’ll give a quick introduction to the build system itself and its major building blocks. Then, we’ll quickly advance to the Android specifics and how the build system being discussed compares to others with respect to building Android applications. We’ll always point you to more detailed information about the tool being discussed.
Technique 81: Building with Ant
Even if you’ve only used a bit of Java before you decided to tread the path of the Android developer, chances are you’ve at least heard of Apache Ant. Perhaps you’ve even used it. Ant (Another neat tool) is a build system written in Java, for Java. You can use it for more than building Java applications, but building Java applications is its primary purpose and motivation behind its development. If you’ve done any programming for native Linux/UNIX applications before, think of Ant as the equivalent to UNIX’s make tool. Unlike make’s crude syntax found in the Makefile describing a build, Ant banks on XML, and the build descriptor is aptly called build.xml.
If you’ve worked with relatively simple build systems such as Ant or GNU Make before, then you already know what I’m going to say now: things can get messy if you reach a certain level of project complexity (lots of dependencies, submodules, that sort of thing). We’ll explain Ant’s strengths and weaknesses in more detail later. For now, let’s summarize Ant by itself as being perfectly fit for simple build tasks in simple applications. Ant is also the standard and Google-official way Android applications are built from the command line. Although Ant has its shortcomings, we’re not wasting your time. But before starting to assess Ant, maybe we should first look at how it works.
Problem
Your application has a simple structure, there are few or no dependencies on other projects or libraries, and you’re looking for an easy way to build an APK from the command line.
Solution
If your application matches the profile of our problem description, which is the case for any standard Android project generated by the ADT project wizard, then Ant is the way to go. Due to its simple command-line interface, it can run directly from a shell and hence is easy to integrate back into other build environments such as Eclipse (through its Ant view) and build servers. We’ll now briefly introduce Ant’s basic concepts.
Where Can I Learn More About Ant?
As mentioned in the introduction, we’ll cover the build systems discussed in this chapter briefly and focus on their application to Android projects. You can find more information about Apache Ant at http://ant.apache.org/manual/.
Ant builds are based on three major building blocks: tasks, targets, and extension points, which are imported or defined using an XML-based build descriptor file called build.xml. A task in Ant describes a piece of work to be performed. This can be anything as simple as creating directories or as complex as creating a JAR file. Ant ships with a set of tasks typically useful when dealing with Java builds, but you’re free to write your own. Examples for tasks are the javac or jar tasks to compile source code and create a JAR file, respectively. Tasks usually form small, atomic steps in a build, and by themselves don’t add a lot of value. Ant can therefore group several tasks together into larger units called targets. A distribution target could consist of the tasks mkdir, javac, jar, and copy. Such a target would create a distribution directory, compile the source code, bundle it into a JAR, and copy it to that directory. The important thing about targets is that unlike tasks, they can be invoked from the command line by passing them to the ant tool as a parameter. For instance, the command
$ant documentation distribution
would first execute a target called documentation, and then the distribution target. Targets can also depend on each other: the distribution target could depend on documentation, so that the project documentation is always generated before distributing the build. In that case, you could omit the explicit invocation of the documentation target on the command line.
The third and last building block is extension points. Extension points are targets, but they don’t define any tasks. Instead, they’re used to further group several targets into larger units. Tasks and targets are usually defined using XML in the build.xml file, which typically sits in the root folder of your application. Alternatively, you can write tasks in Java, package them in a JAR file, and import that JAR file in the build script. That’s the way Android’s Ant build scripts work.
That shall suffice for our quick overview of Ant. Build systems are best explained by example, so let’s see how we can use Ant to build a Hello World style Android application. We’ll call it HelloAnt.
Grab the Project: HelloAnt
You can get the source code for this project at the Android in Practice code website. Because some code listings here are shortened to focus on specific concepts, we recommend that you download the complete source code and follow along within Eclipse (or your favorite IDE or text editor).
Source: http://mng.bz/g3Vd
“Move along; nothing to see here!” Throughout this chapter, we won’t offer sample APKs for download, because we believe it would be pointless. This chapter is about build scripts and tools, not applications. All sample applications here merely serve as sandboxes for automating builds.
The application is our standard Hello World kind of application as generated by the ADT project wizard. We extended it a little to add a dependency to an external library, the Apache Commons Lang library. This library includes a host of useful utility classes. For instance, HelloAnt uses its StringUtils.repeat method to repeat a greeting three times in a toast, as seen in figure 14.4.
Figure 14.4. HelloAnt uses Common Lang’s StringUtils.repeat method to repeat a greeting three times.

This example may look silly, but it’s to illustrate how library dependencies are handled in Ant, so bear with us. The first thing we need in order to build this application using Ant is a build.xml file. We could write it from scratch, but why bother if there’s a simpler way. We’ll generate it using the android tool.
Dude, Where’s My Build.XML?
If you’re creating applications using the ADT project wizard in Eclipse, no build.xml file will be generated for you, because the tools assume you want to build the application solely using Eclipse. But you can use the android command-line tool to generate an Ant build file for you, as explained in this section.
There are two ways to generate an Ant build file using the android tool. One way would be to create your project using the android create command in the first place. This is the way to scaffold Android projects outside an IDE, and it will make sure that a build.xml is generated for you. Most people would prefer to use the Eclipse project wizard, because it’s less cumbersome. Although this leaves you without a build.xml, you can generate the file afterward using a trick. Navigate to your project folder in a shell and type the following:
$android update project –p .
That command is a no-op: it updates your project’s base directory to be the current directory, which it already is. As a side-effect, it’ll also regenerate all files that are missing, among them, a build.xml, as shown in the following listing. Outsmarted!
Listing 14.1. The build.xml file generated by the android tool (minus comments)

Every Ant build script starts with the project tag ![]() . It takes a few optional parameters, such as the project name and a default target that will be used whenever you invoke Ant without passing it any target explicitly. A third argument not being used
here, basedir, lets you specify the path that’s assumed as being the root for everything.
. It takes a few optional parameters, such as the project name and a default target that will be used whenever you invoke Ant without passing it any target explicitly. A third argument not being used
here, basedir, lets you specify the path that’s assumed as being the root for everything.
In Ant, parameters, constants, and variables for a build script are declared as properties. You can do that using the property tag ![]() . Properties can be set in seven ways. The most common ways are to use the name and value attributes or read them from a Java properties file, as seen here. Of the two properties files here, local.properties and default.properties, at least the latter should look familiar to you: it’s the properties file the ADT (or the android tool) generates for every Android project. It contains settings such as the Android version your application targets. New
is local. properties, which contains machine-specific settings, such as the absolute path to the Android SDK, that are required to build the application.
Therefore, this file shouldn’t be checked into version control.
. Properties can be set in seven ways. The most common ways are to use the name and value attributes or read them from a Java properties file, as seen here. Of the two properties files here, local.properties and default.properties, at least the latter should look familiar to you: it’s the properties file the ADT (or the android tool) generates for every Android project. It contains settings such as the Android version your application targets. New
is local. properties, which contains machine-specific settings, such as the absolute path to the Android SDK, that are required to build the application.
Therefore, this file shouldn’t be checked into version control.
As you can see, the build file is rather short, because no tasks have been defined here. The Android SDK defines its tasks
as Java classes bundled in a JAR. When running the build, Ant will resolve and load these tasks by going through the list
of JAR files defined in the android.antlibs path element ![]() . The build is then bootstrapped by declaring the setup task using Ant’s taskdef element
. The build is then bootstrapped by declaring the setup task using Ant’s taskdef element ![]() . See how we reference the path to the JAR file here using the classpathref attribute and passing it the id of the path element we defined. This is a typical example of how Ant wires things together using XML.
. See how we reference the path to the JAR file here using the classpathref attribute and passing it the id of the path element we defined. This is a typical example of how Ant wires things together using XML.
Where Can I Find Android’s Ant Task Definitions?
If you want to take a peek at the various Ant tasks Android defines for you, and how they’re implemented, download the framework source code and navigate to sdk/anttasks, where the task classes reside in the com.android.ant package. Alternatively, browse them online here: http://mng.bz/6d7s.
Android’s Ant build file also defines a few empty targets for us that can be understood as hooks into the build process. These
are –pre-build, -pre-compile, and –post-compile ![]() . You could uncomment and implement the –post-compile hook to post-process the class files being generated for code obfuscation.
. You could uncomment and implement the –post-compile hook to post-process the class files being generated for code obfuscation.
Private Ant Tasks
You may have wondered why these targets start with a hyphen (-). This is a common pattern to create private Ant targets—targets that can’t be invoked directly from the command line. Ant has no notion of private targets, but you can trick it. Because Ant will treat any arguments starting with a hyphen as options to the ant tool itself, and not as targets, they’ll become unreachable from the command line. You can still cross-reference them like any ordinary target from within your build script.
Last but not least, the build file executes the setup task we declared earlier ![]() . It doesn’t take any arguments, so the call is simplified to <setup />. This is where the build script setup is performed.
. It doesn’t take any arguments, so the call is simplified to <setup />. This is where the build script setup is performed.
Building your application
Now that we’ve dissected the build descriptor, let’s use it to build an APK from our application using Ant. The first thing you need to know is which targets are provided to you by Android. The next listing does this by running Ant with the -p flag.
Listing 14.2. Listing available targets and other project information
matthias:[HelloAnt]$ ant -p
Buildfile: /Users/matthias/Projects/eclipse/HelloAnt/build.xml
    [setup] Android SDK Tools Revision 9
    [setup] Project Target: Google APIs
    [setup] Vendor: Google Inc.
    [setup] Platform Version: 2.2
    [setup] API level: 8
    [setup]
    [setup] ------------------
    [setup] Resolving library dependencies:
    [setup] No library dependencies.
    [setup]
    [setup] ------------------
    [setup]
    [setup] WARNING: No minSdkVersion value set. Application will
         install on all Android versions.
    [setup]
    [setup] Importing rules file: tools/ant/main_rules.xml

Main targets:

 clean      Removes output files created by other targets.
 compile    Compiles project's .java files into .class files
 debug      Builds the application and signs it with a debug key.
 install    Installs/reinstalls the debug package onto a running
            emulator or device. If the application was previously
            installed, the signatures must match.
 release    Builds the application. The generated apk file must be signed
            before it is published.
 uninstall  Uninstalls the application from a running emulator or device.
Default target: help
install on all Android versions.
[setup]
[setup] Importing rules file: tools/ant/main_rules.xml
Main targets:
clean Removes output files created by other targets.
compile Compiles project's .java files into .class files
debug Builds the application and signs it with a debug key.
install Installs/reinstalls the debug package onto a running
emulator or device. If the application was previously
installed, the signatures must match.
release Builds the application. The generated apk file must be signed
before it is published.
uninstall Uninstalls the application from a running emulator or device.
Default target: help
To see all targets, including private ones, use the -v flag for verbose output. Alternatively, you can open a build.xml file in Eclipse’s Ant view to get a tree-ish overview of its contents.
Make Sure the Tools Folder is on the Path
Ant needs to know where Android’s Ant tasks are defined. Hence you must ensure that before running Android’s Ant tasks, the $ANDROID_HOME/tools folder is part of the $PATH environment variable that’s used to look up things on the command line.
Ant puts a task’s name in square brackets when it’s outputting text (in this case, that’s the setup task introduced in listing 14.1). Look at the last line of the setup task: Ant indicates here that a rules file was imported. This file, main_rules.xml, contains all properties and taskdefs Android defines for a normal Android application project. It has similar rule files for Android test projects and Android library projects. The test rules will contain additional targets, such as run-tests to execute an instrumentation test project.
Running Test Suites With Ant
Note that we’ll revisit test execution using Ant in section 14.3, when we talk about build servers and continuous integration. For now, it’s enough to know that it’s possible.
These files can be found in the tools/ant directory of your Android SDK installation. Go ahead and look at these files; it’s helpful to understand what sort of options you can tweak to customize your build. The targets seen in listing 14.2 are the main targets, but as mentioned earlier, they consist of smaller tasks that can be mapped to the build steps we introduced in the previous section. Table 14.1 summarizes this correlation.
Table 14.1. The build steps identified in section 14.1.1 and their corresponding Ant tasks
|
Step # |
Description |
Ant tasks / targets |
|---|---|---|
| 1 | Generation of source code for R.java, Manifest.java, and AIDL interfaces | -resource-src -aidl |
| 2 | Compilation of all Java source code | compile |
| 3 | Conversion of class files to DEX format | -dex |
| 4 | Packaging of application resources | -package-resources |
| 5[*] | Packaging of application code and resources to APK | -package-debug-sign (debug mode) -package-release (release mode) |
| 6[*] | Signing of the APK file | -package-debug-sign (debug mode) release (release mode) |
| 7[*] | Resource alignment in the APK file | debug (debug mode) release (release mode) |
* For these steps, there’s no one-to-one mapping from steps to Ant tasks or targets, because sometimes an Ant task/target may perform more than one step at a time
The setup task will always be executed, regardless of which target you run. If you don’t run any target explicitly, Ant will fall back to the default target, which in case of the Android Ant scripts is the help target. Let’s do a fresh build and install it to a running emulator (make sure you’re running one when trying this yourself!). The following listing shows how.
Listing 14.3. Building and installing an application with Ant
matthias:[HelloAnt]$ ant clean install
Buildfile: /Users/matthias/Projects/eclipse/HelloAnt/build.xml
    [setup] Android SDK Tools Revision 9
    [setup] Project Target: Google APIs
    [setup] Vendor: Google Inc.
    [setup] Platform Version: 2.2
    [setup] API level: 8
    [setup]
    [setup] ------------------
    [setup] Resolving library dependencies:
    [setup] No library dependencies.
    [setup]
    [setup] ------------------
    [setup]
    [setup] WARNING: No minSdkVersion value set. Application will
         install on all Android versions.
    [setup]
    [setup] Importing rules file: tools/ant/main_rules.xml

clean:
   [delete] Deleting directory /Users/matthias/Projects/eclipse/HelloAnt/bin
   [delete] Deleting directory /Users/matthias/Projects/eclipse/HelloAnt/gen

-debug-obfuscation-check:

-set-debug-mode:

-compile-tested-if-test:

-dirs:
     [echo] Creating output directories if needed...
    [mkdir] Created dir: /Users/matthias/Projects/eclipse/
        HelloAnt/bin
    [mkdir] Created dir: /Users/matthias/Projects/eclipse/
        HelloAnt/gen
    [mkdir] Created dir: /Users/matthias/Projects/eclipse/HelloAnt/bin/
     classes

-pre-build:

-resource-src:
     [echo] Generating R.java / Manifest.java from the resources...

-aidl:
     [echo] Compiling aidl files into Java classes...

-pre-compile:

compile:

    [javac] /Users/matthias/Library/Development/android-sdk-mac_86
         /tools/ant/main_rules.xml:361: warning: 'includeantruntime'
         was not set, defaulting to build.sysclasspath=last;
         set to false for repeatable builds
    [javac] Compiling 2 source files to /Users/matthias/Projects/eclipse/
     HelloAnt/bin/classes

-post-compile:

-obfuscate:

-dex:
     [echo] Converting compiled files and external libraries into
         /Users/matthias/Projects/eclipse/HelloAnt/bin/classes.dex...

-package-resources:
     [echo] Packaging resources
     [aapt] Creating full resource package...

-package-debug-sign:
[apkbuilder] Creating HelloAnt-debug-unaligned.apk and signing
         it with a debug key...

debug:
     [echo] Running zip align on final apk...
     [echo] Debug Package: /Users/matthias/Projects/eclipse/HelloAnt/bin/
     HelloAnt-debug.apk

install:
     [echo] Installing /Users/matthias/Projects/eclipse/HelloAnt/bin/
     HelloAnt-debug.apk
  onto default emulator or device...
     [exec] 988 KB/s (154421 bytes in 0.152s)
     [exec] pkg: /data/local/tmp/HelloAnt-debug.apk
     [exec] Success

BUILD SUCCESSFUL
Total time: 18 seconds
If you look at the build output, you can see how Ant executes all the steps that are part of an Android build using a single command. Note that the tasks Ant performs here are precisely those we’ve already seen in table 14.1.
Remember how we said we’ve added a dependency on the Apache Commons Lang library to our application on purpose? It may not be obvious immediately how Ant handles this; after all, we didn’t tell it where to look for that JAR file containing the StringUtils class when compiling the source code. That’s because we put it in the libs/ folder (the path libraries are automatically included from by convention). Android’s Ant tasks will peek into that directory and add its contents to the classpath when compiling the application. If you want to use a different folder, you can change that by setting the jar.libs.dir property to a custom path.
Discussion
Apache Ant offers a simple and straightforward way to build your applications from the command line. It’s easy because Android comes with a basic set of tasks and targets you can execute, so you only need to apply your customizations on top of it, if required at all.
The problem with Ant is that once your project gets more complicated in terms of project structure and dependencies, Ant build files can quickly become difficult to manage. Ant has two main weaknesses that will strike you sooner or later.
First, Ant lacks any kind of built-in dependency management. Dropping JAR files into the libs folder is fine if there are only a few of them. If you rely on many different libraries, you can run into problems due to conflicting transitive dependencies. If, for example, your application relies on libraries A and B, and both of them rely on different versions of library C, things can quickly get messy. Moreover, you always need to maintain dependencies yourself; you need to find the correct library files on the Web and download them to your project. Your fellow developers also need them, so you need to commit them to your source code management system, something that many developers frown upon. The Apache Ivy project (http://ant.apache.org/ivy) addresses this issue by providing a dependency management layer that can be used by Ant, but this adds another moving part to the build environment.
Second, Ant doesn’t have native support for multimodule projects. If your application has only one project folder, you’re fine. But as soon as you start adding a test project, which as learned in the previous chapter you should always have, you suddenly need to maintain two builds that are unaware of each other. That may not even be the end of the line. At Qype, our Android application consists of seven projects: the application, three test projects, and three upstream library projects. Wiring all that in Ant means juggling with includes, subants, and macrodefs, making it a manual, complex, and tedious task. Ant has no notion of multi-part projects or builds.
Due to Ant’s shortcomings related to the management of applications on the project level rather than the raw build level, alternate build systems have emerged. We’re going to cover the best-known and most widely distributed one in Java world, Apache Maven. Maven is a lot more complex than Ant, and we’ll only scratch the surface. We’ll focus on its application to Android projects, but we’ve dedicated the entire second part of this chapter to Maven, so we hope you learn a lot.
14.2. Managing builds with Maven
Apache Maven was released as part of the Apache Turbine web application framework, with the purpose of providing a build environment that natively supports recurring processes in mid- to large-sized projects. Maven is written in Java, and being part of the Apache project, is free and open source software.
As opposed to Ant, Maven is modeled around the software project in its entirety, and makes describing and managing it its primary goal. Where Ant focuses on fine-grained tasks (such as copy) that must be manually wired together in a procedural fashion to form an overarching goal (such as building a distribution package), Maven focuses on the big picture and offers native support for recurring project management tasks such as dependency management, project modularization, build management, release and distribution management, generating documentation, and even generating entire project websites. It’s much more than a build system: it’s a project lifecycle management system, although for simplicity and consistency, we’ll stick with the term build system for the remainder of this chapter.
Which Version of Maven?
Throughout this chapter we’re going to assume that you have Maven 3 installed (you can either download it from the project website at http://maven.apache.org or via your computer’s packaging system). Maven 2 will likely work with our examples, but it was superseded by version 3 a while ago and shouldn’t be used anymore.
Granularity of focus is a key difference from Ant, and this becomes particularly evident in how Maven perceives a project. Whereas Ant build scripts are pieced together at a fairly low level to match a project’s requirements, Maven starts with the project nature in mind from the get-go. Because a web project is different from an Android project, Maven provides project scaffolding via so called archetypes. Using project archetypes, you can let Maven generate a default directory layout and initial POM (discussed next) to get you started. Android archetypes have been kindly provided free and open source by Akquinet (https://github.com/akquinet/android-archetypes).
At the heart of any Maven-powered project lies the POM, the Project Object Model. It tracks every aspect of your project configuration, from name, version, authors, and committers, to external library dependencies and release repositories. The POM is described using XML and kept in the project root folder in a file called pom.xml. (We’ll see in a minute what a typical pom.xml looks like.) Commands are issued in the same way as Ant, but they’re passed to the mvn command-line tool. Note that what’s called a target in Ant is called goal in Maven. For instance, in order to clear temporary files and then recompile an application, you’d pass the clean and compile goals[1] to Maven:
1 If you want to nitpick, this isn’t exactly true: clean and compile are lifecycle phases, to which default goals are bound that will be invoked, but this is only an implementation detail.
$ mvn clean compile
Maven employs a powerful dependency management system. In Maven, anything that’s the outcome of a successful build is called an artifact, and can serve as an input to another project. An artifact can be anything from a library JAR file, a source code or JavaDoc archive, to an entire Android application package. Those build artifacts can be uploaded to a Maven repository using the deploy goal, so as to make them visible to other developers. A repository could reside on your local machine (and in fact, there always is one, as we’ll see in a bit), but it can also be hosted on a web server. Because Maven precisely defines how Maven artifacts and repositories look, any software project in the world that also uses Maven can reuse dependencies from other projects uploaded to an online Maven repository, by declaring a dependency on them in their POM. To bootstrap things, a master repository called Maven Central exists on the Internet. This means that if your application depends on a library that’s already on Central, Maven will automatically download it to your local machine as part of the build and cache it. The relationship between a POM and different kinds of repositories is illustrated in figure 14.5.
Figure 14.5. Maven always knows about the Central and local repositories, so you don’t have to declare them. If you add a dependency to an artifact that hasn’t been synced to Central, you must declare it in your POM using the <repository> tag. All artifacts downloaded from remote repositories will be cached in your local repository.

Another key design point behind Maven is its own architecture. Much like Eclipse, Maven is completely based on plugins. The Maven tool itself is only a thin core layer, with almost all extra functionality added via plugins. For instance, the help goal is added by the maven-help-plugin. Compilation, JavaDoc generation... everything is a plugin. This makes Maven extremely modular and extensible, which is important with respect to integrating Maven into the world of Android.
That was a mouthful, so let’s summarize Maven in one sentence: Maven is free and open source, it’s a build system, a project lifecycle management system, a software distribution infrastructure, and a platform. To get a better grasp of Maven’s popularity, here are some numbers: according to Sonatype, the company behind Maven, more than 90,000 artifacts are hosted on Central these days, with more than 40,000 companies making nearly 300 million requests every month. Not too shabby!
Where Can I Learn More about Maven?
The Maven build system is complex, and we can’t cover all aspects here. We do our best at focusing on Android specifics while not leaving you completely in the dark in case you haven’t worked with Maven before, but we suggest that you keep the Maven documentation close for the next few techniques, in case you feel that you need to catch up on some of the Maven fundamentals.
Maven’s User Centre is a good place to start: http://maven.apache.org/users/index.html.
With the background information out of the way, let’s do some hands-on exercises to see how we can manage Android builds with help from Maven. In order to not overwhelm you with information, we’ll start in technique 82 by turning a simple Hello World–style application into a Maven project. Although Maven’s strengths unfold with more complex project layouts, keeping things simple here allows us to clarify what makes a Maven-powered Android application and what Maven has to offer when dealing with the typical Android application lifecycle. We’ll then follow with technique 83 by introducing several Eclipse plugins that make your Maven/Android builds work fully from Eclipse. We’ll wrap things up in technique 84 by showing you how to make managing your local Android libraries as Maven artifacts a breeze.
Technique 82: Building with Maven
We’ve introduced Maven already and given you a quick overview of its architecture and strengths, but we have yet to introduce Android to the formula.
Problem
Your project has grown large enough that Maven’s well-established dependency management system, submodule support, and rich plugin landscape are a good choice for managing your Android builds. You now want to see what a POM for a typical Android application project looks like, and which Android specific goals are available.
Solution
We already mentioned that Maven itself is a platform, to which additional functionality is added by means of plugins. It shouldn’t be a surprise that the same is true when talking about Android and Maven: meet the maven-android-plugin.
For this first Maven technique, we’ll take the simple Hello World–style application from technique 81 and build an APK with the help of Maven and its Android plugin. That means in this technique, we’ll focus on how a POM for an Android project is laid out, and what kind of Maven goals are added by the plugin to make your life easier.
Plugins are Dependencies
Note that plugins in Maven are handled like library dependencies. There’s no need to manually download or install them; you declare them in your POM, and Maven will automatically download any plugins it doesn’t already have, assuming it can find them in the set of repositories it knows about.
After creating the project using the Eclipse wizard or the android create project command, we only need to do one thing in order to Mavenize our application: create its project descriptor, the pom.xml file in the root of your project folder. You can write this yourself, but usually it’s easier to start with a template. For example, you can use the mvn archetype:generate command along with Akquinet’s Android archetypes. We already have everything prepared for you, too.
Grab the Project: HelloMaven
You can get the source code for this project at the Android in Practice code website. Because some code listings here are shortened to focus on specific concepts, we recommend that you download the complete source code and follow along within Eclipse (or your favorite IDE or text editor).
Source: http://mng.bz/a9FY
Listing 14.4 contains the first part of our sample application’s pom.xml. We’ve divided it in two parts to make it more readable. This first part contains everything related to the application itself and its dependencies, whereas part 2 will contain settings specific to the build. Note that in the next technique we’ll also see how to get IDE support for handling POMs.
Listing 14.4. A POM file for a simple Android application (part 1)


We first need to provide some metadata to Maven ![]() . Every POM starts with a <project> element, which takes a few attributes that are used by schema validators. The <modelVersion> tells Maven’s POM interpreter which version of the POM we’re using—in this case 4.0.0, which is the only model version Maven
supports at this time (although that will change with Maven 3.1).
. Every POM starts with a <project> element, which takes a few attributes that are used by schema validators. The <modelVersion> tells Maven’s POM interpreter which version of the POM we’re using—in this case 4.0.0, which is the only model version Maven
supports at this time (although that will change with Maven 3.1).
Now the project-specific configuration starts ![]() and it gets more interesting. Remember how we said that the typical result of a Maven build is an artifact, in our case an
APK? Every such artifact must be uniquely identifiable around the globe, because artifacts are often kept in public Maven
repositories. In order to uniquely identify artifacts, Maven uses two IDs: groupId and artifactId. The groupId identifies the group that governs this artifact. For example, your company id must be globally unique. As with Java packages,
a good convention is to use your company’s Internet domain here. A group can have many artifacts, so Maven uses a second ID,
the artifactId. It must be unique within your group, but need not be globally unique. The combination of both IDs is therefore sufficient
to uniquely identify an artifact worldwide. Because artifacts can come in many versions, you must also supply a version, which can be chosen freely. If you think of Maven’s artifact world as a box, where every artifact has its place, then the
groupId, artifactId, and version number form the three coordinates you need to locate a specific artifact in the box. You can also supply an artifact name and description using free form text, but those are optional and serve as documentation.
and it gets more interesting. Remember how we said that the typical result of a Maven build is an artifact, in our case an
APK? Every such artifact must be uniquely identifiable around the globe, because artifacts are often kept in public Maven
repositories. In order to uniquely identify artifacts, Maven uses two IDs: groupId and artifactId. The groupId identifies the group that governs this artifact. For example, your company id must be globally unique. As with Java packages,
a good convention is to use your company’s Internet domain here. A group can have many artifacts, so Maven uses a second ID,
the artifactId. It must be unique within your group, but need not be globally unique. The combination of both IDs is therefore sufficient
to uniquely identify an artifact worldwide. Because artifacts can come in many versions, you must also supply a version, which can be chosen freely. If you think of Maven’s artifact world as a box, where every artifact has its place, then the
groupId, artifactId, and version number form the three coordinates you need to locate a specific artifact in the box. You can also supply an artifact name and description using free form text, but those are optional and serve as documentation.
Maven by default supports eight different kinds of artifact packaging (POM, JAR, WAR, EAR, RAR, and a few more), but not the apk packaging; after all, we want to build an Android application, not a plain old Java archive. This new packaging format is in fact added by maven-android-plugin (we’ll come back to that in a minute).
Like in Ant build files, we can also set properties using the property element ![]() . Some properties already exist as part of Maven, and some are added from the various plugins a typical build involves, but
you can also add your own. This is what we’ve done here with the androidVersion property, which will come in handy later.
. Some properties already exist as part of Maven, and some are added from the various plugins a typical build involves, but
you can also add your own. This is what we’ve done here with the androidVersion property, which will come in handy later.
Finally, we declare the dependencies our application has to other Maven artifacts ![]() . First and foremost, we tell Maven that we need the android.jar file; otherwise compilation would fail. Fortunately, the Android and Maven community has been hard at work, and managed to
get it on Maven Central, where it’s archived as com.google. android:android (the groupId:artifactId[:version] notation we used is common in Maven, and we’ll see it again on other occasions).
. First and foremost, we tell Maven that we need the android.jar file; otherwise compilation would fail. Fortunately, the Android and Maven community has been hard at work, and managed to
get it on Maven Central, where it’s archived as com.google. android:android (the groupId:artifactId[:version] notation we used is common in Maven, and we’ll see it again on other occasions).
Google and Maven—Not Quite a Love story
It should be stressed that although the Android artifacts are available on Maven Central under com.google.android since June 2010, Google Inc. isn’t involved with anything related to Maven and the Android Maven artifacts. In fact, Google rejected the Maven community’s plea for having artifacts as part of the official Android release process, so the community continued this effort on their own. For more background on this story, the ticket that was created for this on the Android issue tracker is filed as issue 4577 and contains the official response from Google’s AOSP engineering lead Jean-Baptiste Queru.
You may have noticed that we set the scope to provided. Maven uses the scope element to figure out when a dependency should be visible on the class path. The default scope is compile, which means that this dependency is required for your application to compile and run. The runtime scope instead means that you don’t need this dependency for compilation, but it must be loaded as soon as you execute your application. Both compile and runtime mean that Maven will package and deploy the dependency along with your application, but we don’t want that to happen with android.jar, because that library will already be part of the devices’ system images when we’re running the application. That’s where the provided scope comes in: it tells Maven that we need the dependency to compile our application, but that it should not be deployed with it—instead, it’ll already be provided at runtime, in this case by the Android device.
Overall, our HelloMaven application is the HelloAnt application from technique 74, with some wording changed and Ant’s build.xml swapped for a Maven pom.xml. That means we again need the Apache Commons Lang library for the application to compile, so we can display the “Hello Maven” toast that uses the StringUtils helper. Recall that Ant expects external libraries to live in libs/, but we explained that Maven pulls libraries from repositories. That’s why we have to declare commons-lang as a dependency. Maven will then figure out automatically where to find it, and download it to your local repository, unless it’s already there.
Until this point, we’ve configured the POM to give Maven all the basic information about our application, its artifact identifiers, name and description, and its dependencies. The problem is: using only that, Maven would still refuse to compile the application. It doesn’t even know yet what an APK is, but we’ve provided that as the packaging format. The next step is therefore to hook into Maven’s build phase using maven-android-plugin. It turns out this is also done in the same POM, and the following listing shows how.
Listing 14.5. A POM file for a simple Android application (part 2)


Again, we’re going to walk through this from top to bottom. As you can see, we’ve added a new element, the build element, to the POM. The build element here carries all the information that Maven needs in order to turn your Android project into a build artifact. There’s two major things you configure here.
First, you must supply any configuration that specifies the input and output aspects of the build, such as where Maven can
find your source code, the name of the output directory (it defaults to target/), the name of the package file that’s produced, and so forth. You only need to do that if you don’t follow Maven’s conventions.
We mentioned before that Maven makes specific assumptions about the structure of a project, including its directories. For
instance, it assumes that your application sources are in a folder called src/main/java, and that your test sources are in src/test/java. That’s not how a typical Android application is laid out. Tests are kept in a separate project (see chapter 13). Moreover, we don’t use more than one programming language in this example, so we only need one source folder. We use the
sourceDirectory element to tell Maven that our application source code is in the src/ directory ![]() . Note that it’ll still assume src/test/java to be the folder where our tests are, but because that folder doesn’t exist, it’ll silently skip it.
. Note that it’ll still assume src/test/java to be the folder where our tests are, but because that folder doesn’t exist, it’ll silently skip it.
Second, you need to declare and configure all plugins you require to build your application here, which for us is the maven-android-plugin.
The Android plugin lives in the somewhat unwieldy group called com.jayway.maven.plugins.android. generation2, and at the time of this writing, is at version 2.8.4, so that’s what we declare ![]() .
.
As you can see, we specify two blocks of configuration for the Android plugin: configuration and executions. The configuration element is used to configure a plugin. The first thing you must do is tell the plugin Android API level you’re targeting
![]() , level 8, which is Android 2.2.
, level 8, which is Android 2.2.
Maven Properties
Note that you can also use properties as values for elements using the ${...} notation we’ve already seen with Ant. There are also some implicit properties that you don’t need to define yourself but are always available for you to use. There is env, which contains the current environment variables from the shell in which you run the mvn command; there’s also a project property that contains all your project settings, and a settings property that contains the configuration from an optional settings.xml file in your Maven home directory. You can also directly access any Java system property directly that you’d otherwise read using System.getProperty.
Moreover, we tell the plugin to uninstall any already-existing APK before redeploying a new one using the undeployBeforeDeploy element ![]() , so that we can’t run into problems such as reinstallations failing because of different certificates being used to sign
the APKs. The last aspect we configure is the emulator. Yes, maven-android-plugin can start and stop an Android emulator for
you automatically, as we’ll see shortly. We’ve set the AVD name to android-<version>-normal-mdpi, because that’s a good pattern to name your AVDs. If the emulator AVD you’d like to use has a different name, you must use
that instead (refer to section 1.6.2 for how to manage AVDs)
, so that we can’t run into problems such as reinstallations failing because of different certificates being used to sign
the APKs. The last aspect we configure is the emulator. Yes, maven-android-plugin can start and stop an Android emulator for
you automatically, as we’ll see shortly. We’ve set the AVD name to android-<version>-normal-mdpi, because that’s a good pattern to name your AVDs. If the emulator AVD you’d like to use has a different name, you must use
that instead (refer to section 1.6.2 for how to manage AVDs) ![]() .
.
We’ve configured the plugin now, but we’d like to do one more thing. Remember from technique 74 how the Ant build script automatically
used zipalign on any APK for us before deploying it to a device? Unfortunately, maven-android-plugin doesn’t do that by default,
so we must tell it to. Whenever you need to tell a plugin to do extra work as part of its default workflow, you’ll use what
Maven calls an execution ![]() . An execution is an extension to a piece of work the plugin already does. An execution has an ID, which we called alignApk here, and hooks into a specific point in the lifecycle phase of a Maven build. (Maven employs a well-defined and quite complex
build life-cycle, which we won’t cover in detail here.) In our case, we’d like to invoke maven-android-plugin’s zipalign goal as part of the install phase. If you don’t understand what that means, maybe it’ll become clearer once we start introducing the different goals
the plugin supports. Recall that this step, as mentioned in section 14.1, is optional for development, but highly recommended for release builds.
. An execution is an extension to a piece of work the plugin already does. An execution has an ID, which we called alignApk here, and hooks into a specific point in the lifecycle phase of a Maven build. (Maven employs a well-defined and quite complex
build life-cycle, which we won’t cover in detail here.) In our case, we’d like to invoke maven-android-plugin’s zipalign goal as part of the install phase. If you don’t understand what that means, maybe it’ll become clearer once we start introducing the different goals
the plugin supports. Recall that this step, as mentioned in section 14.1, is optional for development, but highly recommended for release builds.
We’re almost done now. The last element we add is the extensions element. This is of utmost importance, because without it, the plugin can’t extend Maven’s default build lifecycle. Granted, we’ve been through a lot of dry material, but without all that, you can’t do anything meaningful. That being said, what can you do now? Sometimes a table speaks louder than words. Table 14.2 summarizes the new goals added by maven-android-plugin.
Table 14.2. The goals exposed by maven-android-plugin
|
Goal[*] |
Description |
|---|---|
| apk | Creates the APK file (by default signs it with debug keystore) |
| deploy | Deploys the built APK file, or another specified APK, to a connected device |
| deploy-dependencies | Deploys all dependencies of packaging type apk (required by instrumentation test projects) |
| dex | Converts all Java class files to DEX format |
| emulator-start | Starts the emulator configured in the POM |
| emulator-stop | Stops the emulator configured in the POM |
| generate-sources | Generates R.java, Manifest.java, and AIDL classes |
| instrument | Runs the instrumentation tests on the device |
| pull | Copies a file or directory from the device to your local machine |
| push | Copies a file or directory from your local machine to the device |
| redeploy | Shortcut to undeploy and deploy |
| undeploy | Uninstalls the application from the connected device |
| unpack | Unzips the application JAR to target/android-classes |
| zipalign | Invokes the zipalign tool to byte-align resources in the APK |
* Don’t forget to prefix these goals with android: when passing them to mvn.
From looking at that table, cleaning and building the application, starting an emulator, and deploying the application to it sounds like a good idea, so let’s do that. Go to the shell and to the HelloMaven project folder, and type:
$mvn clean android:emulator-start install android:deploy
Make sure that $ANDROID_HOME points to your SDK installation before doing this, and that you have a Java 5–compatible Java compiler installed. Note how we prefix the emulator-start and deploy goals with the android: qualifier. That’s because they’re goals exposed by maven-android-plugin, whereas clean and install are part of the default Maven lifecycle. Maven will understand this prefix as long as you’re inside a Maven/Android project (the Android plugin is loaded).
Coming back to the command, here’s what you’ll see written to standard out when running Maven with these four goals (you may see a bunch of downloads happening the first time you run this command). First, we see output related to the clean and emulator-start goals:
[INFO] Scanning for projects... [INFO] [INFO] -------------------------------------------------------------------- [INFO] Building HelloMaven 1.0-SNAPSHOT [INFO] -------------------------------------------------------------------- [INFO] [INFO] --- maven-clean-plug-in:2.4.1:clean (default-clean) @ HelloMaven --- [INFO] Deleting /Users/matthias/Projects/eclipse/HelloMaven/target [INFO] [INFO] -------------------------------------------------------------------- [INFO] Building HelloMaven 1.0-SNAPSHOT [INFO] -------------------------------------------------------------------- [INFO] [INFO] --- maven-android-plug-in:2.8.4:emulator-start (default-cli)
You may want to adjust the 30-second idle period where the build script waits for the emulator to start, depending on how swift your machine is. Note that if an emulator with the given AVD is already present, the emulator-start goal will do nothing:
[INFO] --- maven-android-plug-in:2.8.4:emulator-start (default-cli)
Maven then enters the build phase. This is pretty much the same as what we’ve seen with Ant before: source code gets compiled, resources get packaged, and the APK is bundled and zipaligned (the following snippet is shortened to only contain the log output for the goals that are being triggered):
[INFO] --- maven-android-plug-in:2.8.4:generate-sources
You can see from this snippet how the maven-android-plugin hooks into the default Maven build lifecycle at several well-defined points. For instance, android:generate-sources, the goal that generates R.java, is injected before the compile goal of the maven-compiler-plugin, because it’s a prerequisite for successful compilation.
The goals being executed match almost one-to-one what we’ve seen from Ant (and the general build steps we introduced in section 14.1.1), but the install goal may take more explanation, especially if you were unfamiliar with Maven before. The install goal is part of the maven-install-plugin, and is responsible for copying the artifact that’s being built to your local Maven repository. It can be found in <user-home-directory>/.m2/repository. Other Maven-managed applications could therefore reuse the APK and JAR files generated by this build by adding a respective dependency to their POM.
If everything checked out so far, the entire build should end with these lines:
...
[INFO] --------------------------------------------------------------------
[INFO] BUILD SUCCESSFUL
[INFO] --------------------------------------------------------------------
[INFO] Total time: 1 minute 9 seconds
[INFO] Finished at: Sun Jan 23 18:55:22 CET 2011
[INFO] Final Memory: 51M/123M
[INFO] --------------------------------------------------------------------
Voilà, a successful build served by Maven!
If Your Build Keeps Failing
There are several reasons why the build could fail on your machine. Make sure that your environment variables (JAVA_HOME, ANDROID_HOME, and PATH) are set up, and that you use the latest Java compiler (Java 6 at the time of this writing).
Moreover, the Android dx tool can get hungry for memory when it has to process a lot of classes. If you’re confronted with an OutOfMemoryError during the build, add this to the plugin configuration block:
<jvmArguments>
   <jvmArgument>-Xms256m</jvmArgument>
</jvmArguments>
That will grant the JVM Maven a little extra memory to keep it happy.
One last thing we’d like to mention is device targeting. Most plugin goals target a device. Deploying an APK, pushing a file, or running instrumentation tests require an Android device. If only one device is connected, the plugin will target that. It’ll refuse to do anything though if several devices (such as your phone and an emulator) are connected, so you must tell it explicitly which device you’re targeting. You do that by passing a system property to Maven using Java’s standard -D option:
$mvn deploy -Dandroid:device=emulator-5556
If you’d like to know what kind of options you can pass to maven-android-plugin, you can find out via Maven’s help plugin. For instance, the list of available goals (the ones we summarized in table 14.2) can be obtained by calling:
$mvn help:describe -Dplugin=com.jayway.maven.plugins.android.
This also works for specific goals:
$mvn help:describe -Dcmd=android:<goal_name>
Note
You can get an even more detailed description about the available goals and parameters by passing the -Ddetail property to help:describe.
That covers our hands-on introduction to Maven. If you knew Maven before stepping into this technique, but hadn’t used it for Android projects, then you’ll probably be pleased to see that you don’t have to miss out when moving from JSE/JEE to Android. If Maven was new to you, you’ll hopefully be intrigued by Maven’s strengths and how you can leverage them for your applications.
Discussion
Even with this simple application, it’s easy to see how much work Maven can keep off your back. It does everything Eclipse and the ADT do, such as compiling source code and packaging APKs, but it does much more.
Dependencies to other projects or third party libraries are automatically managed for you, including the handling of transitive dependencies and version conflicts. Do you want to use the RoboGuice library, for example? Easy: drop a dependency declaration to it in your POM, and Maven does the rest.
Breaking up your applications into smaller submodules for better maintainability and easier reuse is another strength. Pull out the source code you want to isolate into a new project, create a POM for it, and other Maven-managed applications can declare a dependency on them. Maven also allows you to plug several Maven projects together under a parent project using a super POM. This is useful for Android projects, where you typically have a separate test project living next to your application project. Put them together under a super POM and you can build and manage them both at once (note that we won’t cover multimodule builds, but examples for this have been provided on the Maven/Android plugin website at http://code.google.com/p/maven-android-plugin).
You can also extend Maven using various other plugins to add to the wealth of functionality that’s already there. For instance, you can add the entire functionality of Ant to a Maven build through the maven-antrun-plugin, or leverage the maven-pro-guard-plugin to post-process your classes.
We should mention that there are also downsides to using Maven. Maven is a fairly complex build system, and its learning curve can be steep. Often it’s not apparent how to achieve a certain task by looking at a POM, especially when trying to do simple imperative tasks such as “print something to standard out.” Maven sometimes feels clunky here. Moreover, even though the number of libraries available as Maven artifacts in public repositories is impressive, you may still occasionally require a JAR file that isn’t published as a Maven artifact. That means Maven can’t directly use it, and you’ll have to take things into your own hands, which in this case means downloading the file manually and turning it into a local Maven artifact using the mvn install-file goal. We’ll see an example for this in technique 77.
Alternatives to Maven
We should mention that there are a few promising alternatives to Maven emerging with respect to building Android applications, most notably the Android plugins for the Gradle and SBT build systems. Both are based on dynamic languages (Groovy and Scala, respectively), and follow the “build scripts are code” paradigm, which makes writing build scripts much easier and more natural. Follow them at https://github.com/jvoegele/gradle-android-plugin (Gradle) and https://github.com/jberkel/android-plugin (SBT).
Let’s move forward. We’ve seen everything that’s required to build your Maven application from the command line, which is fair enough, because that’s what this section is about. But one burning question is: if we declare all our library dependencies in a POM file now and Maven takes care of locating, downloading, and wiring them all together, then how would this ever work when working in Eclipse? Surely we don’t want to lose Eclipse support, but Eclipse knows nothing about Maven repositories. Because we no longer have a libs/ folder that we could add to Eclipse’s project build path, it seems we’re missing something here to get the best of both worlds. Luckily, we thought about that and prepared a technique that shows you how to bridge that gap.
Technique 83: The Maven Eclipse plugin
This will be a relatively short technique compared to the previous one, but important nonetheless. We’ve seen how to employ Maven to build things for us in a programmatic fashion on the command line, which is great for automation on a build server (as we’ll see in technique 78), but we still want to be able to do our development work in Eclipse, and not lose all the features the ADT provides us. Why do we even think that would be the case? Well, let’s open the HelloMaven project in Eclipse and see for ourselves (figure 14.6).
Figure 14.6. By default, Eclipse doesn’t know how to resolve library dependencies defined in a Maven POM file. Apparently, something is missing to bridge this gap.

The problem is that our library dependencies (commons-lang-2.5.jar in this case) aren’t kept in the project folder anymore. Instead, we learned in the previous technique that Maven caches artifacts in your local Maven repository. We could add this directory to the project’s build path manually, but that’s an awkward solution. If we changed the version number of the library we depend on in the POM, then we’d have to manually adjust the Eclipse build path to reflect this change.
The proper solution is to use another plugin: m2eclipse is the official Maven plugin for Eclipse, and integrates Eclipse seamlessly with Maven-powered applications. If you’re now thinking “Hold on a second, you’re writing a technique that shows me how to install a plugin,” hear us out. It’s not that simple. The crux of the matter here is that we have three different build components that we need to get together:
1. Eclipse/JDT—Eclipse itself, or more precisely the JDT plugin for Eclipse, provides the core Java tooling such as source code highlighting and compiling Java source files to Java bytecode.
2. ADT—The Android toolkit, also an Eclipse plugin, takes over the Android-specific tasks such as converting Java bytecode to Dalvik bytecode and packaging APKs.
3. Maven/maven-android-plugin—Maven’s functionality overlaps with the JDT and ADT (it also compiles Java code and package APKs with maven-android-plugin), but those things are already done by 1 and 2 in Eclipse. What we need to integrate is its dependency resolution system.
The m2eclipse plugin alone won’t suffice here. That’s because it knows how to provide Maven dependencies to the JDT so that you can compile a classic Java application that defines its library dependencies via Maven, but the ADT again has no notion of a POM and hence is oblivious to any dependencies defined by Maven.
Recall from section 13.1.1 that in step 3 when Android generates Dalvik bytecode, all JAR library dependencies become part of the classes.dex file. If the ADT doesn’t even know that a library dependency is defined somewhere in your POM, then this can’t work, and even though your application compiles fine, it’ll crash with a ClassNotFoundException at runtime. Let’s fix this.
Problem
You’re managing your Android projects with Maven but don’t want to lose support for building them in Eclipse as well. Because Maven uses a completely different dependency resolution system than Eclipse, you must find a way to wire them together.
Solution
Until recently, there was no proper way to resolve this dilemma: you’d either build an application using Maven or using the ADT, but not both. Eclipse users would typically use an “External Tools” run configuration to invoke a Maven build script from within Eclipse, but because Maven builds are a lot slower than using the ADT, this wasn’t an ideal solution.
The community recognized this problem, and came up with a solution: the m2eclipse-android-integration plugin. This plugin won’t add any new features to your Eclipse workbench—at least none that are visible. Its sole purpose is to accomplish what we mentioned earlier: wiring the ADT together with m2eclipse so that the former honors dependencies managed by the latter when building Android APK files. Because we’re juggling four different Eclipse plugins now (JDT for Java, ADT for Android, m2eclipse for Maven, and m2eclipse-android-integration for the glue), we’ve summarized the interaction of those plugins in figure 14.7.
Figure 14.7. In order for the ADT to recognize dependencies managed by Maven, you need the m2eclipse-android-integration plugin. It provides the glue (specifically the edge marked as “!”) that keeps the other three plugins together.

Now that you’re aware of the problem, solving it is straight forward. First, we need to install m2eclipse and m2eclipse-android-integration, as explained in sidebar “Installing the plugins.”
We assume that you know how to install plugins in Eclipse. If not, you can find instructions here: http://mng.bz/o3c3.
m2eclipse: This plugin is unrelated to Android, and developed by Sonatype, the company behind Maven. Its update URL is http://m2eclipse.sonatype.org/sites/m2e.
m2eclipse-android-integration: This plugin is developed by the Android community. Its update URL is http://mng.bz/bdMQ.
With the m2eclipse plugin installed, you get full support for Maven managed projects in Eclipse. Right-click any standard Android project that has a POM and select Maven > Enable Dependency Management. You should see a new dependency container called Maven Dependencies (for our HelloMaven project we already did that for you). In order to ensure that all settings from your POM are reflected back into the Eclipse project, you can also select Maven > Update Project Configuration. This is also useful if you changed something in the Eclipse project settings and want to revert to your configuration in the POM. Test your application by running it via Run As > Android application. Everything should run smooth as silk now!
Discussion
The m2eclipse plugin adds a host of useful features to your workbench. Not only does it automatically download dependencies defined in your POM (you can follow any Maven-specific output in the Maven console), but you can edit it using a graphical user interface. Double-click the pom.xml and the POM editor will be launched. From there, you can get a better idea of how your project dependencies are interweaved using the Dependency Hierarchy view (see figure 14.8).
Figure 14.8. The m2eclipse plugin adds a powerful POM editor to your Eclipse workbench. From here you can keep a bird’s eye view on your project dependencies, but also edit the POM using graphical tools.

You can see from the figure that the dependencies related to the Android JAR file from Maven Central are grayed out, because they’re flagged as “provided by the runtime platform” and hence won’t be compiled into your application. Because we’re already talking about the Android libraries and Maven Central, there’s one detail we’ve kept from you so far. Should you ever want to use the Google Maps extension library shipped with Android (the one that identifies itself as “Google APIs” instead of “Android”), perhaps because you’re using a MapView in your application, then we have bad news. The maps.jar library file is, unlike android.jar, not available from Maven Central. It contains proprietary code by Google, and hence is not open source. The Central repository is restricted to open source libraries, so no dice. Moreover, there are a few important things you should be aware of when compiling your applications against any Android libraries downloaded from Central. Does that mean we’ve maneuvered you into a dead end by settling on Maven? Not at all; it gets more complicated.
Technique 84: The Maven/Android SDK deployer
Being able to automatically pull dependencies from Maven Central (or any other online repository) is one of Maven’s most redeeming features. Because Android is an open source project, the Maven community was eager to get it published on Maven Central quickly. The process to do so is complicated, though. Two major problems have to be solved, both of which affect developers.
First, not all parts of Android are open source. The most striking example is the code backing Google Maps; it’s property to Google Inc. and can’t be distributed freely. This means it has to be kept and distributed separately from Android’s core framework classes, which is also why you can always target two different flavors of Android in your project settings. For example, you’ll notice that the Vendor column for the project build target Android 2.2 is Android Open Source Project, whereas the Google APIs / 2.2 target names Google Inc. as the vendor (see figure 14.9).
Figure 14.9. You can always choose between two flavors of Android: the fully free and open source core framework stripped of any proprietary code, and the full distribution including closed source user libraries such as Google Maps.

That’s because the latter not only includes the free and open source core framework classes, but also the proprietary extensions such as Google Maps. That’s a huge problem for the Maven community, because they’re not allowed to upload those extensions to Central, but any Android application that involves location and Maps needs them.
Second, the Android framework classes package other open source libraries as part of android.jar, such as Apache Commons HttpClient and the JSON reference implementation from json.org (see chapter 9). Because those libraries are themselves artifacts on Maven Central, it’d be wasteful to package them within another artifact (Android, in this case). Hence, the Maven community stripped out those third-party libraries from the standard android.jar and instead declared dependencies to them. This can be seen in the Maven dependency browser in Eclipse (see figure 14.8). So why is this a problem? It’s a problem because sometimes, the versions of those libraries bundled with Android aren’t exactly the same as those available on Maven Central. Google is free to make modifications to them before bundling them with Android or to package a version that’s not available on Central. This has happened with the JSON library: the one on Maven Central ships with a different implementation of JsonStringer than the one in android.jar, which means that you may run into compilation errors when using that class while building against the android.jar from Central. Clearly, we must find a way to resolve these issues.
Problem
You’re writing a location-aware application that uses Maps (see chapter 10), which means declaring a Maven dependency to the closed-source Google Maps library, or you don’t want to rely on the Android JARs on Central, which are merely an approximation of the libraries shipped by an actual device.
Solution
It seems like the artifacts from Maven Central are good enough for most purposes that involve the core framework classes, but as soon as you want to display a MapView, which almost every location-aware Android application does, you’re stuck. The good news is that though you’re not allowed to put the maps.jar file in an online Maven repository, you’re free to install it into your local Maven repository. That way, any Maven build can depend on it and will compile fine. This solves both problems at once, because Central is completely out of the game. The only question is how?
Maven’s install plugin provides an install-file goal which allows you to publish an arbitrary JAR file to your local Maven repository without needing to write a POM. You must add the few parameters that any artifact must have (groupId, artifactId, and version), and Maven will turn it into a full artifact by generating the POM file for you on-the-fly. For instance, here’s how you could install version 2.2 of Android’s proprietary maps.jar to your local repository:
$mvn install:install-file -Dfile=/path/to/maps.jar -DgroupId=android
You could then declare a dependency to it in your POM as follows:
<dependency>
  <groupId>android</groupId>
  <artifactId>maps</artifactId>
  <version>2.2</version>
  <scope>provided</scope>
</dependency>
That works fine. The problem is that this can be tiresome to manage. With every new platform release, you’d have to update all your development machines (your team’s computers, build servers, and so on) to install the new artifacts to the local Maven cache. This is worse when your build server executes matrix builds where an application is tested against several different versions and configurations of the platform. Fortunately, the awesome Maven/Android community has us covered again: maven-android-sdk-deployer is a Maven installer that offers a convenient way of turning single or multiple Android platform JARs into Maven artifacts for you to use locally on your computer.
Where to Get it?
The project is on GitHub at http://mng.bz/SlaC.
If you’re using Git for version control, execute git clone from the public repository URL. You can also download the master branch as a ZIP archive via the Downloads option.
The maven-android-sdk-deployer is nothing more than a Maven build script itself. What it does is scan your Android SDK folder for available platform versions, bundle them into Maven artifacts, and install them to your local Maven cache. For this to work, you must ensure that you’ve downloaded the Android platform versions you’d like to turn into Maven artifacts using the Android SDK and AVD manager. Using the latest SDK tools, you can ensure that you have all available platform versions by running android update sdk --no-ui from the command line (make sure the SDK’s tools directory is on the PATH). You may need to invoke this command repeatedly until you see “There is nothing to install or update”.
The ANDROID_HOME environment variable must be set to the root of your SDK folder. That’s it for preparations. If you want to turn all downloaded Android platform versions into Maven artifacts, switch to the location where you downloaded the maven-android-sdk-deployer and type:
$ mvn install
A lengthy Maven build output should follow, ending in BUILD SUCCESSFUL. If it fails, then you probably haven’t downloaded all the platform images it’s trying to install. If you merely want to install a specific platform version, you can do that using the -P flag:
$ mvn install -P 2.3
This will only install Android 2.3 Gingerbread:
[INFO] ------------------------------------------------------------- [INFO] Reactor Summary: [INFO] ------------------------------------------------------------- [INFO] Maven Android SDK Deployer ................ SUCCESS [1.642s] [INFO] Android Platforms ......................... SUCCESS [0.008s] [INFO] Android Platform 2.3 API 9 ................ SUCCESS [0.264s] [INFO] Android Add-Ons ........................... SUCCESS [0.007s] [INFO] Android Add-On Google Platform 2.3 API 9 ..............
Note that maven-android-sdk-deployer installs the core Android JAR and the Maps add-on JAR into two different group IDs. Though the groupId of the Maps add-on will be com.google.android.maps, the groupId of android.jar won’t be com.google. android (as seen from the artifact on Maven Central), but android. To make this more hands-on, we’ve supplied a slightly modified version of the HelloMaven application called HelloMavenWithMaps that renders a MapView and declares a dependency to the Maps JAR in its POM. It has also been changed to not use the Android JAR from Central anymore, but the one maven-android-sdk-deployer installs.
Grab the Project: HelloMavenWithMaps
You can get the source code for this project at the Android in Practice code website. Because some code listings here are shortened to focus on specific concepts, we recommend that you download the complete source code and follow along within Eclipse (or your favorite IDE or text editor).
Source: http://mng.bz/1Wnt
Because the MapView related changes are miniscule, we’ll spare you the details here. We covered them in chapter 10. What’s important here is the change to the POM file. For your reference, the new dependencies block that now uses the installed Android artifacts follows.
Listing 14.6. Updated POM that depends on the artifacts installed by the SDK deployer
...
<dependencies>

  <dependency>
    <groupId>android</groupId>
    <artifactId>android</artifactId>
    <version>2.2_r2</version>
    <scope>provided</scope>
  </dependency>

  <dependency>
    <groupId>com.google.android.maps</groupId>
    <artifactId>maps</artifactId>
    <version>8_r2</version>
    <scope>provided</scope>
  </dependency>

</dependencies>
...
Even though we use the proprietary Maps JAR, Maven should now be happy, and not complain that it can’t find the maps artifact.
Discussion
This was a brief technique, but indispensable when you need to juggle Maven and Android JAR files. It becomes powerful when using a team repository server such as Sonatype’s Nexus, to which the SDK deployer can install these artifacts automatically.
Though we could only scratch Maven on the surface in the previous techniques, you’ve seen everything you need to make Maven roll with Android and get all its benefits such as rich dependency management and plugins along the way. We managed to keep you around this far, through a chapter that’s riddled with command line tools and lengthy build logs, so let’s get more visual again! We’ve shown you how you can arrive at a fairly high level of build automation with the help of tools such as Ant and Maven. We’re purists, so that’s still not enough automation for us. After all, this still requires manual interaction, namely executing the build system. Wouldn’t it be much better to have another tool that does this for us automatically? That’s where build servers enter the stage.
14.3. Build servers and continuous builds
Though the power and flexibility of a build system like Maven is great by itself, there’s an added benefit we’ve only briefly mentioned so far. If you recall from the introduction, in order to have a new APK built and tested after every commit, we need two things: the tools to build it and the machinery that kicks off the build process. We’ve seen at some length how to achieve the first part, but kicking off the build was done manually so far. What’s missing is a tool that hooks into our version control system and decides when to trigger a new build. This is what build servers are for, and we’ll show you how to use one of the many available that has proven itself.
Having a build server in place has countless benefits. First and foremost, it can build your application, and run its test suite, completely automated. With good test coverage, this allows you to always have a stable application package whenever the tests pass after a commit. The build server can make all output files available as downloads, so you always have a single place where people can get their hands on the latest development snapshot. While a build server is building, it produces and archives all sorts of helpful output. Test reports, visual timelines and summaries of succeeded and failed builds, the amount of time it takes for a single test or the entire build to run, changelogs and links to commits in the source code control system—all this is provided via the build server’s interface. Figure 14.10 shows a snapshot of the build server we use at Qype, and a timeline of the build we recently set up for our Android application.
Figure 14.10. A build server not only automatically builds applications, but collects all sorts of useful information along the way, such as the time it takes for a build, test summaries, and backlinks into the source code management system.

One of the most striking benefits is a build server’s capability to alarm everyone about broken builds. A build server monitors the source code management system for changes, and can relate recent commits to a failing build. Therefore, if someone commits a change that makes a test fail, the build server can send out emails to all project members to make them aware of this. This makes it easy to detect regressions, and encourages continuous integration, a development approach where developers commit and integrate their changes to a piece of software frequently, as often as dozens of times a day, so that the feedback loop is short and direct, and the chance for diverging source trees is almost eliminated.
In this last part of the chapter, we’ll show you how Android builds can be fully automated using the popular Hudson build server. Hudson has excellent support for Android builds via its rich plugin architecture, and it’s free and open-source software. It’s platform independent and extremely easy to set up and configure, making it a good choice for practically every environment. In this section, we again want to focus less on Hudson per se, and more on its role in relation with Android. For this purpose, we’ve decided to devote two techniques to building Android applications with Hudson. Technique 78 will show you how to set up Hudson’s Android Emulator plugin and get things rolling, and technique 79 will follow up by introducing matrix builds, a powerful way of building and testing Android applications where combinations of various platform configurations are turned into Hudson builds in a completely automatic fashion.
Technique 85: Continuous builds with Hudson
Hudson, the friendly butler, is one of the most popular build servers these days. This can largely be attributed to it being open and free, highly extensible, easy to use, and a nobrainer to set up. If you think we’re going to torture you with pages of installation instructions here, be relieved; we won’t—it’s not necessary. Hudson is great at managing itself, once started. It can update itself at the click of a button, or install new plugins that will extend its functionality. If you were wondering whether Hudson is bound to any specific kind of underlying build system, source code management (SCM) system, or even operating system, the answer is no. Hudson builds stuff, from some source, on some machine. You need to tell it what to build, where to get it, and how it’s being built. Whenever you have to bridge the way to some specific technology, such as using Git for SCM or Maven for builds, you can rely on the vast supply of plugins for Hudson.
Hudson or Jenkins?
Unfortunately, the Hudson project is splitting up as we write these lines. Oracle has claimed the name Hudson as a trademark and raised concerns about the way the project sources were moved from java.net to GitHub without getting the consent of the Hudson community beforehand. In return, this fanned fear that Oracle would use their influence to boycott or slow down other decisions that may come up, so some core committers decided to fork the project and rename it Jenkins, with most of the committers moving to Jenkins it seems. At this moment, both applications are almost identical, but may continue to diverge. The miniscule differences won’t have any effect on the material presented here, whether you use Jenkins or Hudson.
Though Hudson isn’t bound to any specific tools, we’ll assume Subversion and Ant for this technique and the next. We use Subversion because that’s what we used to manage the source code for this book and Hudson has out-of-the-box support for connecting to SVN repositories. We use Ant, and not Maven, because doing so will simplify things for the purpose of this technique. That’s because we’d like to add a test project as part of the build here. Maven would require a multimodule project layout, which we didn’t discuss. Please note that this doesn’t make this technique less significant or less useful in any way. From Hudson’s point of view it doesn’t matter at all which build system you use. We could’ve opted for a simple shell script if we wanted.
Ant Builds and Test Results
There’s one fundamental limitation when using Android’s Ant tasks to run tests on Hudson: Hudson will consider the build to succeed even if there are test failures. That’s because Android’s Ant tasks print test results to standard out instead of generating proper JUnit reports. This is a shortcoming that will hopefully be addressed by Google soon. It’s already compensated in other Android build solutions, such as maven-android-plugin and gradle-android-plugin.
Here, we want to focus on the Android Emulator plugin for Hudson. Because running tests should be an integral part of every build, we’ve added a simple HelloAntTest project containing a single Activity unit test for the HelloAnt project from technique 74, which tests for the existence of the “Hello” text view:
 public class SampleTestCase extends ActivityUnitTestCase<HelloAnt> {

    public SampleTestCase() {
       super(HelloAnt.class);
    }

    public void testHelloViewExists() {
       startActivity(new Intent(), null, null);
       assertNotNull(getActivity().findViewById(R.id.hello));
    }
}
There’s nothing in there you haven’t already seen in the previous chapter, so we’ll spare you further details. See the sidebar about where you can find the project source code if you’d like to take a peek anyway.
Grab the Project: HelloAntTest
You can get the source code for this project at the Android in Practice code website. Because some code listings here are shortened to focus on specific concepts, we recommend that you download the complete source code and follow along within Eclipse (or your favorite IDE or text editor).
Source: http://mng.bz/T10e
It’s easy to see how the build server will build the HelloAnt application: it checks out the latest source code, and invokes the Ant build script. It may not be so obvious how it executes the tests. After all, we need an emulator or device to run the tests! This is where Hudson’s Android Emulator plugin enters the stage.
Problem
You want to automate your builds using a build server, and need a convenient way to start and shut down an emulator for the time of the build, so all instrumentation tests can be executed.
Solution
Before we continue, it should be said that there are other ways to start an emulator for a build. For example, you could start it manually once and let all builds run on that emulator. This is problematic for two reasons. One, we want to make sure that the two builds don’t affect each other. If one build writes a shared preference file during a test, a subsequent build will see a different initial state than the previous one. We can prevent this from happening by starting a new emulator using a fresh AVD for every build. Two, you must ensure that the emulator is always up. Because the Android emulator isn’t the most stable piece of software in the world, you’d need to set up monit (http://mmonit.com/monit/) or equivalent tools to automatically bring it up again should it crash.
Another tool we’ve seen to manage emulators was the maven-android-plugin, which exposes emulator-start and emulator-stop goals. This is simplistic though, because it requires you to set a fixed wait-for-boot timeout. The Hudson plugin is smarter. It probes for a “boot completed” event to detect when the emulator is ready to receive commands. Moreover, it’s build system agnostic so it doesn’t matter if you build using Ant or Maven.
That being said, this technique will show you how to configure Hudson to set up a build that can automatically do these things for you:
1. Compile and package the HelloAnt application.
2. Start an emulator instance for every build.
3. Run the tests contained in HelloAntTest on that emulator.
4. Summarize and archive the outcome of a build (see figure 14.11).
Figure 14.11. The blue ball indicates a successful build. If you don’t like that and aren’t suffering from dyschromatopsia, you can change the color to green by installing the Green Balls plugin, which is the first thing most people do after installing Hudson.

If you haven’t already downloaded and installed Hudson, do that now. If you’re toying around, it’s sufficient to download hudson.war from http://www.hudson-ci.org and start it using:
$java -jar hudson.war
That will boot up Hudson and make it available in your browser of choice at local-host:8080. It’s that easy; we told you! Next, we need to install the Android emulator plugin. Hudson is completely self-contained, so you install plugins from within Hudson. This is done by going to Hudson > Manage Hudson > Manage Plugins > Available, finding and checking Android Emulator Plugin (it’s listed under Build Wrappers), and clicking Install. Your list of installed plugins should now look similar to what’s seen in figure 14.12. Note that you need to restart Hudson for changes to take effect.
Figure 14.12. Hudson is completely self-contained. You can configure everything within Hudson itself, including the installation of new plugins. Note that plugin dependencies will automatically be resolved and installed for you.

We’re now ready to set up a new build configuration. Hudson calls build configurations jobs, so go to Hudson > New Job. We call the job “HelloAnt”, same as the project name, and select the Free-style Software Project configuration. This is the most simple and flexible one. Though this configuration can build any project, including Maven projects, for Maven you should choose the Maven2/3 configuration, because it’s more convenient for Maven builds (this requires the Maven plugin to be installed). Figure 14.13 shows the job setup screen.
Figure 14.13. Hudson supports different kinds of job configurations. Select the Free-style configuration whenever you need utmost flexibility or no extra features specific to a particular build system.

Proceed to the next screen, which is the build configuration screen. For a minimal setup, we must tell Hudson three things: where to get the project source code, how to run an emulator, and how to execute the build.
First, we configure the SCM system that should be used to fetch the sources. Hudson always downloads the latest version from the source repository before triggering a build, so as to always see the latest changes. As mentioned earlier, we use Subversion for version control here, so that’s what we select. The bare minimum we need to provide is the path to the project on the SVN repository and the name of the folder into which it’ll be checked out relative to the job’s workspace directory. Because we need to build two projects (the application and the test project), we must add two locations and check them out into separate folders. This is shown in figure 14.14.
Figure 14.14. How Hudson can find your project source code is specified in the Source Code Management section. In this example, we use the book’s Subversion repository.
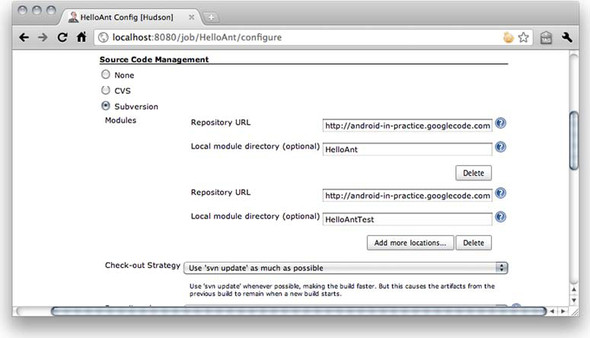
Second, we must tell Hudson to run an Android emulator so that after assembling the application, we can run the tests. Because we’ve installed the Android plugin, we get a new option in the Build Environment section called Run an Android Emulator During Build. After checking it, we get two more options: we can either Run Existing Emulator, which lets us specify the Android virtual device we’d like to use (if we’ve already created one), or we can let the plugin generate one on-the-fly by selecting Run Emulator with Properties. This is convenient, so let’s tell it to run a 2.2 emulator using the default display size. If you tick Reset Emulator State at Start-up, the plugin will invoke the emulator with the -wipe-data flag, which clears the user partition on boot. You can also decide to not Show Emulator Window if you intend to run on a headless server (see figure 14.15).
Figure 14.15. The Android plugin will add a new build environment option. Here you can specify the platform configuration that should be used to run the emulator.

Third and last, we must configure the build. Because we chose to do a free-form build, Hudson lets us specify one or more build steps that are invocations of something like a shell script or a build tool such as Ant. Our case is simple, so under the Build section we add a single Invoke Ant build step and point it to the build file of the test project. Note that this is sufficient: the Ant build scripts generated by Android are smart enough to know that the application under test is required and must be built first, so we don’t need to do that explicitly. It’s also sufficient to invoke the clean and run-tests targets, because run-tests depends on the targets that compile and package everything (see figure 14.16).
Figure 14.16. The build section is used to tell Hudson what it’s supposed to do. Free-form builds are configured by specifying one or more build steps, such as an Ant invocation.

Click Save and we’re ready to roll! To trigger a build manually, you can click the Build Now link in the sidebar. In a production setup, you should configure a trigger under Build Triggers, such as periodically polling the SCM system for changes. You can follow the build by clicking the link that appeared in the sidebar. All builds will appear here in reverse chronological order. If we did everything right, the final screen should look like what we saw in figure 14.11.
Discussion
It should be clear that using build servers such as Hudson is mostly meaningful when maintaining a physical build machine on which the server is running. There’s not much point in doing all this on your local machine beyond having the advantage of a nice interface to manage and summarize your builds. Build machines are typically headless, so the question arises of how the emulator should be started, because by default it requires a window. We’ve already mentioned the option that lets you disable the emulator window (when invoked directly, this would translate to the -no-window emulator option), but this has the disadvantage that you can’t see what’s going on when a build fails. You’re blind to anything except the log files. Moreover, the emulator is known to be flaky when started without a window, so ideally, we’d like to have one. Fortunately, Hudson provides a plugin for XVNC, a protocol that allows you to launch virtual X11 displays. You must install both the Hudson plugin and an XVNC server such as TightXVNC for this to work. You’ll then get a new option in the build configuration to run XVNC as part of the build, and even take screenshots of failed builds.
We’ve only run a single emulator during a build, so far. If you want to test on the baseline device configuration, then this is fine, but for a production application, it’s likely that you want to run the same tests on various different combinations of platform versions and display sizes. Usually we’d have to create a new build configuration for every combination of Android parameters we’d like to test against, but as you may have guessed, there’s an easier way to do that.
Technique 86: Matrix builds
The job configuration we created in the previous technique has one serious disadvantage: it’s static. We’ve explicitly configured the exact Android environment we’d like to execute the tests in, from platform version to display configuration. User interface tests are highly coupled to a device’s display, and a test passing on one screen size may fail on another. Moreover, there’s plenty of things you could configure differently about the environment, such as having an emulator with and without SD card, which helps testing applications that rely on an SD card to fail gracefully in its absence. Yet more examples are network connectivity, geo position... all these aspects are bound to one specific emulator instance, and testing your application under all these different conditions can be tedious.
Things get even worse if you start thinking about combinations of configuration properties. Testing your application on either one or the other configuration may succeed, but when tested against a combination of them, it may fail. To illustrate, imagine there are two properties that affect the functionality of your application: screen size and language. You decided to support medium and small screens, as well as English and Spanish for localization. You may have decided to bundle a background image with localized text on it with your application, so you need it in four different versions: English text and small size, English text and medium size, Spanish text and small size, and Spanish text and medium size. This results in a matrix of configuration combinations, as seen in table 14.4.
Table 14.3. A 2x2 matrix of possible configurations
|
en_US |
es_ES |
|
|---|---|---|
| QVGA | /res/drawable-en-small/bg.png | /res/drawable-es-small/bg.png |
| HVGA | /res/drawable-en-normal/bg.png | /res/drawable-es-normal/bg.png |
Now imagine you forgot to add the image for QVGA/es_ES. Your source code will compile fine, because as soon as there’s at least one image called bg.png, there will also be an R.drawable.bg attribute. But, if your application is run using this specific configuration, it’ll crash, because the runtime resource lookup will fail.
Note
This scenario can be avoided by always having a default configuration with a default resource to which Android can fall back. For instance, the en_US/HVGA image could be stored in /res/drawable, so although a Spanish user with a small screen device would see an untranslated text and a scaled down image, the application would at least remain operational. For more information about the algorithm Android uses to look up resources, refer to chapter 4 (section 4.7).
Clearly what we need is to be able to express which configuration axes we’re interested in, and have the build server execute the job for all combinations.
Problem
Your application supports various platform configurations under which its behavior will change, and you want to automatically test it on all of those without having to create separate build jobs.
Solution
As of version 1.221, Hudson supports so called multi-configuration project jobs, often referred to as matrix builds. From Hudson’s point of view it’s a different kind of job than the one we used in the previous technique, so you can’t go through the free-style software project configuration. In practice, it’s exactly the same: the only difference is that you’ll see a new section in your job settings called Configuration Matrix, where you can specify the axes and value sets along which you’d like to build.
Let’s start from the top. Matrix builds are a separate kind of job, as explained earlier, so we need to recreate the job we created in the previous technique, but we can copy almost all configuration details; those that change we’ll point out along the way. The first step is to create the matrix job, which is shown in figure 14.17.
Figure 14.17. In order to create a matrix build, you must select the Multi-configuration Project job type. This is a free-style project job, but it’ll make new job settings available specific to matrix builds.

The next screen is a free-style job, which we saw in previous techniques. You can copy all settings related to the source code management from there. What’s new is the Configuration Matrix section. Here, we can define the axes and value sets we’d like to use as potential combinations of build parameters. Select Add Axis for every axis you’d like to define. In this example, we’ll stick with the language and screen size example and want to execute the build for every combination of the small and medium screen sizes and English and Spanish device language. Figure 14.18 shows what our matrix configuration looks like.
Figure 14.18. The configuration matrix defines the axes and the values each axis can take. For our example, we have an API level (platform version) and language axis. Values for each axis are entered directly, separated by a blank.

We’ve defined our configuration matrix now, each combination of which will automatically become its own subjob on Hudson whenever the matrix build is triggered. “But hold on a second,” you may ask, “there’s only one Android emulator configuration section, and we need to type the platform version and locale in there directly, so how does this work?” That’s a fair question. As we saw in figure 14.15, we can’t leave the emulator options for the Android emulator plugin blank. Instead, within the same build, these options shift! The solution is simple: we use variables. Hudson has built-in support for variables that can be used in build configuration, which can be made available as environment variables or directly from plugins. In this case, every Name field of a matrix axis becomes a variable that you can use throughout the rest of the build settings. This means we can put in the axes names as values for the Android emulator options, as seen in figure 14.19.
Figure 14.19. Every matrix axis can be referenced as a variable in the build settings by prefixing the axis name with the dollar sign. In this case, we’re making the API level and device locale available to the Android emulator plugin through the matrix variables.

Note that those variables will also be passed to any Ant script you run automatically. If you look at the build output once we’re done setting it up, you’ll notice that the API_LEVEL is made available to the Ant build script as a Java system property via the -D flag.
Speaking of the Ant build script, there’s one more thing left to do. Similar to what we discussed with the Android emulator configuration, we must tell Ant which emulator instance to execute the build script against. By default, the ADB targets whichever device is currently running, and will fail if there’s more than one. In the case of several emulators, you must specify the specific emulator you’d like to target using the -s flag. We don’t directly invoke ADB (after all the Ant script performs the build), so we must tunnel this argument to ADB through the Ant invocation. You can do that using the adb.device.arg system property. Figure 14.20 shows the updated Ant invocation setting for our matrix build.
Figure 14.20. For the Ant invocation to work, we must make the specific emulator that runs the current matrix configuration available through a variable. The Android emulator plugin exports the emulator’s serial number through the ANDROID_AVD_DEVICE variable, which can be passed to Ant’s internal ADB task using the adb.device.arg property.

If you’re curious, ANDROID_AVD_DEVICE isn’t the only variable exported by the Android emulator plugin. You can also access the emulator’s ADB and control ports through the ANDROID_AVD_ADB_PORT and ANDROID_AVD_USER_PORT variables respectively. The latter is particularly useful if your build includes build steps that involve a telnet connection to dispatch emulator commands such as mock GPS fixes (see appendix A).
We’re all set now; let’s save the job settings and trigger a build. The job screen has slightly changed now and displays a matrix of configurations, with each corresponding to a sub-build that you can click through (see figure 14.21).
Figure 14.21. A matrix build job aggregates every subbuild in a table corresponding to the configuration matrix. The bubbles can be clicked to reach a specific subbuild.

Discussion
We need not mention that matrix builds are a powerful way of automating your builds. You should be aware that this also comes at a cost: Running many emulator instances in parallel will consume a lot of system resources, and builds will take significantly longer to execute. Make sure that your build server is strong enough to handle a matrix build. A multicore machine with plenty of RAM is highly recommended; otherwise builds may fail when the Android plugin times out while waiting for an emulator to fully boot.
Another thing that shouldn’t be left unmentioned is sparse configuration matrixes. You may have already realized that if the number of axes and values increases, the total number of combinations will explode. Often there are combinations that don’t warrant a separate build execution, and sometimes they may not even make sense. Consider, for instance, the case of having an SD versus not having one: if SD card is one axis, and language another, you don’t need to rerun a build for every language and SD/no-SD combination, because they don’t affect each other. Hence, matrix jobs support sparse configuration by ticking the Combination Filter check box. Here, you can enter Boolean conditions using Groovy syntax (a Java dialect); any combination that will evaluate to false will be skipped. You can include axis name and values in these tests, as well as the special index variable, which is an index into the matrix itself. To stick with our example, you could have the “no SD card” build only run once for the English language by setting a filter like this (given the two axes SD_CARD and LOCALE):
SD_CARD == "false" && LOCALE =="en_US"
This concludes our discussion on Hudson and Android. We’ve covered a lot of ground again with this chapter, so let’s quickly summarize what you should’ve learned about build automation for Android.
14.4. Summary
Unlike previous chapters, you had to wade through a lot of configuration code in this chapter, and we couldn’t even reward you with neat looking application screenshots! Setting up build scripts or configuring a Hudson job may not be the most enjoyable task, but we hope you agree that it was well-invested time. Let’s do a short retrospective at what we achieved with the techniques in this chapter, and how.
We started out by fundamentally questioning the way we build Android applications: we quickly realized that in order to get more control of the build and a higher degree of automation, we need to step away from purely visual build environments such as Eclipse, and turn to programmatic build systems such as Ant and Maven. With a system in place that can take our project source code and assemble an APK from it solely using the command shell, we could make another leap forward by leveraging build servers such as Hudson, which can connect to our source code management systems and automatically trigger a build, including execution of the test suite, in reaction to a commit. In other words, you’ve seen the full range of Android build automation.
We’ve almost reached the end of this book. Almost! We have one more chapter up our sleeves, one that will take you yet again into something completely new. If you’ve followed the hype lately, then you’ll have come across one particular term frequently: tablet computers! With the release of Android 3.0, aka Honeycomb, Google has added native support for tablet devices, including a completely revamped user interface and a slew of new APIs. With chapter 15, we’d like to give you an overview of what’s special about Honeycomb, how developing for tablets differs from developing for ordinary smartphones, and show you the new APIs that you should know by heart.